F7MSCO30S1 - Oven Fulgor Milano - Free user manual and instructions
Find the device manual for free F7MSCO30S1 Fulgor Milano in PDF.

User questions about F7MSCO30S1 Fulgor Milano
0 question about this device. Answer the ones you know or ask your own.
Ask a new question about this device
Download the instructions for your Oven in PDF format for free! Find your manual F7MSCO30S1 - Fulgor Milano and take your electronic device back in hand. On this page are published all the documents necessary for the use of your device. F7MSCO30S1 by Fulgor Milano.
USER MANUAL F7MSCO30S1 Fulgor Milano
natural_image
Simple geometric diagram with two black rectangles inside a larger rectangle (no text or symbols)F6PSCO30**
F7DSCO30**
F7MSCO24**
F7MSCO30**
STEAM OVEN
FOUR A VAPEUR
EN
INSTRUCTIONS FOR INSTALLATION AND USE
FR
INSTRUCTIONS POUR L'INSTALLATION ET L'UTILISATION
TABLE OF CONTENTS PAGE
1 - Care And Maintenance 3
2 - First Use 5
Using the flat grill 5
Using the perforated tray 5
3 - Respect for the Environment 6
4 - The Control Panel 7
Keypad 7
Control panel 7
5 - General Oven Information 8
Error codes 8
Beeps 8
Default Settings 8
F Failure Number Codes 8
Preheat 8
Locking the keyboard 8
Timer 8
Preheating the Oven 9
Operational Suggestions 9
High Altitude Baking 9
6 - General Oven Tips 9
7 - Getting Started 10
Instructions for initial switch-on 10
8 - User Settings 11
Language 11
Temperature & Weight 11
Time 11
Date 12
Brightness 12
Volume 12
9 - System Setting 13
Event Log 13
Demo 13
10 - Starting Your Oven 14
Switching the oven on and off 14
Selecting the cooking mode 14
Cooking Mode Tables 15
11 - Traditional Cooking 16
Changing the cooking mode 16
Changing temperature 16
Cooking mode quick menu 16
Pre-heating phase 16
TABLE OF CONTENTS PAGE
12 - Steam Cooking 17
Steam operation 17
Steam Cooking 17
Combined Steam and Convection Cooking 18
Steam Assist Function 18
13 - Using Oven Lights 19
14 - Time Oven Mode Operation 20
Cook Time 20
Stop Time 20
15 - Setting the Meat Probe (if present) 21
How use the food probe 22
16 - Recipes 23
17 - Oven Care and Cleaning 25
Air Fry Tips and Techniques (if present) 25
Oven Clean 26
Circuit Clean 26
Circuit discharge 26
18 - Replacing the oven Lamp 27
19 - Installation instructions 28
Introduction 28
Tools you will need 28
Packaging 28
Power requirements 28
Choosing oven location 28
Steps for installation 28
Dimensions and Cabinet Requirements 29
Electrical connections 34
3-Wire branch circuit (for US only) 34
4-Wire branch circuit (for US and CANADA) 34
20 - Solving Traditional Baking Problems 35
21 - Solving Operational Problems 36
22 - Assistance or Service 37
Service Data Record 37

IMPORTANT INSTRUCTIONS AND SAFETY WARNINGS
Read carefully and keep for future use

Dear Customer,
We would like to thank you and congratulate you on your choice.
This new product has been carefully designed and built using top quality materials, and meticulously tested to ensure that it meets all your culinary requirements.
Please read and observe these simple instructions, which will enable you to achieve excellent results from the very first time you use it. This state-of-the-art appliance comes to you with our very best wishes.
THIS PRODUCT IS DESIGNED FOR DOMESTIC USE.
THE MANUFACTURER DECLINES ALL RESPONSIBILITY FOR PERSONAL INJURY OR PROPERTY DAMAGE DERIVING FROM INCORRECT INSTALLATION OR IMPROPER, ERRONEOUS OR UNSUITABLE USE.
THE APPLIANCE MUST NOT BE USED BY PEOPLE (INCLUDING CHILDREN) WITH PHYSICAL, SENSORIAL OR MENTAL IMPAIRMENTS, OR BY PEOPLE WITHOUT THE NECESSARY EXPERIENCE OR KNOWLEDGE, UNLESS THEY ARE SUPERVISED OR INSTRUCTED IN THE USE OF THE APPLIANCE BY A PERSON RESPONSIBLE FOR THEIR SAFETY.
CHILDREN MUST BE SUPERVISED TO ENSURE THAT THEY DO NOT PLAY WITH THE APPLIANCE.
DO NOT PLACE ALUMINIUM FOIL, POTS OR SIMILAR OBJECTS IN CONTACT WITH THE BASE INSIDE THE OVEN FOR COOKING.
THE APPLIANCE GETS VERY HOT DURING USE.
WARNING: DON'T TOUCH THE HEATING ELEMENTS INSIDE THE OVEN.

ATTENTION:
- If the door or the gasket seals of the door are damaged, the oven may not be used until it is repaired by a qualified service technician;
- This appliance and its internal components, especially electrified parts, may only be repaired, modified or customized by the manufacturer, its service department or similarly qualified persons. Incompetent repairs can cause serious accidents, damage to the appliance and its surroundings and malfunctions.
- Remember that even the replacement of the lamp inside the oven must be performed by qualified personnel who will first disconnect the appliance from the mains.
- If the appliance fails to operate or requires repair, contact our service department.
- Use only original replacement part.

IMPORTANT:
- As a safety precaution, before cleaning the oven, always disconnect the plug from the outlet or remove the appliance's power cord.
- In addition, avoid using acid or alkaline substances (such as lemon, vinegar, salt, tomatoes, etc.). Avoid using products containing chlorine, acids or abrasives, especially for cleaning painted parts.
- Although the cooking chamber is made of high-quality steel, incorrect maintenance can cause corrosion;
- The oven must be cleaned periodically and all food residues must be removed;
- Do not clean the oven immediately after the dish has been removed because the residual drops of steam are still very hot (danger of burns); check that the display shows a low residual temperature or none.
• Take care when opening the door when the oven is on because the exiting steam can cause burns.
- If the electricity is interrupted, when it comes back on, the oven requires you to empty the circuit even though there shouldn't be any water in it.
- Do not use rough abrasives or sharp metal scrapers to clean the glass door of the oven because they could scratch the surface and cause the glass to shatter.
- During cleaning, take care that no water enters the appliance.
- Use only slightly damp rags.
- Never spray water inside or outside of the appliance.
- Do not use steam devices for cleaning because water that penetrates could cause damage.
- Do not use the appliance for heating or humidifying the room.
- The appliance must be installed and used in an ambient temperature between 5 °C and 35 °C.
- If there is a risk of frost, the residual water in the pumps could freeze and damage them.
- Use only the thermal probe recommended for this oven.
- The food probe is an accessory available only in some versions of the product
- The set of 6 Gastronorm trays is an accessory available on request
- This appliance must be properly installed and grounded by a qualified technician.
- Do not allow children to use this appliance unless closely supervised by an adult. Children and pets should not be left alone or unattended in the area where the appliance is in use. Never allow children to sit or stand on any part of the oven.
- Do not store flammable materials in or near the oven.
- Do not extinguish a grease fire using water. Smother fire or use a dry chemical or foam -type extinguisher.
- Do not block any vent openings.
- For personal safety, wear proper clothing. Loose fitting or garments with hanging sleeves should never be worn while using this appliance.
- Do not touch elements or interior surfaces of oven.
- The heating elements may be hot even if they are dark in color. The interior surface of an oven become hot enough to cause burns.
- During and after use, do not touch or let clothing or other flammable materials contact the heating elements or the interior surfaces of the oven until they have had sufficient time to cool. Other surfaces of the appliance my become hot enough to cause burns - among these surfaces are (identification of surface - for example, oven vent openings and surfaces near these openings, oven doors, and windows of oven doors).
• Take care when opening the door. Open the door slightly to let hot air or steam escape before removing or replacing food.
- Do not heat unopened food containers. Build-up of pressure may cause the container to burst and cause injury.
- Always place oven racks in desired location while oven is cool. If a rack must be moved while oven is hot, do not let pot holder contact the got heating elements.
- Use only pot holders. Moist or damp pot holders on hot surfaces may result in burns from steam. Do not let pot holder touch hot heating elements. Do not use a towel or other bulky cloth.
- Be careful to prevent aluminum foils and meat probes from contacting the heater elements.
- Do not allow aluminum foil or meat probe to contact heating elements.

IMPORTANT
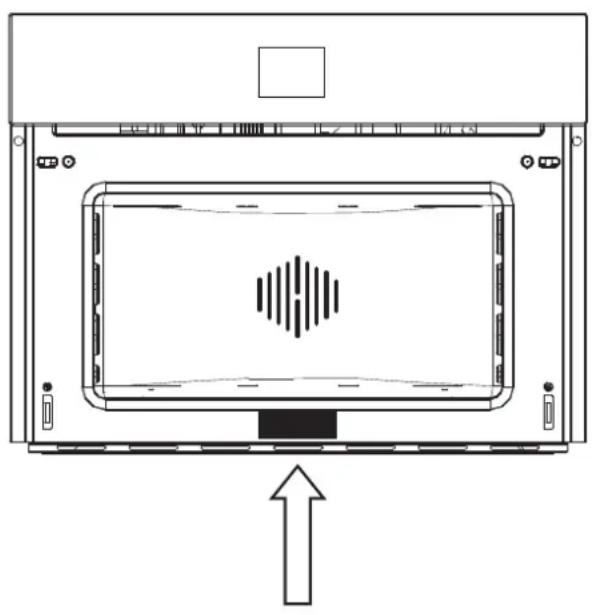
The oven's identification plate is even accessible when the appliance is installed. This identification plate, which is visible when you open the door, shows all the information you will need when requesting replacement parts for the appliance.
RATING PLATE LOCATION
natural_image
Diagram of a device interior with a central screen and directional arrow, no text or symbols presentNOTE: Alternatively, the rating label can be placed in the upper corner of the control panel.
The oven should be thoroughly cleaned with soap and water and carefully rinsed.
Heat the oven for about 30 minutes at the maximum temperature; this eliminates all the residual manufacturing oils that could cause unpleasant odours during cooking. Use the circular plus fan function without accessories in the oven.
Before using the accessories for the first time, clean them carefully with a very hot alkaline washing solution and a soft cloth.
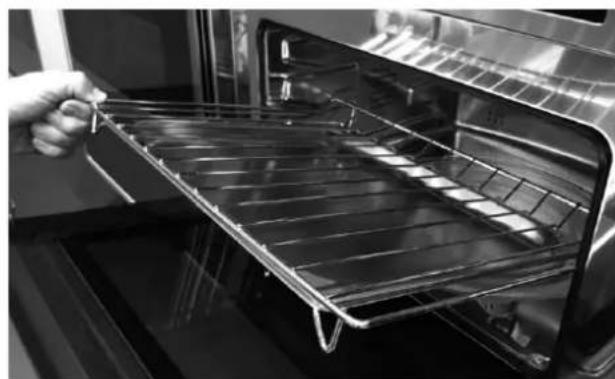
Using the flat grill
To remove the flat grill, pull the grill towards you until it stops and then lift, by pulling upwards, until it comes completely out.
To insert the flat grill, slide it in at an angle of 45^ until it locks and then lower it horizontally and push it all the way in.
natural_image
Black-and-white photo of a hand placing a metal tray into an oven (no text or symbols visible)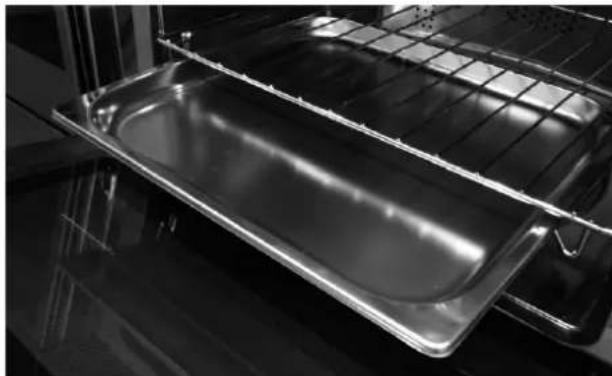
natural_image
Interior view of an oven with a metal baking tray and grid rack (no text or symbols visible)
natural_image
Close-up of hands holding a transparent square baking pan (no text or symbols visible)If the flat grill has a low drip tray, to remove it lift it slightly and slide it towards you. To reinsert it, slide it back until it is correctly seated.
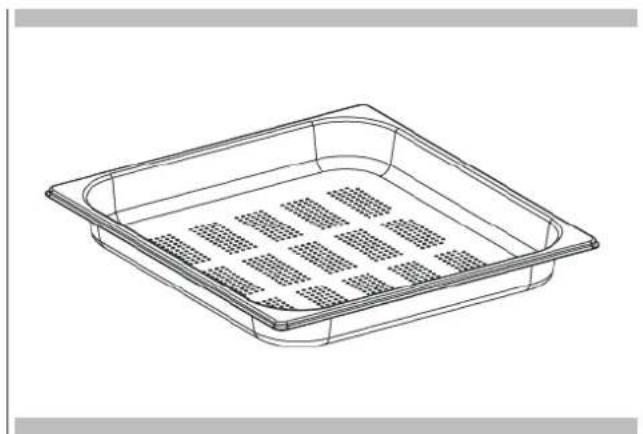
Using the perforated tray
This tray is used for steam cooking and is positioned on the flat grill together with its support.
natural_image
Interior view of an oven with a grating tray and cooling unit (no visible text or symbols)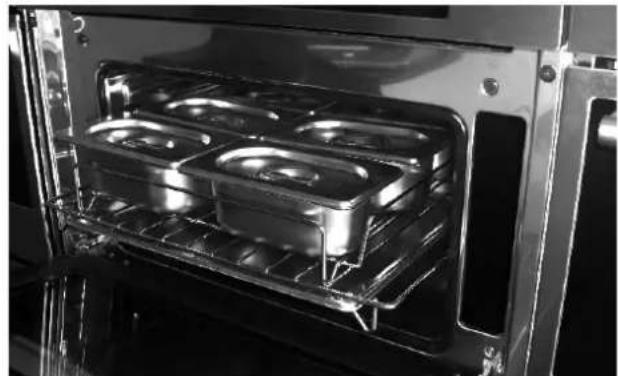
natural_image
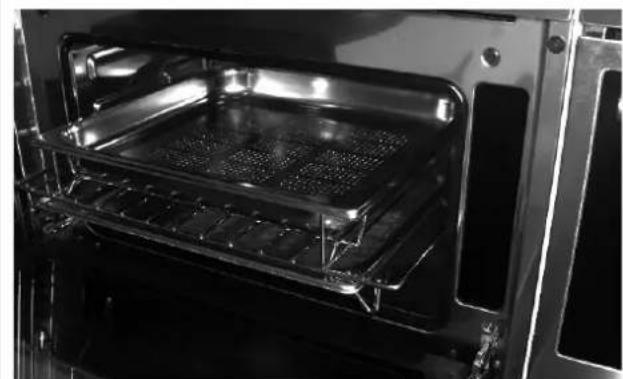
Interior view of an oven with four recessed grilles and a rack, showing no text or symbols.NOTE: the set of 6 Gastronorm trays is an accessory available on request.
We recommend also using it in combination with the drip tray to catch everything the drips from the food during cooking.
The documentation for this appliance is printed on paper bleached without chlorine or recycled paper to contribute to protecting the environment.
The packaging was designed to prevent damage to the environment; they are ecological products that can be recovered or recycled.
Recycling the packing saves raw materials and reduces the volume of industrial and domestic waste.
THE PACKING MATERIAL is 100% recyclable and marked with the recycling symbol.
Dispose of in conformity with local law. The packing material (plastic bags, polystyrene parts, etc.) must be kept out of the reach of children because it is potentially dangerous.
THE SYMBOL on the product or accompanying documentation indicates that this product must not be treated as domestic waste but must be delivered to a suitable collection point for the recycling of electrical and electronic equipment.
DISPOSAL MUST BE MADE in conformity with local laws on waste disposal.
FOR ADDITIONAL INFORMATION about the treatment, recovery and recycling of this product, contact the local office of competence, the domestic waste collection service or the store where the product was purchased.
natural_image
Recycling symbol composed of four arrows forming a circular loop (no text or labels)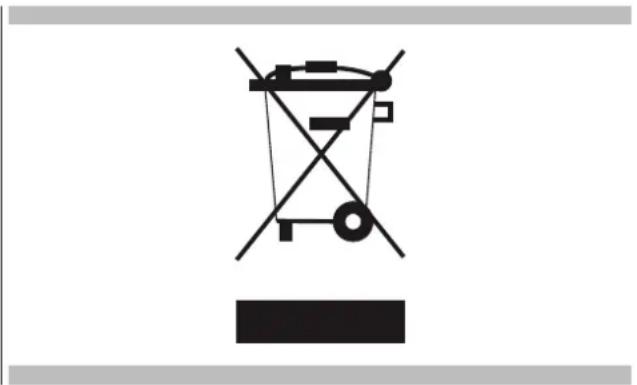
natural_image
Pure electrical circuit lines without any symbolsBEFORE SCRAPPING, make it unusable by cutting the electrical cord.
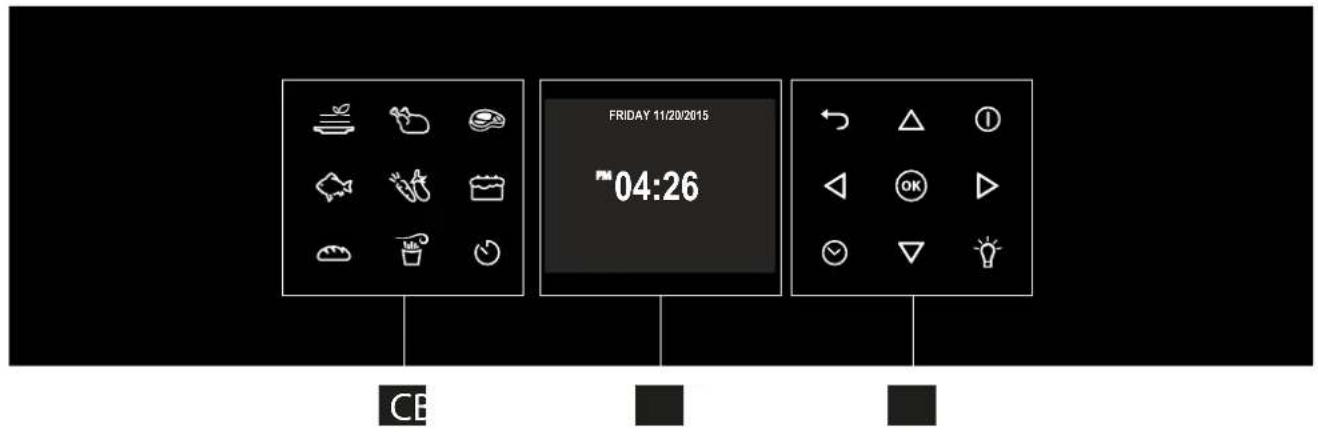
Your appliance could vary slightly compared to the illustrations below.
A - Function keypad
B - Display screen
C - Shortcut keypad
text_image
FRIDAY 11/20/2015 04:26 CEKeypad
To operate the key, press gently. The keypad will not work if more than one key is pressed at the same time.
 | - Movement arrows |
 | - To set the timer. - Enter the functions menu during cooking. |
 | - Switches the inner oven light on and off. The light cannot be switched on during the self-cleaning cycle. |
| [080Z] | - Switches the oven on and off. |
 | - Confirms the settings and starts cooking operations. When pressed during a cooking operation, the function is placed in pause. Press again to restart. |
 | - Return to previous display page. Keep pressed to return to Home page |
Control panel
 | Cooking mode quick menu |
 | |
| [WS8G] | |
 | |
 | |
 | |
 | |
 | AIRFRY or KEYLOCK(depends on model) |
 | |
 | Timer |
Before using your oven for the first time remove all packing and foreign materials from the oven(s). Any material of this sort left inside may melt or burn when the appliance is used.
Error codes
This code appears in the event of the electronic control indicating a fault. When the error appears, the current function is blocked. If the type of error is related to a safety function, the oven becomes unusable and every time a start attempt is made, the same error appears (in which case call in the after-sales service), while if the error relates to a minor fault, after being restarted the oven can be used for the functions that do not involve the faulty part (e.g., a heating element).
Beeps
Confirms that the command has been received after a key has been pressed.
It also indicates that a time function has been completed (e.g. Timer or Timed Cooking). During the execution of a recipe, an acoustic signal warns the user that the oven is waiting for operation by the user (e.g., insert the dish or turn it over).
Beeps also signal an oven fault.
Default Settings
The cooking modes automatically select a suitable temperature when the cooking mode is selected, these can be changed when a different one is needed.
F Failure Number Codes
These codes are displayed when the electronic control detects a problem in the oven or in the electronics.
The error code is recorded in the Error Log in the Setup menu. This error can be communicated to the service technician so he/she can understand the possible cause of the problem in advance.
Preheat
Whenever a cooking mode is set and the oven is heating, the preheating starts, during this period, the instantaneous temperature is displayed together with the thermometer icon.
As soon as the 100% is reached, the control sounds an "end of preheat" tone and the current temperature value disappears.
Locking the keyboard
Hold the Key for 3 seconds. Commands are now locked and a "Key icon" will be displayed.
Repeat the same operation for 3 seconds to unlock the keyboard.
NOTE: The power off operation is always available.
Timer
WARNING
The timer on your oven does not turn the appliance on or off, its only purpose is to alert you through the buzzer. When you want to turn off the oven automatically, use the end-of-cooking or delayed cooking function.
NOTE: Pressing the OFF button does not reset or stop the timer.
- Press the button √ and set the desired time using the arrows △▽ and confirm with the button Ⓞ no switch the selection between hours and minutes use the arrows ◀ ▶
- The time can be set from 1 minute to 12 hours and 59 minutes and, when set, the remaining time is always visible in the bottom status bar until the time expires or is reset.
- To change or cancel the time set, you must reset the timer by pressing and holding the button ☑ for a few seconds.
- Timer format is usually HR:MIN, switching into MIN:SEC during the last minute.
- When the time expires, the display shows 00:00 and the buzzer will sound for one minute or until the button ⬤ is pressed.
Preheating the Oven
- Selecting a higher temperature does not shorten the preheat time.
- Preheating is necessary for good results when baking cakes, cookies, pastry and breads.
• Preheating will help to sear roasts and seal in meat juices. - Place oven racks in their proper position before preheating.
- During preheating, the selected cooking temperature is always displayed.
- A beep will confirm that the oven is preheated and the "detected temperature" will turn off.
Operational Suggestions
- Do not set pans on the open oven door.
- Use the interior oven lights to view the food through the oven door window rather than opening the door frequently.
High Altitude Baking
- When cooking at high altitude, recipes and cooking time will vary from the standard.
Instructions for initial switch-on
Once the oven has been connected to the power supply for the first time, the control automatically prepares for setting a number of user settings, which remain stored in case of any subsequent switch-on.
- Language
• Temperature & Weight - Time
- Date
Refer to the USER SETTING paragraph for setting instructions.
After making the user settings, the control moves automatically to the "Standby" display page.
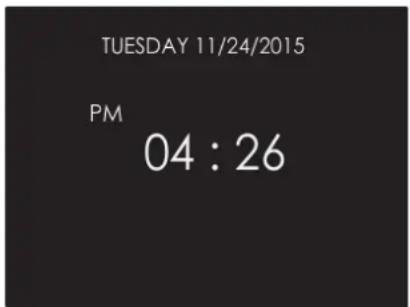
text_image
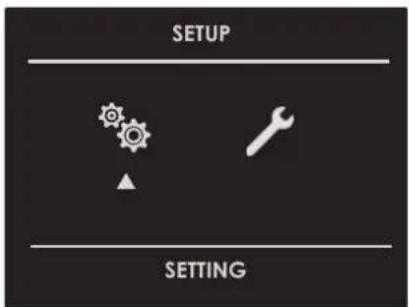
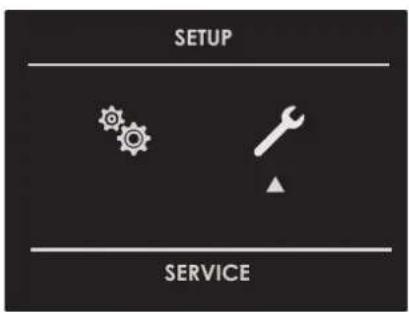
TUESDAY 11/24/2015 PM 04 : 26With the oven on, select the icon and confirm with the key to enter the SETTINGS menu. This menu permits personalizing the settings of your oven. To make access, no active cooking or any set time functions must be in progress.
NOTE: The Setting menù can never be set if any time function is already set: first delete all the active time functions.
- Press the keys ◀ to select the sub menu and confirm by means of the ⓕey.
text_image
SETUP SETTING- Use this menu to change the following settings:
Press the keys ◀ or △▼ to select the setting or change a sub menu from among the six available ones and confirm by means of the key.

text_image
SETUP yk abc 12 LANGUAGELanguage
Press the arrow key △ to select a language from among those available, and confirm with the key.

text_image
ITALIANO ENGLISH US ENGLISH DEUTSCH FRANÇAISE ESPAGÑOL yk abcTemperature & Weight
Press the arrow key ◀ and △▼ to select one of the two temperature options "°C/°F" or weight options Kg/ib and confirm with the key.
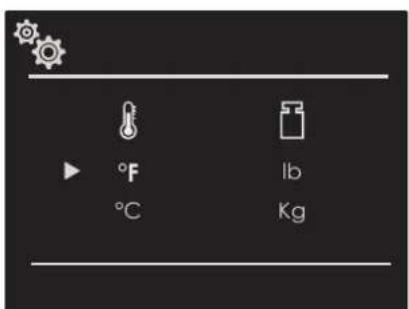
text_image
°F °C lb KgTime
Press the arrow key △to select the time format between the options "12h AM/PM or 24h" and confirm with the ⓔkey. Subsequently, set the time using the arrows △and confirm with the keyok

text_image
12h 24h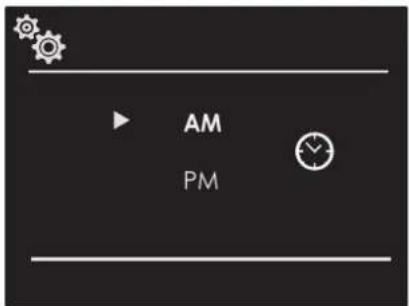
text_image
AM PM
text_image
PM 04 : 26Date
Press the arrow key to select the date format from among the options "D.M.Y. - Y.M.D. - M.D.Y." and confirm with the okey. Subsequently set the value using the arrows and confirm with the key.
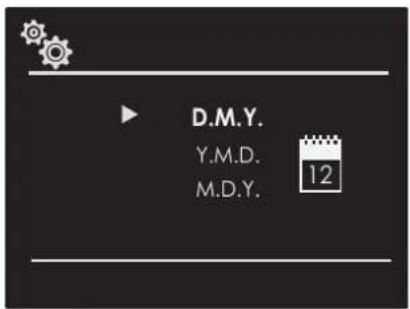
text_image
D.M.Y. Y.M.D. M.D.Y. 12
text_image
11/20/2015 12Volume
Press the arrow △to select the desired volume level and confirm by pressing the Ⓞkey.
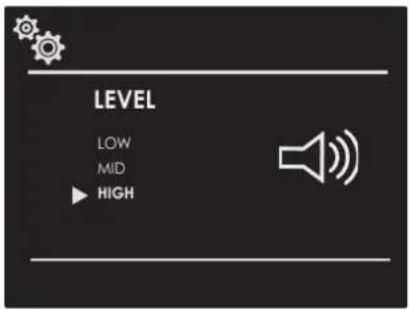
text_image
LEVEL LOW MID ▶ HIGHBrightness
Press the arrow key choose which luminosity setting to change between ON or STANDBY, then by means of the arrows select the required degree of luminosity and confirm with the key.
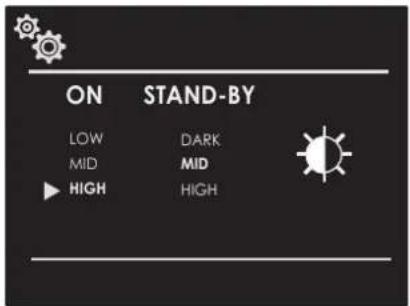
text_image
ON STAND-BY LOW DARK MID MID HIGH HIGHWith the oven on, select the icon 📋 and confirm with the key OK to enter the SETTINGS menu. This menu permits setting a number of parameters or special functions. It also permits accessing the error events list.
- Press the keys ◀ to select the sub menu and confirm with the Ⓞ key.
text_image
SETUP SERVICE- Use this menu to change the following settings:
Press the keys ▲ to select the item to be set or to be displayed from among the three available ones and confirm with the key.
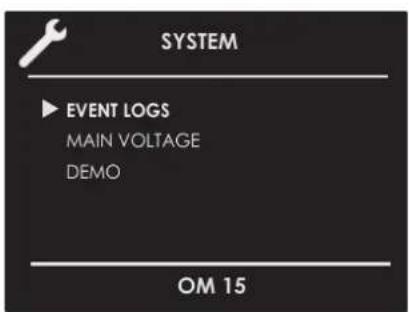
text_image
SYSTEM EVENT LOGS MAIN VOLTAGE DEMO OM 15Event Log
The menu permits checking any recorded errors. These codes can be notified to the after-sales service.
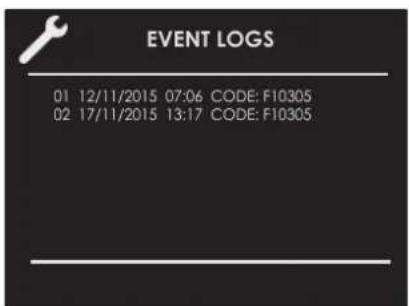
text_image
EVENT LOGS 01 12/11/2015 07:06 CODE: F10305 02 17/11/2015 13:17 CODE: F10305Demo
The purpose of this function is to set the DEMO mode, which makes the oven useless for cooking but automatically performs a demonstration of functions.
- Press the keys ◀ to select the item ON.
- Confirm with the OK key.
- Press the ① key.
After about 30 seconds, the oven starts to operate in this mode.
To temporarily stop the DEMO function, simply keep any key pressed for a few seconds until the oven switches to standby.
To start it again, press the ① key.
To disable the function, enter the DEMO display page and set OFF. Confirm using the OK key.
NOTE: Once set, the function remains enabled even if the oven is disconnected from the power mains.
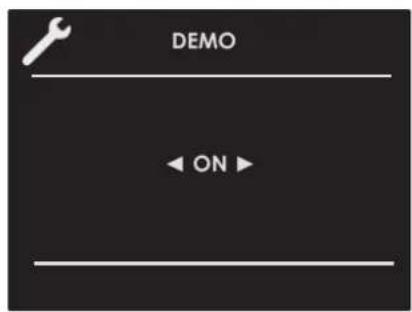
text_image
DEMO ← ON ►Switching the oven on and off

IMPORTANT
• The key does not stop the function.
• After switching off the oven, the cooling fan could continue to operate until the inner parts of the oven have cooled down.
Press ① to switch the oven on and press again to switch it off. The oven returns to standby mode.
Selecting the cooking mode
Traditional Cooking

FAN HEAT

FAN HEAT & GRILL

TURBO CONVECTIONAL HEAT

ECO GRILL

AIRFRY (dedicated key)
Steam Cooking

STEAM 100

STEAM 130

STEAM & FAN HEAT

CLEAN STEAM OVEN

CLEAN STEAM CIRCUIT
- Select the icon and press the key ☑ select the appropriate cooking mode according to the food to be cooked using the arrows △ and △ confirm with the key . OK
- On this display page, it is still possible to change the cooking mode by using the ◀ keys.
- If the proposed temperature is correct, confirm with the OK key to start cooking, otherwise, if the OK key is not pressed within 10 seconds, the oven switches to automatic mode and the cooking mode icon becomes animated.
Cooking Mode Tables
| COOKING MODE ICON TEMPERATURE | Min. Preset Max. | ||
| FAN HEAT 120°F (50°C) 330°F (165°C) 445°F (2 YZK4) | |||
| FAN HEAT & GRILL |  | 120°F (50°C) 410°F (210°C) 445°F (230°C) | |
| TURBO CONVECTIONAL HEAT |  | 120°F (50°C) 330°F (165°C) 445°F (230°C) | |
| ECO GRILL |  | 120°F (50°C) 445°F (230°C) 445°F (230°C) | |
| AIRFRY (if present) |  | 300°F (150°C) 350°F (180°C) 445°F (230°C) | |
| STEAM 100 |  | 105°F (40°C) | 210°F (100°C) |
| STEAM 130 |  | 160°F (70°C) 265°F (130°C) 265°F (130°C) | |
| STEAM & FAN HEAT |  | 120°F (50°C) 330°F (165°C) 445°F (230°C) | |
| CLEAN MODE | ICON TEMPERATURE | ||
| Min. Preset Max. | |||
| CLEAN STEAM OVEN |  | - | 210°F (100°C) |
| CLEAN STEAM CIRCUIT |  | - | - |
Changing the cooking mode
- During untimed cooking, a cooking pause can be set by pressing the OK key. All the settings of the suspended cooking operation remain stored and can be reactivated by pressing the same key again.
- To change the cooking mode while the oven is working, press the Ⓞ key and then the key. At this point, another cooking mode can be selected from among those available in the group by means of the arrows ◀ ▶
Changing temperature

IMPORTANT
- At the end of a function, the display screen shows the residual compartment heat temperature from the standby page.
- From the cooking mode preview display page, the temperature can be changed by means of the arrows △ ▽ subsequently confirming by means of the key.
- Once cooking has started, the temperature can in any case be changed, at any time, by means of the arrows .
Cooking mode quick menu
The quick menu function allows you to rapidly select the most suitable cooking modes for the type of dish you want to cook.
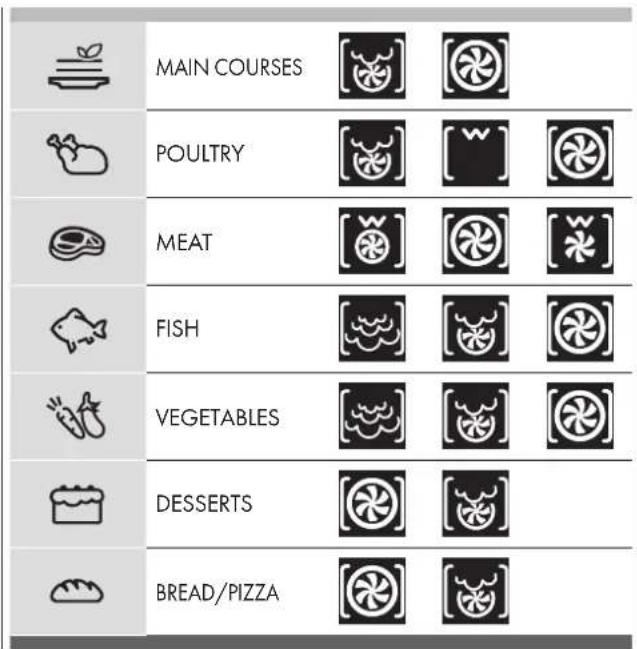
text_image
MAIN COURSES POULTRY MEAT FISH VEGETABLES DESSERTS BREAD/PIZZAPre-heating phase
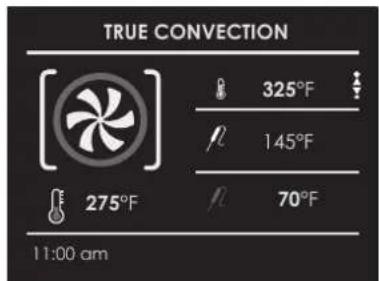
While the oven is in pre-heating phase, the instantaneous temperature is displayed underneath the cooking mode icon.
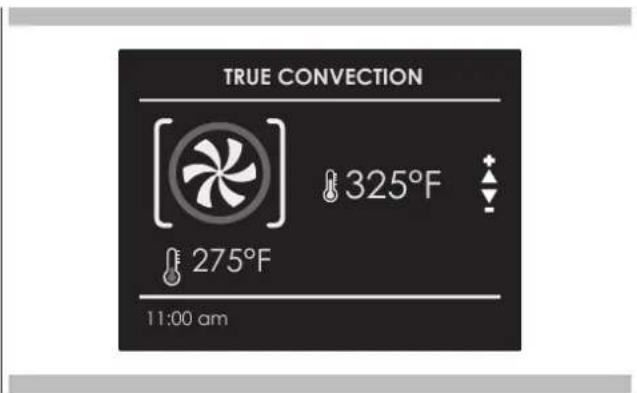
text_image
TRUE CONVECTION 325°F 275°F 11:00 amJust as soon as the set temperature is reached, an acoustic signal is heard and the instantaneous temperature indication disappears.
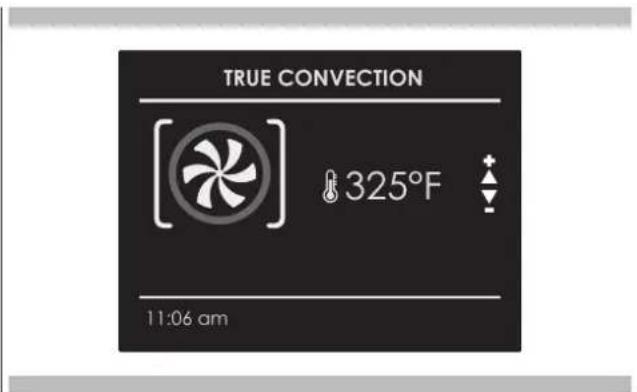
text_image
TRUE CONVECTION 325°F 11:06 amNOTE: it is essential to carefully read the instructions and warnings to ensure correct use.
Steam operation
Steam cooking is used most for oriental cuisine but it is certainly very useful for our own.
It is fat free and has the advantage of preserving the original flavour of the food.
In this case, the food is not cooked with water but with water vapour.
Steam cooking is different than boiling. In fact, the water vapour works on the inside of the cells, which is fundamentally different from the effect of boiling water.
In fact, steam also cooks the food completely but, except for the fat, nothing else comes out of the food.
The cell walls and tendons gradually soften, the protein coagulates without coming out, the starches swell and combine and the sugars and minerals remain unchanged.
The same goes for odours, which are reduced to a minimum, or coloured substances.
Only the fat liquefies due to the heat and, for this reason, it is almost never a good idea to steam cook large cuts of meat or fish. Vitamins are another story because heat generally tends to destroy them; however, depending on the cooking time, some of them are only slightly altered. So, the foods that lend themselves to this cooking method are, generally, those with no fat such as, for example, fish, some types of meat, legumes, potatoes, cereals, eggs, pudding, vegetables, etc.
It is not good for vegetables with tough fibres or fruits in general.
Useful tips
When using the steam oven, always start with the oven cold. Using steam in a hot oven (immediately after traditional cooking) is not recommended because the benefits of cooking with steam will be cancelled out.
For steam cooking try to use the perforated stainless steel tray together with the lower stainless steel drip tray as much as possible.
The first, resting with its support on the flat grill, allows the steam to fully cook the food while draining everything released by the food during cooking through the holes.
The second, lower tray, slid under the grill on its guides, will collect the drippings and keep the oven chamber cleaner.
When done cooking, the support of the perforated tray can be used as a support to keep the hot tray off of the counter while you remove the food you just cooked.

ATTENTION
Before using any steam functions, the water container must be filled. If while the oven is on, the message CHECK WATER CONTAINER appears on the display (acoustic signal will sound), open the door, watching out for the hot steam that will be released, extract the container and refill it. When the door is closed, the oven will go into PAUSE mode. Press the key do continue cooking.
NOTE: The steam functions will not start until the door is closed. If the door is open, the message CLOSE THE DOOR will be shown on the display. If the door is opened while the oven is on, the oven will go into pause mode. To restart the function, the door needs to be closed.
Select the desired function and confirm using the key OK at this point the circuit will be filled. As soon as the water reaches the right temperature, the steam generated by the boiler will enter the cavity.
The function can be paused at any time using the key OK when it is pressed again OK the function restarts.


Steam Cooking
Steam 100
By way of radial ventilation, the steam is distributed to ensure the food is evenly heated and cooked.
This holds the advantage of being able to cook on the three different levels at the same time, taking care to insert the more "full-bodied" food on the higher level, and less dense foods such as vegetables on the lower levels (from the first to the third).
NOTE: during steam cooking, always place the lower stainless steel tray underneath the perforated cooking container, to collect any food scraps or condensate that may eventually fall.
Steam 130
During regeneration, the cooking chamber is heated with steam and warm air, which allows rapid and consistent heating of the food without drying it.
Based on the type of food being reheated, this programme offers the possibility to modify the temperature inside the oven so as to manage this function as you please. This type of function is therefore particularly suitable for:
- Heating pre-cooked food from 160°F (70°C) to 265°F (130°C);
- Preparing ready and semi-ready meals, frozen foods from 160°F (70°C) to 265°F (130°C).
NOTE: for these types of meals, remember to insert suitable dishes in the oven (not made from synthetic or similar materials) and to position them above the grill, making sure to remove any lids.

ATTENTION
Once the functions have been completed, a circuit discharge request will be sent (see WATER DISCHARGE paragraph).

Combined Steam and Convection Cooking
This type of cooking is called "professional cooking" because the food being cooked is placed into a cold chamber that has not been preheated.
After starting the oven, the food is initially exposed to steam (or "steamed"). After a short period of exposure to the steam, depending on the filling volume and therefore on the size of the food being cooked, the appliance automatically moves on to the second warm air phase.
This type of function is particularly suited to large meat and seafood dishes for example; large sized bread loaves made from white or wholemeal flour, with yeast or yeast dough at 375^ F ( 190^ C) until 410^ F ( 210^ C), as well as filled and hollow puff pastry, whether fresh or frozen from 375^ F ( 190^ C) to 410^ F ( 210^ C).
NOTE: For best results when running two consecutive "professional cooking" programmes, the oven must be cooled before inserting the second dish.

ATTENTION
Once the functions have been completed, a circuit discharge request will be sent (see WATER DISCHARGE paragraph).

Steam Assist Function
This particular function can only be used with traditional oven functions.


Once the oven has been turned on, the steam assist function will only become available once the internal oven temperature has exceeded 210^ F ( 100^ C). Only from that moment on will the symbol appear on the lower part of the display.
NOTE: THIS FUNCTION IS NOT ENABLED DURING STEAM COOKING.
To inject steam inside the cavity, press the key select the icon using the arrows and confirm using the key. OK

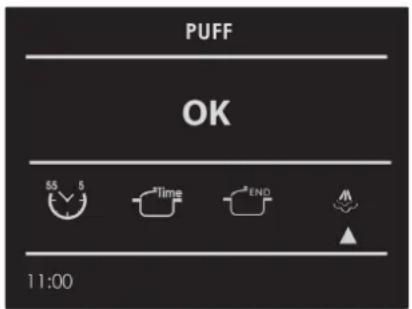
text_image
PUFF OK 55 5 Time END 11:00The steam assist function will be enabled and the change in status can be seen on the animated display. The steam assist function will continue for 5 minutes, humidifying the food so that it doesn't dry out during cooking. Ideal for roasts in general, large meat/seafood dishes and softer cooking.
After 5 minutes, the oven returns to the previously set cooking function.
A single light key activates the lights.
Touch 📋 turn lights on or off.
Oven lights turn on automatically when the door is opened.
When an oven is in use, oven lights turn on automatically when a mode is started.
Oven lights will turn off automatically when the oven mode is cancelled.
NOTE: Once switched on, the lights go off automatically after 3 minutes. To switch them back on, press the key or open the door.
Be sure that the time-of-day clock is displaying the correct time.
The timed mode turns off the oven at the end of the cook time.

CAUTION
Never leave food in the oven for more than one hour before and after cooking. This could deteriorate the properties of the food itself.
NOTE: The time functions cannot be used if the meat probe is on. The maximum cooking time that can be set is 12 h.
Cook Time
Use the "Cook Time" function to operate the oven for a determinate period of time. The oven starts immediately and switches off automatically once the time has expired.
To Set a Timed Mode
- Select the cooking mode and temperature.
- There are two ways to set the function.
a) Select Time to set the duration and press OK
b) Select END to set the stop time and press OK - After selecting one of the two above options, set the time by means of the arrows and confirm with the key
-
After pressing the Ⓞ key, cooking starts and the time cooking information is shown on the display page.
-
Cooking mode
- Temperature
- Cooking time
• End of cooking time
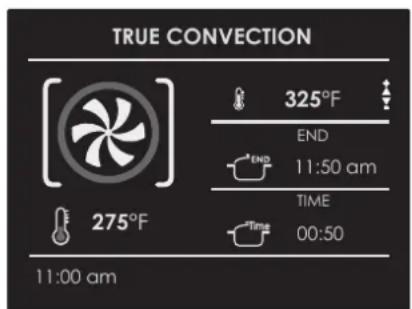
text_image
TRUE CONVECTION 325°F END 11:50 am TIME 00:50 275°F 11:00 am5 After cooking, the oven switches off and an acoustic signal warns that cooking has terminated.
To change the cooking time when the oven is already operating, simply press the ⬤ e key and enter the new cooking time before pressing the Ⓞk key again.
Stop Time
Use the "Stop Time" function to delay the start of timed cooking. Enter the cooking stop time and the oven will automatically calculate the start time. The oven switches on and off automatically.
To Delay the Start of a Timed Mode
1 First of all set the required timed cooking as indicated in the "COOK TIME" paragraph.
2 Select END to set the stop time and press OK
3 Set the cooking stop time by means the arrows and confirm by means of the key.
4 After pressing the OK key, the function positions in standby and the postponed cooking details are shown on the screen.
- Cooking mode
- Temperature
- Cooking stop time
- Cooking start time
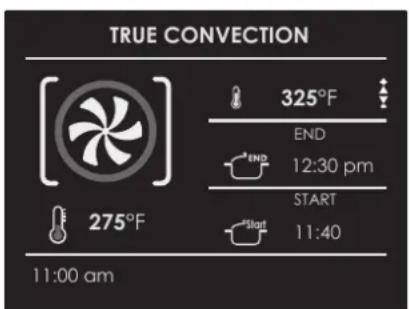
text_image
TRUE CONVECTION 325°F END 12:30 pm START 11:40 275°F 11:00 amAfter cooking, the oven switches off and an acoustic signal warns that cooking has terminated.
To change the cooking time and stop time when the oven is already operating, simply press the key 📋 and enter the new cooking time or cooking stop time and press the key OK again.
When roasts, steaks or poultry are being cooked, this is the best way to tell when the food is correctly cooked.
This oven is optionally provided with the meat probe feature to sense the temperature inside meat and stop cooking as soon as the set value is reached.
When the probe is used, the oven automatically checks the cooking time.
NOTE : the food probe is an accessory available only in some versions of the product.
Tenderness, aroma and flavour are the result of precise, functional control.
The food probe is a thermometer which, when inserted into the food, makes it possible to check the internal temperature and use it to establish the end of cooking.
For example, meat may look like it is cooked on the outside, but still be pink on the inside!
The temperature reached by food during cooking is closely linked to problems relating to health and hygiene. Bacteria can be contained in every kind of meat, poultry and fish, as well as raw eggs.
Certain types of bacteria make food go off, while others, such as Salmonella, Campylobacter jejuni, Listeria monocytogenes, Escherichia coli and Staphylococcus aureus can be seriously harmful to human health. Bacteria multiply very quickly above a temperature of 4.4^ up to 60^ C. Mince is particularly at risk from this point of view. To prevent bacteria from multiplying, it is necessary to take the following measures:
- Do not defrost food at room temperature, always in the
fridge or in the oven using the specific function. In the latter case, cook the food immediately afterwards.
- Stuff chicken just before eating it. Never buy pre-packed ready-stuffed chicken and only buy ready-cooked stuffed chicken when you intend to eat it within 2 hours.
• Marinate food in the fridge, not at room temperature. - Use a food probe to check the temperature of meat, fish and poultry if they are more than 5 cm thick, to ensure that the minimum cooking temperatures are reached.
- The greatest hazards are posed by poorly cooked chicken, particularly at risk from Salmonella.
- Avoid interrupting the cooking process, i.e., partially cooking food, storing it and completing the cooking process later. This sequence encourages the growth of bacteria due to the "warm" temperatures reached inside the food.
- Roast meat and poultry in the oven at temperatures of at least 165^ .

IMPORTANT
Use only the meat probe supplied with the appliance.
In any case, we recommend that you consult the following table taken from the National Food Safety Database (USA).
Food Minimum internal temperature
| Mince | |
| Hamburger | 160°F (71°C) |
| Beef, veal, lamb, pork | 165°F (74°C) |
| Chicken, turkey | 165°F (74°C) |
| Beef, veal, lamb | |
| Roasts and steaks: | |
| Rare | The cooking temperature for rare meat is not indicated by the NFSD as it is unsafe for health reasons |
| Medium-rare | 145°F (63°C) |
| Medium | 160°F (71°C) |
| Well done | 170°F (77°C) |
| Pork | |
| Chops, roasts, ribs: | |
| Medium | 160°F (71°C) |
| Well done | 170°F (77°C) |
| Fresh ham | 160°F (71°C) |
| Fresh sausages | 160°F (71°C) |
| Poultry | |
| Whole chicken or chicken pieces | 180°F (82°C) |
| Duck | 180°F (82°C) |
| Whole turkey (not stuffed) | 180°F (82°C) |
| Turkey breast | 170°F (77°C) |

WARNING
• To avoid burns, use a kitchen glove to fit and remove the meat probe when the oven is hot.
• Always remove the probe using the grip. If it is removed by pulling the cable, it could suffer damage.
- Make sure the food is completely de-frozen when the probe is fitted. Otherwise it could suffer damage.
NOTE: - The meat probe is not enabled for all functions (meat probe function not available also for Recipes).
If it is fitted during one of these functions, a probe removal message appears on the screen.
- If the meat probe is accidentally removed during operation, a warning message appears on the screen.
- The temperature of the probe can be set between 104°F and 212°F (40°C - 100°C).
- The oven stores the last temperature set by the user.
How use the food probe
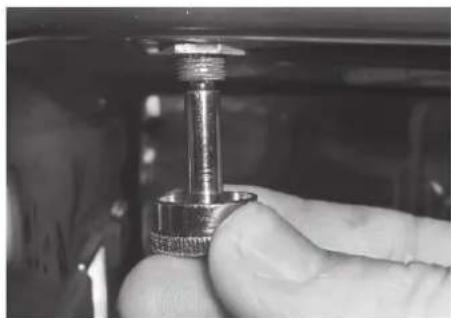
As you can see from Figure, the probe socket is located in the upper left corner of the oven chamber, protected by a metal cover with plug. Remove the cover and insert the plug of the probe all the way (you will hear a slight confirming click).
natural_image
Close-up of a hand holding a metallic connector with threaded shaft (no visible text or symbols)Insert the probe in the food without touching fatty parts or bones.
natural_image
Close-up of a gloved hand holding a tool near an open industrial machine (no visible text or symbols)
WARNING
Remember that the probe will not work if it is connected when the oven is already switched on!
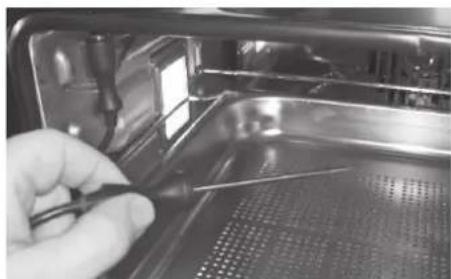
Insert the tip of the probe in the central and thickest part of the meat. Make sure the probe is not in contact with the fat, bone, oven parts or dishes.
The meat probe is automatically recognised when it is inserted and the icon appears R on the screen.
When a cooking mode is started with the probe inserted, the display page for setting the function appears automatically.
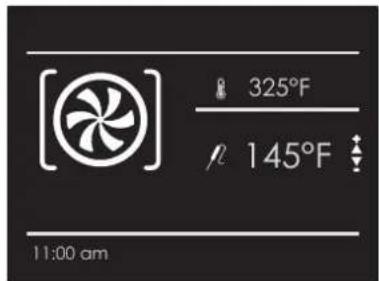
text_image
[325°F 145°F 11:00 am- Set the required probe temperature by means of the arrows and confirm with the OK key.
text_image
TRUE CONVECTION 325°F 145°F 70°F 275°F 11:00 am-
After pressing the Ⓞkey, cooking starts and all probe cooking details appear on the screen.
-
Cooking mode
- Oven temperature
- Set probe temperature
• Instantaneous probe temperature
Once the set probe temperature is reached, the oven switches off and an acoustic signal warns that cooking has terminated.
NOTE: After cooking has started, the oven temperature can in any case be changed at any time by means of the arrows .
To change the probe temperature, press the Ⓞkey and then the ⬇key and finally, the Ⓞkey again.
The Recipe function of your oven gives you the chance to cook food without having to set the oven manually every time. By selecting a "SET" recipe, the cooking mode, the temperature and the time are automatically set according to the recipe selected from the menu.
| Recipe List | Type of Food | Food condition | Recipes List | Information displayed |
| PRESET OR PERSONAL |  | FRESH | BREAD PIZZA FIRST | TYPE OF ACCESSORYLEVEL POSITIONFOOD WEIGHTCOOKING TIMEPREHEAT REQUIRED(YES/NO) |
| FROZEN | ||||
 | WHOLE | MEAT | ||
| IN PEICES | ||||
 | WHOLE | POULTRY | ||
| IN PEICES | ||||
 | WHOLE | FISH | ||
| IN PEICES | ||||
 | - | VEGETABLES | ||
| - | ||||
 | - | PIES | ||
| - |
Select an already-set recipe:
- Switch the oven, select the icon 📋 and press the button . OK
- Using the arrows △ ▽ select the list between "PRESET" or "PERSONAL" and confirm by means of the clay.
-
Choose the type of food to be cooked using the arrows △ and the arrows ◀ and confirm by means of the key
-
Using the arrows △ choose between "FRESH" or "FROZEN" or in other cases between "WHOLE" or "IN PEICES" and confirm with the key.
-
Select the required recipe by means of the arrows △ and confirm using the 🔒 key.
-
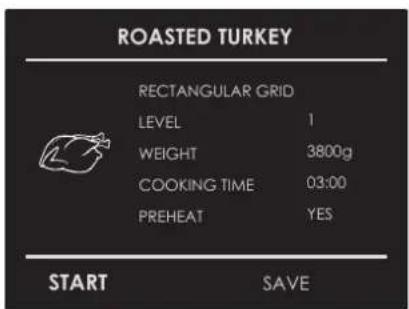
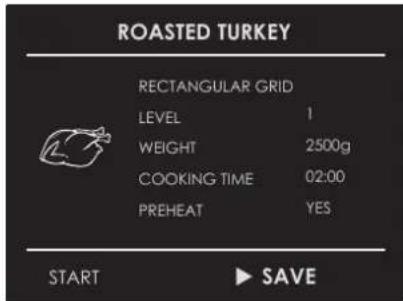
When the recipe is selected, the following display page appears on the screen:
text_image
ROASTED TURKEY RECTANGULAR GRID LEVEL 1 WEIGHT 3800g COOKING TIME 03:00 PREHEAT YES START SAVEEN
- To start the recipe, confirm with the ☐key.
During a recipe, a number of acoustic and visual messages will ask you to perform the following operations. Simply follow the instructions on the screen.
- Upon termination, the oven switches off and an acoustic and visual signal warns that the recipe has terminated.
Saving a personalized recipe:
Once a recipe has been selected, the "Time" and "Weight" setting can be changed and the recipe can be saved among the "PERSONAL" ones.
- Once a recipe has been selected, press the key △ and confirm by means of the ●key.
- To change the weight, enter the desired weight by means of the arrows △ and confirm by means of the key
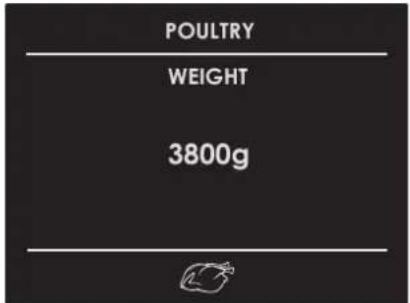
text_image
POULTRY WEIGHT 3800g- The oven switches automatically to the cooking time. To change this time, use the arrows and confirm again by means of the key.
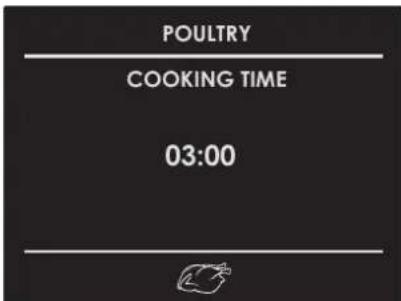
text_image
POULTRY COOKING TIME 03:00- At this point, the recipe can be saved in the list of "PERSONAL" recipes by selecting "SAVE" and confirming by means of the key.
text_image
ROASTED TURKEY RECTANGULAR GRID LEVEL 1 WEIGHT 2500g COOKING TIME 02:00 PREHEAT YES START ▶ SAVENOTE: If the time and weight values are changed and not saved straight away, at the end of the recipe, a message appears which asks whether you want to save it.
- To start the recipe press the key.
Cancelling a Personalized recipe:
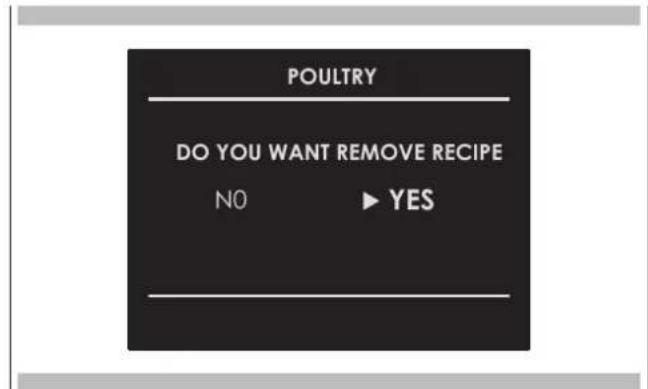
- To eliminate a recipe from the list of personalized recipes, select the recipe.
- Press the key ◀ and select the choice and confirm with the ⓔkey.
text_image
POULTRY DO YOU WANT REMOVE RECIPE NO ▶ YES
Air Fry Tips and Techniques (if present)
Air Fry is a unique cooking mode that is designed to produce foods with a crispier exterior than traditional oven cooking. Select Air Fry, then set the desired temperature and press Start. The temperature can be set between 300°F (150°C) and 445°F (230°C).
Air Fry Cookware Guidelines
- Only use broil safe cookware when using Air Fry mode.
- Oven baking baskets and baking grids can also be used. A sheet pan should be placed on the rack below the foods to catch any drippings when using a baking basket.
natural_image
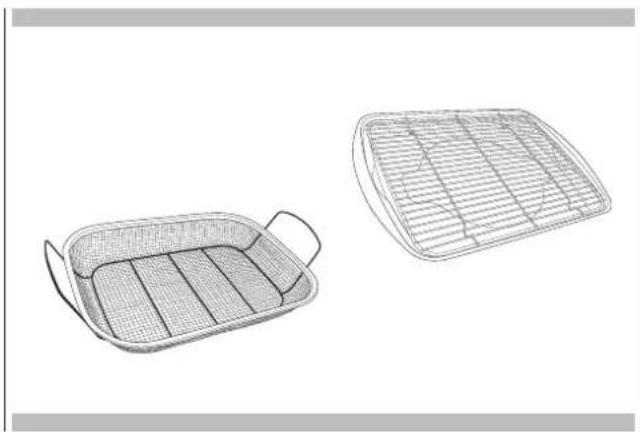
Line drawing of a rectangular tray with perforated inner compartments (no text or symbols)Primary recommended cookware
- A dark sheet pan is recommended. A dark pan promotes better browning and crisping.
• The Air Fry mode is designed for cooking on a single rack. - The Air Fry mode is designed to be used with oven preheating.
- Rack position 3 is recommended for most foods.
- When air frying foods with sauce, it is recommended to apply the sauce at the end of cooking.
- If foods are browning too quickly, try a lower rack position or lower oven set temperature.
- For packaged foods, use traditional oven cooking instructions for set temperature and expected cook time.
- It is not necessary to flip or stir food during cooking.
- Arrange food in a single layer on the pan, do not overload the pan.
natural_image
Line drawings of two woven baskets with different internal patterns (no text or symbols)Alternate cookware options

Oven Clean
This function performs a cleaning cycle by injecting steam into the cavity for 15 minutes. At the end of the cycle, any crusting that may have formed due to high-temperature cooking inside the oven cavity, will be softened and become much easier to remove.

ATTENTION
Once the functions have been completed, a circuit discharge request will be sent (see WATER DISCHARGE paragraph).

Circuit Clean
This function performs a cleaning cycle of the circuit, to keep it clean and efficient over time.

ATTENTION
Once the functions have been completed, a circuit discharge request will be sent (see WATER DISCHARGE paragraph).
This oven is one of its kind insofar as it does not require any descalers to keep the steam generation system running efficiently.

Circuit discharge
At the end of any steam function, when the oven is turned off using the key ⑥ circuit discharge is requested.
The following message will appear on the display: NEED TO DISCHARGE / OPEN THE DOOR.
Open the door, watching out for the hot steam that will be released. A new message will appear on the display with an animated icon, requesting the user to extract the container until the symbol indicated on the same. Press the key do start the steam circuit discharge.
natural_image
Interior view of a laboratory or lab equipment setup with transparent chambers and control panels (no visible text or symbols)At the end of the procedure, the message DISCHARGE ENDED / REMOVE AND EMPTY THE TANK will appear on the display, confirming that the discharge was successful. If you do not wish to immediately repeat a new steam cooking cycle, it is recommended to empty the container and replace it in its housing, then close the door. The oven is now ready for a new cooking cycle.

IMPORTANT
The oven lamp must have precise characteristics:
a) Structure suitable for high temperatures (up to 300 °C);
b) Power supply: see the V/Hz value on the serial number plate;
c) power 25 W;
d) Type G9 connector.
Attention: make sure the appliance is off before replacing the lamp to avoid the possibility of electric shock.
- To avoid damage, spread a tea towel for pots and pans inside the oven;
- Remove the screws holding the steel frame;
- Remove the old lamp by sliding it out of its seat and taking care not to break it;
- Insert the new bulb taking care not to touch it with your hands (we recommend using a disposable latex glove);
- Replace the stainless steel frame taking care not to pinch the silicone gasket seal;
- Screw in the stainless steel screws you previously removed
- Connect the appliance to the power line.
natural_image
Close-up of a gloved hand holding a black object with directional arrows indicating motion or movement (no text or symbols visible)
natural_image
Close-up of a hand inserting a small rectangular component into a metallic frame (no visible text or symbols)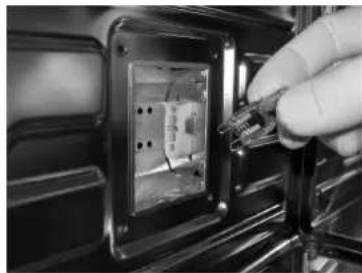
natural_image
Close-up of a hand inserting a small electronic component into a black plastic panel (no visible text or symbols)
WARNING
If the information in this manual is not followed exactly, a fire or explosion may result causing property damage, personal injury or death.
Introduction
Please read these instruction COMPLETELY AND CAREFULLY. They will save you time and effort and help to ensure optimum oven performance. Be sure to observe all WARNINGS.
These installations are intended for use by a qualified installer. In addition to these instructions, the oven shall be installed:
- In the United States, in accordance with the National Electric Code/State and Municipal codes and/or local codes.
- In Canada, in accordance with Canadian Electric Code C22.1-latest edition/Provincial and Municipal codes and/or local codes.
These shall be carefully followed at all times.
NOTE: IF INSTALLING YOUR OVEN IN CANADA PLEASE CHECK TO MAKE SURE THAT YOU HAVE A MODEL WITH THE CANADIAN LISTING

text_image
C LISTED US CETV US IntertekMARK, AS SHOWN ABOVE:
Mark as shown above means the oven complies with both US and CANADIAN Standards.
Tools you will need
The following tools are needed to install your new oven:
- Pencil
• Phillips screwdriver - Level
• Wire cutters and wire stripper - Hand or saber saw
• 1" (2,5 cm) Hole saw - Drill and drill bit
• Safety gloves and goggles
• Volt meter (0-250VAC)
•
- Tape measure and straight edge or rules
Packaging
Remove all tape and packaging before using the oven.
Destroy the packaging after unpacking the oven following the rules in force in your town. Never allow children to play with packaging material.
Power requirements
The oven must be supplied with the proper voltage and frequency. The oven is manufactured to be connected to a three-wire, single phase, 120/240V, 60 Hz or a 120/208 Volt, 60Hz electrical supply on a separate circuit fused in both sides of the line. A circuit breaker or time delay fuse sized not to exceed the circuit rating of the appliance specified on the rating plate located on the frame behind the door of the oven is recommended.
The oven must be supplied with copper or aluminum wires.
If aluminum wire is provided to connect oven to branch circuit, UL listed connectors for joining copper and aluminum must be used. Follow instructions provided with connectors.
If is recommended that you have the electrical wiring and hook-up of your oven performed by a qualified electrician.
After installation is complete have the electrician show you where the main disconnect is and which of the circuit breakers/fuses are for the oven.
Choosing oven location
Carefully select the location where the oven will be placed.
The oven should be located for convenient use in the kitchen, but away from strong drafts.
Strong drafts may be caused by open doors or windows, or by heating and/or air conditioning vents or fans. Make sure that electrical power can be provided to the location selected.
Steps for installation
The following pages provided the necessary information for proper installation of the oven and are arranged as follows:
- Technical Data
- Installation Cutout Dimensions, Required Clearances and Mounting instructions for:
- Under counter installation, Single Oven
- Wall installation, Single Oven
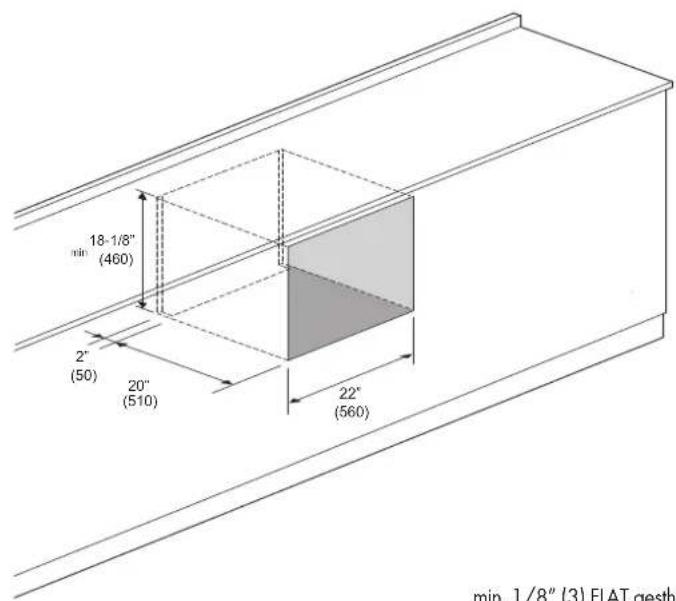
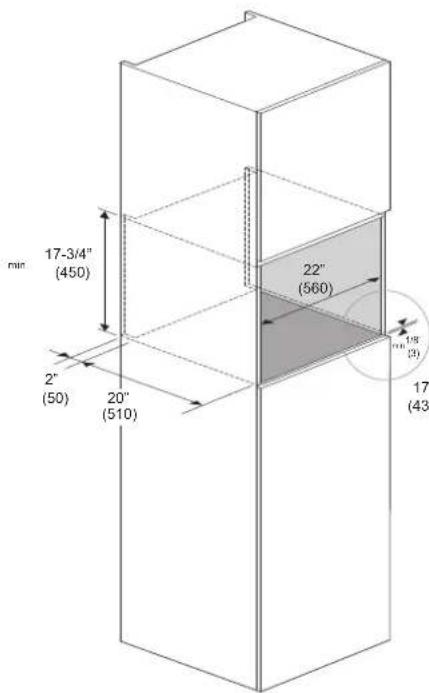
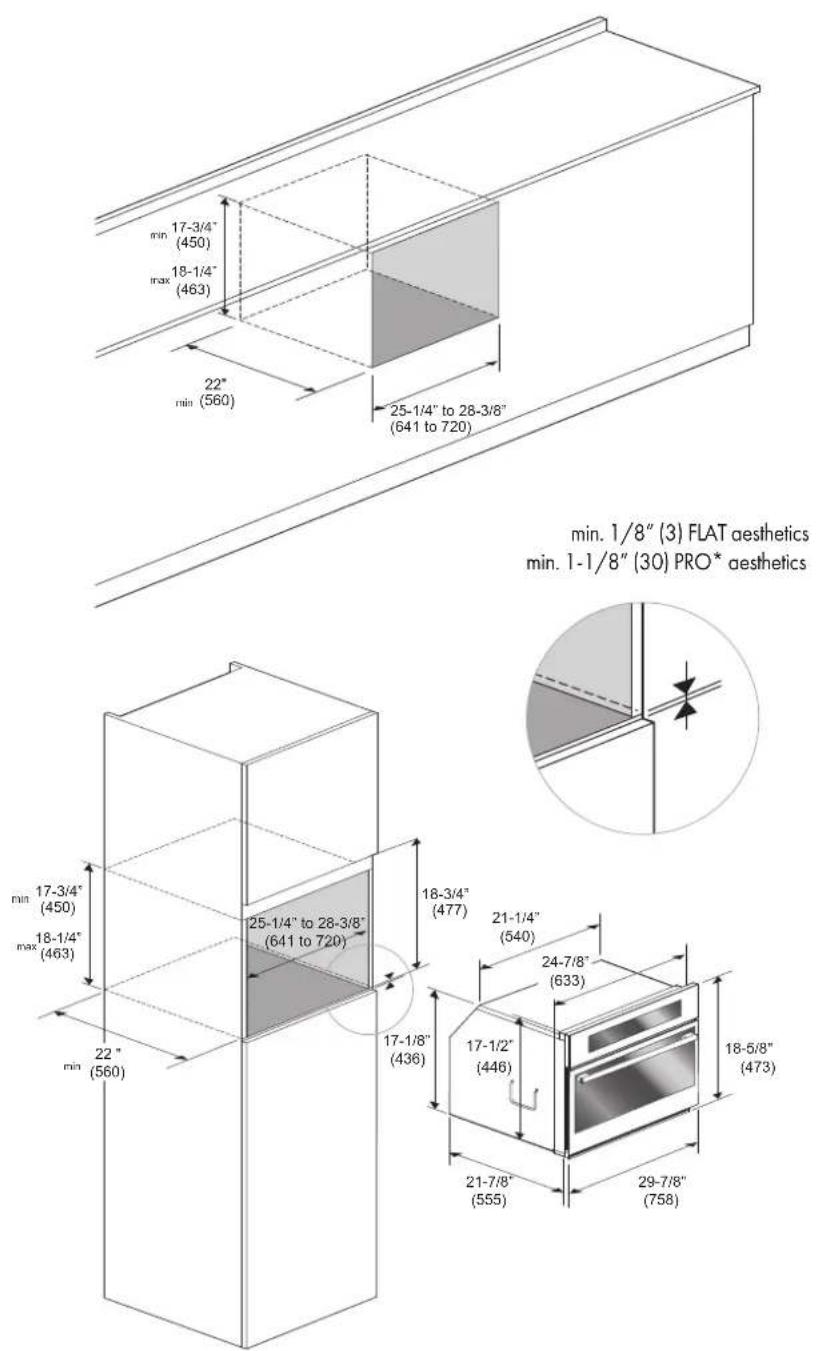
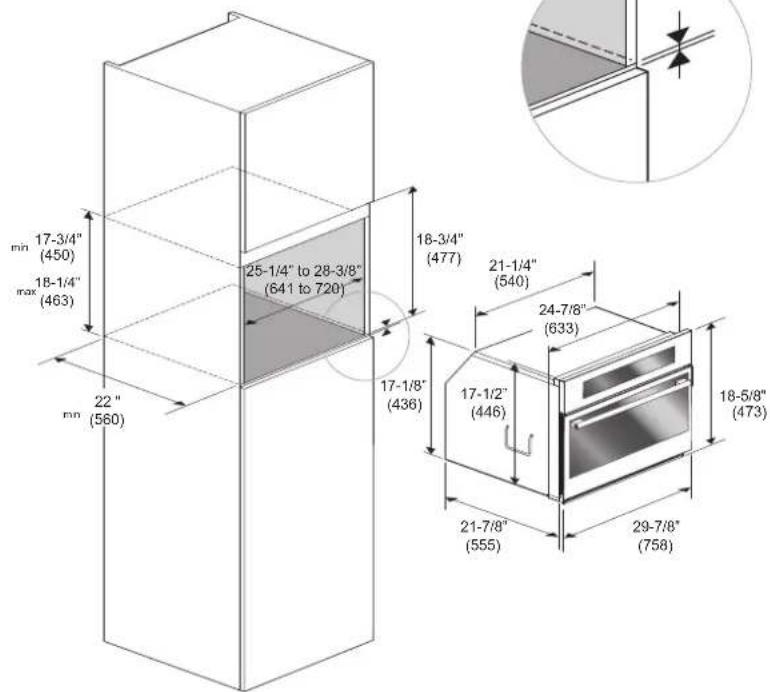
Dimensions and Cabinet Requirements
The oven can be installed under a work top or in a cooking column.
Figure shows the installation dimensions.
Make sure that surrounding materials are heat resistant. Align the oven centrally with respect to the side walls of the units surrounding it and fix it in place with the screws provided.
CUTOUT 24" (60cm)
text_image
18-1/8" min (460) 2" (50) 20" (510) 22" (560) min. 1/8" (3) FLAT gesthemin. 1/8" (3) FLAT aesthetics
min. 1-1/8" (30) PRO* aesthetics
text_image
17-3/4" (450) 22" (560) 2" (50) 20" (510) 17" (432)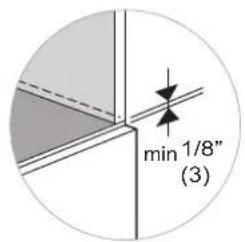
text_image
min 1/8" (3)
text_image
21-1/4" (540) 17-7/8" (455) 21" (533) 23-3/8" (594)CUTOUT 30" (75 cm)
text_image
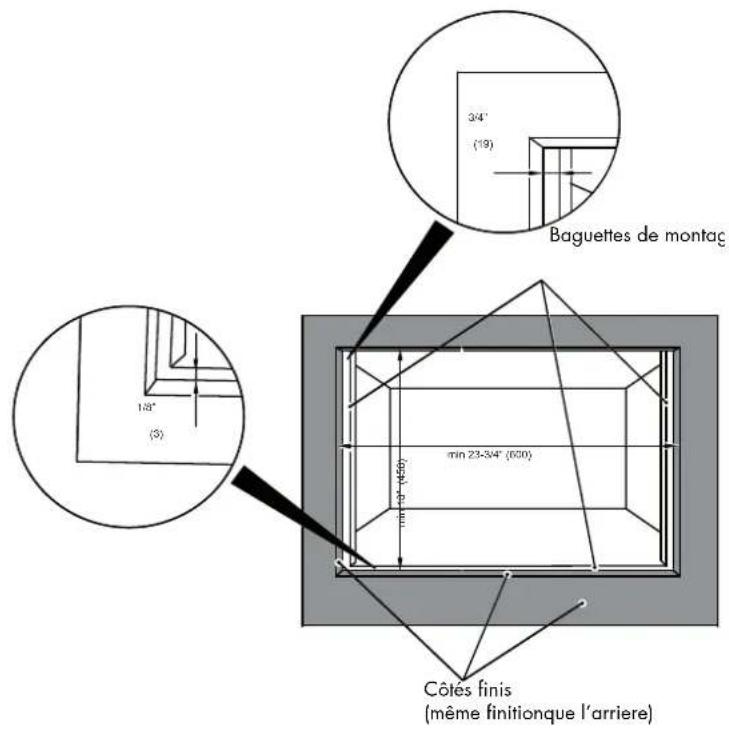
min 17-3/4" (450) max 18-1/4" (463) 22" min (560) 25-1/4" to 28-3/8" (641 to 720) min. 1/8" (3) FLAT aesthetics min. 1-1/8" (30) PRO* aesthetics min 17-3/4" (450) max 18-1/4" (463) 22" min (560) 25-1/4" to 28-3/8" (641 to 720) 18-3/4" (477) 21-1/4" (540) 24-7/8" (633) 17-1/2" (446) 18-5/8" (473) 21-7/8" (555) 29-7/8" (758)FLUSHMOUNT INSTALLATION
24" (60 cm)
FLAT

text_image
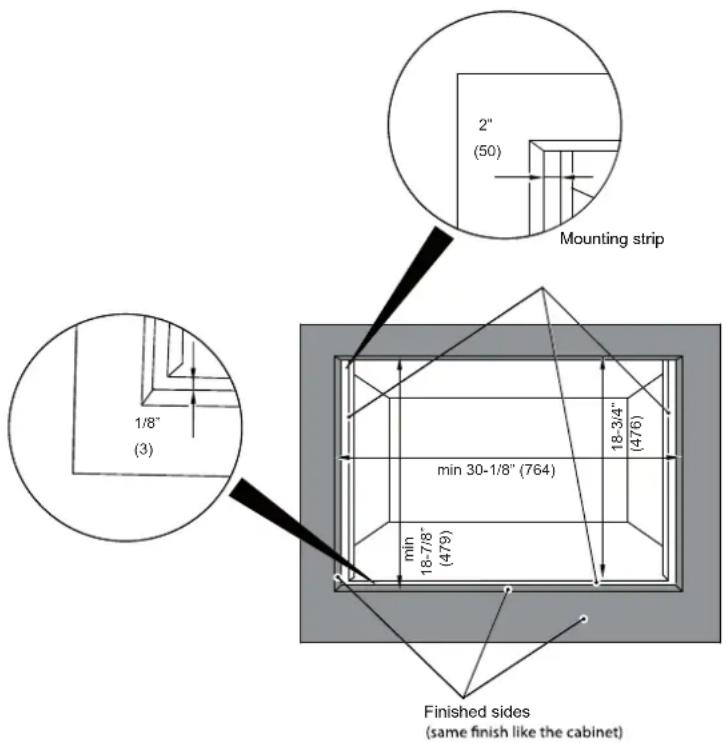
3/4" (19) Mounting strip 1/8" (3) min 23-3/4" (600) min 19" (450) Finished sides (same finish like the cabinet)FLUSHMOUNT INSTALLATION
30" (75 cm)
FLAT
text_image
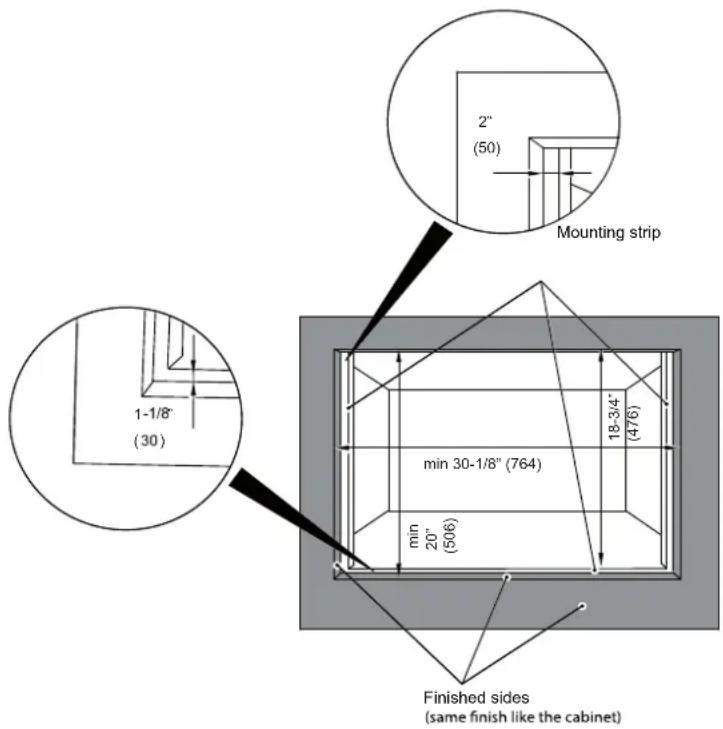
2" (50) Mounting strip 1/8" (3) min 30-1/8" (764) min 18-7/8" (479) 18-3/4" (476) Finished sides (same finish like the cabinet)PRO
text_image
2" (50) Mounting strip 1-1/8" (30) min 30-1/8" (764) min 20" (506) 18-3/4" (476) Finished sides (same finish like the cabinet)24" (60 cm)
FLAT
text_image
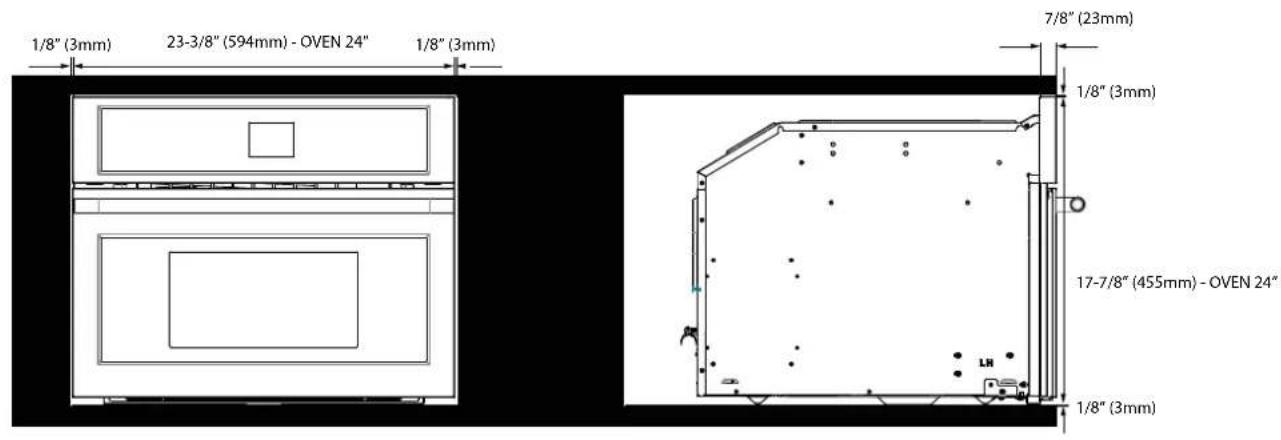
1/8" (3mm) 23-3/8" (594mm) - OVEN 24" 1/8" (3mm) 7/8" (23mm) 1/8" (3mm) 17-7/8" (455mm) - OVEN 24" 1/8" (3mm)30" (75 cm)
FLAT
text_image
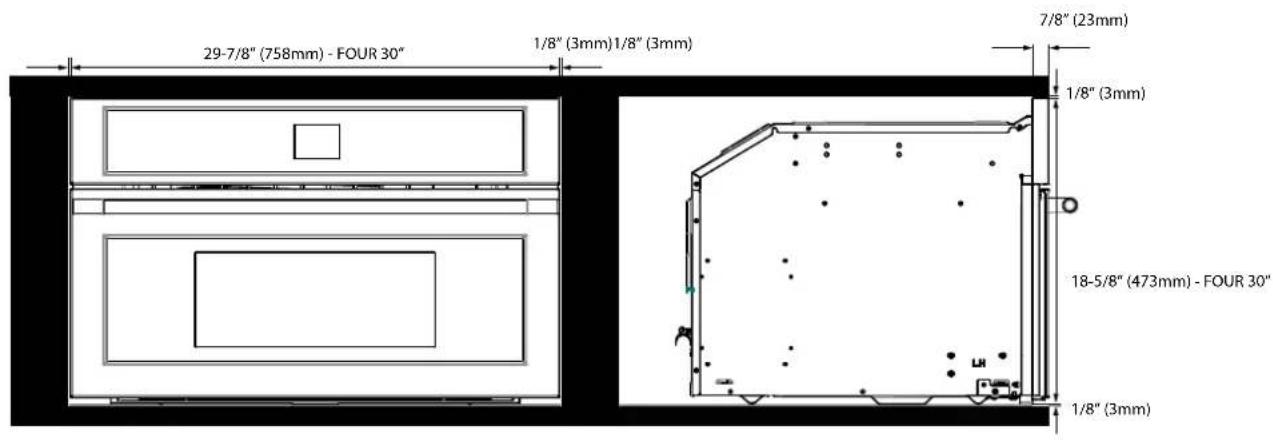
29-7/8" (758mm) - OVEN 30" 1/8" (3mm)1/8" (3mm) 7/8" (23mm) 1/8" (3mm) 18-5/8" (473mm) - OVEN 30" 1/8" (3mm)PRO
text_image
1/8" (3mm) 1/8" (3mm) 29-7/8" (758mm) - OVEN 30" 2" (51mm)2" (51mm) 1/8" 3mm 18-5/8" (473mm) - OVEN 30" 30mmElectrical connections
Be sure your appliance is properly installed and grounded by a qualified technician. Ask your dealer to recommend a qualified technician or an authorized repair service.
This appliance is manufactured is with a green GROUND wire connected to the oven body. After making sure that the power has been turned off, connect the flexible conduit from the oven to the junction box using a U.L. listed conduit connector. Figures A and B and the instructions provided below present the most common way of connecting the ovens.
Your local codes and ordinance, of course, take precedence over these instructions. Complete electrical connections according to local codes and ordinance.

WARNING
Risk of Electric Shock, frame grounded to neutral of appliance through a connection.
Ground through the neutral conductor is prohibited for new branch-circuit installation (1996 NEC); mobile homes; and recreation vehicles, or in an area where local codes prohibit grounding through the neutral conductor. For installations where grounding through the neutral conductor. For installations where grounding through the neutral conductor is prohibited:
- Disconnect the ground from the neutral at free end of conduit;
- Use grounding terminal or lead to ground unit; and usual procedure.
3-Wire branch circuit (for US only)
Refer to Figure A, where local codes allow the connection of GROUND wire from the oven to the branch circuit NEUTRAL wire (gray or white colored wire):
- If local codes permit, connect the green GROUND wire from the oven and the white wire from the oven to the branch circuit NEUTRAL wire (gray or white colored wire).
- Connect the red and black leads from the oven to the corresponding leads in the junction box.
GROUNDED NEUTRAL
A
text_image
Junction box Red wires White wires Bare or green wire Cable from power supply Black wires Cable from oven UL listed conduit connector4-Wire branch circuit (for US and CANADA)
Refer to Figure B:
- Connect the green GROUND wire from the oven to the GROUND wire in the junction box (bare or green colored wire).
- Connect the red and black leads from the oven to the corresponding leads in the junction box.
- Connect the white wire from the oven to the NEUTRAL (gray or white) wire in the junction box.
text_image
Junction box Cable from power supply Red wires White wires Black wires Bare or green wire Cable from oven UL listed conduit connectorWith either Bake or Convection Bake, poor results can occur for many reasons other than a malfunction of the oven. Check the chart below for causes of the most common problems. Since the size, shape and material of baking utensils directly affect the baking results, the best solution may be to replace old baking utensils that have darkened and warped with age and use.
| Baking Problem Cause | |
| Food browns unevenly - Oven not preheated | - Aluminum foil on oven rack or oven bottom- Baking utensil too large for recipe- Pans touching each other or oven walls |
| Food too brown on bottom - Oven not preheated | - Using glass, dull or darkened metal pans- Incorrect rack position- Pans touching each other or oven walls |
| Food is dry or has shrunk excessively - Oven temperature too low | - Oven not preheated- Oven door opened frequently- Tightly sealed with aluminum foil- Pan size too small |
| Food is baking or roasting too slowly - Oven temperature too low | - Oven not preheated- Oven door opened frequently- Tightly sealed with aluminum foil- Pan size too small |
| Pie crusts do not brown on bottom or have soggy crust - Baking time | not long enough- Using shiny steel pans- Incorrect rack position- Oven temperature is too low |
| Cakes pale, flat and may not be done inside - Oven temperature too low | - Incorrect baking time- Cake tested too soon- Oven door opened too often- Pan size may be too large |
| Cakes high in middle with crack on top - Baking temperature too high | - Baking time too long- Pans touching each other or oven walls- Incorrect rack position- Pan size too small |
| Pie crust edges too brown - Oven temperature too high | - Edges of crust too thin |
Before contacting service, check the following to avoid unnecessary service charges.
| Oven Problem Problem Solving Steps | |
| Other F__ Error appears in the display window. | Remove power and turn it back on again after a few seconds. If condition persists, note the code number (in the EVENT LOG list) and contact service. |
| The oven display stays OFF Turn off power at the main power supply (fuse or breaker box). Turn breaker back on.If condition persists, call an authorized service. | |
| Cooling fan continues to run after oven is turned off | The fan turns off automatically when the electronic components have cooled sufficiently. |
| Oven is not heating Check the circuit breaker or fuse box to your house. Make sure there is proper electrical power to the oven. Make sure the oven temperature has been selected. | |
| Oven is not cooking evenly | Refer to cooking charts for recommended rack position. Always reduce recipe temperature by 25°F (15°C) when baking with Convection Bake mode. |
| Oven light is not working properly | Replace or reinsert the light bulb if loose or defective. See Page 27. Avoid touching the bulb glass with bare fingers as finger oil may cause bulbs to burn out prematurely. |
| Clock and timer are not working properly Make sure there is proper electrical power to the oven. | |
Before contacting service, please check "Troubleshooting." It may save you the cost of a service call.
If you still need help, follow the instructions below.
When calling, please know the purchase date and the complete model and serial number of your appliance.
This information will help us to better respond to your request.
Service Data Record
For serial tag location see Page 4. Now is a good time to write this information in the space provided below.
Keep your invoice for warranty validation.
Service Data Record
Model Number
Serial Number
Date of Installation or Occupancy ____
TABLE DES MATIERES
PAGE
natural_image
Technical line drawing of a rectangular device with internal components and an upward arrow, no text or symbols present.natural_image
Interior view of an oven with a hand holding a metal rack (no text or symbols visible)
natural_image
Interior view of an oven with a metal tray and grid rack (no text or symbols visible)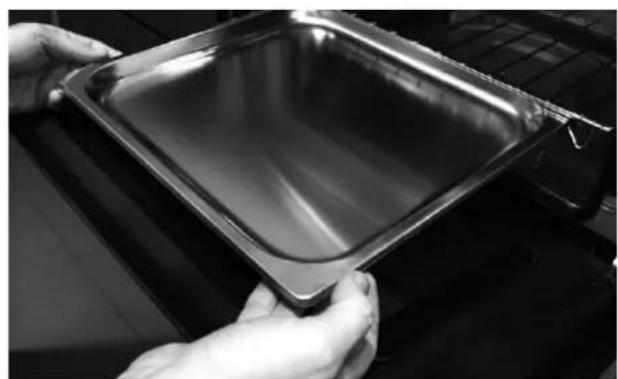
natural_image
Close-up of hands holding a metallic baking tray (no text or symbols visible)natural_image
Interior view of an oven with a tray holding a perforated baking tray (no text or symbols visible)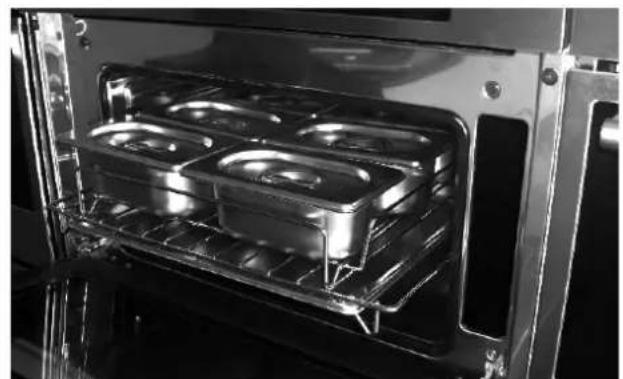
natural_image
Interior view of an oven with illuminated grilles and a rack, no visible text or symbolsnatural_image
Recycling symbol composed of five gray arrows forming a circular loop (no text or labels)
natural_image
Pure electrical circuit lines without any symbols
text_image
11/20/2015 12Luminosité
natural_image
Close-up of a hand holding a metallic mechanical component, no visible text or symbolsnatural_image
Close-up of a gloved hand using a tool to clean or inspect the interior of an oven (no visible text or symbols)
AVERTISSEMENT
natural_image
Line drawing of a rectangular tray with perforated inner compartments (no text or symbols)Primary recommended cookware
natural_image
Line drawings of two woven baskets, one rectangular and one closed, with no text or symbols present.Alternate cookware options

Nettoyage du four
natural_image
Interior view of a laboratory or lab equipment setup with transparent chambers and control panels (no visible text or symbols)text_image
17-3/4" (450) max 18-1/4" (463) 22" min (560) 25-1/4" to 28-3/8" (641 to 720)min. 1/8" (3) FLAT esthétique min. 1-1/8" (30) PRO* esthétique
text_image
17-3/4" (450) 18-1/4" (463) 22" (560) 25-1/4" to 28-3/8" (641 to 720) 18-3/4" (477) 21-1/4" (540) 24-7/8" (633) 17-1/8" (436) 17-1/2" (446) 21-7/8" (555) 29-7/8" (758) 18-5/8" (473)
natural_image
Pure geometric diagram showing a triangular structure with internal lines and arrows, no text or symbols present.INSTALLATION DE MONTAGE ENCASTRÉ
24" (60 cm)
FLAT
text_image
1/8" (3mm) 23-3/8" (594mm) - FOUR 24" 1/8" (3mm) 7/8" (23mm) 1/8" (3mm) 17-7/8" (455mm) - FOUR 24" 1/8" (3mm)30" (75 cm)
FLAT
text_image
29-7/8" (758mm) - FOUR 30" 1/8" (3mm)1/8" (3mm) 7/8" (23mm) 1/8" (3mm) 18-5/8" (473mm) - FOUR 30" 1/8" (3mm)PRO