
GO H2O HammerHead - Vacuum Cleaner TINECO - Free user manual and instructions
Find the device manual for free GO H2O HammerHead TINECO in PDF.


| Brand | Tineco |
| Model | GO H2O HammerHead |
| Product type | Wet-dry vacuum cleaner |
| Use | Domestic, hard floors (vinyl, tile, hardwood) |
| Power supply | Li-ion battery 25.2V, 2000 mAh |
| Runtime | Approximately 25 minutes |
| Charging time | Approximately 5 hours |
| Power | 170 W |
| Water flow rate | 30 to 60 ml/min |
| Clean water tank capacity | 1.0 L |
| Dirty water tank capacity | 0.8 L |
| Waterproof rating | IPX4 |
| Included charger | YLS0261A-T300060 (100-240 V~) |
| Operating modes | ECO and MAX |
| Features | Simultaneous vacuuming and mopping, automatic brush roller cleaning, automatic shut-off in upright position |
| Included accessories | Cleaning and deodorizing solution, cleaning tool, additional brush roller, dry filter, storage tray |
| Maintenance | Regular cleaning of tanks, filters, and roller; automatic cleaning cycle available |
| Safety | Overheat protection, low battery indicator, automatic shut-off if dirty water tank full |
| Warranty | 2-year limited (parts and labor) |
Frequently Asked Questions - GO H2O HammerHead TINECO
User questions about GO H2O HammerHead TINECO
0 question about this device. Answer the ones you know or ask your own.
Ask a new question about this device
Download the instructions for your Vacuum Cleaner in PDF format for free! Find your manual GO H2O HammerHead - TINECO and take your electronic device back in hand. On this page are published all the documents necessary for the use of your device. GO H2O HammerHead by TINECO.
USER MANUAL GO H2O HammerHead TINECO
Cordless Floor Washer
Instruction Manual
Manual De Uso
Mode D'emploi
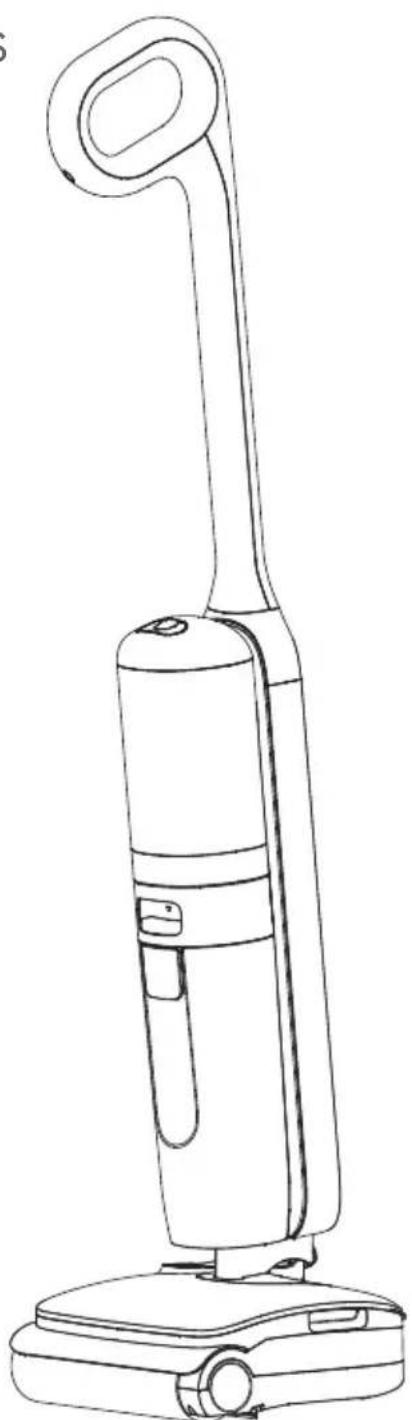
natural_image
Line drawing of a vacuum cleaner with handle and base (no text or symbols)*Actual product may differ from illustration.
CONTENTS
Important Safety Instructions....2
Specifications....7
Overview......8
Accessories....9
Assembly 10
Operation....11
Maintenance 14
Troubleshooting....17
Warranty 18
Important Safety Instructions
SAVE THESE INSTRUCTIONS Household use only.
When using an electrical appliance, basic precautions should always be followed, including the following:
READ ALL INSTRUCTIONS BEFORE USING (THIS APPLIANCE). Failure to follow the warnings and instructions may result in electric shock, fire and/or serious injury.
WARNING – To reduce the risk of fire, electric shock, or injury:
- This appliance can be used by children aged from 8 years and above and persons with reduced physical, sensory or mental capabilities or lack of experience and knowledge if they have been given supervision or instruction concerning use of the appliance in a safe way and understand the hazards involved. Children should not play with the appliance. Cleaning and user maintenance shall not be performed by children without supervision.
- The appliance is not to be used by persons (including children) with reduced physical, sensory or mental capabilities, or lack of experience and knowledge, unless they have been given supervision or instruction.
- Use only indoors, on non-carpeted floor surfaces such as vinyl, tile, sealed wood, etc. Be careful not to run over loose objects or edges of area rugs. Stalling the brush may result in premature belt failure.
- Do not allow to be used as a toy. Close attention is necessary when used by or near children, pets or plants.
- Use only as described in this manual. Use only manufacturer's recommended attachments.
- Do not use with a damaged cord or plug. If appliance has been dropped, damaged, left outdoors, dropped into water, or is not working as it should, return it to a service center.
- Do not handle charger, including charger plug, and charger terminals with wet hands.
- Do not put any object into openings. Do not use with any opening blocked; keep free of dust, lint, hair, and anything that may reduce air flow.
- Keep hair, loose clothing, fingers, and all parts of your body away from openings and moving parts.
- Use extra care when cleaning on stairs.
- Do not use to pick up flammable or combustible liquids, such as gasoline, or use in areas where they may be present.
- Do not pick up anything that is burning or smoking, such as cigarettes, matches, or hot ashes.
- Do not use without filter.
- Prevent unintentional activation. Ensure the switch is in the off-position before picking up or carrying the appliance. Carrying the appliance with your finger on the switch or energizing appliance that have the switch on invites accidents.
-
Always switch off the appliance before making any adjustments, changing accessories, or storing the appliance. Such preventive safety measures reduce the risk of starting the appliance accidentally.
-
Recharge only with the charger specified by Tineco. A charger that is suitable for one type of battery pack may create a risk of fire when used with another battery pack.
- Use appliances only with specifically designated Tineco battery packs. Use of any other battery packs may create a risk of injury and fire.
- Under abusive conditions, liquid may be ejected from the battery; avoid contact. If contact accidentally occurs, flush with water. If liquid comes into eye contact, seek medical help. Liquid ejected from the battery may cause irritation or burns.
- Do not use a battery pack or appliance that is damaged or modified. Damaged or modified batteries may exhibit unpredictable behavior resulting in fire, explosion or risk of injury.
- Do not expose a battery pack or appliance to fire or excessive temperature. Exposure to fire or temperature above 266^ F ( 130^ C) may cause an explosion.
- Follow all charging instructions and do not charge the battery pack or appliance outside of the temperature range specified in the instructions. Charging improperly or at temperatures outside of the specified range may damage the battery and increase the risk of fire.
- Have servicing performed by a qualified repair person using only identical replacement parts. This will ensure that the safety of the product is maintained.
- This appliance contains battery cells that are non-replaceable. Do not modify or attempt to repair the appliance or the battery pack except as indicated in the instructions for use and care.
- Always turn off this appliance before connecting or disconnecting the motorized nozzle.
- Do not charge or store the appliance outdoors or inside the car. Only charge, store or use the battery in a dry indoor area where the temperature is higher than 39.2^ F ( 4^ C) but lower than 104^ F ( 40^ C). The charger is for indoor use only.
- Do not use to pick up ultrafine particles, such as lime, cement, sawdust, gypsum powder, or ashes.
- Do not use to pick up sharp objects, such as metallic nails, pieces of glass, metal paper clips, or pins.
- Do not use to pick up hazardous material and chemicals, such as solvent, drain cleaner, strong acids, or strong alkali.
- Stop using immediately if the appliance is overheating, making unusual noises, producing unusual odors, performing low suction, or leaks electricity.
- Turn cleaner OFF and disconnect from electrical outlet for long-term storage.
- Always clean the Dirty Water Tank after each use to avoid potential blockage, which may lead to low suction power, motor overheating, or reduce the service life of the appliance.
- Store appropriately indoors in a dry place after use.
- Do not place or submerge appliance in standing water or try to clean flooded areas.
- All data and technical instructions of this manual are based on results from lab tests of Tineco or designated third parties. The company reserves all rights for final explanations.
- The plug must be removed from the socket-outlet before cleaning or maintaining the appliance.
- A hazard may occur if the appliance runs over the supply cord.
-
Do not use the appliance when the water depth is more than 5mm above the surface.
-
Do not pull or carry by cord, use cord as a handle, close a door on cord, or pull cord around sharp edges or corners. Do not run appliance over cord. Keep cord away from heated surfaces.
- Do not unplug by pulling on cord. To unplug, grasp the plug, not the cord.
- Do not expose to rain. Store indoors.
- Do not leave appliance when plugged in. Unplug from outlet when not in use and before servicing.
- Turn off all controls before unplugging.
Range of Usage
- The cordless hard floor cleaner is to be used on indoor hard floors, such as vinyl, tile, sealed wood, etc. Use on a rough surface may not get the best performance.
- Keep your appliance away from heat sources, such as fireplace or heater, to avoid casing deformation.
- Do not use to pick up flammable or combustible liquids, ultrafine particles, sharp objects, hazardous material, chemicals or anything that is burning or smoking, as described above.
About Cleaning Solution
- A large amount of cleaning solution entering into the motor may cause damage to the appliance.
- Add solution as instructed in the Operation section. We recommend using the provided cleaning solution. Do not use the product with acidic, alkaline solution, or any substances harmful to the environment.
- Keep out of reach of children. If any solution gets into the eyes, immediately flush them with clean water. If any solution is swallowed by accident, seek medical care immediately.
- Dirty water and solution disposal should comply with local environmental regulations.
About the Appliance
- Do not modify or attempt to repair the appliance except as indicated in the instructions for operating and cleaning.
- Charge the appliance with the Tineco adaptor. Input Voltage: AC 100-240V. Both high and low voltages can damage the adaptor, appliance, or even cause danger to the user.
- Use extra care when cleaning on stairs.
- Ensure that the Power Switch is in the OFF-position before picking up or carrying the appliance. Do not lay flat or lean the appliance so as to prevent dirty water from entering into the motor.
- Always install the Dirty Water Tank and Clean Water Tank properly before use.
- Do not allow the appliance or charger to get wet to avoid risk of fire or injury caused by a short circuit.
FCC Supplier's Declaration of Conformity
TINECO / GO H2O HammerHead
This appliance complies with part 15 of the FCC Rules. Operation is subject to the following two conditions:
(1) This appliance may not cause harmful interference, and (2) this appliance must accept any interference received, including interference that may cause undesired operation.
TINECO INTELLIGENT, INC.
1700 WESTLAKE AVENUE N., SUITE 200, SEATTLE, WA, 98109, USA
WWW.TINECO.COM
1-855-292-8864
Changes or modifications not expressly approved by the party responsible for compliance could void the user's authority to operate the equipment.
Note: This equipment has been tested and find it to comply with the limits for a Class B digital appliance, pursuant to Part 15 of the FCC Rules. These limits are designed to provide reasonable protection against harmful interference in a residential installation.
This equipment generates uses and can radiate radio frequency energy and, if not installed and used in accordance with the instructions, may cause harmful interference to radio communications. However, there is no guarantee that interference will not occur in a particular installation. If this equipment does cause harmful interference to radio or television reception, which can be determined by turning the equipment off and on, the user is encouraged to try to correct the interference by one or more of the following measures:
(1) Reorient or relocate the receiving antenna.
(2) Increase the separation between the equipment and receiver.
(3) Connect the equipment into an outlet on a circuit different from that to which the receiver is connected.
(4) Consult the dealer or an experienced radio/TV technician for help.
FCC Radiation Exposure Statement
This equipment complies with FCC radiation exposure limits set forth for an uncontrolled environment. This equipment should be installed and operated with a minimum distance of 20cm between the radiator and any part of your body.
Note
The manufacturer is not responsible for any radio or TV interference caused by unauthorized modifications to this equipment, such modifications could void the user's authority to operate this equipment.
IC Note
This appliance contains licence-exempt transmitter(s)/receiver(s) that comply with Innovation, Science and Economic Development Canada's licence-exempt RSS(s). Operation is subject to the following two conditions:
(1) this appliance may not cause interference.
(2) this appliance must accept any interference, including interference that may cause undesired operation of the appliance.
- This Class B digital apparatus complies with Canadian ICES-003.
- This equipment complies with ISED RSS-102 radiation exposure limits set forth for an uncontrolled environment. This equipment should be installed and operated with a minimum distance of 20cm between the radiator and any part of your body.
Symbol:
| --- | Direct current |
Specifications
| Product GO H2O HammerHead | |
| AC Input 100-240V~ | |
| Voltage | 25.2V=2000mAh Li-ion |
| Rated Power 170W | |
| Running Time ~25 mins | |
| Charging Time 5 hrs | |
| Water Flow Rate 30-60 ml/min | |
| CWT Capacity 1.0L | |
| DWT Capacity 0.8L | |
| Waterproof IPX4 |
- For use only with charger YLS0261A-T300060.
Disposal
- The battery contains materials that are harmful to the environment and must be removed from the appliance before it is discarded.
- When removing the battery, the appliance must be powered off.
- Batteries, chargers, accessories and packaging should be sorted for environmental friendly recycling. Do not put them into fire, water or soil. Do not dispose of batteries and chargers into household waste!
- If battery leakage contacts skin or clothing, immediately flush with water to avoid irritation and seek medical help.
Overview
Note:
Please refer to the purchase link for the actual accessories and product features.
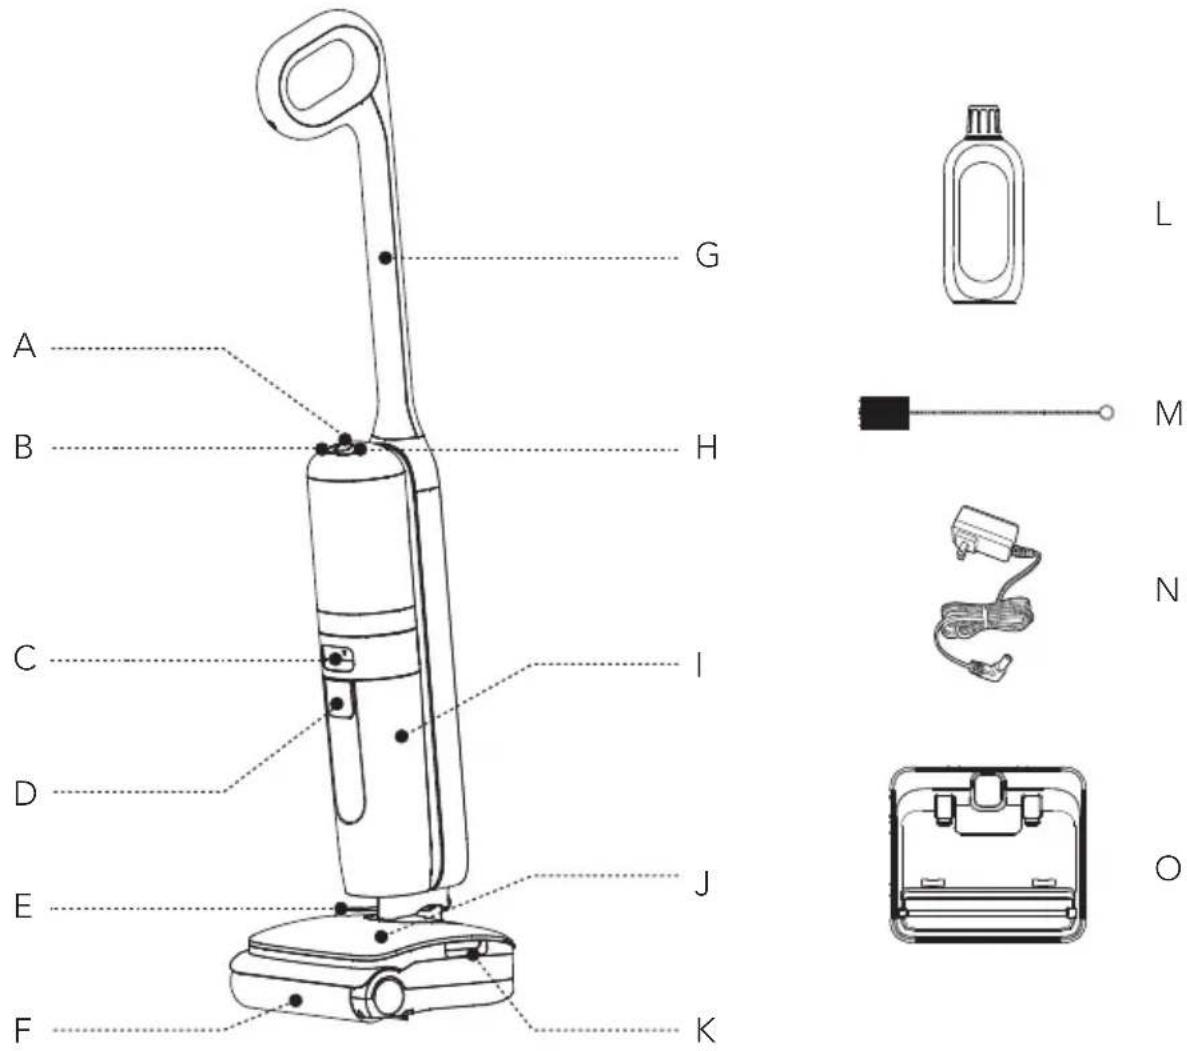
A. Self-cleaning Button
B. Mode Switch
C. Dirty Water Tank Release
D. Dirty Water Tank Handle
E. Clean Water Inlet
F. Brush Roller
G. Tube
H. Power On/Off
I. Dirty Water Tank (DWT)
J. Clean Water Tank (CWT)
K. Clean Water Tank Release
L. Deodorizing & Cleaning Solution
M. Cleaning Tool
N. Adaptor
O. Storage Tray
Accessories
Note:
Accessories may vary among markets. If you require more accessories, please go to www.tineco.com or store.tineco.com.
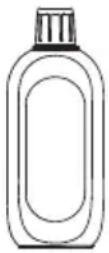
Deodorizing & Cleaning Solution
Removes dirt, grime, grease and tough stains from most types of hard surfaces, like tile, marble, sealed hardwood floors, and more. Always use Tineco solution in your appliance.
Add one bottle cap of solution to each full tank of clean water.
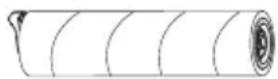
Brush Roller
Soft roller head with bristles can be used to vacuum and wash at the same time. It can be easily cleaned with the self-cleaning function.
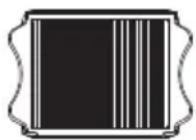
Dry Flter
Dry filter and filter net can block large particles and debris, ensuring the appliance's durability.
* Please install the dry filter before use, or it may lead to weak suction.
* Replace every 6 months.

Cleaning Tool
A full brush to clean the DWT, brush chamber and opening. The tool also has a bristled end to remove dirt and mud on the roller and DWT.
Assembly
How to Assemble/Disassemble
Note:
For water tank and brush assembly, please refer to "Operation" and "Maintenance".
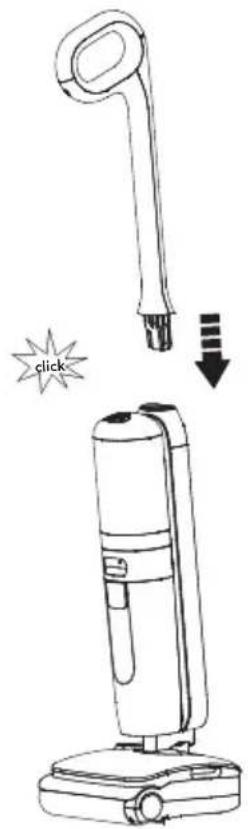
To assemble the handle, insert it into the appliance until you hear a click.
natural_image
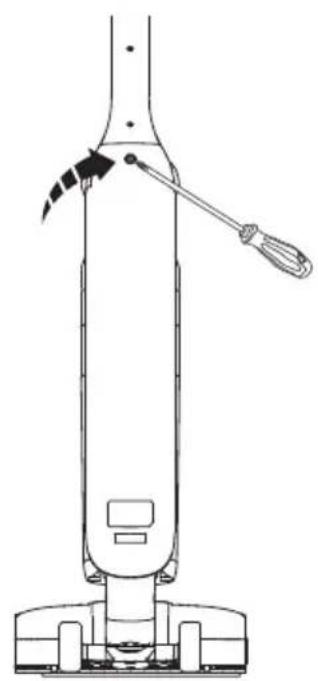
Technical line drawing of a vacuum cleaner with a tool and mechanical component (no text or symbols)In the event that the handle needs to be disassembled, press the spring to release the handle with a tool (like a screwdriver) and lift the released handle from the appliance.
Operation
Preparing for Use
Before first use, please charge the appliance for approximately 5 hours (refer to "Charging Instructions" for details).
* Based on results from Tineco Laboratory tests. Lab temperature 39.2°F (4°C) \~ 104°F (40°C).

Menu Button

Mode Switch Button

Self-cleaning Button

Power On/Off Button
Press the Ⓑ button and the appliance will start in default mode. Press it again to turn off the appliance. Switch between ECO and MAX modes by pressing the ⏻ button.
natural_image
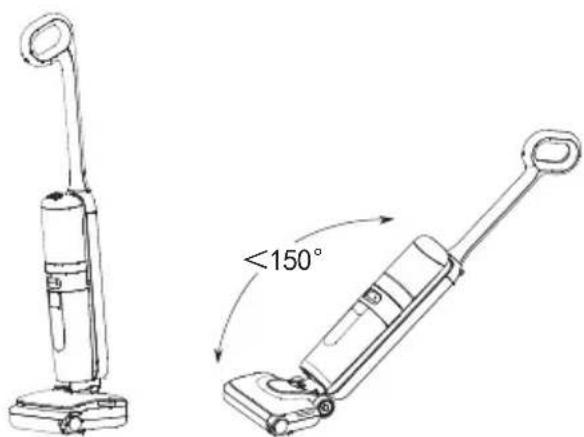
Technical line drawing of a vacuum cleaner with a 150-degree angle annotation (no text or symbols on the device itself)Stop Working Resume Working
natural_image
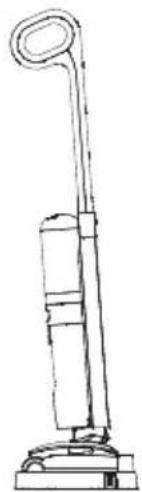
Line drawing of a vacuum cleaner with handle and base (no text or symbols)Place the appliance on the storage tray vertically after use.
The appliance will stop working when put uprightly and start running again when reclined.
* Do not recline more than 150° to avoid water leakage.
Note:
- Do not vacuum foamed liquid.
• To vacuum water left on the surface, the appliance will switch off in 3 seconds after powering off.
Filling Clean Water Tank
natural_image
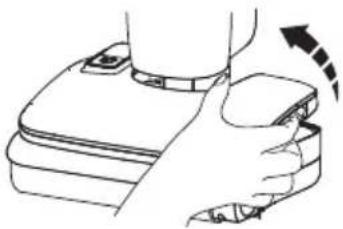
Illustration of a hand gripping a device with a curved arrow indicating rotation (no text or symbols)Reach into the groove and pull up the clean water tank to remove it.
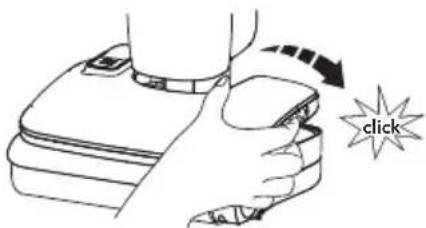
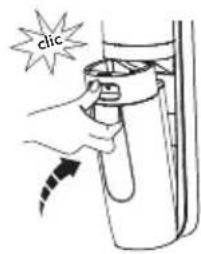
Place the tank back into the appliance. You should hear a click if done correctly.
flowchart
graph TD
    A["Water Input"] --> B["Mixing"]
    B --> C["Collection Valve"]
    C --> D["Water Outlet"]
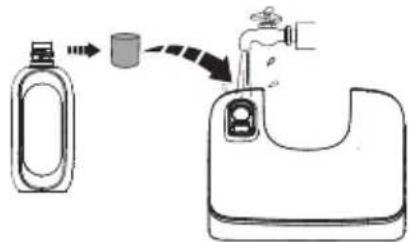
Open the tank cap, and fill with tap water. When deep cleaning is necessary, add one bottle cap of solution to the CWT and tightly close the cap.
Note:
Only use water under 140°F/60°C.
DO NOT USE HOT WATER.
Only Tineco solution is recommended.
Charging Instructions
natural_image
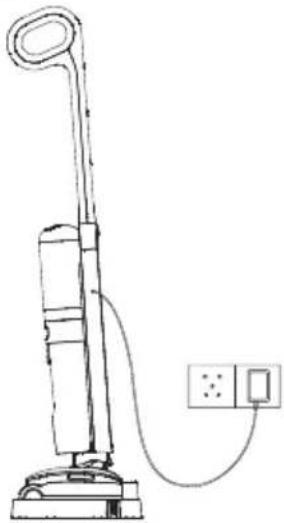
Line drawing of a vacuum cleaner with attached electrical outlet (no text or symbols)Please charge the appliance when the indicator blinks red.
-
To charge the appliance, connect the external charging cord to the appliance and plug it into the wall outlet.
-
To avoid tripping hazards, please place the appliance on the storage tray near a wall during charging.

Warning:
- Only charge the appliance with the adaptor supplied by Tineco.
- During long periods of non-use, the appliance must be charged once every 3 months for optimal performance. It may take approximately 5 hours for a full charge.
- Store indoors in a dry place. Do not expose the appliance to sunlight or freezing temperatures. Recommended temperature range: 39.2°F (4°C) \~ 104°F (40°C).
Runtime
• The runtime is approximately 25 minutes.
• Estimated runtime data was obtained by Tineco Laboratory.
Charging Time
- A full charge takes approximately approximately 5 hours.
- Estimated data was obtained by Tineco Laboratory using ambient temperatures from 39.2°F (4°C) to 104°F (40°C).
Indicator
When in Use

Flashing red: low power.
Flashing green: mode switched.
Solid green: appliance is functioning properly.

Off: no power or battery malfunction.

Solid red: brush roller has a blockage or DWT is full.
During Charging

Flashing green: charging.
Fully Charged

Within 5 minutes of full charge: solid green.

After 5 minutes: light off.
Maintenance
Note:
- For optimal performance and to prevent odors, always clean and dry DWT, floater, filters, brush roller, brush roller cover completely after each use.
- Please make sure each part is installed correctly or the appliance may not work properly.
• After maintenance, place the appliance on the storage tray vertically. Do not expose the appliance to direct sunlight, and store it indoors in a dry place.
Main Body
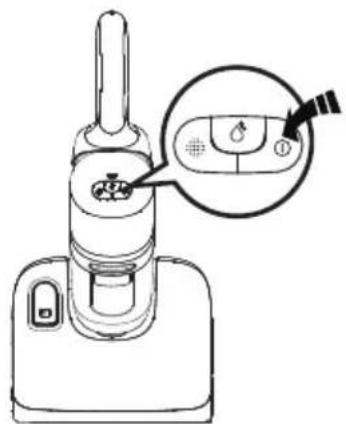
To reduce the risk of injury, switch off before performing maintenance.
natural_image
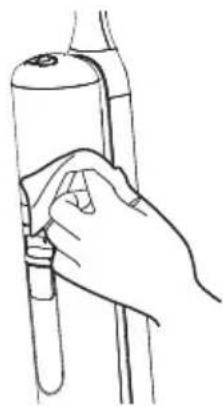
Line drawing of a hand holding a tool over a cylindrical object (no text or symbols)Use a cloth to clean the surface with a neutral detergent. The cloth should be dry to prevent water from entering the appliance.
natural_image
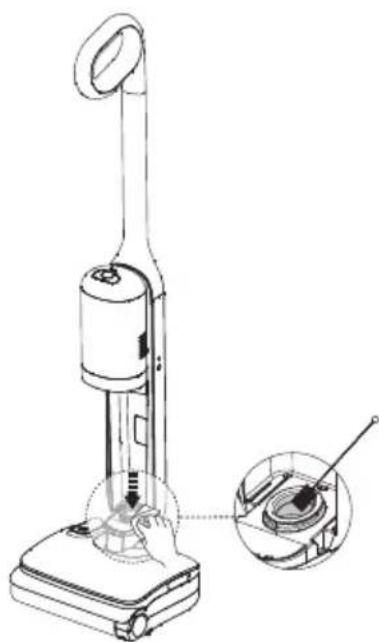
Line drawing of a vacuum cleaner with an inset close-up showing the base and handle (no text or symbols)Remove Dirty Water Tank, clean the dirt water port with a damp cloth or the cleaning tool to prevent blockage.
Dirty Water Tank
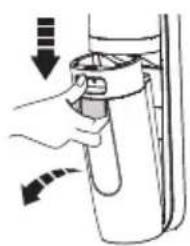
natural_image
Illustration of a hand holding a tool with an arrow indicating direction (no text or symbols)①
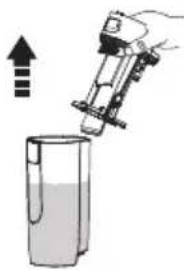
②

natural_image
Illustration of a hand pouring liquid into a container (no text or symbols)③
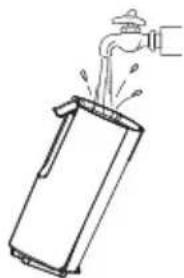
natural_image
Simple line drawing of a hand pouring liquid into a container (no text or symbols)④
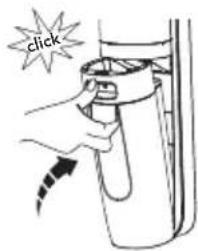
⑤
- When dirty water reaches the Max line, the floater will block off the DWT and create a high pitched sound indicating it's time to switch off the appliance.
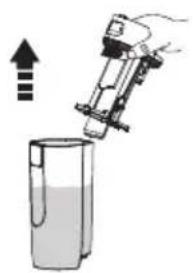
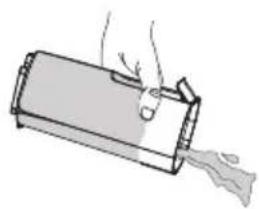
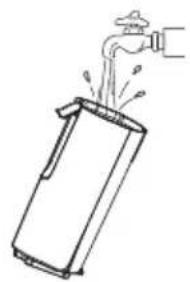
- Pull up the tank lid to empty the DWT. Use the cleaning tool to remove remaining debris. Rinse the inside of the DWT and place back into the appliance.
Dry Filter & Floater

natural_image
Illustration of a hand holding a smartphone with an arrow indicating the screen (no text or symbols present)①
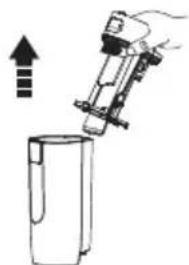
natural_image
Simple line drawing of a hand pouring liquid into a container with an upward arrow (no text or symbols)②
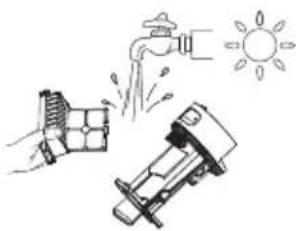
natural_image
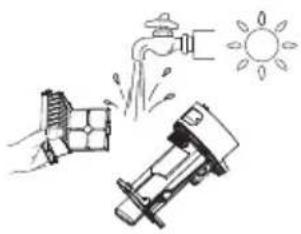
Illustration of a faucet spraying water onto a car, with sun symbolizing sunlight (no text or symbols)③
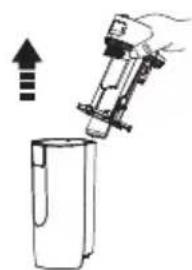
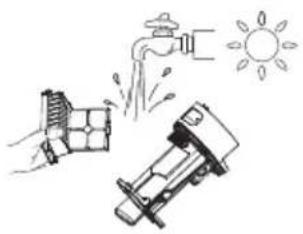
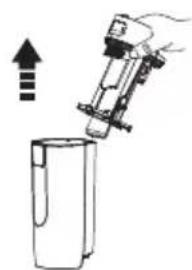
- Grasp recessed area on each side of the dry filter and pull upward. Then pull out the floater. Rinse under running water and must be completely dry before recombining with the lid of the DWT.
Brush Roller Self-cleaning

natural_image
Line drawing of a vacuum cleaner with a magnified inset showing the eye and plug (no text or symbols)- Place the appliance on the storage tray after use, and then press the self-cleaning button to begin the progress.
- Once complete, the appliance will begin charging.
Note:
- Ensure the appliance is plugged in.
- Before self-cleaning cycle, please clean the DWT and ensure the water level in the CWT > 40%.
Brush Roller
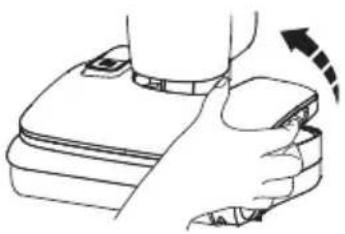
natural_image
Illustration of a hand gripping a device with a curved arrow indicating rotation (no text or symbols)Reach into the groove and pull up the clean water tank to remove it from the appliance.
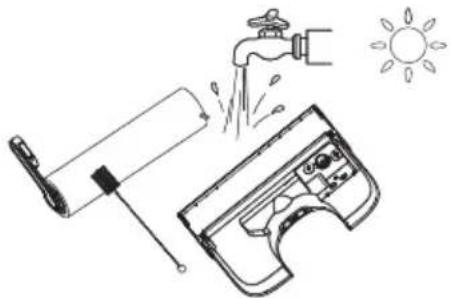
natural_image
Illustration of a water spray gun with a faucet and sun symbol (no text or labels)Use the cleaning tool to remove hair and debris wrapped around the roller and rinse the roller and back of the CWT with water. Allow them to dry completely before reinstalling.
natural_image
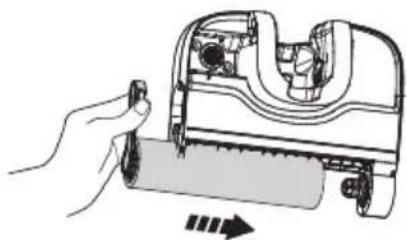
Illustration of a hand using a handheld device to press or install a sheet of paper (no text or symbols visible)Install the brush roller by inserting its end into the right side of the holder, then lock the pull tab into place.
natural_image
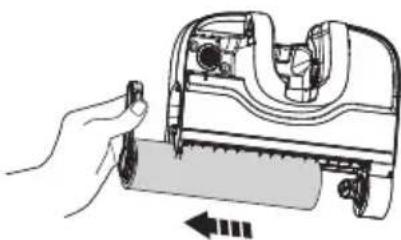
Illustration of a hand using a tool to cut a mechanical component, with no visible text or symbols.Remove the brush roller by grabbing the brush roller tab and pulling out.
natural_image
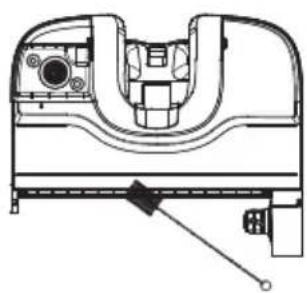
Technical line drawing of a mechanical component with no visible text or symbolsRemove hair and debris from the brush roller chamber and the opening with the cleaning tool.
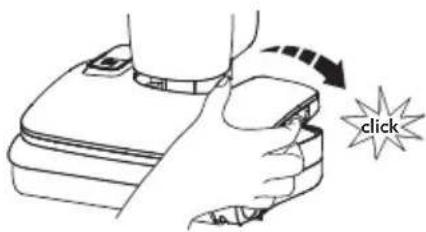
Place the tank back into the appliance. You should hear a click if done correctly.
Troubleshooting
| Problem Possible cause Solution | ||
| The appliance does not turn on | Auto protection for overheating | Cool the appliance down and restart |
| The dirty water in DWT has reached the MAX line | Empty the dirty water and then reinstall the DWT | |
| Weak suction | The dry filter is not installed, or the dry filter is dirty | Install the dry filter or clean and allow it to dry completely |
| Appliance won’t charge | Incompatible adaptor Use the original adaptor | |
| The adaptor is not correctly inserted | Reinsert the adaptor correctly | |
| The indicator turns red | The brush roller is blocked Remove blockages | |
| The dirty water in DWT has reached the MAX line | Empty the dirty water and then reinstall the DWT | |
| The indicator blinks red | Battery low Charge the appliance, or restart | |
| Indicator off in operation | Battery overheats or malfunctions | Cool the appliance down and restart |
Note:
If the above troubleshooting guide fails to provide a solution, please visit our website
www.tineco.com for further support.
Warranty
2-YEAR LIMITED WARRANTY
- Only applies to purchases made from authorized retailers of Tineco.
- Is subject to the adherence of the requirements outlined in this instruction manual, and is subject to further conditions outlined below.
- This warranty is governed by and construed under the laws of the country in which the purchase took place. We provide 2-year warranty or a warranty period as stipulated by applicable local law, whichever is longer.
WHAT IS COVERED?
- Your Tineco appliance has a 2-year warranty against original defects in material and workmanship, when used for private household purposes in accordance with the Tineco Instruction Manual. Motorized accessories and battery bought separately come with a 1-year warranty.
- This warranty provides, at no extra cost to you, all labor and parts necessary to ensure your appliance is in proper operating condition during the warranty period.
- This warranty will only be valid if the appliance is used in the country in which it was sold.
WHAT IS NOT COVERED?
Tineco shall not be liable for costs, damages or repairs incurred as a result of:
- Appliances purchased from an unauthorized dealer.
- Careless operation or handling, misuse, abuse and/or lack of maintenance or use not in accordance with the Tineco Instruction Manual.
- Use of the appliance other than for normal domestic purposes, e.g. for commercial or rental purposes.
- Use of parts not in accordance with the Tineco Instruction Manual.
- Use of parts and accessories other than those produced or recommended by Tineco.
- External factors unrelated to product quality and use, such as weather, modifications, accidents, electrical outages, power surges or acts of God.
• Repairs or alterations carried out by unauthorized parties or agents. - Failing to clear blockage and other hazardous material from the appliance.
- Normal wear and tear, including normal wearing parts, such as clear bin, belt, filter, HEPA, brush bar, and power cord (or where external damage or abuse is diagnosed), carpet or floor damage due to use not in accordance with manufacturer's instructions or failure to turn the brush bar off when necessary.
- Reduction in battery discharge time due to battery age or use.
WARRANTY LIMITATIONS
- Any implied warranties relating to your appliance including but not limited to warranty of merchantability or warranty of fitness for a particular purpose, are limited to the duration of this warranty.
- Warranty coverage applies to the original owner and to the original battery only and is not transferable.
- This limited warranty gives you specific legal rights. You may also have other rights which vary by region.
- Manufacturer's warranties may not apply in all cases, depending on factors such as use of the product, where the product was purchased, or who you purchased the product from.
Please review the warranty carefully, and contact the manufacturer if you have any questions.
WARRANTY SERVICE
Register: We highly recommend that upon purchase, you register your appliance by logging into our official website (www.tineco.com) or scanning the QR code (see right) to enjoy more exclusive benefits. To register, please enter the whole serial number (found on the back of the appliance). Failure to register your product won't diminish your warranty rights.
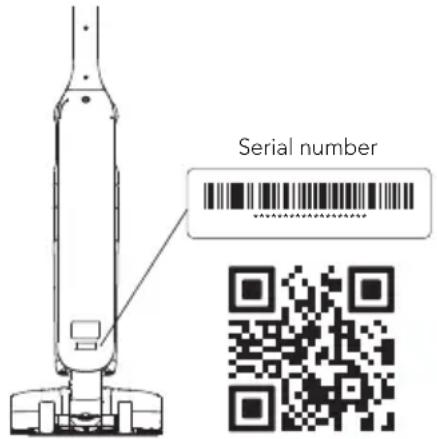
How to Claim: Please retain your proof of purchase. To make a claim under our Limited Warranty, you need to provide your serial number and the original purchase receipt with the purchase date and order number on it.
All work will be carried out by Tineco or its authorized agency.
Any replaced defective parts will become the property of Tineco.
Service under this warranty will not extend the period of this warranty.
Contact our Customer Service
Hotline: 1-855-292-8864
or Visit Tineco website
www.tineco.com
for expert customer service.
CONTENIDO
| --- | Corriente directa |
Especificaciones
natural_image
Line drawing of a vacuum cleaner with a handle and base, showing a click button and downward arrow (no text or symbols)natural_image
Technical line drawing of a vacuum cleaner with a tool and base mount (no text or symbols)Botón de menú

natural_image
Technical line drawing of a vacuum cleaner with a 150-degree angle标注 (no text or symbols on the device itself)natural_image
Line drawing of a vacuum cleaner with handle and base (no text or symbols)natural_image
Illustration of a hand pressing down on a device with an arrow indicating motion (no text or symbols)natural_image
Line drawing of a vacuum cleaner with attached electrical outlet (no text or symbols)natural_image
Line drawing of a hand holding a tool over a cylindrical object (no text or symbols)natural_image
Line drawing of a vacuum cleaner with an inset close-up showing the base and handle (no text or symbols)natural_image
Illustration of a hand holding a device with a scroll wheel, showing a downward arrow and motion indicator (no text or symbols)①
natural_image
Illustration of a hand pouring liquid from a beaker into a container with an upward arrow (no text or symbols)②
natural_image
Illustration of a hand pouring liquid into a container (no text or symbols)③
natural_image
Line drawing of a hand washing a water bottle with a faucet (no text or symbols)④
⑤
natural_image
Simple line drawing of a hand holding a rectangular device with an arrow indicating motion (no text or symbols)①
natural_image
Diagram showing a hand holding a device above a container with an upward arrow, no text or symbols present.②
natural_image
Illustration of a faucet spraying water onto a surface with a sun symbol above (no text or symbols present)③
natural_image
Line drawing of a vacuum cleaner with a circular dial indicator and electrical outlet (no text or symbols)natural_image
Line drawing of a hand holding a device with a curved arrow indicating rotation (no text or symbols)natural_image
Illustration of a cleaning tool with a faucet and sun symbol (no text or labels)natural_image
Illustration of a hand using a tool to press or adjust a mechanical component, with no visible text or symbols.natural_image
Illustration of a hand using a sewing machine to press or adjust a sheet of fabric (no text or symbols visible)natural_image
Technical line drawing of a mechanical component with no visible text or symbolsnatural_image
Line drawing of a vacuum cleaner with a handle and base, showing a click button and downward arrow (no text or symbols)natural_image
Technical line drawing of a vacuum cleaner with handle and base mount (no text or symbols)Bouton du menu

natural_image
Technical line drawing of a vacuum cleaner with a 150-degree angle标注 (no text or symbols on the device itself)natural_image
Line drawing of a vacuum cleaner with handle and base (no text or symbols)natural_image
Illustration of a hand pressing down on a device with a curved arrow indicating motion (no text or symbols)natural_image
Line drawing of a vacuum cleaner with attached electrical outlet (no text or symbols)natural_image
Line drawing of a hand holding a tool near a cylindrical object (no text or symbols)natural_image
Line drawing of a vacuum cleaner with an inset close-up showing the base and handle (no text or symbols)natural_image
Hand holding a rectangular device with a curved arrow indicating motion or force (no text or symbols)①
natural_image
Diagram showing a hand holding a device above a container with an upward arrow, no text or symbols present.②
natural_image
Illustration of a faucet spraying water onto a car, with sun symbolizing sunlight (no text or symbols)③
natural_image
Line drawing of a vacuum cleaner with a circular dial indicator and electrical outlet (no text or symbols)natural_image
Line drawing of a hand holding a device with a curved arrow indicating rotation (no text or symbols)natural_image
Illustration of a hand using a handheld device to press or install a sheet of paper (no text or symbols visible)natural_image
Illustration of a water spray gun with a faucet and sun symbol (no text or labels)natural_image
Technical line drawing of a mechanical component with no visible text or symbolsnatural_image
Illustration of a hand using a tool to cut or mark a mechanical component, with no visible text or symbols.
- Cordless Floor Washer
- CONTENTS
- Important Safety Instructions
- SAVE THESE INSTRUCTIONS Household use only.
- WARNING – To reduce the risk of fire, electric shock, or injury:
- Range of Usage
- About Cleaning Solution
- About the Appliance
- FCC Supplier's Declaration of Conformity
- FCC Radiation Exposure Statement
- Note
- IC Note
- Specifications
- Disposal
- Overview
- Note:
- Accessories
- Deodorizing & Cleaning Solution
- Brush Roller
- Dry Flter
- Cleaning Tool
- Assembly
- Operation
- Preparing for Use
- Menu Button
- Filling Clean Water Tank
- Charging Instructions
- Warning:
- Runtime
- Charging Time
- Indicator
- Maintenance
- Main Body
- Dirty Water Tank
- Dry Filter & Floater
- Brush Roller Self-cleaning
- Troubleshooting
- Warranty
- 2-YEAR LIMITED WARRANTY
- WHAT IS COVERED?
- WHAT IS NOT COVERED?
- WARRANTY LIMITATIONS
- WARRANTY SERVICE
- CONTENIDO
- Especificaciones
- Botón de menú
- Bouton du menu
Brand : TINECO
Model : GO H2O HammerHead
Category : Vacuum Cleaner