
DMW07E1RDB - Microwave DANBY - Free user manual and instructions
Find the device manual for free DMW07E1RDB DANBY in PDF.
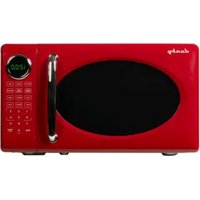


| Product Type | Microwave Oven |
| Brand | Danby |
| Model | DMW07E1RDB |
| Capacity | 0.7 cu ft (approx. 20 L) |
| Output Power | 700 W |
| Power Levels | 10 (100% to 10%) |
| Cooking Modes | Microwave, defrost by weight or time, auto cook (8 menus), reheat, timer, express cook |
| Display Type | LED digital display |
| Turntable | Yes, glass |
| Safety Features | Child lock, door safety lock, two-step door opening |
| Power Supply | 120 V / 60 Hz |
| Power Consumption | Approx. 1050 W |
| Dimensions (W × D × H) | Approx. 45 × 35 × 25 cm |
| Net Weight | Approx. 11 kg |
| Installation Type | Countertop |
| Warranty | 12 months parts and labor (plastic parts: 30 days) |
| Care and Cleaning | Interior: damp cloth and mild detergent; glass turntable and roller ring dishwasher safe |
| Features | 12-hour clock; mica sheet protecting magnetron (do not remove) |
Frequently Asked Questions - DMW07E1RDB DANBY
User questions about DMW07E1RDB DANBY
0 question about this device. Answer the ones you know or ask your own.
Ask a new question about this device
Download the instructions for your Microwave in PDF format for free! Find your manual DMW07E1RDB - DANBY and take your electronic device back in hand. On this page are published all the documents necessary for the use of your device. DMW07E1RDB by DANBY.
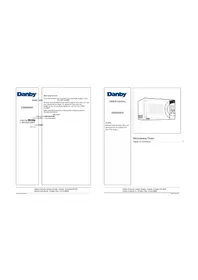
USER MANUAL DMW07E1RDB DANBY
OWNER'S MANUAL MANUEL DU PROPRIÉTAIRE MANUAL DEL PROPIETARIO
MODEL * MODÈLE * MODELO
DMW07E1GDB
DMW07E1RDB
MICROWAVE
Owner's Manual....1 - 25
MICRO ONDE
Danby Products Limited, Guelph, Ontario, Canada N1H 6Z9
Danby Products Inc. Findlay, Ohio, U.S.A. 45840
www.danby.com

Printed in China | Imprimé en Chine | Impreso en China
2025.11.18
Welcome to the Danby family.
We are proud of our quality products and we believe in dependable service. Read this owner's manual before plugging in your new appliance as it contains important operation information to ensure the reliability and longevity of your appliance. You are entitled to the warranty coverage as described in the owner's manual.
- Please write down your appliance information below. You must keep the original proof of purchase receipt to validate and receive warranty services.
- Register your product online and fill out a survey to receive a FREE 2 MONTH WARRANTY EXTENSION. Follow the link: www.danby.com/support/product-registration
Model Number: ____
Serial Number: ____
Date of Purchase: ____
Need Help?
- Read your Owner's Manual for installation, troubleshooting, and maintenance.
- Visit www.Danby.com to access self-service tools, FAQs and more by searching for your model number using the search bar at the top of the page.
- For consumer service, please fill out the web form at: www.danby.com/support. Your submission will go directly to an expert on your appliance. Our average response times are between 20 minutes and 2 hours, during business hours.
- Or call 1-800-263-2629 - hold times can exceed one hour in peak periods.
PARTS & SERVICE DISCLAIMER: Danby does not guarantee availability of all parts indefinitely, service manuals for every model, or availability of service technicians in all areas.
Important Safety Information READ AND FOLLOW ALL SAFETY INSTRUCTIONS
Basic safety precautions should be followed when using electrical appliances, including the following:
WARNING - To reduce the risk of burns, electric shock, fire, injury to persons or exposure to excessive microwave energy:
- Read all instructions before using the microwave.
- Read and follow the specific "PRECAUTIONS TO AVOID POSSIBLE EXPOSURE TO EXCESSIVE MICROWAVE ENERGY" found on page 5.
- This microwave must be grounded. Connect only to a properly grounded outlet. See "GROUNDING INSTRUCTIONS" found on page 6.
- Install or locate this microwave only in accordance with the provided installation instructions.
- Some products such as whole eggs and sealed containers, for example, closed glass jars, are able to explode and should not be heated in this oven.
- Use this microwave only for its intended use as described in this manual. Do not use corrosive chemicals or vapors in this microwave. This type of oven is specifically designed to heat, cook or dry food. It is not designed for industrial or laboratory use.
- HOT CONTENTS CAN CAUSE SEVERE BURNS. DO NOT ALLOW CHILDREN TO USE THE MICROWAVE. Use caution when removing hot items.
SAVE THESE INSTRUCTIONS!
Important Safety Information READ AND FOLLOW ALL SAFETY INSTRUCTIONS
- Do not operate this microwave if it has a damaged cord or plug, it if is not working properly or if it has been damaged or dropped.
- This microwave should be serviced only by qualified service personnel. Contact the nearest authorized service facility for examination, repair, or adjustment.
- Do not cover or block any openings on the microwave.
- Do not store this microwave outdoors. Do not use this microwave near water, for example, near a kitchen sink, in a wet basement, near a swimming pool or similar location.
- Do not immerse the power cord or plug in water.
- Keep the power cord away from heated surfaces.
- Do not let the power cord hang over edge of a table or counter.
- When cleaning the surfaces of the door and oven that make contact when the door is closed, use only mild, nonabrasive soaps, or detergent applied with a sponge or soft cloth.
- To reduce the risk of fire in the oven cavity:
- Do not overcook food. Carefully attend the microwave when paper, plastic, or other combustible materials are placed inside the oven to facilitate cooking.
- Remove wire twist-ties from paper or plastic bags before placing the bag in oven.
- If material inside of the oven ignites, keep the oven door closed, turn the oven off, and disconnect the power cord, or shut off the power at the fuse or circuit breaker panel.
- Do not use the oven for storage purposes. Do not leave paper products, cooking utensils, or food inside the oven when not in use.
- Liquids, such as water, coffee, or tea are able to be overheated beyond the boiling point without appearing to be boiling. When the container is removed from the microwave, visible bubbling or boiling is not always present. THIS COULD RESULT IN VERY HOT LIQUIDS SUDDENLY BOILING OVER WHEN THE CONTAINER IS DISTURBED OR A UTENSIL IS INSERTED INTO THE LIQUID.
- Do not overheat liquids. Stir liquids both before and halfway through heating.
- Do not use straight sided containers with narrow necks.
- After heating, allow the container to stand in the microwave for a short period of time before removing it.
- Use extreme care when inserting a spoon or other utensil into the container.
PRECAUTIONS TO AVOID POSSIBLE EXPOSURE TO EXCESSIVE MICROWAVE ENERGY
(1) Do not attempt to operate this oven with the door open. Open-door operation can result in harmful exposure to microwave energy. It is important not to defeat or tamper with the safety interlocks. (2) Do not place any object between the oven cabinet and the door or allow soil or cleaner residue to accumulate on surfaces that make contact when the door is closed. (3) Do not operate the oven if it is damaged. It is particularly important that the oven door close properly and that there is no damage to the:
(a) door (bent), (b) hinges and latches (broken or loosened), (c) door seals and sealing surfaces.
(4) The oven should not be adjusted or repaired by anyone except properly qualified service personnel.
GROUNDING INSTRUCTIONS
This microwave must be grounded. In the event of an electrical short circuit, grounding reduces the risk of electrical shock by providing an escape wire for the electrical current.
This microwave is equipped with a cord that has a grounding wire with a grounding plug. The power cord must be plugged into an outlet that is properly grounded. If the outlet is a 2 prong wall outlet, it is your responsibility to have it replaced with a properly grounded 3 prong wall outlet. The serial rating plate indicates the voltage and frequency the microwave is designed for.
WARNING - Improper use of the grounding plug can result in a risk of electric shock. Consult a qualified electrician or service agent if the grounding instructions are not completely understood, or if doubt exists as to whether the microwave is properly grounded.
Longer cord sets or extension cords are available and may be used if care is exercised in their use. If it is necessary to use an extension cord, use only a 3 wire extension cord that has a 3 blade grounded plug and a 3 slot receptacle that will accept the plug on the microwave. The marked electrical rating of the extension cord must be at least as great as the electrical rating of the microwave. The longer cord must be arranged so that it will not drape over the counter top or tabletop where it can be pulled by children or tripped over.
DANGER - Electric Shock Hazard: Touching some of the internal components can cause serious personal injury or death. Do not disassemble this microwave.
WARNING - Electric Shock Hazard: Improper use of the grounded plug can result in electric shock. Do not plug the microwave in if the grounded plug is damaged.
A short power supply cord is provided to reduce the risks resulting from becoming entangled in or tripping over a longer cord.
If the power supply cord is damaged, it must be replaced by the manufacturer, its service agent or similar qualified person to avoid hazard.
Have a qualified electrician install a grounded outlet near the microwave if the power cord is too short.
SAFETY - SUPERHEATED LIQUID
Liquids can be overheated beyond their boiling point without appearing to boil due to the surface tension of the liquid. Visible bubbling will not always be present when the liquid is removed from the microwave. This could result in very hot liquids suddenly boiling over when a utensil or other item, such as a tea bag, is inserted into the liquid.
To reduce the risk of injury:
- Do not overheat liquids. Do not heat any liquid for more than 2 minutes per cup. Stir liquids before and halfway through heating.
- Do not use straight-sided containers with narrow necks, as this can cause a build-up of steam.
- Superheated liquid can begin to spontaneously boil when removed from the microwave. After heating, allow the liquid to stand in the microwave for 30 seconds before removing.
- Use extreme care when inserting a utensil or other item into hot liquids.
The contents of milk bottles and baby food jars should be stirred or shaken and the temperature checked before serving to avoid burns.
Do not defrost frozen beverages, especially carbonated beverages, in this microwave as they could explode.
Hot foods and steam can cause burns. Be careful when opening any container that has been heated in the microwave. Direct the opening away from the hands and face to avoid burns.
SAFETY - ARCING
Arcing refers to sparks inside the microwave while it is in operation. Arcing is caused by:
• Metal or foil inside the microwave. - Recycled paper towels being used inside the microwave, as these can contain small pieces of metal.
If arcing is present, stop operation and remove any metal or paper towels from the microwave.
RADIO INTERFERENCE
This microwave generates and uses ISM frequencies and if not installed and used properly in strict accordance with the manufacturer's instructions, it may cause interference to radio and television reception. It has been type-tested and found to comply with limits for ISM Equipment pursuant to Part 18 of the FCC Rules, which are designed to provide reasonable protection against such interference in a residential installation.
However, there is no guarantee that interference will not occur in particular installations. If this microwave does cause interference to radio or television reception, which can be determined by turning the equipment off and on, the interference can be corrected by one or more of the following methods:
- Reorient the receiving antenna of radio or television.
- Move the microwave away from the receiver.
- Plug the microwave into a different outlet so that the microwave and receiver are on different branch circuits.
The manufacturer is not responsible for any radio or TV interference caused by unauthorized modification of this microwave. It is the responsibility of the user to correct such interference.
INSTALLATION INSTRUCTIONS
- Remove all packing materials from the inside and outside of the microwave. Do not remove the cardboard mica sheet covering the magnetron.
- Check the microwave for damage before using, such as a misaligned or bent door, damaged door seals, broken or loose door hinges or latches, or dents inside the cavity or on the door. If there is any damage, do not use the microwave, return it to its point of purchase or contact consumer care.
- The microwave must be placed on a flat, stable surface that is able to hold its weight and the heaviest food likely to be cooked in it.
- Do not use this microwave where heat, moisture or high humidity are generated.
- Do not clean this microwave with or use near combustible materials.
- Allow 7.5 cm (3 inches) of space above the microwave, 2.5 cm (1 inch) at the back of the microwave and 7.5 cm (3 inches) on both sides for proper air flow. Do not block any ventilation openings.
- Do not operate the microwave without the glass tray, roller support and shaft in their correct positions.
- WARNING: Do not install the microwave over a range cooktop or other heat producing appliance. If installed near or above a heat source the microwave could be damaged and the warranty would be void.
OPERATING INSTRUCTIONS
COOKING TECHNIQUES
To achieve the best results, follow the suggestions below.
STIRRING
Stir foods while cooking to distribute heat evenly. Food at the outside of the dish absorbs more energy and will heat more quickly so stir from the outside of the dish toward the center.
ARRANGEMENT
Arrange unevenly shaped foods with thicker, meatier parts toward the outside of the turntable so they receive more heat. To prevent overcooking, place delicate items toward the center of the turntable.
TURNING
Turn food over midway through cooking to expose all parts to the microwave energy. This is important with large items and meat.
STANDING
Foods cooked in a microwave build up internal heat and continue to cook for a few minutes after heating stops. Let foods stand to complete cooking, especially meats and liquids. All liquids should be allowed to stand for a few minutes after cooking and should be shaken or stirred before consuming.
ADDING MOISTURE
Microwave energy is attracted to water molecules. Food that is uneven in moisture content should be covered and allowed to stand after cooking to allow the heat to disperse evenly. Add a small amount of water to dry food to help it cook.
OPERATING INSTRUCTIONS
COOKING UTENSILS GUIDE
Certain utensils are inappropriate for use in a microwave. See below for more information on which utensils are recommended, which should only have limited use and which are not recommended.
RECOMMENDED
Microwave Browning Dish: Used to brown the exterior of small food items. Follow the directions provided with the browning dish.
Microwavable Plastic Wrap: Used to retain steam. Leave a small opening to avoid a build up of steam. Do not place directly on food.
Glass and Ceramic Bowls and Dishes: Use for heating or cooking.
Paper Plates and Cups: Use for short term heating at low temperatures. Do not use recycled paper as they can contain metal and could ignite.
Paper Towels and Napkins:
Use for short term heating and covering. They can absorb excess moisture and prevent splattering. Do not use recycled paper towels as they can contain metal and could ignite.
Wax Paper: Use as a cover to prevent splattering.
Thermometers: Only use those that are labeled "microwave safe" and follow all directions. Check the food in several places. Conventional thermometers can be used once the food has been removed from the microwave.
OPERATING INSTRUCTIONS
LIMITED USE
Ceramic, Porcelain and
Stoneware: Only use if they are labeled "microwave safe".
Plastic: Only use if labeled "microwave safe".
NOT RECOMMENDED
Glass Jars and Bottles: Regular glass is too thin to be used in a microwave. It can shatter and cause damage or injury.
Paper Bags: These are a fire hazard and could ignite. The only exception is popcorn bags, which are designed for microwave use.
Styrofoam Plates and Cups: These can melt and leave an unhealthy residue on food.
Plastic Storage and Food
Containers: These can melt and ignite.
Metal Utensils: These can cause arcing and damage to the microwave. Remove all metal before operation.
Aluminum Foil: Using foil can cause arcing and damage the microwave.
OPERATING INSTRUCTIONS
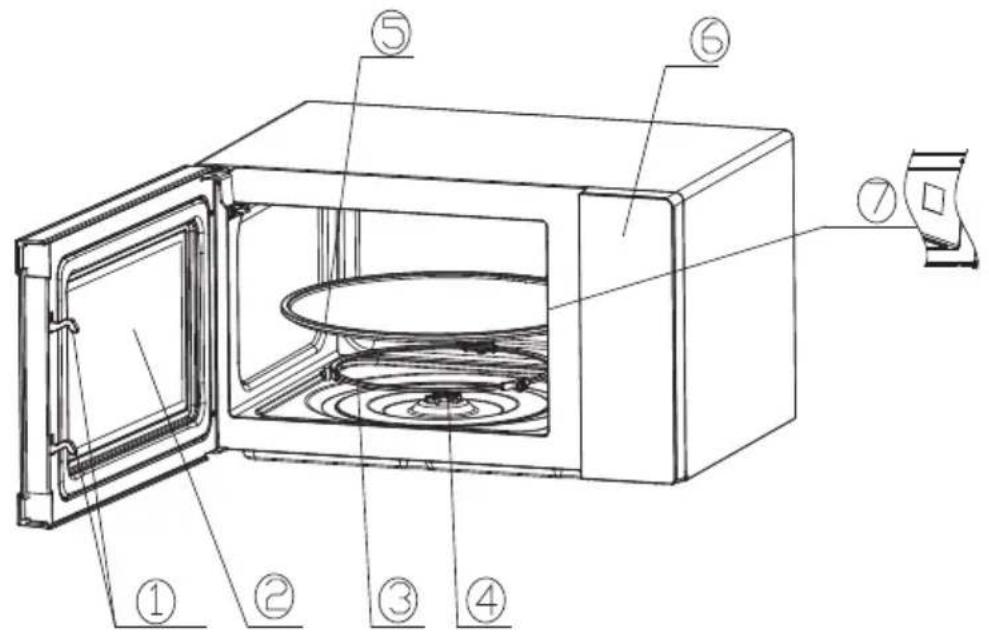
PRODUCT FEATURES
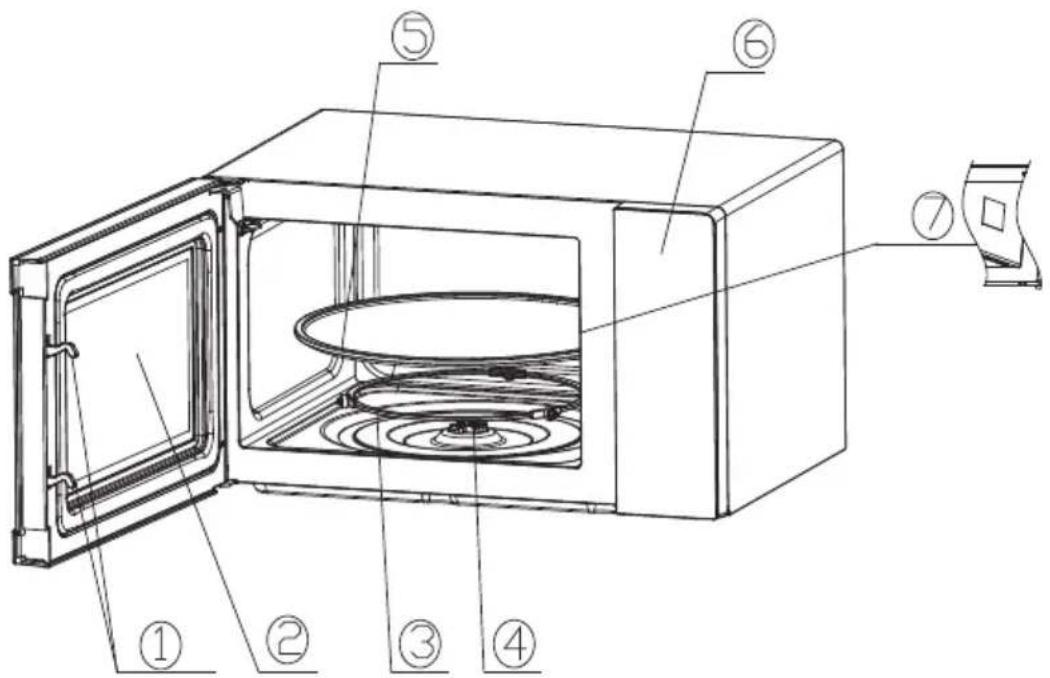
- Door lock: Microwave oven door must be properly closed in order for it to operate
- Viewing Window: Allow user to see the cooking status
- Rotating ring: The glass turntable sits on its wheels; it supports the turntable and helps it to balance when rotating
- Rotating axis: The glass turntable sits on the axis; the motor underneath it drives the turntable to rotate.
- Turntable: The food sits on the turntable; its rotation during operation helps to cook food evenly.
CAUTION
- Place the rotating ring first.
- Fit the turntable onto the rotating axis and make sure that it is geared in properly.
- Control panel: See below for details (the control panel is subject to change without prior notice).
- Waveguide cover: It is inside the microwave oven, next to the wall of the control panel.
WARNING
Never remove the waveguide cover.
OPERATING INSTRUCTIONS
CONTROL PANEL
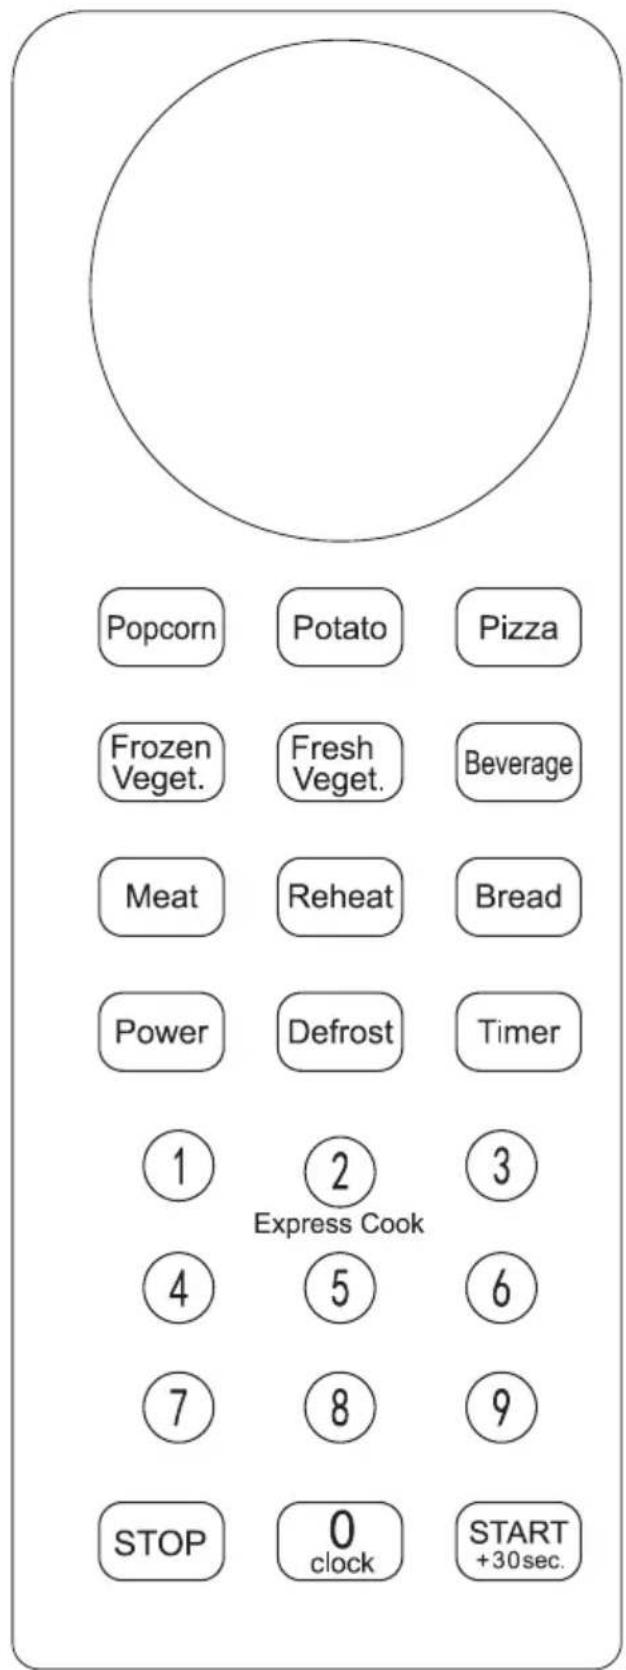
OPERATING INSTRUCTIONS
BEFORE COOKING
The display lights up when plugged into the power supply, then it enters the standby state and shows 1:00.
POWER FUNCTION
There are ten microwave power levels: 100P, 90P, 80P, 70P, 60P, 50P, 40P, 30P, 20P, and 10P. Press the "Power" button repeatedly to select the desired microwave power level. Press number buttons 0-9 to input the cooking time; the maximum time that can be input is 99:99. After entering the cooking time, press the "START/+30s" button to start. A buzzing sound will notify you when the operation is complete.
| HIGH | 100% and 90% power output | (Applicable for quick and thorough cooking) |
| M. High | 80% and 70% power output | (Applicable for medium express cooking) |
| MED | 60% and 50% power output | (Applicable for steaming food) |
| M. Low | 40% and 30% power output | (Applicable for defrosting food) |
| LOW | 20% and 10% power output | (Applicable for keeping warm) |
CAUTION
- The maximum time that can be set is 99 minutes and 99 seconds.
- Never use the grill rack during microwave cooking.
- Never operate the oven empty.
- At maximum microwave power, the oven will automatically lower the power after a certain cooking time to extend its service life.
- If you turn the food during operation, press the Start/+30s button once and the preset cooking procedure will continue.
- If you intend to remove the food before the preset time, you must press the Stop button once to clear the preset procedure to avoid unintended operation next time.
OPERATING INSTRUCTIONS
DEFROST
There are two defrost modes: dEF1 and dEF2. dEF1 is for defrosting by weight, and dEF2 is for defrosting by time. Press the "Defrost" button to select defrost by weight or by time; the display will show "dEF1" or "dEF2" accordingly. Press number buttons 0-9 to input the food weight or defrosting time. The weight range for dEF1 is from 4 to 50 oz, and the maximum time for dEF2 is 99:99. After entering, press the "START/+30s" button to start. A buzzing sound will notify you when the operation is complete. In dEF1 mode (by weight), the oven will beep to prompt you to turn the food during defrosting.
Below is some food defrosting time advice:
| dEF1 For defrosting, the weight range from 4 to 50oz |
| dEF2 For defrosting, the maximum time is 99:99 |
CAUTION
- It is necessary to turn over the food during operation to obtain uniform effect. Usually defrosting will need longer time than that of cooking the food.
- If the food can be cut by knife, the defrosting process can be considered completed.
- Microwave penetrates around 4cm into most food.
- Defrosted food should be consumed as soon as possible, it is not advised to put back in fridge or freeze again.
OPERATING INSTRUCTIONS
AUTO COOKING
There are eight automatic menus: popcorn, potato, pizza, frozen vegetable, fresh vegetable, beverage, meat and bread respectively. Select the desired auto menu button and press the corresponding menu button which to be selected continuously to select the desired food weight, and the display shows the corresponding weight. After selecting the cooking weight, press "START/+30s" button to start work. A buzzing sound will notify completion of the operation.
CAUTION
- The temperature of food before cooking would be 20-25°C. Higher or lower temperature of the food before cooking would require increase or decrease of cooking time.
- The temperature, weight and shape of food will largely influence the cooking effect. If any deviation has been found to the factor noted on above menu, you can adjust the cooking time for best result.
| Display | KindMethod | |
| A.1 Popcorn | Optional | weights: 3.0oz and 3.5oz |
| A.2 Potato | Optional | weights: 9.0oz, 18.0oz and 27.0oz |
| A.3 Pizza | Optional | weights: 7.0oz and 14.0oz |
| A.4 Frozen vegetables | Optional weights: 7.0oz, 14.0oz and 21.0oz. | |
| A.5 Fresh vegetables | Optional weights: 7.0oz, 14.0oz and 21.0oz. | |
| A.6 Beverage | Optional | weights: 1 cup, 2 cups or 3 cups, each one about 250ml. |
| A.7 Meat | Optional | weights:7.0oz, 14.0oz and 21.0oz. |
| A.8 Bread | Optional | weights: 3.5oz, 7.0oz, 10.5oz, 14.0oz and 17.5oz. |
OPERATING INSTRUCTIONS
TIMER
In standby mode, press this button to enter the setting interface, and the countdown function icon and "0:00" will be displayed on the display screen. Press the 0 \~ 9 number buttons to input the time. The maximum time that can be input is 99:99. After setting the time, press the "START/+30s" button to begin the countdown. A buzzing sound will notify completion of the countdown.
REHEAT
Reheat function is mainly to facilitate users to heat food according to the weight of food. Press "Reheat" button continuously, select the appropriate weight of food. The weight range that can be selected are 7.0oz, 14.0oz, 21.0oz, 28.0oz and 35.0oz. After selecting the weight, press "START/+30s" button to start work. A buzzing sound will notify completion of the operation.
EXPRESS COOK
- In standby mode, you can directly press the 1~6 number buttons to start the microwave oven. The working time is 1~6 minutes, that is, press 1 to work for 1 minute, press 2 to work for 2 minutes, and so on. After selecting the time, press the "START/+30s" button to start work, and a buzzing sound will notify completion of the operation.
- In standby mode, after putting food in and closing the door, press the "START/+30s" button to start the microwave quickly. The default working time is 30 seconds. During operation, press the "START/+30s" button once to add 30 seconds. A buzzing sound will notify completion of the operation.
OPERATING INSTRUCTIONS
0/CLOCK
The clock function and "0" button are combined in one button.
The clock is 12-hour system. The operation of the clock function is as follows:
In standby mode, press and hold down the "0/Clock" button for more than 3 seconds to enter the clock setting interface. Press the 0~9 number buttons to input the clock time directly, and the input must be between 1:00~12:59 to be valid. Press the "START/+30s" button to confirm the set time and exit the clock setting mode.
STOP
During cooking settings, you can press the "STOP" button to cancel the settings and return to standby state. During microwave oven operation, you can press the "STOP" button to pause. In the paused state, you can press the "STOP" button again to cancel the function and return to standby state.
START/+30s
After setting the cooking time or food weight, press the "START/+30s" button to start the microwave oven immediately. In working state, you can press the "START/+30s" button to increase time; press once to add 30 seconds, but the menu mode and weight defrosting mode cannot adjust time. In paused state, you can press the "START/+30s" button to continue the microwave oven in the previous cooking mode.
CHILD LOCK FUNCTION
Use this feature to lock the control panel when you are cleaning or so that children cannot use the oven unsupervised. All the buttons are rendered inoperable in this mode.
- Set lock: Press and hold down the STOP button for 3 seconds.
- Cancel lock: Press and hold down the STOP button for 3 seconds.
OPERATING INSTRUCTIONS
SAFETY LOCK
The Safety Lock is a system that safeguards against unintended activation of the microwave, providing a protective measure to ensure child safety.
Initiating a cooking process triggers the door lock, and it also engages if the door remains unlocked for an additional 30 minutes following the completion of cooking.
The Safety Lock is active by default. It will only be deactivated if the user chooses to do so manually. Even in the event of loss of power, the oven will preserve the state of the safety lock, whether it is activated or deactivated.
TWO-STEP DOOR OPENING FUNCTION
To open the door while two-step door function is active:
- During operation, or after the operation is completed, press the STOP button to pause or return the microwave oven to standby mode
- Open the microwave oven door
When the microwave oven is not in operation, or after 30 minutes of work, the door can be opened directly.
To turn the two-step door opening function ON or OFF:
- While the microwave oven is in standby mode, press and hold the STOP + START + POWER buttons
- The display will show "1" for ON or "0" for OFF
CARE & MAINTENANCE
CLEANING
Turn off and unplug the microwave before performing any cleaning.
The inside of the microwave should be cleaned with a warm, damp cloth and mild detergents. Do not allow food splatters to build up on the inside of the microwave as this can affect the efficiency and if sufficiently dirty, can ignite and cause fire.
The outside of the microwave should be cleaned with a warm, damp cloth. To avoid damage to internal components, do not allow any water to drip into the ventilation openings.
Clean the door and window on both sides, the door seals and the adjacent parts frequently with a damp cloth to remove any spills or splatters. Do not use abrasive cleaners.
Do not allow the control panel to become wet. If necessary, clean the control panel with a damp cloth and then wipe dry.
The glass tray can be removed and cleaned in warm water and mild detergent or can be placed in a dishwasher.
The roller ring and oven floor should be cleaned regularly to avoid excessive noise or spilling. The roller ring can be cleaned in warm water and mild detergent or can be placed in a dishwasher. Ensure that the roller ring and glass tray are replaced in the proper position to avoid noise or spilling.
CARE & MAINTENANCE
MAINTENANCE
To remove odors from the microwave:
- Combine a cup of water with the juice and skin of one lemon in a microwavable bowl.
- Microwave on full power for 5 minutes.
- Wipe the inside of the microwave and glass tray and roller ring thoroughly with a warm, damp cloth.
DISPOSAL
This microwave should not be treated as ordinary household waste; it should be transported to the appropriate collection point for the recycling of electrical components. For information on local waste collection points, contact your local waste disposal agency or government office.
MICA SHEET
Inside the microwave there is a cardboard mica sheet protecting the magnetron. Do not remove this sheet. Exposing the magnetron to food splatters can cause arcing or fire. If it becomes dirty, the mica sheet can be cleaned with a warm cloth.
TROUBLESHOOTING
| PROBLEM POSSIBLE CAUSE | |
| No power • A fuse may be blown or the circuit breaker trippedPlug not fully inserted into the wall outletMicrowave door may not be closed properly | |
| Arcing or sparking during operation | Metallic items were left in the microwave during operationThe microwave is being operated while emptySpilled food has built up inside the microwave or on the mica sheet |
| Unevenly cooked food | Food was not completely defrosted before cookingCooking time or power level were insufficientFood was not turned or stirred during cooking |
| Overcooked food • The power level or cooking time were too high | |
| Undercooked food • Food was not completely defrosted before cookingCooking time or power level were insufficientFood was not turned or stirred during cookingVentilation openings are blocked | |
| Poor Defrosting • Defrosting time or power level were insufficientFood was not turned or stirred during defrosting | |
Limited "Carry-In" Warranty
This quality product is warranted to be free from manufacturer's defects in material and workmanship, provided that the unit is used under the normal operating conditions intended by the manufacturer. This warranty is available only to the person to whom the unit was originally sold by Danby Products Limited (Canada) or Danby Products Inc. (U.S.A.) (hereafter "Danby") or by an authorized distributor of Danby, and is non-transferable.
Terms of Warranty
Plastic parts are warranted for thirty (30) days from the date of purchase, with no extensions provided.
First 12 months
During the first twelve (12) months, any functional parts of this product found to be defective will be repaired or replaced, at warrantor's option, at no charge to the original purchaser.
To obtain service
Contact the dealer where the unit was purchased, or contact the nearest authorized Danby service depot, where service must be performed by a qualified service technician. If service is performed on the unit by anyone other than an authorized service depot, all obligations of Danby under this warranty shall be void.
It is the responsibility of the purchaser to transport the appliance to the nearest authorized service depot. Transportation charges to and from the service location are not protected by this warranty and are the responsibility of the purchaser.
Nothing within this warranty shall imply that Danby will be responsible or liable for any spoilage or damage to food or other contents of this appliance, whether due to any defect of the appliance, or its use, whether proper or improper.
Exclusions
Except as provided herein by Danby, there are no other warranties, conditions, representations or guarantees, express or implied, made or intended by Danby or its authorized distributors, and all other warranties, conditions, representations or guarantees, including any warranties, conditions, representations or guarantees under any Sale of Goods Act or like legislation or statute, are hereby expressly excluded. Except as provided herein, Danby shall not be responsible for any damages to persons or property, including the unit itself, howsoever caused, or any consequential damages arising from the malfunction of the unit. By purchasing the unit, the purchaser agrees to indemnify and hold harmless Danby from any claim for damages to persons or property caused by the unit.
General Provisions
No warranty or insurance herein contained or set out shall apply when damage or repair is caused by any of the following:
- Power failure.
- Damage in transit or when moving the appliance.
- Improper power supply such as low voltage, defective house wiring or inadequate fuses.
- Accident, alteration, abuse or misuse of the appliance such as inadequate air circulation in the room or abnormal operating conditions (i.e., extremely high or low room temperature).
- Use for commercial or industrial purposes (i.e., if the appliance is not installed in a domestic residence).
- Fire, water damage, theft, war, riot, hostility, acts of God such as hurricanes, floods, etc.
- Service calls resulting in customer education.
- Improper installation (i.e., building-in of a free standing appliance or using an appliance outdoors that is not approved for outdoor application, including but not limited to: garages, patios, porches or anywhere that is not properly insulated or climate controlled).
Proof of purchase date will be required for warranty claims; retain bills of sale. In the event that warranty service is required, present the proof of purchase to our authorized service depot.
SAVE THESE INSTRUCTIONS!
PRODUCT FEATURES
PROBLEM POSSIBLE CAUSE


- OWNER'S MANUAL MANUEL DU PROPRIÉTAIRE MANUAL DEL PROPIETARIO
- WELCOME TO THE DANBY FAMILY
- NEED HELP
- IMPORTANT SAFETY INFORMATION READ AND FOLLOW ALL SAFETY INSTRUCTIONS
- SAVE THESE INSTRUCTIONS
- PRECAUTIONS TO AVOID POSSIBLE EXPOSURE TO EXCESSIVE MICROWAVE ENERGY
- GROUNDING INSTRUCTIONS
- SAFETY - SUPERHEATED LIQUID
- SAFETY - ARCING
- RADIO INTERFERENCE
- INSTALLATION INSTRUCTIONS
- OPERATING INSTRUCTIONS
- COOKING TECHNIQUES
- STIRRING
- ARRANGEMENT
- TURNING
- STANDING
- ADDING MOISTURE
- COOKING UTENSILS GUIDE
- RECOMMENDED
- PAPER TOWELS AND NAPKINS
- LIMITED USE
- CERAMIC, PORCELAIN AND
- NOT RECOMMENDED
- PLASTIC STORAGE AND FOOD
- PRODUCT FEATURES
- CAUTION
- WARNING
- CONTROL PANEL
- BEFORE COOKING
- POWER FUNCTION
- DEFROST
- AUTO COOKING
- TIMER
- REHEAT
- EXPRESS COOK
- CLOCK
- STOP
- START/+30S
- CHILD LOCK FUNCTION
- SAFETY LOCK
- TWO-STEP DOOR OPENING FUNCTION
- CARE & MAINTENANCE
- CLEANING
- MAINTENANCE
- DISPOSAL
- MICA SHEET
- TROUBLESHOOTING
- LIMITED "CARRY-IN" WARRANTY
- TERMS OF WARRANTY
- FIRST 12 MONTHS
- TO OBTAIN SERVICE
- EXCLUSIONS
- GENERAL PROVISIONS
Brand : DANBY
Model : DMW07E1RDB
Category : Microwave