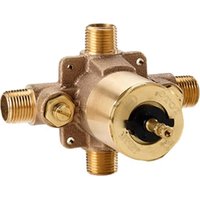
TSPTM - Sanitary faucets TOTO - Free user manual and instructions
Find the device manual for free TSPTM TOTO in PDF.


| Product Type | Plumbing fixture - Pressure balancing valve |
| Brand | TOTO |
| Model | TSPTM |
| Usage | Shower and tub faucet |
| Operating pressure | 20 to 80 psi (0.14-0.55 MPa) |
| Max hot water temperature | 60 °C (140 °F) |
| Max set temperature | 49 °C (120 °F) after adjustment |
| Connection | 12 mm (1/2 in) copper tube with 90° elbow |
| Shower head mounting height | ≥ 1016 mm (40 in) above center of valve |
| Tub spout mounting height | 305 mm ± 25 mm below center of valve |
| Connection center distance | 43-68 mm from finished wall |
| Material | Chrome-plated brass |
| Functions | Pressure balancing, maximum temperature adjustment |
| Safety | Adjustable anti-scald temperature stop |
| Care and cleaning | Clean with a soft cloth, avoid abrasive products |
| Replacement parts | Major repair kit, minor repair kit, shut-off valve kit |
| Warranty | Lifetime for residential use (North, Central, South America) |
| Installation | Flush lines before, do not overheat during soldering |
| Note | Min. 20 psi dynamic, max. 80 psi static pressure |
Frequently Asked Questions - TSPTM TOTO
User questions about TSPTM TOTO
0 question about this device. Answer the ones you know or ask your own.
Ask a new question about this device
Download the instructions for your Sanitary faucets in PDF format for free! Find your manual TSPTM - TOTO and take your electronic device back in hand. On this page are published all the documents necessary for the use of your device. TSPTM by TOTO.
USER MANUAL TSPTM TOTO
Installation and Owner's Manual
1/2 " Pressure Balance Valve
natural_image
Technical line drawing of a mechanical assembly with concentric rings and mounting ports (no text or symbols)TSPTM
For Tub Spout installation see instructions on page 3.
Warranty Registration and Inquiry
For product warranty registration, TOTO U.S.A. Inc. recommends online warranty registration. Please visit our web site http://www.totousa.com. If you have questions regarding warranty policy or coverage, please contact TOTO U.S.A. Inc., Customer Service Department, 1155 Southern Road, Morrow, GA 30260 (888) 295-8134 or (678) 466-1300 when calling from outside of U.S.A.
TABLE OF CONTENTS
Thanks for Choosing TOTO! 2
Before Installation....2
Warnings....2
Installation Procedure....3-4
Maximum Temperature Adjustment 5
Cartridge Replacement....6
Warranty....7
Rough-In Dimensions 20-21
Spare Parts....22
THANKS FOR CHOOSING TOTO!
The mission of TOTO is to provide the world with healthy, hygienic and more comfortable lifestyles. We design every product with the balance of form and function as a guiding principle. Congratulations on your choice.
BEFORE INSTALLATION
■ Observe all local plumbing codes.
■ Flush all water lines prior to installation.
■ Make sure the water supply is shut off.
- Read these instructions carefully to ensure proper installation.
■ TOTO reserves the right to update product design without notice.
WARNINGS
For safe operation, please observe the following:
■ Use only 1/2" or greater copper tube and one 90° elbow for connection from valve to tub spout.
■ Tub spout shall be installed 12"± 1" below valve center.
■ The showerhead must be installed 40" or more above valve center.
■ Do not install a shut-off device after the valve.
■ RISK OF SCALDING: This valve must have the maximum temperature adjusted after installation (see page 5).
■ Recommended operating pressure:
■ Minimum pressure......20 psi (0.14 MPa)
■ Maximum pressure......80 psi (0.14 MPa)
If you are soldering during installation, do not apply excessive heat to the valve body. Excessive heat may damage internal components.
■ Hot water supply temperature should not exceed 120^ F ( 49^ C).
■ Do not use this valve at an ambient temperature below 32^ F ( 0^ C).
■ Insulate the hot water supply pipe to minimize heat loss.
■ Do not use steam for the hot water supply.
■ Do not disassemble the valve cartridge.
INSTALLATION PROCEDURE
CAUTION: RISK OF PERSONAL INJURY.
When this valve is installed, it must be adjusted to minimize the risk of scalding. The maximum water temperature should never exceed 120^ F ( 49^ C).
If Soldering: Excessive heat when soldering can cause damage to internal valve components. Use caution not to heat the valve more than necessary to form a good joint. Removal of the valve cartridge and service stops is not necessary if excessive heat is avoided. Remove plaster guard if necessary.
- Shut off the main hot and cold water supply.
- Install the valve so that the port centers are positioned between 1-11/16" and 2-11/16" [43-68 mm] from the finished wall surface.
- Connect the hot and cold supply lines to the proper ports, marked "H" and "C". For installation with reversed inlets, refer to page 4.
- Secure the valve to wall framing or blocking using the two unthreaded mounting ears.
For shower with tub installation:
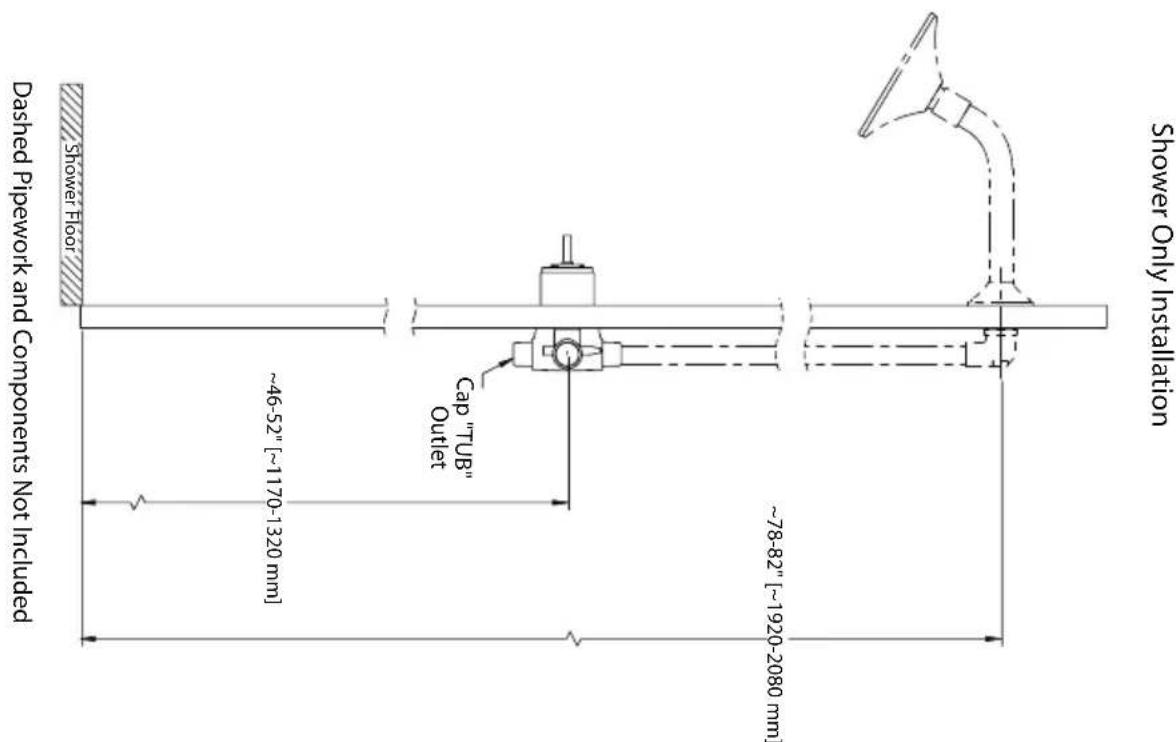
• See recommended installation dimensions on page 20.
- Plumb the valve's bottom port (labeled "TUB") to the tub spout. To ensure correct operation, the tub spout must be connected to the valve using 1/2" or greater copper tube (12" ± 1" length) and a single 90° elbow. Do not use PEX or similar materials.
- Plumb the valve's top port to the showerhead. The showerhead must be installed 40" or more above valve center.
For shower only installations:
• See recommended installation dimensions on page 20.
- Cap the valve's bottom port (labeled "TUB"). 1/2" NPT cap not included.
- Plumb the valve's top port to the showerhead.
-
Follow maximum temperature adjustment procedure (page 5).
-
Replace the plaster guard (if removed during installation) on the valve until finished wall is complete.
INSTALLATION PROCEDURE
Installation with Reversed Inlets
For back-to-back valve applications, the inlets to one of the valves may be reversed for ease of installation. The following procedure must be followed to ensure correct operation of valves installed with reversed inlets.
- Do not install the valve receiving reversed inlets upside down. The port labeled "TUB" must face downward for the valve to function properly.
- On the valve receiving reversed inlets, connect the cold water supply to the hot port (marked "H"), and the hot water supply to the cold port (marked "C")
- Use a flat bladed screwdriver to shut off the hot and cold water supply at the service stops on the valve with reversed inlets.
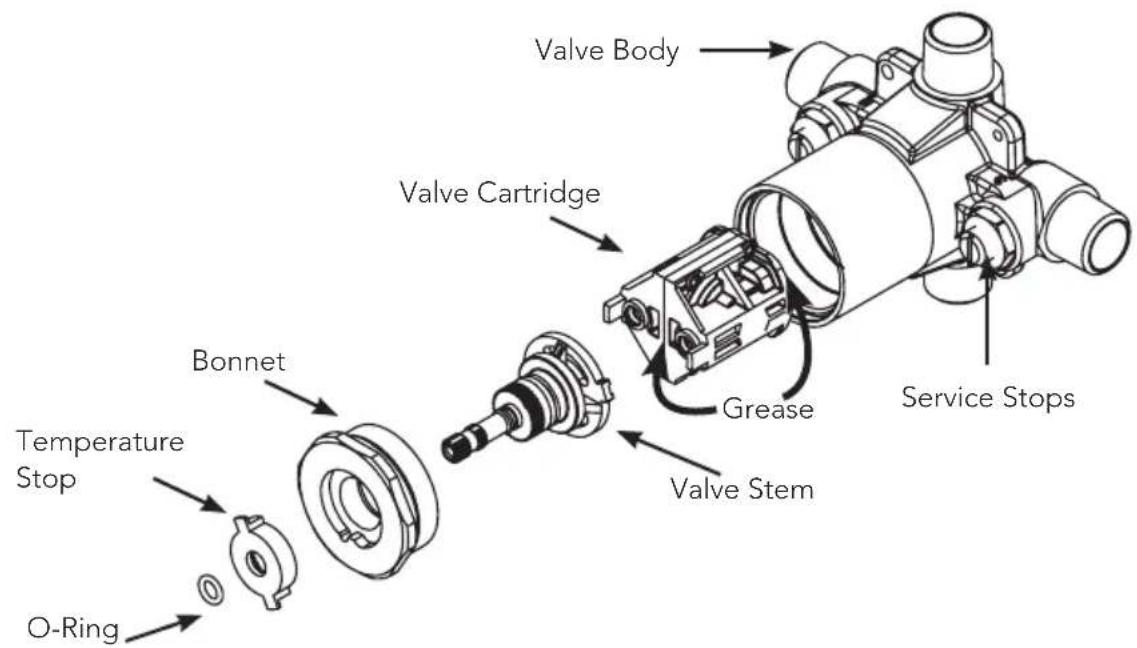
- Remove the o-ring, temperature stop and bonnet, as shown below.
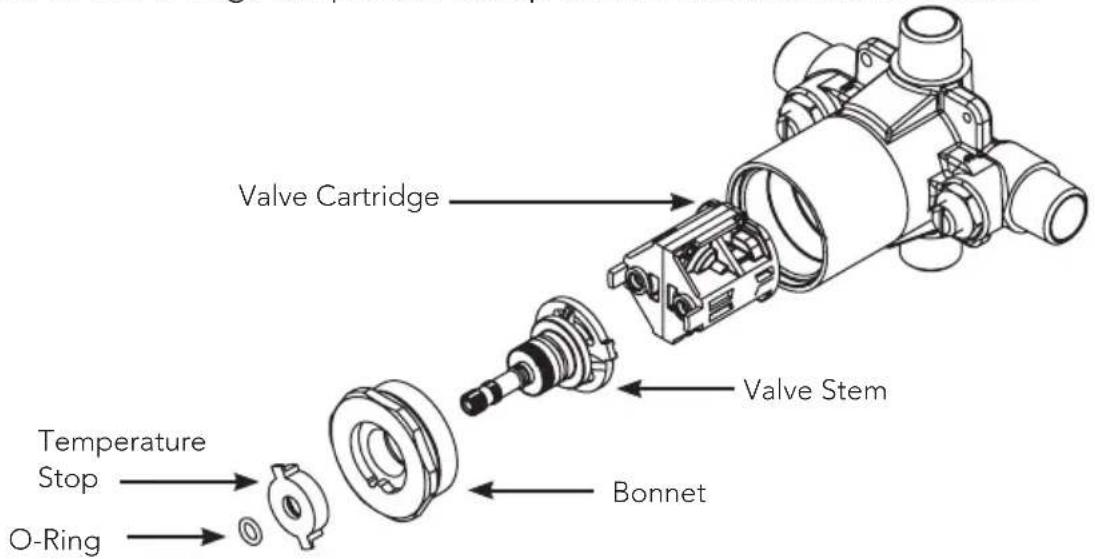
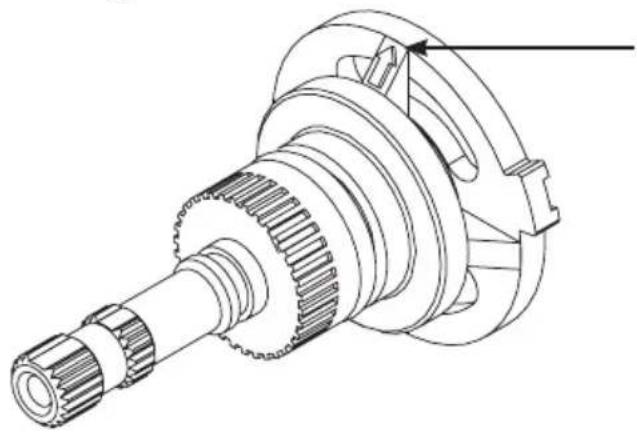
- Remove the valve stem, rotate it 180^ so that the arrow faces DOWN, and replace. See figure below.
natural_image
Technical line drawing of a mechanical gear assembly (no text or symbols)ARROW:
- Faces up for standard installation
-
Faces down for reversed inlet installation
-
Reinstall the bonnet and restore hot and cold water supply by opening the service stops.
- Relabel the ports on the valve to prevent confusion during future service.
- Follow maximum temperature adjustment procedure (page 5).
MAXIMUM TEMPERATURE ADJUSTMENT
CAUTION: The maximum temperature setting must be adjusted in the following situations:
• After initial installation of the valve.
• After servicing or replacing the valve cartridge.
• After any adjustments, replacements, or repairs to equipment supplying hot water to the valve.
- Seasonally to compensate for temperature variation in the water supply.
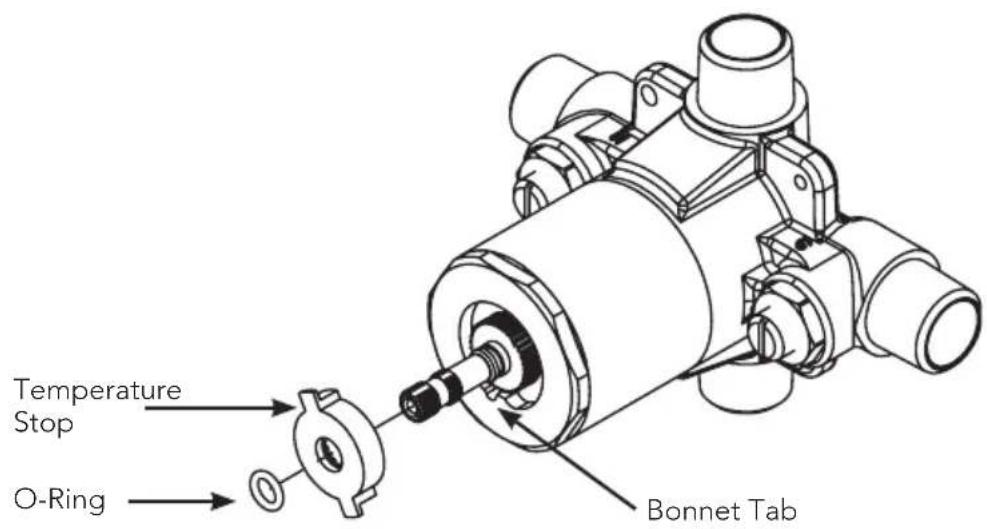
- Remove the o-ring.
- Remove the temperature stop.
- Monitor water temperature with thermometer and rotate valve stem counterclockwise until desired water temperature is reached. Do not set the water temperature above 120^ F ( 49^ C).
- Reinstall the temperature stop so that is touching the bonnet tab, preventing further counterclockwise rotation of the valve stem.
- Reinstall the o-ring to secure the temperature stop.
CARTRIDGE REPLACEMENT
- Use a flat bladed screwdriver to shut off the hot and cold water supply at the service stops.
- Remove the o-ring and temperature stop.
- Unscrew the bonnet and remove valve stem.
- Use needle nose pliers to remove valve cartridge.
- Apply silicone grease to new cartridge where indicated and install into valve body.
- Replace valve stem with arrow pointing UP (for reversed inlet installations, arrow should point DOWN), and reinstall bonnet.
- Restore hot and cold water supply by opening service stops.
- Follow maximum temperature adjustment procedure on Page 5.
WARRANTY
- TOTO ^® warrants its residential faucets and bathroom accessories ("Product") to be free from defects in materials and workmanship during normal use when properly installed and serviced, for the lifetime of the Product from date of purchase. This limited warranty is extended only to the ORIGINAL PURCHASER of the Product and is not transferable to any third party, including but not limited to any subsequent purchaser or owner of the Product. This warranty applies only to TOTO Product purchased and installed in North, Central and South America.
- TOTO's obligations under this warranty are limited to repair, replacement or other appropriate adjustment, at TOTO's option, of the Product or parts found to be defective in normal use, provided that such Product was properly installed, used and serviced in accordance with instructions. TOTO reserves the right to make such inspections as may be necessary in order to determine the cause of the defect. TOTO will not charge for labor or parts in connection with warranty repairs or replacements. TOTO is not responsible for the cost of removal, return and/or reinstallation of the Product.
- This warranty does not apply to the following items:
a. Damage or loss sustained in a natural calamity such as fire, earthquake, flood, thunder, electrical storm, etc.
b. Damage or loss resulting from any accident, unreasonable use, misuse, abuse, negligence, or improper care, cleaning, or maintenance of the Product.
c. Damage or loss resulting from sediments or foreign matter contained in a water system.
d. Damage or loss resulting from improper installation or from installation of the Product in a harsh and/or hazardous environment, or improper removal, repair or modification of the Product.
e. Damage or loss resulting from electrical surges or lightning strikes or other acts which are not the fault of TOTO or which the Product is not specified to tolerate.
f. Damage or loss resulting from normal and customary wear and tear, such as gloss reduction, scratching or fading over time due to use, cleaning practices or water or atmospheric conditions, including but not limited to, the use of bleach, alkali, acid cleaners, dry (powder) cleaners or any other abrasive cleaners or the use of metal or nylon scrubbers.
- In order for this limited warranty to be valid, proof of purchase is required. TOTO encourages warranty registration upon purchase to create a record of Product ownership at http://www.totousa.com. Product registration is completely voluntary and failure to register will not diminish your limited warranty rights.
- If the Product is used commercially or is installed outside of North, Central or South America, TOTO warrants the Product to be free from defects in materials and workmanship during normal use for one (1) year from the date of installation of the Product, and all other terms of this warranty shall be applicable except the duration of the warranty.
- THIS WARRANTY GIVES YOU SPECIFIC LEGAL RIGHTS. YOU MAY HAVE OTHER RIGHTS WHICH VARY FROM STATE TO STATE, PROVINCE TO PROVINCE OR COUNTRY TO COUNTRY.
- To obtain warranty repair service under this warranty, you must take the Product or deliver it prepaid to a TOTO service facility together with proof of purchase (original sales receipt) and a letter stating the problem, or contact a TOTO distributor or products service contractor, or write directly to TOTO U.S.A., INC., 1155 Southern Road, Morrow, GA 30260, or call (888) 295 8134 or (678) 466-1300, if outside the U.S.A. If, because of the size of the Product or nature of the defect, the Product cannot be returned to TOTO, receipt by TOTO of written notice of the defect together with proof of purchase (original sales receipt) shall constitute delivery. In such case, TOTO may choose to repair the Product at the purchaser's location or pay to transport the Product to a service facility.
THIS WRITTEN WARRANTY IS THE ONLY WARRANTY MADE BY TOTO. REPAIR, REPLACEMENT OR OTHER APPROPRIATE ADJUSTMENT AS PROVIDED UNDER THIS WARRANTY SHALL BE THE EXCLUSIVE REMEDY AVAILABLE TO THE ORIGINAL PURCHASER. TOTO SHALL NOT BE RESPONSIBLE FOR LOSS OF THE PRODUCT OR FOR OTHER INCIDENTAL, SPECIAL OR CONSEQUENTIAL DAMAGES OR EXPENSES INCURRED BY THE ORIGINAL PURCHASER, OR FOR LABOR OR OTHER COSTS DUE TO INSTALLATION OR REMOVAL, OR COSTS OF REPAIRS BY OTHERS, OR FOR ANY OTHER EXPENSE NOT SPECIFICALLY STATED ABOVE. IN NO EVENT WILL TOTO'S RESPONSIBILITY EXCEED THE PURCHASE PRICE OF THE PRODUCT. EXCEPT TO THE EXTENT PROHIBITED BY APPLICABLE LAW, ANY IMPLIED WARRANTIES, INCLUDING THAT OF MERCHANTABILITY OR FITNESS FOR USE OR FOR A PARTICULAR PURPOSE, ARE EXPRESSLY DISCLAIMED. SOME STATES DO NOT ALLOW LIMITATIONS ON HOW LONG AN IMPLIED WARRANTY LASTS, OR THE EXCLUSION OR LIMITATION OF INCIDENTAL OR CONSEQUENTIAL DAMAGES, SO THE ABOVE LIMITATION AND EXCLUSION MAY NOT APPLY TO YOU.
natural_image
Technical line drawing of a mechanical gear assembly (no text or symbols)FLÈCHE:
REPLACEMENT DE LA CARTOUCHE
ROUGH-IN DIMENSIONS / DIMENSIONES PRELIMINARES / DIMENSIONS BRUTES
![Shower Outlet Hot Inlet 3-3/4" [95mm] TOTO. TSPTM Cold Inlet Tub Outlet plug (not included) if unused 5-1/16" [129mm]](/content/2026/04/742465/images/387d65d363521014c22ff69219c73688f7fd8a99bed0f12208b486d4b6ead96f.jpg)
![Min: 1-11/16" [43mm] Max: 2-11/16 [68mm] 4-11/16" [119mm] Finished Wall Surface QL](/content/2026/04/742465/images/c0bab4ed46bb534f9f427862ad8693d1d3b3485da510fb3b961c1b64a2326f78.jpg)
SPARE PARTS / PIEZAS DE REPUESTO / PIÈCES DE RECHANGE

scatter
| Point | X | Y | |---|---|---| | 1 | 0.0000 | 0.0000 | | 2 | 0.0000 | 0.0000 | | 3 | 0.0000 | 4.0000 | | 4 | 0.0000 | 0.0000 | | 5 | 0.0000 | 0.0000 | | 6 | 0.0000 | 0.0000 | | 7 | 0.0000 | 8.0000 | | 8 | 0.0000 | 8.0000 | | 9 | 0.0000 | 9.0000 |TOTO® U.S.A., Inc. 1155 Southern Road, Morrow, Georgia 30260
Tel: 888-295-8134 Fax: 800-699-4889
www.totousa.com
0GU4200
Rev C


- TABLE OF CONTENTS
- THANKS FOR CHOOSING TOTO!
- BEFORE INSTALLATION
- WARNINGS
- INSTALLATION PROCEDURE
- CAUTION: RISK OF PERSONAL INJURY.
- For shower with tub installation:
- For shower only installations:
- Installation with Reversed Inlets
- ARROW:
- MAXIMUM TEMPERATURE ADJUSTMENT
- CAUTION: The maximum temperature setting must be adjusted in the following situations:
- CARTRIDGE REPLACEMENT
- WARRANTY
- FLÈCHE:
- REPLACEMENT DE LA CARTOUCHE
- SPARE PARTS / PIEZAS DE REPUESTO / PIÈCES DE RECHANGE
Brand : TOTO
Model : TSPTM
Category : Sanitary faucets