
GDS50 - Pressure washer SCHEPPACH - Free user manual and instructions
Find the device manual for free GDS50 SCHEPPACH in PDF.

| Product type | Manual pressure sprayer |
| Brand | Scheppach |
| Model | GDS50 |
| Tank capacity | 5 L (total volume 5.71 L) |
| Maximum working pressure | 2.5 bar |
| Flow rate | 0.9 L/min |
| Spray hose length | 650 mm |
| Tank dimensions (diameter x height) | 180 x 460 mm |
| Empty weight | 1.3 kg |
| Weight with fill (max) | 6.28 kg |
| Nozzle type supplied | Round jet nozzle and flat jet nozzle |
| Tank material | Impact-resistant plastic |
| Power supply | Manual (hand pump) |
| Intended use | Spraying water and mild detergents (home, garden, greenhouse) |
| Safety | Safety valve (2.5 bar), frost protection, PPE instructions |
| Maintenance | Cleaning of nozzles and filters, rinsing after each use |
| Storage | Dry and frost-free place, empty and depressurized tank |
| Spare parts | Available on request (use original parts) |
| Warranty | Legal warranty (material or manufacturing defects) |
Frequently Asked Questions - GDS50 SCHEPPACH
User questions about GDS50 SCHEPPACH
0 question about this device. Answer the ones you know or ask your own.
Ask a new question about this device
Download the instructions for your Pressure washer in PDF format for free! Find your manual GDS50 - SCHEPPACH and take your electronic device back in hand. On this page are published all the documents necessary for the use of your device. GDS50 by SCHEPPACH.
USER MANUAL GDS50 SCHEPPACH
natural_image
White spray sprayer with black tubing and label 'scheppach' (no other text or symbols visible)
GDS50
| DE | DrucksprüherOriginalbetriebsanleitung | 7 |
| GB | Pressure sprayerTranslation of original instruction manual | 18 |
| FR | PulvérisateurTraduction des instructions d'origine | 26 |
1


natural_image
Line drawing of a showerhead with spray and component, no text or symbols present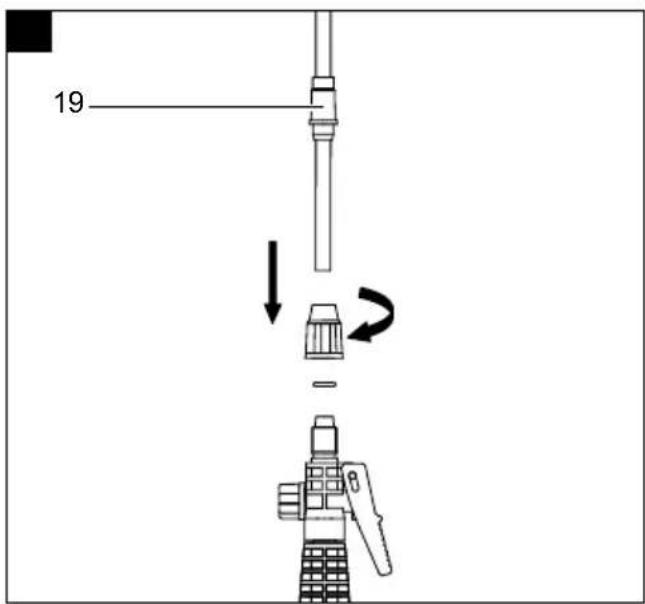
Günzburger Straße 69
D-89335 Ichenhausen
Verehrter Kunde,
Homepage: https://www.scheppach.com/de/service
Explanation of the symbols on the product
Symbols are used in this manual to draw your attention to potential hazards. The safety symbols and the accompanying explanations must be fully understood. The warnings themselves will not rectify a hazard and cannot replace proper accident prevention measures.
 | Warning - Read the operating manual to reduce the risk of injury. | 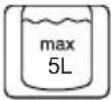 | Max. capacity: ca. 5 litres |
 | Wear respiratory protection! Do not use cc  substances! substances! | ||
 | Wear safety goggles. |  | Do not use highly flammable liquids! |
 | Wear safety gloves! Only spray on plants! 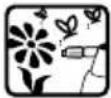 | ||
 | Wear safety gloves! | 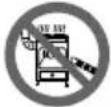 | Keep away from naked flames and heat sources! |
 | Make sure that other persons maintain a sufficient safety distance. |  | Protect from frost and store in a frost-free location. |
 | Do not spray on animals! |  | Do not leave the pressure sprayer in the sun. There is a risk of explosion! |
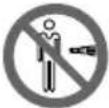 | Do not spray on people! |
Table of contents: Page:
- Introduction....20
- Product description (fig. 1, 6, 8, 9).... 20
- Scope of delivery (fig. 1, 8, 9)....20
- Proper use 20
- General safety instructions.... 21
- Residual risks 21
- Technical data....22
- Unpacking 22
- Assembly 22
- Before commissioning 22
- Operating the pressure sprayer....22
- Transport.... 24
- Cleaning (Fig. 10) 24
- Storage 24
- Maintenance 25
- Repair & ordering spare parts 25
- Disposal and recycling....25
- Troubleshooting 25
1. Introduction
Manufacturer:
Scheppach GmbH
Günzburger Straße 69
D-89335 Ichenhausen
Dear Customer,
We hope your new product brings you much enjoyment and success.
Note:
In accordance with the applicable product liability laws, the manufacturer of this product assumes no liability for damage to the product or caused by the product arising from:
- Improper handling
• Non-compliance with the operating manual
• Repairs carried out by third parties, unauthorised specialists
• Installing and replacing non-original spare parts
• Application other than specified
Note:
The operating manual is part of this product.
It includes important instructions for the safe, proper and economic operation of the product, for avoiding danger, for minimising repair costs and downtimes and for increasing the reliability and extending the service life of the product. In addition to the safety instructions in this operating manual, you must also observe the regulations applicable to the operation of the product in your country.
Familiarise yourself with all operating and safety instructions before using the product. Only operate the product as described and for the specified areas of application. Keep the operating manual in a good place and hand over all documents when passing the product on to third parties.
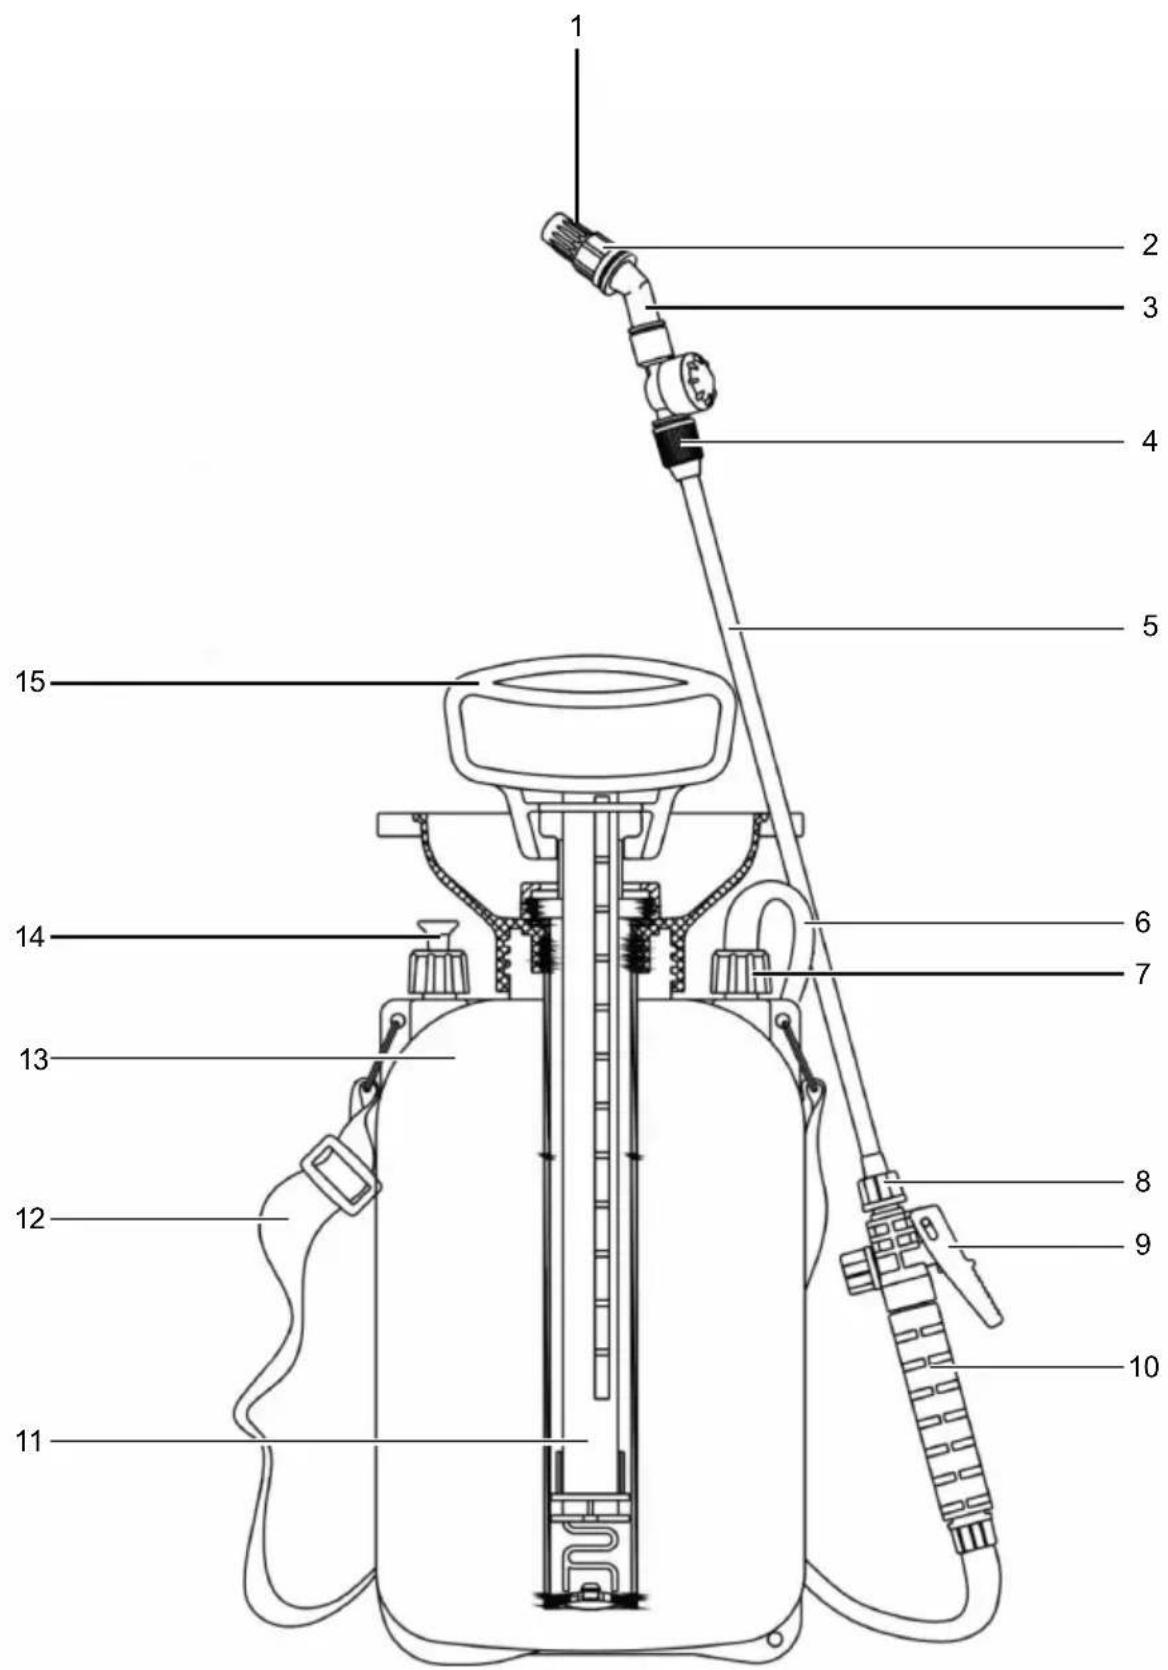
2. Product description (fig. 1, 6, 8, 9)
- Nozzle cap
- Union nut (nozzle)
- Spray valve
- Union nut (spray valve)
- Spray wand
- Vacuum hose
- Union nut (suction hose)
- Union nut (handle of the spray wand)
-
Trigger lever
-
Handle of the spray wand
- Pump
- Carrying strap
- Container
- Safety valve
- Handle
- Round spray nozzle
- Flat spray nozzle
- Dirt filter
- Holding device
- Holder
- Screw connection
3. Scope of delivery (fig. 1, 8, 9)
Item Quantity Designation
| 17. 1 x | Flat spray nozzle |
| 5. 1 x Spray wand | |
| 3. 1 x Spray valve | |
| 1 x Pressure sprayer | |
| 1 x Operating manual | |
4. Proper use
The product is used for spraying liquids in the home, garden and greenhouse.
The spraying of solvents or liquids containing solvents and oil in particular is considered improper use.
The product is permitted for private use only.
The pressure sprayer is used exclusively for spraying the following liquids in the home, garden or in green-houses:
- Water,
- Mild, pH-neutral cleaning agents
The spray agents may only be sprayed in the concentration specified by the spray agent manufacturer. If in doubt, please enquire with the manufacturer of the spray agent. The pressure sprayer is permitted for private use only.
In particular, the spraying of the following liquids is considered improper use:
- Plant protection products
- Weedkillers
- Disinfectants
- Fertilisers
- Solvents or liquids containing solvents
• Oil
• Highly flammable liquids
• Corrosive liquids such as acids or alkalis.
The product may only be used in the intended manner. Any use beyond this is improper. The user/operator, not the manufacturer, is responsible for damages or injuries of any type resulting from this.
An element of the intended use is also the observance of the safety instructions, as well as the assembly instructions and operating information in the operating manual.
Persons who operate and maintain the product must be familiar with the manual and must be informed about potential dangers.
The liability of the manufacturer and resulting damages are excluded in the event of modifications of the product.
The product may only be operated with original parts and original accessories from the manufacturer.
The safety, operating and maintenance specifications of the manufacturer, as well as the dimensions specified in the technical data, must be observed.
Please note that our products were not designed with the intention of use for commercial or industrial purposes. We assume no guarantee if the product is used in commercial or industrial applications, or for equivalent work.
The manufacturer is not liable for damage caused by an improper use or incorrect operation of this device.
5. General safety instructions
⚠ WARNING - Read all safety information, instructions, illustrations and technical data for this product.
Failure to follow all instructions listed below may result in electric shock, fire and/or serious injury.
Save all warnings and instructions for future reference.
⚠ WARNING Risk of injury!
There is a risk of skin injuries due to contact with the spray. Wear safety goggles, suitable protective clothing, sturdy shoes, gloves and respiratory protection when spraying.
⚠ WARNING
Do not carry out any repairs or modifications to the pressure sprayer. Do not modify or repair any components.
⚠ WARNING
The pressure sprayer must not be used if the user is tired, ill or under the influence of alcohol, drugs or medication.
⚠️ CAUTION Risk of explosion!
Do not expose the product (empty or full) to direct sunlight!
- Children or persons who lack knowledge or experience in handling the product, or who are limited in their physical, sensory or mental capabilities, must not use the product without supervision or instruction by a person responsible for their safety. Children must be supervised so that they do not play with the product.
- Clean your hands and face after spraying.
- Always observe the chemical manufacturer's instructions when working with or mixing spray solutions.
- Before opening the container, release the residual pressure in the container by pulling the safety valve.
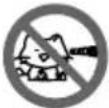
- Never spray towards people and animals, into the wind, into water or into drinking water sources.
- Release the residual pressure after each use.
- Never unscrew or remove the safety valve.
- If necessary, request the safety data sheets for chemical substances and their formulations from the spray agent manufacturer.
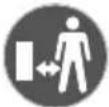
- Keep children and other people away while using the product.
- The water jet must never be directed at live electrical equipment.
- Never connect the pressure sprayer to a compressed air device.
- Ensure that the liquids only reach the intended places and are not carried away by wind or other factors.
• Always wear suitable personal protective equipment.
6. Residual risks
The product has been built according to state-of-the-art and the recognised technical safety rules. However, individual residual risks can arise during operation.
• Furthermore, despite all precautions having been met, some non-obvious residual risks may still remain.
- Residual risks can be minimised if the "Safety Instructions" and the "Intended Use" together with the operating manual as a whole are observed.
- Keep your hands away from the working area when the product is in operation.
7. Technical data
Container dimensions ∅ x H ∅ 180 x 460 mm
| Length of the spray wand 650 mm | |
| Filling content 5 l | |
| Container volume 5.71 l | |
| Maximum pressure 2.5 bar | |
| Carrying method | With carrying strap on the side |
| Volumetric flow (l/min) | 0.9 l/min |
| Empty weight | 1.3 kg |
| Filled weight | 6.28 kg |
Subject to technical changes!
8. Unpacking
- Open the packaging and carefully remove the product.
- Remove the packaging material, as well as the packaging and transport safety devices (if present).
- Check whether the scope of delivery is complete.
- Check the product and accessory parts for transport damage. In the event of complaints the carrier must be informed immediately. Later claims will not be recognised.
- If possible, keep the packaging until the expiry of the warranty period.
- Familiarise yourself with the product by means of the operating manual before using for the first time.
- With accessories as well as wearing parts and replacement parts use only original parts. Spare parts can be obtained from your specialist dealer.
- When ordering please provide our article number as well as type and year of manufacture for the product.
⚠ WARNING!
The product and the packaging material are not children's toys! Do not let children play with plastic bags, films or small parts! There is a danger of choking or suffocating!
9. Assembly
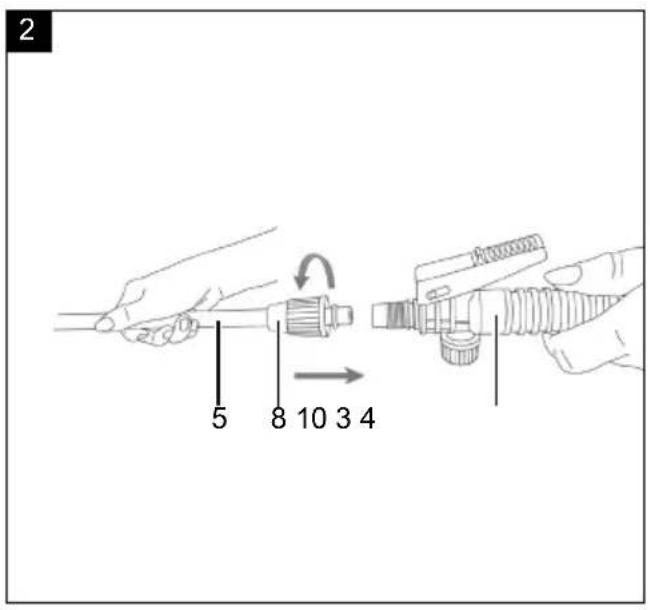
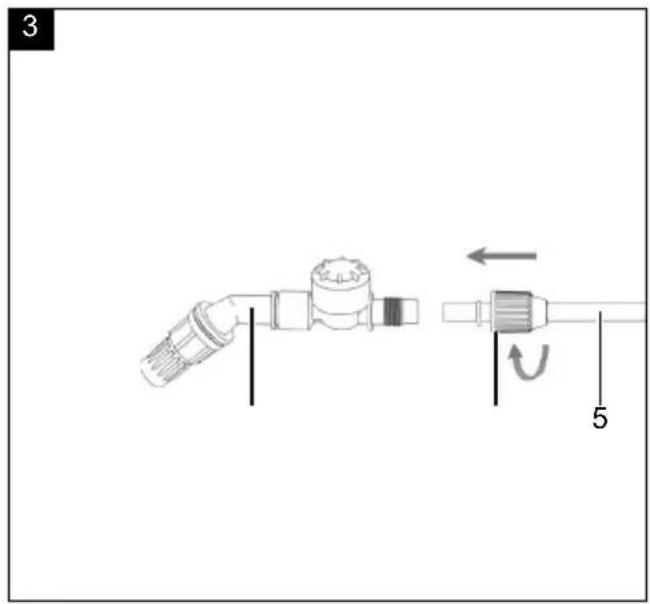
9.1 Fitting the spray wand (Fig. 2, 3, 11, 12)
Note
Ensure the holding device (19) is fitted in the correct direction during assembly (Fig. 11).
- Push the spray wand (5) with the sealing ring into the handle of the spray wand (10) as far as it will go.
- Screw the union nut (8) onto the spray wand (10).
- Insert the other side of the spray wand (5) with the sealing ring into the spray valve (3).
- Screw the union nut (4) onto the spraying valve (3).
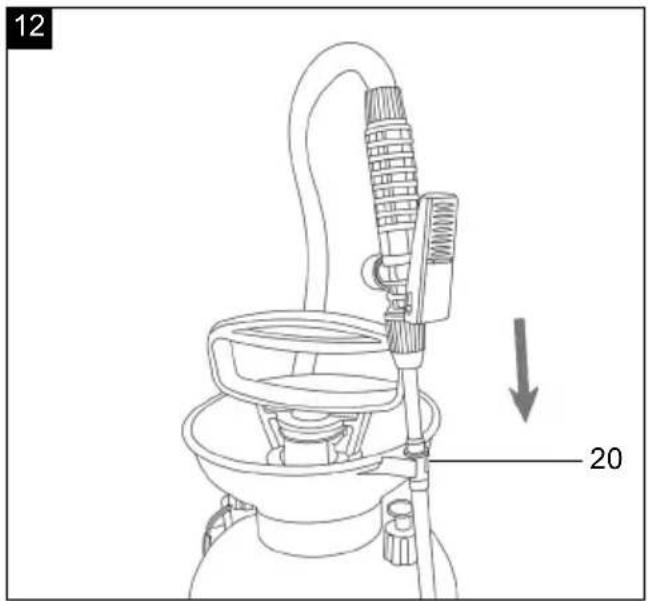
- Hang the spray wand (5) with the holding device (19) into the holder (20).
- Disassembly takes place in reverse order. Ensure that the seals do not slip off the spray wand (5) during disassembly.
10. Before commissioning
CAUTION
Check safe function! Check the pressure sprayer for visible damage and safe operation before each use. To do so, carry out the following checks:
- Check the container (13), the suction hose (6) and the carrying strap (12) for visible damage.
- Check the hose connections for firm seating.
- Check the pipe connections for firm seating.
- Check the function of the safety valve (14) as described under 10.2 Generating operating pressure.
11. Operating the pressure sprayer
⚠ Attention!
Always make sure the product is fully assembled before commissioning!
Note
Ensure that the product is in perfect condition before use.
Always wear suitable personal protective equipment.
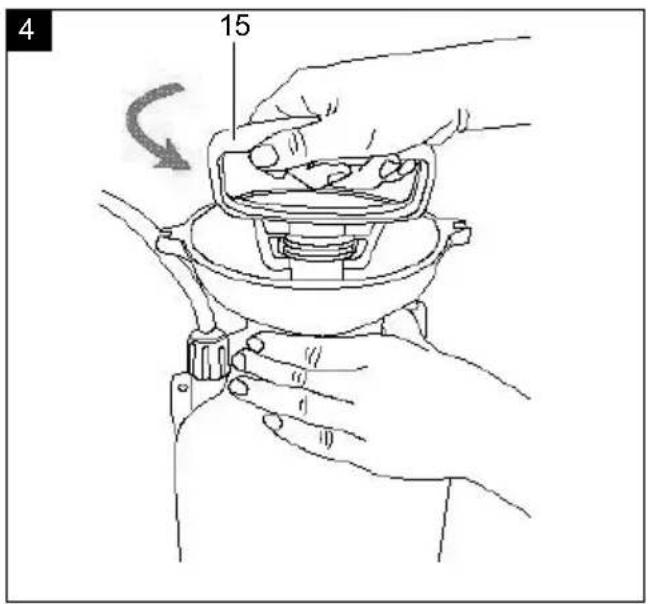
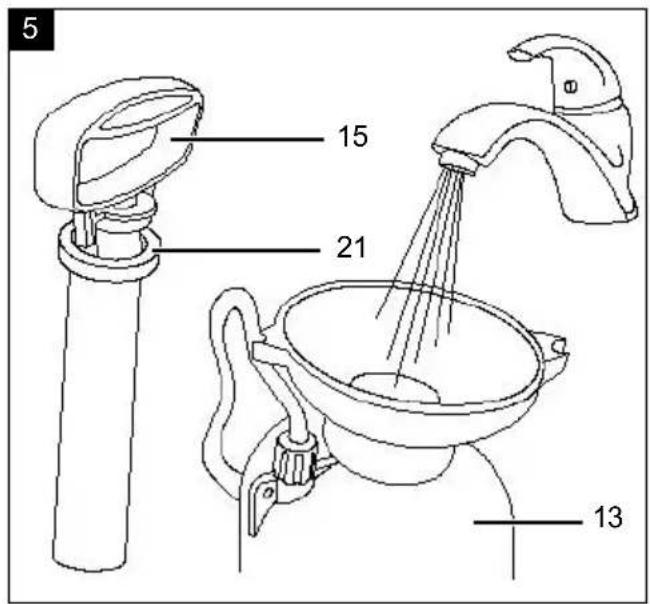
11.1 Filling the container (13) (Fig. 4, 5)
- Place the product on a level, even surface.
- Hang the spray wand (5) with the holding device (19) into the holder (20).
- To release the residual pressure in the container (13), pull the safety valve (14) upwards as far as it will go.
- Only then open the container (13) by turning the screw connection (21) anti-clockwise.
- Pull the pump (11) out of the container (13) using the handle (15).
- Only fill the container (13) with as much liquid as you need for the application (no more than max. 5 litres).
- Place the handle (15) back into the container (13)
- Turn the screw connection (21) clockwise as far as it will go.
11.2 Creating the operating pressure (Fig. 6) Note
If the air pressure in the container (13) exceeds 2.5 bar, pressure is automatically released via the safety valve (14).
- Place the product on a level, even surface.
- Check the union nut (7) for firm seating.
- Place the handle (15) into the container (13).
- Turn the screw connection (21) clockwise as far as it will go.
- To release the handle (15), turn it upwards through the recess.
- Move the handle (15) up and down until the pressure sprayer is inflated to the maximum permissible operating pressure of 2.5 bar.
- Press the handle (15) down through the recess and turn the handle (15) clockwise as far as it will go.
11.3 Spray
Note
Ensure that pressure sprayer is always vertical. This is the only way to ensure proper operation.
For the spray function, the operating pressure must be generated as described under 10.2 Creating the operating pressure. If the pressure in the container (13) is no longer sufficient for spraying, pump the container (13) back up to the maximum permissible operating pressure of 2.5 bar.
- Release the spray wand (5) from the holder (20).
-
Hang the pressure sprayer over your shoulder using the carrying strap (12).
-
Hold the spray wand (5) by the handle (10) and point the spray valve (3) at a plant, for example.
- Press the trigger lever (9) to start the spraying process.
- Release the trigger lever (9) to stop the spraying process.
- To release the residual pressure in the container (13), pull the safety valve (14) upwards as far as it will go.
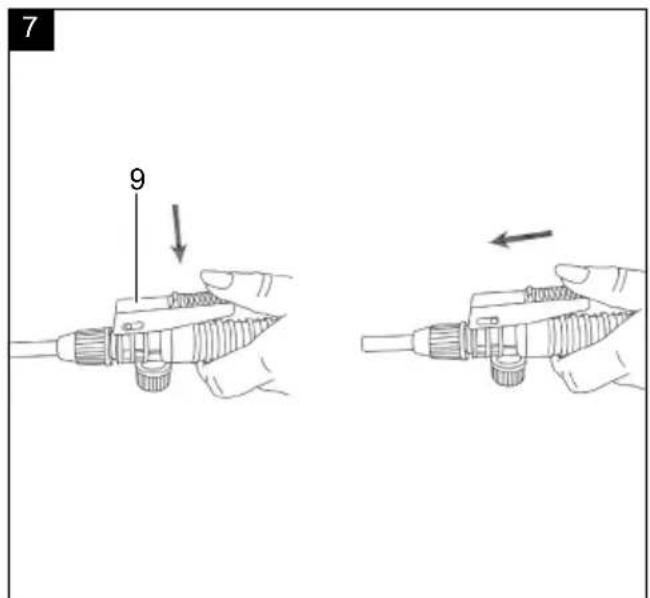
11.4 Locking the trigger lever (9) when spraying (Fig. 7)
- Press the trigger lever (9) to start the spraying process.
- To lock, push the trigger lever (9) forwards.
- To release, push the trigger lever (9) backwards.
11.5 Releasing the operating pressure (Fig. 1)
- To release the residual pressure in the container (13), pull the safety valve (14) upwards as far as it will go. If no more hissing can be heard when the safety valve (14) is pulled, the container (13) is depressurised.
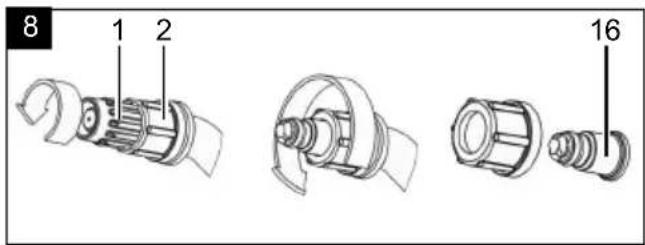
11.6 Insert the flat spray nozzle (17) (Fig. 9) Note
The flat spray nozzle (17) is not adjustable.
- Turn the nozzle cap (1) on the spraying valve (3) anti-clockwise. Remove the nozzle cap (1).
- Unscrew the union nut (2) anti-clockwise.
- Remove the dirt filter (18) and the round spray nozzle (16). Store the round spray nozzle (16) and the nozzle cap (1) carefully.
- Slide the flat spray nozzle (17) into the opening of the union nut (2).
- Insert the dirt filter (18) into the union nut (2) and onto the flat spray nozzle (17).
- Screw the pre-assembled union nut (2) onto the spraying valve (3) hand-tight.
11.7 Insert the round spray nozzle (16) (Fig. 8)
- Unscrew the union nut (2) anti-clockwise.
- Remove the dirt filter (18) and the flat spray nozzle (17). Store the flat spray nozzle (17) carefully.
- Slide the round spray nozzle (16) into the opening of the union nut (2).
- Insert the dirt filter (18) into the union nut (2) and onto the round spray nozzle (16).
-
Screw the pre-assembled union nut (2) onto the spraying valve (3) hand-tight.
-
To adjust the spray pattern, turn the nozzle cap (1) on the round spray nozzle (16) clockwise.
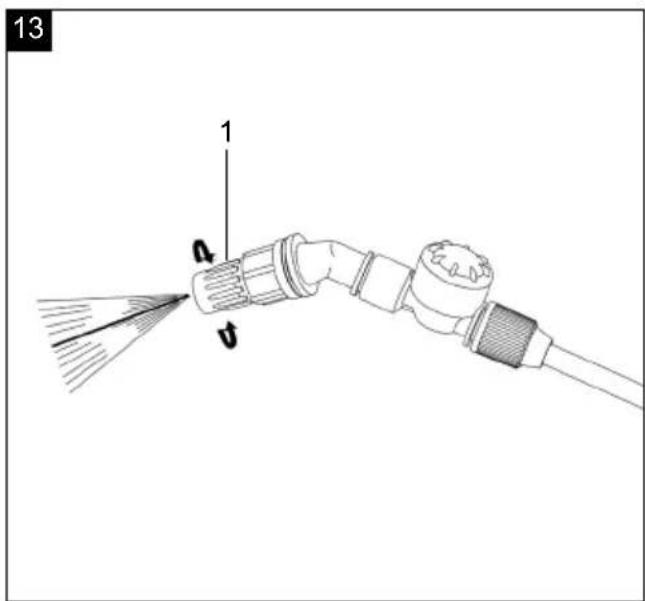
11.8 Setting the round or mist spray pattern (Fig. 13)
- To set a round spray, turn the nozzle cap (1) on the round spraying valve (16) anti-clockwise.
- To set the mist spray function, turn the nozzle cap (1) on the round jet nozzle (16) clockwise.
12. Transport
Note
To prevent damage to the container (13) during transport, always lift the pressure sprayer and do not drag it across the floor.
Transport during use
Note
Ensure that pressure sprayer is always upright. Only then can the pressure sprayer function properly.
- Hang the pressure sprayer over your shoulder using the carrying strap (12).
Transport after use
-
Press the handle (15) down through the recess and turn the handle (15) clockwise as far as it will go.
-
Pull the safety valve (14) up as far as it will go to release the residual pressure in the container (13).
-
Hang the spray wand (5) with the holding device (19) into the holder (20).
-
Carry the pressure sprayer by the handle (15) or using the carrying strap (12).
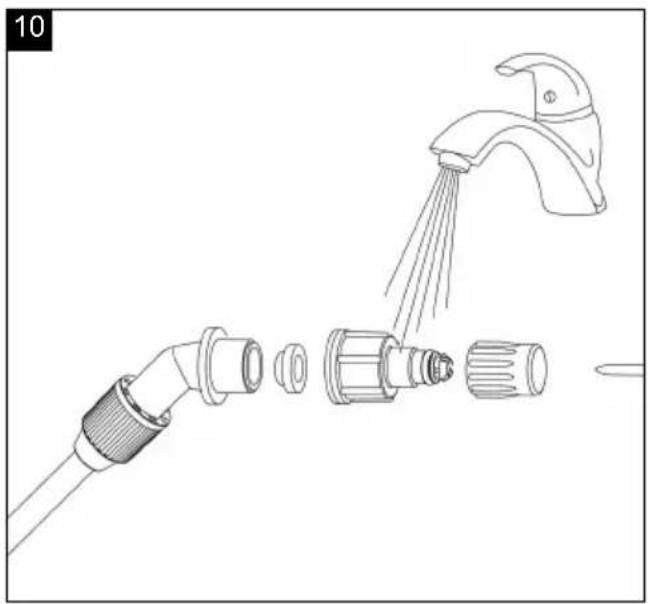
13. Cleaning (Fig. 10)
• Empty the container after each use.
• We recommend that you clean the product directly after every use.
- Clean the product at regular intervals using a damp cloth and a little soft soap. Do not use any cleaning products or solvents; they could attack the plastic parts of the product.
• Always wear suitable personal protective equipment.
13.1 Cleaning the nozzle (16, 17)
Note
Do not blow the nozzles clear with your mouth if they are blocked.
- Unscrew the nozzle.
- Clean the nozzle under running water.
- To clean a blocked nozzle, use a needle to pierce the nozzle.
13.2 Cleaning the pressure sprayer
- Place the product on a level, even surface.
- To release the residual pressure in the container (13), pull the safety valve (14) upwards as far as it will go.
- Only then open the container (13) by turning the screw connection (21) anti-clockwise.
- Pull the pump (11) out of the container (13) using the handle (15).
- Remove the spray wand (5) as described in8.1 Assembly.
- Rinse the pressure sprayer and the lines with water.
- Clean the surfaces with a damp cloth.
- Dry the product with a cloth after cleaning.
13.3 Cleaning the suction hose (6)
- Place the product on a level, even surface.
- To release the residual pressure in the container (13), pull the safety valve (14) upwards as far as it will go.
- Loosen the union nut (7).
- Pull the suction hose (6) out of the container (13).
- Remove the dirt filter from the suction hose (6) and clean the dirt filter and the suction hose (6) under running water.
- Fit the dirt filter onto the suction hose (6).
- Push the suction hose (6) into the container (13).
- Screw on the union nut (7) hand-tight.
14. Storage
Note
Never leave the pressure sprayer with a full, pressurised container unattended for long periods of time.
- Release any residual pressure in the container after use. To do this, pull up the knob of the safety valve until you no longer hear any hissing.
- Remove any residual spray agent from the container and lines.
-
Clean the appliance thoroughly and allow it to dry before storing it for the winter. This prevents damage caused by frost.
-
Store the pressure sprayer in a dry, dust-free place.
15. Maintenance
The product has no internal parts that require maintenance.
16. Repair & ordering spare parts
After repairs or maintenance, make sure that all safety-related parts are installed and are in perfect condition. All parts which may cause injury must be kept where they are inaccessible to children or others.
Attention: According to the German Product Liability Act, no liability is accepted for damage caused by improper repairs or by not using original spare parts. Such work should be performed by a customer service centre or an authorised specialist. The same applies to accessory parts.
Spare parts and accessories can be obtained from our Service Centre. To do this, scan the QR code on the front page.
16.1 Ordering spare parts
Please provide the following information when ordering spare parts:
- Model designation
- Item number
- Type plate data
17. Disposal and recycling
Notes for packaging


The packaging materials are recyclable. Please dispose of packaging in an environmentally friendly manner.
18. Troubleshooting
The following table shows fault symptoms and describes remedial measures in the event of your product failing to work properly. If you cannot localise and rectify the problem with this, please contact your service workshop.
| Fault Possible cause Remedy | ||
| No pressure builds up in the container. | The pump is not screwed tight. Screw | the pump in tightly. |
| Safety valve leaking or defective. Replace the safety valve. | ||
| The sealing ring of the pump is not lubricated. | Grease the sealing ring of the pump. | |
| Pressure sprayer does not spray. | No pressure present. Build up pressure with the pump. | |
| Too little pressure present. Build up sufficient pressure with the pump. | ||
| The nozzle is clogged. | Clean the nozzle. | |
| No spray agent in the container. | Fill with spray agent. | |
| Dirt filter is clogged. | Clean the dirt filter of the nozzle or the suction hose. | |
Günzburger Straße 69
D-89335 Ichenhausen
Cher client,
Apparent defects must be notified within 8 days from the receipt of the goods. Otherwise, the buyer's rights of claim due to such defects are invalidated. We guarantee for our machines in case of proper treatment for the time of the statutory warranty period from delivery in such a way that we replace any machine part free of charge which provably becomes unusable due to faulty material or defects of fabrication within such period of time. With respect to parts not manufactured by us we only warrant insofar as we are entitled to warranty claims against the upstream suppliers. The costs for the installation of the new parts shall be borne by the buyer. The cancellation of sale or the reduction of purchase price as well as any other claims for damages shall be excluded.
Garantie FR

- Verehrter Kunde,
- Explanation of the symbols on the product
- Table of contents: Page:
- Introduction
- Manufacturer:
- Dear Customer,
- Note:
- Product description (fig. 1, 6, 8, 9)
- Scope of delivery (fig. 1, 8, 9)
- Proper use
- General safety instructions
- ⚠ WARNING - Read all safety information, instructions, illustrations and technical data for this product.
- ⚠ WARNING Risk of injury!
- ⚠ WARNING
- ⚠️ CAUTION Risk of explosion!
- Residual risks
- Technical data
- Unpacking
- ⚠ WARNING!
- Assembly
- Fitting the spray wand (Fig. 2, 3, 11, 12)
- Note
- Before commissioning
- CAUTION
- Operating the pressure sprayer
- ⚠ Attention!
- Filling the container (13) (Fig. 4, 5)
- Creating the operating pressure (Fig. 6) Note
- Spray
- Locking the trigger lever (9) when spraying (Fig. 7)
- Releasing the operating pressure (Fig. 1)
- Insert the flat spray nozzle (17) (Fig. 9) Note
- Insert the round spray nozzle (16) (Fig. 8)
- Setting the round or mist spray pattern (Fig. 13)
- Transport
- Transport during use
- Transport after use
- Cleaning (Fig. 10)
- Cleaning the nozzle (16, 17)
- Cleaning the pressure sprayer
- Cleaning the suction hose (6)
- Storage
- Maintenance
- Repair & ordering spare parts
- Ordering spare parts
- Disposal and recycling
- Notes for packaging
- Troubleshooting
- Cher client,
- Garantie FR
Brand : SCHEPPACH
Model : GDS50
Category : Pressure washer