
SVC252420FFA - Vacuum Cleaner GORENJE - Free user manual and instructions
Find the device manual for free SVC252420FFA GORENJE in PDF.

| Product type | Cordless vacuum |
| Brand | Gorenje |
| Model | SVC252420FFA |
| Power supply | Rechargeable battery with mains adapter |
| Number of speeds | 3 (ECO, MAX, BOOST) |
| Display | Battery charge level, remaining time, brush blockage icon |
| Main brush | Motorised floor brush |
| Included accessories | 2-in-1 crevice tool, narrow crevice tool, wall mount |
| Filter type | Washable filter, replacement recommended every 6 months |
| Filter maintenance | Rinse with water (max 3 times), dry for at least 24 hours before reuse |
| Dust container cleaning | Washable, complete drying before reassembly |
| Brush cleaning | Remove the roller, remove hair and debris with scissors |
| Safety | Do not vacuum liquids, embers, sharp objects; do not immerse the housing |
| Use | Indoor, dry surfaces only |
| Battery warranty | 24 months |
| After-sales service | Contact Gorenje Customer Service in your country or Hisense retailer |
| Compliance | Electrical standards and WEEE directive 2012/19/EC |
| Spare parts | Filter, battery, brush, adapter – use original parts |
| Wall mount | Included, mount at least 1 m from heat sources |
| Blockage indicator | Roller crossed out icon if object stuck, preventive stop |
Frequently Asked Questions - SVC252420FFA GORENJE
User questions about SVC252420FFA GORENJE
0 question about this device. Answer the ones you know or ask your own.
Ask a new question about this device
Download the instructions for your Vacuum Cleaner in PDF format for free! Find your manual SVC252420FFA - GORENJE and take your electronic device back in hand. On this page are published all the documents necessary for the use of your device. SVC252420FFA by GORENJE.
USER MANUAL SVC252420FFA GORENJE
natural_image
Black and silver Gorenje vacuum cleaner with adjustable arm and power cord (no visible text or symbols)SI Navodila za uporabo....13
EN Instruction manual....29

flowchart
graph TD
    A["Device Insert"] --> B["Recycle"]
    B --> C{Recycle Path}
    C -->|Yes| D["Recycle Body"]
    C -->|No| E["Recycle Cell"]
    D --> F["Recycle Buffer"]
    E --> G["Recycle Buffer"]
    F --> H["Recycle Buffer"]
    G --> I["Recycle Buffer"]

flowchart
graph TD
    A["4-6h"] --> B["ECO"]
    B --> C["BOOST"]
    C --> D["BIOOST ≥13 min"]
    C --> E["MAX ≥30 min"]
    C --> F["ECO ≥60 min"]
BOOST ≥ 13 min
MAX ≥ 30min
ECO ≥ 60 min

natural_image
Line drawing of a digital camera with scroll wheel and rotary button (no text or symbols)
natural_image
Line drawing of a portable air purifier device with no visible text or symbols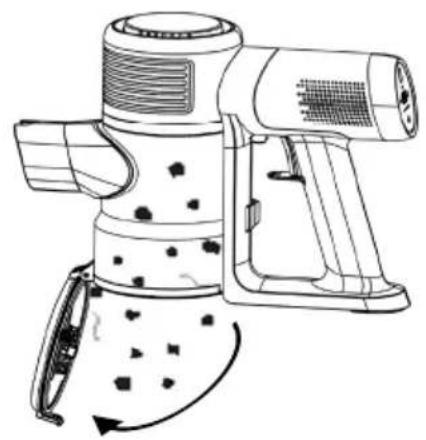
natural_image
Line drawing of a portable air purifier with cooling fan and handle (no text or symbols)
natural_image
Line drawing of a vacuum cleaner with an arrow pointing to the component (no text or symbols present)
natural_image
Diagram of a vacuum cleaner with an upward arrow indicating motion (no text or symbols present)
natural_image
Technical line drawing of a mechanical component with internal channels and mounting holes (no text or symbols)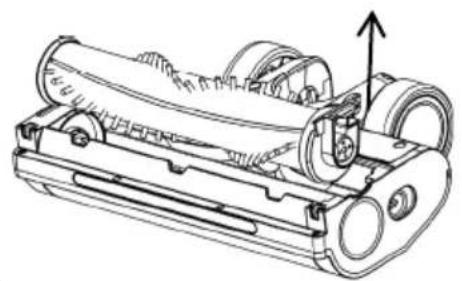
natural_image
Technical line drawing of a mechanical device with cylindrical components and an upward arrow indicating motion (no text or symbols)
natural_image
Technical line drawing of a cylindrical mechanical component with intersecting threads and a cutting tool (no text or symbols)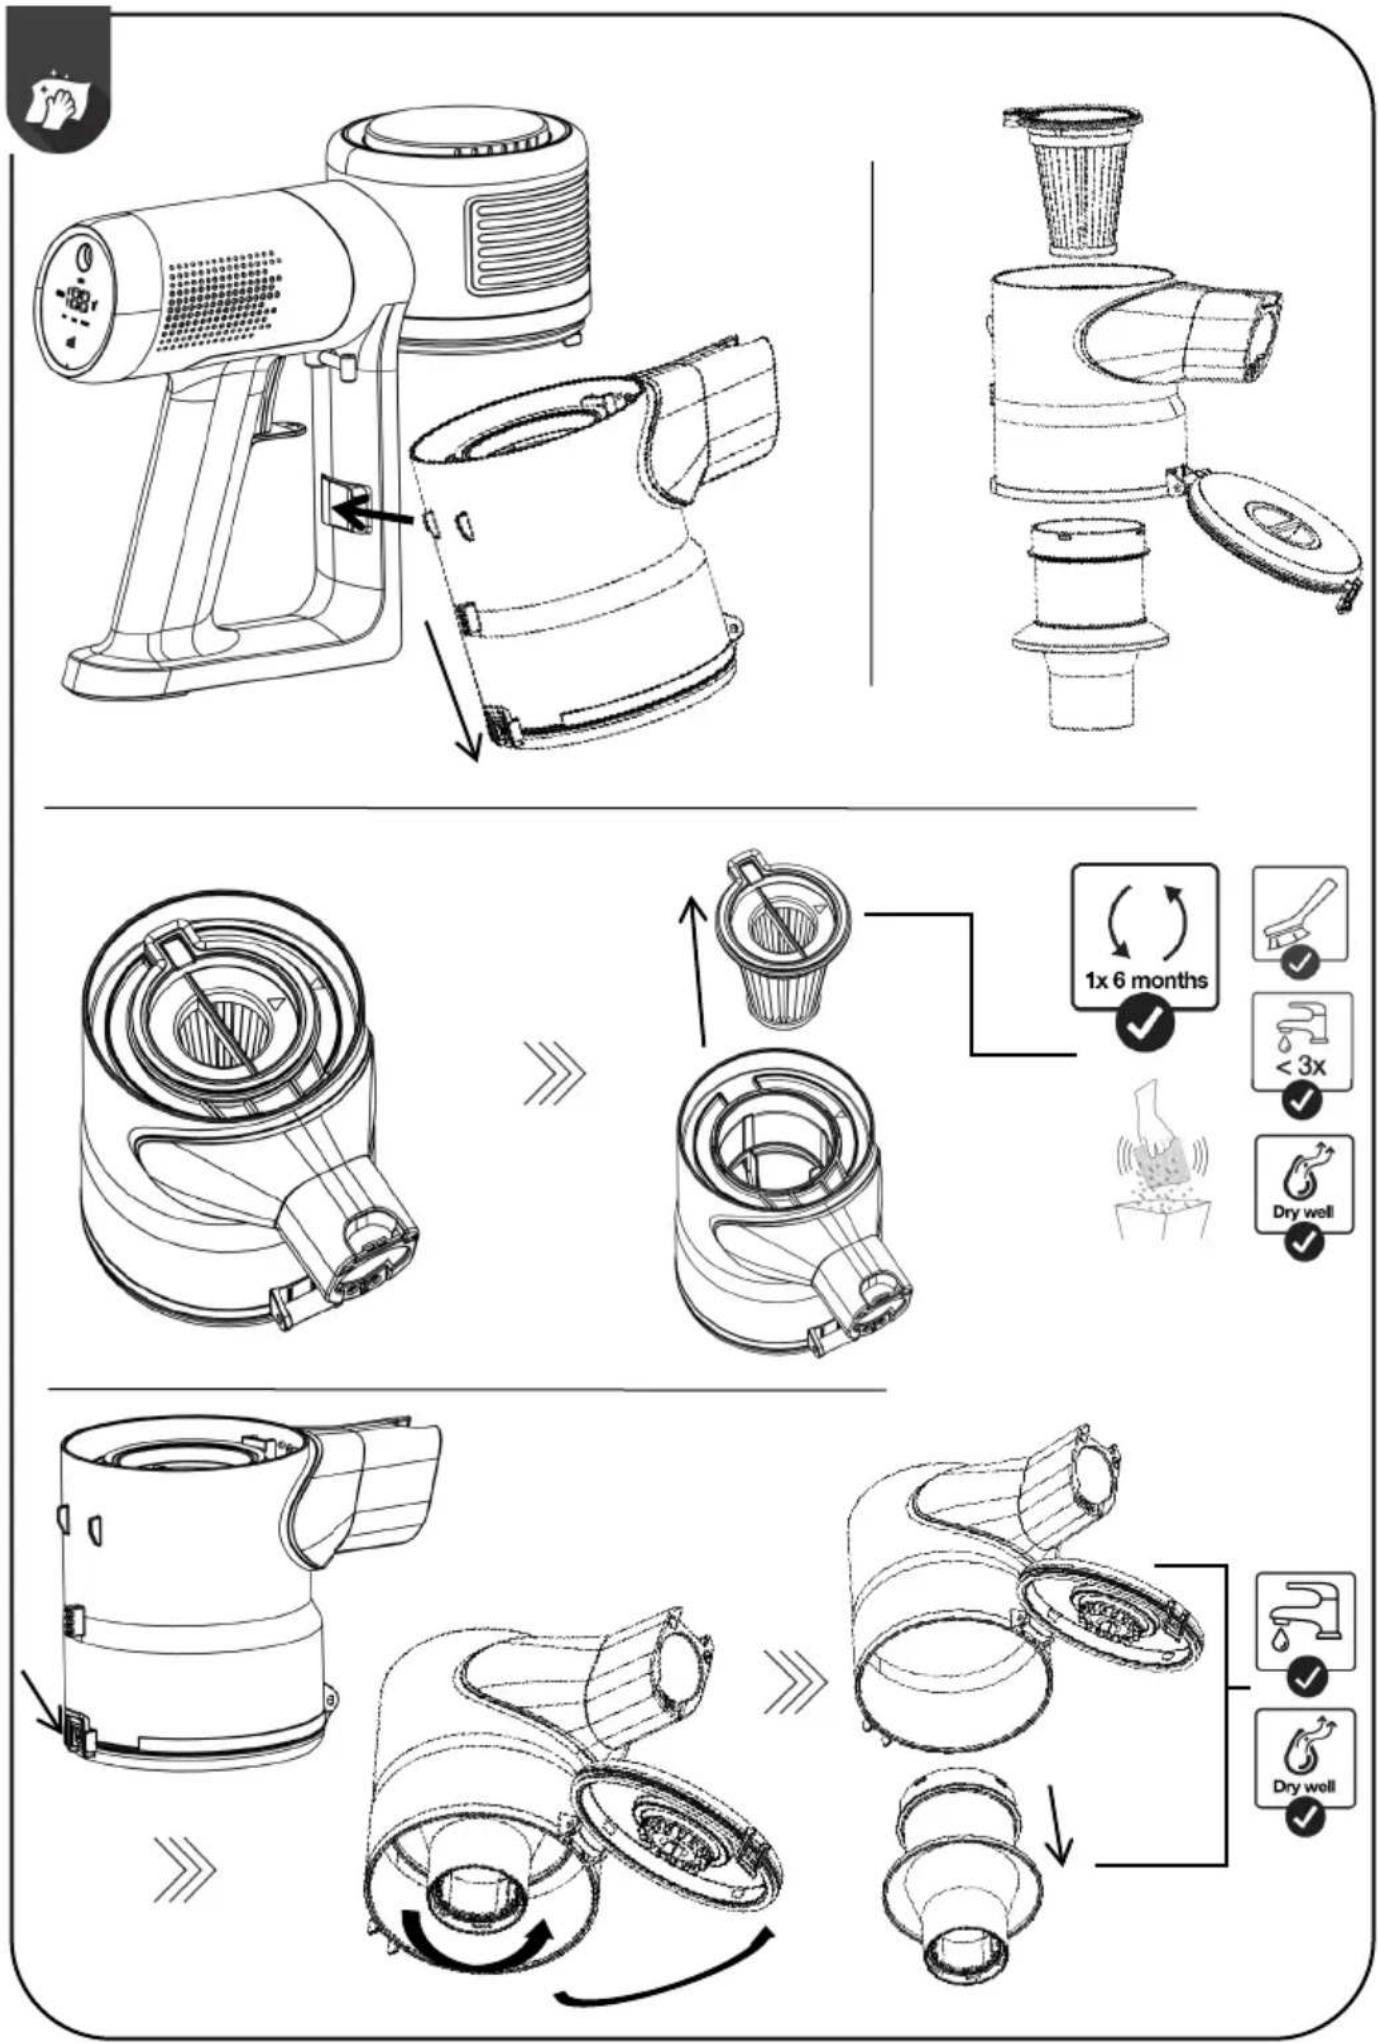


natural_image
Technical line drawings of a robotic vacuum cleaner assembly, showing front, side, and top views (no text or symbols)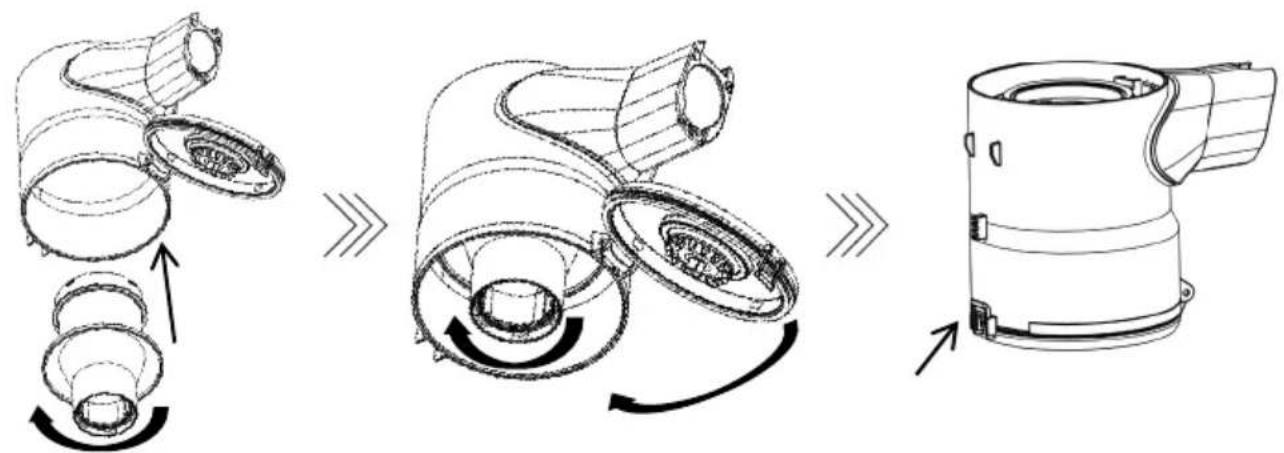
flowchart
graph LR
    A["Engine"] --> B["Turbine"]
    B --> C["Airpump"]
    C --> D["Airies"]
    D --> E["Airbox"]
natural_image
Technical line drawings of three different vacuum cleaner components (no text or symbols)
Splošna opozorila
When using the vacuum cleaner always observe the following basic safety precautions: Carefully read this instruction manual and only use the appliance in accordance with the instructions herein. Before using the appliance for the first time, remove all protective film or plastics. // Never leave the appliance unattended during use. // Before using the appliance, carefully assemble all of its parts. // Only use the appliance indoors and in dry areas. // Only use the appliance with the parts recommended by the manufacturer. // Do not use the appliance if it has been dropped, if it is damaged, if it has been kept outdoors, or if it has been dropped or immersed in a liquid. // Regular cleaning can extend the appliance's useful life. // Make sure your hair, loose parts of your garments, fingers or other parts of the body do not come into contact with the vents or moving parts of the appliance. // The appliance complies with all required standards regarding electricity, and radio interference regulations. // The appliance is not intended to be used by children and persons with impaired physical or mental abilities. This appliance may be used by children aged 8 years and more, and by persons with reduced physical, sensory or mental capabilities or lack of experience and knowledge, if they are supervised during the use of the appliance or if they have been provided relevant instructions regarding the use of the appliance in a safe way, and they understand the hazards involved. Keep children under supervision while they are using the appliance and make sure they do not play with it. // Children should not perform any cleaning or maintenance tasks on the appliance, unless they are older than 8 years, and they do so under supervision. // Switch off the appliance after use.
Danger
Do not immerse the main unit/appliance housing or the charging base in water or any other liquid and do not rinse them under running water.
Special warnings
Before connecting the appliance or the charging base with the power cord to the power mains, make sure the indicated voltage matches the voltage of the power mains in your home. // Do not used a damaged vacuum cleaner or a damaged charging base (or adapter – depending on your vacuum cleaner model). // If the charging base (or adapter) is damaged, replace it only with an original spare part in order to avoid danger. // A transformer is integrated into the adapter. Removal and replacement of adapter with another one are not allowed as this may lead to a dangerous situation. // Only charge the vacuum cleaner with the supplied adapter and charging base. The adapter may heat up during charging. This is a normal occurrence. (Depending on your model, if it has an adapter.) // Switch off the appliance during charging. // Never use the vacuum cleaner without filters or filtering unit in place. // The exhaust vents may not be blocked during vacuum cleaning. // Only use the appliance for household purposes and indoors. // Keep the suction vents clean and free in order to ensure optimum and unimpeded suction power of the appliance. It is highly recommended to regularly clean the open parts of the suction hose, and to remove dust, hair, or anything else that may block the airflow. // Before cleaning the support or the charging base, unplug it from the power socket. // Never use the vacuum cleaner to clean up embers or filings, cigarette butts, matches, liquids (e.g. water, carpet cleaning foam), or sharp or pointed objects (broken glass
etc.). // Keep the suction tube or the open part of the appliance away from your face and body. // Never use the appliance to vacuum construction material (such as fine sand, lime, cement powder, toner dust etc.). This can cause damage to the appliance.
Problems and solution
| Problem | Possible reason | Solution |
| Not working. | The battery is dead.The handy VC is not assembled correctly. | Charge.Assemble the handy VC correctly. |
| Suction power has decreased. | The dust cup is full.Block in filter.Block in the air inlet tunnel or on the roller of electrical brush. | Pour out the dust.Clean or change filter.Clean the electrical brush. |
| The VC is not charging. | The charger is not connected on socket.The connector of charger is not connected to the hole of base body.The handy VC is not assembled to the body. | Connect the charger on socket.Connect the charger with base body of VC.Assemble the handy VC on body. |
| Use very short time after charging. | Not enough charging time.The battery is aging. | Charge according to instruction.Change the battery. |
Environment

not throw away the appliance with the normal household waste at the end of its life. Hand it in at an official collection point for recycling. By doing this, you help to preserve the environment.
This appliance is marked according to the European directive 2012/19/EU on Waste Electrical and Electronic Equipment (WEEE). This guideline is the frame of a European-wide validity of return and recycling on Waste Electrical and Electronic Equipment.
Guarantee & service
If you need information or if you have a problem, please contact the Gorenje Customer Care Centre in your country (the phone number is in the worldwide guarantee leaflet). If there is no Customer Care Centre in your country, go to your local Gorenje dealer or contact the Service department of Gorenje domestic appliances.
Note: The warranty on the battery of vacuum cleaner is 12 months.
For personal use only!
For easier transport, some appliance parts are packed separately and safely placed in the main packaging unit. // Before first use, read and follow the instructions for assembly and safe use. // The appliance is intended for dry vacuuming in a domestic environment for domestic use.
PARTS
1 Housing with the motor, battery and dust container
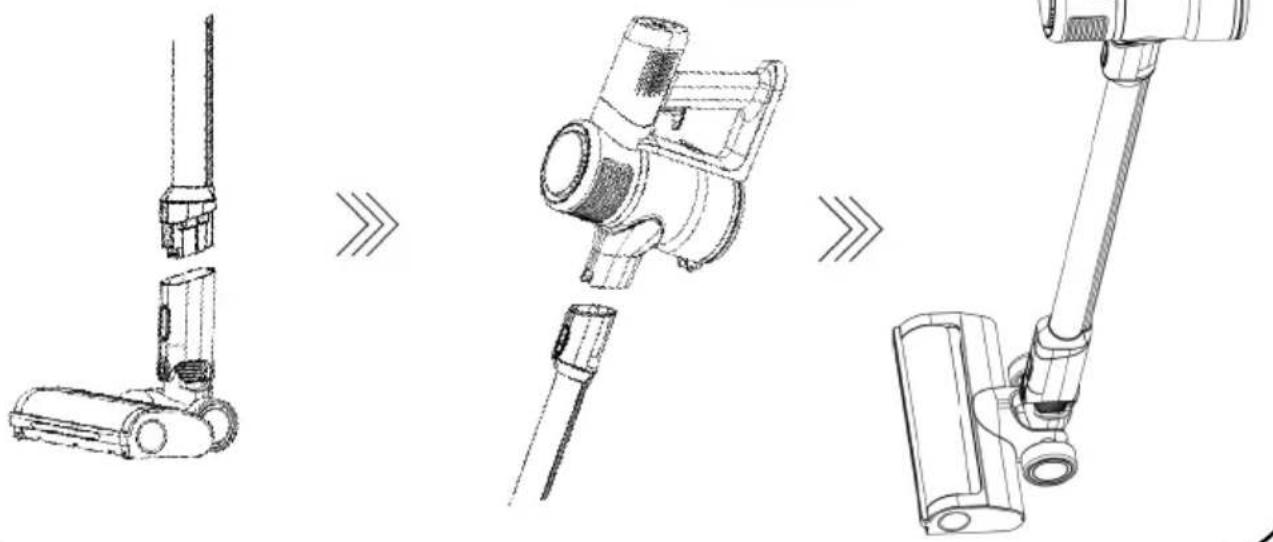
2 Suction hose
3 Motorised floor brush
4 2-in-1 nozzle
5 Longer narrow nozzle
6 Wall bracket
7 Adapter

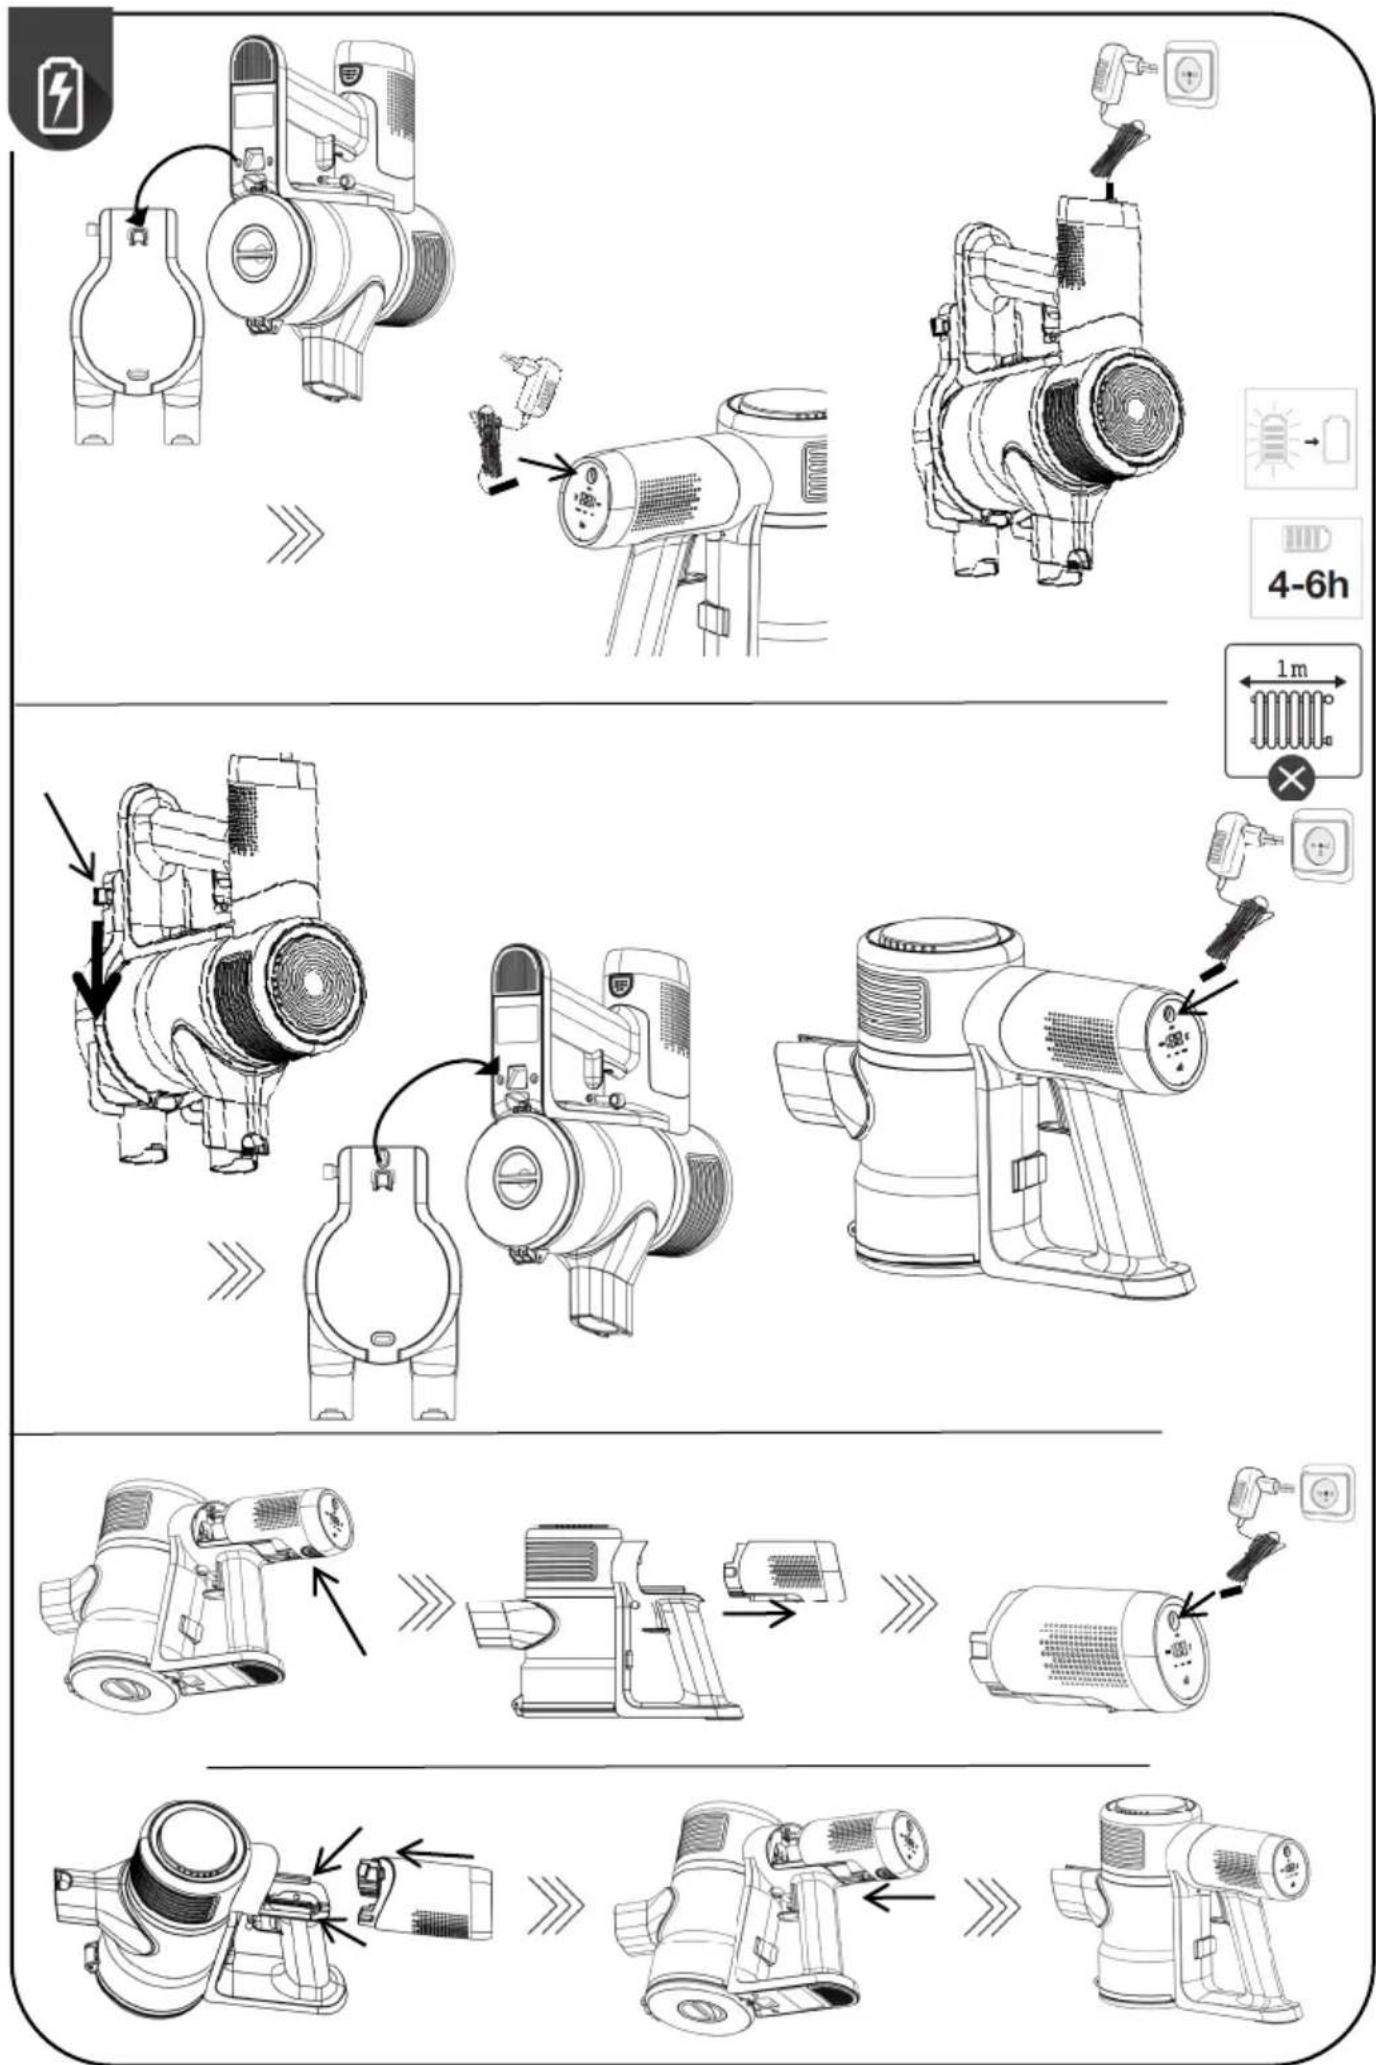
INSTALLATION
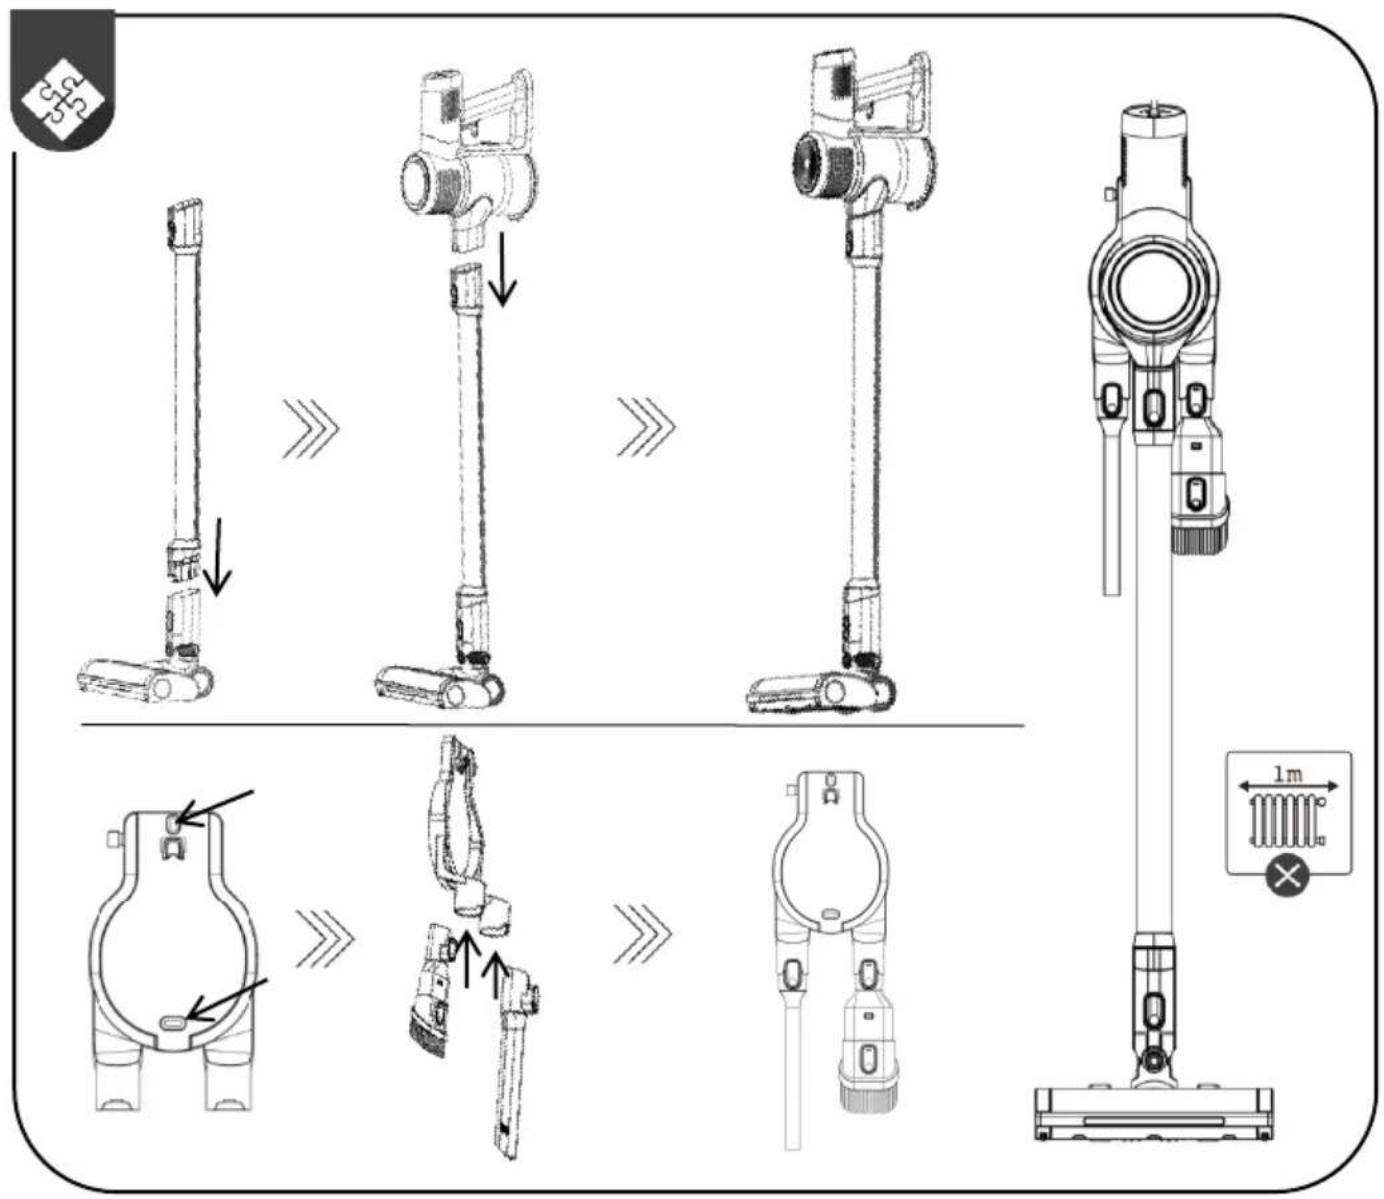
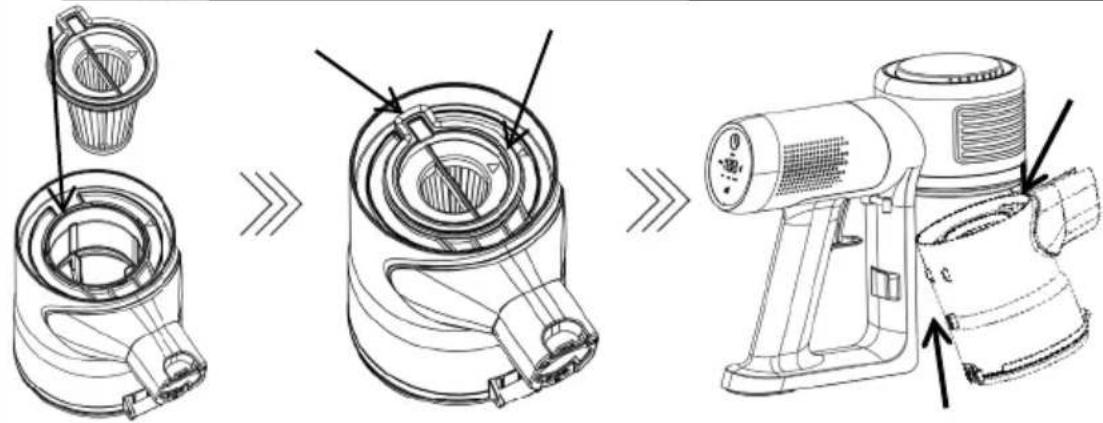
Connect the upper part of the hose to the motor unit and the lower part to the floor brush. The installation is correct when the appliance is firmly fixed all the way to the grooves (you hear a slight click, no matter which setting you are using).
A wall bracket is also included to store the vacuum cleaner and attachments. // Follow the attached pictorial instructions for mounting the wall bracket. // Keep the wall bracket at least 1 m away from the heating body. // You can store attachments in the lower part of the wall bracket. // Keeping the vacuum cleaner on the bracket allows you to always keep it safe and ready for use. // Due to its shape, the appliance is not self-standing.

USE
The vacuum cleaner is not intended for vacuuming any liquids, glass, cigarette butts, fire, or any sharp objects that may cause damage to the appliance.
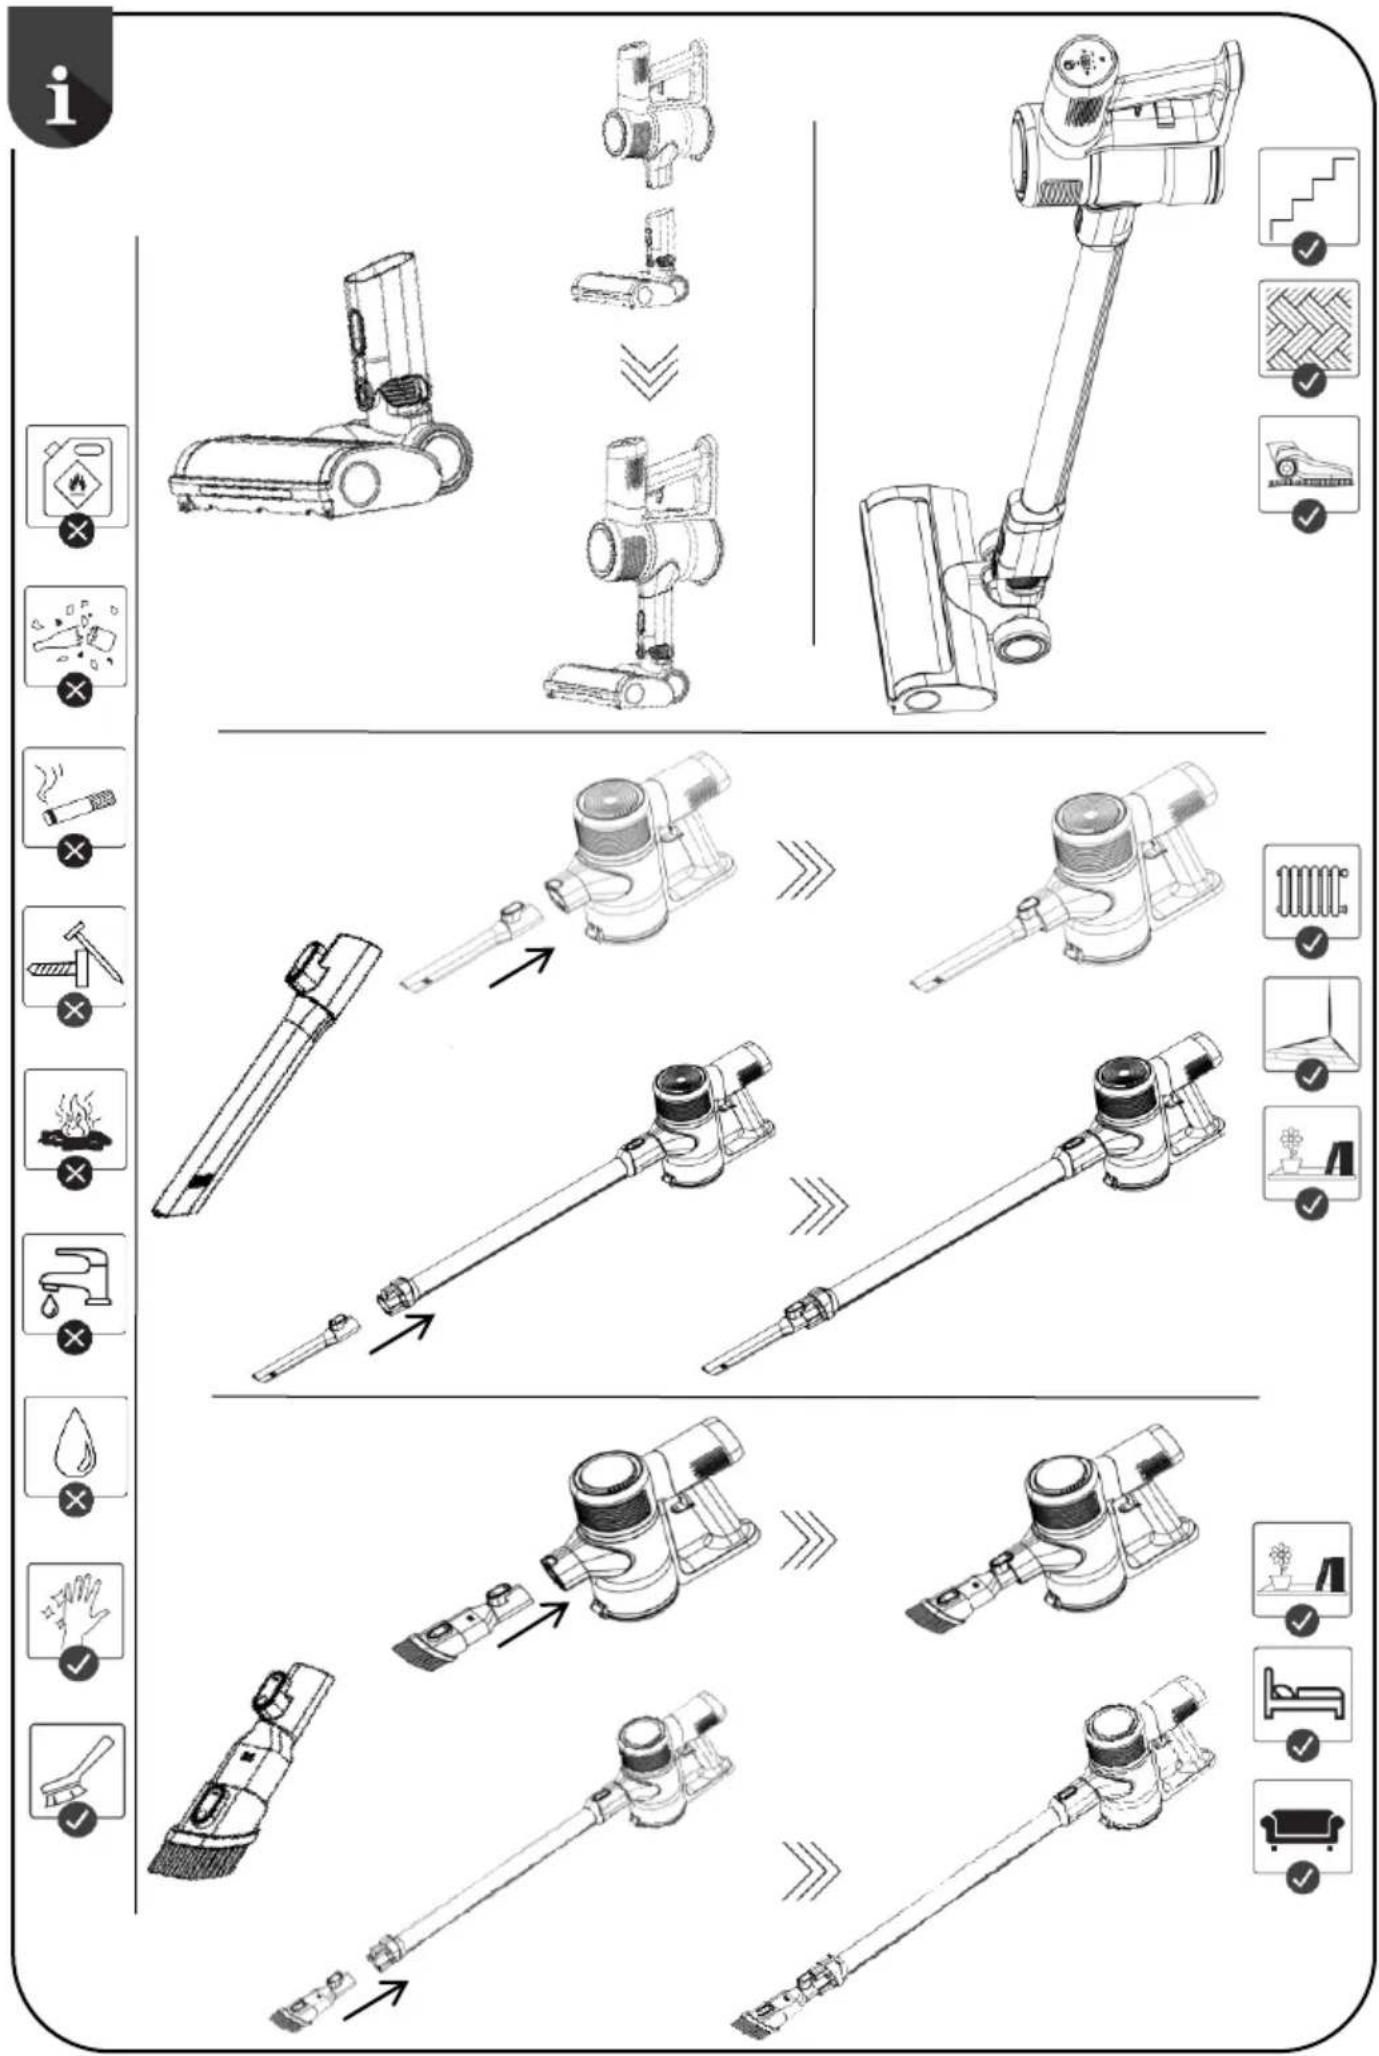
Brushes and attachments fit both the hose and the motor unit. // By pressing the button on the brushes and attachments, you can freely switch between them. They are intended for various uses. They are attached correctly when you hear a short click.
- The floor brush is used for vacuuming all (dry) floor surfaces. Do not try to vacuum carpets with a high pile as the fibres may become entangled in the roller brushes and damage the vacuum cleaner.
- The narrow nozzle is intended for vacuuming narrower and more difficult-to-reach parts (corners, armchairs, cobwebs, space behind the radiator ...).
- The 2-in-1 nozzle can help you clean smaller objects. // Push in the part with the bristles to convert the attachment from a narrow nozzle to a nozzle with soft bristles (suitable for frames, drawers, etc.).
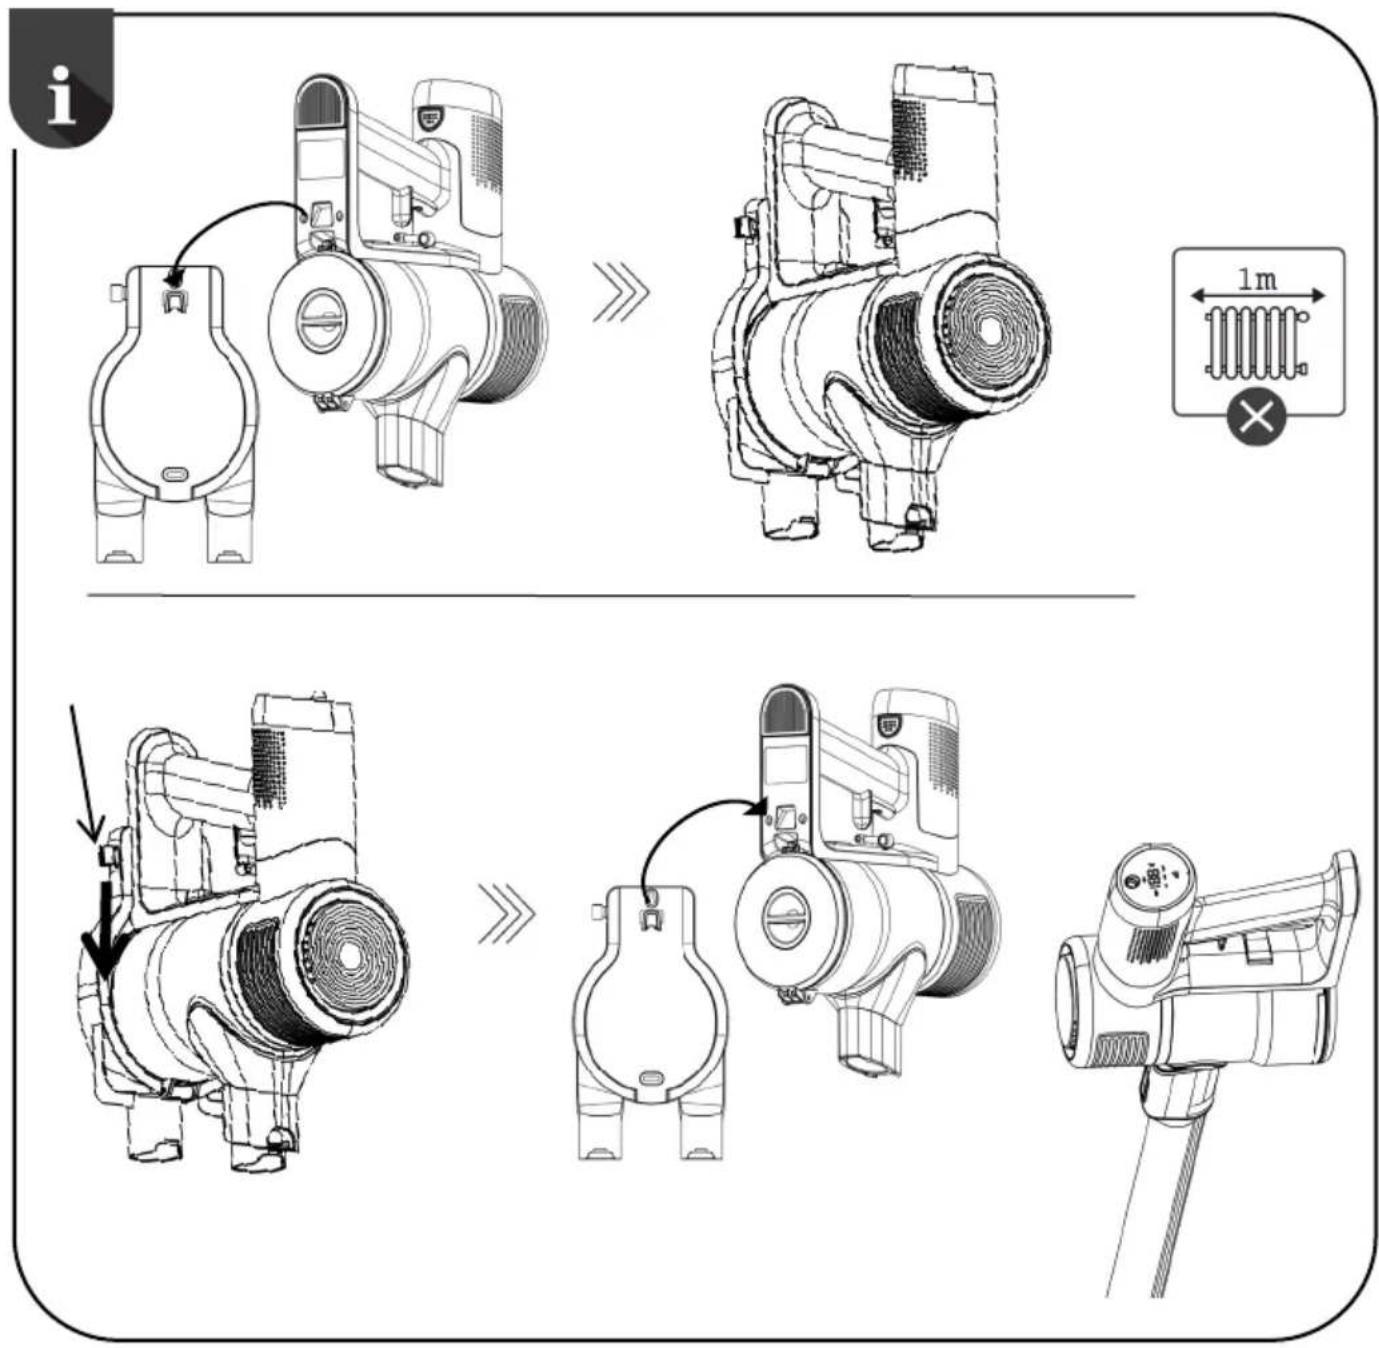
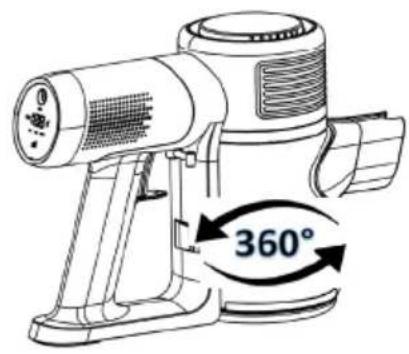
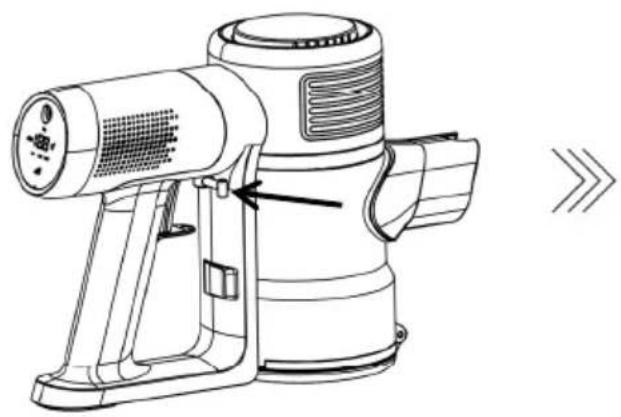
- The wall bracket helps you store the vacuum cleaner. // There is a small opening at the back of the motor unit that you attach to the wall bracket. // Keep the wall bracket at least 1m away from any heating surfaces. // When you want to remove the vacuum cleaner from the wall bracket, push the side lever down and remove the vacuum cleaner.

DISPOSAL OF THE APPLIANCE
If you want to replace the appliance or you no longer need it, you should also think about protecting the environment. The battery must be removed before disposing of the vacuum cleaner. // To safely remove the battery, make sure that the battery is completely discharged. If the appliance does not have a removable battery, follow the instructions given in the booklet with figures. // To properly remove the battery, follow the pictorial instructions.
OPERATION
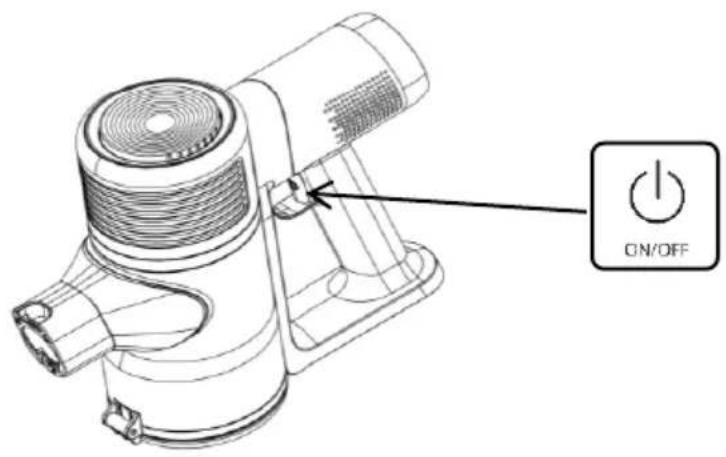
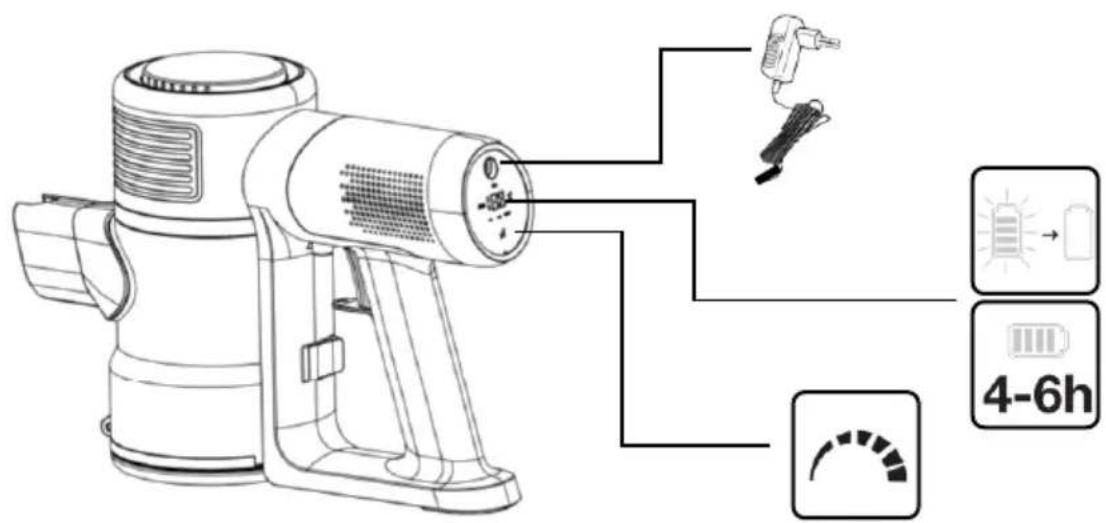
There is an on/off button on the handle of the handheld unit. // The charging adapter is located on the upper part of the display unit.
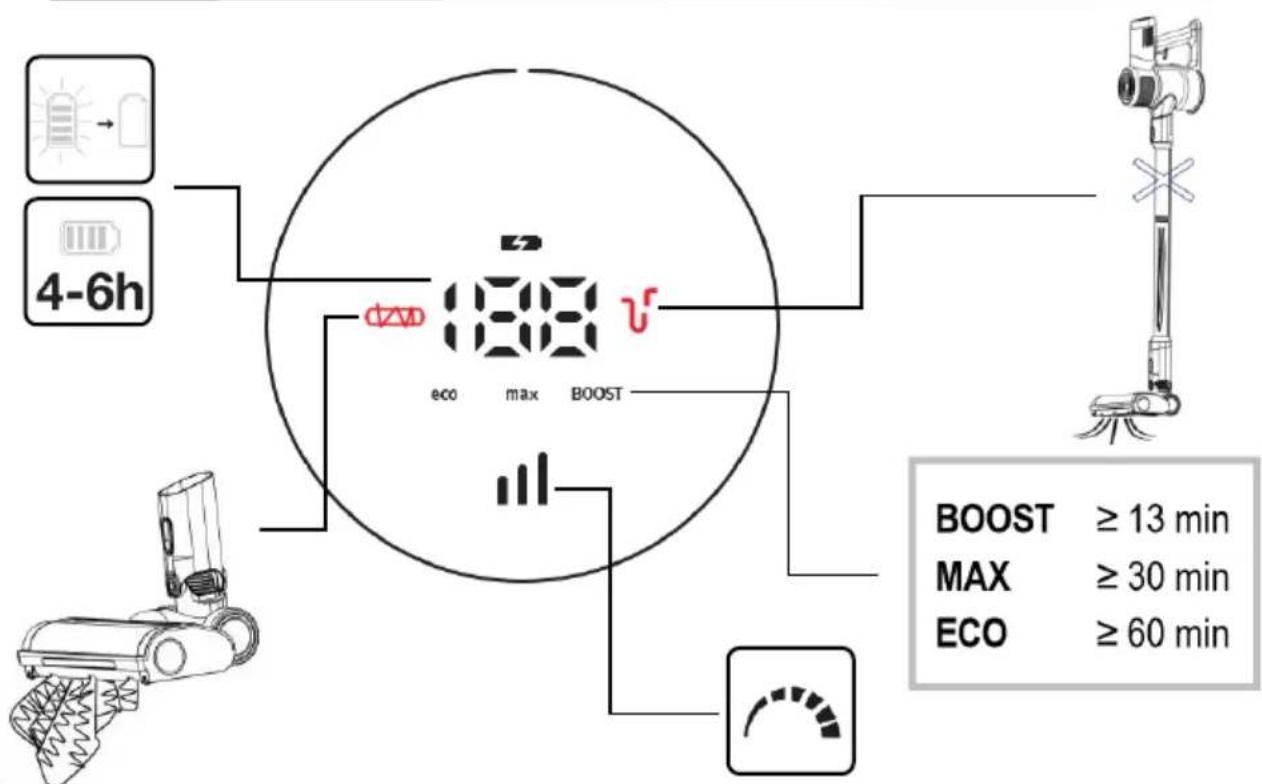
The display shows various functions:
- The appliance has a digital battery charge display. It digitally displays the battery charge during use or charging.
- The crossed-out roller icon appears if an object gets stuck in the brush. // When this icon lights up, the vacuum cleaner turns off preventively to protect the appliance from damage. // In this case, it is necessary to remove the object stuck in the brush. // After removing the object, the icon will no longer show when the device is switched on again.
- When selecting the speed, the display shows the remaining time to vacuum before the battery runs out. // The vacuum cleaner has three speeds; ECO (power saving mode where a single charge will last the longest), MAX (medium running mode where a single charge will last the standard amount of time) and BOOST (short running time on a single charge, maximum suction power).

CHARGING
Charge the vacuum cleaner at least 1 m away from any heating surfaces. // The appliance cannot be switched on while charging.
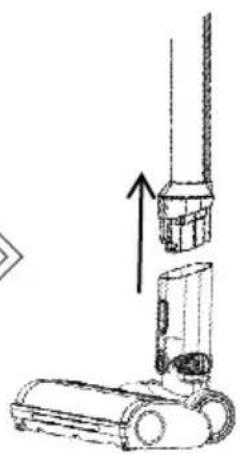
The adapter with the vacuum cleaner charging cable is included in the packaging. // Insert the charging adapter into the charging compartment located on the upper part of the display unit. // You can charge the battery on the wall bracket or charge it separately from the motor unit. // Remove the battery by pressing the button below the display to pull it out of the grooves of the motor unit. // For separate charging, it is necessary to make sure that the appliance is charged at least 1m from any heating surfaces. // To correctly place the battery back on the motor unit, it is necessary to correctly place the battery back on the grooves (check both sides). When done correctly, you will hear a slight click.
During charging, the battery percentage level will appear on the display.

DUST CONTAINER AND FILTERS
1 Dust container and filters
Removing dust from the container
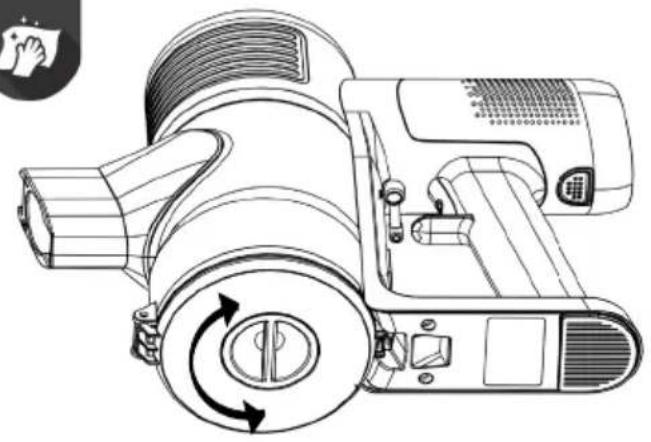
The filter can be cleaned during vacuuming. // There is a rotating knob on the lower part of the appliance which can be used to wipe the filter. Turn it in either direction to clean the filter. // Nevertheless, the filter must be rinsed and cleaned properly when you are cleaning the appliance.
To empty the dust container, remove the motor unit from the hose. // There is a pin on the side of the handle that protrudes from the motor unit. // Pull it towards the handle, and the bottom of the container will open. Therefore, only open the container while holding it over a dustbin.
Removing the container from the motor unit
Remove the hose from the motor unit. // To remove the dust container, push the button on the inner part of the container (pictorial instructions). // To safely remove the container, first remove the back part of the container and then lift and remove the filter from the grooves on the front of the motor unit. // Shake and gently brush the filter to remove any dirt that has accumulated during vacuuming. // Rinse the filter no more than three times and gently squeeze it. // Before reuse, it must be well dried (for at least 24 hours).
Push the pin on the back of the container to open the bottom of the container. // Rotate the filter rim and remove it from the container. // The container and the filter rim are washable. // Before re-use, they must be completely dry (dry them for at least 24 hours). // Do not wet the front of the container where the hose is placed, so as not to damage the part where the part comes into contact with the hose.
2 Replacing the filter
If you notice that the filter is damaged, replace it immediately. With regular use, we recommend replacing the filter every 6 months to ensure the longest life of the vacuum cleaner.
FLOOR BRUSH
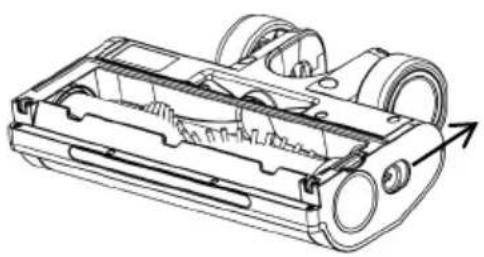
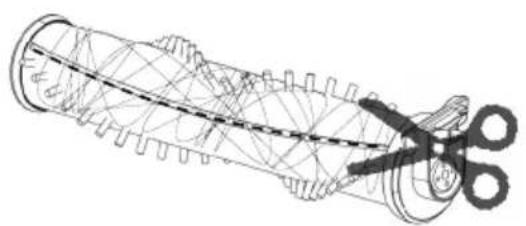
Press the button on the side of the brush to release the pin and remove the brush from the housing and wipe the underside of the housing with a cloth. // Clean the suction hose of the brush. // Shake the roller on the brush and carefully cut off the waste and hair that have accumulated in the designated groove on the brush with a scissor. // Do not pull the hair or strings, so as not to damage the bristles on the roller. /// Reinsert the roller back into the brush. // The roller is correctly positioned when a slight click is heard and the side pin is securely attached to the brush housing.
ASSEMBLY FOR REUSE
Insert the cleaned roller back into the brush. Push the part with the narrow end into the opening and insert the part with the "handle" back into the original part of the brush... the roller is correctly positioned when you hear a slight click.
Before reassembling the dust container, check that all components are completely dry. Damp parts may cause the vacuum cleaner to malfunction. // Insert the filter rim into the container and latch it in the opposite direction as you have removed it. You will hear a click when it has been reinserted correctly. // Close the bottom of the container. You can also check whether the filter rim is correctly positioned by checking that the lower part of the container closes easily, without requiring force to open. // If you force it to close, you can damage the bottom of the container. // On the upper part, properly place the filter back into the rim and container. // If the arrows on the filter and the filter rim are aligned, the filter has been installed properly. The "handle" of the filter also needs to be safely attached in the container.
Correct placement of the container back on the motor unit // The front part of the container, which includes the connection part for the hose, must be inserted into the grooves located on the motor unit. Only then you can push the back part of the container onto the latch on the motor unit. // If the filter is correctly placed in the container and the container was safely latched into the grooves, you will be able to easily connect the container to the motor unit. // Otherwise, repeat the procedure.
REPLACING THE FILTER
To prolong the life of your appliance, it is recommended to clean the filter regularly after each use, and to change if every 6 months with regular use.
Allgemeine hinweise
AVHENDING AV APPARATET
MANUEL D'INSTRUCTIONS FR
- ∂ξηξούξηξηξηξηξηξηξηξηξηξηξηξηξηξηξηξηξηξηξηξηξηξηξηξηξηξηξηξηξηξηξηξηξηξηξηξηξηξηξηξηξηξηξηξηξηξηξηξηξηξηξι
3068906760056 483605 403605
g0m06n5 g5f8d6p5 g4lsdwn8d9mos d3g3m1s16m7g0l g2sdmy6b0d0 q6m5. // dmhymdonom0d0 f3g0s b5h0m0d0 g2mss3g8d9mos dd6m6s3o lsbgm7g0, hmdm0l g2sdmy6b0nosg a4lsdwn8d9mos g0m06n5 g5f8d6p5. g0m06n5 g5sff8d6p5q g2pss3f6osw0n ol hmdgmo0d g0dsmn7g0d0n. // dmhydqn3sq sd0s, dmhymdonom0d0 g2f8d6p0l q6m5 g0m06n lbsnsbsomq y6p5 g2m6g8b0l q5 g2slyg0mszqgl.