
DRC033 - Ice Maker Scotsman - Free user manual and instructions
Find the device manual for free DRC033 Scotsman in PDF.


| Product type | Automatic ice machine |
| Brand | Scotsman |
| Model | DRC033 (DRCP033A-1SS and DRCG033A-1SS) |
| Use | Domestic (also for restaurant) |
| Power supply | 115 V / 60 Hz, single phase, 15 A (dedicated circuit) |
| Refrigerant | R290 (flammable) |
| Operating ambient temperature | 10 °C to 38 °C |
| Supply water temperature | 4.5 °C to 38 °C |
| Water pressure | 20 to 80 psig (dynamic min 20 psig) |
| Ice cube production | Approximately 8 cubes every 30 minutes |
| Ice cube dimensions | Cone 3.17 cm (base diameter) × 2.85 cm (height) |
| Drain type | Gravity (DRCG033A-1SS) or built-in pump (DRCP033A-1SS) |
| Cabinet material | Stainless steel |
| Decorative door option | Stainless steel panel kit (SS33) or custom |
| Ice cube size adjustment | Yes (adjustment screw) |
| Bin level adjustment | Yes (thermostat knob) |
| Harvest time adjustment | Yes (electronic timer, 2 to 5 min) |
| Door reversibility | Yes (hinge installation left or right) |
| Recommended maintenance | Cleaning at least once a year with Scotsman cleaner |
| Safety | Flammable refrigerant, fire extinguisher nearby, professional installation |
| Compliance | UL60335-2-24, C.U.L. |
Frequently Asked Questions - DRC033 Scotsman
User questions about DRC033 Scotsman
0 question about this device. Answer the ones you know or ask your own.
Ask a new question about this device
Download the instructions for your Ice Maker in PDF format for free! Find your manual DRC033 - Scotsman and take your electronic device back in hand. On this page are published all the documents necessary for the use of your device. DRC033 by Scotsman.
USER MANUAL DRC033 Scotsman
Installation and User's Manual for Residential Ice Machine
Model DRC033
natural_image
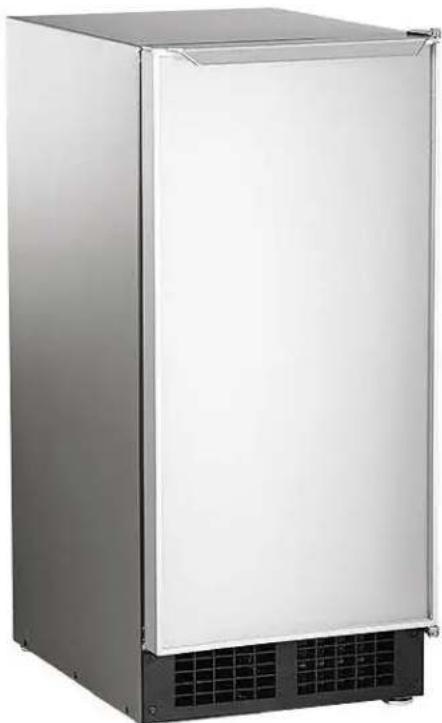
Exterior view of a stainless steel refrigerator with open lid and cooling panel (no visible text or symbols)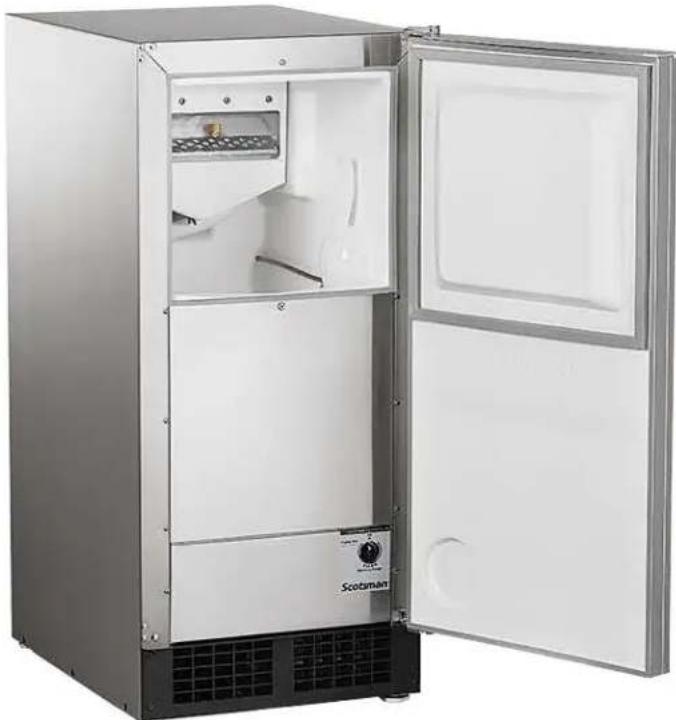
natural_image
Interior view of a stainless steel refrigerator with open doors and a small appliance on the door (no visible text or symbols)Important Safety Information. Make sure to read through fully to avoid severe injury or death.

WARNING
R290 Refrigerant is
Flammable.
Flame can cause burns or property damage
Keep away from sources of fire
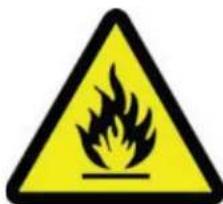

This ice machine contains FLAMMABLE refrigerant and improper use can result in fire or explosion. Do not use cigarettes, vapes, or cellphones near pipes or cables, as it can be a source of ignition or spark.

This ice machine must not be installed next to equipment with an open ignition source (ie. open flames, an operating gas appliance, or electric heater).

Do not store explosive substances such as aerosol cans with a flammable propellant in this appliance.

WARNING: Do not use electrical appliances inside the food/ice storage compartments unless they are of the type recommended by the manufacturer.

WARNING: In order to reduce flammability hazards the installation of this appliance must only be carried out by a suitably qualified person.

This appliance must be installed according to the safety standard for refrigeration systems presented in ANSI/ASHRAE 15.

Do not install next to anything that continuously vibrates, avoiding excessive vibrations or pulsations.

Install in a well ventilated environment and ensure ventilation and outlets are not obstructed.

Properly secure electrical wiring and cabling for the machine to minimize wear and vibrations.

Keep fire extinguisher nearby in case of emergencies.

WARNING: Do not damage the refrigerating circuit

Use a Scotsman recommended technician certified to repair R290 equipment.

Install ONLY Scotsman factory service parts. Use of non-OEM parts can be dangerous due to the design changes needed to safely use R290 refrigerant.

WARNING: Cancer and Reproductive Harm. Visit www.P65Warnings.ca.gov for details.

This appliance is not intended for use by persons (including children) with reduced physical, sensory or mental capabilities, or lack of experience and knowledge, unless they have been given supervision or instruction concerning the use of the appliance by a person responsible for their safety.

Children should be supervised to ensure that they do not play with the appliance.
Do not unplug or disconnect power to the ice machine with out shutting off the water supply.
Note: This ice machine should be on its own dedicated circuit with out any other appliances or devices.
The Scotsman DRC033 is a restaurant type ice machine designed for home use. It produces the same high quality ice as large Scotsman commercial ice cube machines, and stores that ice in a heavily insulated storage bin.
This manual includes the information needed to install, start up and maintain the ice machine. Note any Caution or Warning indicators, as they provide notice of potential hazards. Keep this manual for future reference.
Contents
INTRODUCTION Page 1
CABINET DIMENSIONS Page 2
INSTALLATION Page 3
TO INSTALL: Plumbing Page 4
TO INSTALL: Plumbing Page 5
TO INSTALL: Plumbing Page 6
TO INSTALL: Add on Kits ...... Page 7
AFTER INSTALLATION - OPERATION...... Page 8
AFTER INSTALLATION...... Page 9
COMPONENT LOCATION Page 10
MAINTENANCE & CLEANING...... Page 11
CLEANING Page 12
ADJUSTMENTS Page 13
ADJUSTMENTS Page 14
SERVICE DIAGNOSIS...... Page 15
DECOMMISSIONING...... Page 16
| Model Number Basic Electricals | Maximum Fuse Size | Cabinet Color | Drain Pump? |
| DRCP033A-1SS 1 | 15/60/1 15 amp Stainless No | ||
| DRCG033A-1SS 1 | 15/60/1 15 amp Stainless Yes |
• Stainless Steel Door Panel Kit is SS33
• Cabinet Extensions: KCE18-SS (Stainless Steel)
- Drain Pump Kit to convert gravity drain to pump drain is part number KPMP.
Scotsman ice machines are designed and manufactured with the highest regard for safety and performance. They meet or exceed the standards of UL60335-2-24, and C.U.L. Scotsman assumes no liability or responsibility of any kind for products manufactured by Scotsman that have been altered in any way, including the use of any parts and/or other components not specifically approved by Scotsman.
Warranty information is supplied separately from this manual. Refer to it for coverage. In general, the warranty covers defects in materials or workmanship and does not cover corrections of installation errors or maintenance. Fill out the Warranty Registration Form and mail it in or scan the QR code to be taken to the Scotsman warranty website:
![2°15' E 0.1 cm 29.15' [41.1 cm] 6 [102.3 cm] 21.5' 64.0 cm 45°18.3 cm 101.8" 144.5 cm Side View](/content/2026/04/739195/images/97c12026c6d7234fb5b95ea63ad4564eb88d471dbae94295c2f514bcde0e9840.jpg)
To properly make and store ice, the DRC033 requires access to air, potable water, 115 volt electricity and a drain. The machine must be installed indoors, in a controlled environment.
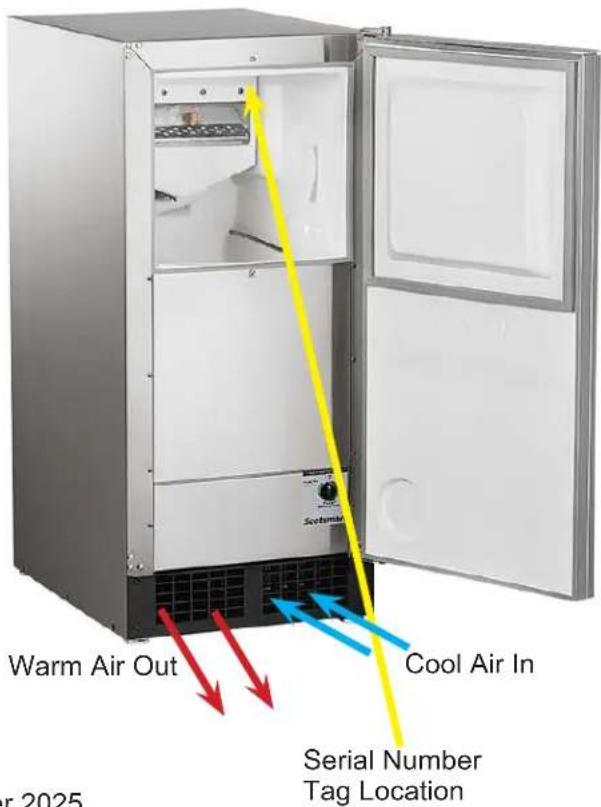
Air: The ice machine uses a fan to take in room temperature air at the front of the machine through the right side of the kick plate. It discharges warm air out the left side of the kick plate. Anything placed in front of the kick plate will restrict air flow and cause a decrease in performance and efficiency. The minimum air temperature the machine will operate in is 50^ F, and the maximum is 100^ F.
Water Supply: The ice machine requires a continuous supply of potable water at no less than 20 PSIG of flowing pressure. Static water pressure should not exceed 80 PSIG. The minimum water temperature the machine will operate in is 40^ F, and the maximum is 100F^ .
Water Quality: There is no such thing as “pure” water. All water, including potable water supplied by municipalities, contains some “impurities”. Water absorbs impurities from the air as rain and/or as it flows through the ground. Some of these impurities are solid particles. These are known as suspended solids, and a fine particle filter will remove them. Other impurities are chemically bonded to the water molecules, and cannot be filtered out. These are called dissolved solids.
Ice made by the DRC033 will have a lower mineral content than the water it was made from.
Purer water will freeze first in the ice making molds. The reason for this is that anything dissolved in water lowers the water's freezing temperature.
This concentrates most of the impurities in the ice machine's water reservoir, where they may form hard deposits known as scale. The DRC033 dilutes the concentration of minerals by overfilling the reservoir during the harvest cycle (with the excess water flowing down the drain). About 3 quarts of water flow into the unit each cycle. About 1 quart of that rinses the reservoir and goes down the drain.
Some impurities will inevitably remain. These impurities will stick to parts in the machine, causing malformed ice cubes. Eventually, built up mineral scale can shorten machine life. To keep the machine operating properly, these impurities or minerals will have to be regularly dissolved by an acid cleaning, using Scotsman Clear 1 Ice Machine Cleaner. Directions for this may be found in the section under cleaning.
In general, it is always a good idea to filter the water. A water filter, if it is of the proper type, can remove taste and odors as well as suspended solids. Some methods of water treatment for dissolved solids include reverse osmosis, and polyphosphate feeders. A reverse osmosis system should include post treatment to satisfy the R.O. water's "aggressiveness".
Deionized water is not recommended.
Because water softeners exchange one mineral for another, Scotsman does not recommend their use for ice machines. Where water is very hard, softened water may result in white, mushy cubes that stick together.
If you are in doubt about the quality of your water, we encourage you to contact a local water specialist who can help address any specific concerns.
Electricity: The unit is equipped with an electrical power cord, but should only be plugged into a circuit dedicated to the ice machine. The unit must be the only device on the circuit and powered directly from the breaker panel.
Confirm the outlet is properly grounded and is in good condition. Worn outlets should be replaced as they can cause erratic operation of equipment. Do not use an extension cord.
The fuse (or circuit breaker) size should be 15 amps.
Drain: There are two DRC033 models:
The DRCG033A-1 is a gravity drain model which uses gravity to carry a water down a drain tube and into a sanitary sewer drain below the machine.
The DRCP033A-1 uses a built in drain pump to pump water up to a drain point, such as a nearby sink.
Cabinet Stability: In some free standing installations, it may be prudent to add a bracket that secures the back of the cabinet to a wall. That kit number is KATB.
DRC033
User Manual
TO INSTALL: Plumbing
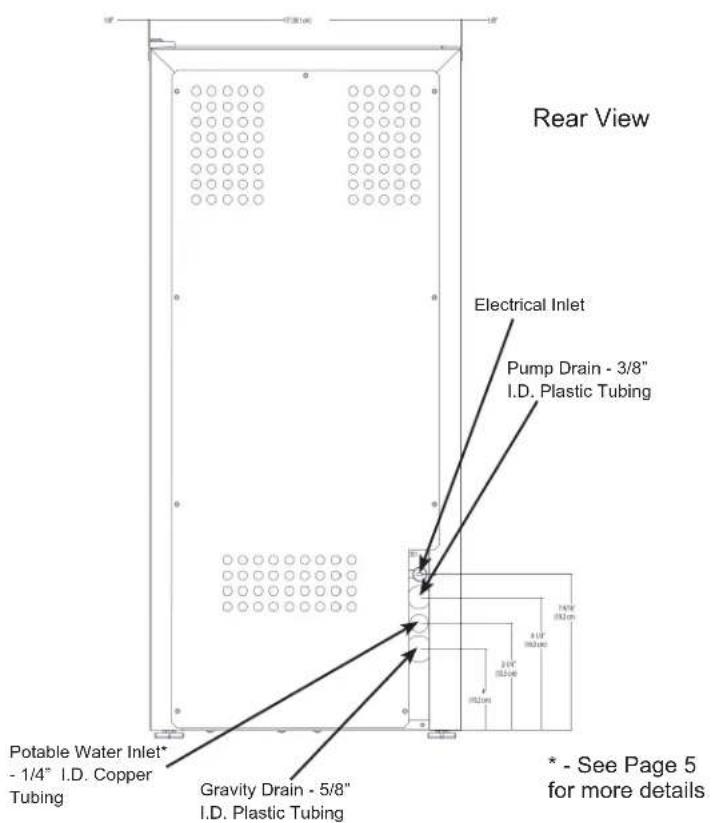
The water supply and drain should be roughed in and ready at the point of installation. A wall outlet directly behind the ice machine will make under-counter installation easier. All electrical, water and drain connections must conform to local codes.
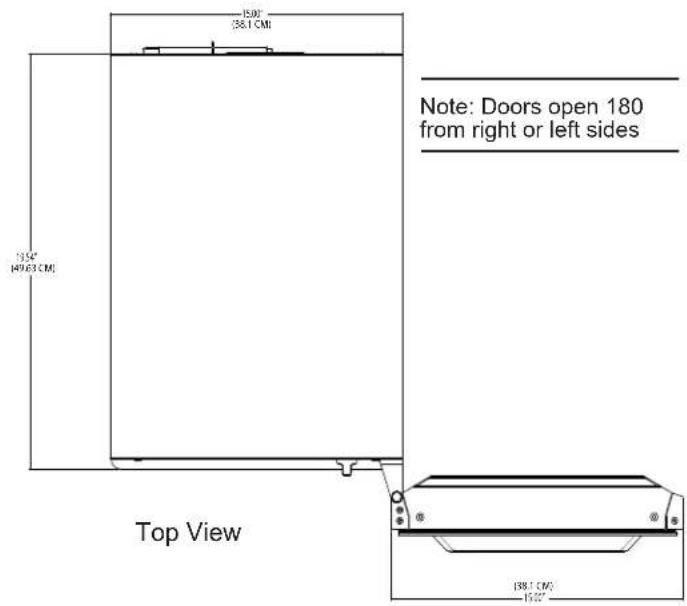
Installation Cautions: Although the DRC033 has been designed to be serviced in place, in some cases it may be necessary to pull the unit out for service. For that reason do not restrict access to the cabinet at the front, top and bottom.
If a floor is to be installed after the ice machine, shims the thickness of the floor should be installed under the DRC033 to keep the machine level with the floor. Also, allow 1/8" clearance on each side of the cabinet.
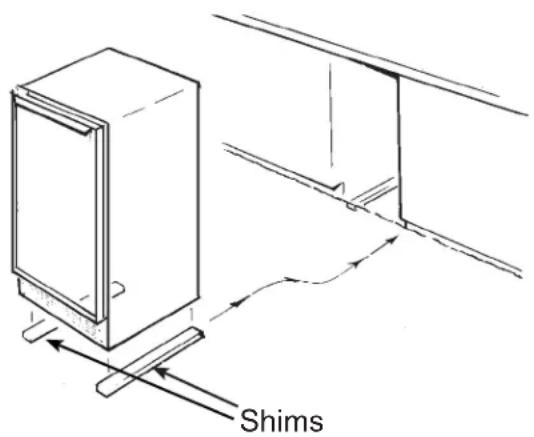
Installations on a slab: Use a pump
(DRCP033A-1) model and pump the water to the point of drainage. Pump models are able to pump water up to 10 feet vertically.
Installations over a crawl space or basement:
Either gravity drain or pump model units may be used, if there is not enough room behind the machine for a drain/waste receptacle, the drain will have to be below the floor.
FOLLOW ALL LOCAL PLUMBING CODES
Note: When installed in a corner, the door swing may be limited due to handle contact with the wall or cabinet face.
Note: It is recommended to purge the water supply lines prior to connecting to the ice machine. This will flush sediment from the line and prevent water flow restrictions.
Install Unit
Flush with
Floor
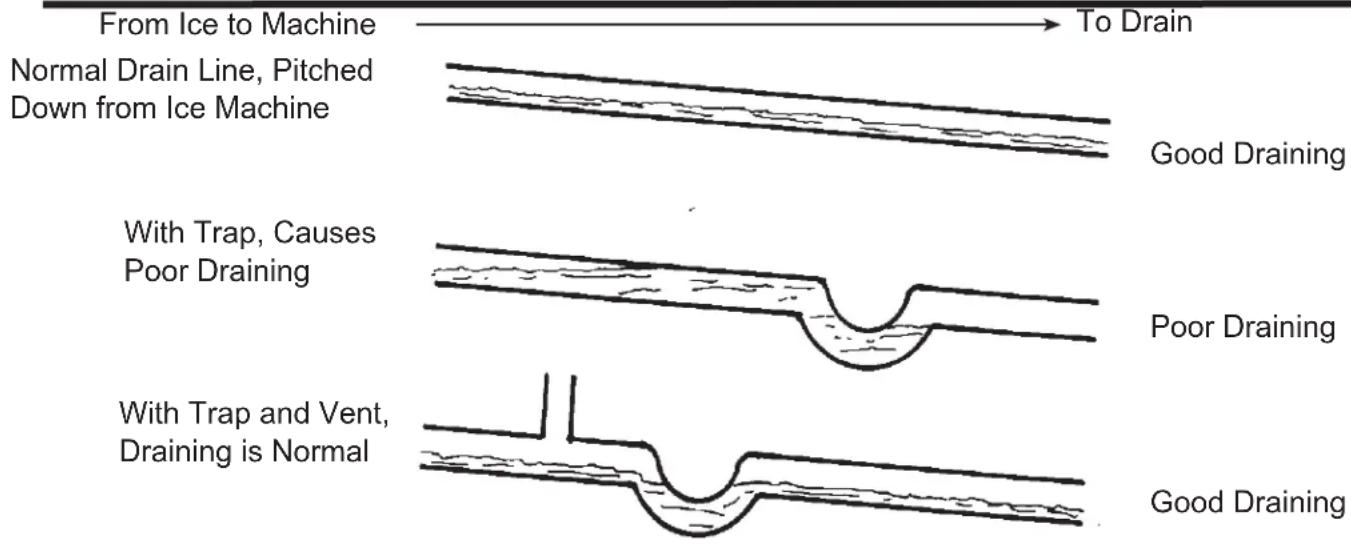
These are examples of Gravity Drain Tube installations.
September 2025
Gravity Drain Model
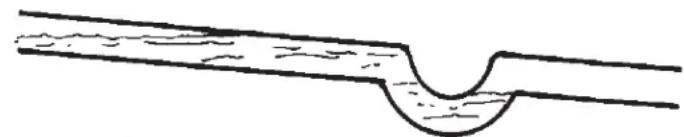
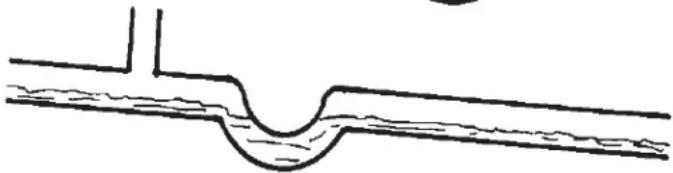
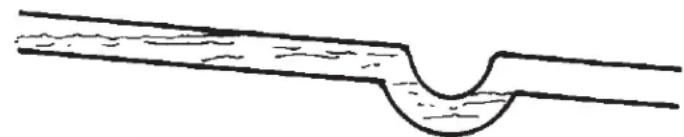
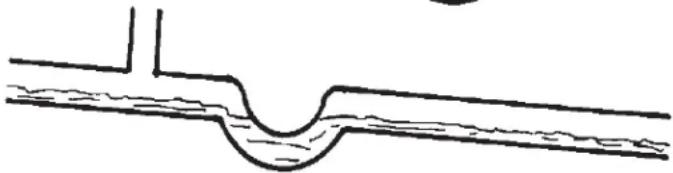
This model includes factory-installed water and drain lines. The installer must connect these lines to the building's water supply and drain system. All horizontal runs of drain lines must have a 14 " per foot fall. An air gap will likely be required between the ice machine drain tube and the drain/waste receptacle.
Note: Poor draining will cause a high rate of ice melting in the bin.
- Place ice machine in front of installation location. Adjust leg levelers to approximately correct position.
- Remove kickplate and the access cover above it.
- Locate the factory-installed water line at the rear of the cabinet. The line terminates with a compression fitting. Connect this fitting to the building's cold water supply and tighten the compression nut to seal.
- Locate the factory-installed drain line at the rear of the cabinet. Route the tube to the floor drain or standpipe. Ensure the tube is properly secured and that the end extends well into the drain fitting.
Note: if using a long horizontal run (more than 5 ft), the drain should be vented at the back of the cabinet. All horizontal runs of drain lines must have a 14 " per foot fall.
- If electrical outlet for ice machine is behind the cabinet, plug in the ice machine now.
- Push ice machine into installed position.
- Purge the building water supply line before connecting to flush out any sediment and prevent restrictions.
- After water line has been purged and connected, turn on the water supply and check for water leaks on the interior and exterior lines of the machine and at all fittings.
- Replace the kickplate and the access cover above it. Level the machine as needed.
ALL PLUMBING MUST MEET LOCAL CODES
Note: It is recommended to purge the water supply lines prior to connecting to the ice machine. This will flush sediment from the line and prevent water flow restrictions.
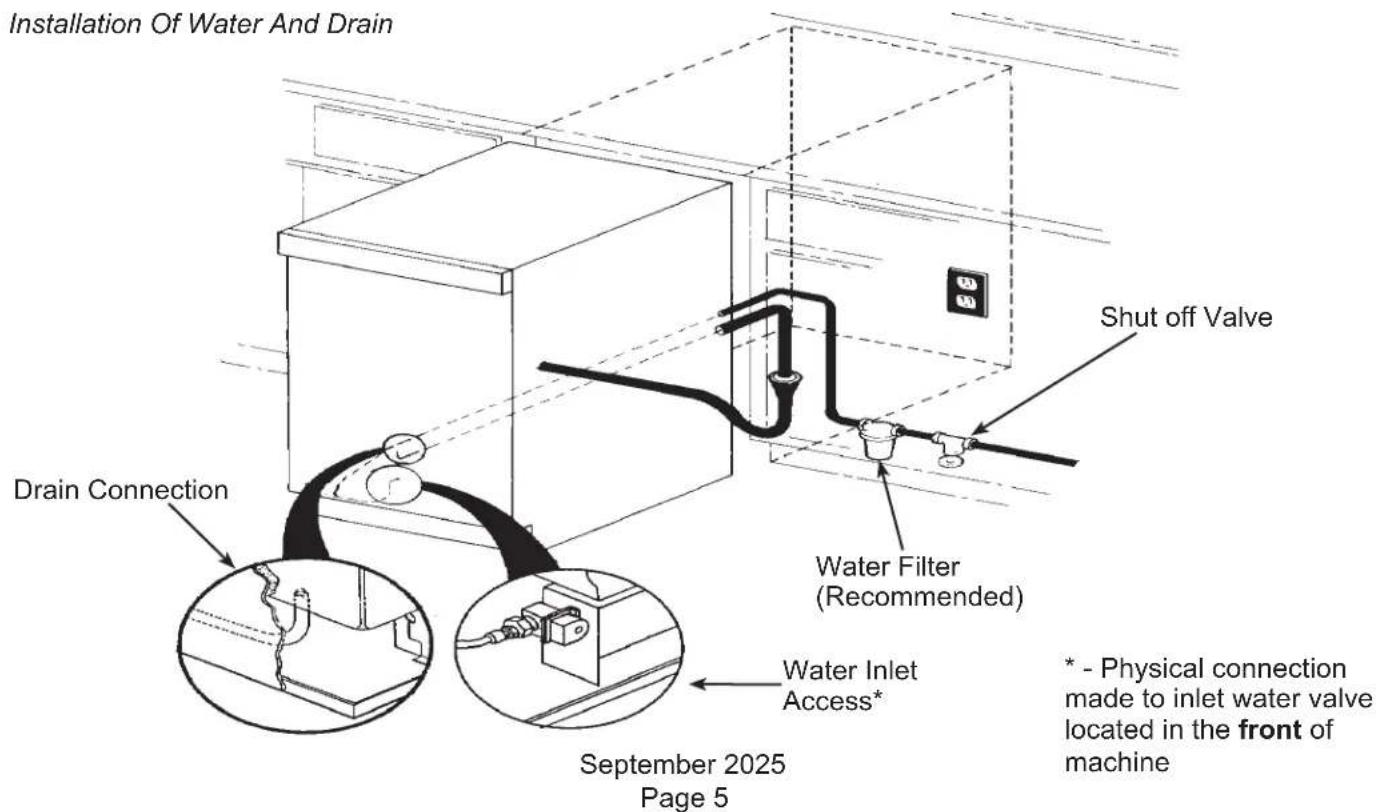
Pump Model
- Place ice machine in front of installed location. Adjust leg levelers to approximately correct position.
- Remove kickplate and control box cover.
- Locate the factory-installed water line at the rear of the cabinet. The line terminates with a compression fitting. Connect this fitting to the building's cold water supply and tighten the compression nut to seal.
- Locate the coil of factory-installed 3/8" ID plastic drain tubing secured to the back of the cabinet.
- Route plastic drain tube from back of cabinet to drain connection point.
Note: Often an air gap is required by local codes between the ice machine drain tube and the drain receptacle.
- If electrical outlet for ice machine is behind the cabinet, plug in the ice machine now.
- Push ice machine into installed position.
- Purge the building water supply line before connection to flush out sediment and prevent restrictions.
- After water supply has been purged and connected, turn on the water supply, and make sure that the ice machine is plugged in and the power is on.
- Pour a couple of quarts of water into the storage bin and watch it drain. Check for water leaks on th einterior and exterior lines of the machine and at all fittings.
- Replace kickplate and control box cover.
- Level the cabinet as needed.
ALL PLUMBING MUST MEET LOCAL CODES
Note: It is recommended to purge the water supply lines prior to connecting to the ice machine. This will flush sediment from the line and prevent water flow restrictions.
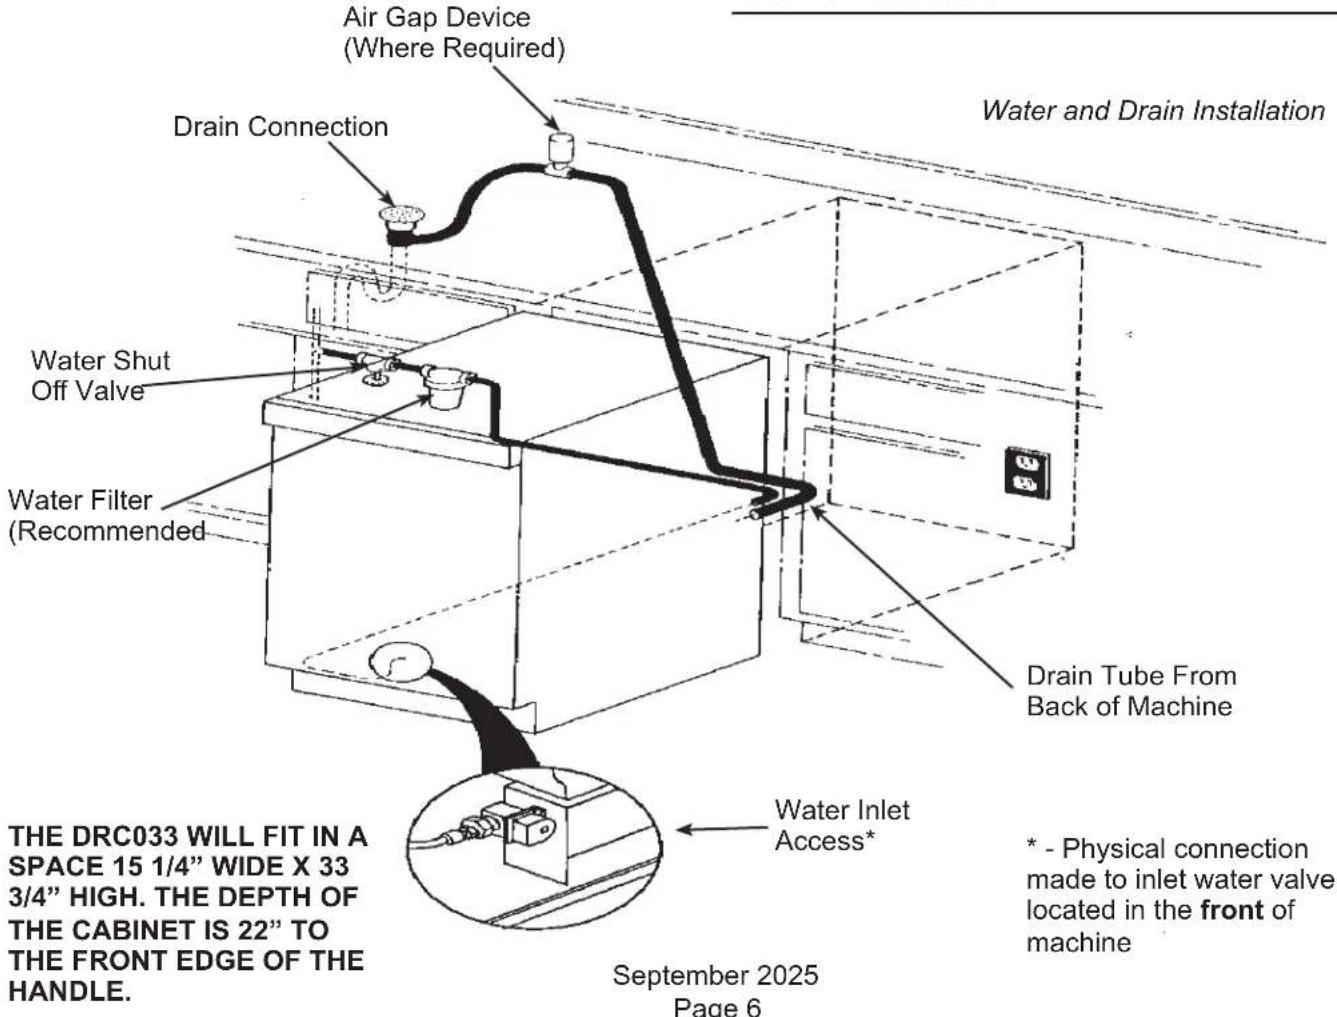
Door Kit: The door may be modified to accept a decorator door panel.
Customizing Door Panel
A custom door panel may be installed in front of the standard one. Any panel 14 3/4" wide, 28 15/16" high and 1/4" thick or less at the edges may be used as a decorator panel. Examples of decorator panels include wood to match the adjacent cabinets, metal of different colors to match nearby appliances, or just about any material that will fit. Scotsman has a stainless steel panel available to fit this machine, the kit number is SS33. If the material is less than 1/4" thick, the space between the new panel and the original may be filled with cardboard.
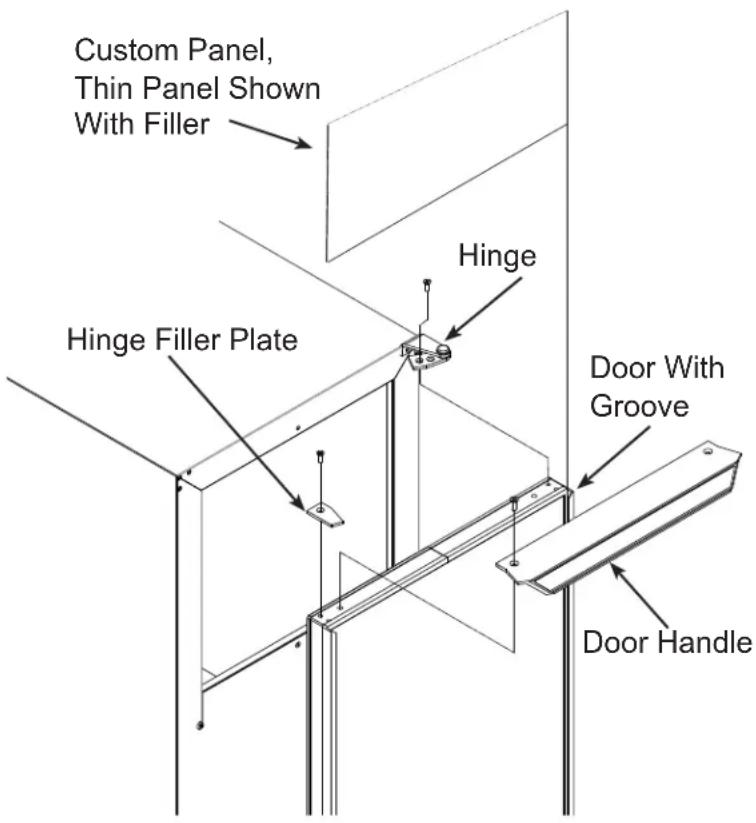
- Remove single screw and the left hand hinge filler plate from the top of the door.
- Remove two screws from the top of the door and lift off the door handle.
- Open the door slightly, about one-third or so. Then remove the front screw holding the hinge to the door.
- Loosen the rear screw of the hinge just enough to allow the door to sag or move forward. This will allow access to the top of the channels at the right and left edges of the door.
- From the top of the door, insert the decorator panel (pre-cut) evenly into the channels. Carefully slide the panel all the way down until the panel is fully into the bottom channel.
- Check that the panel is the in all the way and does not protrude past the top edge of the door.
- Push the top hinge corner of the door IN to align screw hole in the hinge with the screw hole in the door. Install the screw previously removed. Tighten the other screw.
- Replace the door handle and filler plate. Secure with screws previously removed.
Parts Involved in Customizing Door Panel
Final Check List
- Has the machine been properly uncrated, and have all packing materials and tape been removed from inside the bin?
- Have the installation instructions been followed, including connecting the machine to water, drain and electricity?
- Has the machine been leveled?
- Has the machine been plugged into a dedicated circuit?
- Has the supply water and drain been checked for leaks?
Initial Start Up:
- Turn on water supply.
- With unit plugged in, rotate ice machine control knob to the ON position.
- Allow the unit to operate for 1 hour, and check the size of the cubes, if they are not correct, adjust as recommended on page 18.
- After the cubes are confirmed to be the correct size, replace all panels.
- Locate the nameplate on the control box cover. Record the serial number and date of start up here in the manual. Keep the manual handy for future reference.
Serial Number:
Date of initial start up:
- Fill out the Warranty Registration. This can be done by filling out the attached warranty and mailing it in or scan the QR code to be taken to the Scotsman warranty website:
How To Use:
The ice machine is simple to use. Simply turn the ice machine control knob to the ON position. The DRC033 will automatically begin to make ice and will continue to do so until the bin is full. A new machine, warm out of the box, could take as long as 48 hours to fill and shut off.
Use the scoop to remove ice and place the ice scoop in the holder provided (do not leave the scoop on the ice, as it will gradually disappear into the ice).
What to expect from the DRC033
The DRC033 will release a batch of 8 ice cubes about every 30 minutes. At the same time the cubes fall into the storage bin, water will be entering the ice machine and draining out.
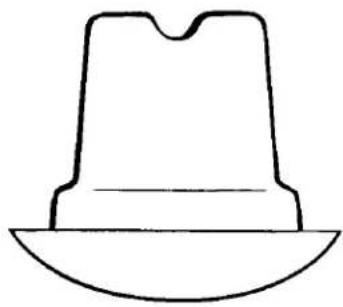
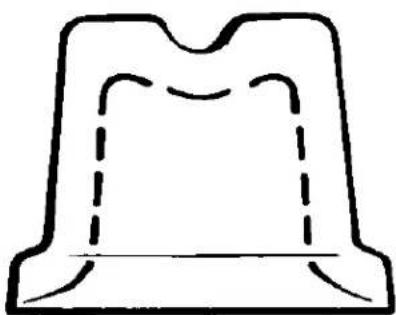
Ice: The ice cubes are tapered cylinders about 1 1/4" in diameter at the widest end, taper down to 1" wide at the top and are 1 1/8" high. When the machine is adjusted properly, there should be a 1/4" indent in the base of the cube. The ice will appear wet when fresh — this is normal. It may also develop frost on the outside and look cloudy — this is also normal (the frost will disappear when liquid is poured over the ice).
Storage: All restaurant type ice machines operate on this principal: The ice storage bin is not refrigerated. Instead, it's heavily insulated, much like a picnic cooler or ice chest. If the ice bin were to be refrigerated, the ice would freeze together into one very large cluster of ice and would begin to evaporate. This would yield ice that is very poor in quality, and difficult to remove from the machine.
The DRC033 will continue to operate until ice builds up high enough to contact the bin thermostat sensor tube, then it will shut off. Models with a drain pump will occasionally pump out melted water when the machine is off. The pump will only be on for a few seconds.
Run Time: The amount of time the DRC033 will run to replace melted ice is about 6 hours per day. The amount of time the ice machine will run to replace ice removed is dependent upon how much is removed, how clean the ice machine is, and how hot the air and water supplied to the machine are. A machine that has been emptied will usually take about 24-36 hours to re-fill.
Reversing Door Swing:
The hinged side of the door may be reversed to the other side if desired.
The DRC033 was shipped with the door hinged at the right. The door and hinges are designed for placing the hinges on either the right or the left side of the cabinet. Moving the hinges to the left allows the door to pivot from the left side.
Note: There is a part, packed with the machine, that is required for this procedure.
- Open the door and remove the three screws holding the lower hinge to the cabinet.
- With the door open enough to see both screws at the top door hinge, remove the two screws. The door is now free of the cabinet.
- Remove the single screw and the hinge filler plate from the top of the door.
- Install the other filler plate (shipped inside refrigerator compartment) onto the top corner of the door where the hinge was.
- Remove the three plastic plugs from the top front corner where the hinge will mount.
- Remove the three plastic plugs from the lower front corner where that hinge will mount.
- Remove the three screws holding the top hinge to the cabinet. Remove that hinge from the top and, flipping it upside down, install it onto the bottom of the door, on the opposite side using the original screws.
- Remove the hinge assembly from the bottom of the door, and flip it upside down; secure it to the cabinet at the opposite side top position with the original screws.
- Hold the door up to the cabinet. Secure the door to the top hinge with the original screws.
- Secure the bottom hinge to the cabinet with the original screws.
- Place the plastic plugs removed earlier into the empty holes.
- Check operation of the door by opening and closing it.
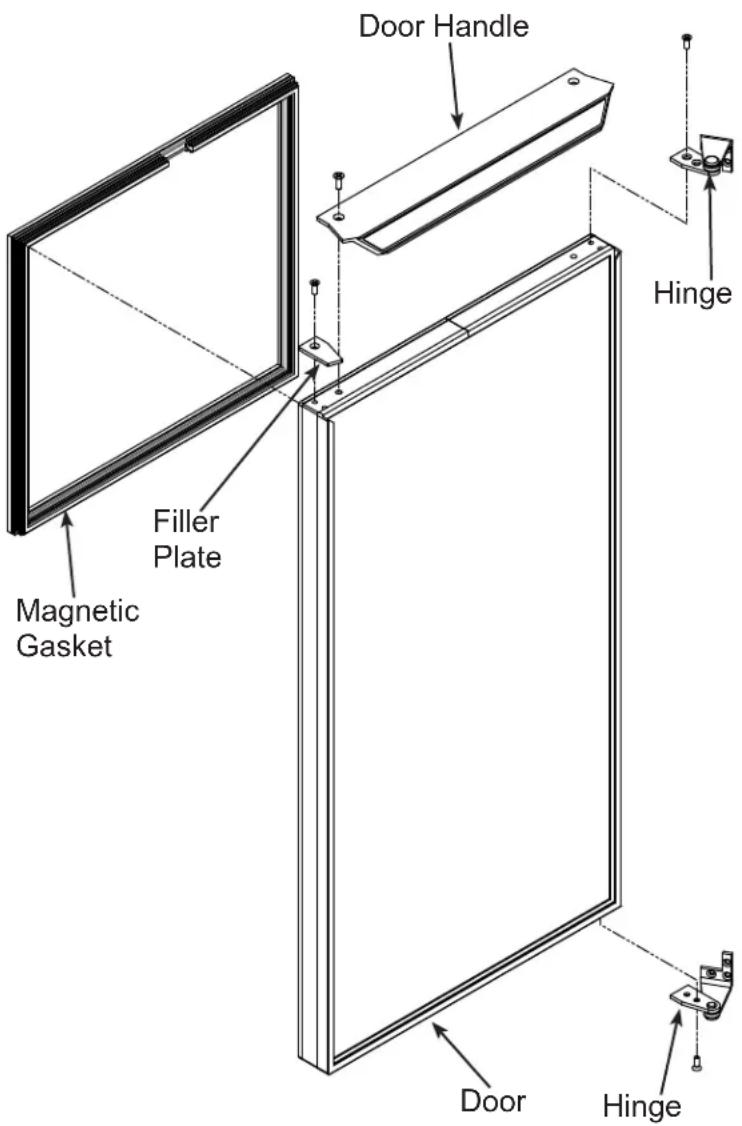
Reverse Hinges From Top to Bottom and Left to Right to Reverse Door Swing
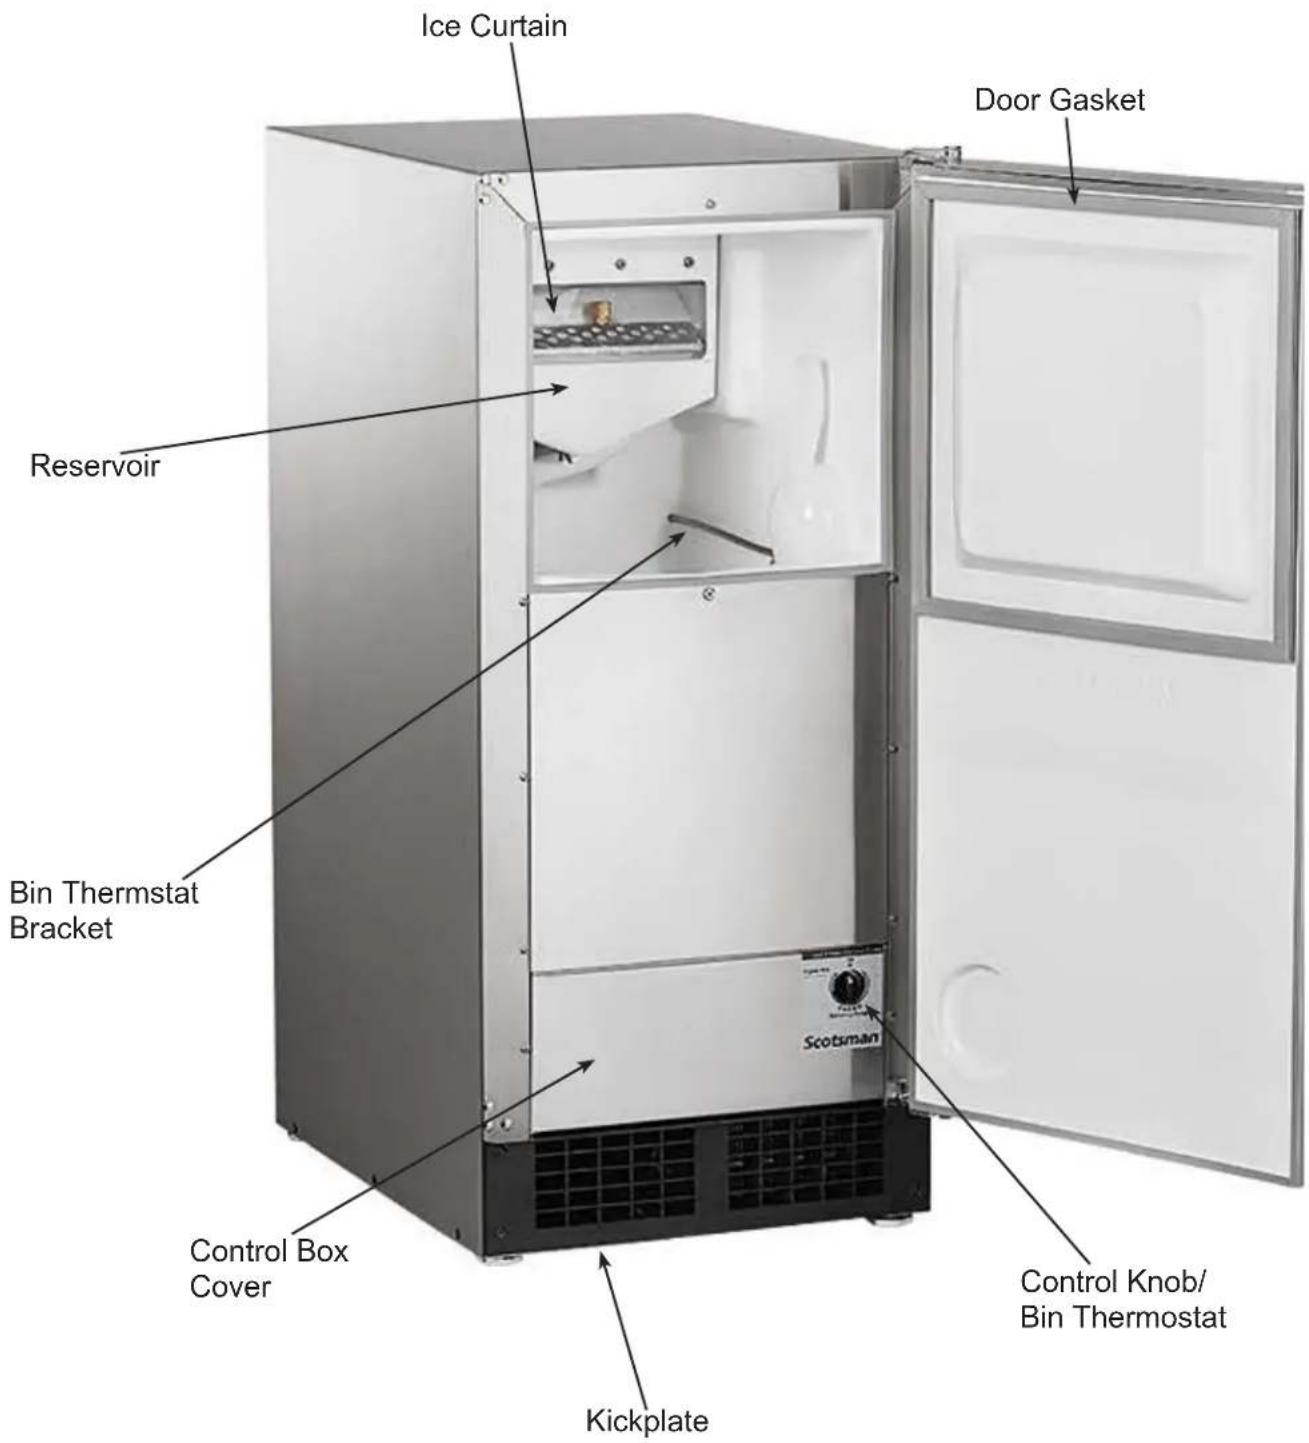
What shouldn't be done?
Never keep anything in the ice storage bin that is not ice. Objects like wine or beer bottles are not only unsanitary, but the labels may slip off and plug up the drain.
Never allow the machine to operate without regular cleaning. The machine will last longer if it is kept clean. Regular cleaning should happen at least once per year, and preferably twice. Some water conditions will dictate even more frequent cleaning of the ice making section, and some carpets or pets will dictate more frequent cleaning of the condenser.
What should be kept clean?
There are 6 things to keep clean:
- The outside cabinet & door.
- The ice storage bin.
- The condenser.
- The ice making system.
- The ice scoop.
- The drain pump system.
How to clean the cabinet.
Wipe off any spills on the surface of the door and handle as they occur. If anything spilled on the door or gasket dries onto the surface, wash with soap and warm water to remove.
How to clean the ice storage bin.
The ice storage bin should be sanitized occasionally. It is usually convenient to sanitize the bin after the ice making system has been cleaned, and the storage bin is empty.
A sanitizing solution can be made of 1 ounce of household bleach and 2 gallons of hot (95F. - 115F.) water. Use a clean cloth and wipe the interior of the ice storage bin with the sanitizing solution. Pour some of the solution down the drain. Allow to air dry.
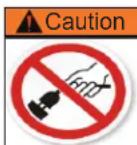
Do not unplug or disconnect power to the ice machine with out shutting off the water supply.
Note: This ice machine should be on its own dedicated circuit with out any other appliances or devices.
How to clean the condenser.
The condenser is like the radiator on a car, it has fins and tubes that can become clogged. To clean:
- Remove the kickplate.
- Locate the condenser surface.
- Vacuum the surface, removing all dust and lint.
Caution: Do not dent the fins.
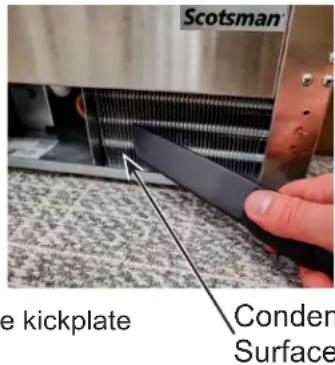
- Replace the kickplate
Winterizing
- Clean the machine as explained on the next page.
- Turn off the water supply.
- Drain the water reservoir. See page 26, Spray Pump Repair and follow the instructions to remove the pump hose (step 2, bottom hose only).
- Disconnect the incoming water line at the inlet water valve.
- Remove control box cover and turn the timer into the harvest cycle.
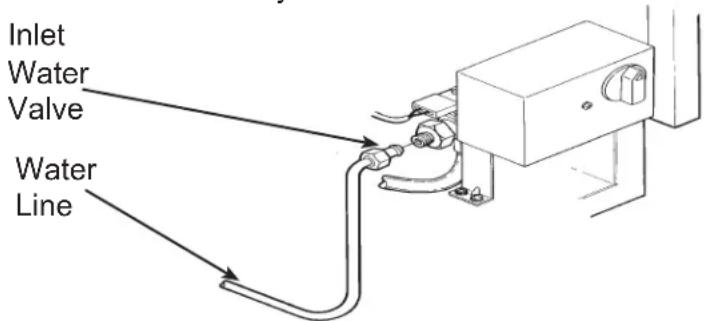
- With the machine operating, blow air through the inlet water valve; a tire pump could do the job.
- Drain pump models should have about 1/2 gallon of RV antifreeze (propylene glycol) poured into the ice storage bin drain.
Note: Automotive antifreeze must NOT be used.
- Replace control box cover. Switch off and unplug the machine.
Note: To use after winterizing, reconnect pump hose and water line. Repeat initial start up.
How to clean the ice making system.
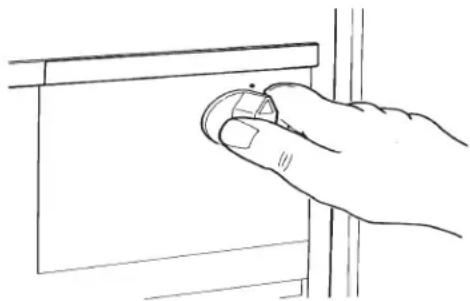
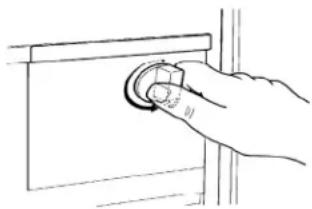
- Open the Door and turn the ice machine control knob to OFF.
natural_image
Line drawing of a hand holding a circular object on a rectangular panel (no text or symbols)Caution
Do not unplug or disconnect power to the ice machine with out shutting off the water supply.
Note: This ice machine should be on its own dedicated circuit with out any other appliances or devices.
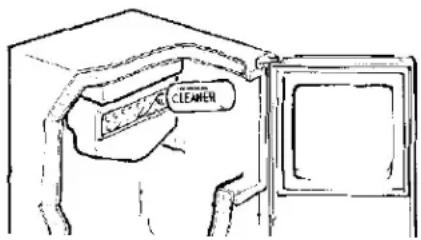
- Scoop out all of the ice. Either discard it or save it in a ice chest or cooler.
- Pour 4 ounces of Clear 1 scale remover (available from a local Scotsman Distributor or Dealer, ask for part number 19-0343-06 - an 8 ounce bottle) into the ice machine reservoir.
- Turn the ice machine control to ON.
- Allow the machine to operate for about 2 hours.
- Pour hot (95°F - 115°F) water into the bin to melt the ice that has formed. That ice will likely be white and frosty looking.
*For Pump Only models.
natural_image
Hand pressing a button on a door panel (no text or symbols visible)- Clean the bin liner of mineral scale by mixing a solution of 2.5 ounces of Clear 1 Scale Remover and 1 quart of water. Scrub the scale
off of the liner.
| WARNING | Scotsman Ice Machine Cleaner contains acids. These compounds may cause burns. If swallowed, DO NOT induce vomiting. Give large amounts of water or milk. Call Physician immediately. In case of skin contact, flush with water. Keep out of the reach of children. |
*7a. Slowly pour about 1 quart of water down the bin drain until the pump turns on. Once pump turns on, IMMEDIATELY stop.
*7b. Once pump shuts off, add a mixture of 10 ounces of water and 4 ounces of Scotsman's Clear 1 scale remover to bin drain. If the pump cycles during this process, then repeat step 7a; making sure to stop pouring as soon as the pump turns on. Then repeat step 7b. Let machine sit in off state for 1/2 an hour.
8. Rinse the liner with hot water.
*For Pump Only models.
- Create a solution of sanitizer by mixing 1 gallon (4 liters) of clean, warm potable water (105-115°F) with 1.6 ounces of locally approved sanitizer to sanitize the bin interior and flush the drain.
*9a. Pour 1 quart of water down the bin drain until the pump turns on. Once pump turns on IMMEDIATELY stop.
*9b. Once the pump shuts off, mix 13 ounces of clean, warm potable water (105-115°F) with 1 ounce of locally approved sanitizer to sanitize the bin interior. If the pump cycles during this process, then repeat step 9a, making sure to stop pouring as soon as the pump turns on. Then repeat step 9b. Let machine sit in off state for 10 minutes.
10. Replace the ice removed in step 2.
The ice scoop should be washed regularly. Wash it just like any other food container.
There are three items that may be adjusted: Cube Size, Harvest Time and Bin Level.
Note: Cube Size and Harvest Time adjustments should only be done by a qualified service person.
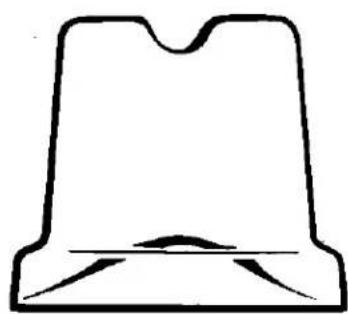
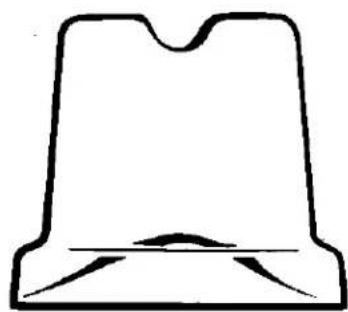
Too Big
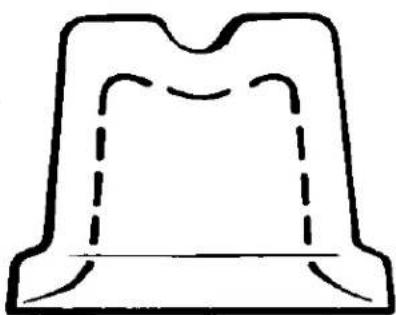
Cube Size Control.
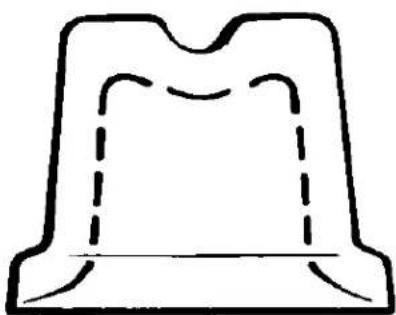
The cube size control should only be adjusted to bring the cubes to the correct shape. The overall size cannot be adjusted. Try to adjust the cube size control when the ice machine is in the harvest cycle, or in the first 10 minutes of the freeze cycle.
- Open the door and remove the kickplate. Then gently pull the Control Knob off and remove the control box cover.
natural_image
Simple line drawing of a hat and a curved base (no text or symbols)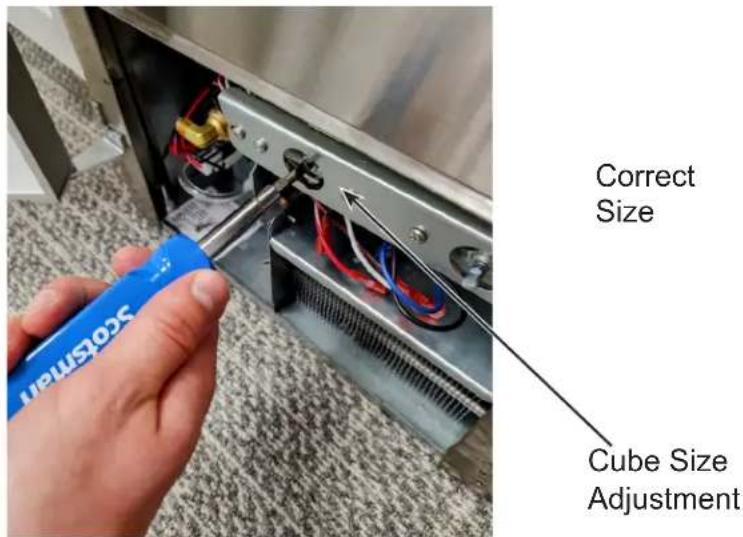
natural_image
Simple line drawing of a mechanical component or bracket (no text or symbols)-
Locate the cube size adjustment screw, and to make fuller cubes, turn the screw clockwise about 1/4 turn. This will make the freezing cycle longer.
-
To shorten the freezing cycle and make cubes that are not as full, turn the adjustment screw 1/4 turn counterclockwise.
-
After the next freezing cycle, the cubes should have responded to the adjustment, if another adjustment is required, do it early in the freeze cycle.
Too Small
natural_image
Simple line drawing of a mechanical part or bracket with dashed internal lines (no text or symbols)Bin's Ice Level
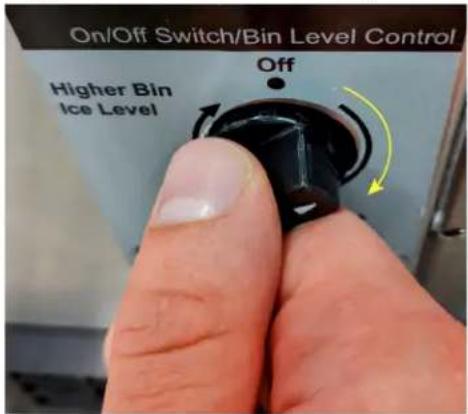
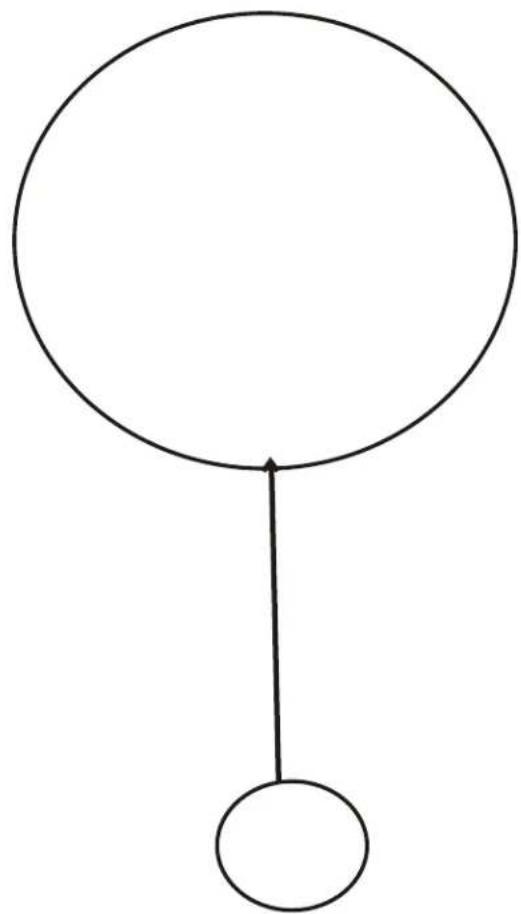
When the ice machine shuts off, the ice level in the bin should be even with the metal tube inside the bin. If the ice in the bin is too high or low, turn the ice machine control knob to adjust the bin thermostat.
- To lower the ice level, turn the knob counterclockwise. Usually, 1/8 of a turn will be enough.
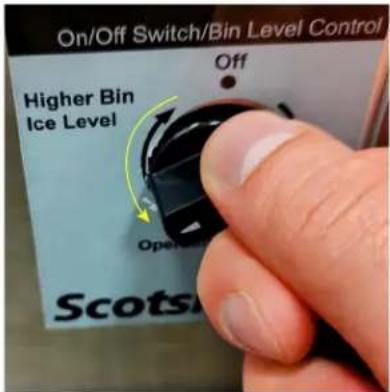
- To increase the ice level, turn the knob clockwise. Usually, 1/8 of a turn will be enough.
Harvest Time Adjustment
The harvest time can be adjusted so that all the ice is released during the harvest period, with a few seconds extra for a safety margin. The adjustment range is between 2 to 5 minutes.
There is an adjustment screw on the surface of the electronic timer. Rotate the screw CCW to reduce harvest time, and CW to increase it. It should be set to match the machine's performance. If the machine takes 2 and a half minutes to release the ice, the harvest time should be set to about 3 minutes.
natural_image
Simple line drawing of a pendulum with a circular head and a hanging mass (no text or symbols)| PROBLEM POSSIBLE CAUSE | PROBABLE CORRECTION | |
| No ice falling in bin, but machine operates | Ice may be stuck in the evaporator and the unit is “frozen up”. | Check water supply - filter may be restricted |
| Check inlet water valve - screen may be restricted, or valve does not operate. | ||
| Hot gas valve may not operate -check and repair/replace. | ||
| Too much heat load. Inlet water valve leaks thru, needs to be replaced. | ||
| No water spray Water pump does not work, replace it. | ||
| Water leak from reservoir, locate and repair. | ||
| Cube size control will not close See “Too much heat load” or “not enough refrigerant” | ||
| Control defective - must be replaced. | ||
| No airflow Fan motor not turning, needs to be replaced. | ||
| Fan blade broken, needs to be replaced. | ||
| Condenser completely blocked up, needs cleaning. | ||
| Standing water in the bin Drain line restriction or drain pump maintenance required | Remove restriction or follow scale removal cleaning instructions and sanitize bin. If problem persists, contact a local service provider. | |
Note: Over time, biofilm can grow inside the drain system which can affect the drain's ability to evacuate drain water. On the pump models, this can also drive a erratic pump operation, which can cause the pump to cycle rapidly or run constantly. Biofilm and pump cycling issues will eventually lead to low production and standing water in the bin. To ensure that this does not become an issue, frequent bin sanitizing may be required.
Only qualified technicians familiar with R290 refrigerant should decommission a machine, as special tools and containers are required for the removal, transportation, and disposal of this highly flammable substance.
• Before attempting the procedure:
* Ensure that all protective gear is present and used throughout the procedure.
* Make sure recovery equipment and containers are available and ready for use. All containers used for recovery must be rated for R290 refrigerant and must be labeled as such.
* Weigh any refrigerant prior to reclaiming.
- Maintain safety through standard operating procedures as outlined on page 20 of this document. Be sure to follow local, state, and federal guidelines for proper disposal.
- Do not fill containers more than 80% and do not exceed the pressure limits of the container. Make sure the machine to be decommissioned is in satisfactory working order and that the electrical components of the machine are properly sealed to prevent ignition.
- Recovered refrigerant should not be charged into another refrigerating system or mixed in another container.
- Make sure to safely transport the refrigerant in line with standard operating procedures.
- All recovered refrigerant must be returned to refrigerant supplier for proper disposal.
- If compressor or compressor oils are removed ensure it has been removed to an acceptable level so the flammable refrigerant does not remain in the lubricant.
Scotsman
The Ideal Ice®
natural_image
Exterior view of a stainless steel refrigerator with front panel and side grilles (no visible text or symbols)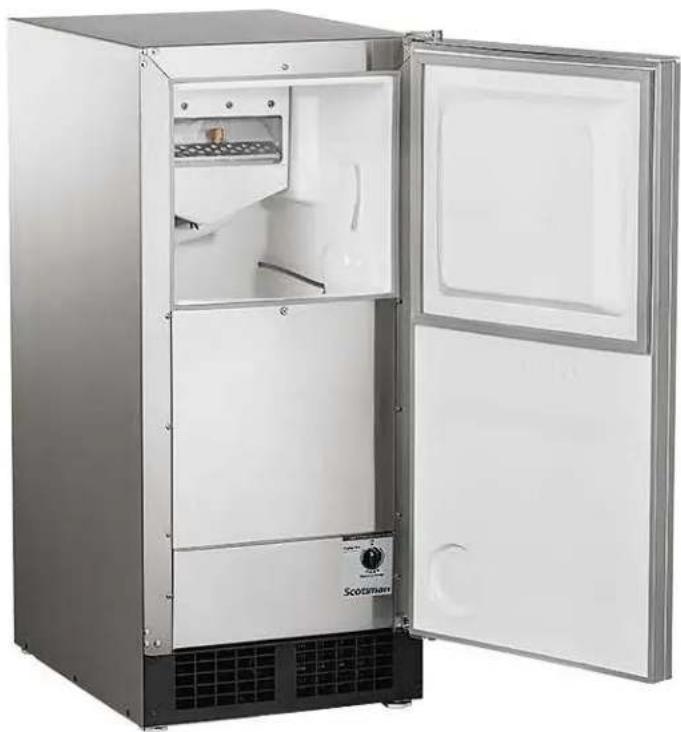
natural_image
Interior view of a stainless steel refrigerator with open doors and internal compartments (no visible text or symbols)
AVERTISSEMENT
natural_image
Two parallel horizontal lines with a wavy line inside, no text or symbols present.À la vidange
Vidange correcte
natural_image
Simple line drawing of a pipe with a V-shaped notch (no text or symbols)Vidange incorrecte
natural_image
Simple line drawing of a pipe with a wavy bottom and a vertical line above it (no text or symbols)Vidange correcte
natural_image
Close-up of a hand holding a black tab near a stainless steel appliance labeled 'Scotsman' (no other text or symbols visible)natural_image
Hand holding a circular object on a vertical surface, no text or symbols visiblenatural_image
Line drawing of a hand placing food into an oven with a tray of food inside (no text or symbols)natural_image
Hand pressing a button on a panel, no text or symbols visiblenatural_image
Close-up of a hand using a blue-handled tool to adjust or install electronic components on a stainless steel appliance (no visible text or symbols)natural_image
Simple line drawing of a hat with a curved base (no text or symbols)Dimension correcte

natural_image
Simple line drawing of a mechanical component or bracket (no text or symbols)Trop petit
natural_image
Simple line drawing of a mechanical part or bracket with dashed internal lines (no text or symbols)natural_image
Simple line drawing of a pendulum with a circular head and a hanging mass (no text or symbols)natural_image
Exterior view of a stainless steel refrigerator with open lid and ventilation grilles (no text or symbols visible)
natural_image
Interior view of a stainless steel refrigerator with open doors and internal compartments (no visible text or symbols)
ADVERTENCIA
natural_image
Two parallel horizontal lines with a wavy line inside, no text or symbols presentHacia el drenaje
Buen drenaje
natural_image
Simple line drawing of a pipe with a V-shaped notch (no text or symbols)Drenaje deficiente
natural_image
Simple line drawing of a pipe with a wavy bottom and a vertical line above it (no text or symbols)Buen drenaje
natural_image
Close-up of a hand using a tool to cut a metal grille with a knife, no visible text or symbolsSuperficie del condensador
natural_image
Line drawing of a hand holding a circular knob on a panel (no text or symbols)natural_image
Line drawing of a hand placing food into an oven with a tray of food inside (no text or symbols)natural_image
Hand pressing a button on a rectangular panel (no text or symbols visible)natural_image
Close-up of a hand using a blue screwdriver to adjust cable wiring inside a stainless steel appliance (no visible text or symbols)natural_image
Simple line drawing of a hat with a curved base (no text or symbols)Tamaño
correcto
natural_image
Simple line drawing of a mechanical component or bracket (no text or symbols)Demasiado
pequeño
natural_image
Simple line drawing of a mechanical part or bracket with dashed internal lines (no text or symbols)Nivel de hielo del recipiente.
natural_image
Simple line drawing of a pendulum with a circular head and a hanging mass (no text or symbols)101 Corporate Woods Parkway
Vernon Hills, IL 60061
800-726-8762
www.scotsman-ice.com
- Installation and User's Manual for Residential Ice Machine
- Model DRC033
- WARNING
- Contents
- DRC033
- User Manual
- TO INSTALL: Plumbing
- FOLLOW ALL LOCAL PLUMBING CODES
- Gravity Drain Model
- ALL PLUMBING MUST MEET LOCAL CODES
- Pump Model
- Customizing Door Panel
- Final Check List
- Initial Start Up:
- How To Use:
- What to expect from the DRC033
- Reversing Door Swing:
- What shouldn't be done?
- What should be kept clean?
- How to clean the cabinet.
- How to clean the ice storage bin.
- How to clean the condenser.
- Winterizing
- Cube Size Control.
- Bin's Ice Level
- Harvest Time Adjustment
- Scotsman
- The Ideal Ice®
- AVERTISSEMENT
- ADVERTENCIA
- Hacia el drenaje
- Nivel de hielo del recipiente.
Brand : Scotsman
Model : DRC033
Category : Ice Maker