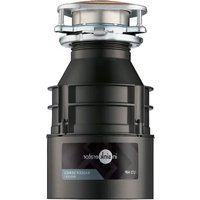
Badger 5 - Trash can InSinkErator - Free user manual and instructions
Find the device manual for free Badger 5 InSinkErator in PDF.

User questions about Badger 5 InSinkErator
0 question about this device. Answer the ones you know or ask your own.
Ask a new question about this device
Download the instructions for your Trash can in PDF format for free! Find your manual Badger 5 - InSinkErator and take your electronic device back in hand. On this page are published all the documents necessary for the use of your device. Badger 5 by InSinkErator.
USER MANUAL Badger 5 InSinkErator
Registered trademark/TM Trademark of InSinkErator
© 2025 All rights reserved.
們 Marca registrada/TM Marca commercial de InSinkErator,
situation which, if not avoided, will result in death or serious injury.
WARNING indicates a hazardous
situation which, if not avoided, could result in death or serious injury.
CAUTION indicates a hazardous
situation which, if not avoided, could result in minor or moderate injury.
NOTICE
is used to address
practices not related to personal injury.
SAFETY
(or equivalent) signs
INSTRUCTIONS
indicate specific
safety-related instructions or procedures.
A PELIGRO
peligrosa que, si no se
Read these instructions thoroughly. Failure to follow the Installation, Operating and User-Maintenance Instructions may result in personal injury or property damage.
Turn off electric power at circuit breaker or fuse box.
PELIGRO DE DESCARGA ELECTRICA
If you are replacing an existing er, continue to Step 2. Here is no existing dispenser, disconnect sink drain and skip to Step 9.
Turn off electrical power at circuit breaker or fuse box. Disconnect drain trap from waste discharge tube. Disconnect dishwasher if connected to the dispenser.
Support disposer, insert end of wrenchette (H) into right side of mounting lug, and turn. Disposer will fall free.
Flip dispenser over and remove electrical cover plate. Save cable connector if applicable.
Disconnect the dispenser wires from the electrical supply.
Using a flathead screwdriver, loosen the 3 screws on the mounting assembly.
Using a flathead screwdriver, pry off the snap ring (G).
Remove flange from sink. Remove old plumber's putty from sink with putty knife.
Evenly apply 1 / 2'' thick rope of plumber's putty around sink flange (B).
Property Damage: Risk of long/short term water leakage if not properly assembled.
Press sink flange (B) firmly into sink drain. Remove excess putty.
Place a weight, such as the dispenser, on the sink flange to hold it in place. Use a towel to avoid scratching sink.
Tighten 3 mounting screws (F) evenly and firmly against backup flange.
Insert fiber gasket (C), backup flange (D) and mounting ring (E). Hold in place while inserting snap ring (G). Pull snap ring (G) open and press firmly until it snaps into place.
If NOT connecting a dishwasher, continue to step 16.
NOTICE: Drain plug cannot be replaced once it is knocked out. Turn disposer (J) onto side and knock out drain plug with screwdriver. Remove plug from inside of dispenser with pliers.
IMPORTANT: Dishwasher connection only
If the dishwasher connection is made without removing the plug, the dishwasher may overflow.
Turn disposer over and remove electrical cover plate. Pull out wires.
Property Damage: Do not remove or displace motor compartment insulation shield.
Insert cable connector (not included) and run electrical cable through access hole on bottom of dispenser. Tighten cable connector.
This dispenser requires a switch with a marked "Off" position (wired to disconnect all ungrounded supply conductors) installed within sight of the dispenser sink opening (1 hp minimum rating).
Connect white wire from dispenser to neutral (white) wire from power source. Connect black wire from dispenser to hot (black, red) wire from power source with wire nuts (not included). Connect ground wire to green grounding screw. Unit must be grounded for safe and proper installation.
Push wires into dispenser and replace electrical cover plate.
You may need to trim discharge tube (J) to ensure proper fit.
Property Damage Risk: Do not remove or displace motor compartment insulation shield.
Slide flange (L) over discharge tube (J). Insert gasket (K) into discharge outlet. Secure flange and discharge tube to dispenser with two bolts (M). Although the supplied discharge tube is preferred, a straight discharge tube may be used.
NOTE BEFORE INSTALLING THE DISPOSAL: Lift & Latch Technology features a lower mounting ring that is fixed with a tab; the lower mounting ring will not turn freely on the disposal. (This is intentional for ease of installation and lifting the disposal with two hands). Tip: Review how the lower mounting ring tabs interact with the ramps on the bottom of the flange prior to install.
1 Lift the disposal to align with flange. Ensure all three (3) mounting tabs on the lower mounting ring are aligned with the lowest part of the three (3) ramps on the flange. Slightly push/compress the mounting gasket against the flange and turn the disposal to the right to slide up the ramps. Verify all three tabs are engaged on the flange ramps.
2 Once the lower mounting ring is secure on the flange ramps, the disposal will rotate freely. Rotate the disposal to the right and align with plumbing. Caution: Do not turn the disposal to the left as it could fall off the flange ramps.
Do not position your head or body under dispenser; unit could fall during removal or installation.
To avoid leaks and/or potential falling hazard, make sure all 3 mounting tabs are latched over ridges.
Lock the flange in place by using the wrenchette (H) for leverage. Insert the wrenchette in one of the hooks on the lower mounting ring and turn right until all three tabs are over the ridges on the high side of the ramps.
Tip: Pliers (not included) can also be used to help secure the disposal on the ramps by clasping one end on a hook and the other end on one of the three lobes of the flange.
NOTICE/AVISO/AVIS
Property Damage: Risk of long/short term water leakage if all three mounting tabs are not properly engaged on all slide-up ramps and locked in place past the ridges.
Detach removable portion of spec label and place on a visible location.
To test for leaks, insert (N) into (B), press down evenly until it snaps into place. Insert (A) into sink opening, fill sink with water, remove (A) to drain, then look under sink for leaking water.
Reconnect plumbing. If the dishwasher connection is used make sure drain plug in dispenser is removed. Make sure discharge tube mount is straight.
Property Damage: Risk of long/short term water leakage if not properly assembled.
You may need to trim tube for proper fit. To reduce the potential of leaking, the drain line must be properly pitched (not less than 1/4'' of pitch per foot of run) from the dispenser to the drain connection, with the drain connection being lower than the dispenser discharge. Failure to do so could lead to premature corrosion or leaking due to standing water left in the dispenser.
IMPORTANT SAFETY INSTRUCTIONS

WARNING
Personal Injury: Do not position your head or body under dispenser; unit could fall during removal or installation.
GROUNDING INSTRUCTIONS
For all grounded, cord-connected disposers:
This disposer must be grounded to reduce the risk of electric shock in the event of a malfunction or breakdown. Grounding provides a path of least resistance for electric current. If your disposer did not include a factory installed power cord, use a cord having an equipment-grounding conductor and a grounding plug. (InSinkErator power cord accessory CRD-00 recommended.) The plug must be plugged into an outlet that is properly installed and grounded in accordance with all local codes and ordinances.
For permanently connected disposers:
This disposer must be connected to a grounded, metal, permanent wiring system; or an equipment-grounding conductor must be run with the circuit conductors and connected to the equipment-grounding terminal or lead on the disposer.

WARNING
Improper connection of the equipment-grounding conductor can result in a risk of electric shock. Check with a qualified electrician or serviceman if you are in doubt as to whether the dispenser is properly grounded. If the plug you are using does not fit the outlet, do not modify the plug or attempt to force the plug into the outlet - have a proper outlet installed by a qualified electrician.
- This dispenser must be properly grounded.
- Do not attach ground wire to gas supply line.
- Disconnect power before installing or servicing disposer.
- If three-pronged grounded plug is used, plug must be inserted into three-hole grounded receptacle.
- All wiring must comply with local electrical codes.
- Do not reconnect electrical current at main service panel until proper grounds are installed.
NOTICE
- Do not use plumber's putty on any other dispenser connection other than sink flange. Do not use thread sealants or pipe dope. These may harm dispenser and cause property damage.
AWARNING
When using electric appliances, basic precautions are always to be followed, including:
- Read all instructions before using the appliance.
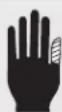
To reduce the risk of injury, close supervision is required when an appliance is used near children. - Do not put fingers or hands into a waste disposal.
- Turn the power switch to the off position before attempting to clear a jam, removing an object from the dispenser or pressing reset button.
- When attempting to loosen a jam in a waste dispenser, use the self-service wrenchette.
- When attempting to remove objects from a waste disposal, use long-handled tongs or pliers.
- Do not put the following into a dispenser: clam or oyster shells, caustic drain cleaners or similar products, glass, china, or plastic, metal (such as bottle caps, steel shot, tin cans, or utensils), hot grease or other hot liquids.
-
When not operating a dispenser, leave the stopper in place to reduce the risk of objects falling into the dispenser.
-
This product is designed to dispose of normal household food waste; inserting materials other than food waste into dispenser could cause personal injury and/or property damage.
- To reduce the risk of injury and/or property damage, do not use the sink containing the dispenser for purposes other than food preparation (such as baby bathing or washing hair).
- Do not dispose of the following in the dispenser: paints, solvents, household cleaners and chemicals, automotive fluids, plastic wrap.
- FIRE HAZARD: Do not store flammable items such as rags, paper or aerosol cans near dispenser. Do not store or use gasoline or other flammable vapors and liquids in vicinity of dispenser.
- LEAK HAZARD: Regularly inspect dispenser and plumbing fittings for leaks, which can cause property damage and could result in personal injury.
SAVE THESE INSTRUCTIONS
OPERATING INSTRUCTIONS
- Remove stopper from sink opening and run cold water.
- Turn on dispenser.
- Slowly insert food waste into dispenser. WARNING! Position stopper to minimize possible ejection of material while grinding.
- After grinding is complete, turn disposer off and run water for a few seconds to flush drain line.
DO...
- First turn on cold water and then turn on the dispenser. Continue running cold water for several seconds after grinding is completed to flush the drain line.
- Grind hard materials such as small bones, fruit pits, and ice.
A scouring action is created by the particles inside the grind chamber.
- Grind peelings from citrus fruits to freshen up drain smells.
- Use a dispenser cleaner, degreer, or deodorizer as necessary to relieve objectionable odors caused by grease build-up.
NOTICE
Failure to flush the dispenser properly may result in damage to the dispenser and/or property damage.
DON'T...
- DON'T POUR GREASE OR FAT DOWN YOUR DISPOSER OR ANY DRAIN. IT CAN BUILD UP IN PIPES AND CAUSE DRAIN BLOCKAGES. PUT GREASE IN A JAR OR CAN AND DISPOSE IN THE TRASH.

- Don't use hot water when grinding food waste. It is OK to drain hot water into the dispenser between grinding periods.
- Don't fill dispenser with a lot of vegetable peels all at once. Instead, turn the water and dispenser on first and then feed the peels in gradually.
- Don't grind large amounts of egg shells or fibrous materials like corn husks, artichokes, etc., to avoid possible drain blockage.
- Don't turn off dispenser until grinding is completed and only sound of motor and water is heard.
USER MAINTENANCE INSTRUCTIONS
CLEANING DISPOSER
Over time, food particles may accumulate in the grind chamber and baffle. An odor from the dispenser is usually a sign of food buildup. To clean dispenser:
- Place stopper in sink opening and fill sink halfway with warm water.
- Mix 1/4 cup baking soda with water. Turn disposer on and remove stopper from sink at same time to wash away loose particles.
RELEASING DISPOSER JAM
If motor stops while dispenser is operating, dispenser may be jammed. To release jam:
- Turn off dispenser and water.
- Insert one end of self-service wrenchette into center hole on bottom of dispenser (see Figure A). Work wrenchette back and forth until it turns one full revolution. Remove wrenchette.
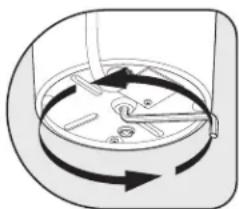
Figure A
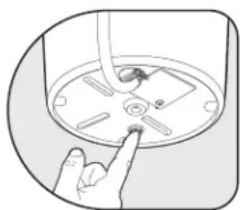
Figure B
WARNING
Injury Hazard
Remove wrenchette before reconnecting power to the dispenser. Do not hold the wrenchette when operating the dispenser. Failure to do so can result in broken bones or cuts.
- Reach into dispenser with tongs and remove object(s). Allow dispenser motor to cool for 3 - 5 minutes, then lightly push red reset button on dispenser bottom (see Figure B). (If motor remains inoperative, check service panel for tripped circuit breakers or blown fuses.
IN-HOME FULL-SERVICE LIMITED WARRANTY BADGER 1, BADGER 1XL BADGER 100 - 2 YEARS, BADGER 5, BADGER 5XL BADGER 500 - 5 YEARS, BADGER 5XP BADGER 700 - 6 YEARS
This limited warranty is provided by InSinkErator, LLC, ("InSinkErator" or "Manufacturer" or "we" or "our" or "us") to the original consumer owner of the InSinkErator product with which this limited warranty is provided (the "InSinkErator Product"), and any subsequent owner of the residence in which the Product was originally installed ("Customer" or "you" or "your").
InSinkErator warrants to Customer that your InSinkErator Product will be free from defects in materials and workmanship, subject to the exclusions described below, for the warranty period, commencing on the later of: (a) the date your InSinkErator Product is originally installed, (b) the date of purchase (or delivery if later), or (c) the date of manufacture as identified by your InSinkErator Product serial number. You will be required to show written documentation supporting (a) or (b). If you are unable to provide documentation supporting either (a) or (b), the Warranty Period commencement date will be determined by Manufacturer, in its sole and absolute discretion, based upon your InSinkErator Product serial number.
What is Covered
This limited warranty covers defects in materials or workmanship, subject to the exclusions below, in InSinkErator Products used by a consumer Customer for residential use only, and includes all replacement parts and labor costs. YOUR SOLE AND EXCLUSIVE REMEDY UNDER THIS LIMITED WARRANTY SHALL BE LIMITED TO REPAIR OR REPLACEMENT OF THE INSINKERATOR PRODUCT, PROVIDED THAT IF WE DETERMINE IN OUR SOLE DISCRETION THAT NEITHER REMEDY IS PRACTICABLE, WE MAY PROVIDE YOU A REFUND OF YOUR PURCHASE PRICE OR A CREDIT TOWARDS ANOTHER INSINKERATOR PRODUCT.
What is not Covered
This limited warranty does not extend to and expressly excludes:
- Losses or damages or the inability to operate your InSinkErator Product resulting from conditions beyond the Manufacturer's control including, without limitation, accident, alteration, misuse, abuse, neglect, negligence (other than Manufacturer's), failure to install, maintain, assemble, or mount the InSinkErator Product in accordance with Manufacturer's instructions or local electrical and plumbing codes.
- Wear and tear expected to occur during the normal course of use, including without limitation, cosmetic rust, scratches, dents or comparable and reasonably expected losses or damages.
In addition to the above exclusions, this limited warranty does not apply to InSinkErator Products installed in a commercial or industrial application.
No Other Express Warranty Applies
This limited warranty is the sole and exclusive warranty provided to the Customer identified above. No other express warranty, written or verbal, applies. No employee, agent, dealer, or other person is authorized to alter this limited warranty or make any other warranty on behalf of Manufacturer. The terms of this limited warranty shall not be modified by the Manufacturer, the original owner, or their respective successors or assigns.
What we will do to Correct Problems
If your InSinkErator Product does not operate in accordance with the documentation provided to you, or you have questions concerning your InSinkErator Product or how to determine when service is needed, please call the toll free InSinkErator AnswerLine® at 1 (800) 558-5700, or visit our website at www.insinkerator.com. You may also
notify us at: InSinkErator Service Center, 4700 21st Street, Racine, Wisconsin 53406 USA.
The following information must be provided as part of your warranty claim: your name, address, phone number, your InSinkErator Product model and serial number, and if necessary, upon request, written confirmation of either: (a) the date shown on your installation receipt, or (b) the date shown on your purchase receipt.
Manufacturer or its authorized service representative will determine, in its sole and absolute discretion, if your InSinkErator Product is covered under this limited warranty. You will be given the contact information for your closest authorized InSinkErator Service Center. Please contact your InSinkErator Service Center directly to receive in home warranty repair or replacement service. Only an authorized InSinkErator service representative may provide warranty service. InSinkErator is not responsible for warranty claims arising from work performed on your InSinkErator Product by anyone other than an authorized InSinkErator service representative.
If a covered claim is made during the Warranty Period, Manufacturer will, through its authorized service representative, either repair or replace your InSinkErator Product. Cost of replacement parts or a new InSinkErator Product, and cost of labor for repair or installation of the replacement InSinkErator Product are provided at no cost to you. Repair or replacement shall be determined by Manufacturer or its authorized service representative in their sole discretion. All repair and replacement services will be provided to you at your home. If Manufacturer determines that your InSinkErator Product must be replaced rather than repaired, the limited warranty on the replacement InSinkErator Product will be limited to the unexpired term remaining in the original Warranty Period.
This dispenser is covered by Manufacturer's limited warranty. This limited warranty is void if you attempt to repair the InSinkErator Product.
For service information, please visit www.insinkerator.com or call, toll free, 1-800-558-5700.
Limitation of Liability
TO THE EXTENT PERMITTED BY LAW, IN NO EVENT
SHALL MANUFACTURER OR ITS AUTHIZED SERVICE
REPRESENTATIVES BE LIABLE FOR ANY INCIDENTAL,
SPECIAL, INDIRECT, OR CONSEQUENTIAL DAMAGES,
INCLUDING ANY ECONOMIC LOSS, WHETHER RESULTING FROM
NONPERFORMANCE, USE, MISUSE OR INABILITY TO USE THE
INSINKERATOR PRODUCT OR THE MANUFACTURER'S OR ITS
AUTHORIZED SERVICE REPRESENTATIVE'S NEGLIGENCE.
MANUFACTURER SHALL NOT BE LIABLE FOR DAMAGES CAUSED
BY DELAY IN PERFORMANCE AND IN NO EVENT, REGARDLESS
OF THE FORM OF THE CLAIM OR CAUSE OF ACTION (WHETHER
BASED IN CONTRACT, INFRINGMENT, NEGLIGENCE,
STRICT LIABILITY, OTHER TORT OR OTHERWISE), SHALL
MANUFACTURER'S LIABILITY TO YOU EXCEED THE PRICE PAID
BY THE ORIGINAL OWNER FOR THE INSINKERATOR PRODUCT.
The term "consequential" damages shall include, but not be limited to, loss of anticipated profits, business interruption, loss of use or revenue, cost of capital or loss or damage to property or equipment.
Some states do not allow the exclusion or limitation of incidental or consequential damages, so the above limitation may not apply to you. This limited warranty gives you specific legal rights and you may also have other rights which vary from state to state.
Food waste is roughly 60-95% water. By using your disposal regularly, you can help divert food waste from landfills and reduce greenhouse gas emissions. Make sustainability a family affair by using your disposal. After all, the smallest changes can make the biggest impact. For U.S. www.insinkerator.com/green For Canada www.insinkerator.ca
InSinkErator® may make improvements and/or changes in the specifications at any time, in its sole discretion, without notice or obligation and further reserves the right to change or discontinue models.
The mounting collar configuration is a trademark of InSinkErator, LLC.