
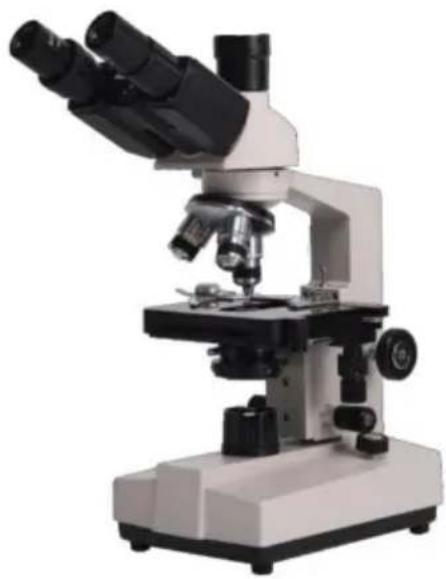
XSP-36TV - Microscope Vevor - Free user manual and instructions
Find the device manual for free XSP-36TV Vevor in PDF.
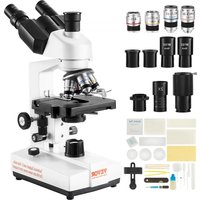


| Product Type | Binocular Biological Microscope |
| Brand | Vevor |
| Model | XSP-36TV |
| Total Magnification | 40× to 5000× (with optional 2× magnifying lens) |
| Head | Binocular inclined at 30°, interpupillary distance 48–76 mm |
| Eyepieces | Wide field WF10×/18 mm and WF25×/8 mm (connector 23.2 mm) |
| Objectives | Achromatic: 4× (N.A. 0.1), 10× (N.A. 0.25), 40× (S) (N.A. 0.65), 100× (S, oil) (N.A. 1.25) – RMS thread |
| Condenser | Abbe N.A. 1.25 with iris diaphragm and adjustment |
| Focus | Coarse (14 mm) and fine (1.3 mm) non-coaxial |
| Stage | Double layer mechanical 115×125 mm, travel 72×30 mm |
| Illumination | Cool LED light, high brightness (20 mA / 3.0 V) |
| Power Supply | Adapter 100–240 V AC / 5 V DC, 1 A |
| Mechanical Tube Length | 185 mm |
| Observation | Articulated binoculars, 30° tilt |
| Included Accessories | Eyepieces, objectives, condenser, mechanical stage, power adapter |
| Maintenance and Cleaning | Clean lenses with a soft cloth and isopropyl alcohol; store in a dry, dust-free place |
| Safety | Use the provided adapter; do not look directly at the LED source; avoid shocks and moisture |
| Spare Parts and Repairability | Contact Vevor customer service for replacement parts |
| Warranty | Electronic warranty via www.vevor.com/support |
Frequently Asked Questions - XSP-36TV Vevor
User questions about XSP-36TV Vevor
0 question about this device. Answer the ones you know or ask your own.
Ask a new question about this device
Download the instructions for your Microscope in PDF format for free! Find your manual XSP-36TV - Vevor and take your electronic device back in hand. On this page are published all the documents necessary for the use of your device. XSP-36TV by Vevor.
USER MANUAL XSP-36TV Vevor
Technical Support and E-Warranty Certificate www.vevor.com/support
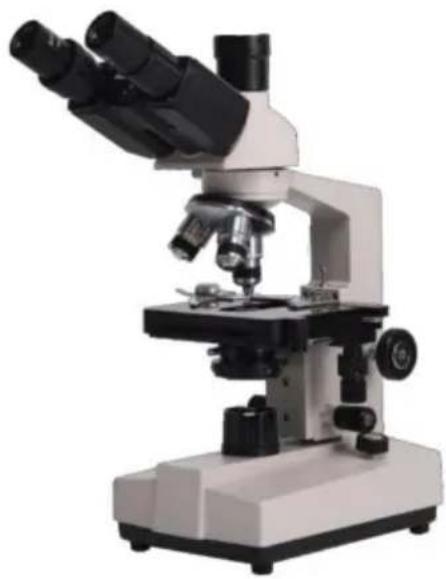
MICROSCOPE
MODEL: XSP-36 XSP-36TV
We continue to be committed to provide you tools with competitive price. "Save Half", "Half Price" or any other similar expressions used by us only represents an estimate of savings you might benefit from buying certain tools with us compared to the major top brands and does not necessarily mean to cover all categories of tools offered by us. You are kindly reminded to verify carefully when you are placing an order with us if you are actually Saving Half in comparison with the top major brands.
VEVOR®
TOUGH TOOLS, HALF PRICE
MICROSCOPE
MODEL: XSP-36 XSP-36TV
NEED HELP? CONTACT US!
Have product questions? Need technical support? Please feel free to contact us:
Technical Support and E-Warranty Certificate www.vevor.com/support
This is the original instruction, please read all manual instructions carefully before operating. VEVOR reserves a clear interpretation of user manual. The appearance of the product shall be subject to the product you received. Please forgive us that we won't inform you and there are any technology or software updates on our product.
INSTRUCTIONS

Thank you very much for choosing this product. Please read all of the instructions before using it. The information will help you achieve the best possible results.
SAFETY TIPS
- This microscope is intended for micro observation only. It must not be used for any other purpose, as this could damage the instrument.
- Apart from the detachable parts mentioned in this manual, it is strictly prohibited to disassemble any other parts. Otherwise, it may reduce the instrument's capability and can result in electric shock, injury, and damage to the instrument. If you have any problems, please contact the nearest agent.
- The input voltage is indicated on the plate behind the microscope. Make sure the input voltage is consistent with the output voltage of the charging adapter used. If not, do not use the microscope and contact the nearest agent. Using the wrong input voltage will cause electrical damage, which will damage the microscope.
- Using improper light source accessories may lead to instrument damage or fire.
- To prevent electric shock or fire, the power supply must be turned off before installing the microscope, replacing the light source accessories, and plugging or unplugging the power supply switch. To turn off the power switch, simply flip the switch to "O".
- To prevent short circuits or other failures, do not place the microscope in a humid area.
* If water is spilled on the microscope, immediately turn off the power switch (flip the switch to "O"), unplug the power cord, and wipe off the water with a dry cloth.
* When unidentified objects enter or drip into the microscope, please stop use and contact the nearest sales agent.
- When moving the stage, the rack of the stage will extend out. Please be careful not to hurt your hands or other body parts with the rack when operating the microscope.
- This microscope is a precision optical instrument. If used or kept improperly, it will cause damage to the instrument or adversely affect its accuracy. When choosing a place to use, please consider the following conditions. Otherwise, it may cause the function decline of the instrument or malfunction.
* Avoid placing the microscope in direct sunlight, under indoor vertical lighting, and other bright fields.
* The room temperature of the use environment and place is 0°C - 40°C, and the maximum relative humidity is 85%. Do not place the microscope in high temperature and high humidity places. Otherwise, the lens will fog or mold, which will damage the microscope and shorten its service life.
* Impurities and dust will reduce the optical performance of the microscope, so they should be avoided.
* Strong electromagnetic noise will interfere with the output signal of the microscope, so avoid approaching instruments and equipment that emit electromagnetic waves.
* Place the microscope on a sturdy table that can support the weight of the instrument and level it.
- This microscope is a precision optical instrument, so be careful when carrying it. Heavy impact and rough operation can cause damage to instruments. Vibrating the objective lens will reduce the imaging accuracy.
- Do not rotate the left and right focusing hand-wheel in opposite directions at the same time. When the stage has reached the limited position of movement, please do not continue to rotate the coarse tuning hand-wheel. These operations will cause damage to the focusing mechanism.
- When oil immersion observation, only a small amount of oil is needed. To prevent excess oil from polluting the stage and condenser, degrading the performance of the instruments. When replacing the objective lens or ending the observation, the oil should be cleaned in time to avoid dirtying other lenses. It will be difficult to wipe out after the oil is dried.
TECHNICAL PARAMETERS
- Technical Specification
| Main Parameter | Total Magnification | 40X~2500X (XSP-36) 40X~5000X (XSP-36TV) | |||
| Mechanical length | 160mm | Objective conjugate distance | 185mm | ||
| Observation | Hinged binocular Inclined | Viewing: 30° | Interpupillary distance:48~76mm | ||
| Hinged trinocular | Viewing: 30° Inclined | Interpupillary distance:48~76mm | |||
| Eyepiece | Wide field: WF10x/18mm | Eyepiece connector:23.2mm | |||
| Wide field: WF25x/8mm | |||||
| 2X Magnification Lens (Optional) | |||||
| Objective | Magnification | N.A. | |||
| 4X Achromatic objective | 0.1 | ||||
| 1 0X Achromatic objective | 0.25 | ||||
| 40X(S) Achromatic objective | 0.65 | ||||
| 1 00X(S, O) Achromatic objective | 1.25 | ||||
| Objective connector: WJ 4/5"×1/36" | |||||
| Condenser | Abbe Condenser | N.A: 1.25, Iris diaphragm, adjust knob | |||
| Focusing system | Coarse and fine tuning are not coaxial Coarse range: 14mm, Fine range: 1.3mm | ||||
| Stage | Double layer mechanical stage Size: 115mm×125mm, Moving range: 72mm*30mm | ||||
| Illumination | High brightness LED cold light source | 20mA/3.0V | |||
| Light source | Input | AC100-240V | |||
| Output DC 5V/1A | |||||
PARTS LIST
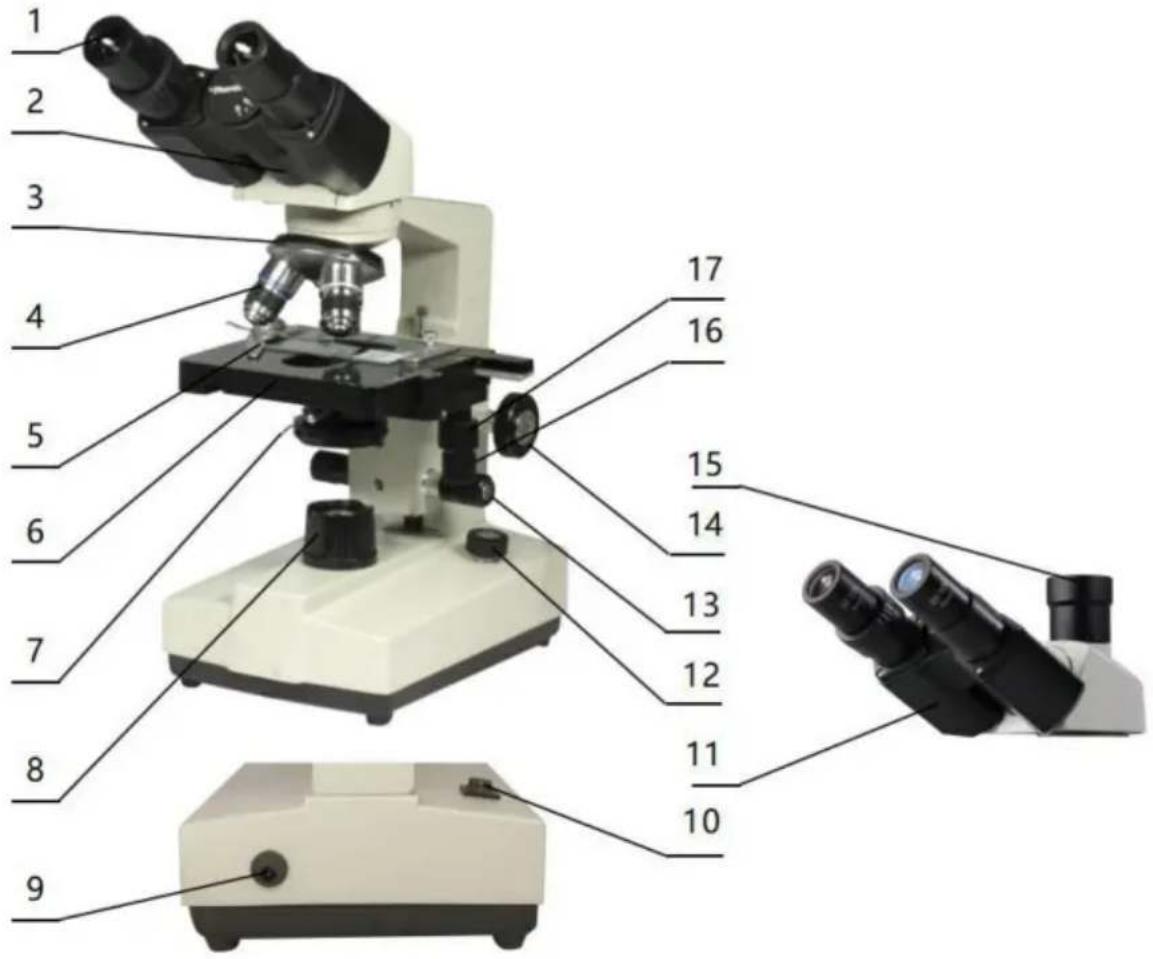
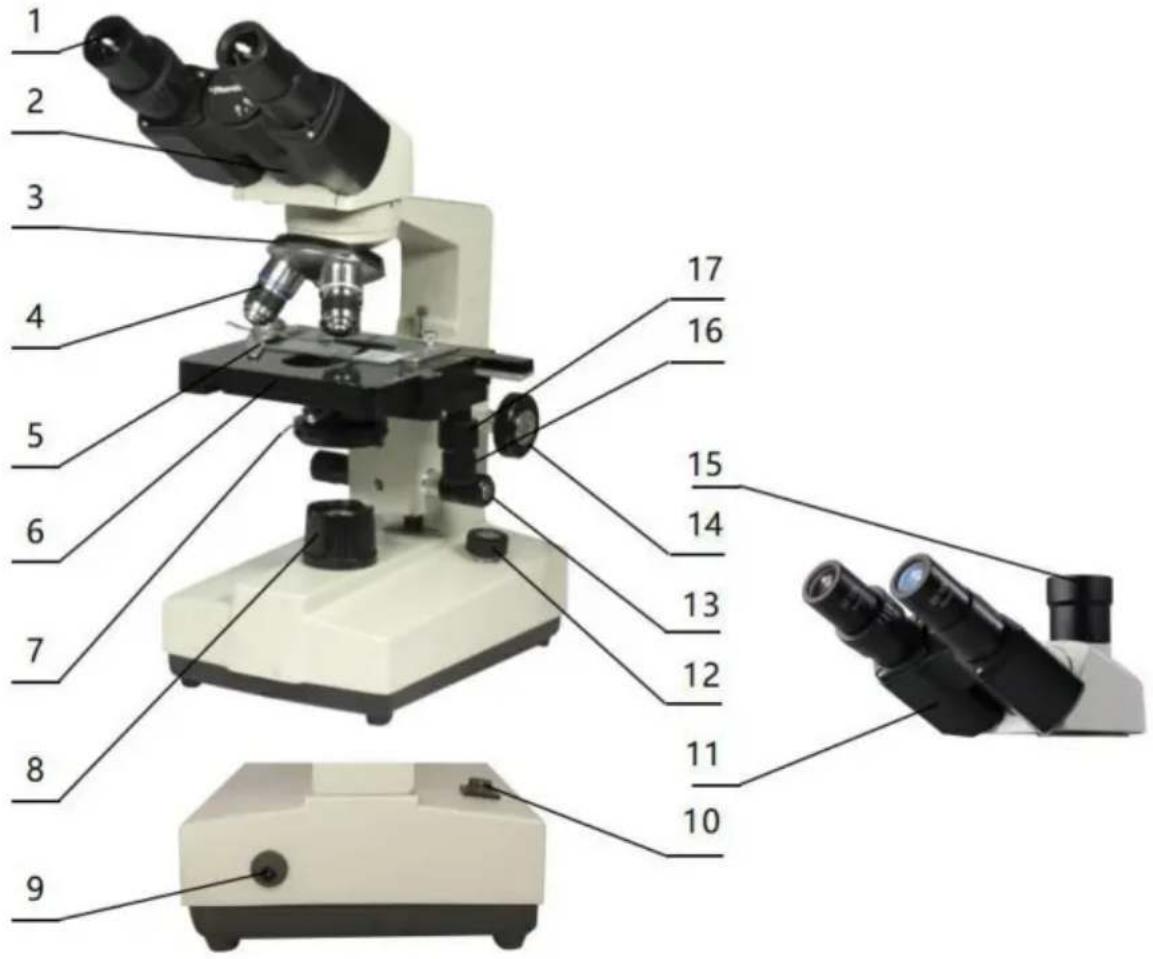
2. Microscope Structure and Characteristics
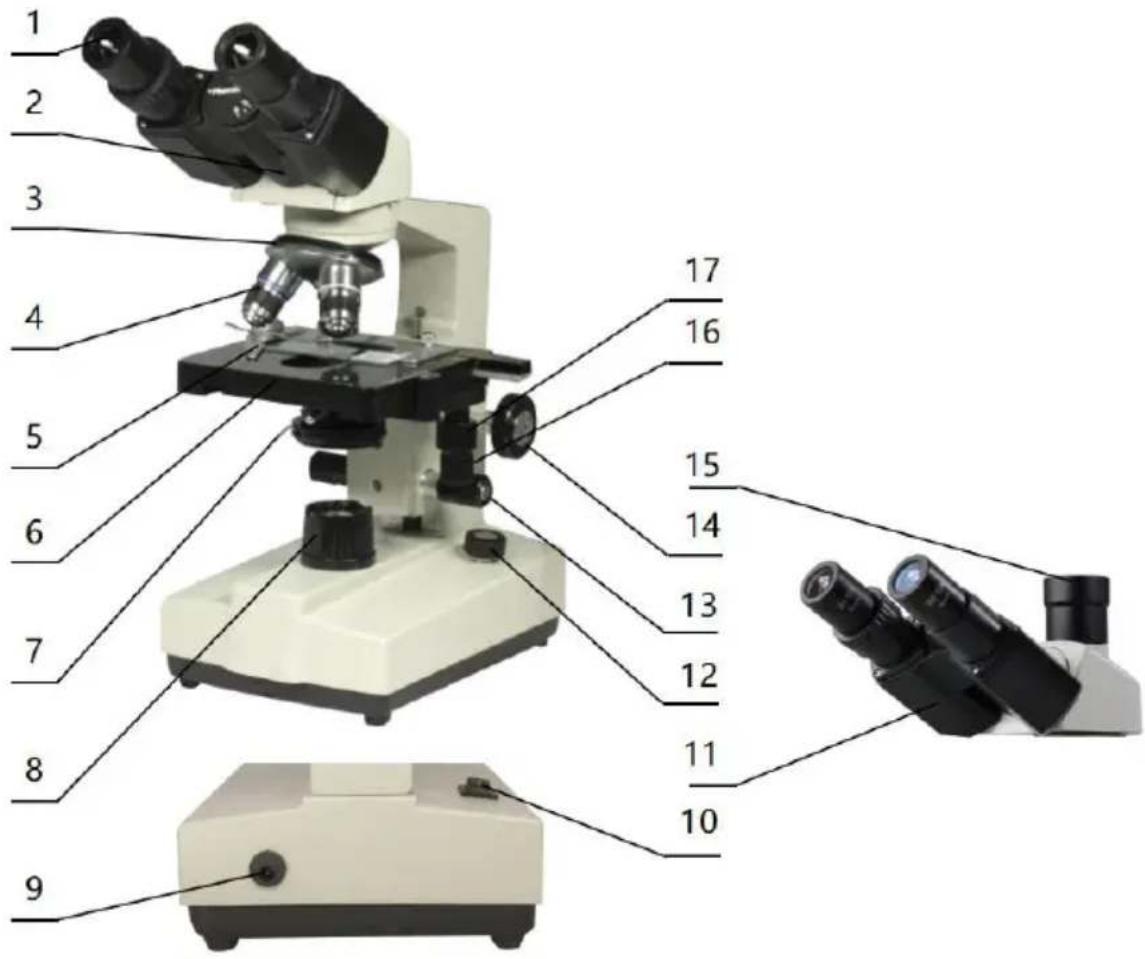
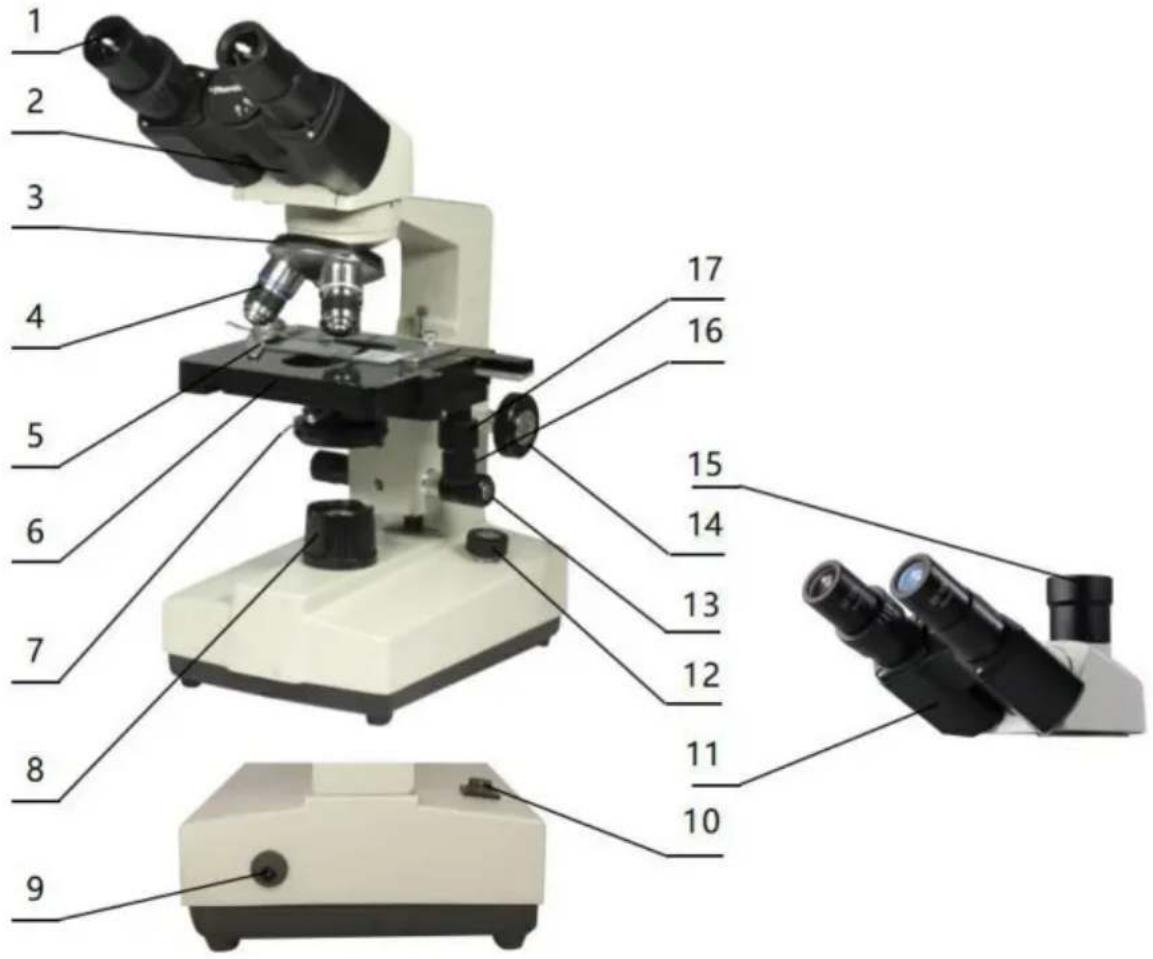
- Eyepiece: provides secondary magnification of the specimen for observation.
- Binocular observer: allows observation of the specimen.
- Converter: selects different objective lenses (positioning with a click).
- Objective: provides primary magnification of the specimen.
- Clips: hold the specimen in place.
- Stage: supports the specimen.
- Condenser diaphragm lever: adjusts the size of the condenser diaphragm aperture.
- Collector: gathers light to illuminate the specimen.
- Power connector: connects to external power.
- Power switch: main power switch for the instrument.
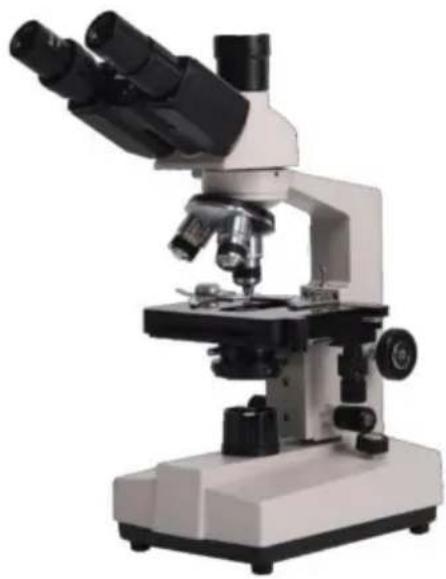
- Trinocular observation: visual and video observation of specimens.
- Brightness adjustment rotary knob: adjust the brightness so that the field of view is moderate.
- Fine adjustment hand-wheel: micro focusing.
- Coarse adjustment hand-wheel: focus the specimen.
- The third eyepiece: used for connecting extra accessories and CCD.
- X moving hand-wheel: adjust the lateral movement of the stage.
- Y moving hand-wheel: adjust the longitudinal movement of the stage.
INSTALLATION AND USE
3. Instrument Installation
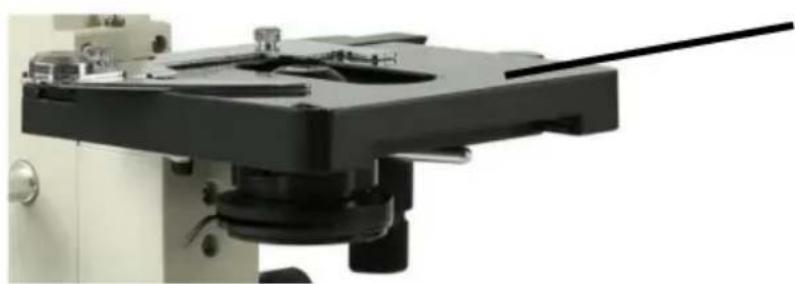
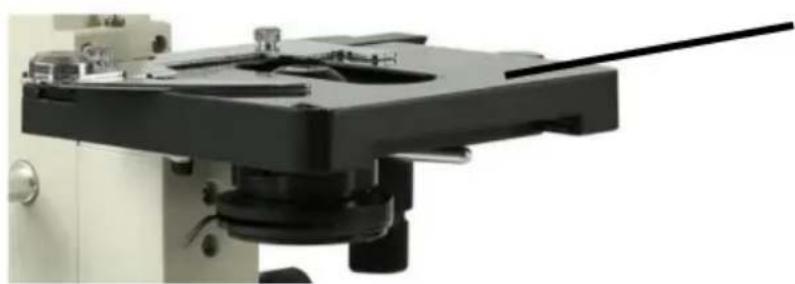
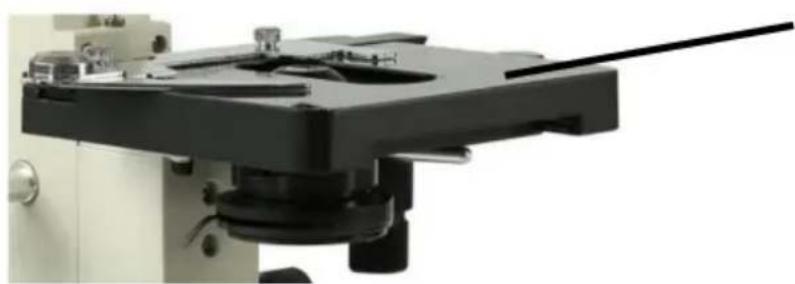
3.1 Place the microscope on a stable workbench. When moving the instrument, especially the optical parts, avoid touching the lens' surface with your hands or objects with oil stains. Finger marks or oil stains on the surface of the lens will affect the imaging quality. 3.2 The platform surface is covered with a protective film during transportation. It should be torn off before using the microscope (see picture 1).
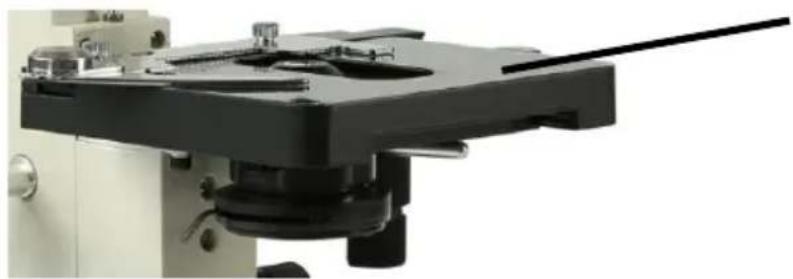
Surface with protective film
Picture 1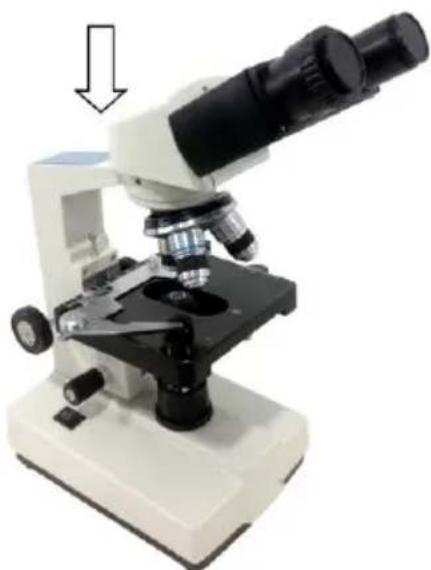
Picture 2
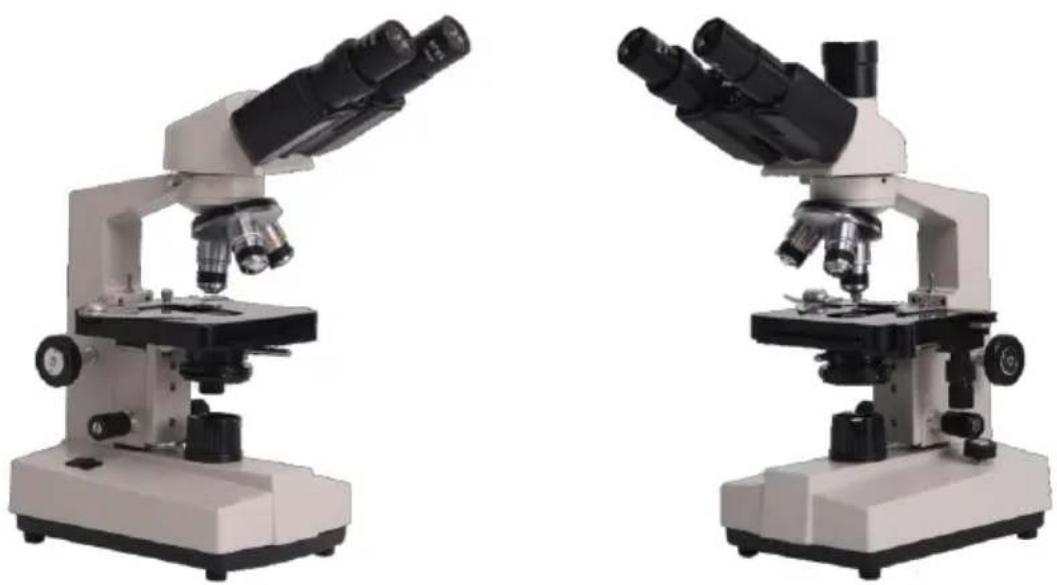
3.3 Place the observer gently in the mounting hole of the frame, gently press the upper part of the observation body with one hand and tighten the fixing screw on the head of the frame with the other hand. When installing, ensure that the observation head is in place and not loose (see picture 2). 3.4 After the microscope is installed, insert the DC plug into the power socket in the base and connect to the external power supply, under the situation of supply voltage is consistent with the rated voltage of the instrument. 3.5 Finally, insert the eyepiece into the microscope eyepiece tube.
OPERATION
4. Operation
4.1 Electric illumination
4.1.1 Turn on the power switch (flip the switch to "-" to make the bulb lighting).
4.1.2 Rotate the brightness adjustment knob to adjust the field of view brightness.
4.2 Install the specimen
4.2.1 Open the section holder gently with your finger, place the specimen in, cover the glass, release your finger and secure the section.
4.2.2 Adjust the platform moving hand-wheel so that the observed area is directly under the objective lens, make sure it's easy to observation and adjustment.
4.3 Focus with 10X objective
* Rotate the objective converter to turn the 10X objective into the light path (the objective will be automatically snapped when rotated into the right place).
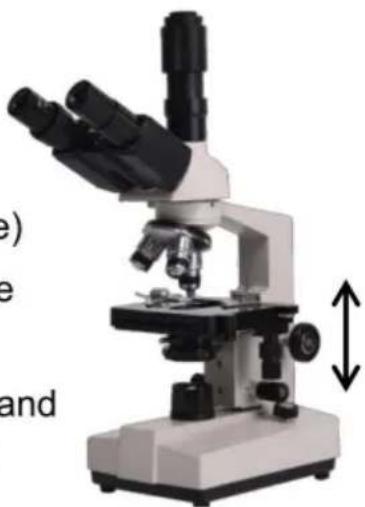
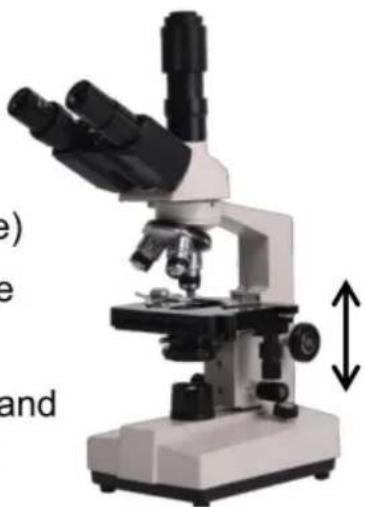
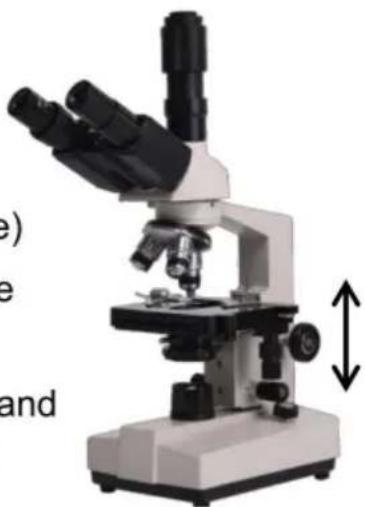
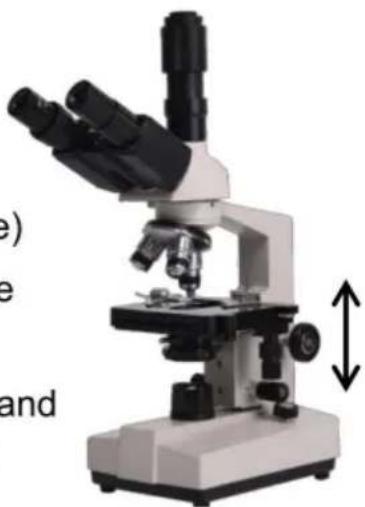
* Rotate the coarse adjustable hand wheel to move the stage to the highest position (see picture 3).
* Observe through the eyepiece, rotate the coarse hand wheel slowly to lower the stage. Stop rotating when the image appears (see picture 3).
4.4 Rotate the fine hand wheel for precise focusing.
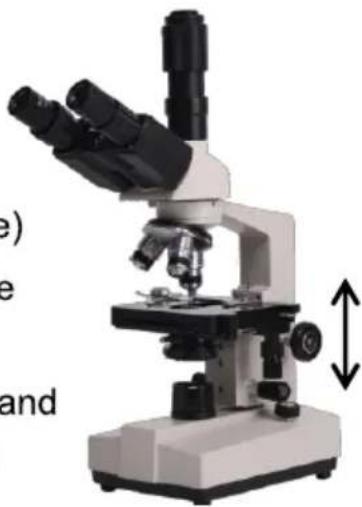
Picture 3
*When you want to observe with a high-magnification objective, first use the 10X or the 4X objective to focus, then replace the high-magnification objective and rotate the fine hand wheel for precise focusing.
*Confirm the direction of rotation when rotating the coarse hand wheel for focusing, can only lower the direction of the stage.
*When using coarse adjustable hand wheels to raise the stage, pay attention to the distance between the specimen surface and the lower-end
face of the objective.
*Since the working distance is farther for the 10X and 4X objectives, as long as it is used the standard thickness of the slide and cover glass (the standard thickness of the slide and cover glass is 1.2mm and 0.17mm, respectively), even if the stage is moved to the highest position, the objective lens will not touch the specimen.
4.5 Select Objective
Rotate objective Converter. Select the desired objective magnification (the objective can be automatically snapped when rotated in the right place)
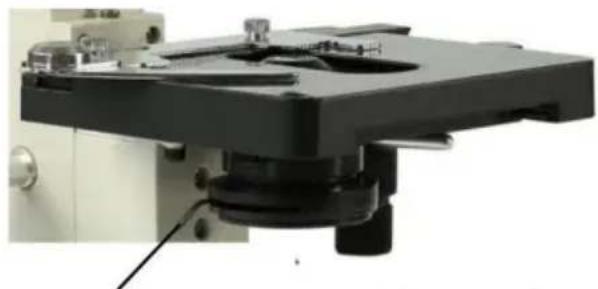
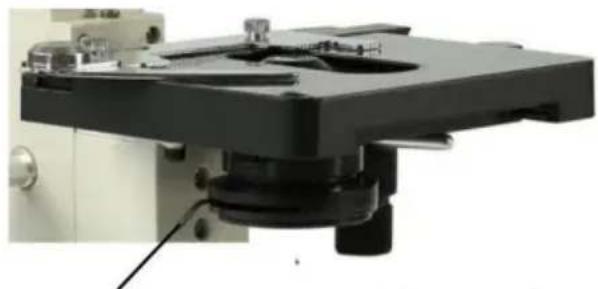
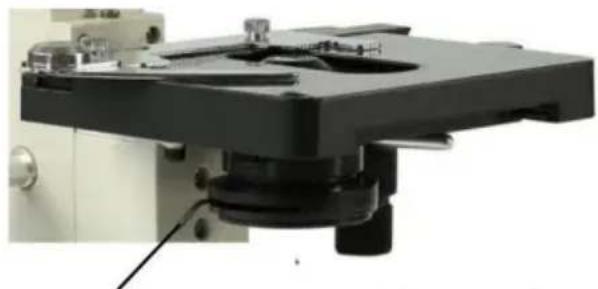
4.6 Adjust the diaphragm adjusting knob makes the aperture diaphragm meet the observation requirements (see picture 4).
4.7 After the observation is finished, turn off the power switch.
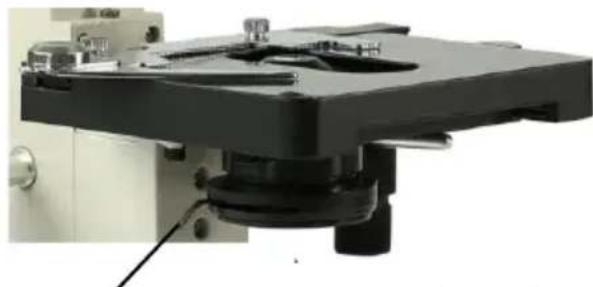
Picture 4
Diaphragm adjusting knob
5 Installation and use of accessories (optional)
5.1 Installed external CCD camera accessories

ATTENTION:
For the parameters and usage of the CCD camera and digital viewer, please refer to the instruction manual contained in the CDROM supplied with the CCD camera or digital viewer.
Trinocular observation viewer:
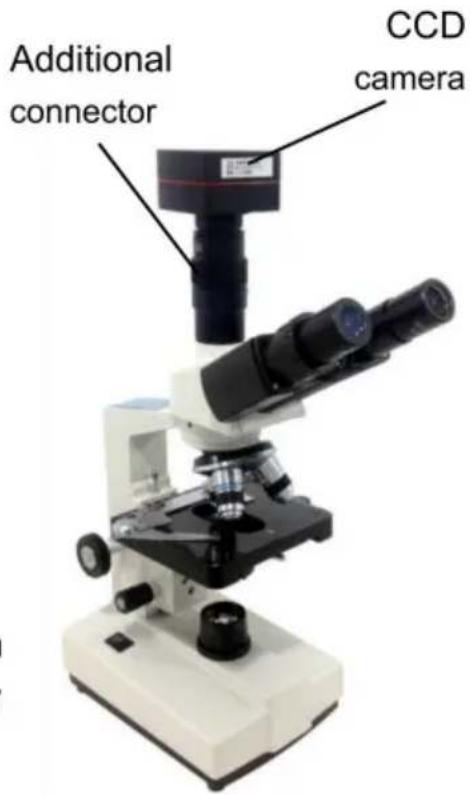
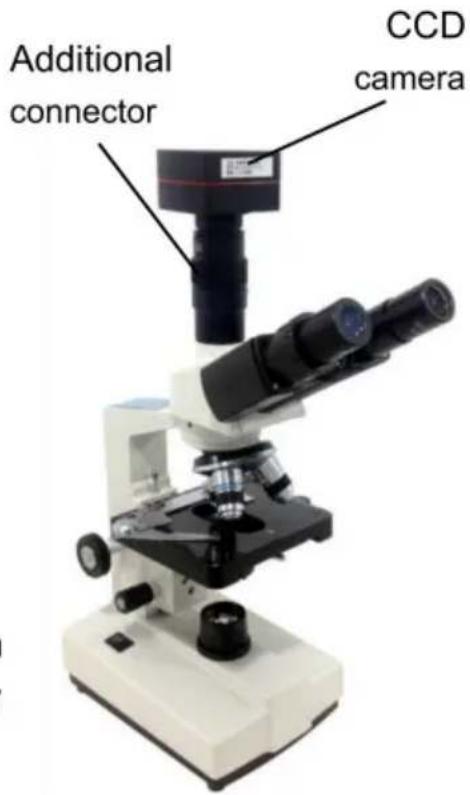
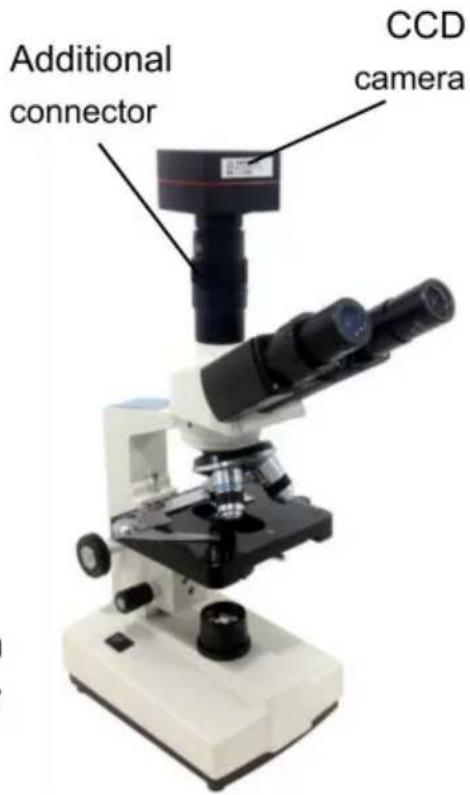
Remove the CCD camera, screw the lens end onto the additional connector, and insert the interface into the third eyepiece. Use the provided hex hook wrench to tighten the screw securing the additional connector. Use the provided USB cable to connect the video output of the CCD camera to the video input of the computer. Plug in the microscope power plug, then turn on the microscope and the computer.
Following the focusing method described in the operation manual, adjust the image clearly by adjusting the adjustable viewing tube on the additional connector until a clear image appears on the computer screen. Video observation is then available (see Picture 5).
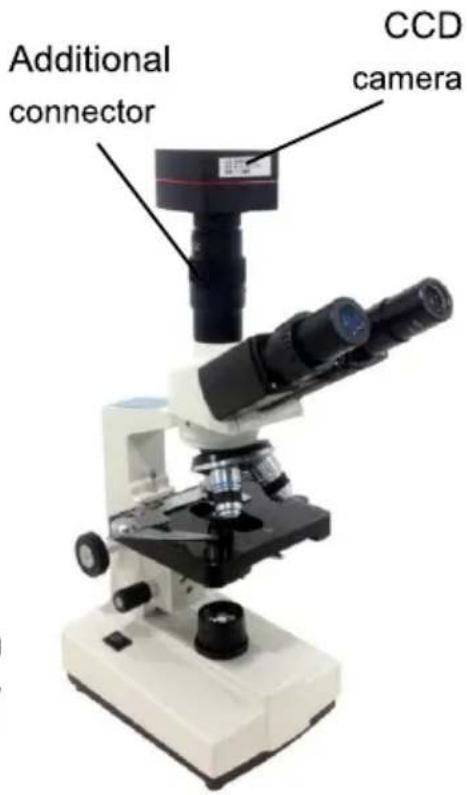
Picture 5
5.2 Installation of frosted glass
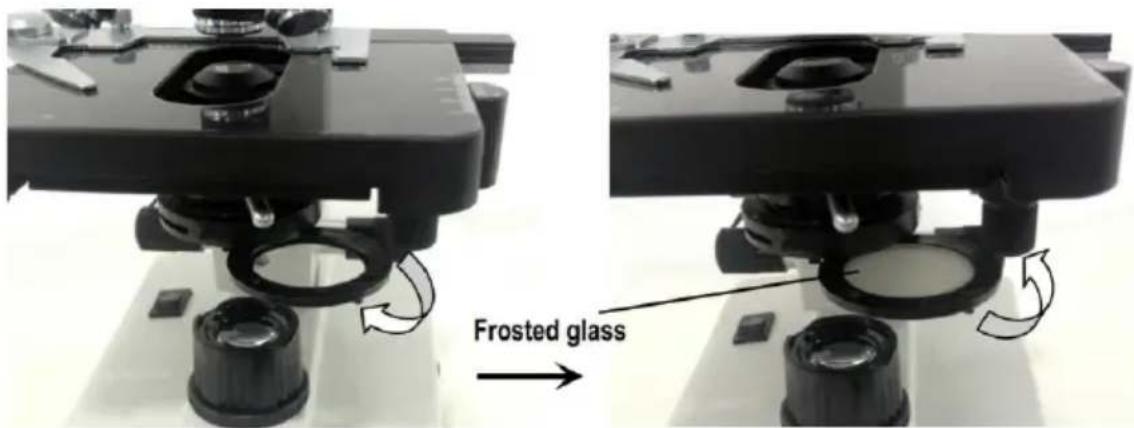
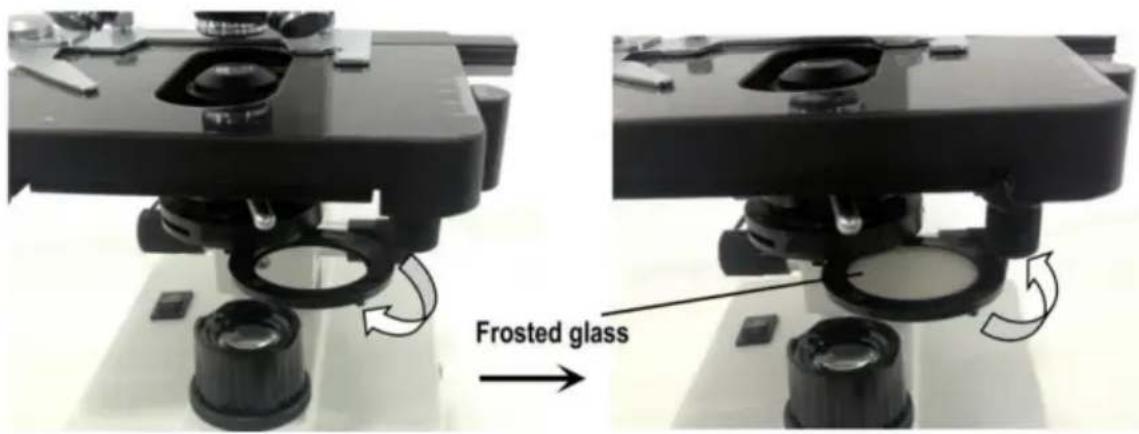
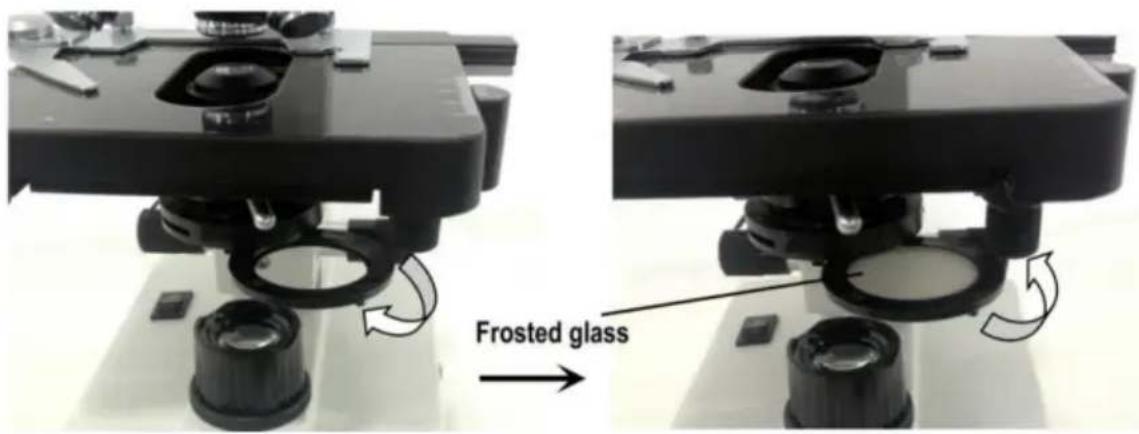
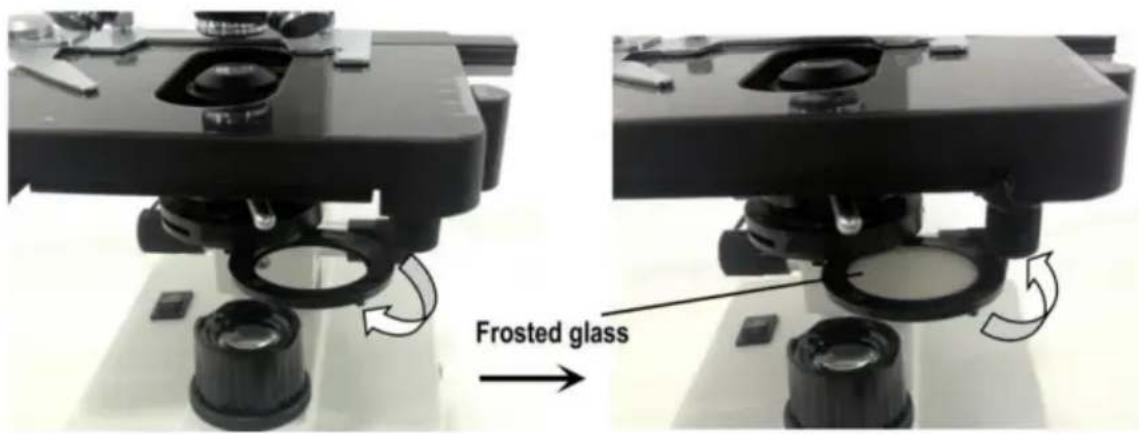
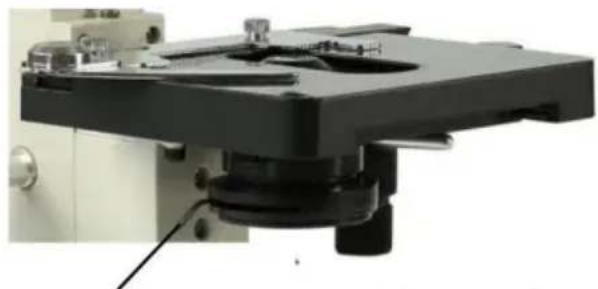
When using LED lighting, it is necessary to add frosted glass. First, turn out the ground glass bracket, place the frosted glass smoothly into the bracket slot, and then turn the frosted glass bracket back to its original position (see Picture 6).
Picture 6

ATTENTION
When observing with a 4x objective lens, it is necessary to install frosted glass. It is also recommended to use frosted glass to ensure uniform lighting when observing with 10x.
MAINTENANCE
6. Maintenance
6.1 When the microscope is finished being used or is suspended, cut off the power supply to avoid electrical components remaining in a working state. When not used for a long time, remove the power plug from the power socket and properly store all transmission wires. 6.2 Cleaning lenses: Use a blow ball or a soft brush to remove dust from the lenses. Heavy dirt and fingerprints can be gently wiped with lens paper or a soft cloth dipped in a little alcohol and ether mixture (the mixture is about 20 to 30% alcohol and 70 to 80% ether). 6.3 Cleaning the instrument surface: Can be wiped with a clean soft cloth; heavy dirt can be scrubbed with a neutral cleaner.

ATTENTION
Do not use organic solvents (such as alcohol, ether, and their diluents) to wipe, to avoid paint coming off the surface of the instrument.
6.4 Storage: If you do not use the microscope for a long time, turn off the power supply, allow the bulb to cool completely, put the dust-proof cover on the microscope, and place it in the packing box. Store in a dry, ventilated, clean place free of acid and alkali vapors to avoid mold.
Troubleshooting Schedule
- Troubleshooting Schedule
| Common fault | Reasons | Solutions |
| The field of view is blurred or the brightness of the field of view is uneven, and the complete field of view cannot be seen. | The converter is not positioned correctly (the objective is not coaxial with the optical path) | Rotate the objective converter until accurate positioning (moving the objective into the light path correctly) |
| The condenser is not centered | Adjust the center of the condenser | |
| Light bulb was installed incorrectly | Check that the bulb is inserted correctly | |
| Stains or dust on a condenser, objective, collector, eyepiece, or specimen | Wipe relevant parts | |
| The aperture is too small | Proper adjusting the diaphragm | |
| The field of view is unclean | Lens surface is not clean | Proper cleaning |
| The surface of the slide is not clean | Wipe clean | |
| Lack of clarity Poor imaging | Specimen slide is not covered with glass | Attach cover glass |
| Cover glass is too thick or too thin | Use a cover glass of standard thickness (0.17mm) | |
| The specimen is upside down | Flip the slide so that the cover slide is up | |
| Oil on the dry objective | Wipe clean | |
| Lens surface is not clean (objective/eyepiece/condens er/collector) | Wipe clean | |
| Aperture is too small | Proper adjusting the diaphragm | |
| Unilateral darkening | Objective converter is not positioned correctly | Rotate the objective converter until accurate positioning |
| Specimen is higher than the stage | Specimens should be firmly clamped to the platform clips | |
| Unable to focus when using a high-power objective | Slide upside down | Flip the slide so that the cover slide is up |
| Cover glass is too thick | Use specified cover glass (thickness 0.17mm) | |
| Objective not screwed tightly | Tightening objective | |
| The left and right images do not coincide when viewed with the binocular tube | Unadjusted pupil distance | Adjust interpupillary distance |
| Unadjusted diopter | Adjust the diopter | |
| The bulb doesn't work | Power supply not connected | Check whether the power switch is turned on, and whether the charger voltage is consistent with the voltage marked on the instrument |
| Power plug is in poor contact with the socket | Check whether the connection between the plug and the socket is firm and reliable | |
| Light flicker, Luminance instability | Bulb poor contact | Plug the bulb firmly |
| Socket poor contact | Check that the socket connection is reliable |
Warranty Policy
8. Warranty Policy
8.1 Warranty Period
From the date of purchase, the company provides one-year warranty service for the host.
8.2 Non-Warranty Policy
The following circumstances (but not limited to the following) are not covered by the warranty and require payment of maintenance fees:
* The warranty period has expired.
* Damage caused by force majeure.
* Damage caused by human error or improper use.
* Any damage caused by failure to use, maintain, or adjust the product according to the instructions; unauthorized dismantling, repair, modification, misuse, abuse, liquid ingress, accidents, use of non-original parts, or malicious damage to the warranty card (e.g., tearing, tampering).
* Other failures or damage caused by issues not related to the product's design, manufacturing, or quality.
8.3 Warranty Card
| Item Production Number | |||
| Fault phenomenon | |||
| Buying date | |||
| Contact | |||
| Contact address | |||
| Remark: This form is a return copy of the warranty card. Please cut out this form and send it to the seller or manufacturer whose address is on the "back cover". | |||
The company reserves the right to make certain improvements to the design as it deems necessary. Therefore, the instructions in this manual may not fully reflect the detailed features of each product type currently available.
AFTER-SALES SERVICE
- If the product you received has other problems such as usage problems, please feel free to contact us and reply to online customer service within 24 hours to serve you.
- Our products support 90 days for no reason to return or exchange.
- Wish you a happy online shopping.
CORRECT DISPOSAL

This product is subject to the provision of European Directive
2012/19/EC. The symbol showing a wheelie bin crossed through indicates that the product requires separate refuse collection in the European Union. This applies to the product and all accessories marked with this symbol. Products marked as such may not be discarded with normal domestic waste, but must be taken to a collection point for recycling electrical and electronic devices.
Made In China
VEVOR®
TOUGH TOOLS, HALF PRICE
Technical Support and E-Warranty Certificate
www.vevor.com/support
VEVOR®
TOUGH TOOLS, HALF PRICE
Technical Support and E-Warranty Certificate www.vevor.com/support
MICROSCOPE
MODEL: XSP-36 XSP-36TV
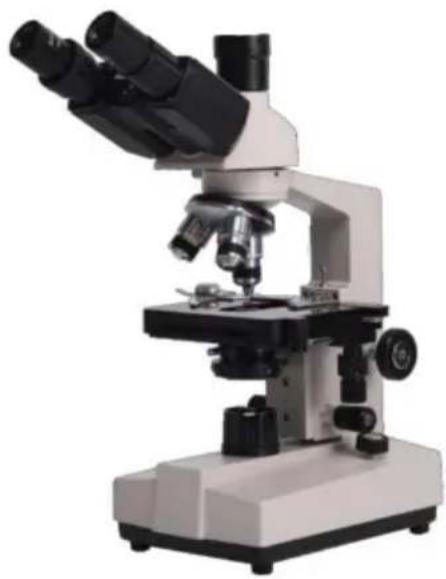
NEED HELP? CONTACT US!
Thank you very much for choosing this product. Please read all of the instructions before using it. The information will help you achieve the best possible results.
SAFETY TIPS
- This microscope is intended for micro observation only. It must not be used for any other purpose, or the instrument may be damaged.
- Apart from the detachable parts mentioned in this manual, it is strictly prohibited to disassemble any other parts. Otherwise, it may reduce the instrument's capability and can result in electric shock, injury, and damage to the instrument. If you have any problems, please contact the nearest agent.
- The input voltage is indicated on the plate behind the microscope. Make sure the input voltage is consistent with the output voltage of the charging adapter used. If not, do not use the microscope and contact the nearest agent. Using the wrong input voltage may cause electrical damage, which will damage the microscope.
- Using improper light source accessories may lead to instrument damage or fire.
- To prevent electric shock or fire, the power supply must be turned off before installing the microscope, replacing the light source accessories, and plugging or unplugging the power supply switch. To turn off the power switch, flip the switch to "O".
- To prevent short circuits or other failures, do not place the microscope in a humid area.
* If water is spilled on the microscope, immediately turn off the power switch (flip the switch to "O"), unplug the power cord, and wipe off the water with a dry cloth.
* If unidentified objects enter or drip into the microscope, please stop use and contact the nearest sales agent.
- When moving the stage, the rack of the stage will extend out. Please be careful not to hurt your hands or other body parts with the rack when operating the microscope.
- This microscope is a precision optical instrument. If used or kept improperly, it may cause damage to the instrument or adversely affect its accuracy. When choosing a place to use, please consider the following conditions. Otherwise, it may cause the function decline of the instrument or malfunction.
* Avoid placing the microscope in direct sunlight, under indoor vertical lighting, and other bright fields.
* The room temperature of the use environment and place is 0°C - 40°C, and the maximum relative humidity is 85%. Do not place the microscope in high temperature and high humidity places. Otherwise, the lens will fog or mold, which will damage the microscope and shorten its service life.
* Impurities and dust will reduce the optical performance of the microscope, so they should be avoided.
* Strong electromagnetic noise will interfere with the output signal of the microscope, so avoid approaching instruments and equipment that emit electromagnetic waves.
* Place the microscope on a sturdy table that can support the weight of the instrument and level it.
- This microscope is a precision optical instrument, so be careful when carrying it. Heavy impact and rough operation can cause damage to instruments. Vibrating the objective lens will reduce the imaging accuracy.
- Do not rotate the left and right focusing hand-wheel in opposite directions at the same time. When the stage has reached the limited position of movement, please do not continue to rotate the coarse tuning hand-wheel. These operations will cause damage to the focusing mechanism.
- When oil immersion observation, only a small amount of oil is needed. To prevent excess oil from polluting the stage and condenser, degrading the performance of the instruments. When replacing the objective lens or ending the observation, the oil should be cleaned in time to avoid dirtying other lenses. It will be difficult to wipe out after the oil is dried.
2. Microscope Structure and Characteristics
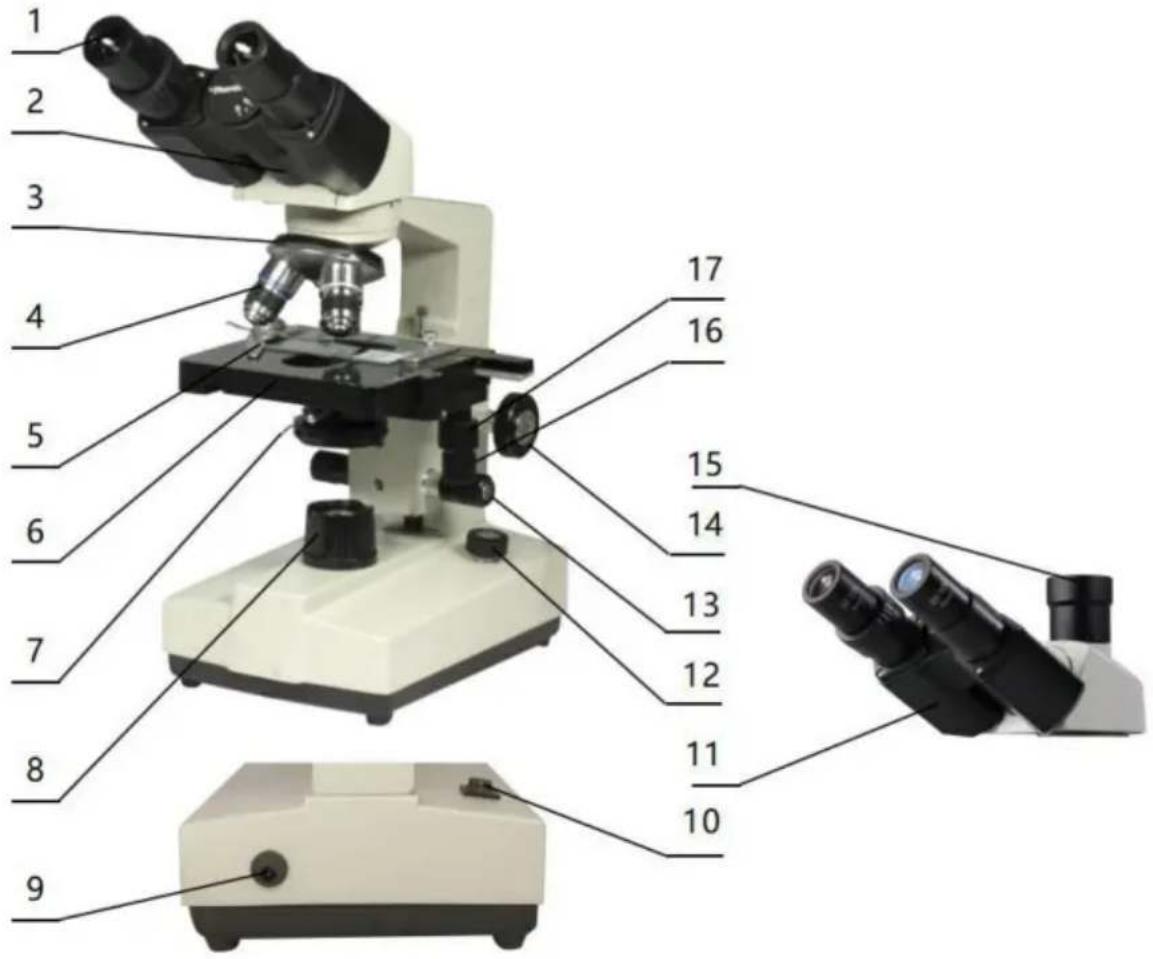
- Eyepiece: secondary magnifying of the specimen for observation
- Binocular observer: observation of the specimen
- Converter: select different objective lens (positioning with a sound)
- Objective: primary magnifying of the specimen
- Clips: fix the specimens
- Stage: place the specimens
- Condenser diaphragm lever: adjust the size of the condenser diaphragm hole
- Collecting: gather light to illuminate the specimen
- Power connector: connect external power
- Power switch: the main power switch of the instrument
- Trinocular observation: visual and video observation of specimens
- Brightness adjustment rotary knob: adjust the brightness, so that the field of view is moderate
- Fine adjustment hand-wheel: micro focusing
- Coarse adjustment hand-wheel: focus the specimen
- The third eyepiece: used for connecting extra accessories and CCD
- X moving hand-wheel: adjust the lateral movement of the stage
- Y moving hand-wheel: adjust the longitudinal movement of the stage
INSTALLATION AND USE
3. Instrument Installation
3.1 Place the microscope on a stable workbench. When moving the instrument, especially the optical parts, should avoid touching the lens' surface with your hands or objects with oil stains. Finger marks or oil stains on the surface of the lens will affect the imaging quality. 3.2 The platform surface is covered with a protective film during transportation. It should be torn off before using the microscope (see picture 1).
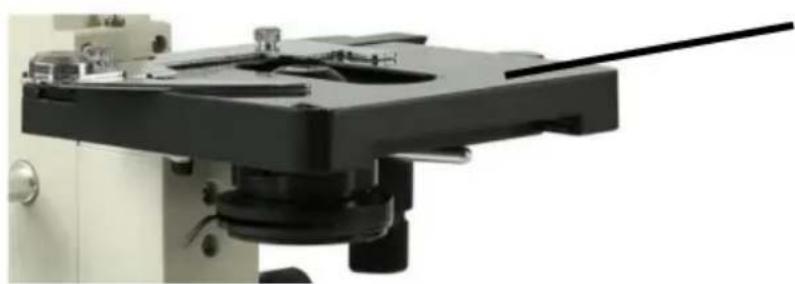
Surface with protective film
Picture 1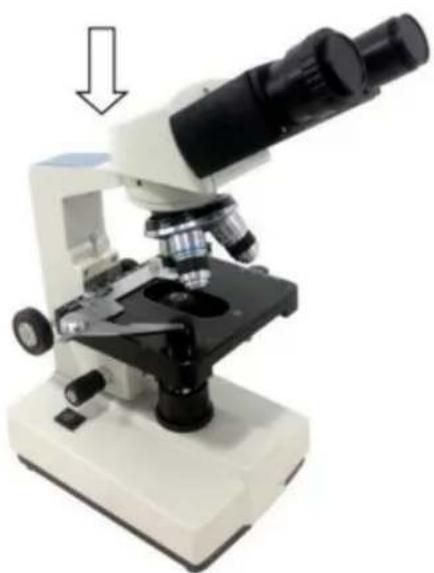
Picture 2
3.3 Place the observer gently in the mounting hole of the frame, gently press the upper part of the observation body with one hand and tighten the fixing screw on the head of the frame with the other hand. When installing, ensure that the observation head is in place and not loose (see picture 2). 3.4 After the microscope is installed, insert the DC plug to the power socket in the base and connect to the external power supply, under the situation of supply voltage is consistent with the rated voltage of the instrument. 3.5 Finally, insert the eyepiece into the microscope eyepiece tube.
OPERATION
4. Operation
4.1 Electric illumination
4.1.1 Turn on the power switch (flip the switch to "-" to make the bulb light).
4.1.2 Rotate the brightness adjustment knob to adjust the field of view brightness.
4.2 Install the specimen
4.2.1 Open the section holder gently with your finger, place the specimen in, cover the glass, release your finger and secure the section.
4.2.2 Adjust the platform moving hand-wheel so that the observed area is directly under the objective lens, making sure it is easy to observe and adjust.
4.3 Focus with 10X objective
* Rotate the objective converter to turn the 10X objective into the light path (the objective will be automatically snapped when rotated into the right place).
* Rotate the coarse adjustable hand wheel to move the stage to the highest position (see picture 3).
* Observe through the eyepiece, rotate the coarse hand wheel slowly to lower the stage. Stop rotating when the image appears (see picture 3).
4.4 Rotate the fine hand wheel for precise focusing.
Picture 3
* When you want to observe with a high-magnification objective, first use the 10X or the 4X objective to focus, then replace the high-magnification objective and rotate the fine hand wheel for precise focusing.
* Confirm the direction of rotation when rotating the coarse hand wheel for focusing; you can only lower the stage in that direction.
* When using coarse adjustable hand wheels to raise the stage, pay attention to the distance between the specimen surface and the lower end
face of the objective.
*Since the working distance is farther for the 10X and 4X objectives, as long as the standard thickness of the slide and cover glass is used (the standard thickness of the slide and cover glass is 1.2mm and 0.17mm, respectively), even if the stage is moved to the highest position, the objective lens will not touch the specimen.
4.5 Select Objective
Rotate the objective converter. Select the desired objective magnification (the objective can be automatically snapped into place when rotated to the correct position).
4.6 Adjust the diaphragm adjusting knob so that the aperture diaphragm meets the observation requirements (see picture 4).
4.7 After the observation is finished, turn off the power switch.
Picture 4
Diaphragm adjusting knob
INSTALLATION AND USE OF ACCESSORIES
5 Installation and use of accessories (optional)
5.1 Installing external CCD camera accessories

ATTENTION:
For the parameters and usage of the CCD camera and digital viewer, please refer to the instruction manual contained in the CD-ROM supplied with the CCD camera or digital viewer.
Trinocular observation viewer:
Take out the CCD camera, screw the lens end onto the additional connector, insert the interface into the third eyepiece. Use the provided hex hook wrench to hold the screw fixing the additional connector tight, use the provided USB cable to connect the video output end of the CCD camera and the video input end of the computer. Plug in the microscope power plug, turn on the microscope and the computer switch.
According to the focusing method described in the operation manual, adjust the image clearly by adjusting the adjustable viewing tube on the additional connector until a clear image appears on the computer screen; video observation is then available (see Picture 5).
Picture 5
5.2 Installation of frosted glass
When using LED lighting, it is necessary to add frosted glass. First, turn out the ground glass bracket, place the frosted glass smoothly into the bracket slot, and then turn the frosted glass bracket back to its original position (see Picture 6).
Picture 6

ATTENTION
When observing with a 4x objective lens, it is necessary to install frosted glass. It is also recommended to use frosted glass to ensure uniform lighting when observing with 10X.
MAINTENANCE
6. Maintenance
6.1 When the microscope is finished observing or is suspended, cut off the power supply to avoid the electrical components in the instrument remaining in the working state. When not used for a long time, remove the power plug from the power socket and properly keep all transmission wires. 6.2 Clean lens: Use a blow ball or a soft brush to wipe dust off the lens. Heavy dirt and fingerprints can be gently wiped with lens paper or a soft cloth dipped in a little alcohol and ether mixture (the mixture is about 20 to 30% alcohol and 70 to 80% ether). 6.3 Clean instrument surface: Can be wiped with a clean soft cloth; heavy dirt can be scrubbed with a neutral cleaner.

ATTENTION
Do not use organic solvents (such as alcohol, ether, and their diluents) to wipe, to avoid paint coming off the surface of the instrument.
6.4 Storage: If you do not use the microscope for a long time, turn off the power supply of the instrument, fully cool the bulb, put the dust-proof cover on the microscope, and place it in the packing box. Store in a dry, ventilated, clean, and acid-alkali vapor-free place to avoid mold.
TROUBLESHOOTING SCHEDULE
- Troubleshooting schedule
| Common fault | Reasons | Solutions |
| The field of view is blurred or the brightness of the field of view is uneven, and the complete field of view cannot be seen. | The converter is not positioned correctly (the objective is not coaxial with the optical path) | Rotate the objective converter until accurate positioning (moving the objective into the light path correctly) |
| The condenser is not centered | Adjust the center of the condenser | |
| Light bulb was installed incorrectly | Check that the bulb is inserted correctly | |
| Stains or dust on a condenser, objective, collector, eyepiece, or specimen | Wipe relevant parts | |
| The aperture is too small | Proper adjusting the diaphragm | |
| The field of view is unclean | Lens surface is not clean | Proper cleaning |
| The surface of the slide is not clean | Wipe clean | |
| Lack of clarity Poor imaging | Specimen slide is not covered with glass | Attach cover glass |
| Cover glass is too thick or too thin | Use a cover glass of standard thickness (0.17mm) | |
| The specimen is upside down | Flip the slide so that the cover slide is up | |
| Oil on the dry objective | Wipe clean | |
| Lens surface is not clean (objective/eyepiece/condens er/collector) | Wipe clean | |
| Aperture is too small | Proper adjusting the diaphragm | |
| Unilateral darkening | Objective converter is not positioned correctly | Rotate the objective converter until accurate positioning |
| Specimen is higher than the stage | Specimens should be firmly clamped to the platform clips | |
| Unable to focus when using a high-power objective | Slide upside down | Flip the slide so that the cover slide is up |
| Cover glass is too thick | Use specified cover glass (thickness 0.17mm) | |
| Objective not screwed tightly | Tightening objective | |
| The left and right images do not coincide when viewed with the binocular tube | Unadjusted pupil distance | Adjust interpupillary distance |
| Unadjusted diopter | Adjust the diopter | |
| The bulb doesn't work | Power supply not connected | Check whether the power switch is turned on, and whether the charger voltage is consistent with the voltage marked on the instrument |
| Power plug is in poor contact with the socket | Check whether the connection between the plug and the socket is firm and reliable | |
| Light flicker, Luminance instability | Bulb poor contact | Plug the bulb firmly |
| Socket poor contact | Check that the socket connection is reliable |
WARRANTY POLICY
8. Warranty policy
8.1 Warranty period
From the date of purchase, the company provides one-year warranty service for the host.
8.2 Non-warranty policy
The following circumstances (but not limited to the following circumstances) are not covered by warranty and need to pay maintenance fees:
* The warranty period has expired.
* Damage caused by force majeure factors.
* Damage caused by human damage or improper use of customs declaration.
* Any damage caused by failure to use, maintain, and adjust according to the instructions; unauthorized personnel dismantling, repairing, modification, misuse, abuse, liquid intake, accidents, use of non-original parts causing failure or damage; malicious damage to the warranty card content, tearing, tampering, etc.
* Other failure and damage caused by problems other than the design, manufacturing, and quality of the product itself.
8.3 Warranty card
| Item Production Number | |||
| Fault phenomenon | |||
| Buying date | |||
| Contact | |||
| Contact address | |||
| Remark: This form is a return copy of the warranty card. Please cut out this form and send it to the seller or manufacturer whose address is on the "back cover". | |||
The company reserves the right to make certain improvements to the design as it deems necessary. Therefore, the instructions given in this manual may not fully reflect the detailed features of each product type currently available.
AFTER-SALES SERVICE
- If the product you received has other problems such as usage problems, please feel free to contact us and reply to online customer service within 24 hours to serve you.
- Our products support 90 days for no reason to return or exchange.
- Wish you a happy online shopping.
CORRECT DISPOSAL

This product is subject to the provision of European Directive
2012/19/EC. The symbol showing a wheelie bin crossed through indicates that the product requires separate refuse collection in the European Union. This applies to the product and all accessories marked with this symbol. Products marked as such may not be discarded with normal domestic waste, but must be taken to a collection point for recycling electrical and electronic devices.
Made In China
VEVOR®
TOUGH TOOLS, HALF PRICE
Technical Support and E-Warranty Certificate
www.vevor.com/support
VEVOR®
TOUGH TOOLS, HALF PRICE
Technical Support and E-Warranty Certificate www.vevor.com/support
MICROSCOPE
MODEL: XSP-36 XSP-36TV
Thank you very much for choosing this product. Please read all of the instructions before using it. The information will help you achieve the best possible results.
SAFETY TIPS
- This microscope is only for micro observation. It cannot be used for other purposes, or the instrument will be damaged.
- Apart from the detachable parts mentioned in this manual, it is strictly prohibited to disassemble any other parts. Otherwise, it may reduce the instrument's capability and can result in electric shock, injury, and damage to instruments. If you have any problems, please contact the nearest agent.
- The input voltage is indicated on the plate behind the microscope. Make sure the input voltage is consistent with the output voltage of the charging adapter used. If not, do not use the microscope and contact the nearest agent. If using the wrong input voltage, it will cause electrical appliance damage, which will damage the microscope.
- Using improper light source accessories may lead to instrument damage or instrument fire disaster.
- To prevent electric shock or fire, the power supply must be turned off before installing the microscope, replacing the light source accessories, and plugging or unplugging the power supply switch. To turn off the power switch, just flip the switch to "O".
- To prevent short circuits or other failures, do not place the microscope in a humid area.
* If water is spilled on the microscope, immediately turn off the power switch (flip the switch to "O"), unplug the power cord, and wipe off the water with a dry cloth.
* When unidentified objects enter or drip into the microscope, please stop use and contact the nearest sales agent.
- When moving the stage, the rack of the stage will extend out. Please be careful not to hurt your hands or other body parts with the rack when operating the microscope.
- This microscope is a precision optical instrument. If used or kept improperly, it will cause damage to the instrument or adversely affect its accuracy. When choosing a place to use, please consider the following conditions. Otherwise, it may cause the function decline of the instrument or malfunction.
* Avoid placing the microscope in direct sunlight, under indoor vertical lighting, and other bright fields.
The room temperature of the use environment and place is 0°C - 40°C, and the maximum relative humidity is 85%. Do not place the microscope in high temperature and high humidity places. Otherwise, the lens will fog or mold, which will damage the microscope and shorten its service life.
Impurities and dust will reduce the optical performance of the microscope, so they should be avoided.
Strong electromagnetic noise will interfere with the output signal of the microscope, so avoid approaching instruments and equipment that emit electromagnetic waves.
Place the microscope on a sturdy table that can support the weight of the instrument and level it.
- This microscope is a precision optical instrument, so be careful when carrying it. Heavy impact and rough operation can cause damage to instruments. Vibrating the objective lens will reduce the imaging accuracy.
- Do not rotate the left and right focusing hand-wheel in opposite directions at the same time. When the stage has reached the limited position of movement, please do not continue to rotate the coarse tuning hand-wheel. These operations will cause damage to the focusing mechanism.
- When oil immersion observation, only a small amount of oil is needed. To prevent excess oil from polluting the stage and condenser, degrading the performance of the instruments. When replacing the objective lens or ending the observation, the oil should be cleaned in time to avoid dirtying other lenses. It will be difficult to wipe out after the oil is dried.
2. Microscope Structure and Characteristics
- Eyepiece: secondary magnifying of the specimen for observation
- Binocular observer: observation of the specimen
- Converter: select different objective lens (positioning with a sound)
- Objective: primary magnifying of the specimen
- Clips: fix the specimens
- Stage: place the specimens
- Condenser diaphragm lever: adjust the size of the condenser diaphragm hole
- Collecting: gather light to illuminate the specimen
- Power connector: connect external power
- Power switch: the main power switch of the instrument
- Trinocular observation: visual and video observation of specimens
- Brightness adjustment rotary knob: adjust the brightness, so that the field of view is moderate
- Fine adjustment hand-wheel: micro focusing
- Coarse adjustment hand-wheel: focus the specimen
- The third eyepiece: used for connecting extra accessories and CCD
- X moving hand-wheel: adjust the lateral movement of the stage
- Y moving hand-wheel: adjust the longitudinal movement of the stage
INSTALLATION AND USE
3. Instrument Installation
3.1 Place the microscope on a stable workbench. When moving the instrument, especially the optical parts, avoid touching the lens surface with your hands or objects with oil stains. Finger marks or oil stains on the lens surface will affect imaging quality. 3.2 The platform surface is covered with a protective film during transportation. It should be torn off before using the microscope (see Picture 1).
Surface with protective film
Picture 1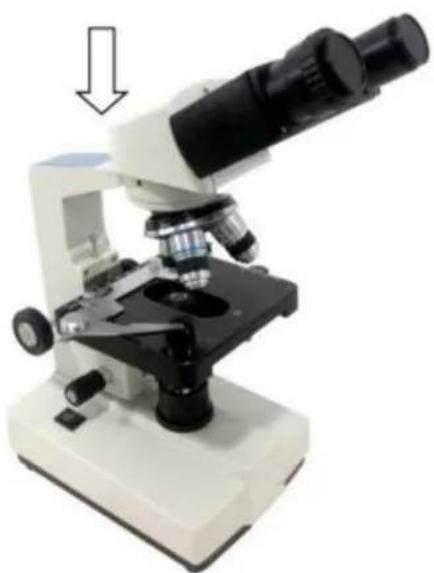
Picture 2
3.3 Gently place the observation head into the mounting hole of the frame, gently press the upper part of the observation body with one hand and tighten the fixing screw on the head of the frame with the other hand. When installing, ensure that the observation head is in place and not loose (see Picture 2). 3.4 After the microscope is installed, insert the DC plug into the power socket in the base and connect to the external power supply, provided that the supply voltage is consistent with the rated voltage of the instrument. 3.5 Finally, insert the eyepiece into the microscope eyepiece tube.
OPERATION
4. Operation
4.1 Electric illumination
4.1.1 Turn on the power switch (flip the switch to "-") to make the bulb light.
4.1.2 Rotate the brightness adjustment knob to adjust the field of view brightness.
4.2 Install the specimen
4.2.1 Open the section holder gently with your finger, place the specimen in, cover with the glass, release your finger and secure the section.
4.2.2 Adjust the platform moving hand-wheel so that the observed area is directly under the objective lens, making it easy to observe and adjust.
4.3 Focus with 10X objective
* Rotate the objective converter to turn the 10X objective into the light path (the objective will be automatically snapped when rotated in the right place)
* Rotate the coarse adjustable hand wheel to move the stage to the highest position (see picture 3).
* Observe through the eyepiece, rotate the coarse hand wheel slowly to lower the stage. Stop rotating when the image appears (see picture 3).
4.4 Rotate the fine hand wheel for precise focusing.
Picture 3
* When you want to observe with a high-magnification objective, first use the 10X or the 4X objective to focus, then replace the high-magnification objective and rotate the fine hand wheel for precise focusing.
* Confirm the direction of rotation when rotating the coarse hand wheel for focusing; it can only lower the stage.
* When using coarse adjustable hand wheels to raise the stage, pay attention to the distance between the specimen surface and the lower-end
face of the objective.
* Since the working distance is farther for the 10X and 4X objectives, as long as the standard thickness of the slide and cover glass is used (the standard thickness of the slide and cover glass is 1.2mm and 0.17mm, respectively), even if the stage is moved to the highest position, the objective lens will not touch the specimen.
4.5 Select Objective
Rotate objective converter. Select the desired objective magnification (the objective can be automatically snapped when rotated in the right place)
4.6 Adjust the diaphragm adjusting knob so that the aperture diaphragm meets the observation requirements (see picture 4).
4.7 After the observation is finished, turn off the power switch.
Picture 4
Diaphragm adjusting knob
INSTALLATION AND USE OF ACCESSORIES
5 Installation and use of accessories (optional)
5.1 Installed external CCD camera accessories

ATTENTION:
For the parameters and usage of the CCD camera and digital viewer, please refer to the instruction manual contained in the CD-ROM supplied with the CCD camera or digital viewer.
Trinocular observation viewer:
Take out the CCD camera, screw the lens end on the additional connector, insert the interface into the third eyepiece. Use the provided hex hook wrench to hold the screw fixing the additional connector tight, use the provided USB cable to connect the video output end of the CCD camera and the video input end of the computer. Plug in the microscope power plug, turn on the microscope and the computer switch.
According to the focusing method described in the operation manual, adjust the image clearly. Adjust the adjustable viewing tube on the additional connector until a clear image appears on the computer screen, video observation is available (see picture 5).
Picture 5
5.2 The installation of frosted glass
When using the LED lighting, it is necessary to add frosted glass. First turn out the ground glass bracket, put the frosted glass smoothly into the bracket slot, and then turn the frosted glass bracket back to the original position (see picture 6).
Picture 6

ATTENTION
When observing with a 4x objective lens, it is necessary to install frosted glass, and it is also recommended to use frosted glass to ensure uniform lighting when observing with 10x.
MAINTENANCE
6. Maintenance
6.1 When the microscope is finished observing or suspended, cut off the power supply to avoid the electrical components in the instrument remaining in the working state. When not used for a long time, the power plug should be removed from the power socket and all transmission wires should be properly kept. 6.2 Clean lens: Use a blow ball or a soft brush to wipe the dust off the lens. Heavy dirt and fingerprints can be gently wiped by lens paper or soft cloth dipped in a little alcohol and ether mixture (the mixture of the two is about 20 to 30% alcohol, 70 to 80% ether). 6.3 Clean instrument surface: Can be wiped with a clean soft cloth; Heavy dirt can be scrubbed with a neutral cleaner.

ATTENTION
Do not use organic solvents (such as alcohol, ether and its diluent, etc.) to wipe, so as to avoid paint off the surface of the instrument.
6.4 Storage: if you do not use the microscope for a long time, please turn off the power supply of the instrument, fully cool the bulb, put the dust-proof cover on the microscope, and put it in the packing box. Store in a dry, ventilated, clean and acid-alkali vapor-free place to avoid mold.
TROUBLESHOOTING SCHEDULE
- Troubleshooting schedule
| Common fault | Reasons | Solutions |
| The field of view is blurred or the brightness of the field of view is uneven, and the complete field of view cannot be seen. | The converter is not positioned correctly (the objective is not coaxial with the optical path) | Rotate the objective converter until accurate positioning (moving the objective into the light path correctly) |
| The condenser is not centered | Adjust the center of the condenser | |
| Light bulb was installed incorrectly | Check that the bulb is inserted correctly | |
| Stains or dust on a condenser, objective, collector, eyepiece, or specimen | Wipe relevant parts | |
| The aperture is too small | Proper adjusting the diaphragm | |
| The field of view is unclean | Lens surface is not clean | Proper cleaning |
| The surface of the slide is not clean | Wipe clean | |
| Lack of clarity Poor imaging | Specimen slide is not covered with glass | Attach cover glass |
| Cover glass is too thick or too thin | Use a cover glass of standard thickness (0.17mm) | |
| The specimen is upside down | Flip the slide so that the cover slide is up | |
| Oil on the dry objective | Wipe clean | |
| Lens surface is not clean (objective/eyepiece/condens er/collector) | Wipe clean | |
| Aperture is too small | Proper adjusting the diaphragm | |
| Unilateral darkening | Objective converter is not positioned correctly | Rotate the objective converter until accurate positioning |
| Specimen is higher than the stage | Specimens should be firmly clamped to the platform clips | |
| Unable to focus when using a high-power objective | Slide upside down | Flip the slide so that the cover slide is up |
| Cover glass is too thick | Use specified cover glass (thickness 0.17mm) | |
| Objective not screwed tightly | Tightening objective | |
| The left and right images do not coincide when viewed with the binocular tube | Unadjusted pupil distance | Adjust interpupillary distance |
| Unadjusted diopter | Adjust the diopter | |
| The bulb doesn't work | Power supply not connected | Check whether the power switch is turned on, and whether the charger voltage is consistent with the voltage marked on the instrument |
| Power plug is in poor contact with the socket | Check whether the connection between the plug and the socket is firm and reliable | |
| Light flicker, Luminance instability | Bulb poor contact | Plug the bulb firmly |
| Socket poor contact | Check that the socket connection is reliable |
WARRANTY POLICY
8. Warranty policy
8.1 Warranty period
From the date of purchase, the company provides one-year warranty service for the host.
8.2 Non-warranty policy
The following circumstances (but not limited to the following circumstances) are not covered by warranty and need to pay maintenance fees:
*The warranty period has expired.
*Damage caused by force majeure factors.
*Damage caused by human damage or improper use of customs declaration.
*Any damage caused by failure to use, maintain, and adjust according to the instructions, unauthorized personnel dismantling, repairing, modifying, misusing, abusing, liquid intake, accidents, use of non-original parts causing failure or damage, malicious damage to the warranty card content, tearing, tampering, etc.
*Other failure and damage caused by problems other than the design, manufacturing, and quality of the product itself.
8.3 Warranty card
| Item Production Number | |||
| Fault phenomenon | |||
| Buying date | |||
| Contact | |||
| Contact address | |||
| Remark: This form is a return copy of the warranty card. Please cut out this form and send it to the seller or manufacturer whose address is on the "back cover". | |||
The Company reserves the right to make certain improvements to the design as it deems necessary. Therefore, the instructions given in this manual may not fully reflect the detailed features of each product type currently available.
AFTER-SALES SERVICE
- If the product you received has other problems such as usage problems, please feel free to contact us and reply to online customer service within 24 hours to serve you.
- Our products support 90 days for no reason to return or exchange.
- Wish you a happy online shopping.
CORRECT DISPOSAL

This product is subject to the provision of European Directive
2012/19/EC. The symbol showing a wheelie bin crossed through indicates that the product requires separate refuse collection in the European Union. This applies to the product and all accessories marked with this symbol. Products marked as such may not be discarded with normal domestic waste, but must be taken to a collection point for recycling electrical and electronic devices.
Made In China
VEVOR®
TOUGH TOOLS, HALF PRICE
Technical Support and E-Warranty Certificate
www.vevor.com/support
VEVOR®
TOUGH TOOLS, HALF PRICE
Technical Support and E-Warranty Certificate www.vevor.com/support
MICROSCOPE
MODEL: XSP-36 XSP-36TV
Thank you very much for choosing this product. Please read all of the instructions before using it. The information will help you achieve the best possible results.
SAFETY TIPS
- This microscope is only for micro observation. It cannot be used for other purposes, or the instrument will be damaged.
- Apart from the detachable parts mentioned in this manual, it is strictly prohibited to disassemble any other parts. Otherwise, it may reduce the instrument's capability and can result in electric shock, injury, and damage to instruments. If you have any problems, please contact the nearest agent.
- The input voltage is indicated on the plate behind the microscope. Make sure the input voltage is consistent with the output voltage of the charging adapter used. If not, do not use the microscope and contact the nearest agent. If using the wrong input voltage, it will cause electric appliance damage, which will damage the microscope.
- Using improper light source accessories may lead to instrument damage or instrument fire disaster.
- To prevent electric shock or fire, the power supply must be turned off before installing the microscope, replacing the light source accessories, and plugging or unplugging the power supply switch. To turn off the power switch, just flip the switch to "O".
- To prevent short circuits or other failures, do not place the microscope in a humid area.
* If water is spilled on the microscope, immediately turn off the power switch (flip the switch to "O"), unplug the power cord, and wipe off the water with a dry cloth.
* When unidentified objects enter or drip into the microscope, please stop use and contact the nearest sales agent.
- When moving the stage, the rack of the stage will extend out. Please be careful not to hurt your hands or other body parts with the rack when operating the microscope.
- This microscope is a precision optical instrument. If used or kept improperly, it will cause damage to the instrument or adversely affect its accuracy. When choosing a place to use, please consider the following conditions. Otherwise, it may cause the function decline of the instrument or malfunction.
* Avoid placing the microscope in direct sunlight, under indoor vertical lighting, and other bright fields.
* The room temperature of the use environment and place is 0°C - 40°C, and the maximum relative humidity is 85%. Do not place the microscope in high temperature and high humidity places. Otherwise, the lens will fog or mold, which will damage the microscope and shorten its service life.
* Impurities and dust will reduce the optical performance of the microscope, so they should be avoided.
* Strong electromagnetic noise will interfere with the output signal of the microscope, so avoid approaching instruments and equipment that emit electromagnetic waves.
* Place the microscope on a sturdy table that can support the weight of the instrument and level it.
- This microscope is a precision optical instrument, so be careful when carrying it. Heavy impact and rough operation can cause damage to instruments. Vibrating the objective lens will reduce the imaging accuracy.
- Do not rotate the left and right focusing hand-wheels in opposite directions at the same time. When the stage has reached the limit of its movement, do not continue to rotate the coarse tuning hand-wheel. These operations will cause damage to the focusing mechanism.
- When performing oil immersion observation, only a small amount of oil is needed. To prevent excess oil from polluting the stage and condenser, which would degrade the performance of the instruments. When replacing the objective lens or ending the observation, the oil should be cleaned in time to avoid dirtying other lenses. It will be difficult to wipe off once the oil has dried.
TECHNICAL PARAMETERS
- Technical specifications
2. Microscope Structure and Characteristics
- Eyepiece: secondary magnification of the specimen for observation
- Binocular observer: observation of the specimen
- Converter: select different objective lenses (positioning with a sound)
- Objective: primary magnification of the specimen
- Clips: fix the specimens
- Stage: place the specimens
- Condenser diaphragm lever: adjust the size of the condenser diaphragm aperture
- Collector: gather light to illuminate the specimen
- Power connector: connect external power
- Power switch: the main power switch of the instrument
- Trinocular observation: visual and video observation of specimens
- Brightness adjustment rotary knob: adjust the brightness, so that the field of view is moderate
- Fine adjustment hand-wheel: micro focusing
- Coarse adjustment hand-wheel: focus the specimen
- The third eyepiece: used for connecting extra accessories and CCD
- X moving hand-wheel: adjust the lateral movement of the stage
- Y moving hand-wheel: adjust the longitudinal movement of the stage
INSTALLATION AND USE
3. Instrument Installation
3.1 Place the microscope on a stable workbench. When moving the instrument, especially the optical parts, should avoid touching the lens' surface with your hands or objects with oil stains. Finger marks or oil stains on the surface of the lens will affect the imaging quality. 3.2 The platform surface is covered with a protective film during transportation. It should be torn off before using the microscope (see picture 1).
Surface with protective film
3.3 Place the observer gently in the mounting hole of the frame, gently press the upper part of the observation body with one hand and tighten the fixing screw on the head of the frame with the other hand. When installing, ensure that the observation head is in place and not loose (see picture 2). 3.4 After the microscope is installed, insert the DC plug into the power socket in the base and connect to the external power supply, under the situation of supply voltage is consistent with the rated voltage of the instrument. 3.5 Finally, insert the eyepiece into the microscope eyepiece tube.
OPERATION
4. Operation
4.1 Electric illumination
4.1.1 Turn on the power switch (flip the switch to "-" to make the bulb lighting).
4.1.2 Rotate the brightness adjustment knob to adjust the field of view brightness.
4.2 Install the specimen
4.2.1 Open the section holder gently with your finger, place the specimen in, cover the glass, release your finger and secure the section.
4.2.2 Adjust the platform moving hand-wheel and so that the observed area is directly under the objective lens, make sure it's easy to observation and adjustment.
4.3 Focus with 10X objective
* Rotate the objective converter to turn the 10X objective into the light path (the objective will be automatically snapped when rotate in the right place)
* Rotate the coarse adjustable hand wheel Move the stage to the highest position (see picture 3).
* Observe through the eyepiece, rotate the coarse hand wheel slowly to lower down the stage. Stop rotating when the image appears (see picture 3).
4.4 Rotate the fine hand wheel for precise focusing.
*When you want to observe with a high-magnification objective, first use the 10X or the 4X objective to focus, then replace the high-magnification objective and rotate the fine hand wheel for precise focusing.
*Confirm the direction of rotation when rotating the coarse hand wheel for focusing, can only lower the direction of the stage.
*When using coarse adjustable hand wheels to raise the stage, pay attention to the distance between the specimen surface and the lower-end
face of the objective.
*Since the working distance is farther for the 10X and 4X objectives, as long as it is used the standard thickness of the slide and cover glass (the standard thickness of the slide and cover glass is 1.2mm and 0.17mm, respectively), even if the stage is moved to the highest position, the objective lens will not touch the specimen.
4.5 Select Objective
Rotate objective Converter. Select the desired objective magnification (the objective can be automatically snapped when rotated in the right place)
4.6 Adjust the diaphragm adjusting knob makes the aperture diaphragm meet the observation requirements (see picture 4).
4.7 After the observation is finished, turn off the power switch.
Diaphragm adjusting knob
INSTALLATION AND USE OF ACCESSORIES
5 Installation and use of accessories (optional)
5.1 Installed external CCD camera accessories

ATTENTION:
For the parameters and usage of the CCD camera and digital viewer, please refer to the instruction manual contained in the CD-ROM supplied with the CCD camera or digital viewer.
Trinocular observation viewer:
Take out the CCD camera, screw the lens end onto the additional connector, insert the interface into the third eyepiece. Use the provided hex hook wrench to hold the screw fixing the additional connector tight, use the provided USB cable to connect the video output end of the CCD camera and the video input end of the computer. Plug in the microscope power plug, turn on the microscope and the computer switch.
According to the focusing method described in the operation manual, adjust the image clearly. Adjust the adjustable viewing tube on the additional connector until a clear image appears on the computer screen, video observation is available (see picture 5).
Picture 5
5.2 The installation of frosted glass
When using the LED lighting, it is necessary to add frosted glass. First, turn out the ground glass bracket, put the frosted glass smoothly into the bracket slot, and then turn the frosted glass bracket back to the original position (see picture 6).
Picture 6

ATTENTION
When you observe with 4x objective lens, it is necessary to install frosted glass, and it is also recommended to try to use frosted glass to ensure uniform lighting when it is observed with 10X.
MAINTENANCE
6. Maintenance
6.1 When the microscope is finished observing or suspended, cut off the power supply to avoid the electrical components in the instrument still being in the working state. When not used for a long time, the power plug should be removed from the power socket and all transmission wires should be properly kept. 6.2 Clean lens: Use a blow ball or a soft brush to wipe the dust off the lens. Heavy dirt and fingerprints can be gently wiped by lens paper or soft cloth dipped in a little alcohol and ether mixture (the mixture of the two is about 20 to 30% alcohol, 70 to 80% ether). 6.3 Clean instrument surface: Can be wiped with a clean soft cloth; Heavy dirt can be scrubbed with a neutral cleaner.

ATTENTION
Do not use organic solvents (such as alcohol, ether, and their diluents) to wipe the instrument, to avoid paint peeling off the surface.
6.4 Storage: If you do not use the microscope for a long time, please turn off the power supply, let the bulb cool completely, put the dust cover on the microscope, and place it in the packing box. Store in a dry, ventilated, clean place free from acid and alkali vapors to prevent mold.
TROUBLESHOOTING SCHEDULE
- Troubleshooting Schedule
| Common fault | Reasons | Solutions |
| The field of view is blurred or the brightness of the field of view is uneven, and the complete field of view cannot be seen. | The converter is not positioned correctly (the objective is not coaxial with the optical path) | Rotate the objective converter until accurate positioning (moving the objective into the light path correctly) |
| The condenser is not centered | Adjust the center of the condenser | |
| Light bulb was installed incorrectly | Check that the bulb is inserted correctly | |
| Stains or dust on a condenser, objective, collector, eyepiece, or specimen | Wipe relevant parts | |
| The aperture is too small | Proper adjusting the diaphragm | |
| The field of view is unclean | Lens surface is not clean | Proper cleaning |
| The surface of the slide is not clean | Wipe clean | |
| Lack of clarity Poor imaging | Specimen slide is not covered with glass | Attach cover glass |
| Cover glass is too thick or too thin | Use a cover glass of standard thickness (0.17mm) | |
| The specimen is upside down | Flip the slide so that the cover slide is up | |
| Oil on the dry objective | Wipe clean | |
| Lens surface is not clean (objective/eyepiece/condens er/collector) | Wipe clean | |
| Aperture is too small | Proper adjusting the diaphragm | |
| Unilateral darkening | Objective converter is not positioned correctly | Rotate the objective converter until accurate positioning |
| Specimen is higher than the stage | Specimens should be firmly clamped to the platform clips | |
| Unable to focus when using a high-power objective | Slide upside down | Flip the slide so that the cover slide is up |
| Cover glass is too thick | Use specified cover glass (thickness 0.17mm) | |
| Objective not screwed tightly | Tightening objective | |
| The left and right images do not coincide when viewed with the binocular tube | Unadjusted pupil distance | Adjust interpupillary distance |
| Unadjusted diopter | Adjust the diopter | |
| The bulb doesn't work | Power supply not connected | Check whether the power switch is turned on, and whether the charger voltage is consistent with the voltage marked on the instrument |
| Power plug is in poor contact with the socket | Check whether the connection between the plug and the socket is firm and reliable | |
| Light flicker, Luminance instability | Bulb poor contact | Plug the bulb firmly |
| Socket poor contact | Check that the socket connection is reliable |
WARRANTY POLICY
8. Warranty Policy
8.1 Warranty Period
From the date of purchase, the company provides one-year warranty service for the host.
8.2 Non-Warranty Policy
The following circumstances (but not limited to the following) are not covered by the warranty and require payment of maintenance fees:
* The warranty period has expired.
* Damage caused by force majeure.
* Damage caused by human damage or improper use.
* Any damage caused by failure to use, maintain, or adjust according to the instructions; unauthorized dismantling, repair, modification, misuse, abuse, liquid ingress, accidents, use of non-original parts, or malicious damage to the warranty card content, tearing, tampering, etc.
*Other failure and damage caused by problems other than the design, manufacturing and quality of the product itself.
8.3 Warranty card
| Item Production Number | |||
| Fault phenomenon | |||
| Buying date | |||
| Contact | |||
| Contact address | |||
| Remark: This form is a return copy of the warranty card. Please cut out this form and send it to the seller or manufacturer whose address is on the "back cover". | |||
The Company reserves the right to make certain improvements to the design as it deems necessary. Therefore, the instructions given in this manual may not fully reflect the detailed features of each product type currently available.
AFTER-SALES SERVICE
- If the product you received has other problems such as usage problems, please feel free to contact us and reply to online customer service within 24 hours to serve you.
- Our products support 90 days for no reason to return or exchange.
- Wish you a happy online shopping.
CORRECT DISPOSAL

This product is subject to the provision of European Directive
2012/19/EC. The symbol showing a wheelie bin crossed through indicates that the product requires separate refuse collection in the European Union. This applies to the product and all accessories marked with this symbol. Products marked as such may not be discarded with normal domestic waste, but must be taken to a collection point for recycling electrical and electronic devices.
Made In China
VEVOR®
TOUGH TOOLS, HALF PRICE
Technical Support and E-Warranty Certificate
www.vevor.com/support
VEVOR®
TOUGH TOOLS, HALF PRICE
Technical Support and E-Warranty Certificate www.vevor.com/support
MICROSCOPE
MODEL: XSP-36 XSP-36TV
Thank you very much for choosing this product. Please read all of the instructions before using it. The information will help you achieve the best possible results.
SAFETY TIPS
- This microscope is only for micro observation. It cannot be used for other purposes, or the instrument will be damaged.
- Apart from the detachable parts mentioned in this manual, it is strictly prohibited to disassemble any other parts. Otherwise, it may reduce the instrument's capability and can result in electric shock, injury, and damage to instruments. If you have any problems, please contact the nearest agent.
- The input voltage is indicated on the plate behind the microscope. Make sure the input voltage is consistent with the output voltage of the charging adapter used. If not, do not use the microscope and contact the nearest agent. Using the wrong input voltage will cause electrical appliance damage, which will damage the microscope.
- Using improper light source accessories may lead to instrument damage or instrument fire disaster.
- To prevent electric shock or fire, the power supply must be turned off before installing the microscope, replacing the light source accessories, and plugging or unplugging the power supply switch. To turn off the power switch, just flip the switch to "O".
- To prevent short circuits or other failures, do not place the microscope in a humid area.
* If water is spilled on the microscope, immediately turn off the power switch (flip the switch to "O"), unplug the power cord, and wipe off the water with a dry cloth.
* When unidentified objects enter or drip into the microscope, please stop use and contact the nearest sales agent.
- When moving the stage, the rack of the stage will extend out. Please be careful not to hurt your hands or other body parts with the rack when operating the microscope.
- This microscope is a precision optical instrument. If used or kept improperly, it will cause damage to the instrument or adversely affect its accuracy. When choosing a place to use, please consider the following conditions. Otherwise, it may cause the function decline of the instrument or malfunction.
* Avoid placing the microscope in direct sunlight, under indoor vertical lighting, and other bright fields.
* The room temperature of the use environment and place is 0°C - 40°C, and the maximum relative humidity is 85%. Do not place the microscope in high temperature and high humidity places. Otherwise, the lens will fog or mold, which will damage the microscope and shorten its service life.
* Impurities and dust will reduce the optical performance of the microscope, so avoid them.
* Strong electromagnetic noise will interfere with the output signal of the microscope, so avoid approaching instruments and equipment that emit electromagnetic waves.
* Place the microscope on a sturdy table that can support the weight of the instrument and level it.
- This microscope is a precision optical instrument, so be careful when carrying it. Heavy impact and rough operation can cause damage to instruments. Vibrating the objective lens will reduce the imaging accuracy.
- Do not rotate the left and right focusing hand-wheel in opposite directions at the same time. When the stage has reached the limited position of movement, please do not continue to rotate the coarse tuning hand-wheel. These operations will cause damage to the focusing mechanism.
- When performing oil immersion observation, only a small amount of oil is needed. To prevent excess oil from polluting the stage and condenser, which would degrade the performance of the instruments. When replacing the objective lens or ending the observation, the oil should be cleaned in time to avoid dirtying other lenses. It will be difficult to wipe out after the oil is dried.
TECHNICAL PARAMETERS
2. Microscope Structure and Characteristics
- Eyepiece: secondary magnifying of the specimen for observation
- Binocular observer: observation of the specimen
- Converter: select different objective lens (positioning with a sound)
- Objective: primary magnifying of the specimen
- Clips: fix the specimens
- Stage: place the specimens
- Condenser diaphragm lever: adjust the size of the condenser diaphragm hole
- Collecting: gather light to illuminate the specimen
- Power connector: connect external power
- Power switch: the main power switch of the instrument
- Trinocular observation: visual and video observation of specimens
- Brightness adjustment rotary knob: adjust the brightness, so that the field of view is moderate
- Fine adjustment hand-wheel: micro focusing
- Coarse adjustment hand-wheel: focus the specimen
- The third eyepiece: used for connecting extra accessories and CCD
- X moving hand-wheel: adjust the lateral movement of the stage
- Y moving hand-wheel: adjust the longitudinal movement of the stage
INSTALLATION AND USE
3. Instrument Installation
3.1 Place the microscope on a stable workbench. When moving the instrument, especially the optical parts, should avoid touching the lens' surface with your hands or objects with oil stains. Finger marks or oil stains on the surface of the lens will affect the imaging quality. 3.2 The platform surface is covered with a protective film during transportation. It should be torn off before using the microscope (see picture 1).
Surface with protective film
Picture 1
Picture 2
3.3 Place the observer gently in the mounting hole of the frame, gently press the upper part of the observation body with one hand and tighten the fixing screw on the head of the frame with the other hand. When installing, ensure that the observation head is in place and not loose (see picture 2). 3.4 After the microscope is installed, insert the DC plug to the power socket in the base and connect to the external power supply, under the situation of supply voltage is consistent with the rated voltage of the instrument. 3.5 Finally, insert the eyepiece into the microscope eyepiece tube.
OPERATION
4. Operation
4.1 Electric illumination
4.1.1 Turn on the power switch (flip the switch to "-") to make the bulb light.
4.1.2 Rotate the brightness adjustment knob to adjust the field of view brightness.
4.2 Install the specimen
4.2.1 Open the section holder gently with your finger, place the specimen in, cover the glass, release your finger and secure the section.
4.2.2 Adjust the platform moving hand-wheel so that the observed area is directly under the objective lens, making it easy to observe and adjust.
4.3 Focus with 10X objective
* Rotate the objective converter to turn the 10X objective into the light path (the objective will be automatically snapped when rotated into the right place).
* Rotate the coarse adjustable hand wheel to move the stage to the highest position (see picture 3).
* Observe through the eyepiece, rotate the coarse hand wheel slowly to lower the stage. Stop rotating when the image appears (see picture 3).
4.4 Rotate the fine hand wheel for precise focusing.
Picture 3
* When you want to observe with a high-magnification objective, first use the 10X or the 4X objective to focus, then replace the high-magnification objective and rotate the fine hand wheel for precise focusing.
*Confirm the direction of rotation when rotating the coarse hand wheel for focusing; it can only lower the direction of the stage.
*When using coarse adjustable hand wheels to raise the stage, pay attention to the distance between the specimen surface and the lower-end
face of the objective.
*Since the working distance is farther for the 10X and 4X objectives, as long as the standard thickness of the slide and cover glass is used (the standard thickness of the slide and cover glass is 1.2mm and 0.17mm, respectively), even if the stage is moved to the highest position, the objective lens will not touch the specimen.
4.5 Select Objective
Rotate the objective converter. Select the desired objective magnification (the objective can be automatically snapped when rotated in the right place).
4.6 Adjust the diaphragm adjusting knob so that the aperture diaphragm meets the observation requirements (see picture 4).
4.7 After the observation is finished, turn off the power switch.
Picture 4
Diaphragm adjusting knob
INSTALLATION AND USE OF ACCESSORIES
5 Installation and use of accessories (optional)
5.1 Installed external CCD camera accessories

ATTENTION:
For the parameters and usage of the CCD camera and digital viewer, please refer to the instruction manual contained in the CD-ROM supplied with the CCD camera or digital viewer.
Trinocular observation viewer:
Remove the CCD camera, screw the lens end onto the additional connector, and insert the interface into the third eyepiece. Use the provided hex hook wrench to tighten the screw securing the additional connector. Use the provided USB cable to connect the video output of the CCD camera to the video input of the computer. Plug in the microscope power plug, and turn on the microscope and the computer.
According to the focusing method described in the operation manual, adjust the image clearly. Adjust the adjustable viewing tube on the additional connector until a clear image appears on the computer screen; video observation is then available (see Picture 5).

Picture 5
5.2 Installation of frosted glass
When using LED lighting, it is necessary to add frosted glass. First, turn out the ground glass bracket, place the frosted glass smoothly into the bracket slot, and then turn the frosted glass bracket back to its original position (see Picture 6).
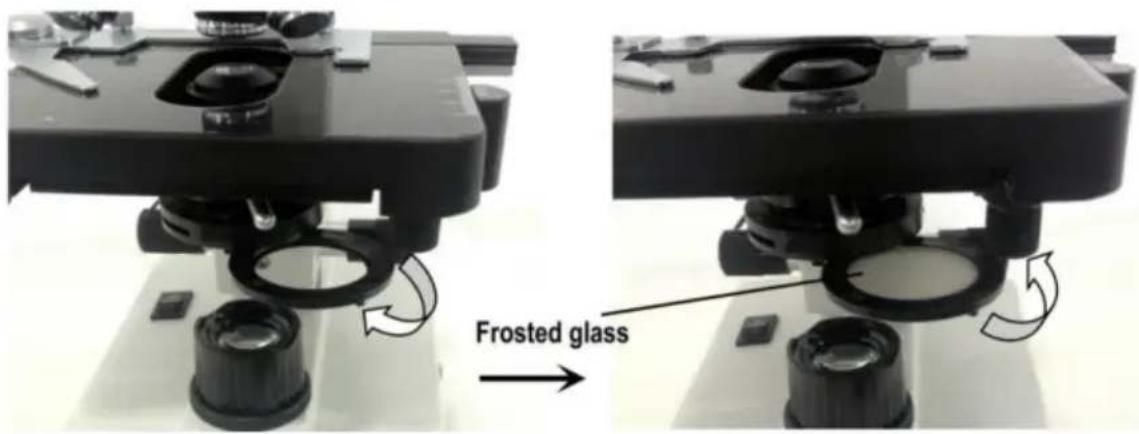
Picture 6

ATTENTION
When observing with a 4x objective lens, it is necessary to install frosted glass. It is also recommended to use frosted glass to ensure uniform lighting when observing with 10x.
MAINTENANCE
6. Maintenance
6.1 When the microscope is finished being used or is suspended, cut off the power supply to avoid electrical components remaining in the working state. When not used for a long time, remove the power plug from the power socket and properly store all transmission wires. 6.2 Clean lens: Use a blow ball or a soft brush to wipe dust off the lens. Heavy dirt and fingerprints can be gently wiped with lens paper or a soft cloth dipped in a little alcohol and ether mixture (the mixture is about 20 to 30% alcohol and 70 to 80% ether). 6.3 Clean instrument surface: Can be wiped with a clean soft cloth; heavy dirt can be scrubbed with a neutral cleaner.

ATTENTION
Do not use organic solvents (such as alcohol, ether, and their diluents) to wipe, to avoid paint coming off the surface of the instrument.
6.4 Storage: If you do not use the microscope for a long time, turn off the power supply, fully cool the bulb, put the dust-proof cover on the microscope, and place it in the packing box. Store in a dry, ventilated, clean place free of acid and alkali vapors to avoid mold.
Troubleshooting Schedule
- Troubleshooting Schedule
| Common fault | Reasons | Solutions |
| The field of view is blurred or the brightness of the field of view is uneven, and the complete field of view cannot be seen. | The converter is not positioned correctly (the objective is not coaxial with the optical path) | Rotate the objective converter until accurate positioning (moving the objective into the light path correctly) |
| The condenser is not centered | Adjust the center of the condenser | |
| Light bulb was installed incorrectly | Check that the bulb is inserted correctly | |
| Stains or dust on a condenser, objective, collector, eyepiece, or specimen | Wipe relevant parts | |
| The aperture is too small | Proper adjusting the diaphragm | |
| The field of view is unclean | Lens surface is not clean | Proper cleaning |
| The surface of the slide is not clean | Wipe clean | |
| Lack of clarity Poor imaging | Specimen slide is not covered with glass | Attach cover glass |
| Cover glass is too thick or too thin | Use a cover glass of standard thickness (0.17mm) | |
| The specimen is upside down | Flip the slide so that the cover slide is up | |
| Oil on the dry objective | Wipe clean | |
| Lens surface is not clean (objective/eyepiece/condens er/collector) | Wipe clean | |
| Aperture is too small | Proper adjusting the diaphragm | |
| Unilateral darkening | Objective converter is not positioned correctly | Rotate the objective converter until accurate positioning |
| Specimen is higher than the stage | Specimens should be firmly clamped to the platform clips | |
| Unable to focus when using a high-power objective | Slide upside down | Flip the slide so that the cover slide is up |
| Cover glass is too thick | Use specified cover glass (thickness 0.17mm) | |
| Objective not screwed tightly | Tightening objective | |
| The left and right images do not coincide when viewed with the binocular tube | Unadjusted pupil distance | Adjust interpupillary distance |
| Unadjusted diopter | Adjust the diopter | |
| The bulb doesn't work | Power supply not connected | Check whether the power switch is turned on, and whether the charger voltage is consistent with the voltage marked on the instrument |
| Power plug is in poor contact with the socket | Check whether the connection between the plug and the socket is firm and reliable | |
| Light flicker, Luminance instability | Bulb poor contact | Plug the bulb firmly |
| Socket poor contact | Check that the socket connection is reliable |
Warranty Policy
8. Warranty Policy
8.1 Warranty Period
From the date of purchase, the company provides one-year warranty service for the host.
8.2 Non-Warranty Policy
The following circumstances (but not limited to the following) are not covered by the warranty and require payment of maintenance fees:
* The warranty period has expired.
* Damage caused by force majeure.
* Damage caused by human damage or improper use.
* Any damage caused by failure to use, maintain, or adjust according to the instructions; unauthorized personnel dismantling, repairing, modifying, misusing, abusing, liquid intake, accidents, use of non-original parts, malicious damage to the warranty card content, tearing, tampering, etc.
* Other failures and damage caused by problems other than the design, manufacturing, and quality of the product itself.
8.3 Warranty Card
| Item Production Number | |||
| Fault phenomenon | |||
| Buying date | |||
| Contact | |||
| Contact address | |||
| Remark: This form is a return copy of the warranty card. Please cut out this form and send it to the seller or manufacturer whose address is on the "back cover". | |||
The company reserves the right to make certain improvements to the design as it deems necessary. Therefore, the instructions given in this manual may not fully reflect the detailed features of each product type currently available.
AFTER-SALES SERVICE
- If the product you received has other problems such as usage problems, please feel free to contact us and reply to online customer service within 24 hours to serve you.
- Our products support 90 days for no reason to return or exchange.
- Wish you a happy online shopping.
CORRECT DISPOSAL
This product is subject to the provision of European Directive
2012/19/EC. The symbol showing a wheelie bin crossed through indicates that the product requires separate refuse collection in the European Union. This applies to the product and all accessories marked with this symbol. Products marked as such may not be discarded with normal domestic waste, but must be taken to a collection point for recycling electrical and electronic devices.
Made In China
VEVOR®
TOUGH TOOLS, HALF PRICE
Technical Support and E-Warranty Certificate
www.vevor.com/support
VEVOR®
TOUGH TOOLS, HALF PRICE
Technical Support and E-Warranty Certificate www.vevor.com/support
MICROSCOPE
MODEL: XSP-36 XSP-36TV
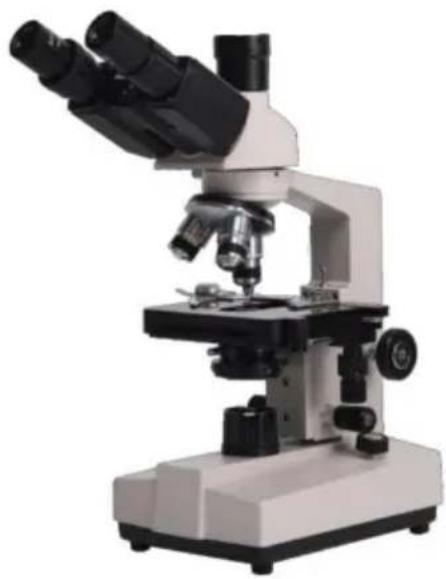
NEED HELP? CONTACT US!
Thank you very much for choosing this product. Please read all of the instructions before using it. The information will help you achieve the best possible results.
SAFETY TIPS
- This microscope is only for micro observation. It cannot be used for other purposes, or the instrument will be damaged.
- Apart from the detachable parts mentioned in this manual, it is strictly prohibited to disassemble any other parts. Otherwise, it may reduce the instrument's capability and can result in electric shock, injury, and damage to instruments. If you have any problems, please contact the nearest agent.
- The input voltage is indicated on the plate behind the microscope. Make sure the input voltage is consistent with the output voltage of the charging adapter used. If not, do not use the microscope and contact the nearest agent. If using the wrong input voltage, it will cause electric appliance damage, which will damage the microscope.
- Using improper light source accessories may lead to instrument damage or fire disaster.
- To prevent electric shock or fire, the power supply must be turned off before installing the microscope, replacing the light source accessories, and plugging or unplugging the power supply switch. To turn off the power switch, just flip the switch to "O".
- To prevent short circuits or other failures, do not place the microscope in a humid area.
* If water is spilled on the microscope, immediately turn off the power switch (flip the switch to "O"), unplug the power cord and wipe off the water with a dry cloth.
* When unidentified objects enter or drip into the microscope, please stop use and contact the nearest sales agent.
- When moving the stage, the rack of the stage will extend out. Please be careful not to hurt your hands or other body parts with the rack when operating the microscope.
- This microscope is a precision optical instrument. If used or kept improperly, it may cause damage to the instrument or adversely affect its accuracy. When choosing a place to use, please consider the following conditions. Otherwise, it may cause the function decline of the instrument or malfunction.
* Avoid placing the microscope in direct sunlight, under indoor vertical lighting, and other bright fields.
* The room temperature of the use environment and place is 0°C - 40°C, and the maximum relative humidity is 85%. Do not place the microscope in high temperature and high humidity places. Otherwise, the lens will fog or mold, which will damage the microscope and shorten its service life.
* Impurities and dust will reduce the optical performance of the microscope, so they should be avoided.
* Strong electromagnetic noise will interfere with the output signal of the microscope, so avoid approaching instruments and equipment that emit electromagnetic waves.
* Place the microscope on a sturdy table that can support the weight of the instrument and level it.
- This microscope is a precision optical instrument, so be careful when carrying it. Heavy impact and rough operation can cause damage to the instrument. Vibrating the objective lens will reduce the imaging accuracy.
- Do not rotate the left and right focusing hand-wheels in opposite directions at the same time. When the stage has reached the limited position of movement, please do not continue to rotate the coarse tuning hand-wheel. These operations will cause damage to the focusing mechanism.
- When performing oil immersion observation, only a small amount of oil is needed. To prevent excess oil from polluting the stage and condenser, degrading the performance of the instrument. When replacing the objective lens or ending the observation, the oil should be cleaned in time to avoid dirtying other lenses. It will be difficult to wipe out after the oil is dried.
TECHNICAL PARAMETERS
2. Microscope Structure and Characteristics
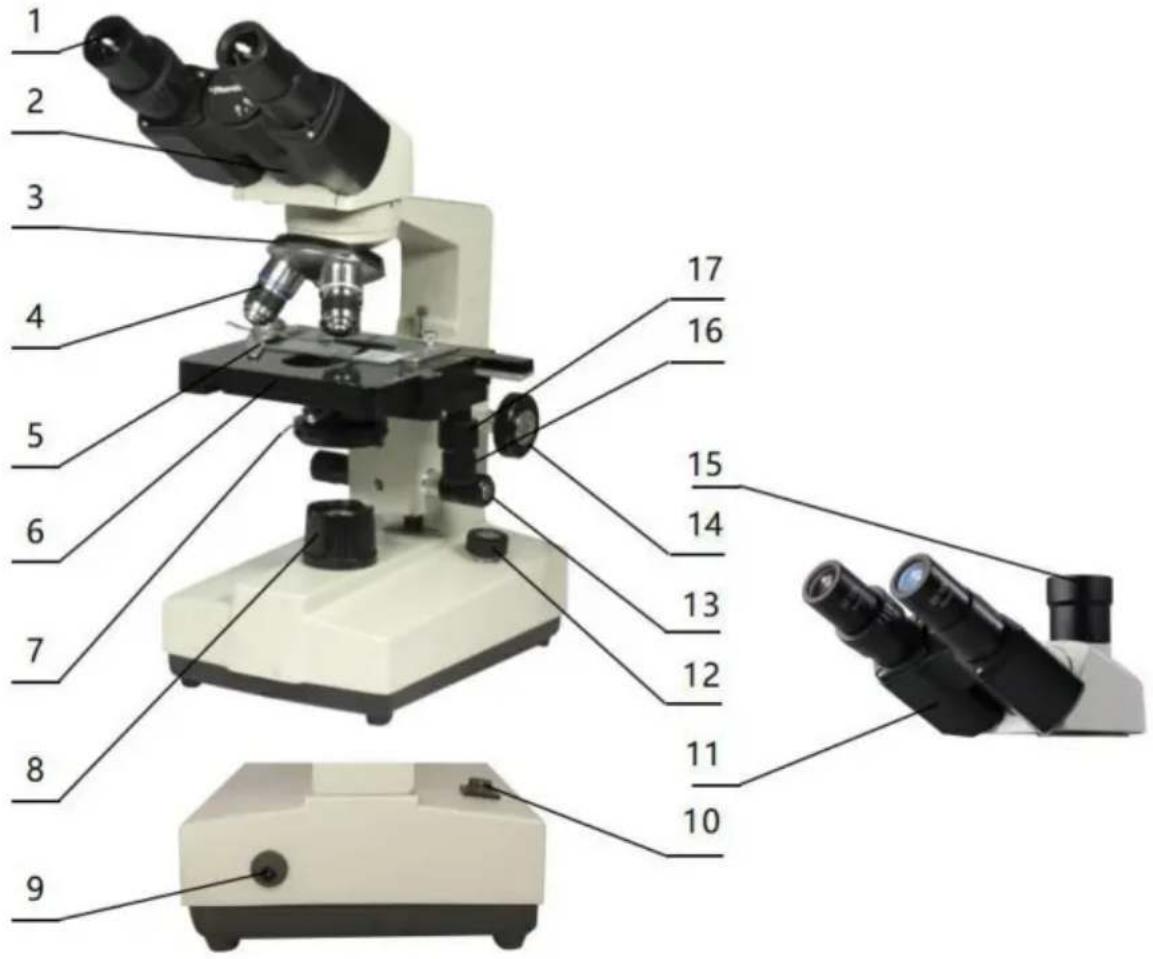
- Eyepiece: secondary magnifying of the specimen for observation
- Binocular observer: observation of the specimen
- Converter: select different objective lens (positioning with a sound)
- Objective: primary magnifying of the specimen
- Clips: fix the specimens
- Stage: place the specimens
- Condenser diaphragm lever: adjust the size of the condenser diaphragm hole
- Collecting: gather light to illuminate the specimen
- Power connector: connect external power
- Power switch: the main power switch of the instrument
- Trinocular observation: visual and video observation of specimens
- Brightness adjustment rotary knob: adjust the brightness so that the field of view is moderate
- Fine adjustment hand-wheel: micro focusing
- Coarse adjustment hand-wheel: focus the specimen
- The third eyepiece: used for connecting extra accessories and CCD
- X moving hand-wheel: adjust the lateral movement of the stage
- Y moving hand-wheel: adjust the longitudinal movement of the stage
INSTALLATION AND USE
3. Instrument Installation
3.1 Place the microscope on a stable workbench. When moving the instrument, especially the optical parts, avoid touching the lens' surface with your hands or objects with oil stains. Finger marks or oil stains on the surface of the lens will affect the imaging quality. 3.2 The platform surface is covered with a protective film during transportation. It should be torn off before using the microscope (see picture 1).
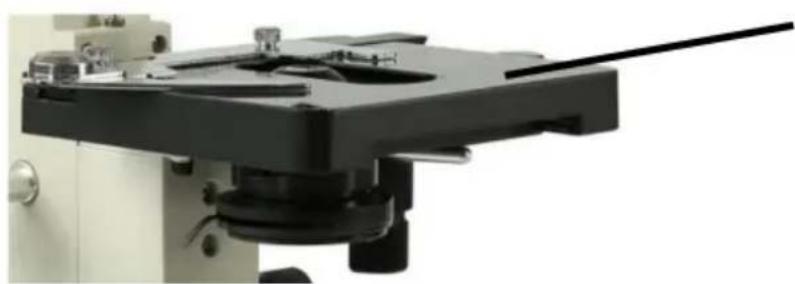
Surface with protective film
Picture 1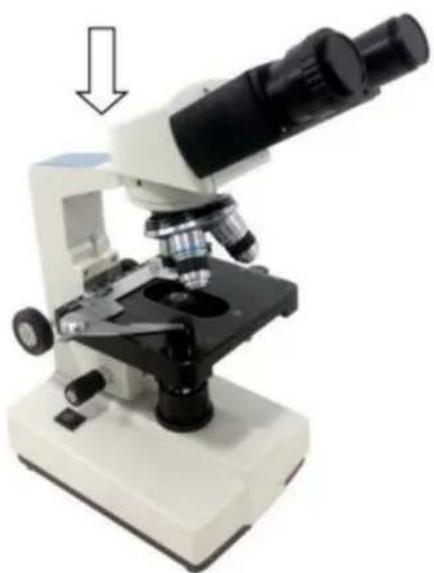
Picture 2
3.3 Place the observer gently in the mounting hole of the frame, gently press the upper part of the observation body with one hand and tighten the fixing screw on the head of the frame with the other hand. When installing, ensure that the observation head is in place and not loose (see picture 2). 3.4 After the microscope is installed, insert the DC plug to the power socket in the base and connect to the external power supply, under the situation of supply voltage is consistent with the rated voltage of the instrument. 3.5 Finally, insert the eyepiece into the microscope eyepiece tube.
OPERATION
4. Operation
4.1 Electric illumination
4.1.1 Turn on the power switch (flip the switch to "-" to make the bulb light).
4.1.2 Rotate the brightness adjustment knob to adjust the field of view brightness.
4.2 Install the specimen
4.2.1 Open the section holder gently with your finger, place the specimen in, cover the glass, release your finger and secure the section.
4.2.2 Adjust the platform moving hand-wheel so that the observed area is directly under the objective lens, making sure it's easy to observe and adjust.
4.3 Focus with 10X objective
* Rotate the objective converter to turn the 10X objective into the light path (the objective will be automatically snapped when rotated into the right place).
* Rotate the coarse adjustable hand wheel to move the stage to the highest position (see picture 3).
* Observe through the eyepiece, rotate the coarse hand wheel slowly to lower the stage. Stop rotating when the image appears (see picture 3).
4.4 Rotate the fine hand wheel for precise focusing.
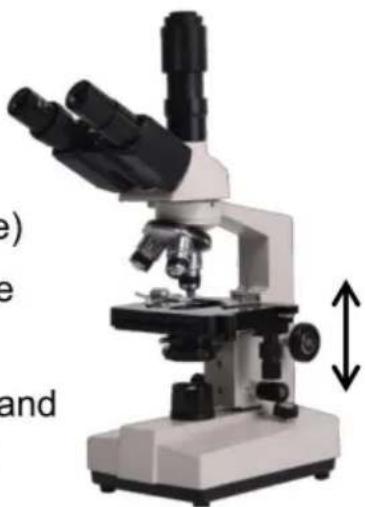
Picture 3
* When you want to observe with a high-magnification objective, first use the 10X or the 4X objective to focus, then replace the high-magnification objective and rotate the fine hand wheel for precise focusing.
* Confirm the direction of rotation when rotating the coarse hand wheel for focusing; you can only lower the stage.
When using coarse adjustable hand wheels to raise the stage, pay attention to the distance between the specimen surface and the lower-end face of the objective.
Since the working distance is farther for the 10X and 4X objectives, as long as the standard thickness of the slide and cover glass is used (the standard thickness of the slide and cover glass is 1.2mm and 0.17mm, respectively), even if the stage is moved to the highest position, the objective lens will not touch the specimen.
*Since the working distance is farther for the 10X and 4X objectives, as long as the standard thickness of the slide and cover glass is used (1.2mm and 0.17mm, respectively), even if the stage is moved to the highest position, the objective lens will not touch the specimen.
Rotate the objective converter. Select the desired objective magnification (the objective can be automatically snapped when rotated in the right place).
Rotate objective converter. Select the desired objective magnification (the objective can be automatically snapped when rotated into the right place).
4.6 Adjust the diaphragm adjusting knob so that the aperture diaphragm meets the observation requirements (see picture 4).
4.7 After the observation is finished, turn off the power switch.

Diaphragm adjusting knob
INSTALLATION AND USE OF ACCESSORIES
5 Installation and use of accessories (optional)
5.1 Installed external CCD camera accessories
ATTENTION:

For the parameters and usage of the CCD camera and digital viewer, please refer to the instruction manual contained in the CD-ROM supplied with the CCD camera or digital viewer.
For the parameters and usage of the CCD camera and digital viewer, please refer to the instruction manual contained in the CD-ROM supplied with the CCD camera or digital viewer.
Trinocular observation viewer:
Take out the CCD camera, screw the lens end onto the additional connector, and insert the interface into the third eyepiece. Use the provided hex hook wrench to tighten the screw fixing the additional connector. Use the provided USB cable to connect the video output end of the CCD camera to the video input end of the computer. Plug in the microscope power plug, turn on the microscope and the computer switch.
According to the focusing method described in the operation manual, adjust the image clearly. Adjust the adjustable viewing tube on the additional connector until a clear image appears on the computer screen; video observation is then available (see Picture 5).
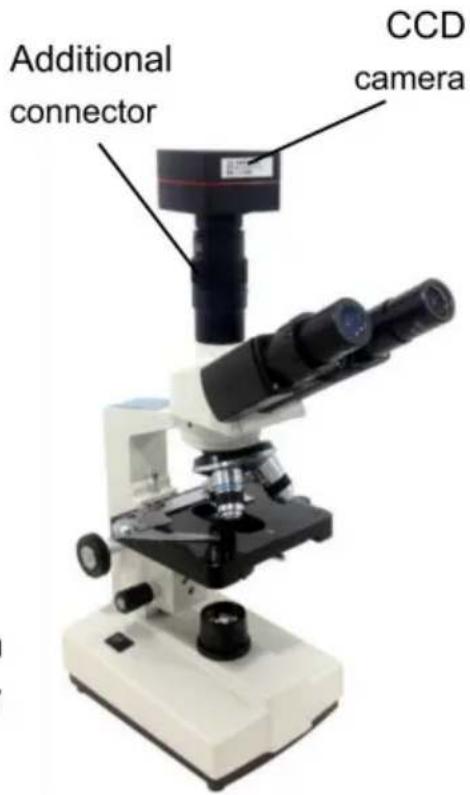
Picture 5
5.2 Installation of frosted glass
When using LED lighting, it is necessary to add frosted glass. First, turn out the ground glass bracket, put the frosted glass smoothly into the bracket slot, and then turn the frosted glass bracket back to its original position (see Picture 6).
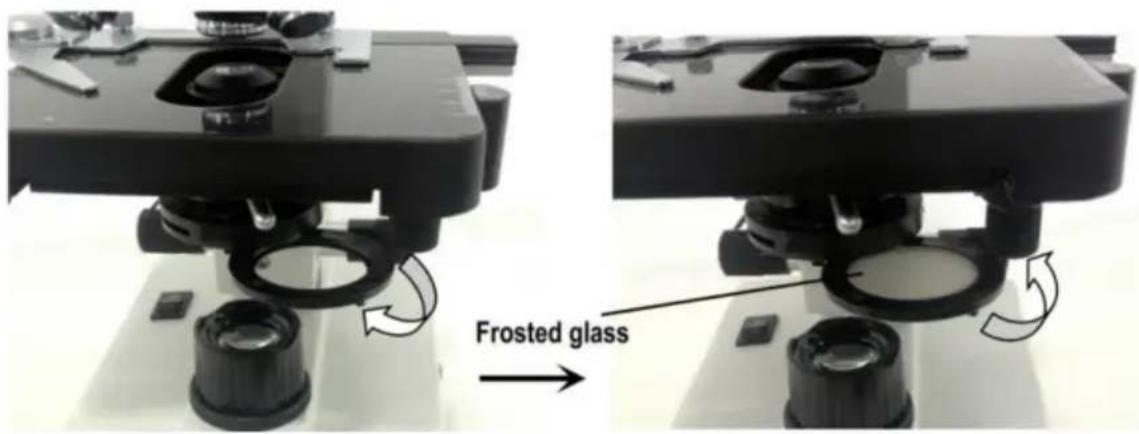
Picture 6

ATTENTION
When observing with a 4x objective lens, it is necessary to install frosted glass. It is also recommended to use frosted glass to ensure uniform lighting when observing with 10X.
MAINTENANCE
6. Maintenance
6.1 When the microscope is finished observing or is suspended, cut off the power supply to avoid the electrical components in the instrument remaining in the working state. When not used for a long time, remove the power plug from the power socket and properly keep all transmission wires. 6.2 Clean lens: Use a blow ball or a soft brush to wipe dust off the lens. Heavy dirt and fingerprints can be gently wiped with lens paper or a soft cloth dipped in a little alcohol and ether mixture (the mixture is about 20 to 30% alcohol and 70 to 80% ether). 6.3 Clean instrument surface: Can be wiped with a clean soft cloth; heavy dirt can be scrubbed with a neutral cleaner.

ATTENTION
Do not use organic solvents (such as alcohol, ether, and their diluents) to wipe, so as to avoid paint coming off the surface of the instrument.
6.4 Storage: If you do not use the microscope for a long time, turn off the power supply of the instrument, fully cool the bulb, put the dust-proof cover on the microscope, and place it in the packing box. Store in a dry, ventilated, clean, and acid-alkali vapor-free place to avoid mold.
TROUBLESHOOTING SCHEDULE
- Troubleshooting schedule
| Common fault | Reasons | Solutions |
| The field of view is blurred or the brightness of the field of view is uneven, and the complete field of view cannot be seen. | The converter is not positioned correctly (the objective is not coaxial with the optical path) | Rotate the objective converter until accurate positioning (moving the objective into the light path correctly) |
| The condenser is not centered | Adjust the center of the condenser | |
| Light bulb was installed incorrectly | Check that the bulb is inserted correctly | |
| Stains or dust on a condenser, objective, collector, eyepiece, or specimen | Wipe relevant parts | |
| The aperture is too small | Proper adjusting the diaphragm | |
| The field of view is unclean | Lens surface is not clean | Proper cleaning |
| The surface of the slide is not clean | Wipe clean | |
| Lack of clarity Poor imaging | Specimen slide is not covered with glass | Attach cover glass |
| Cover glass is too thick or too thin | Use a cover glass of standard thickness (0.17mm) | |
| The specimen is upside down | Flip the slide so that the cover slide is up | |
| Oil on the dry objective | Wipe clean | |
| Lens surface is not clean (objective/eyepiece/condens er/collector) | Wipe clean | |
| Aperture is too small | Proper adjusting the diaphragm | |
| Unilateral darkening | Objective converter is not positioned correctly | Rotate the objective converter until accurate positioning |
| Specimen is higher than the stage | Specimens should be firmly clamped to the platform clips | |
| Unable to focus when using a high-power objective | Slide upside down | Flip the slide so that the cover slide is up |
| Cover glass is too thick | Use specified cover glass (thickness 0.17mm) | |
| Objective not screwed tightly | Tightening objective | |
| The left and right images do not coincide when viewed with the binocular tube | Unadjusted pupil distance | Adjust interpupillary distance |
| Unadjusted diopter | Adjust the diopter | |
| The bulb doesn't work | Power supply not connected | Check whether the power switch is turned on, and whether the charger voltage is consistent with the voltage marked on the instrument |
| Power plug is in poor contact with the socket | Check whether the connection between the plug and the socket is firm and reliable | |
| Light flicker, Luminance instability | Bulb poor contact | Plug the bulb firmly |
| Socket poor contact | Check that the socket connection is reliable |
WARRANTY POLICY
8. Warranty policy
8.1 Warranty period
From the date of purchase, the company provides one-year warranty service for the host.
8.2 Non-warranty policy
The following circumstances (but not limited to the following circumstances) are not covered by warranty and need to pay maintenance fees:
* The warranty period has expired.
* Damage caused by force majeure factor.
* Damage caused by human damage or improper use of customs declaration.
* Any damage caused by failure to use, maintain and adjust according to the instructions, unauthorized personnel to dismantle, repair, modification, misuse, abuse, liquid intake, accidents, use of non-original parts caused by failure or damage, malicious damage to the warranty card content, tear, tamper, etc.
* Other failure and damage caused by problems other than the design, manufacturing and quality of the product itself.
8.3 Warranty card
| Item Production Number | |||
| Fault phenomenon | |||
| Buying date | |||
| Contact | |||
| Contact address | |||
| Remark: This form is a return copy of the warranty card. Please cut out this form and send it to the seller or manufacturer whose address is on the "back cover". | |||
The Company reserves the right to make certain improvements to the design as it deems necessary. Therefore, the instructions given in this manual may not fully reflect the detailed features of each product type currently available.
AFTER-SALES SERVICE
- If the product you received has other problems such as usage problems, please feel free to contact us and reply to online customer service within 24 hours to serve you.
- Our products support 90 days for no reason to return or exchange.
- Wish you a happy online shopping.
CORRECT DISPOSAL

This product is subject to the provision of European Directive
2012/19/EC. The symbol showing a wheelie bin crossed through indicates that the product requires separate refuse collection in the European Union. This applies to the product and all accessories marked with this symbol. Products marked as such may not be discarded with normal domestic waste, but must be taken to a collection point for recycling electrical and electronic devices.
Made In China
VEVOR®
TOUGH TOOLS, HALF PRICE
Technical Support and E-Warranty Certificate
www.vevor.com/support
VEVOR®
TOUGH TOOLS, HALF PRICE
Technical Support and E-Warranty Certificate www.vevor.com/support
MICROSCOPE
MODEL: XSP-36 XSP-36TV
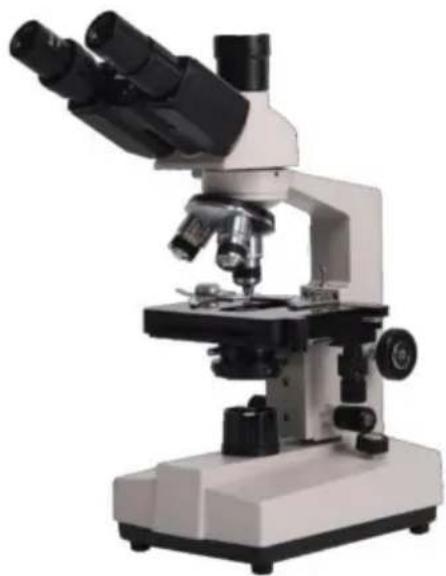
Thank you very much for choosing this product. Please read all of the instructions before using it. The information will help you achieve the best possible results.
SAFETY TIPS
- This microscope is only for micro observation. It cannot be used for other purposes, or the instrument will be damaged.
- Apart from the detachable parts mentioned in this manual, it is strictly prohibited to disassemble any other parts. Otherwise, it may reduce the instrument's capability and can result in electric shock, injury, and damage to instruments. If you have any problems, please contact the nearest agent.
- The input voltage is indicated on the plate behind the microscope. Make sure the input voltage is consistent with the output voltage of the charging adapter used. If not, do not use the microscope and contact the nearest agent. If using the wrong input voltage, it will cause electric appliance damage, which will damage the microscope.
- Using improper light source accessories may lead to instrument damage or instrument fire disaster.
- To prevent electric shock or fire, the power supply must be turned off before installing the microscope, replacing the light source accessories, and plugging or unplugging the power supply switch. To turn off the power switch, just need to flip the switch to "O".
- To prevent short circuits or other failures, do not place the microscope in a humid area.
* If water is spilled on the microscope, immediately turn off the power switch (flip the switch to "O"), unplug the power cord and wipe off the water with a dry cloth.
* When unidentified objects enter or drip into the microscope, please stop use and contact the nearest sales agent.
- When moving the stage, the rack of the stage will extend out. Please be careful not to hurt your hands or other body parts with the rack when operating the microscope.
- This microscope is a precision optical instrument. If used or kept improperly, it will cause damage to the instrument or adversely affect its accuracy. When choosing a place to use, please consider the following conditions. Otherwise, it may cause the function decline of the instrument or malfunction.
* Avoid placing the microscope in direct sunlight, under indoor vertical lighting, and other bright fields.
* The room temperature of the use environment and place is 0°C - 40°C, and the maximum relative humidity is 85%. Do not place the microscope in high temperature and high humidity places. Otherwise, the lens will fog or mold, which will damage the microscope and shorten its service life.
* Impurities and dust will reduce the optical performance of the microscope, so they should be avoided.
* Strong electromagnetic noise will interfere with the output signal of the microscope, so avoid approaching instruments and equipment that emit electromagnetic waves.
* Place the microscope on a sturdy table that can support the weight of the instrument and level it.
- This microscope is a precision optical instrument, so be careful when carrying it. Heavy impact and rough operation can cause damage to the instrument. Vibrating the objective lens will reduce the imaging accuracy.
- Do not rotate the left and right focusing hand-wheels in opposite directions at the same time. When the stage has reached the limited position of movement, please do not continue to rotate the coarse tuning hand-wheel. These operations will cause damage to the focusing mechanism.
- When performing oil immersion observation, only a small amount of oil is needed. To prevent excess oil from polluting the stage and condenser, degrading the performance of the instruments. When replacing the objective lens or ending the observation, the oil should be cleaned in time to avoid dirtying other lenses. It will be difficult to wipe out after the oil is dried.
2. Microscope Structure and Characteristics
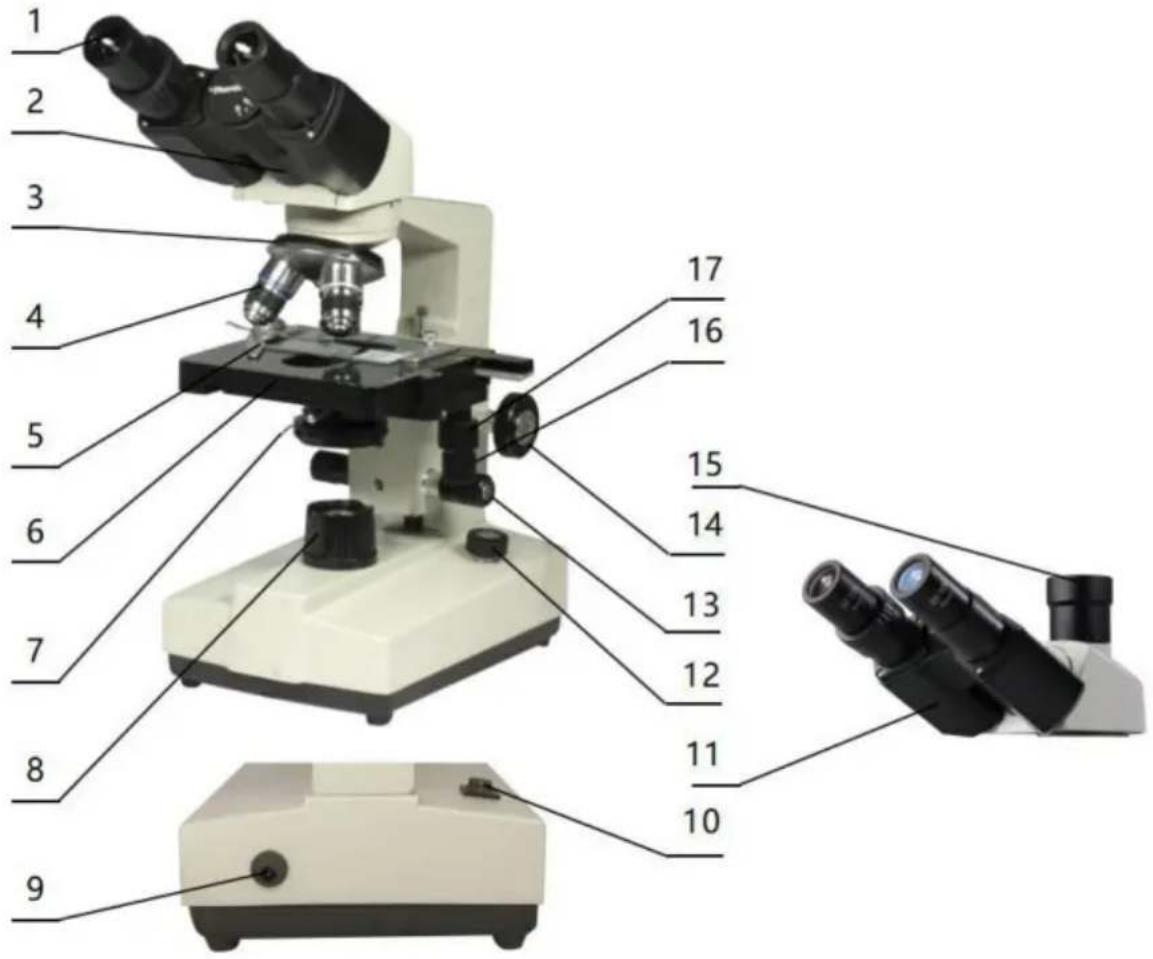
- Eyepiece: secondary magnifying of the specimen for observation
- Binocular observer: observation of the specimen
- Converter: select different objective lens (positioning with a sound)
- Objective: primary magnifying of the specimen
- Clips: fix the specimens
- Stage: place the specimens
- Condenser diaphragm lever: adjust the size of the condenser diaphragm hole
- Collecting: gather light to illuminate the specimen
- Power connector: connect external power
- Power switch: the main power switch of the instrument
- Trinocular observation: visual and video observation of specimens
- Brightness adjustment rotary knob: adjust the brightness, so that the field of view is moderate
- Fine adjustment hand-wheel: micro focusing
- Coarse adjustment hand-wheel: focus the specimen
- The third eyepiece: used for connecting extra accessories and CCD
- X moving hand-wheel: adjust the lateral movement of the stage
- Y moving hand-wheel: adjust the longitudinal movement of the stage
INSTALLATION AND USE
3. Instrument Installation
3.1 Place the microscope on a stable workbench. When moving the instrument, especially the optical parts, avoid touching the lens' surface with your hands or objects with oil stains. Finger marks or oil stains on the lens surface will affect the imaging quality. 3.2 The platform surface is covered with a protective film during transportation. It should be torn off before using the microscope (see picture 1).
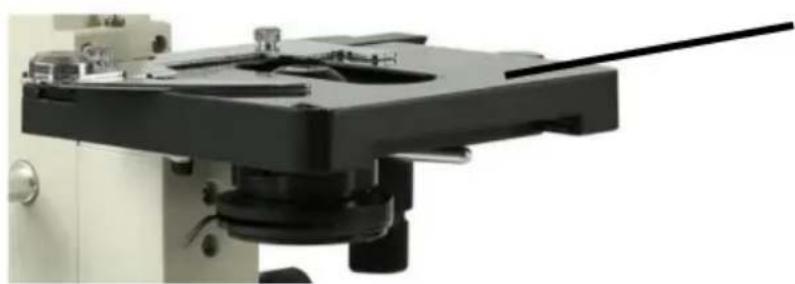
Surface with protective film
Picture 1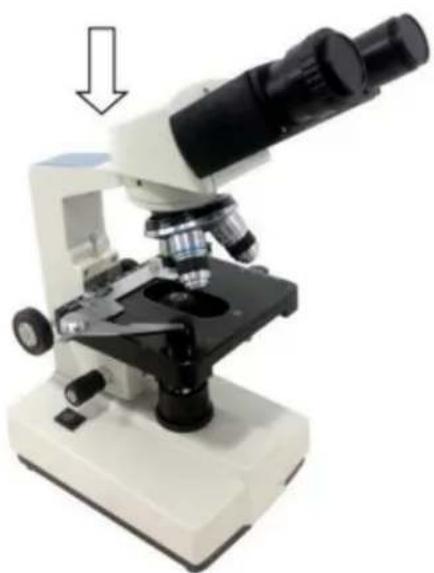
Picture 2
3.3 Place the observer gently in the mounting hole of the frame, gently press the upper part of the observation body with one hand and tighten the fixing screw on the head of the frame with the other hand. When installing, ensure that the observation head is in place and not loose (see picture 2). 3.4 After the microscope is installed, insert the DC plug into the power socket in the base and connect to the external power supply, under the situation of supply voltage is consistent with the rated voltage of the instrument. 3.5 Finally, insert the eyepiece into the microscope eyepiece tube.
OPERATION
4. Operation
4.1 Electric illumination
4.1.1 Turn on the power switch (flip the switch to "-" to make the bulb lighting).
4.1.2 Rotate the brightness adjustment knob to adjust the field of view brightness.
4.2 Install the specimen
4.2.1 Open the section holder gently with your finger, place the specimen in, cover the glass, release your finger and secure the section.
4.2.2 Adjust the platform moving hand-wheel so that the observed area is directly under the objective lens, make sure it's easy to observe and adjust.
4.3 Focus with 10X objective
* Rotate the objective converter to turn the 10X objective into the light path (the objective will be automatically snapped when rotated in the right place)
* Rotate the coarse adjustable hand wheel to move the stage to the highest position (see picture 3).
* Observe through the eyepiece, rotate the coarse hand wheel slowly to lower the stage. Stop rotating when the image appears (see picture 3).
4.4 Rotate the fine hand wheel for precise focusing.
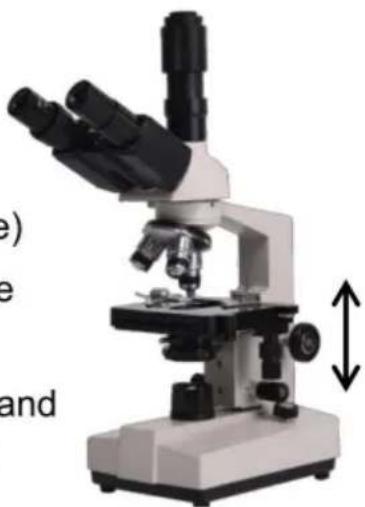
Picture 3
* When you want to observe with a high-magnification objective, first use the 10X or the 4X objective to focus, then replace the high-magnification objective and rotate the fine hand wheel for precise focusing.
* Confirm the direction of rotation when rotating the coarse hand wheel for focusing, can only lower the direction of the stage.
* When using coarse adjustable hand wheels to raise the stage, pay attention to the distance between the specimen surface and the lower-end
face of the objective.
* Since the working distance is farther for the 10X and 4X objectives, as long as it is used the standard thickness of the slide and cover glass (the standard thickness of the slide and cover glass is 1.2mm and 0.17mm, respectively), even if the stage is moved to the highest position, the objective lens will not touch the specimen.
4.5 Select Objective
Rotate objective converter. Select the desired objective magnification (the objective can be automatically snapped when rotated in the right place)
4.6 Adjust the diaphragm adjusting knob so that the aperture diaphragm meets the observation requirements (see Picture 4).
4.7 After observation is finished, turn off the power switch.
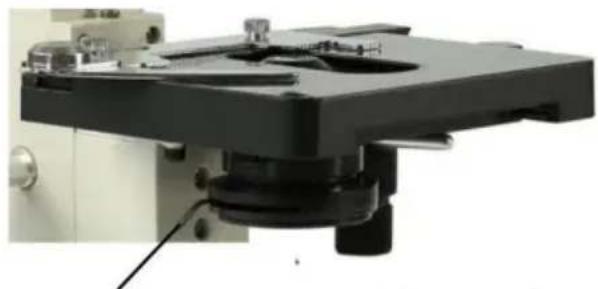
Picture 4
Diaphragm adjusting knob
INSTALLATION AND USE OF ACCESSORIES
5 Installation and use of accessories (optional)
5.1 Installing external CCD camera accessories

ATTENTION:
For the parameters and usage of the CCD camera and digital viewer, please refer to the instruction manual contained in the CD-ROM supplied with the CCD camera or digital viewer.
Trinocular observation viewer:
Take out the CCD camera, screw the lens end onto the additional connector, insert the interface into the third eyepiece. Use the provided hex hook wrench to tighten the screw fixing the additional connector. Use the provided USB cable to connect the video output end of the CCD camera to the video input end of the computer. Plug in the microscope power plug, turn on the microscope and the computer switch.
According to the focusing method described in the operation manual, adjust the image clearly. Adjust the adjustable viewing tube on the additional connector until a clear image appears on the computer screen; video observation is then available (see Picture 5).
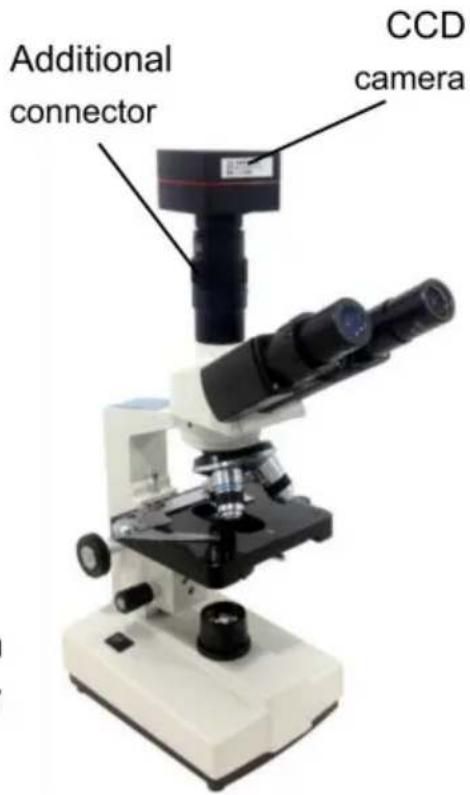
Picture 5
5.2 Installation of frosted glass
When using LED lighting, it is necessary to add frosted glass. First, turn out the ground glass bracket, place the frosted glass smoothly into the bracket slot, and then turn the frosted glass bracket back to its original position (see Picture 6).
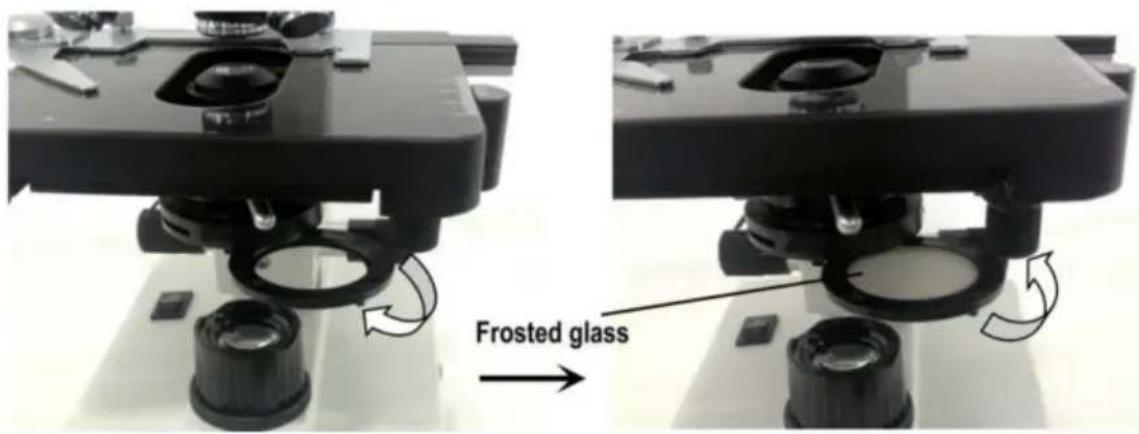

ATTENTION
When observing with a 4x objective lens, it is necessary to install frosted glass, and it is also recommended to use frosted glass to ensure uniform lighting when observing with a 10x objective lens.
MAINTENANCE
6. Maintenance
6.1 When the microscope is finished being used or is suspended, cut off the power supply to avoid the electrical components in the instrument remaining in a working state. When not used for a long time, the power plug should be removed from the power socket and all transmission wires should be properly kept. 6.2 Clean lens: Use a blow ball or a soft brush to wipe the dust off the lens. Heavy dirt and fingerprints can be gently wiped with lens paper or a soft cloth dipped in a little alcohol and ether mixture (the mixture of the two is about 20 to 30% alcohol, 70 to 80% ether). 6.3 Clean instrument surface: Can be wiped with a clean soft cloth; heavy dirt can be scrubbed with a neutral cleaner.

ATTENTION
Do not use organic solvents (such as alcohol, ether and its diluent, etc.) to wipe, so as to avoid paint coming off the surface of the instrument.
6.4 Storage: if you do not use the microscope for a long time, please turn off the power supply of the instrument, fully cool the bulb, put the dust-proof cover on the microscope, and put it in the packing box. Store in a dry, ventilated, clean and acid-alkali vapor-free place to avoid mold.
TROUBLESHOOTING SCHEDULE
- Troubleshooting schedule
| Common fault | Reasons | Solutions |
| The field of view is blurred or the brightness of the field of view is uneven, and the complete field of view cannot be seen. | The converter is not positioned correctly (the objective is not coaxial with the optical path) | Rotate the objective converter until accurate positioning (moving the objective into the light path correctly) |
| The condenser is not centered | Adjust the center of the condenser | |
| Light bulb was installed incorrectly | Check that the bulb is inserted correctly | |
| Stains or dust on a condenser, objective, collector, eyepiece, or specimen | Wipe relevant parts | |
| The aperture is too small | Proper adjusting the diaphragm | |
| The field of view is unclean | Lens surface is not clean | Proper cleaning |
| The surface of the slide is not clean | Wipe clean | |
| Lack of clarity Poor imaging | Specimen slide is not covered with glass | Attach cover glass |
| Cover glass is too thick or too thin | Use a cover glass of standard thickness (0.17mm) | |
| The specimen is upside down | Flip the slide so that the cover slide is up | |
| Oil on the dry objective | Wipe clean | |
| Lens surface is not clean (objective/eyepiece/condens er/collector) | Wipe clean | |
| Aperture is too small | Proper adjusting the diaphragm | |
| Unilateral darkening | Objective converter is not positioned correctly | Rotate the objective converter until accurate positioning |
| Specimen is higher than the stage | Specimens should be firmly clamped to the platform clips | |
| Unable to focus when using a high-power objective | Slide upside down | Flip the slide so that the cover slide is up |
| Cover glass is too thick | Use specified cover glass (thickness 0.17mm) | |
| Objective not screwed tightly | Tightening objective | |
| The left and right images do not coincide when viewed with the binocular tube | Unadjusted pupil distance | Adjust interpupillary distance |
| Unadjusted diopter | Adjust the diopter | |
| The bulb doesn't work | Power supply not connected | Check whether the power switch is turned on, and whether the charger voltage is consistent with the voltage marked on the instrument |
| Power plug is in poor contact with the socket | Check whether the connection between the plug and the socket is firm and reliable | |
| Light flicker, Luminance instability | Bulb poor contact | Plug the bulb firmly |
| Socket poor contact | Check that the socket connection is reliable |
WARRANTY POLICY
8. Warranty policy
8.1 Warranty period
From the date of purchase, the company provides one-year warranty service for the host
8.2 Non-warranty policy
The following circumstances (but not limited to the following circumstances) are not covered by warranty and need to pay maintenance fees:
*The warranty period has expired.
*Damage caused by force majeure factor.
*Damage caused by human damage or improper use of customs declaration.
*Any damage caused by failure to use, maintain and adjust according to the instructions unauthorized personnel to dismantle, repair, modification, misuse, abuse, liquid intake, accidents, use of non-original parts caused by failure or damage, malicious damage to the warranty card content, tear, tamper, etc.
*Other failure and damage caused by problems other than the design, manufacturing and quality of the product itself.
8.3 Warranty card
| Item Production Number | |||
| Fault phenomenon | |||
| Buying date | |||
| Contact | |||
| Contact address | |||
| Remark: This form is a return copy of the warranty card. Please cut out this form and send it to the seller or manufacturer whose address is on the "back cover". | |||
The Company reserves the right to make certain improvements to the design as it deems necessary. Therefore, the instructions given in this manual may not fully reflect the detailed features of each product type currently available.
AFTER-SALES SERVICE
- If the product you received has other problems such as usage problems, please feel free to contact us and reply to online customer service within 24 hours to serve you.
- Our products support 90 days for no reason to return or exchange.
- Wish you a happy online shopping.
CORRECT DISPOSAL

This product is subject to the provision of European Directive
2012/19/EC. The symbol showing a wheelie bin crossed through indicates that the product requires separate refuse collection in the European Union. This applies to the product and all accessories marked with this symbol. Products marked as such may not be discarded with normal domestic waste, but must be taken to a collection point for recycling electrical and electronic devices.
Made in China
VEVOR®
TOUGH TOOLS, HALF PRICE
Technical Support and E-Warranty Certificate
www.vevor.com/support
VEVOR®
TOUGH TOOLS, HALF PRICE
Technical Support and E-Warranty Certificate www.vevor.com/support
MICROSCOPE
MODEL: XSP-36 XSP-36TV
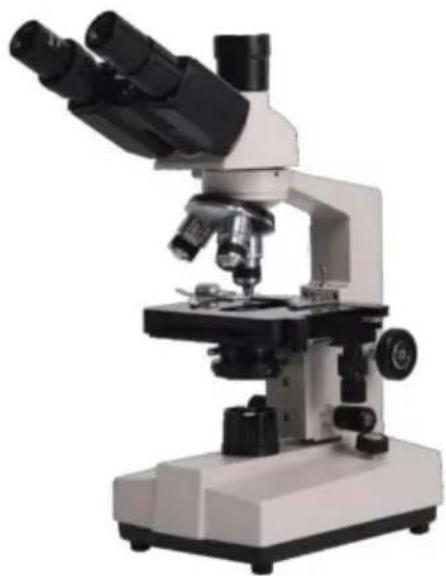
NEED HELP? CONTACT US!
Thank you very much for choosing this product. Please read all of the instructions before using it. The information will help you achieve the best possible results.
SAFETY TIPS
- This microscope is only for micro observation. It cannot be used for other purposes, or the instrument will be damaged.
- Apart from the detachable parts mentioned in this manual, it is strictly prohibited to disassemble any other parts. Otherwise, it may reduce the instrument's capability and can result in electric shock, injury, and damage to instruments. If you have any problems, please contact the nearest agent.
- The input voltage is indicated on the plate behind the microscope. Make sure the input voltage is consistent with the output voltage of the charging adapter used. If not, do not use the microscope and contact the nearest agent. If using the wrong input voltage, it will cause electric appliance damage, which will damage the microscope.
- Using improper light source accessories may lead to instrument damage or instrument fire disaster.
- To prevent electric shock or fire, the power supply must be turned off before installing the microscope, replacing the light source accessories, and plugging or unplugging the power supply switch. To turn off the power switch, just need to flip the switch to "O".
- To prevent short circuits or other failures, do not place the microscope in a humid area.
* If water is spilled on the microscope, immediately turn off the power switch (flip the switch to "O"), unplug the power cord and wipe off the water with a dry cloth.
* When unidentified objects enter or drip into the microscope, please stop use and contact the nearest sales agent.
- When moving the stage, the rack of the stage will extend out. Please be careful not to hurt your hands or other body parts with the rack when operating the microscope.
- This microscope is a precision optical instrument, if used or kept improperly, it will cause damage to the instrument or adversely affect its accuracy. When choosing a place to use, please consider the following conditions. Otherwise, it may cause the function decline of the instrument or malfunction.
* Avoid placing the microscope in direct sunlight, under indoor vertical lighting, and other bright fields.
* The room temperature of the use environment and place is 0°C - 40°C, and the maximum relative humidity is 85%, do not place the microscope in high temperature and high humidity places. Otherwise, the lens will fog or mold, which will damage the microscope, and shorten its service life.
* Impurities and dust will reduce the optical performance of the microscope, which should be avoided.
* Strong electromagnetic noise will interfere with the output signal of the microscope, so avoid approaching instruments and equipment that emit electromagnetic waves.
* Place the microscope on a sturdy table that can support the weight of the instrument and level it.
- This microscope is a precision optical instrument, so be careful when carrying it. Heavy impact and rough operation can cause damage to instruments. Vibrating the objective lens will reduce the imaging accuracy.
- Do not rotate the left and right focusing hand-wheel in opposite directions at the same time. When the stage has reached the limited position of movement, please do not continue to rotate the coarse tuning hand-wheel. These operations will cause damage to the focusing mechanism.
- When oil immersion observation, only a small amount of oil is needed. To prevent excess oil from polluting the stage and condenser, degrading the performance of the instruments. When replacing the objective lens or ending the observation, the oil should be cleaned in time to avoid dirtying other lenses. It will be difficult to wipe out after the oil is dried.
TECHNICAL PARAMETERS
- Technical specification
2. Microscope Structure and Characteristics
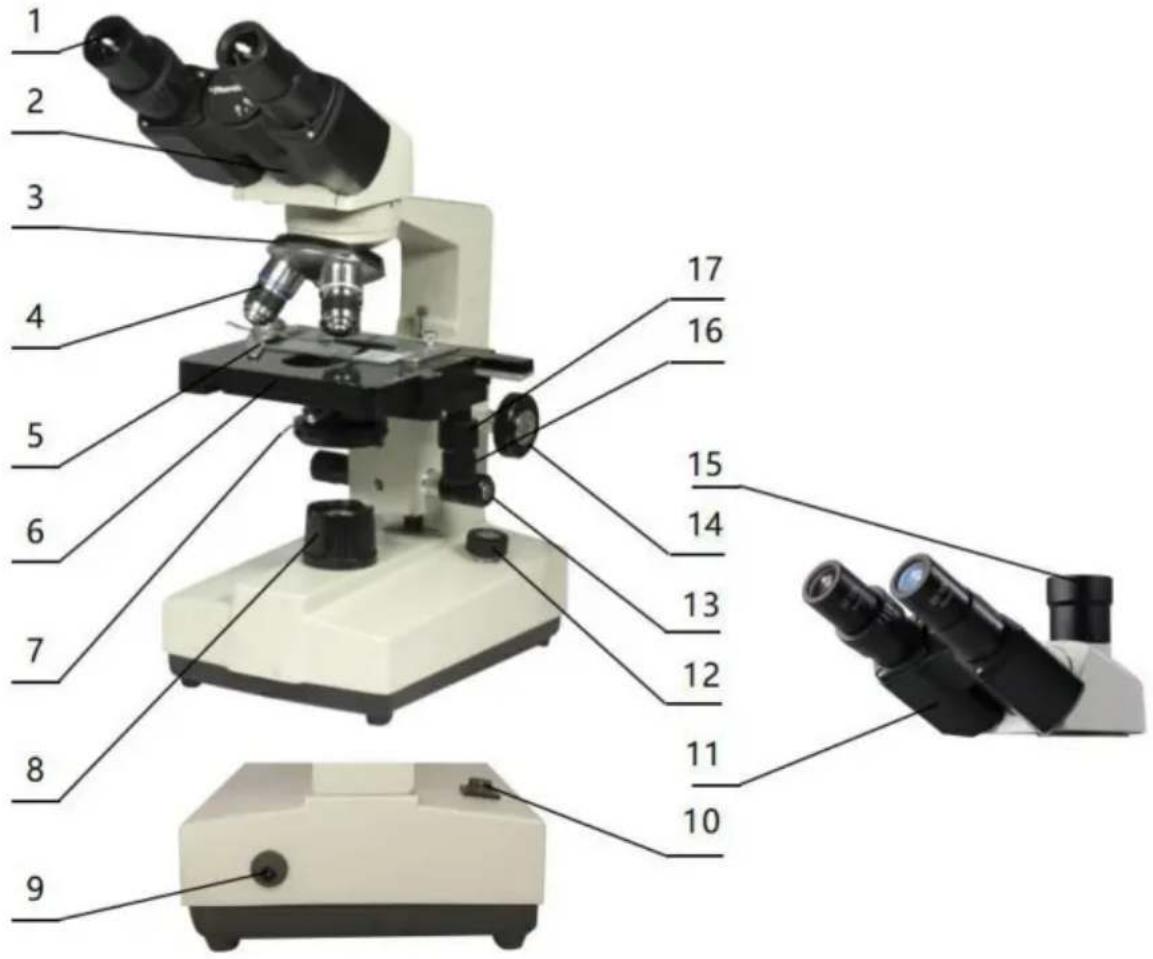
- Eyepiece: secondary magnifying of the specimen for observation
- Binocular observer: observation of the specimen
- Converter: select different objective lens (positioning with a sound)
- Objective: primary magnifying of the specimen
- Clips: fix the specimens
- Stage: place the specimens
- Condenser diaphragm lever: adjust the size of the condenser diaphragm hole
- Collecting: gather light to illuminate the specimen
- Power connector: connect external power
- Power switch: the main power switch of the instrument
- Trinocular observation: visual and video observation of specimens
- Brightness adjustment rotary knob: adjust the brightness, so that the field of view is moderate
- Fine adjustment hand-wheel: micro focusing
- Coarse adjustment hand-wheel: focus the specimen
- The third eyepiece: used for connecting extra accessories and CCD
- X moving hand-wheel: adjust the lateral movement of the stage
- Y moving hand-wheel: adjust the longitudinal movement of the stage
INSTALLATION AND USE
3. Instrument Installation
3.1 Place the microscope on a stable workbench. When moving the instrument, especially the optical parts, avoid touching the lens' surface with your hands or objects with oil stains. Finger marks or oil stains on the surface of the lens will affect the imaging quality. 3.2 The platform surface is covered with a protective film during transportation. It should be torn off before using the microscope (see picture 1).
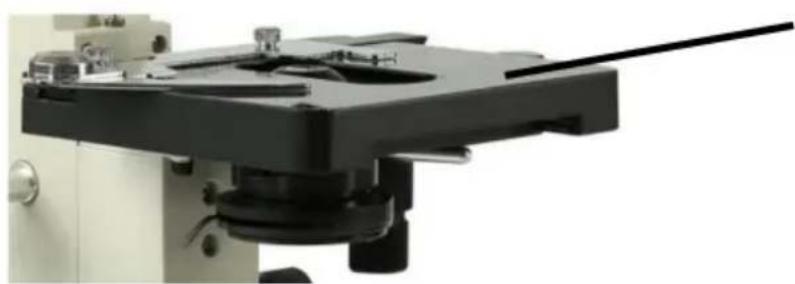
Surface with protective film
Picture 1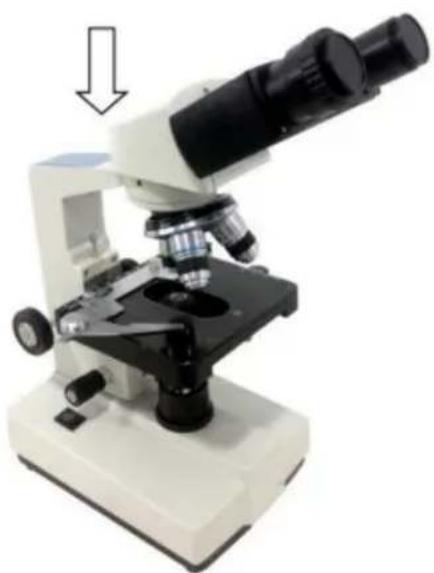
Picture 2
3.3 Place the observer gently in the mounting hole of the frame, gently press the upper part of the observation body with one hand and tighten the fixing screw on the head of the frame with the other hand. When installing, ensure that the observation head is in place and not loose (see picture 2). 3.4 After the microscope is installed, insert the DC plug to the power socket in the base and connect to the external power supply, under the situation of supply voltage is consistent with the rated voltage of the instrument. 3.5 Finally, insert the eyepiece into the microscope eyepiece tube.
OPERATION
4. Operation
4.1 Electric illumination
4.1.1 Turn on the power switch (flip the switch to "-" to make the bulb lighting).
4.1.2 Rotate the brightness adjustment knob to adjust the field of view brightness.
4.2 Install the specimen
4.2.1 Open the section holder gently with your finger, place the specimen in, cover the glass, release your finger and secure the section.
4.2.2 Adjust the platform moving hand-wheel and so that the observed area is directly under the objective lens, make sure it's easy to observation and adjustment.
4.3 Focus with 10X objective
* Rotate the objective converter to turn the 10X objective into the light path (the objective will be automatically snapped when rotated in the right place).
* Rotate the coarse adjustable hand wheel to move the stage to the highest position (see picture 3).
* Observe through the eyepiece, rotate the coarse hand wheel slowly to lower the stage. Stop rotating when the image appears (see picture 3).
4.4 Rotate the fine hand wheel for precise focusing.
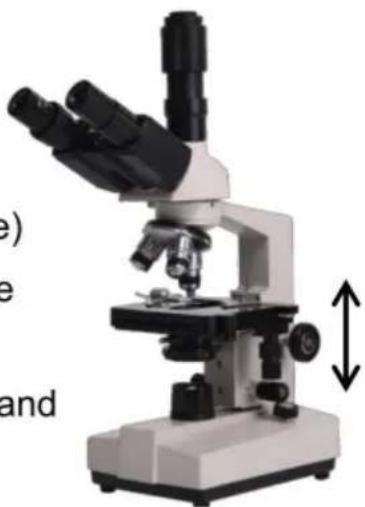
Picture 3
* When you want to observe with a high-magnification objective, first use the 10X or the 4X objective to focus, then replace the high-magnification objective and rotate the fine hand wheel for precise focusing.
* Confirm the direction of rotation when rotating the coarse hand wheel for focusing; it can only lower the stage.
* When using coarse adjustable hand wheels to raise the stage, pay attention to the distance between the specimen surface and the lower-end
face of the objective.
* Since the working distance is farther for the 10X and 4X objectives, as long as the standard thickness of the slide and cover glass is used (the standard thickness of the slide and cover glass is 1.2mm and 0.17mm, respectively), even if the stage is moved to the highest position, the objective lens will not touch the specimen.
4.5 Select Objective
Rotate the objective converter. Select the desired objective magnification (the objective can be automatically snapped when rotated in the right place).
4.6 Adjust the diaphragm adjusting knob so that the aperture diaphragm meets the observation requirements (see picture 4).
4.7 After the observation is finished, turn off the power switch.
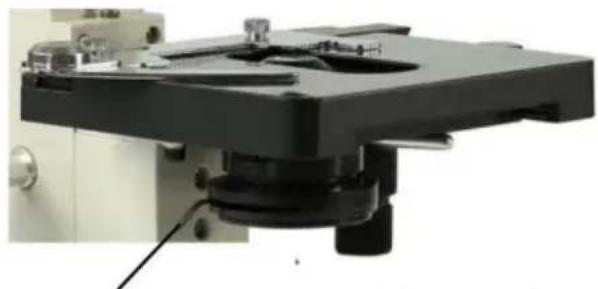
Picture 4
Diaphragm adjusting knob
INSTALLATION AND USE OF ACCESSORIES
5 Installation and use of accessories (optional)
5.1 Installed external CCD camera accessories

ATTENTION:
For the parameters and usage of the CCD camera and digital viewer, please refer to the instruction manual contained in the CDROM supplied with the CCD camera or digital viewer.
Trinocular observation viewer:
Take out the CCD camera, screw the lens end on the additional connector, insert the interface into the third eyepiece. Use the provided hex hook wrench to hold the screw fixing the additional connector tight, use the provided USB cable to connect the video output end of the CCD camera and the video input end of the computer. Plug in the microscope power plug, turn on the microscope and the computer switch.
According to the focusing method described in the operation manual, adjust the image clearly adjust the adjustable viewing tube on the additional connector until a clear image appears on the computer screen, video observation is available (see picture 5).
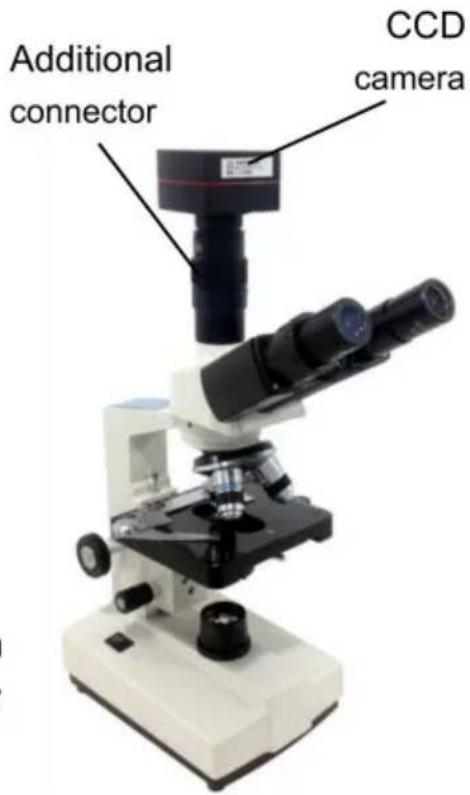
Picture 5
5.2 The installation of frosted glass
When using the LED lighting, it is necessary to add frosted glass, first turn out the ground glass bracket, put the frosted glass smoothly into the bracket slot, and then turn the frosted glass bracket back to the original position (see picture 6).

Picture 6

ATTENTION
When you observe with 4x objective lens, it is necessary to install frosted glass, and it is also recommended try to use frosted glass to ensure uniform lighting when it is observed with 10X.
MAINTENANCE
6. Maintenance
6.1 When the microscope is finished observing or suspended, cut off the power supply to avoid the electrical components in the instrument are still in the working state. When not used for a long time, the power plug should be removed from the power socket and all transmission wires should be properly kept. 6.2 Clean lens: Use a blow ball or a soft brush to wipe the dust off the lens. Heavy dirt and fingerprints can be gently wiped by lens paper or soft cloth dipped in a little alcohol and ether mixture (the mixture of the two is about 20 to 30% alcohol, 70 to 80% ether). 6.3 Clean instrument surface: Can be wiped with a clean soft cloth; Heavy dirt can be scrubbed with a neutral cleaner.

ATTENTION
Do not use organic solvents (such as alcohol, ether and its diluent, etc.) to wipe, so as to avoid paint off the surface of the instrument.
6.4 Storage: if you do not use the microscope for a long time, please turn off the power supply of the instrument, fully cool the bulb, put the dust-proof cover on the microscope, and put it in the packing box. Store in a dry, ventilated, clean and acid-alkali vapor-free place to avoid mold.
TROUBLESHOOTING SCHEDULE
- Troubleshooting schedule
| Common fault | Reasons | Solutions |
| The field of view is blurred or the brightness of the field of view is uneven, and the complete field of view cannot be seen. | The converter is not positioned correctly (the objective is not coaxial with the optical path) | Rotate the objective converter until accurate positioning (moving the objective into the light path correctly) |
| The condenser is not centered | Adjust the center of the condenser | |
| Light bulb was installed incorrectly | Check that the bulb is inserted correctly | |
| Stains or dust on a condenser, objective, collector, eyepiece, or specimen | Wipe relevant parts | |
| The aperture is too small | Proper adjusting the diaphragm | |
| The field of view is unclean | Lens surface is not clean | Proper cleaning |
| The surface of the slide is not clean | Wipe clean | |
| Lack of clarity Poor imaging | Specimen slide is not covered with glass | Attach cover glass |
| Cover glass is too thick or too thin | Use a cover glass of standard thickness (0.17mm) | |
| The specimen is upside down | Flip the slide so that the cover slide is up | |
| Oil on the dry objective | Wipe clean | |
| Lens surface is not clean (objective/eyepiece/condens er/collector) | Wipe clean | |
| Aperture is too small | Proper adjusting the diaphragm | |
| Unilateral darkening | Objective converter is not positioned correctly | Rotate the objective converter until accurate positioning |
| Specimen is higher than the stage | Specimens should be firmly clamped to the platform clips | |
| Unable to focus when using a high-power objective | Slide upside down | Flip the slide so that the cover slide is up |
| Cover glass is too thick | Use specified cover glass (thickness 0.17mm) | |
| Objective not screwed tightly | Tightening objective | |
| The left and right images do not coincide when viewed with the binocular tube | Unadjusted pupil distance | Adjust interpupillary distance |
| Unadjusted diopter | Adjust the diopter | |
| The bulb doesn't work | Power supply not connected | Check whether the power switch is turned on, and whether the charger voltage is consistent with the voltage marked on the instrument |
| Power plug is in poor contact with the socket | Check whether the connection between the plug and the socket is firm and reliable | |
| Light flicker, Luminance instability | Bulb poor contact | Plug the bulb firmly |
| Socket poor contact | Check that the socket connection is reliable |
WARRANTY POLICY
8.Warranty policy
8.1 Warranty period
From the date of purchase, the company provides one-year warranty service for the host
8.2 Non-warranty policy
The following circumstances (but not limited to the following circumstances) are not covered by warranty and need to pay maintenance fees:
*The warranty period has expired.
*Damage caused by force majeure factor.
*Damage caused by human damage or improper use of customs declaration.
*Any damage caused by failure to use, maintain and adjust according to the instructions, unauthorized personnel to dismantle, repair, modification, misuse, abuse, liquid intake, accidents, use of non-original parts caused by failure or damage, malicious damage to the warranty card content, tear, tamper, etc.
*Other failure and damage caused by problems other than the design, manufacturing and quality of the product itself.
8.3 Warranty card
| Item Production Number | |||
| Fault phenomenon | |||
| Buying date | |||
| Contact | |||
| Contact address | |||
| Remark: This form is a return copy of the warranty card. Please cut out this form and send it to the seller or manufacturer whose address is on the "back cover". | |||
The Company reserves the right to make certain improvements to the design as it deems necessary. Therefore, the instructions given in this manual may not fully reflect the detailed features of each product type currently available.
AFTER-SALES SERVICE
- If the product you received has other problems such as usage problems, please feel free to contact us and reply to online customer service within 24 hours to serve you.
- Our products support 90 days for no reason to return or exchange.
- Wish you a happy online shopping.
CORRECT DISPOSAL

This product is subject to the provision of European Directive
2012/19/EC. The symbol showing a wheelie bin crossed through indicates that the product requires separate refuse collection in the European Union. This applies to the product and all accessories marked with this symbol. Products marked as such may not be discarded with normal domestic waste, but must be taken to a collection point for recycling electrical and electronic devices.
Made In China
VEVOR®
TOUGH TOOLS, HALF PRICE
Technical Support and E-Warranty Certificate
www.vevor.com/support
- MICROSCOPE
- VEVOR®
- NEED HELP? CONTACT US
- INSTRUCTIONS
- SAFETY TIPS
- TECHNICAL PARAMETERS
- PARTS LIST
- MICROSCOPE STRUCTURE AND CHARACTERISTICS
- INSTALLATION AND USE
- INSTRUMENT INSTALLATION
- OPERATION
- SELECT OBJECTIVE
- INSTALLATION AND USE OF ACCESSORIES (OPTIONAL)
- INSTALLED EXTERNAL CCD CAMERA ACCESSORIES
- ATTENTION
- TRINOCULAR OBSERVATION VIEWER
- INSTALLATION OF FROSTED GLASS
- MAINTENANCE
- TROUBLESHOOTING SCHEDULE
- WARRANTY POLICY
- WARRANTY PERIOD
- NON-WARRANTY POLICY
- WARRANTY CARD
- AFTER-SALES SERVICE
- CORRECT DISPOSAL
- MADE IN CHINA
- TOUGH TOOLS, HALF PRICE
- INSTALLATION AND USE OF ACCESSORIES
- INSTALLING EXTERNAL CCD CAMERA ACCESSORIES
- THE INSTALLATION OF FROSTED GLASS
- ROTATE THE OBJECTIVE CONVERTER. SELECT THE DESIRED OBJECTIVE MAGNIFICATION (THE OBJECTIVE CAN BE AUTOMATICALLY SNAPPED WHEN ROTATED IN THE RIGHT PLACE)
- FOR THE PARAMETERS AND USAGE OF THE CCD CAMERA AND DIGITAL VIEWER, PLEASE REFER TO THE INSTRUCTION MANUAL CONTAINED IN THE CD-ROM SUPPLIED WITH THE CCD CAMERA OR DIGITAL VIEWER
Brand : Vevor
Model : XSP-36TV
Category : Microscope