
SM-1511Z - Food processor Vevor - Free user manual and instructions
Find the device manual for free SM-1511Z Vevor in PDF.

| Product Type | Stand Mixer / Food Processor |
| Brand | Vevor |
| Model | SM-1511Z |
| Maximum Dough Capacity | 1.5 kg |
| Speeds | 6 speeds (1 to 6) |
| Included Accessories | Dough hook, beater, whisk |
| Overheat Protection | Yes, automatic shut-off with 15 to 30 minutes cooling |
| Lift Button | Yes, to raise the head |
| Plug Type | Polarized (one wider blade) |
| Usage | Household only |
| Body Cleaning | Do not immerse, wipe with a dry cloth |
| Accessories Cleaning | With clean water, dry immediately, do not use corrosive products |
| Technical Support | www.vevor.com/support |
| Warranty | Electronic warranty certificate available on the website |
| Included Recipes | 6 recipes: flaxseed rolls, toast, pizza, butter bread, French bread, cakes |
Frequently Asked Questions - SM-1511Z Vevor
User questions about SM-1511Z Vevor
0 question about this device. Answer the ones you know or ask your own.
Ask a new question about this device
Download the instructions for your Food processor in PDF format for free! Find your manual SM-1511Z - Vevor and take your electronic device back in hand. On this page are published all the documents necessary for the use of your device. SM-1511Z by Vevor.
USER MANUAL SM-1511Z Vevor
Technical Support and E-Warranty Certificate www.vevor.com/support
Stand Mixer
MODEL:SM-1511Z
We continue to be committed to provide you tools with competitive price. "Save Half", "Half Price" or any other similar expressions used by us only represents an estimate of savings you might benefit from buying certain tools with us compared to the major top brands and does not necessarily mean to co all categories of tools offered by us. You are kindly reminded to verify carefully when you are placing an order with us if you are actually Saving Half in comparison with the top major brands.
MODEL:SM-1511Z

natural_image
Line drawing of a kitchen mixer with control panel and handle (no text or symbols)NEED HELP? CONTACT US!
Have product questions? Need technical support? Please feel free to contact us:
Technical Support and E-Warranty Certificate www.vevor.com/support
This is the original instruction, please read all manual instructions carefully before operating. VEVOR reserves a clear interpretation of user manual. The appearance of the product shall be subject to product you received. Please forgive us that we won't inform you and there are any technology or software updates on our product.
 | Warning-To reduce the risk of injury, user must re instructions manual carefully. |
General Safety Instructions
Read the operating instructions carefully before putting the appliance in operation and keep the instructions including the warranty, the receipt if possible, the box with the internal packing. If you give this device people, please also pass on the operating instructions.
- Read all instructions.
- To protect against risk of electrical shock do not put base in water liquid.
- This appliance is not intended for use by persons (including children) reduced physical, sensory, or mental capabilities, or lack of experience knowledge, unless they are closely supervised and instructed concerning use of the appliance by a person responsible for their safety. Close supervision is necessary when any appliance is used by or near child. Children should be supervised to ensure that they do not play with the appliance.
- Turn the appliance OFF, then unplug from the outlet when not in before assembling or disassembling parts and before cleaning. To unp grasp the plug and pull from the outlet. Never pull from the power of
- Avoid contacting moving parts.
Do not attempt to defeat any safety interlock mechanisms
- Do not operate any appliance with a damaged cord or plug or after appliance malfunctions, or is dropped or damaged in any manner. Con the manufacturer at their customer service telephone number for information on examination, repair, or adjustment.
- The use of attachments not recommended or sold by the manufacture may cause fire, electric shock or injury.
- Do not use outdoors.
- Do not let cord hang over edge of table or counter.
- Keep hands, hair, clothing, as well as spatulas and other utensils from beaters during operation to reduce the risk of injury to persons, damage to the mixer.
- Remove beaters from mixer before washing.
• Household use only.
Special safety Instructions for this Machine
- Only operate this machine under supervision.
- Do not interfere with any safety switches.
- Do not insert anything into the rotating hooks while the machine is working.
- Place the machine on a smooth, flat and stable working surface.
- Do not insert the mains plug of the machine into the power socke having installed all the necessary accessories.
This appliance has a polarized plug(one blade is wider than the other) reduce the risk of electric shock.this plug will fit in a polarized outlet one way. If the plug is not fully plugged into the socket,reverse the still does not fit, contact a qualified electrician.Do not modify the plug way.
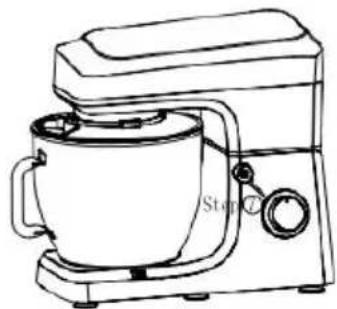
Name of different parts
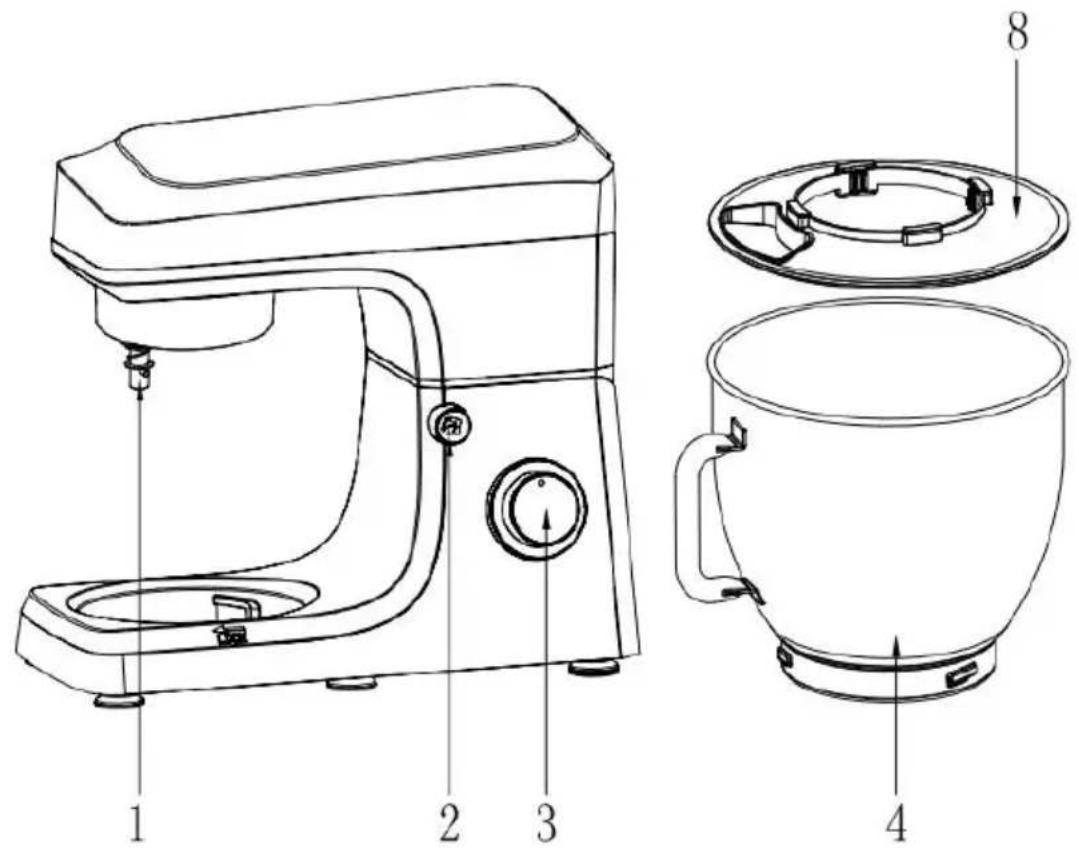

Main parts and standard parts:
| 1 | Output shaft | 5 | Dough hook |
| 2 | Rise button | 6 | Beater |
| 3 | Speed button | 7 | Whisk |
| 4 | Bowl | 8 | Bowl cover |
How to use the machine
- Before use, wash the accessories by clean water, rinse and dry.
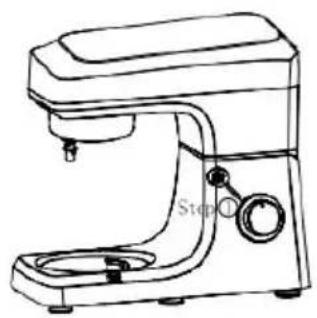
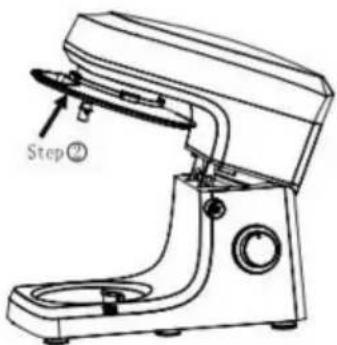
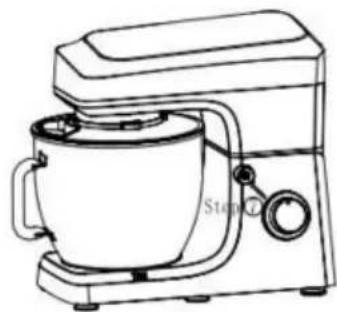
- Place the machine on a flat, clean and dry table, Press the head machine, press down the head-up knob (2) Step1, the upper body with up automatically. (PG 1 & 2).
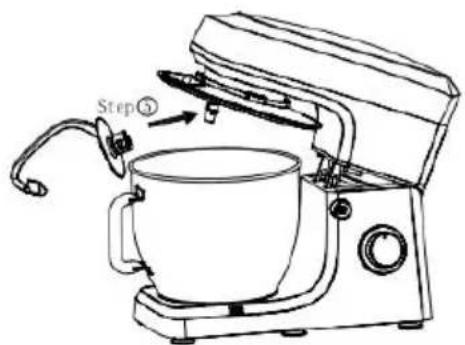
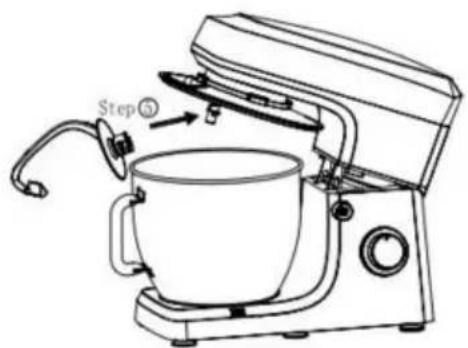
- Install the pot cover into the stirring end Step2. of the machine a PG2
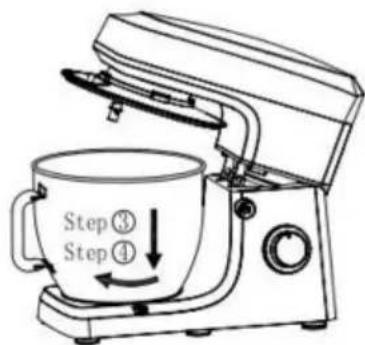
- Weigh the food and water to be processed into the mixing bowl, assemble the mixing bowl (4) on the machine step 3, rotate clockwise the buckle is screwed in and locked step 4; (PG3)
5.Do not exceed the amount of dough - the total weight can hold up 1.5kg; -
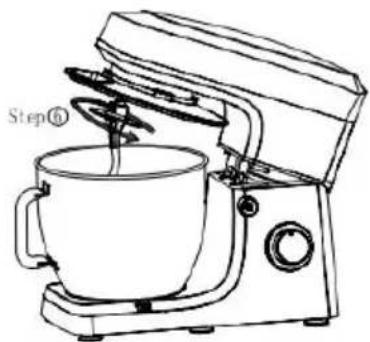
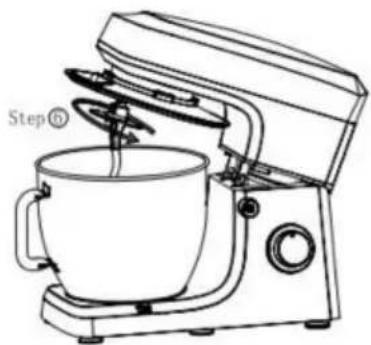
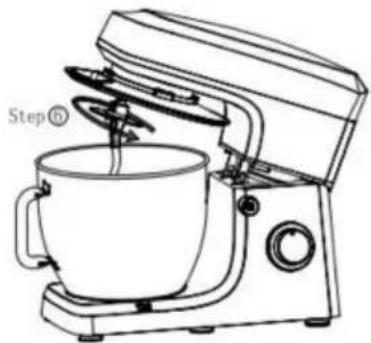
Install the required accessories (5), (6) and (7) (only one of the three be used at a time) onto the head mixing output shaft (1) step 5, put accessories to the top, and then turn a quarter turn counterclockwise locking position step 6; (PG4&5)
-
Press the head of the machine, the machine will automatically lock head button (2) step 7, which is in the horizontal position; (PG6).
- then plug in the plug and turn on the power switch.
- Control speed knob (3) to the required speed - start mixing;
- After the dough meets the requirements, turn the speed knob (3) I to gear 0 to finish.
- Press the head of the machine by hand, rotate the lifting knob (2 clockwise, lift the upper body, rotate the mixing bowl counterclockwise, remove the mixing bowl and take out the dough.
- Switch off the appliance and disconnect from supply before changing accessories or approaching parts that move in use.
natural_image
Line drawing of a kitchen mixer with control knob and stand (no text or symbols)PG1

PG2

PG3
PG4
natural_image
Line drawing of a kitchen mixer with a cup and control panel (no text or symbols)PG5
natural_image
Line drawing of a kitchen mixer with a stand and control knob (no text or symbols)PG6
Suggestion
Adjusting the Levels and Using the Hook for not more than 1.5kg of
| Accessories | Picture | Speed | Time (min) | Maximum | Operation method |
| Dough hook | 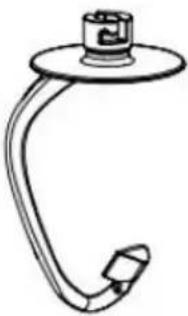 | 1-3 | 3-5 | 1000g flour+538g water | 1 speed run for 30s, the speed run for 30s, and then the 3 speed run for 2 mi to 4 min to form a cluster |
| Beater |  | 2-4 | 3-10 | 660g flour+840g water | 2 speed run for20s, the 4 speed run for more than 2min40s |
| Whisk |  | 5-6 | 3-10 | 3 egg whites (min) | Open 5 or 6 speed to run 3min above. |
Recipe
Linseed Bread Rolls
Ingredients: 30g linseed, 40g water, 250g bread flour, 3g dry yeast, sugar, 3g salt, 10g milk powder, 20g butter, 15g egg liquid
Process:
- Soak the 30g linseed into 40g water for 12 hours
- Put 250g bread flour, 3g dry yeast, 30g sugar, 3g salt, 10g milk powder, 150g water into the mixing bowl, use dough hook to knead th
ingredients to dough at levels 1-3, and then add 20g butter and con-knead the dough until smooth, then add soaked linseed until the dou well kneaded. Cover with preservative film and allow fermenting to do its size in a warm place.
-
Knead thoroughly once more, remove from the bowl and divided into rolls. After being rounded, cover the rolls and allow fermenting at 38^ hour.
-
After the fermentation is finished, brush the surface of the bread with liquid, put it on penultimate layer in the preheated oven, set fire up down at 180^ C and bake for 20 minutes, then remove the mold and on the grill to cool down.
Toast bread
Ingredients: 270g high-gluten flour, 30g low-gluten flour, 1 egg, 3g sa 55g sugar, 4g yeast, 80g light cream, 10g milk powder, 90g water.
Process:
-
Put all the ingredients into the mixing bowl, use dough hook to kne ingredients to dough at levels 1-3.
-
Keep the mixture in a warm place and allow fermenting to double
-
Knead thoroughly once more, remove from the bowl and divided it portions, cover the dough with preservative film for 15 minutes
-
Take one portion and roll it into a tongue shape, fold both sides t the middle, and roll it up from bottom to top. After all three are roll the rolls with preservative film for 15 minutes
-
After finishing 3 servings, put them into the mold for the 2nd ferme ferment to 80% of the mold height. set fire up and dovandabake for 40 minutes, then remove the mold and put it on the grill to coo
Homemade Pizza
Raw materials: 170g high-gluten flour, 100g water, 1.5g edible salt, 1 white sugar, 2g yeast, 15g butter, and some stuffing.
Process:
- Put 170g high-gluten flour, 100g water, 1.5g edible salt, 15g sugar
2g yeast into the mixing bowl. Mix with dough hook at levels 1-3. A kneading into dough, add butter and continue to knead until it can p to be a flexible film
- Leave the dough fermenting to double its size in a warm place.
- During the fermentation, the pizza stuffing can be made and reserve future use.
- Knead thoroughly once more, take half of the dough to roll it round to relax for 5 minutes, then use a rolling pin to gently roll it to the six pizza pan, put it on the pizza pan, press it around the pizza pan with hands, finally use a fork to make small holes.
- Set the upper and lower tube heating mode of the oven, preheat Brush the pie mold base with olive oil first, then scoop the pizza sa spread it evenly, and then, sprinkle a little mozzarella cheese and sh onion, put the 8-inch pizza pan in the second layer of the preheated and bake for 8 minutes.
- When the time is up, take out the pizza pan and spread a layer Here you can put your favorite food and prepared stuffing in order.
- Put it in the preheated oven, set the working time for 15 minutes cheese is melted and the crust is golden.
Butter bread
Ingredients: 375g high-gluten flour, 180g milk, 35g butter, 30g sugar, milk powder, 4g yeast, 3g salt, 1 egg
Process:
- Put all the ingredients into the mixing bowl except the butter, leave of egg for the final brushing.
- Use dough hook to mix at levels 1-3, after forming dough, add so butter and continue kneading into glove film status.
- Cover the mixture with preservative film and allow fermenting to do its size in a warm place.
-
Knead thoroughly once more, remove from the bowl and divided it 10 portions. Take a portion of the dough and roll it into an oval shell roll it up from top to bottom.
-
Place the greased paper on the baking tray, then put the rolled dough on the tray, allow fermenting to double its size in a warm plate.
- Brush the egg liquid on the bread dough surface, preheat the oven 160^ C, put the bread dough at the middle layer and bake for 20 min.
French bread
Ingredients: 250g high-gluten flour, 50g low-gluten flour, 150g water, sugar, 3g yeast powder, 1g edible salt.
Process:
- Put all the ingredients into the mixing bowl, use the dough hook levels 1-3, and knead the dough into a dough shape.
- Cover the mixture with preservative film and allow fermenting to do its size in a warm place.
- Knead thoroughly once more, remove from the bowl and divided it portions. Take a portion of the dough and roll it into an oval shape, it up from top to bottom.
- Then cover with preservative film and allow fermenting to double it
- Brush the surface with sesame oil, preheat the oven put 180e bread dough at the middle layer and bake for 20 minutes.
Original cake
Ingredients: 100g cake flour, 5 eggs, 50g edible oil, 80g sugar, a s amount of lemon juice, 55g milk.
Process:
- Separate the egg white and egg yolk, add 20g sugar into the egg mix with egg beater at level 6 until the sugar is completely melted. and continue to stir evenly at level 6
- Pour edible oil and continue beating until fully emulsified.
- Pour the cake flour through a sieve, and stir evenly into a fine epsilon paste.
- Put a few drops of lemon juice into the egg white, add sugar in times and beat with an egg beater until it is cotton-like.
- Take 1/3 of the egg white, put them in the egg yolk paste and
pour the paste back to the remaining egg white and stir evenly to a cake paste
-
Brush edible oil on the surface of cake mold, then pour the cake into the mold
-
Preheat the oven to 150^ C, set upper and lower pipe heating mod baking time 50 minutes, then bake it till golden color.
Chocolate cake
Ingredients: 150g egg liquid, 50g pure milk, 40g cocoa powder, 80g sugar.
Process:
- Add 150g egg liquid, beat with egg beater at level 6 until it is c then take it out and set aside
- Put 80g white sugar, 50g milk, and 40g cocoa powder into a bow stir into a fine powder with a stirring paddle at level 6.
- Pour the prepared fine powder into the beaten egg liquid and mix
- Pour the mixed raw materials into the oil-brushed baking tray mold put it in the oven for baking at 180^ C.
- After being baked and shaped, take them out from the mold and cooling down before eating
Chocolate ice cream cake
Ingredients: 140g cream cheese, 140g dark chocolate, 220g milk, 100 powdered sugar, 240g whipped cream, 2g edible salt.
Process:
- The outside of the square mold is wrapped with tin foil, and put baking paper inside
- Add powdered sugar and a pinch of salt into cream cheese and with a stirring paddle.
- Chop the dark chocolate and heat it to melt, pour the melted chol into the cheese, then use a stirring paddle to stir evenly. Take it out place it on a tray for later use.
-
Put whipped cream in the pot and then stir until it is almost cott
-
Add the whipped cream in 2 times into the chocolate cheese and evenly, then pour the milk into it in 2 times and mix it well again.
- Finally, pour it into the mold and put it in the refrigerator for sev Take it out and de-mould it.
Analysis of common problems
| Phenomenons | causes | Solutions |
| The machine suddenly stops working during use. | It may be that the machine runs too long, or the ambient temperature is too high, resulting in the machine's motor temperature being too high; the machine starts the overheating protection program, automatic shutdown. | Gear reset to "0", unp the power, wait for the machine to return to room temperature can be restarted (generally need 15-30 minutes, the room temperature varies cooling time). |
| Turning the gear knob machine does not run | Check if the plug is good contact with the socket. | Verify that the power plug is plugged into the outlet. |
| Check if the power out. | Wait for power before operating | |
| Check if the rise button spring back i place. | Make sure the headstock is stuck in place. | |
| Excessive noise when the machine running | 1The machine will work louder in high gear than in low ge 2The amount of fo stirred is too large, resulting inoverloading the machine.3Voltage is unstable4Working time is to long. | 1 Choose the right ge to stir food according the recommendations in the manual 2 Reduce the amount stirring.3If the voltage is unstable, wait for the voltage to stabilize before using.4If the working time i too long, stop and co down for a while befor using. |
| The machine speed drops, or the speed unstable | 1 Whether the roo temperature is low, causing the lubricant in the machine to harden.2The ingredients stirred are too hard and too much, resulting in too muc load on the machine3Whether the voltage suddenly becomes low. | 1Remove the mixing bowl and let the mach idle for 5 minutes to soften the lubricant in machine and restore th speed stability.2Reduce the mixing volume and let the machine work according to the normal workload3When the voltage is stable, use the machin again. |
| Machine swaying and shaking when working | 1Check if the foot pad on the base is 2Whether the machine is placed o a smooth and flat countertop for use. | 1Check if the foot pa on the base is off.2Place on a smooth and flat countertop for use |
| The headstock can't spring back to rese after putting on the anti-splash cover an mixing bowl | Check that the anti-splash cover is place and the mixing bowl is assembled. | Rotate the anti-splash cover and assemble it place, and assemble th mixing pot in place. |
| Dough darkening found after use | Black powder falls onto the dough at mixing head. | Please check that the mixing head and hook are dry and that no w or dust is present on surface before use. |
Cleaning
| Body Cleaning | 1. Do not immerse the machine in the water not use water to shower directly on top of machine to prevent the host body from ente the water to avoid short circuits, electric sho leakage, rust, and other failures.2. Do not use a dripping wet towel to wipe machine3. Do not use detergent/vinegar/salt and othe corrosive, strongly acidic, strong alkaline clea products to clean the machine body, otherwise accessible to damage the machine's surface.4. Do not use sharp and rough tools such balls to brush the accessories. Otherwise, it easy to damage the surface of the accessor |
| Accessory Cleaning | 1. Do not put the cast aluminum parts into dishwasher or wash them with corrosive, stro acidic, or alkaline cleaning products. Please not put them into the dishwasher for cleaning (Except for stainless steel parts or surface-tr Teflon parts and electrophoresis parts)2. Do not soak for a long time in detergen saltwater, vinegar, and other corrosive liquids in time to clean accessories.3. After cleaning, dry the accessories, mainly keep the internal parts dry in time. |
| Special Cleaning | 1. The rotating output shaft will produce a black trace due to high speed and friction with the machine is working. After each use, please clean it promptly and keep the part dry.2. Pay attention to the sharp blade and rela sharp edge parts or accessories. |
| Preservation and maintenance | 1. You can use olive oil to apply on the b surface, knife plate, and mixing pot to ensure dry and wet environment to oxidize it.2. When not in use, you can cover the ma with a packaging bag and place it in a dry environment. |
Disposal
 | Do not dispose of the device in normal domestic waste Dispose of the device over a registered waste disposal through your communal waste disposal facility. Observe the currently valid regulations. In case of doubt consult your waste disposal facility. |
VEVOR®
TOUGH TOOLS, HALF PRICE
Technical Support and E-Warranty Certificate
www.vevor.com/support
VEVOR®
TOUGH TOOLS, HALF PRICE
natural_image
Line drawing of a modern kitchen mixer with control panel and handle (no text or symbols)BESOIN D'AIDE? CONTACTEZ-NOUS!

natural_image
Line drawing of a kitchen mixer with control panel and stand (no text or symbols)PG1

PG2

PG3

PG4

natural_image
Line drawing of a kitchen mixer with a side-mounted cup and control panel (no text or symbols)PG5

natural_image
Line drawing of a modern kitchen mixer with a stand mixer (no text or symbols)PG6
Suggestion
natural_image
Line drawing of a modern kitchen mixer with control panel and side-mounted buttons (no text or symbols)
natural_image
Line drawing of a kitchen mixer with control panel and stand (no text or symbols)PG1

PG2

PG3

PG4

natural_image
Line drawing of a kitchen mixer with a side-mounted cup and control panel (no text or symbols)PG5

natural_image
Line drawing of a kitchen mixer with a stand mixer (no text or symbols)PG6
Anregung
www.vevor.com/support
VEVOR®
TOUGH TOOLS, HALF PRICE
natural_image
Line drawing of a modern kitchen mixer with control panel and handle (no text or symbols)
Parti principali e parti standard:
natural_image
Line drawing of a kitchen mixer with control panel and stand (no text or symbols)PG1
PG2
PG3

PG4

natural_image
Line drawing of a kitchen mixer with a side-mounted cup and control panel (no text or symbols)PG5

natural_image
Line drawing of a kitchen mixer with a stand mixer (no text or symbols)PG6
Suggerimento
elettronica www.vevor.com/support
VEVOR®
TOUGH TOOLS, HALF PRICE
natural_image
Line drawing of a modern kitchen mixer with control panel and side-mounted buttons (no text or symbols)
natural_image
Line drawing of a kitchen mixer with control panel and stand (no text or symbols)PG1

PG2

PG3

PG4

natural_image
Line drawing of a kitchen mixer with a side-mounted stand mixer (no text or symbols)PG5
natural_image
Line drawing of a kitchen mixer with a stand mixer (no text or symbols)PG6
Sugerencia
natural_image
Line drawing of a modern kitchen mixer with control panel and handle (no text or symbols)POTRZEBUJESZ POMOCY? SKONTAKTUJ SIĘ Z NAMI!

natural_image
Line drawing of a kitchen mixer with control panel and stand (no text or symbols)PG1

PG2

PG3

PG4
natural_image
Line drawing of a kitchen mixer with a side-mounted stand mixer (no text or symbols)PG5

natural_image
Line drawing of a kitchen mixer with a stand mixer (no text or symbols)PG6
Sugestia
natural_image
Line drawing of a modern kitchen mixer with control panel and handle (no text or symbols)HULP NODIG? NEEM CONTACT MET ONS OP!

natural_image
Line drawing of a kitchen mixer with control panel and stand (no text or symbols)PG1

PG2

PG3

PG4
natural_image
Line drawing of a kitchen mixer with a side-mounted cup and control panel (no text or symbols)PG5

natural_image
Line drawing of a kitchen mixer with a stand mixer (no text or symbols)PG6
Suggestie
garantiecertificaat www.vevor.com/support
VEVOR®
TOUGH TOOLS, HALF PRICE
natural_image
Line drawing of a modern kitchen mixer with control panel and handle (no text or symbols)BEHÖVER HJÄLP? KONTAKTA OSS!

natural_image
Line drawing of a kitchen mixer with stand and control knob (no text or symbols)PG1

PG2

PG3
PG4

natural_image
Line drawing of a kitchen mixer with a side-mounted fan and control panel (no text or symbols)PG5

natural_image
Line drawing of a kitchen mixer with stand mixer and control panel (no text or symbols)PG6
Förslag
www.vevor.com/support


