SC-TC-2108 - Electric bain-marie Vevor - Free user manual and instructions
Find the device manual for free SC-TC-2108 Vevor in PDF.

User questions about SC-TC-2108 Vevor
0 question about this device. Answer the ones you know or ask your own.
Ask a new question about this device
Download the instructions for your Electric bain-marie in PDF format for free! Find your manual SC-TC-2108 - Vevor and take your electronic device back in hand. On this page are published all the documents necessary for the use of your device. SC-TC-2108 by Vevor.
USER MANUAL SC-TC-2108 Vevor
Technical Support and E-Warranty Certificate www.vevor.com/support
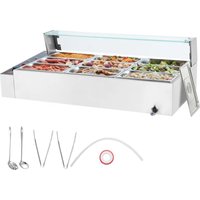
Electric Bain Marie
Applicable models:
sc-tc-213\sc-tc-214\sc-tc-215\SC-TC-216\SC-TC-2108\SC-TC-2110
sc-tc-316\SC-TC-319\SC-TC-3112\SC-TC-2110-B\SC-TC-3112-B
\SC-TC-2108-B
We continue to be committed to provide you tools with competitive price. "Save Half", "Half Price" or any other similar expressions used by us only represent the estimate of savings you might benefit from buying certain tools with us compared major top brands and does not necessarily mean to cover all categories of tools us. You are kindly reminded to verify carefully when you are placing an order v are actually saving half in comparison with the top major brands.
Model: sc-tc-213\sc-tc-214\sc-tc-215\SC-TC-216\SC-TC-2108\SC-TC-2110\sc-tc-316\SC-TC-319\SC-TC-3112\SC-TC-2110-B\SC-TC-3112-B\SC-TC-2108-B
natural_image
3D rendering of a laboratory incubator with green lid and control panel (no text or symbols visible)NEED HELP? CONTACT US!
Have product questions? Need technical support? Please feel fr contact us: Technical Support and E-Warranty Certificate www.vevor.com/support
This is the original instruction, please read all manual instructions of before operating. VEVOR reserves a clear interpretation of our user. The appearance of the product shall be subject to the product you. Please forgive us that we won't inform you again if there are any or software updates on our product.
 | Warning-To reduce the risk of injury, user must read instru manual carefully. |
 | CORRECT DISPOSALThis product is subject to the provision of European Directi 2012/19/EC. The symbol showing a wheelie bin crossed thr indicates that the product requires separate refuse collection European Union. This applies to the product and all access marked with this symbol. Products marked as such may no discarded with normal domestic waste, but must be taken t collection point for recycling electrical and electronic devices |

WARM PROMPT
This product is protected by a protective film on the surface of the machine to prevent scratches during transportation. Please remove all protective films before use!
1.Instructions for Use:
- Safety grounding is mandatory before use!
2.The voltage used must match the rated voltage -
For initial use, fill the water tank to about two-thirds capacity before connecting to the power supply; When the water tank under the machine is low on water, first cut off the power and allow cooling before replenishing, ensuring that the water level does not exceed two-thirds the tank to prevent electric shock hazards.
-
When the power supply is on and the power indicator light is lit, the temperature control heating switch to select the desired food insul temperature, which will heat the water in the tank to a specific temp and maintain it in the soup bucket.
-
After use, always turn off the power to prevent accidents during cle 6. If any abnormalities occur during use, discontinue use and have a professional troubleshoot before continuing.
-
The product is not suitable for individuals with physical, sensory, or mental impairments or those lacking experience and knowledge, including children.
-
Avoid immersing hands or other body parts in or near the water ta High temperatures may appear on the surface for some time after operation or at the end of use; touch only when absolutely necessary avoid burns or other injuries.
-
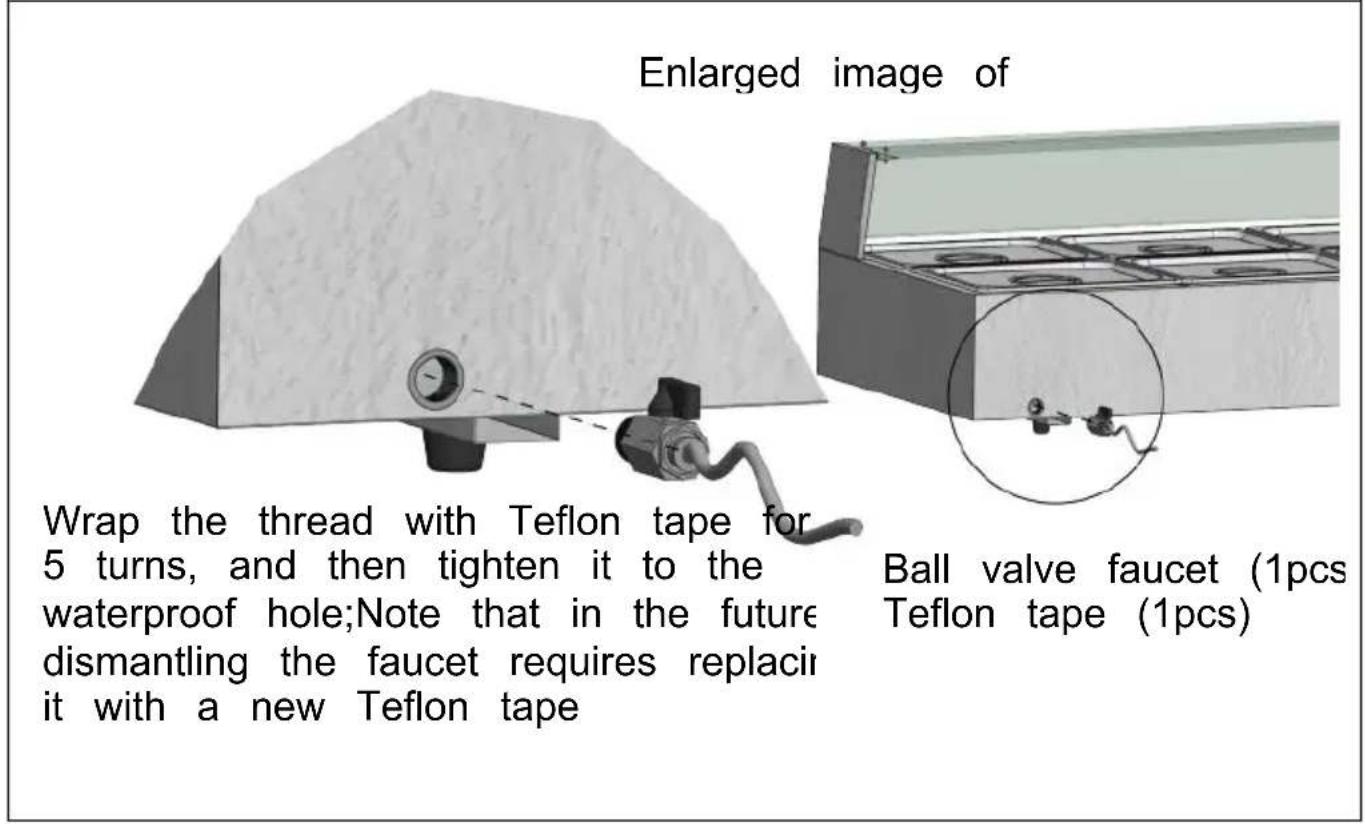
When installing the drain faucet for the first time, ensure a seal is by wrapping tape around the threads.
-
To dismantle the drain faucet at a later time, replace the tape with new one and reapply it securely.
-
To adjust the drain valve, press the knob to adjust.
2. Precautions and maintenance:
- The operation should be carried out by designated personnel who proficient in using the machinery and equipment.
- Be careful when moving the machine, and if there is a malfunction should be repaired by professional personnel and should not be knock
- Please do not install or store this device in the following locations avoid accidental operation and malfunction:
3.1 On an unstable table or counter.
3.2 Places with high or low temperatures.
3.3 Places with excessive air volume and dust.
3.4 Places with highly unstable power supply voltage.
3.5Places without good grounding devices.
-
Appliances must not be cleaned with water spray pipes or soaked water to prevent electrical leakage.
-
After use, use a non corrosive cleaning agent to wipe the water and food bowl clean.
-
It is strictly prohibited to use liquids that are soluble in the paint the surface of the machine
-
Special precautions:
7.1 This product is a commercial device and is not suitable for house use
7.2 Do not shake or tilt during use
7.3 Cannot be disassembled, modified, or dismantled without authorization, as modification may lead to serious accidents.
7.4 Before cleaning, it is necessary to cut off the power to prevent accidental leakage accidents
7.5 During use, do not directly touch the cabinet with your hands due high temperatures. Use special tools and heat-resistant gloves when handling food.
7.6 It is prohibited to use hard and sharp objects to scratch or cut machine.
3. Normal working environment conditions:
- The ambient temperature is 5-50 °C, and the relative humidity of
is not more than 90%;
- Power supply voltage: 110V ± 10%, frequency: 60 ± 1% HZ. (220-10%, frequency: 50 ± 1% HZ)
4. Product Introduction
- This product has a novel and unique design, beautiful appearance, combination of square and circular shapes, multiple food boxes, easy classify and use simultaneously, sturdy and durable, and easy to mair. Equipped with steam heating function, it can uniformly increase temperature and is equipped with a large water tank to maintain food moisture. It is a specialized equipment for food display, display, insula moisturizing, and classification.
Symbol Description:
In this manual, symbols are used to highlight all important safety instructions and recommendations related to the equipment. To avoid accidents, casualties, or property damage, please be particularly careful follow these instructions.

Equipotential Dangerous voltage Anti scalding label
6.Product specifications
| MODEL | VOLTAGE (V) | Hz | POWER (W) | SIZE (mm) | Electronic thermometer | Power cord type |
| SC-TC-213 | AC110-120 | 60 | 1500 | 980*395*380 | NO | Plug |
| AC220-240 | 50 | |||||
| SC-TC-214 | AC110-120 | 60 | 1500 | 1217*375*385 | NO | Plug |
| AC220-240 | 50 | |||||
| SC-TC-215 | AC110-120 | 60 | 1500 | 1484*378*385 | NO | Plug |
| AC220-240 | 50 | |||||
| SC-TC-216 | AC110-120 | 60 | 1500 | 1133*580*385 | NO | Plug |
| AC220-240 | 50 | |||||
| SC-TC-2108 | AC110-120 | 60 | 1700 | 1461*580 *385 | NO | Plug |
| AC220-240 | 50 | 3200 | ||||
| SC-TC-2110 | AC110-120 | 60 | 1700 | 1468*730 *381 | NO | Plug |
| AC220-240 | 50 | 3200 | ||||
| SC-TC-316 | AC110-120 | 60 | 1500 | 127*375* 385 | NO | Plug |
| AC220-240 | 50 | |||||
| SC-TC-319 | AC110-120 | 60 | 1500 | 1133*580 *385 | NO | Plug |
| AC220-240 | 50 | |||||
| SC-TC-3112 | AC110-120 | 60 | 1700 | 1461*580 *385 | NO | Plug |
| AC220-240 | 50 | 3200 | ||||
| SC-TC-2108-B | AC220-240 | 50 | 3200 | 1461*580 *385 | YES | Cable |
| SC-TC-2110-B | AC220-240 | 50 | 3200 | 1468*730 *381 | YES | Cable |
| SC-TC-3112-B | AC220-240 | 50 | 3200 | 1461*580 *385 | YES | Cable |
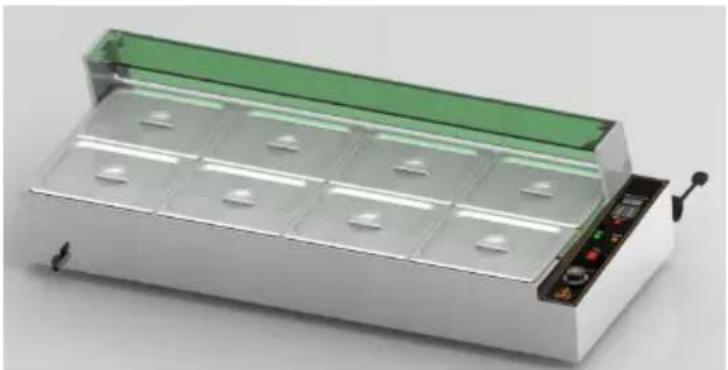
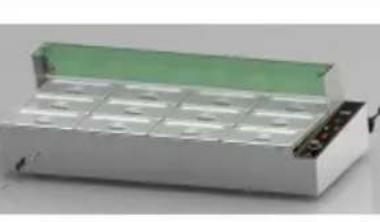
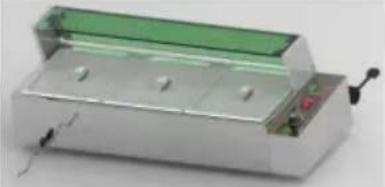
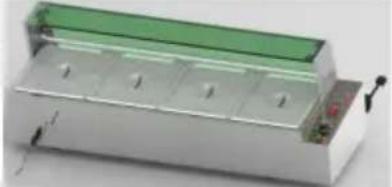
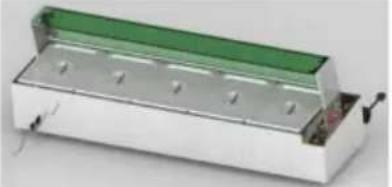
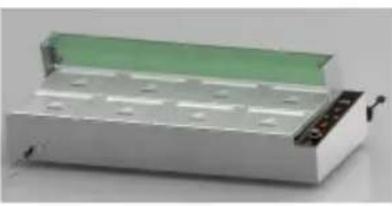
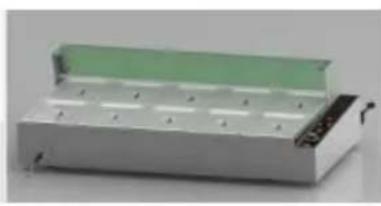
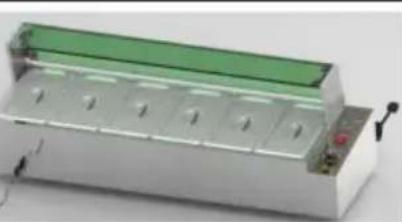
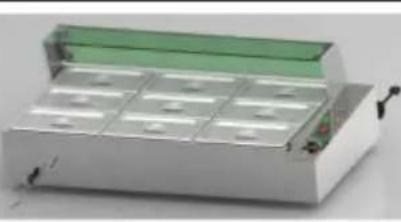
7.Product appearance
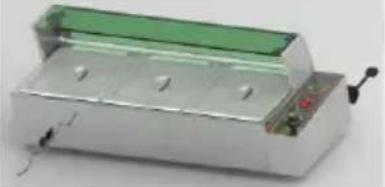 |  | 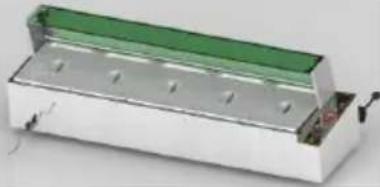 |
| SC-TC-213 | SC-TC-214 | SC-TC-215 |
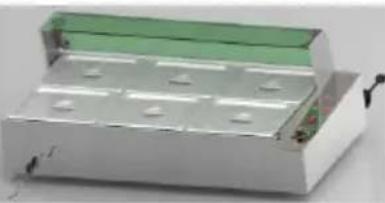 | 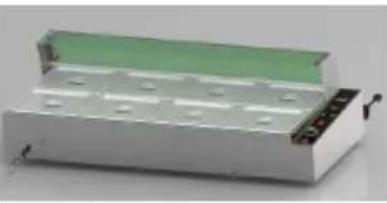 |  |
| SC-TC-216 | SC-TC-2108 | SC-TC-2110 |
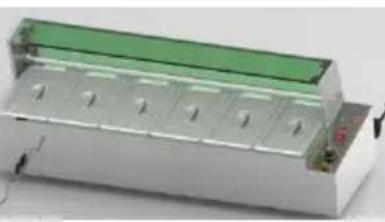 | 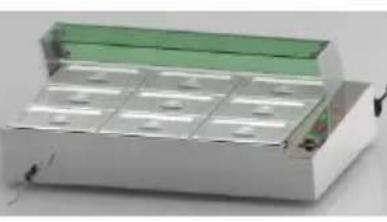 |  |
| SC-TC-316 | SC-TC-319 | SC-TC-3112 |
| SC-TC-2108-B | SC-TC-2110-B | SC-TC-3112-B |
Note: The location of this electrical component is based on the design that time, and our company reserves the right to make changes to the participating design. If the design changes and the instruction manual not improved in a timely manner, we hope the customer can understand
8.Product Structure Diagram
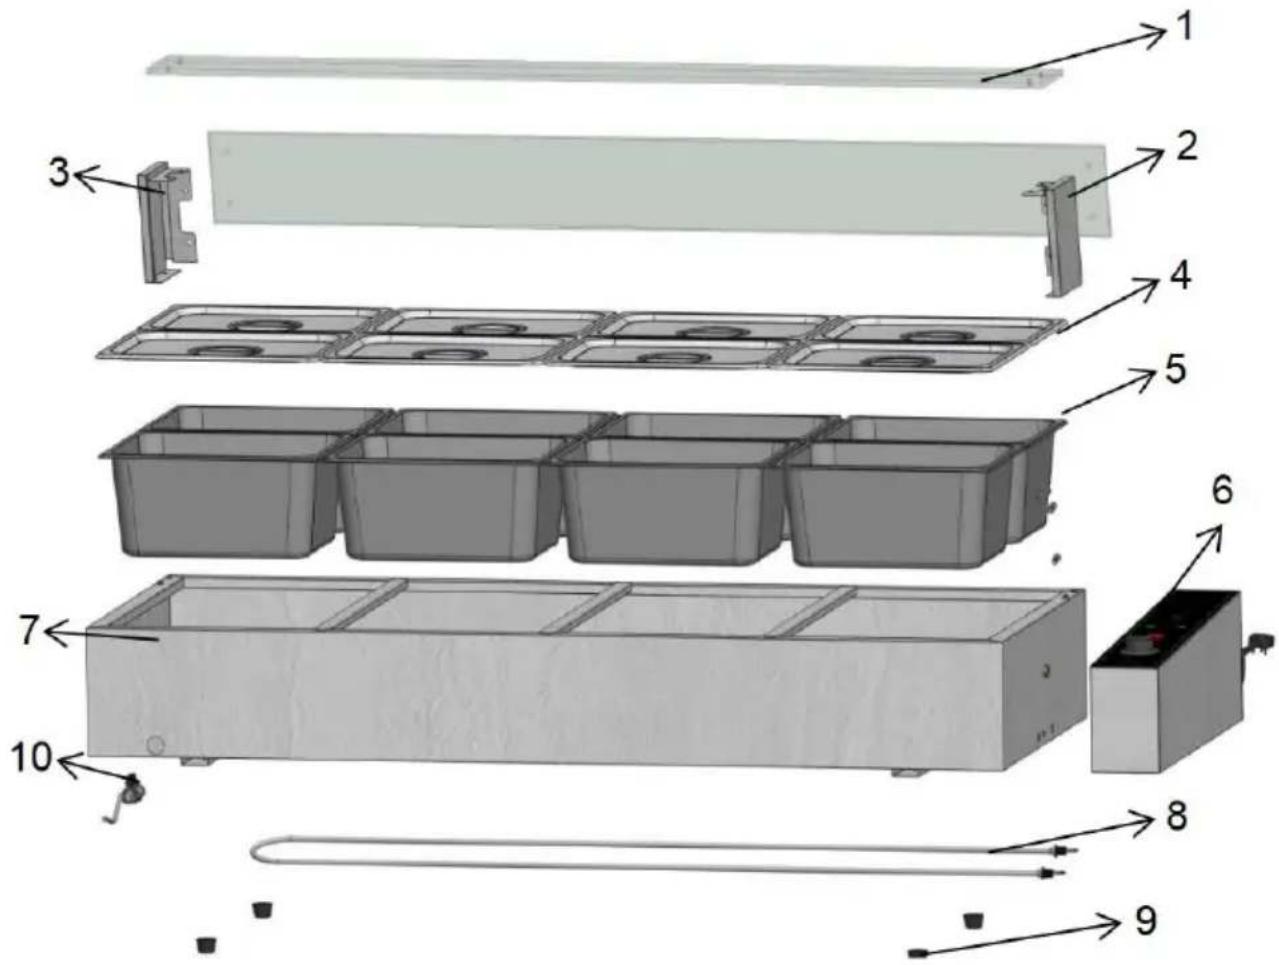
| SC-TC-2108 BOOM LIST | |||||
| NO. | NAME | PCS | NO. | NAME | PCS |
| 01 | Glass | 2 | 06 | Control box | 1 |
| 02 | Right glass bracket | 1 | 07 | Water tank rack | 8 |
| 03 | Left glass bracket | 8 | 08 | Heating tube | 1 |
| 04 | Half a basin lid | 1 | 09 | Machine foot | 1 |
| 05 | Half basin | 4 | 10 | Ball valve fauce | 1 |
SC-TC List of Series Spareparts
| NO. | NAME | PCS | NO. | NAME | PCS |
| 01 | Right glass bracket | 1 | 06 | Rubber gasket | 8 |
| 02 | Left glass bracket | 1 | 07 | Nut | 8 |
| 03 | Glass | 2 | 08 | Teflon tape | 1 |
| 04 | Screw | 12 | 09 | Spoon | 1 |
| 05 | Ball valve faucet | 1 | 10 | Leaky spoon | 1 |
| Attention: Please check if the Spareparts are complete bef installation! | |||||
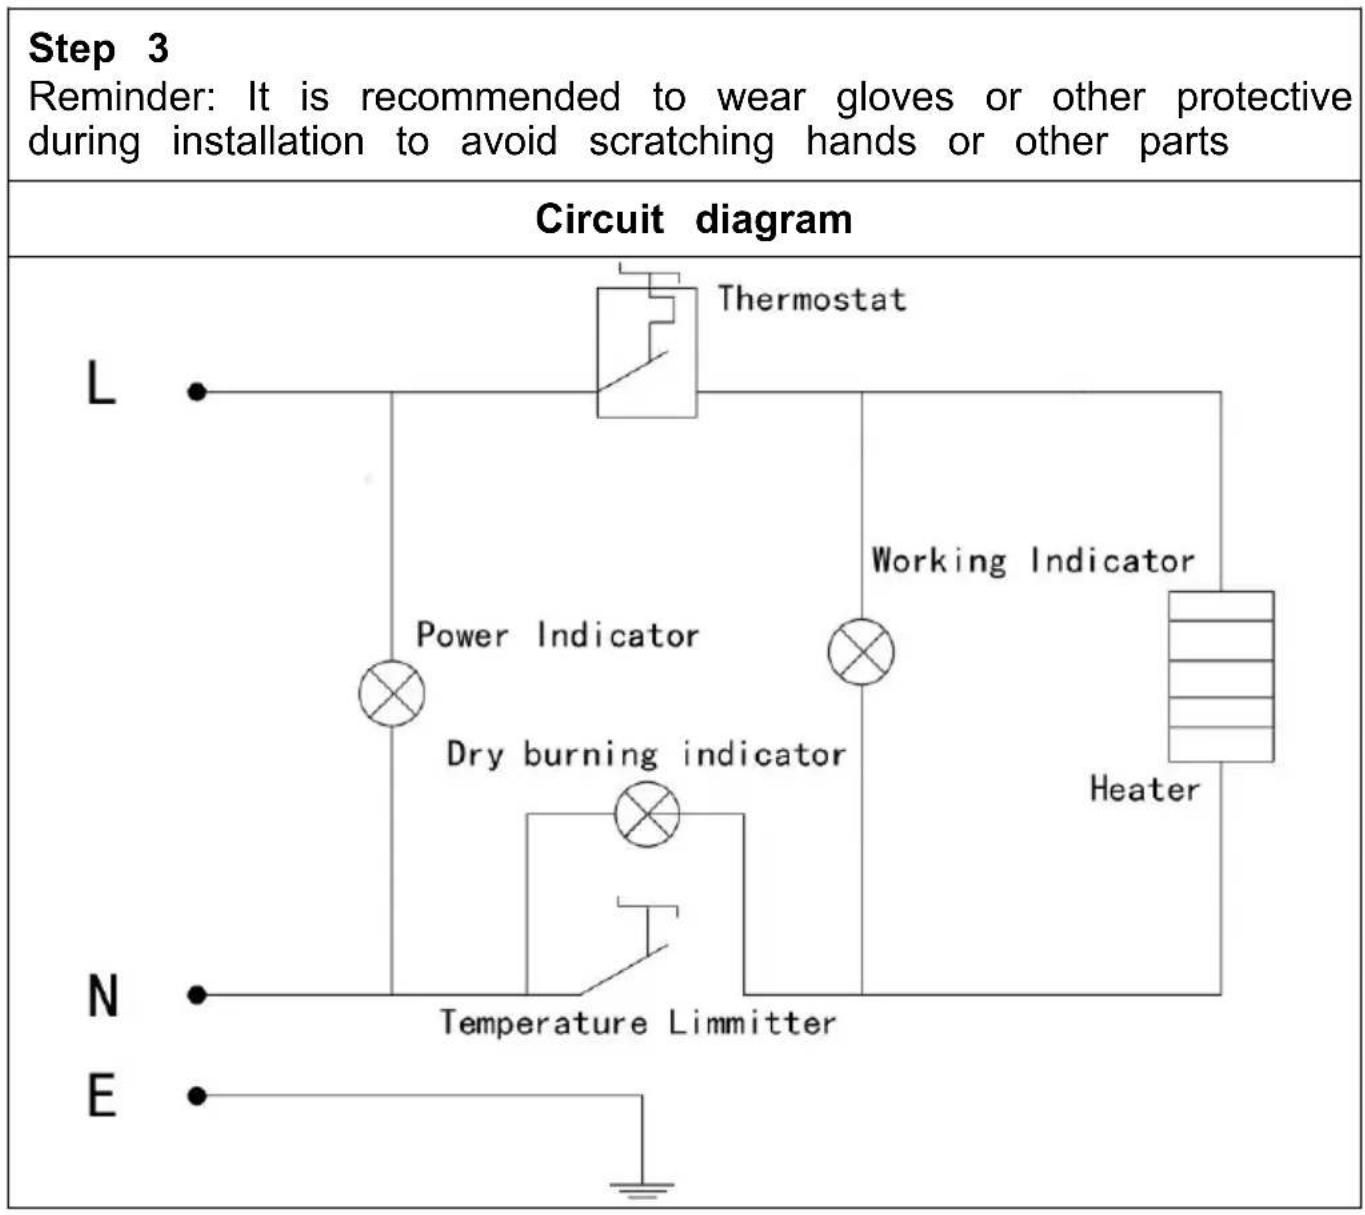
SC-TC-2108 Installation diagram
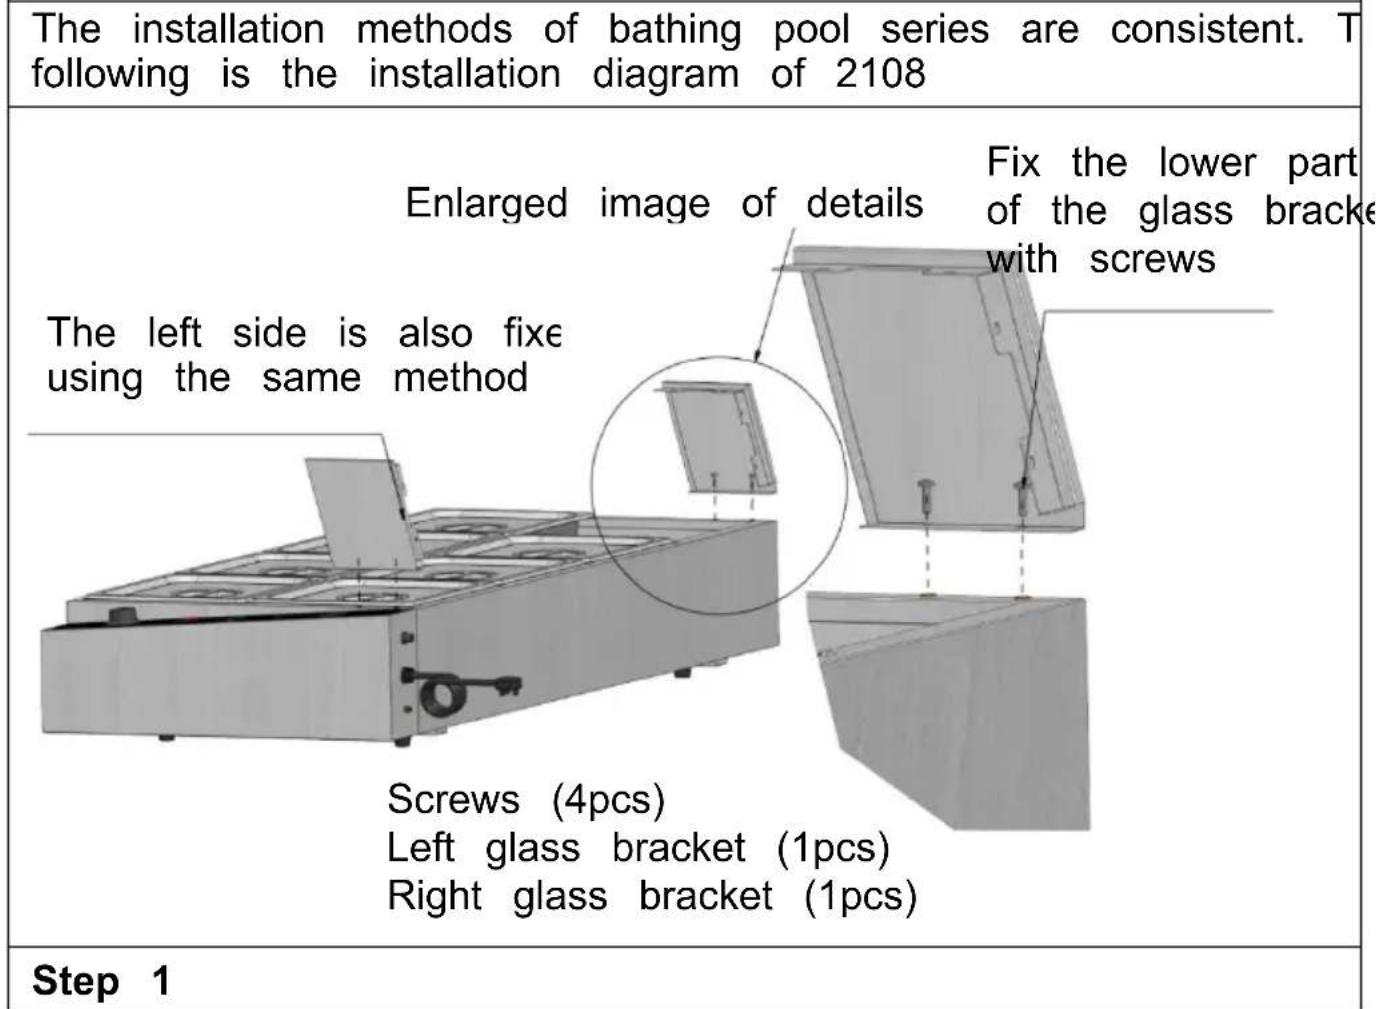
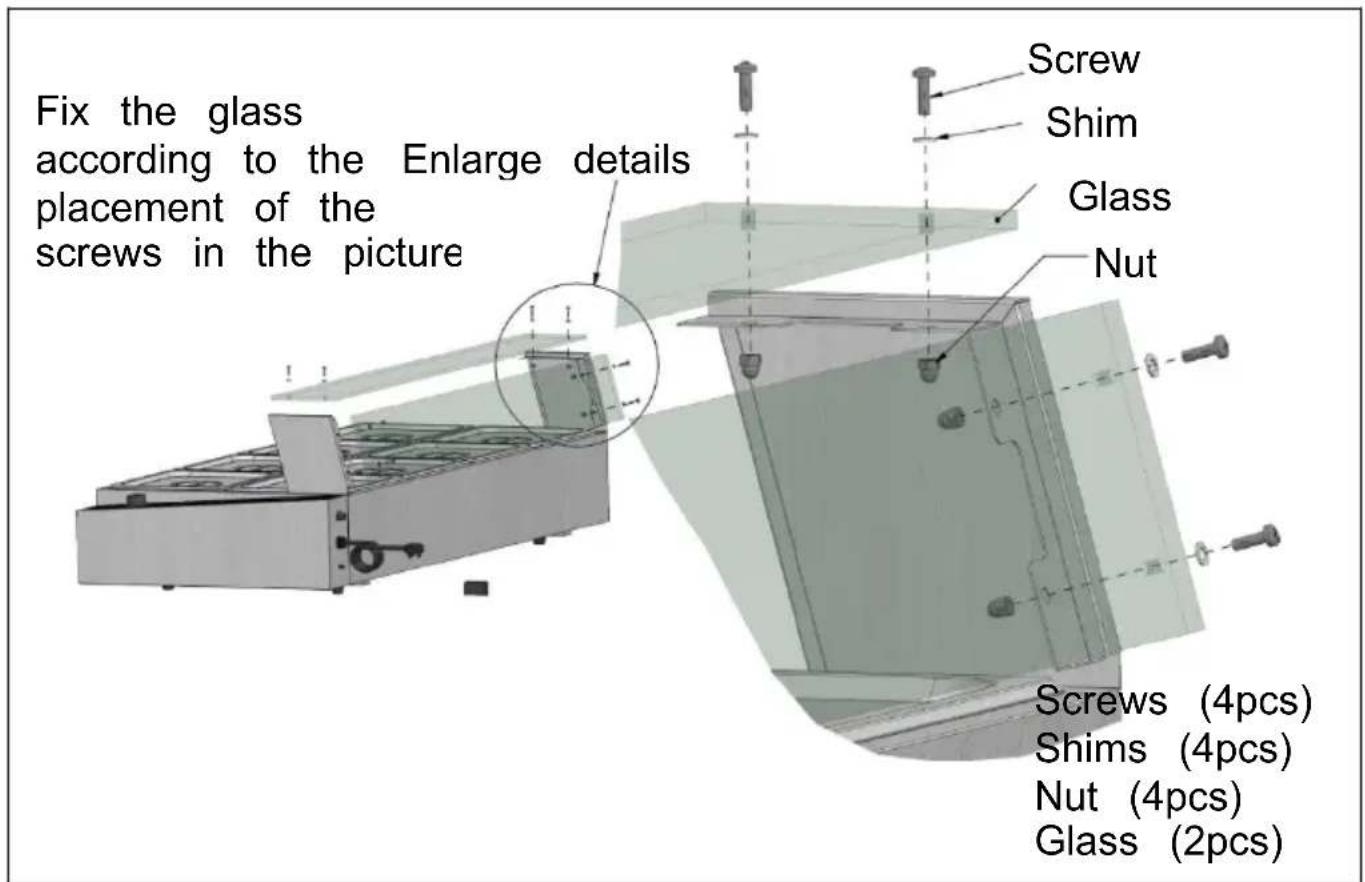
Step 2
9.Fault analysis
| NO. | Fault phenomenon | Reason | Exclusion method |
| 01 | The green and re indicator lights are on simultaneously, and the temperature does not rise | The wiring of the electric heating tube is loose, an the electric heating tube is burnt out | 1Tighten the wiring bolts of the electric heating tube.2Replace the electric heating tube |
| 02 | The work indicator light is on and the temperature rise cannot be controlled. | Temperature controller malfunction | 1Replace the thermostat |
| 03 | The indicator light not on, and the temperature control is normal | The indicator light is burnt out | 1Replacing indicator lights |
| 04 | Cannot automatically insulate. | Temperature controller malfunction | 1Replace the thermostat |
| 05 | The shell has electric leakage and feels numb to the hands | Insulation is damp or the inner wire come into contact with the casing. | 1Send to the maintenance department for repair. |
| Attention: The above issues are for analysis and reference only handle them on your own. Relevant professionals are require investigate and repair them. In case of safety abnormalities s electric leakage, the power should be cut off in a timely mann use should be stopped! | |||
VEVOR®
TOUGH TOOLS, HALF PRICE
Technical Support and E-Warranty Certificate www.vevor.com/support
VEVOR®
TOUGH TOOLS, HALF PRICE
natural_image
3D rendering of a laboratory incubator with green lid and control panel (no text or symbols visible)BESOIN D'AIDE? CONTACTEZ-NOUS!
www.vevor.com/support
natural_image
3D diagram of a mechanical assembly with multiple circular components and a magnified inset showing a small component (no text or symbols)natural_image
3D rendering of a laboratory incubator with green lid and control panel (no visible text or symbols)www.vevor.com/support
natural_image
3D rendering of a laboratory incubator with green lid and control panel (no text or symbols visible)natural_image
3D rendering of a laboratory incubator with green lid and control panel (no visible text or symbols)www.vevor.com/support
natural_image
3D rendering of a laboratory incubator with green lid and control panel (no visible text or symbols)POTRZEBUJESZ POMOCY? SKONTAKTUJ SIE Z NAMI!
www.vevor.com/support
natural_image
3D diagram of a mechanical assembly with mounting holes and a circled detail view (no text or symbols)natural_image
3D rendering of a laboratory incubator with green lid and control panel (no text or symbols visible)HULP NODIG? NEEM CONTACT MET ONS OP!
- Products specificities
| MODEL | SPANNING(V) | Hertz | STROOM MAAT(IN) | (mm) | Elektronisch thermome hebben | Stroom koord type |
| SC-TC-213 | AC110-120 60 | 1500 | 980*395*380 | NEE | Plug | |
| AC220-240 50 | ||||||
| SC-TC-214 | AC110-120 60 | 1500 | 1217*375*385 | NEE | Plug | |
| AC220-240 50 | ||||||
| SC-TC-215 | AC110-120 60 | 1500 | 1484*378*385 | NEE | Plug | |
| AC220-240 50 | ||||||
| SC-TC-216 | AC110-120 60 | 1500 | 1133*580*385 | NEE | Plug | |
| AC220-240 50 | ||||||
| SC-TC-2108 | AC110-120 60 | 1700 | 1461*580 *385 | NEE | Plug | |
| AC220-240 50 | 3200 | |||||
| SC-TC-2110 | AC110-120 60 | 1700 | 1468*730 *381 | NEE | Plug | |
| AC220-240 50 | 3200 | |||||
| SC-TC-316 | AC110-120 60 | 1500 | 127*375*385 | NEE | Plug | |
| AC220-240 50 | ||||||
| SC-TC-319 | AC110-120 60 | 1133*580 *385 | NEE1500 | Plug | ||
| AC220-240 50 | ||||||
| SC-TC-3112 | AC110-120 60 | 1700 | 1461*580 *385 | NEE | Plug | |
| AC220-240 50 | 3200 | |||||
| SC-TC-2108-B | AC220-240 50 | 3200 | 1461*580 *385 | JA Kabel | ||
| SC-TC-2110-B | AC220-240 50 | 3200 | 1468*730 *381 | JA Kabel | ||
| SC-TC-3112-B | AC220-240 50 | 3200 | 1461*580 *385 | JA Kabel |
7.Productuiterlijk
 |  |  |
| SC-TC-213 | SC-TC-214 | SC-TC-215 |
 |  |  |
| SC-TC-216 | SC-TC-2108 SC-TC-2110 | |
 |  |  |
| SC-TC-316 | SC-TC-319 SC-TC-3112 | |
| SC-TC-2108-B | SC-TC-2110-B | SC-TC-3112-B |
Kogelkraan (1st) Teflontape (1st)
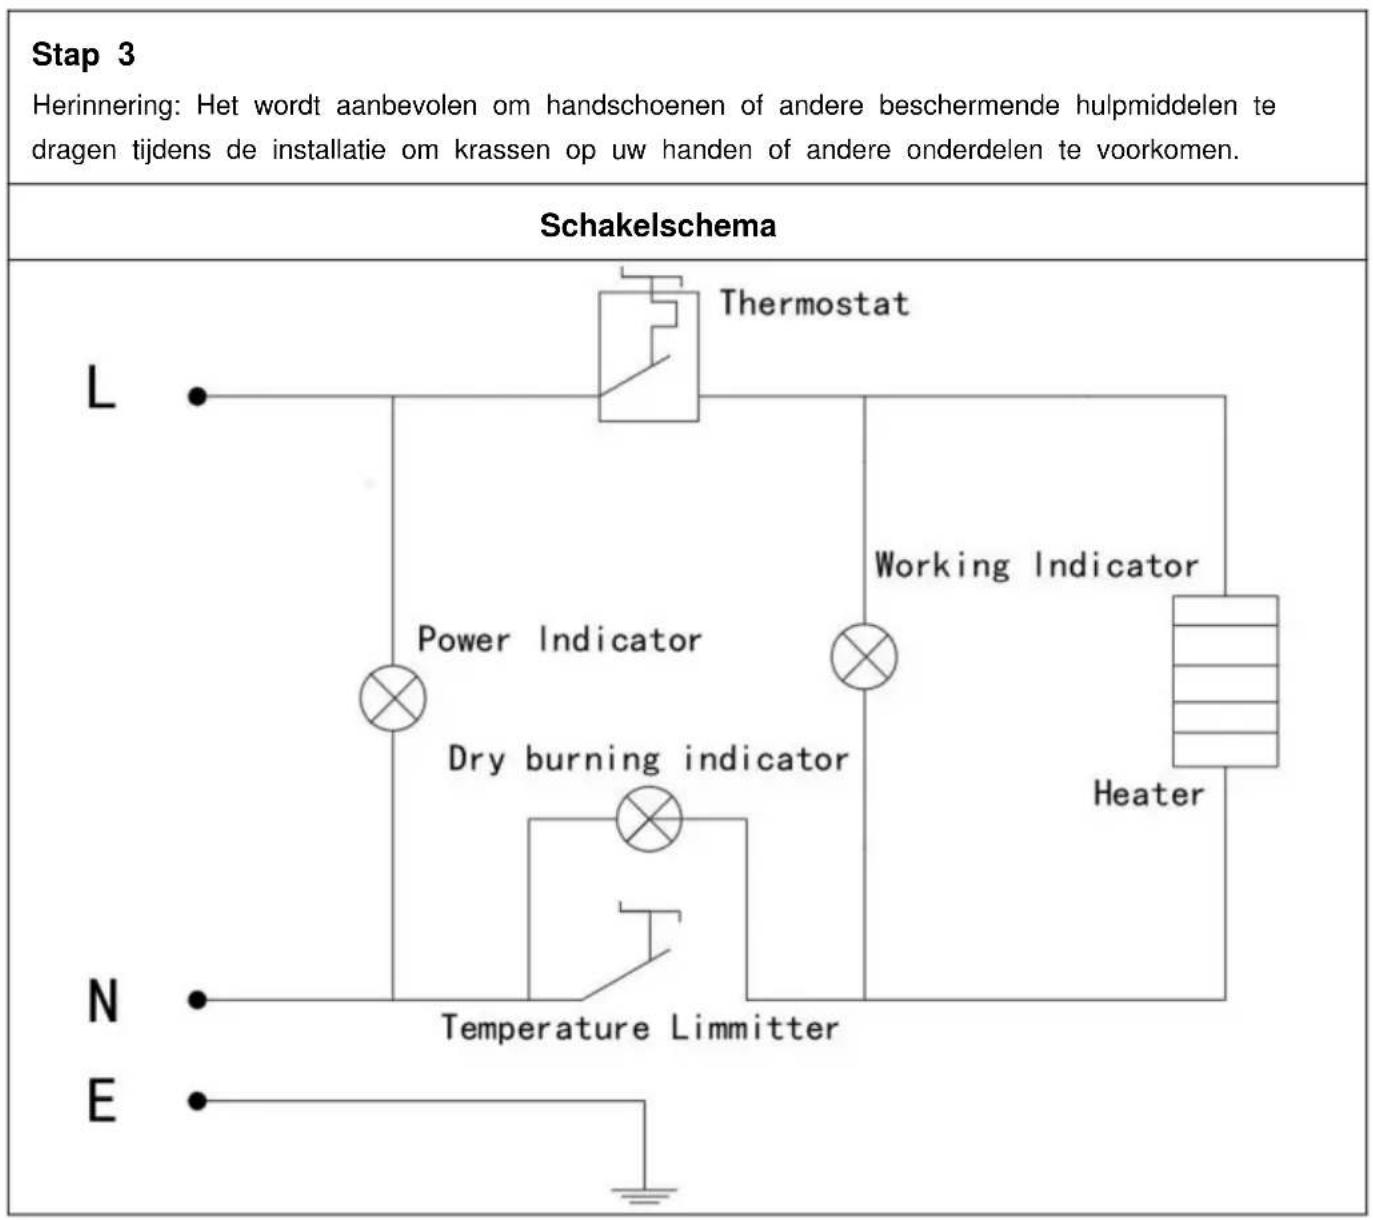
flowchart
graph TD
    A["Thermostat"] --> B["Power Indicator"]
    A --> C["Dry burning indicator"]
    A --> D["Heater"]
    B --> E["Temperature Limmitter"]
    C --> E
    D --> E
    style A fill:#f9f,stroke:#333
    style B fill:#ccf,stroke:#333
    style C fill:#cfc,stroke:#333
    style D fill:#fcc,stroke:#333
9.Foutanalyse
garantiecertificaat www.vevor.com/support
VEVOR®
TOUGH TOOLS, HALF PRICE
natural_image
3D rendering of a laboratory incubator with green lid and control panel (no text or symbols visible)BEHÖVER HJÄLP? KONTAKTA OSS!
www.vevor.com/support
www.vevor.com/support