
HC-2000Y - Choppers Vevor - Free user manual and instructions
Find the device manual for free HC-2000Y Vevor in PDF.



| Brand | Vevor |
| Model | HC-2000Y |
| Product type | Grain mill / Electric grinder |
| Power supply | 230 V, 50 Hz (grounded plug) |
| Bowl capacity | About 2/3 of the tank (do not overfill) |
| Bowl material | Stainless steel (estimated) |
| Main functions | Grinding grains, cereals, spices, herbs, and other dry materials |
| Safety | Overload protection, lid safety switch, automatic stop in case of blockage |
| Running time | Maximum 3 continuous minutes, then rest for 5 to 10 minutes |
| Motor type | Carbon brush motor |
| Rotation speed | High speed (not specified) |
| Cleaning | By hand, do not immerse motor unit, do not use in dishwasher |
| Included spare parts | 1 set of blades, 1 set of carbon brushes, 1 sieve, 1 brush, 1 socket wrench |
| Maintenance | Replace blades and carbon brushes after wear |
| Warranty | Technical support and electronic warranty certificate at www.vevor.com/support |
| Intended use | Indoor only, household use |
| Standards | Compliant with FCC Part 15, WEEE directive 2012/19/EC |
Frequently Asked Questions - HC-2000Y Vevor
User questions about HC-2000Y Vevor
0 question about this device. Answer the ones you know or ask your own.
Ask a new question about this device
Download the instructions for your Choppers in PDF format for free! Find your manual HC-2000Y - Vevor and take your electronic device back in hand. On this page are published all the documents necessary for the use of your device. HC-2000Y by Vevor.
USER MANUAL HC-2000Y Vevor
Technical Support and E-Warranty Certificate www.vevor.com/support
GRAIN GRINDER USER MANUAL
MODEL: HC-150 HC300 HC-550 HC-750 HC-300Y HC-500Y HC-750Y HC-1000Y HC-2000Y HC-2500Y
We continue to be committed to provide you tools with competitive price. "Save Half", "Half Price" or any other similar expressions used by us only represent estimate of savings you might benefit from buying certain tools with us compared top brands and does not necessarily mean to cover all categories of tools offered are kindly reminded to verify carefully when you are placing an order with us actually saving half in comparison with the top major brands.
VEVOR®
GRAIN GRINDER

NEED HELP? CONTACT US!
Have product questions? Need technical support? Please feel fr contact us:
Technical Support and E-Warranty Certificate www.vevor.com/support
This is the original instruction, please read all manual instruction carefully before operating. VEVOR reserves a clear interpretation user manual. The appearance of the product shall be subject to product you received. Please forgive us that we won't inform you there are any technology or software updates on our product.
 | Warning-To reduce the risk of injury, user must re instructions manual carefully. |
 | CORRECT DISPOSALThis product is subject to the provision of European 2012/19/EC. The symbol showing a wheelie bin cros through indicates that the product requires separate r collection in the European Union. This applies to the and all accessories marked with this symbol. Produ marked as such may not be discarded with normal o waste, but must be taken to a collection point for r electrical and electronic devices |
Note: Before beginning assembly of product, make sure all parts are present. Compare parts with package content list and hardware conter Do not attempt to assemble the unit if any parts are missing or dar Contact customer service for replacement parts.
Warnings
When using electrical appliances, basic safety precautions should always be followed including the following:
SAVE THIS INSTRUCTION!
- READ ALL OPERATING INSTRUCTIONS AND PRODUCT SAFETY LABELS! FAILURE TO FOLLOW ALL INSTRUCTIONS MAY RESULT SERIOUS INJURY OR PROPERTY DAMAGE!
2.CHECK FOR DAMAGED PARTS: Before using the grinder, check whether all parts work normally and perform the expected functions. Check for alignment, binding and installation of moving parts. and any other conditions that may affect the operation. If any parts, the Power or the Grinder are damaged, call the Customer Service number shown this manual.
-
Always unplug power cord from outlet when not in use, before putting or taking off parts or accessories, and before cleaning. After unplugging the unit, turn power switch ON, then OFF to ensure that all power has been discharged from the grinder.
-
This appliance can be used by children aged from 8 years and ab and persons with reduced physical, sensory or mental capabilities or I of experience and knowledge if they have been given supervision or instruction concerning use of the appliance in a safe way and unders the hazards involved. Children shall not play with the appliance. Clear and user maintenance shall not be made by children without supervisi
-
NEVER LEAVE GRINDER UNATTENDED WHILE IT IS RUNNING!
-
Wait until all moving parts have stopped and turn off power before removing any part from the grinder.
-
DO NOT use outdoors, this product is intended for INDOOR USE (
-
DO NOT pull the power cord to disconnect.
-
DO NOT USE WITH EXTENSION CORD. Always plug directly into a grounded wall receptacle.
-
This grinder uses a grounded, three prong plug (hot, neutral and ground), the grounding plug is used for electrical appliances with metal shell to prevent electric shock. DO NOT change or alter the plug in way. NEVER break off a grounding prong from a 3-- - conductor plug. Doing so will invalidate the warranty and may cause electric shock.
-
Place the grinder on a firm and stable surface. Ensure that the grinder is not placed near the edge of the worktop, where it can be easily pushed off or fall.
-
The Gear Housing and the Motor Cover may become HOT during operation. This is normal. DO NOT TOUCH these parts while operating.
-
To reduce the risk of unintentional starting, check that the control is OF F before plugging the cord into wall outlet. To disconnect, turn the controller to OFF, then remove plug from wall outlet.
-
DO NOT operate your grinder under a wall cabinet. Always unplug the unit from the electrical outlet when storing
it. Not doing so could create a risk of fire, especially if the appliance touche
s the walls of the garage or the door touches the unit as it closes.
-
NEVER plug the grinder in where water may flood the area.
-
To protect against risk of electrical shock, DO NOT submerge the grinder in water or other liquids. Be sure the grinder is disconnected from the power source before cleaning. NEVER rinse the Grinder Motor under running water, only use a moist cloth to clean the Grinder Motor Unit.
-
The use of attachments or parts not specifically recommended or sold by the manufacturer for this grinder will void the warranty and may cause fire, electric shock or injury.
-
HANDS WASH ALL PARTS! DO NOT USE DISHWASHER. Never put the unit near a hot burner, in an oven, or in a dishwasher.
-
NEVER use abrasive cleaning agents or abrasive cloths when cleaning the grinder.
-
The Manufacturer disclaims any responsibility in the case of improper use of Grinder. Improper use of the Grinder voids the warranty.
-
DO NOT REMOVE WARNING LABELS FROM THE GRINDER. Doing so will void the product warranty and may result in serious personal
-
This appliance must be grounded while in use to protect the operation from electrical shock. This grinder uses a grounded, three prong plug should be connected directly to a grounded 120V(US)/230V(EC), three prong grounded wall outlet receptacle. Grounded plugs are used on metal-encased electric appliances in order to provide protection from a electric shock. DO NOT change or alter the plug in anyway. NEVER off a grounding prong from a 3-conductor plug. Doing so voids the warranty and may result in electric shock.
-
Type X attachment: If the supply cord is damaged, it must be rep by a special cord or assembly available from the manufacturer or its service agent.
24.Do not fill the grinding tank to full otherwise it will cause overload material you gonna to grind one time must cover the long blade in middle and no more than 2/3 of the tank. Because this machine needs space to complete the cycle of the blades and the material to be gr 25.Even if grinding stone, it only takes 2 minutes, so don't use it for
long. It takes 5-10 minutes to rest after every 3 minutes of work. If grinding some hard items, there should have a interval which is to prevent bearing overheating, damage to the motor. General grains only need to be ground into powder. If you are not satisfied with the grinding of you can sieve out the coarse particles with a mesh screen and grind again for finer powder.
- To ensure safety, the nut should be tightened before grinding. After long-term use, blades and carbon brushes need to be replaced if the worn.
- The motor of the grinder is the brush motor, the sparks and the normal when the first several uses. The sparks and the brush friction odor will disappear after you use the machine some times later.
You can Grind some rice or tea leaves first for several times to eliminate the odor.
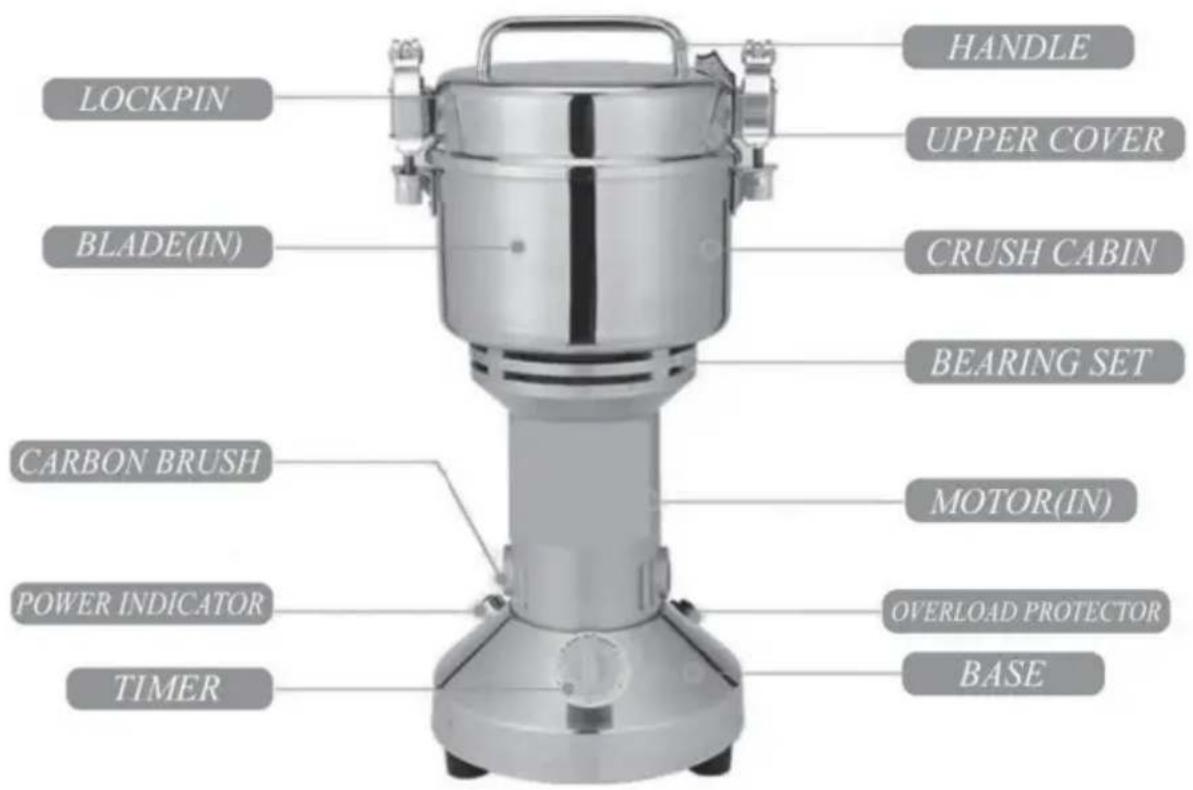
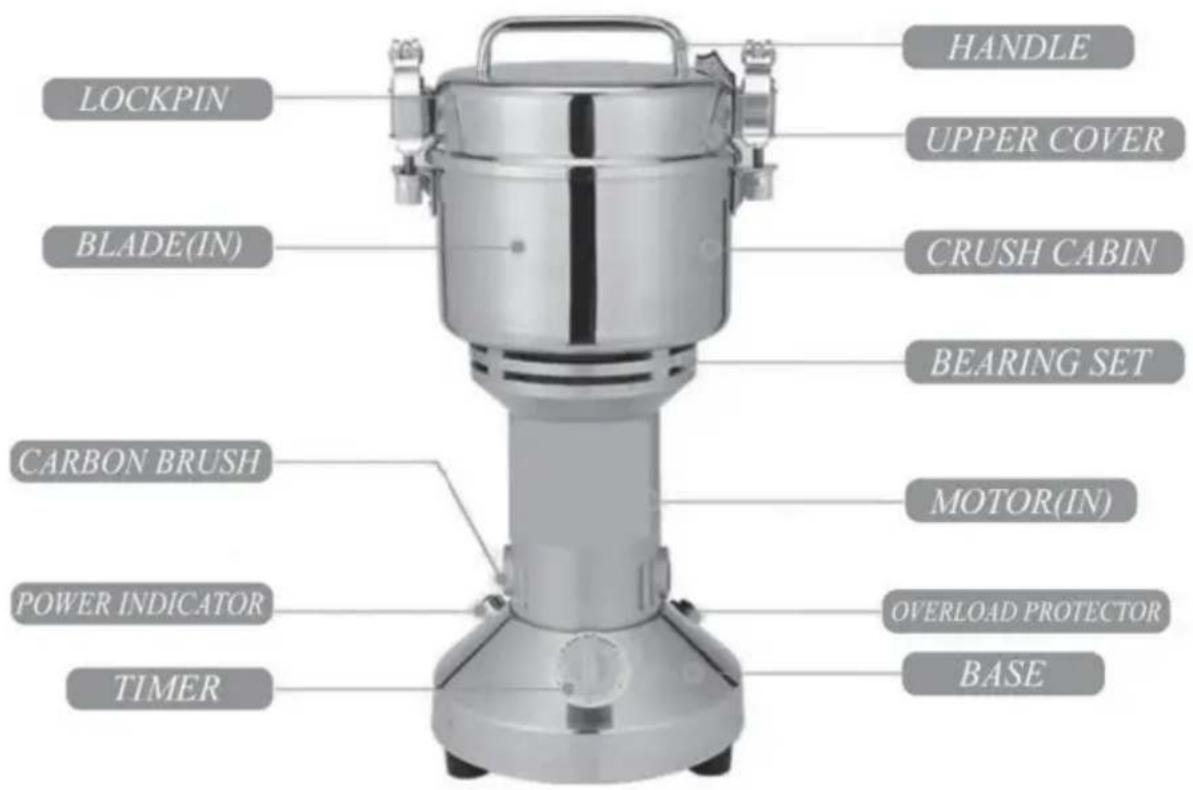
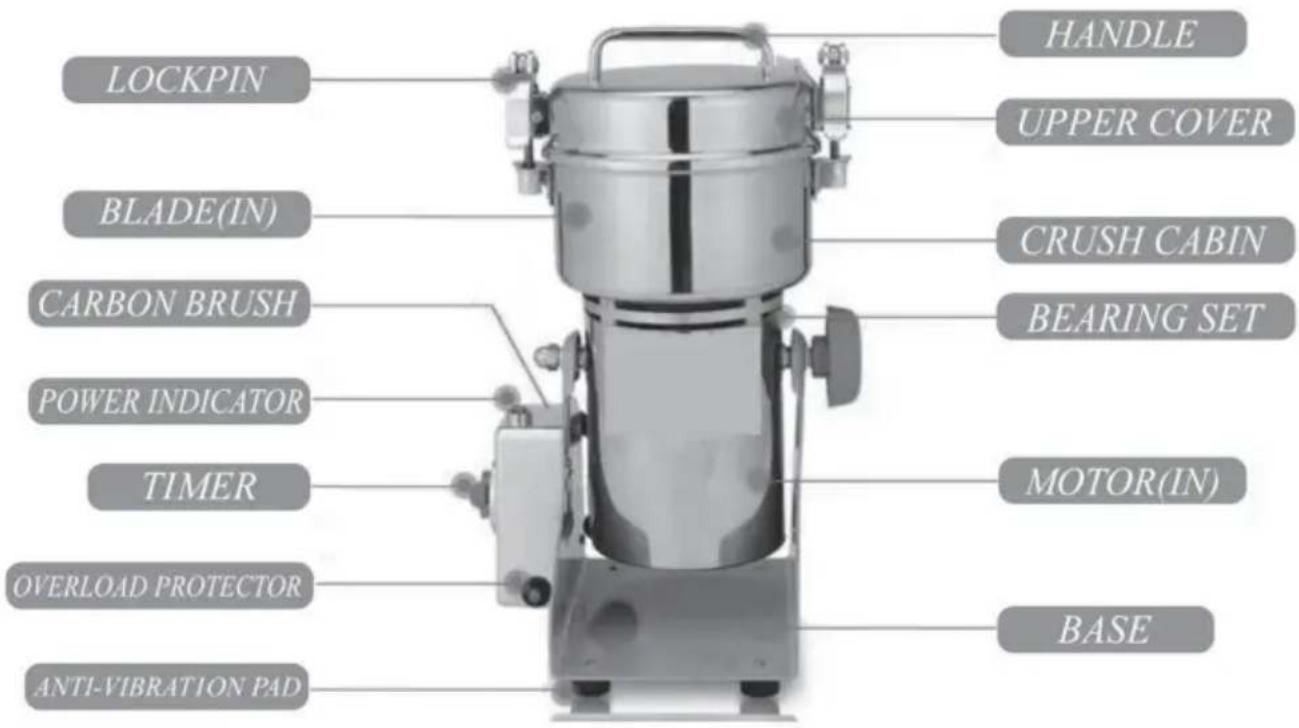
PRODUCT STRUCTURE
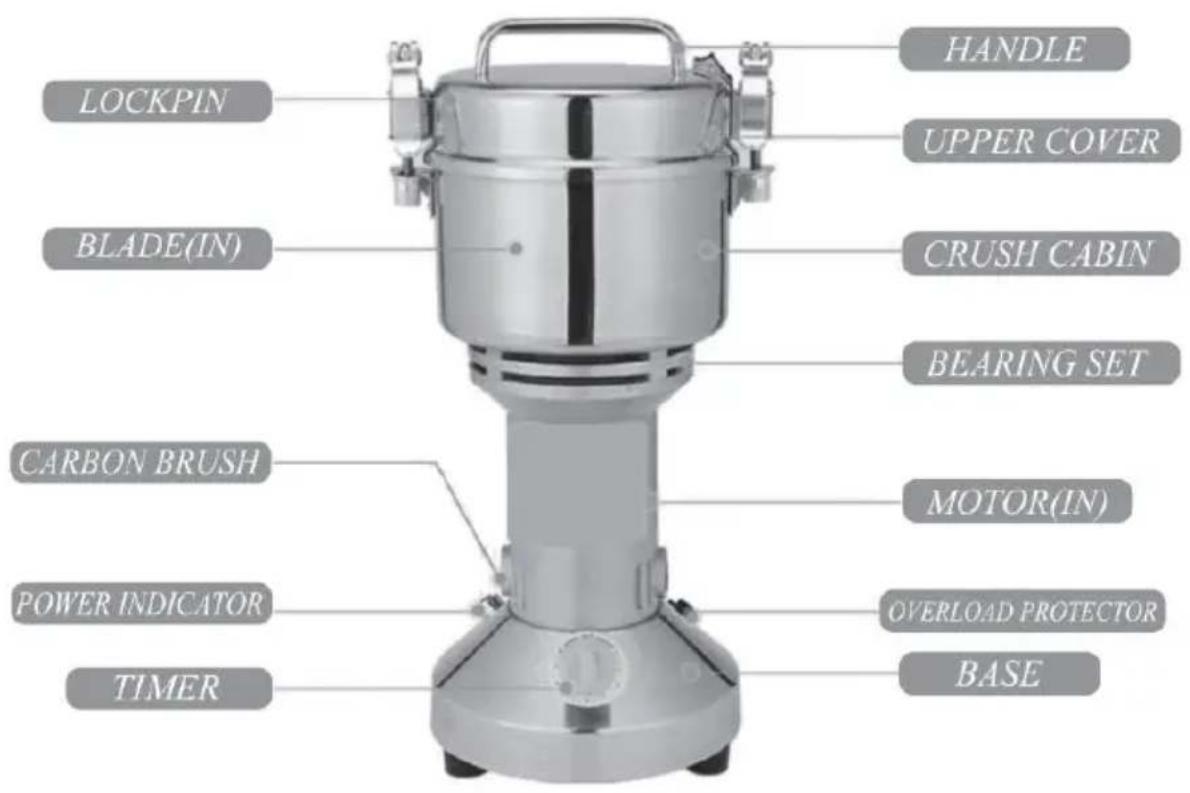

1. Operations Guide:
1) Open the upper cover and put the dried material inside;
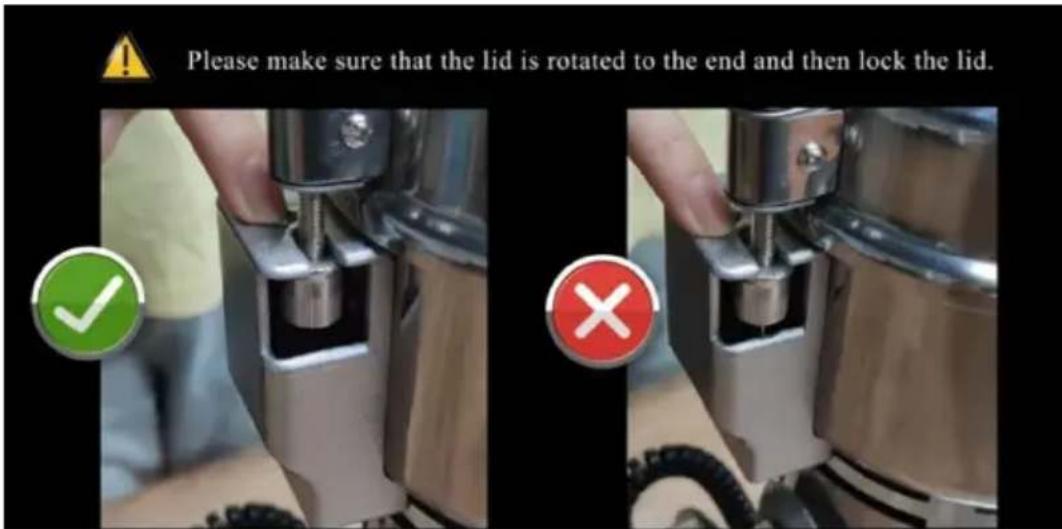
2) Close the upper cover tightly; (Please make sure the lid is rotated end and locked tightly on the top.)
3) Plug in and turn on the timer switch, then turn on the switch for grinding(Rolling sound will be heard );
4)Turn off the switch; (When you hear the sound rolling evenly, the material has been grinded into powder, then you can turn off the sw
5) Disconnect power supply before opening
6)Open the upper cover and brush the powder out
2.Grinding Cautions:
Wet or water-containing materials cannot be ground, dry materials only. Grinding time varies depending on the type of material used, and diff types of materials require different grinding methods for better results.
1) Before using the grinder for the first time, put some rice and dry leaves to grind for about 30 seconds to clean the inner wall and rest stains.
2) For seasonings, it is generally recommended to grind for about 20 seconds and do not grind for too long. (Chili, Pepper, Fennel, etc.)
3) For ordinary grains, it is recommended to set the timer for about 3 seconds, if the desired effect is not achieved, grind again. (Soybeans, Millet, Black rice, Corn, etc.)
4) For general materials, it is recommended to set the timer for about minutes. (Ginseng, Astragalus, Asparagus, etc.)
5) For greasy materials, it is recommended to first dry and de-oil the materials, and then grind them intermittently. Grind for about 10 seconds and pause 5 seconds. Check the grinding effect during the process to avoid the machine getting overheated, causing the materials to become burnt. (Sesame, Peanuts, Walnuts, etc.)
6) For super hard materials, it is recommended to first break the material into small pieces and then grind them, pause for 10 seconds after g for about 1 minute. The grinding can be completed after about 2-3 min (Crystal sugar, Cumin, Cinnamon, etc.)
7) For fibrous materials, the material itself is a fibrous structure, so inside of being ground into powder, it will appear fluffy. It is recommended grind these materials intermittently. (Barly, Ganoderma lucidum, etc.)
Notice: When you first use the machine, you'd better clean the machin with cloth moistened with vinegar or medical alcohol, and then put some rice and dried tea leaves into grinding bin, grind them for 30\~50 seconds, then pour the power out, clean the grinding bin.
3. Common Questions:
*Why the grinder cannot be started?
First check whether the indicator light is on.
If the indicator light is not on, check whether the power supply is pl in tightly and whether the power cord is damaged (you can replace power cord of other household appliances).
If the indicator light is on, the possible reason is that the induction is the two buckles of the cover is not triggered yet.
*What to do if the grinder suddenly stops working?
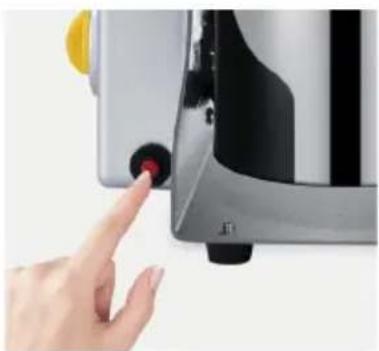
If the grinder stopped working, the reason may be that the blades be is stuck or the overload protector function works because of overload the carbon brush is worn. It's easy to solve this problem.
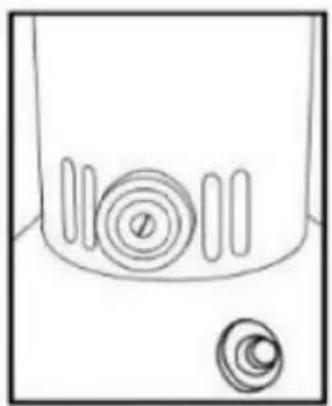
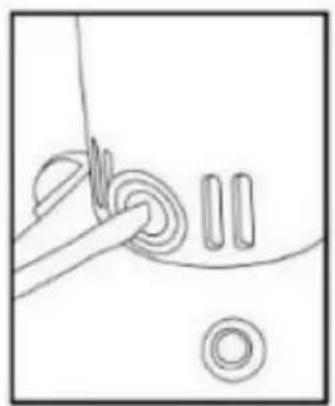
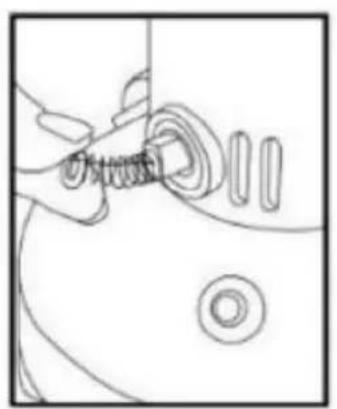
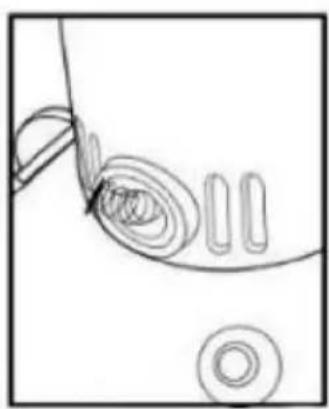
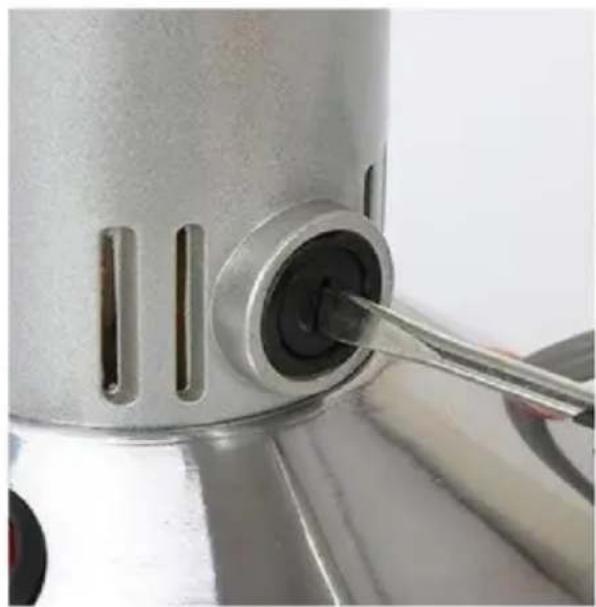
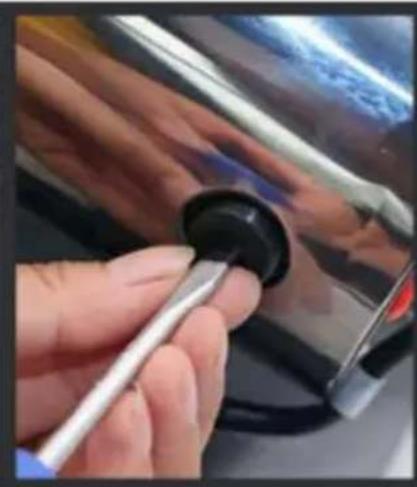
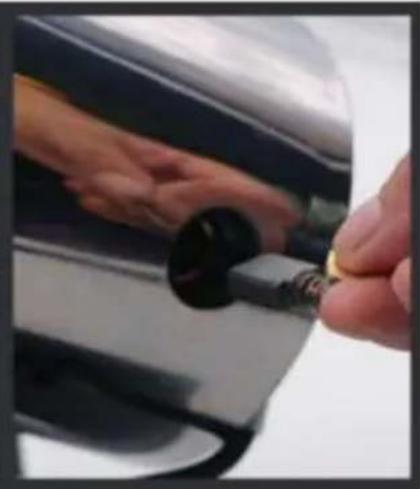
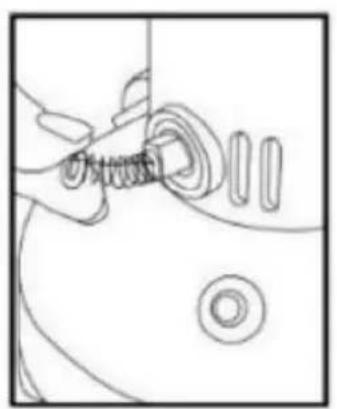
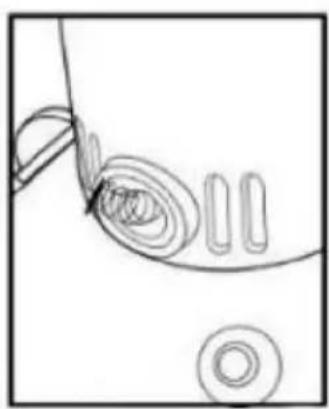
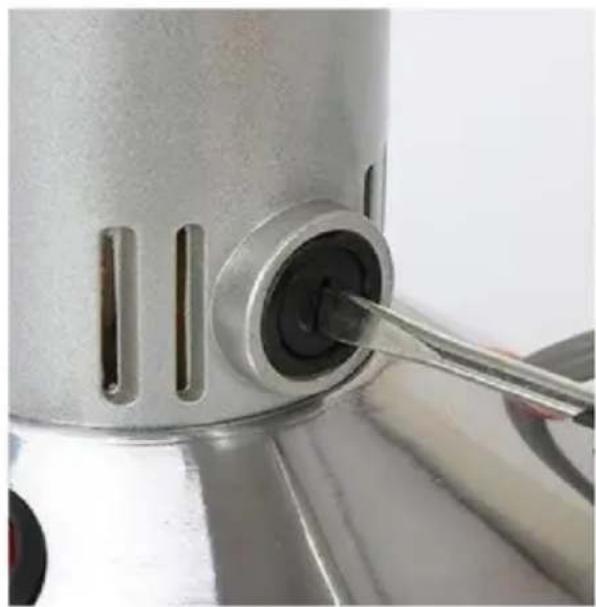
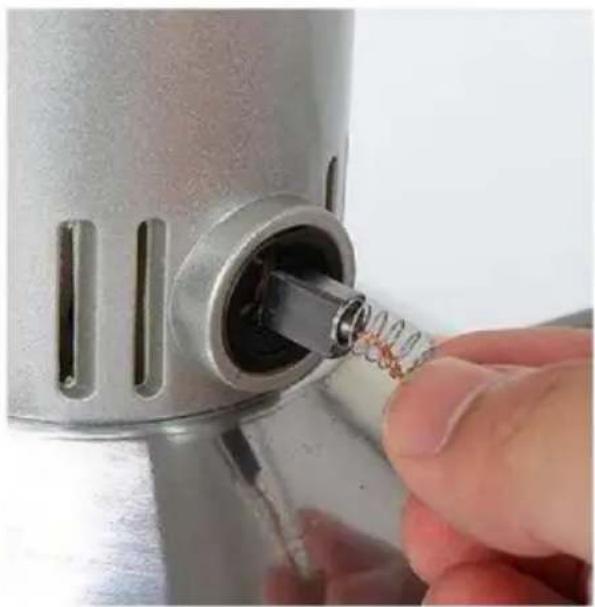
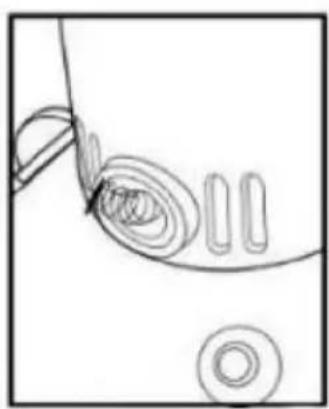
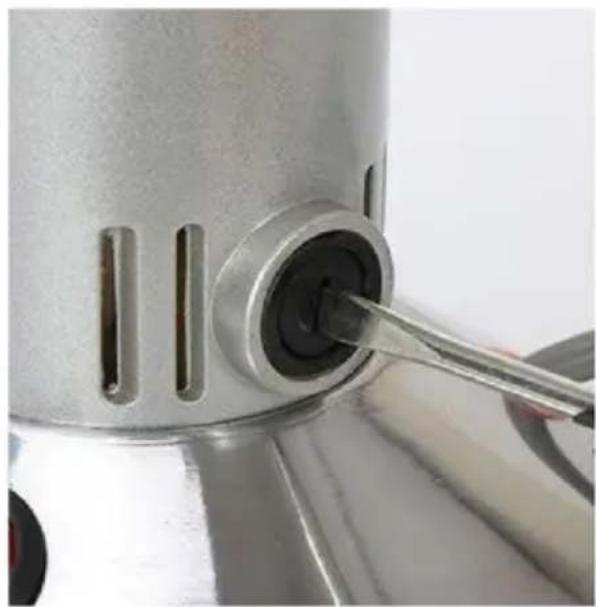
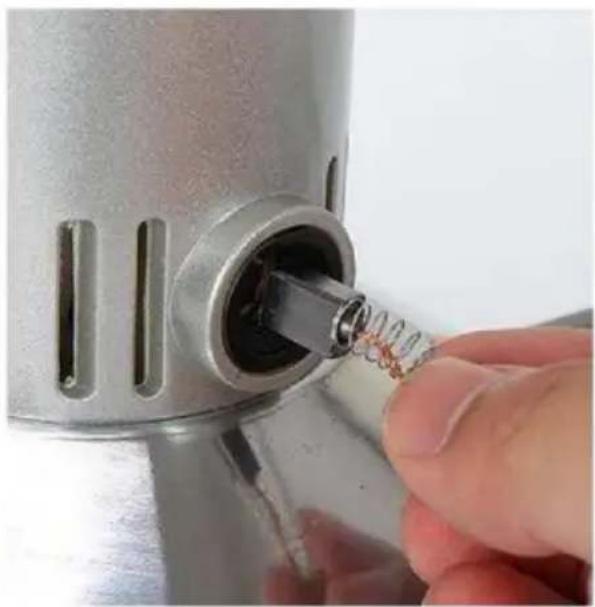
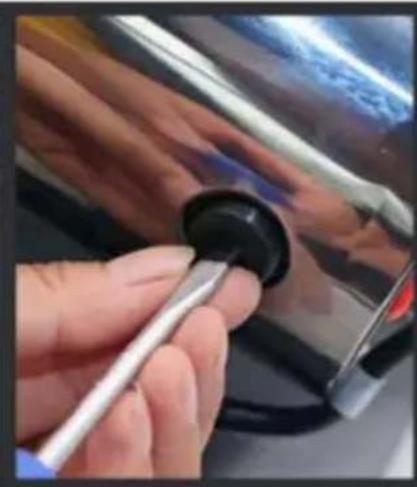
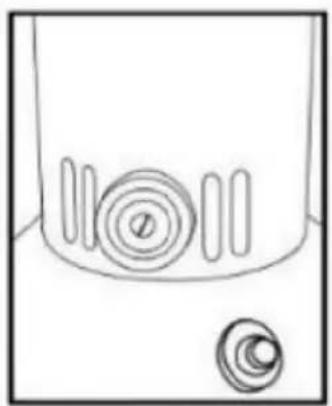
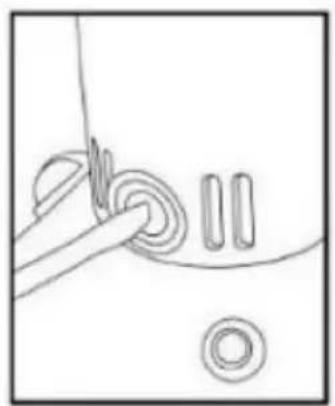
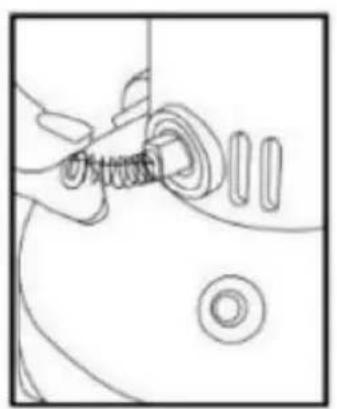
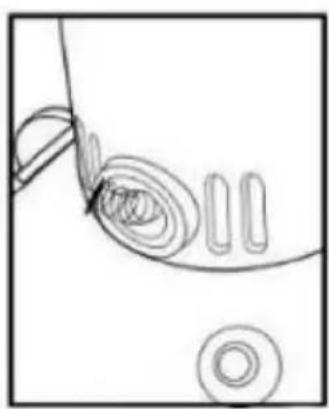
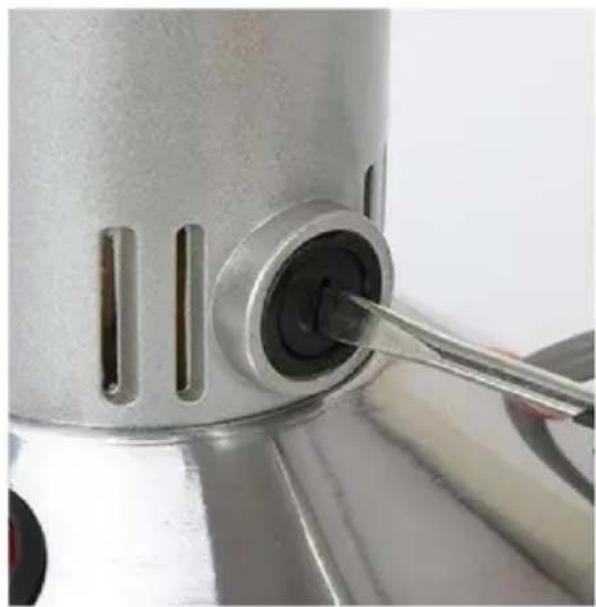
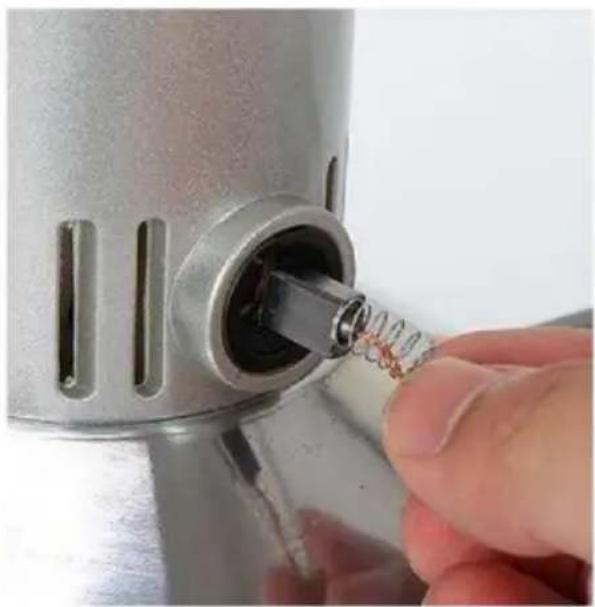
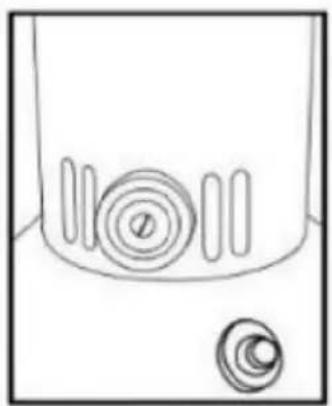
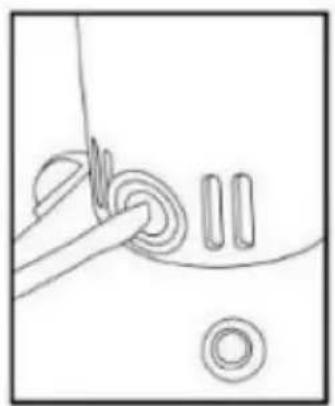
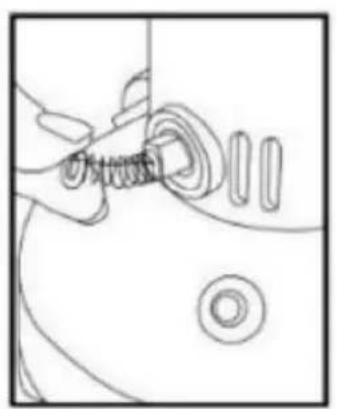
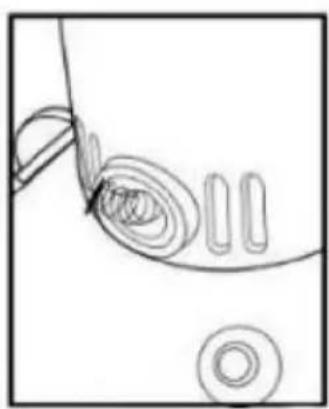
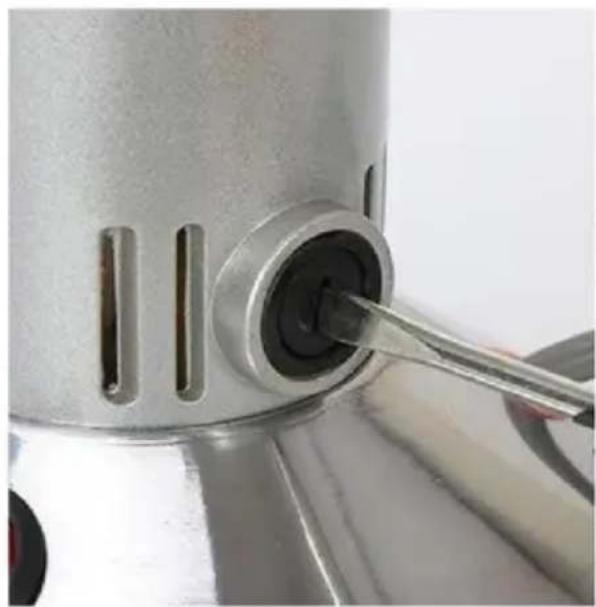
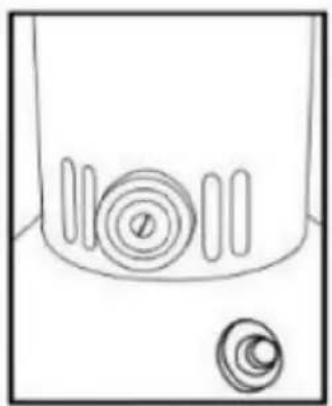
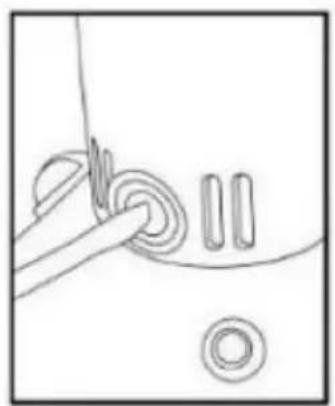
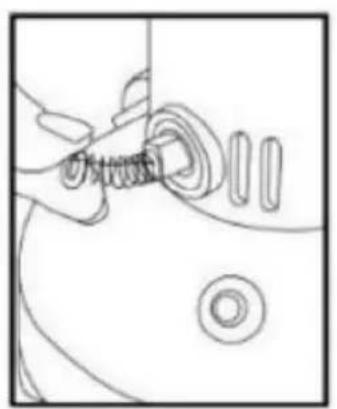
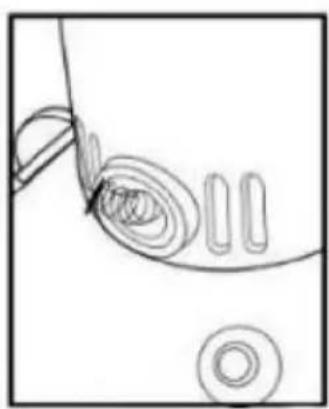
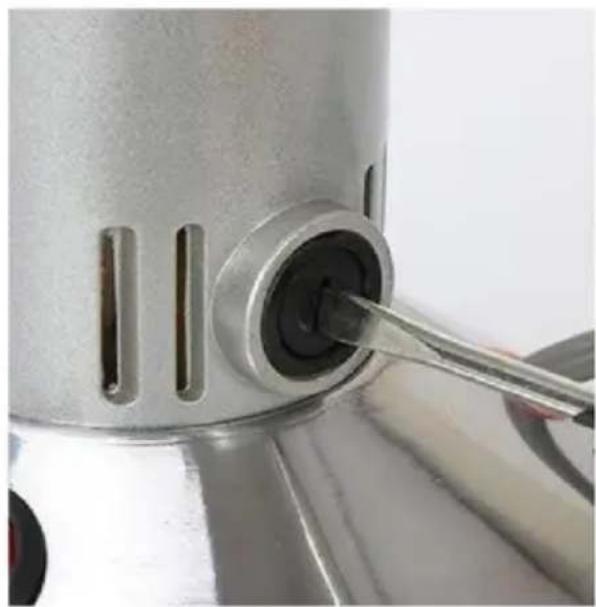
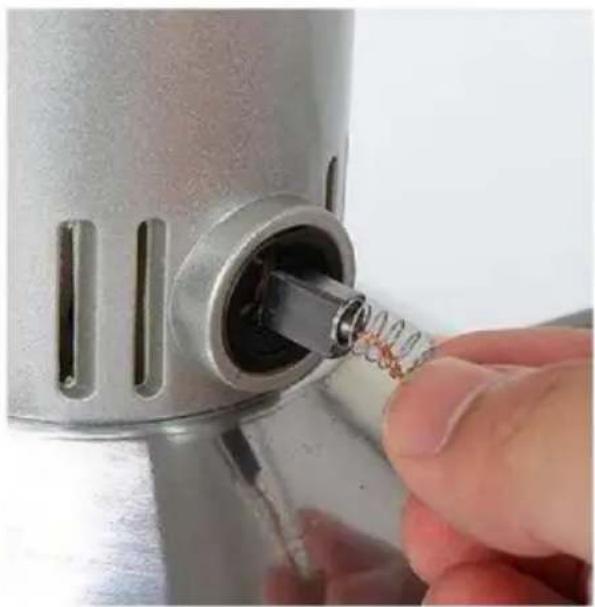
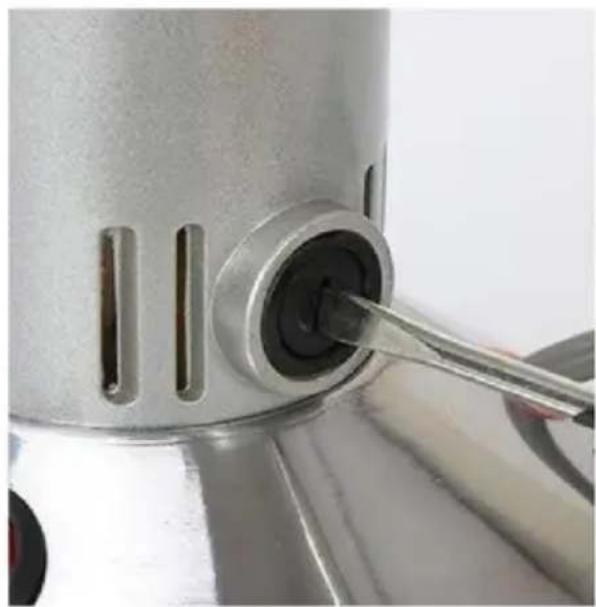
You just need clean the blades bottom or re-install the carbon brush both sides again and then press the overload protector button again, the grinder could work well. Please see the overload protector and ca brush in the attached pictures, please check that.
*Why the motor becomes hot?
It is normal for the grinding machine to be slightly heat, because the working principle of the machine is to pulverize the material into power through the high-speed rotation of the blades. The whole process is carried out in the closed grinding bin, which will generate heat and the machine to heat up.
There may be several reasons for machine overheat:
1) The materials ground is wet, moisture.
Please Dry the materials as much as possible before grinding, and thr grind it when it is completely cool.
2) Grinding time is too long.
The machine must take 5-10 minutes to rest after every 3 minutes cIf you grinding some hard items, there should has a interval which is
prevent bearing overheating, damage to the motor.
3) Put too much materials into the grinding bin one time.
The material you gonna to grind one time must cover the long blade middle and no more than 2/3 of the tank. Because this machine needs space to complete the cycle of the blades and the material to be grown. If the machine overheat makes ono-working, you can also solve it re-installing the carbon brushes on the both sides again and then pressing the overload protector button again, then the grinder could work well.
INSTRUCTIONS OF AIR OVERLOAD PROTECTOR
When blades are jammed in grinding bin, it will happen that air over protector pop up and the machine automatically cut off the power sup. If this situation happens, turn off the power and check the grinding b just need clean the blades bottom and press the overload protector b again, then the grinder could work well.
* Upright type grinder:

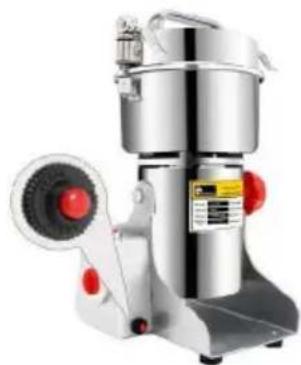
*Swing type grinder:
HOW TO CLEAN UP THE GRINDING BIN
You can clean up the grinding bin of grinder with a brush first, and t clean it with dry cloth.
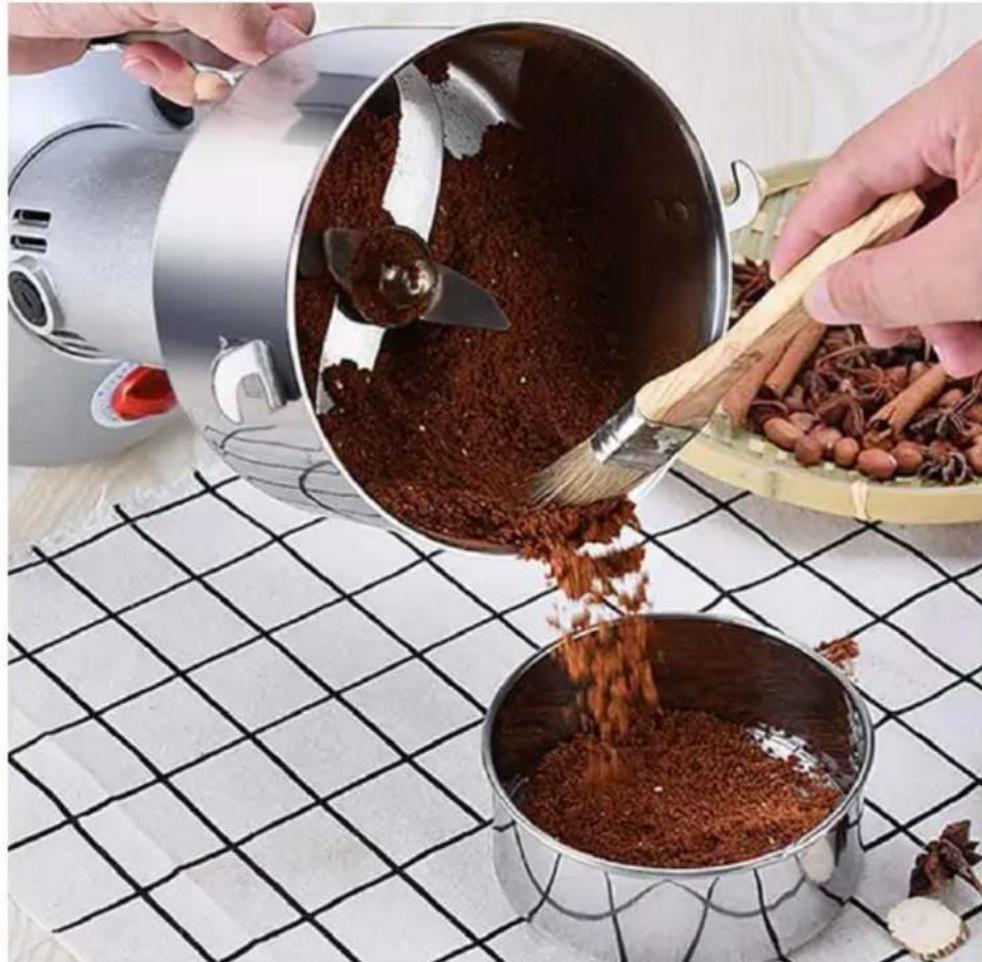
After using blades for a long time ,you can remove them and clean with water.(The blades of new grinder must be very tight,you need to for a long time,then blades can be removed.)
- Firstly, loosen the nut by using a pincer and remove the blade.
• Secondly, wipe the grinding bin with a dry rag after removal of the and please do not clean with water directly.
Please Note: If you clean the blades by using the wet rag or with directly, please make sure grinding bin and the blades be dry enough before re-install the blades.
- Lastly, install the blades and tighten the nut, it is finished.
HOW TO REPLACE THE BLADE
OPERATING PROCEDURES OF REPLACING BLADES
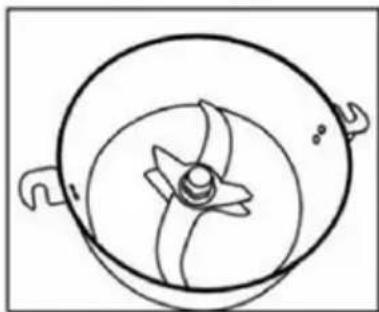
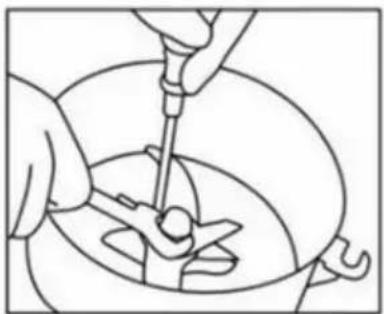
The machine has been upgraded to a three-blades one
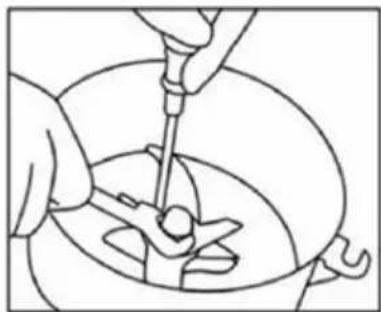
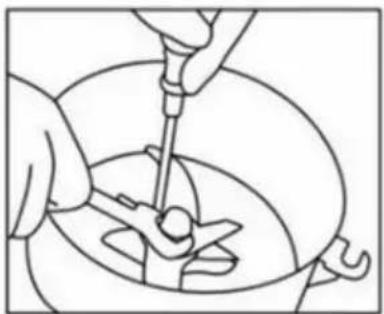
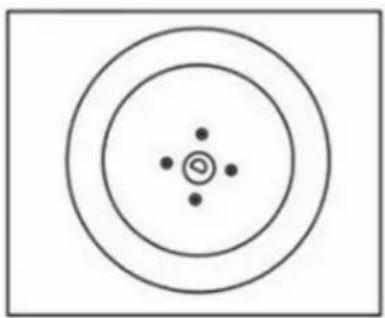
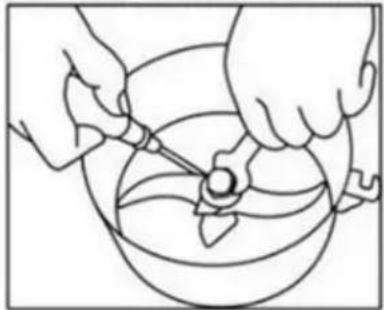
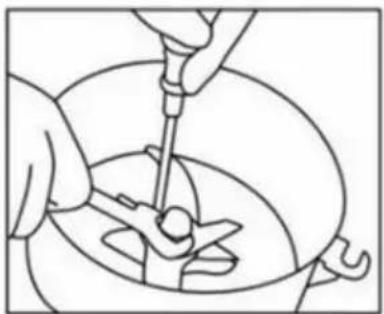
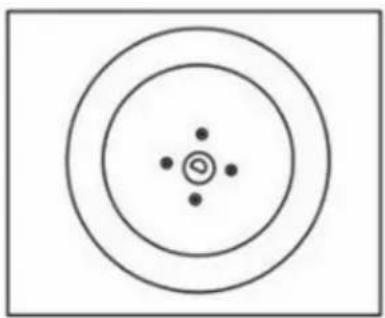
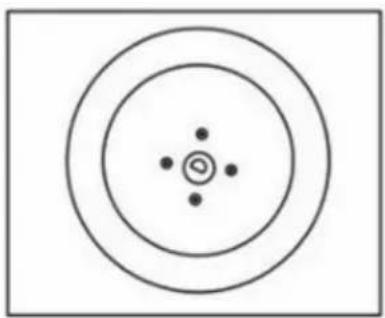
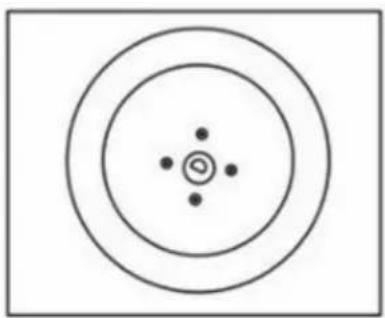
Use ascrewdriver to fix the screw under crushing warehouse, stuck the blade to prevent slipping, use a professional tool counterclockwise to unscrew the nut

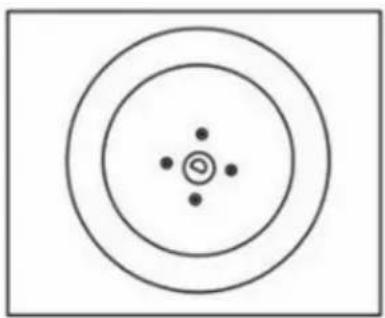
After losing the nut, as the state is shown in the picture, remove the pad and two above blade
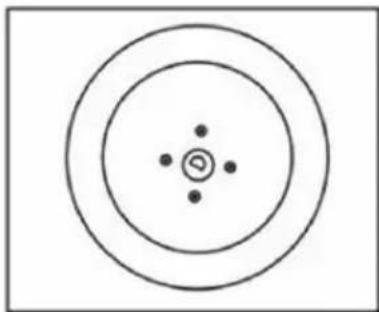
Remove the blade and install with a new one according to the original order

When installing the blade, you need to use a screwdriver to stuck the blade to prevent slipping and tighten it clockwise by the professional tool
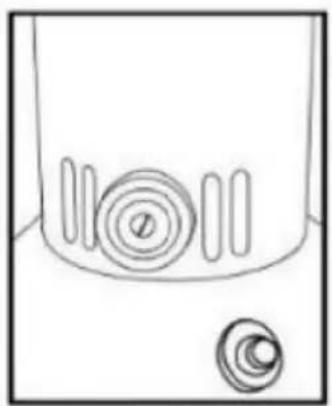
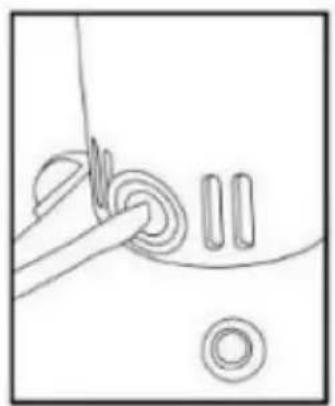
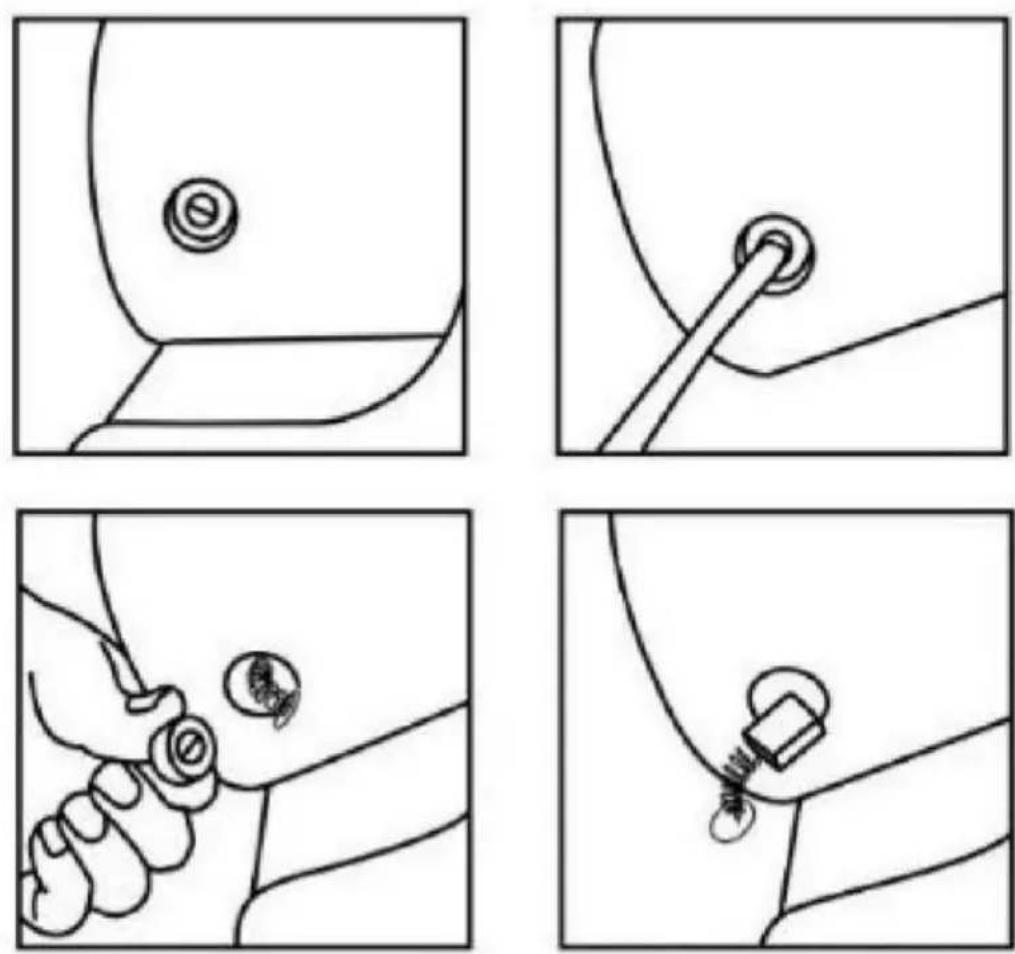
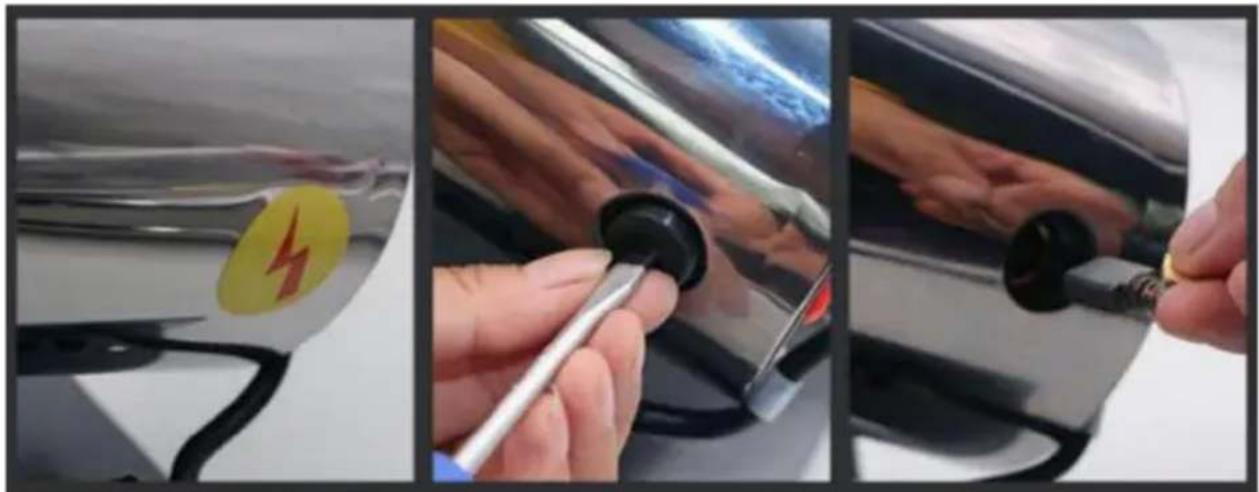
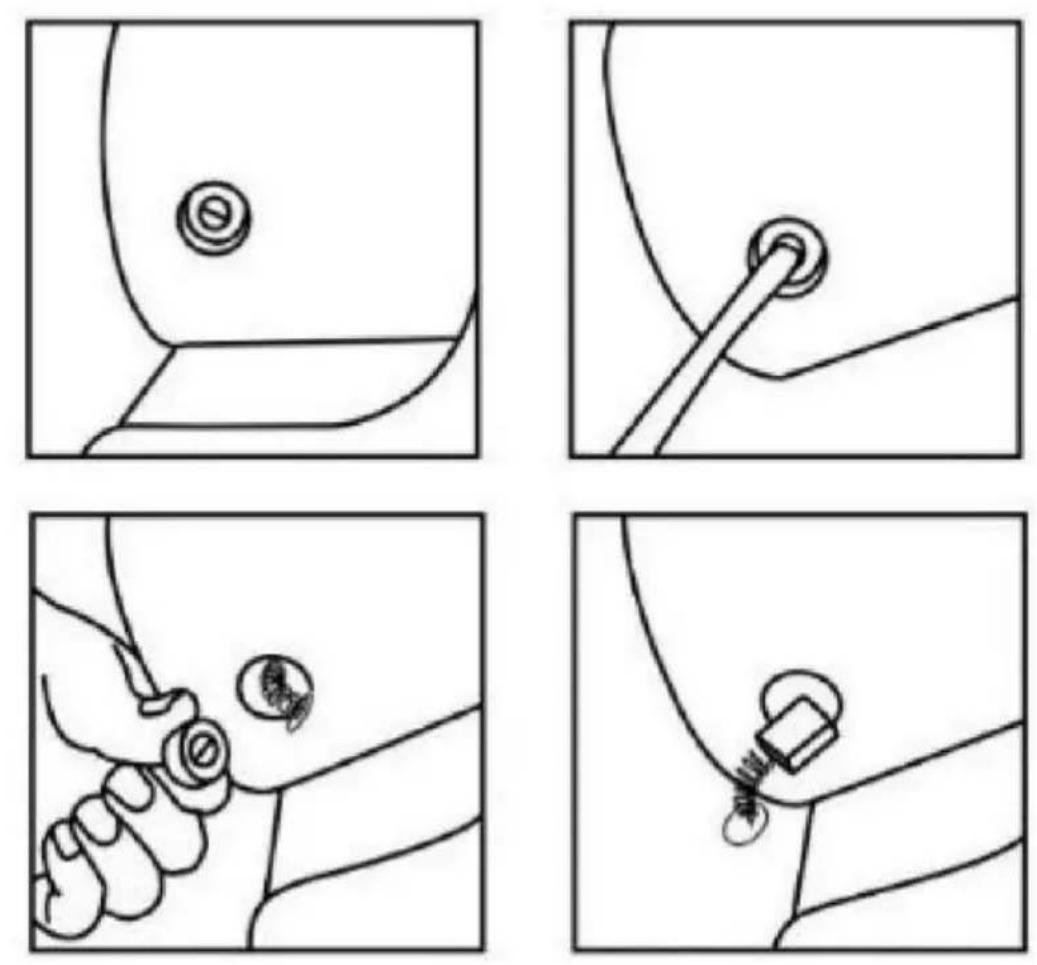
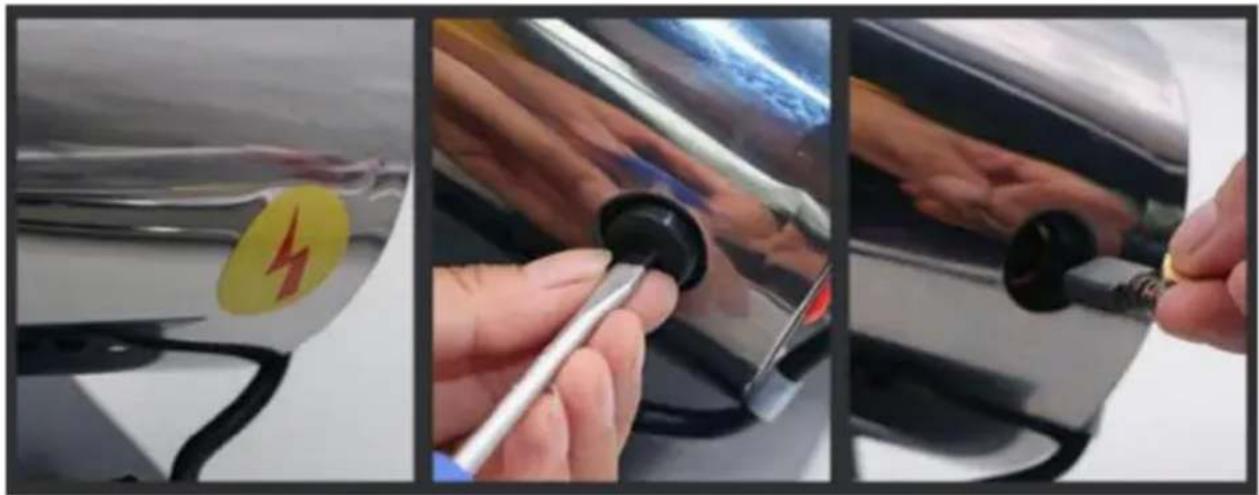
HOW TO REPLACE CARBON BRUSHES
• The upright type grinder:
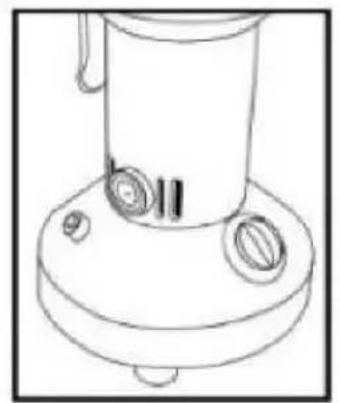
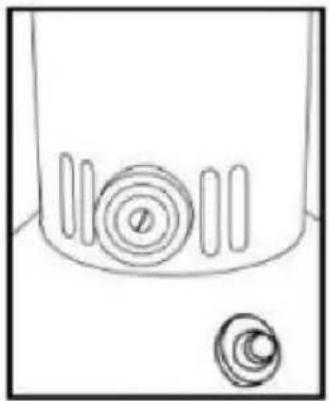
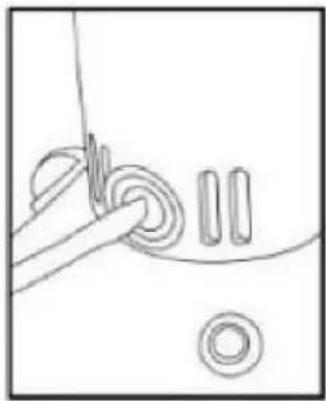
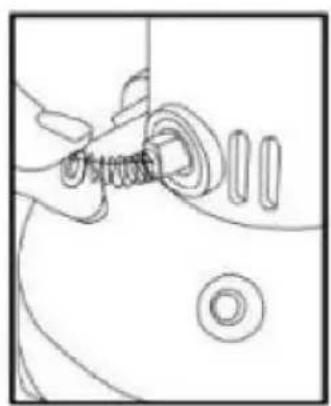
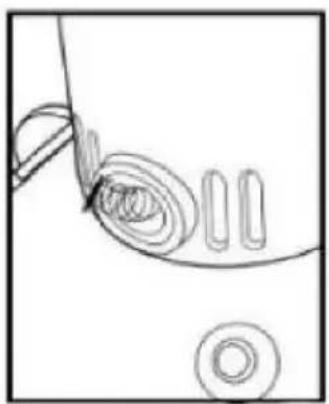
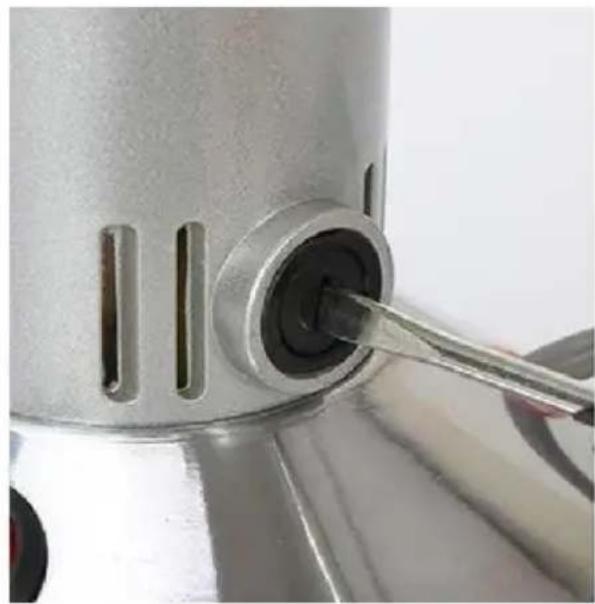
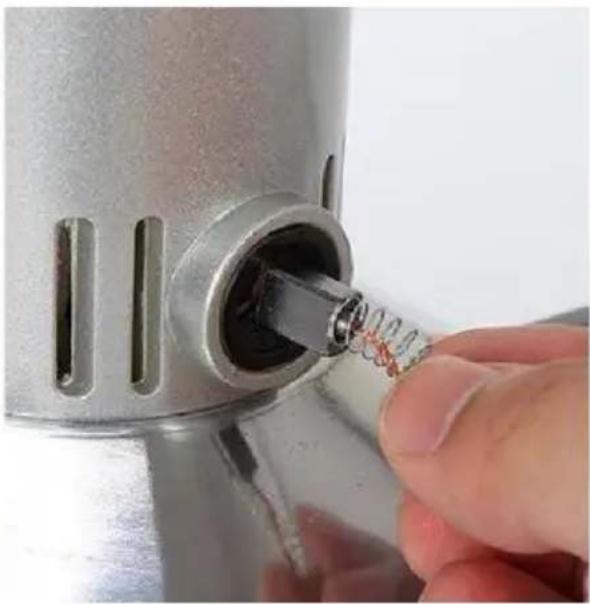
• The swing type grinder:
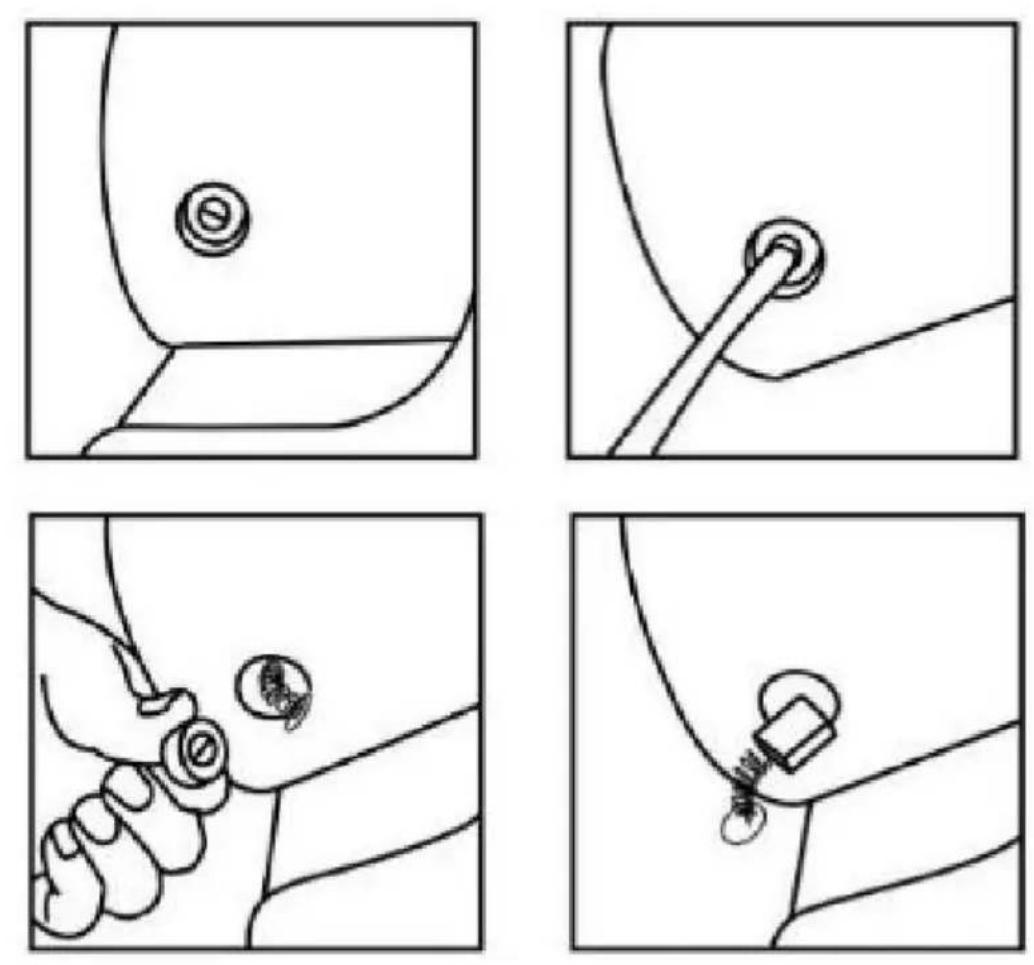

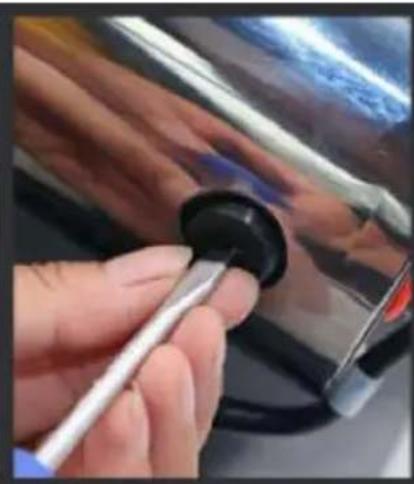
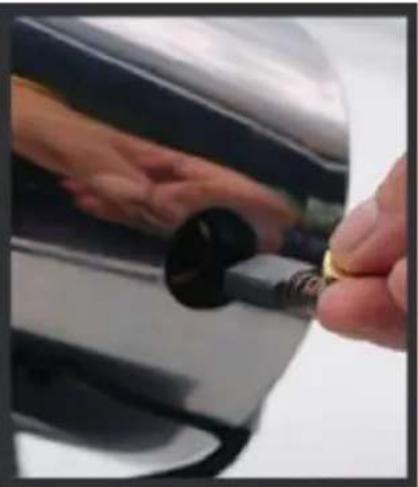
TROUBLE SHOOTING
| Trouble | Cause | Elimination method (*Please cut off the power when do following) |
| The machine does not operate after power on. | Poor contact between the plug and socket. | repair or change the plug socket. |
| Poor contact between the lid and induction switched. | Adjust the position of the screws on both sides of th in advance so that they ca trigger the induction switche in the ears when close the | |
| Air over-load protector protecting. | Press the air over-load protector to restart. | |
| Carbon brush ware out. | Change the carbon brush. | |
| Motor run slowly,o not runs, even vibrates,making noise. | Stuck inside of crus cabin by material, o foreign subject. | Remove the stuck stuff. |
| Low power voltage. | Insert the plug directly wall socket instead of the termir block. Then try another pla to see if the machine can turned on. | |
| Motor cabin over heat. | Over load capacity. | Reducing the amount of grinding and decreasing the working pressure. |
| Material not dry enough. | Dry the material in the sur bake it. | |
| Low power voltage. | Insert the plug directly into wall socket instead of the terminal block. Then try another place to see if the machine can be turned on. | |
| Spark on the carbon brush surface. | Carbon brush is no smooth. | remove the stuff on the surface |
PACKING LIST
| No. | Item | Qty | Remark |
| 1 | Grain Grinder | 1 set | |
| 2 | Manual | 1 pcs | |
| 3 | carbon brush | 1 pcs | |
| 4 | hairbrush | 1 pcs | |
| 5 | blade | 1 set | |
| 6 | mesh sieve | 1 pcs | |
| 7 | socket spanner | 1 pcs |
FCC Information
CAUTION: Changes or modifications not expressly approved by the pa responsible for compliance could void the user's authority to operate t equipment!
This device complies with Part 15 of the FCC Rules. Operation is subject to the following two conditions:
1) This product may cause harmful interference.
2) This product must accept any interference received, including interference that may cause undesired operation.
WARNING: Changes or modifications to this product not expressly approved by the party.responsible for compliance could void the user's authority to operate the product.
Note: This product has been tested and found to comply with the lir a Class B digital device pursuant to Part 15 of the FCC Rules, The are designed to provide reasonable protection against harmful interference in a residential installation.
This product generates, uses and can radiate radio frequency energy, if not installed and used in accordance with the instructions, may cause harmful interference to radio communications. However, there is no guarantee that interference will not occur in a particular installation. If product does cause harmful interference to radio or television reception, which can be determined by turning the product off and on, user is encouraged to try to correct the interference by one or more following measures.
- Reorient or relocate the receiving antenna.
- Increase the distance between the product and receiver.
- Connect the product to an outlet on a circuit different from that to the receiver is connected.
- Consult the dealer or an experienced radio/TV technician for assista
VEVOR®
TOUGH TOOLS, HALF PRICE
Technical Support and E-Warranty Certificate
www.vevor.com/support
VEVOR®
TOUGH TOOLS, HALF PRICE
MODÈLE : HC-150 HC300 HC-550 HC-750 HC-300Y HC-500Y
HC-750Y HC-1000Y HC-2000Y HC-2500Y
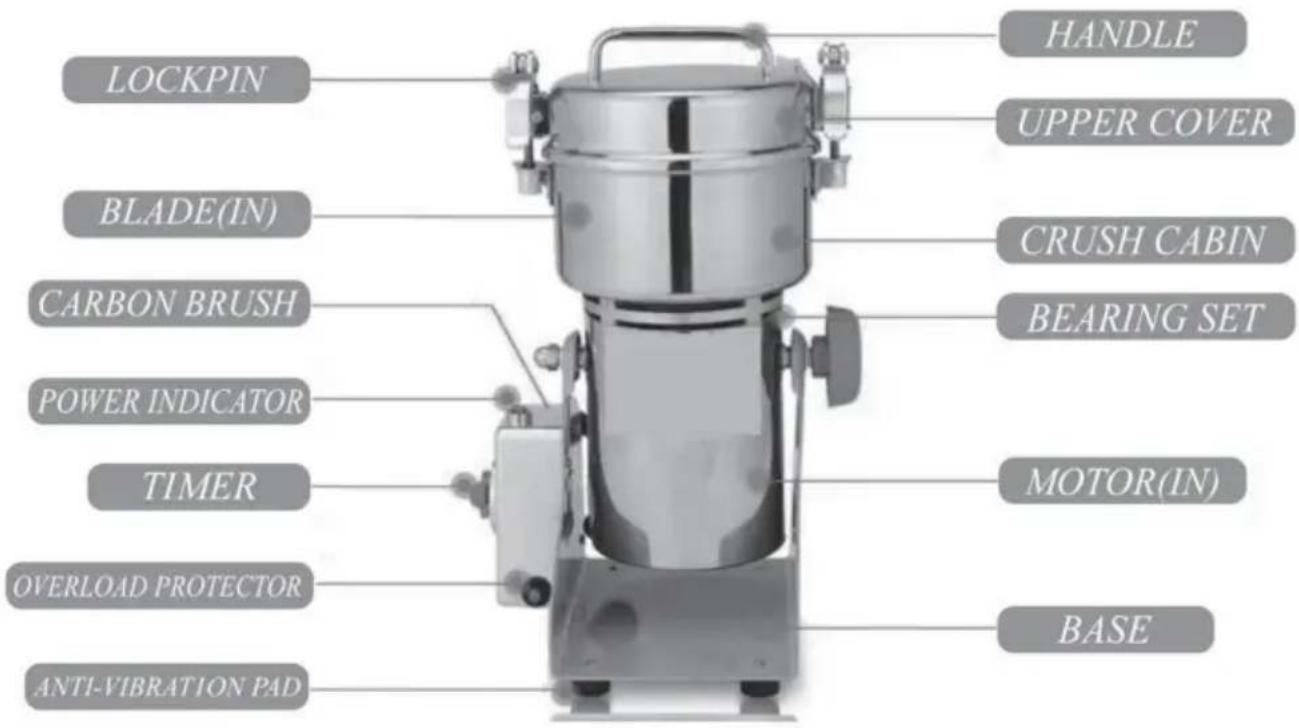
STRUCTURE DU PRODUIT
MODE D'EMPLOI
Broyeur vertical :

COMMENT NETTOYER LE RÉCIPIENT DE BROYAGE
COMMENT REMPLACER LA LAME
PROCÉDURES OPÉRATIONNELLES DE REMPLACEMENT DES LAMES
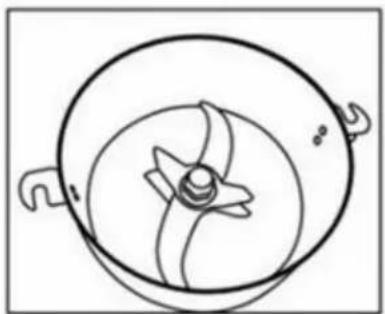
The machine has been upgraded to a three-blades one
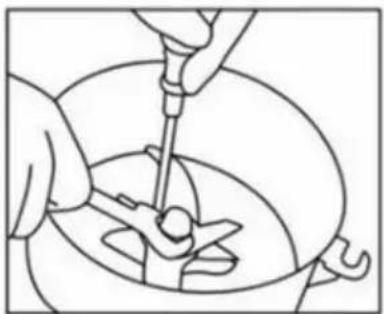
Use ascrewdriver to fix the screw under crushing warehouse, stuck the blade to prevent slipping, use a professional tool counterclockwise to unscrew the nut

After losing the nut, as the state is shown in the picture, remove the pad and two above blade
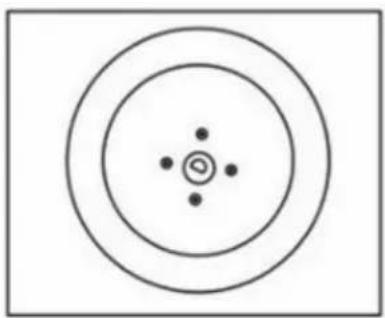
Remove the blade and install with a new one according to the original order
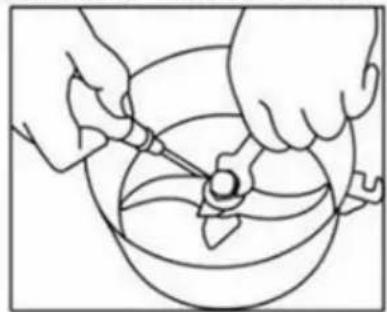
When installing the blade, you need to use a screwdriver to stuck the blade to prevent slipping and tighten it clockwise by the professional tool
COMMENT REMPLACER LES BALAIS DE CHARBON

DÉPANNAGE
MODELL: HC-150 HC300 HC-550 HC-750 HC-300Y HC-500Y HC-750Y HC-1000Y HC-2000Y HC-2500Y
Standschleifer:

*Schwingschleifer:

SO REINIGEN SIE DEN MAHLBEHÄLTER
The machine has been upgraded to a three-blades one
Use ascrewdriver to fix the screw under crushing warehouse, stuck the blade to prevent slipping, use a professional tool counterclockwise to unscrew the nut

After losing the nut, as the state is shown in the picture, remove the pad and two above blade
Remove the blade and install with a new one according to the original order
When installing the blade, you need to use a screwdriver to stuck the blade to prevent slipping and tighten it clockwise by the professional tool
SO ERSETZEN SIE KOHLEBÜRSTEN
• Die Schwingmühle:
FEHLERBEHEBUNG
www.vevor.com/support
VEVOR®
TOUGH TOOLS, HALF PRICE
MODELLO: HC-150 HC300 HC-550 HC-750 HC-300Y HC-500Y
Modello HC-750Y Modello HC-1000Y Modello HC-2000Y Modello HC-2500Y
COME PULIRE IL CONTENITORE DI MACINAZIONE
The machine has been upgraded to a three-blades one
Use ascrewdriver to fix the screw under crushing warehouse, stuck the blade to prevent slipping, use a professional tool counterclockwise to unscrew the nut

After losing the nut, as the state is shown in the picture, remove the pad and two above blade
Remove the blade and install with a new one according to the original order
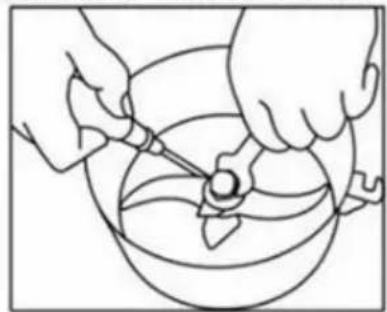
When installing the blade, you need to use a screwdriver to stuck the blade to prevent slipping and tighten it clockwise by the professional tool
COME SOSTITUIRE LE SPAZZOLE DI CARBONIO
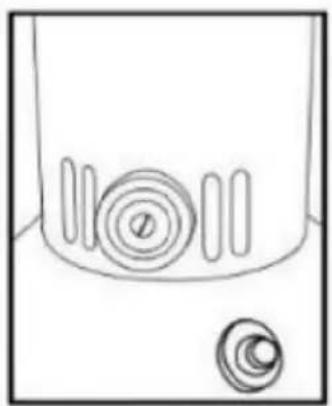
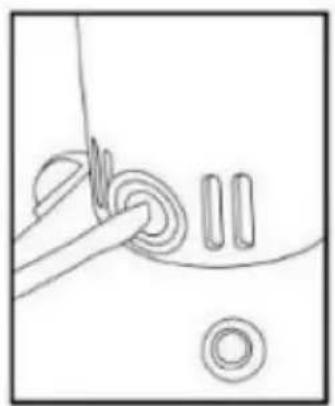
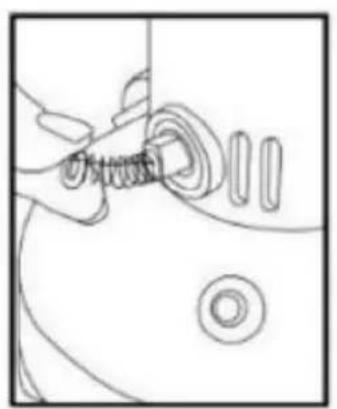
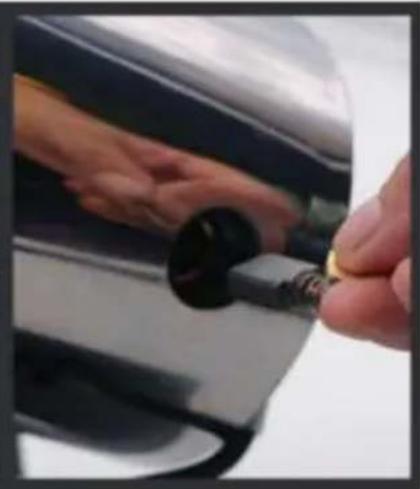
elettronica www.vevor.com/support
VEVOR®
TOUGH TOOLS, HALF PRICE
MODELO: HC-150 HC300 HC-550 HC-750 HC-300Y HC-500Y HC-750Y HC-1000Y HC-2000Y HC-2500Y
ESTRUCTURA DEL PRODUCTO
CÓMO LIMPIAR EL CONTENEDOR DE MOLIENDA
The machine has been upgraded to a three-blades one

Use ascrewdriver to fix the screw under crushing warehouse, stuck the blade to prevent slipping, use a professional tool counterclockwise to unscrew the nut

After losing the nut, as the state is shown in the picture, remove the pad and two above blade
Remove the blade and install with a new one according to the original order
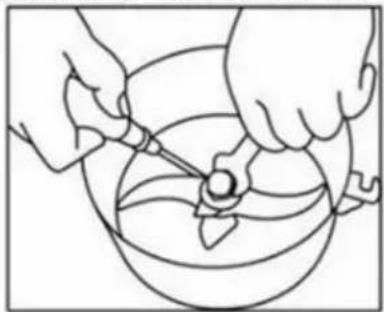
When installing the blade, you need to use a screwdriver to stuck the blade to prevent slipping and tighten it clockwise by the professional tool
MODELE: HC-150 HC-300 HC-550 HC-750 HC-300Y HC-500Y HC-750Y HC-1000Y HC-2000Y HC-2500Y
POTRZEBUJESZ POMOCY? SKONTAKTUJ SIĘ Z NAMI!
Szlifierka pionowa:

*Młynek typu swing:

JAK CZYŚCIĆ POJEMNIK DO SZLIFOWANIA
The machine has been upgraded to a three-blades one
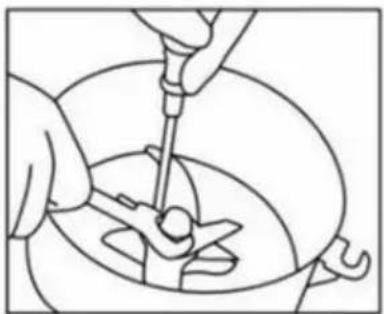
Use ascrewdriver to fix the screw under crushing warehouse, stuck the blade to prevent slipping, use a professional tool counterclockwise to unscrew the nut

After losing the nut, as the state is shown in the picture, remove the pad and two above blade
Remove the blade and install with a new one according to the original order
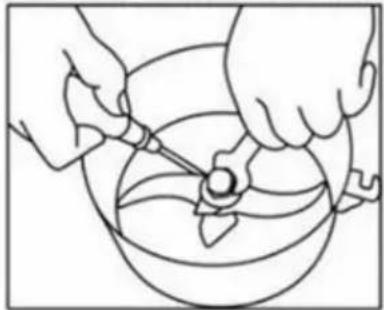
When installing the blade, you need to use a screwdriver to stuck the blade to prevent slipping and tighten it clockwise by the professional tool
JAK WYMIENIĆ SZCZOTKI WĘGLOWE

ROZWIAZYWANIE PROBLEMÓW
MODELL: HC-150 HC300 HC-550 HC-750 HC-300Y HC-500Y HC-750Y HC-1000Y HC-2000Y HC-2500Y
BEHÖVER HJÄLP? KONTAKTA OSS!
*Kvarn av svängtyp:

HUR MAN RENGÖR SLIPBINGEN
The machine has been upgraded to a three-blades one
Use ascrewdriver to fix the screw under crushing warehouse, stuck the blade to prevent slipping, use a professional tool counterclockwise to unscrew the nut

After losing the nut, as the state is shown in the picture, remove the pad and two above blade
Remove the blade and install with a new one according to the original order
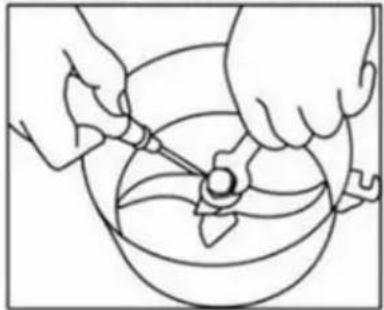
When installing the blade, you need to use a screwdriver to stuck the blade to prevent slipping and tighten it clockwise by the professional tool
HUR MAN BYTER KOLBORSTAR
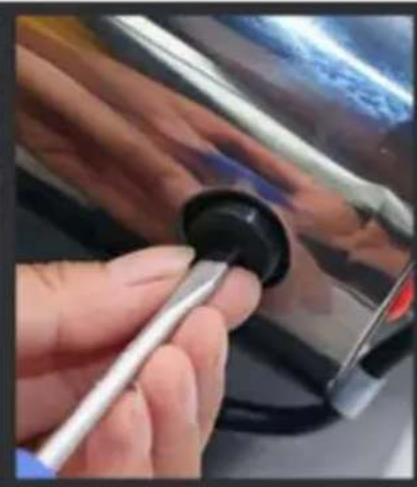
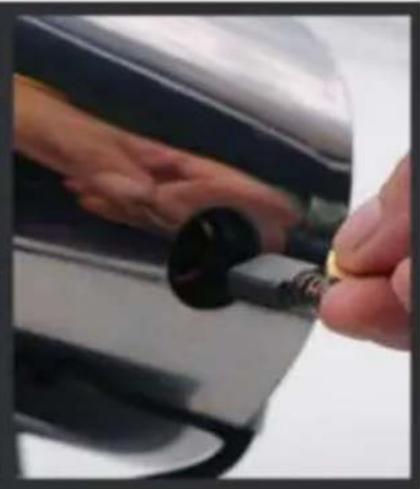
FELSÖKNING
www.vevor.com/support
VEVOR®
TOUGH TOOLS, HALF PRICE
Technische ondersteuning en e-garantiecertificaat www.vevor.com/support
MODEL: HC-150 HC300 HC-550 HC-750 HC-300Y HC-500Y HC-750Y HC-1000Y HC-2000Y HC-2500Y
HULP NODIG? NEEM CONTACT MET ONS OP!
*Swing type slijpmachine:

HOE JE DE MAALBAK SCHOONMAAKT
The machine has been upgraded to a three-blades one
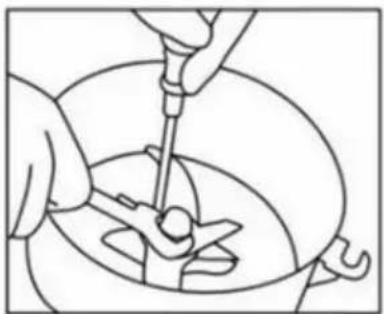
Use ascrewdriver to fix the screw under crushing warehouse, stuck the blade to prevent slipping, use a professional tool counterclockwise to unscrew the nut

After losing the nut, as the state is shown in the picture, remove the pad and two above blade

Remove the blade and install with a new one according to the original order
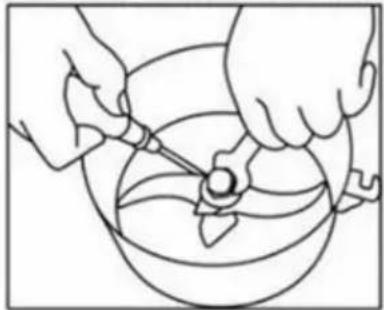
When installing the blade, you need to use a screwdriver to stuck the blade to prevent slipping and tighten it clockwise by the professional tool
HOE KOOLBORSTELS TE VERVANGEN
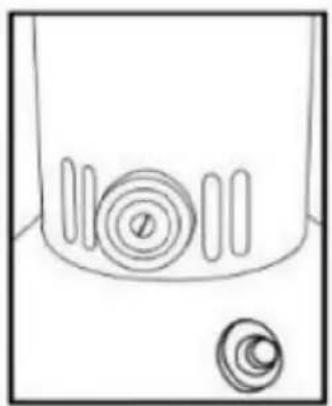
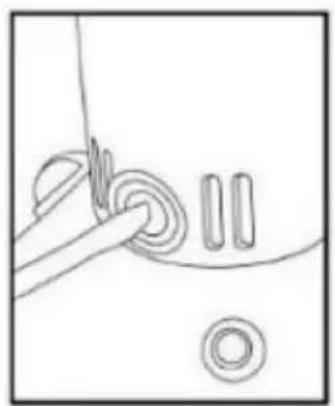
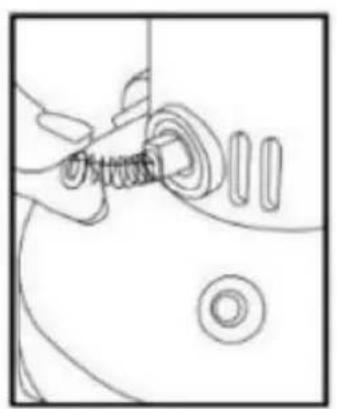
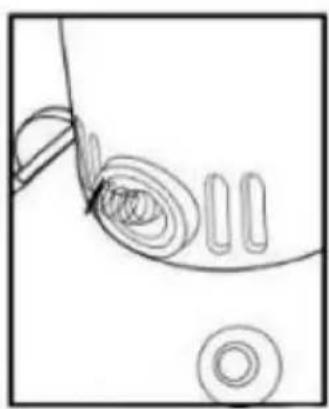

- De swing-type grinder:
PROBLEMEN OPLOSSEN
- GRAIN GRINDER USER MANUAL
- VEVOR®
- NEED HELP? CONTACT US
- WARNINGS
- OPERATIONS GUIDE
- GRINDING CAUTIONS
- COMMON QUESTIONS
- WHY THE GRINDER CANNOT BE STARTED
- PUT TOO MUCH MATERIALS INTO THE GRINDING BIN ONE TIME
- INSTRUCTIONS OF AIR OVERLOAD PROTECTOR
- HOW TO CLEAN UP THE GRINDING BIN
- HOW TO REPLACE THE BLADE
- OPERATING PROCEDURES OF REPLACING BLADES
- HOW TO REPLACE CARBON BRUSHES
- FCC INFORMATION
- TOUGH TOOLS, HALF PRICE
- MODE D'EMPLOI
- COMMENT NETTOYER LE RÉCIPIENT DE BROYAGE
- COMMENT REMPLACER LA LAME
- PROCÉDURES OPÉRATIONNELLES DE REMPLACEMENT DES LAMES
- COMMENT REMPLACER LES BALAIS DE CHARBON
- MODELL: HC-150 HC300 HC-550 HC-750 HC-300Y HC-500Y HC-750Y HC-1000Y HC-2000Y HC-2500Y
- SO REINIGEN SIE DEN MAHLBEHÄLTER
- SO ERSETZEN SIE KOHLEBÜRSTEN
- DIE SCHWINGMÜHLE
- COME PULIRE IL CONTENITORE DI MACINAZIONE
- COME SOSTITUIRE LE SPAZZOLE DI CARBONIO
- CÓMO LIMPIAR EL CONTENEDOR DE MOLIENDA
- JAK CZYŚCIĆ POJEMNIK DO SZLIFOWANIA
- JAK WYMIENIĆ SZCZOTKI WĘGLOWE
- BEHÖVER HJÄLP? KONTAKTA OSS
- HUR MAN RENGÖR SLIPBINGEN
- HUR MAN BYTER KOLBORSTAR
- MODEL: HC-150 HC300 HC-550 HC-750 HC-300Y HC-500Y HC-750Y HC-1000Y HC-2000Y HC-2500Y
- HULP NODIG? NEEM CONTACT MET ONS OP
- HOE JE DE MAALBAK SCHOONMAAKT
- HOE KOOLBORSTELS TE VERVANGEN
Brand : Vevor
Model : HC-2000Y
Category : Choppers