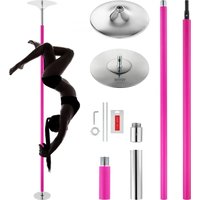
USER MANUAL HM-594 Vevor
Technical Support and E-Warranty Certificate www.vevor.com/support
Portable Dance Pole
MODEL: HM-594/HM-590
We continue to be committed to providing you with tools at competitive prices. "Save Half", "Half Price", or any other similar expressions used by us only represent an estimate of savings you might benefit from buying certain tools with us compared to top brands, and does not necessarily mean to cover all categories of tools offered. We kindly remind you to verify carefully when placing an order with us to ensure you are actually saving half in comparison with the top major brands.
MODEL: HM-594/HM-590

Have product questions? Need technical support? Please feel free to contact us:
Technical Support and E-Warranty Certificate
www.vevor.com/support
This is the original instruction. Please read all manual instructions carefully before operating. VEVOR reserves a clear interpretation of the user manual. The appearance of the product shall be subject to the product you received. Please forgive us that we won't inform you of any changes in data on our product.

Warning - To reduce the risk of injury, the user must read the manual carefully.
SAFETY WARNINGS AND PRECAUTIONS
Thank you for using this product. In order to make sure that you can operate the machine correctly, read this instruction carefully before operation and keep it properly for future reference. Please be sure to follow the precautions and safety rules in this page to ensure your safe use. This manual will outline safety warnings and precautions, operating, and maintenance. The warnings and instructions reviewed in this manual cannot cover all possible conditions and situations that may occur. Common sense is not built into this product, since we believe users will comply with these codes.
Please read ALL the instructions before using your machine.
- Assembly needs to follow these instructions. Incorrect assembly can create a hazard.
- Do not assemble when tired or when under the influence of alcohol, drugs, or medication.
- Weight, elasticity, and other product properties are only applicable to correctly and completely assembled products.
- Keep the assembly area clean and well-lit.
- Keep bystanders out of the area during assembly.
- This is equipment, not a toy; it needs to be used under the guidance of a professional. Do not allow children and pets to play alone or approach this item.
- Inspect before every use. Do not use it if parts are loose or damaged. Do not apply this unit to any other purposes than the indicated use.
- Do not use it for commercial purposes.
- Do not clean it with any abrasive material.
- Never leave it unattended while in use.
- Pet urine and feces can damage the product; please keep away.
- Do not place the product on or near hot air, electric burners, or open flames.
- Young children should be supervised to ensure that they do not play with the product. Pets should stay away from the product.
Do not use outdoors in rainy and cloudy days to avoid lightning strikes and falls. People or pets hanging on the product will cause injury or death.
PARTS IDENTIFICATION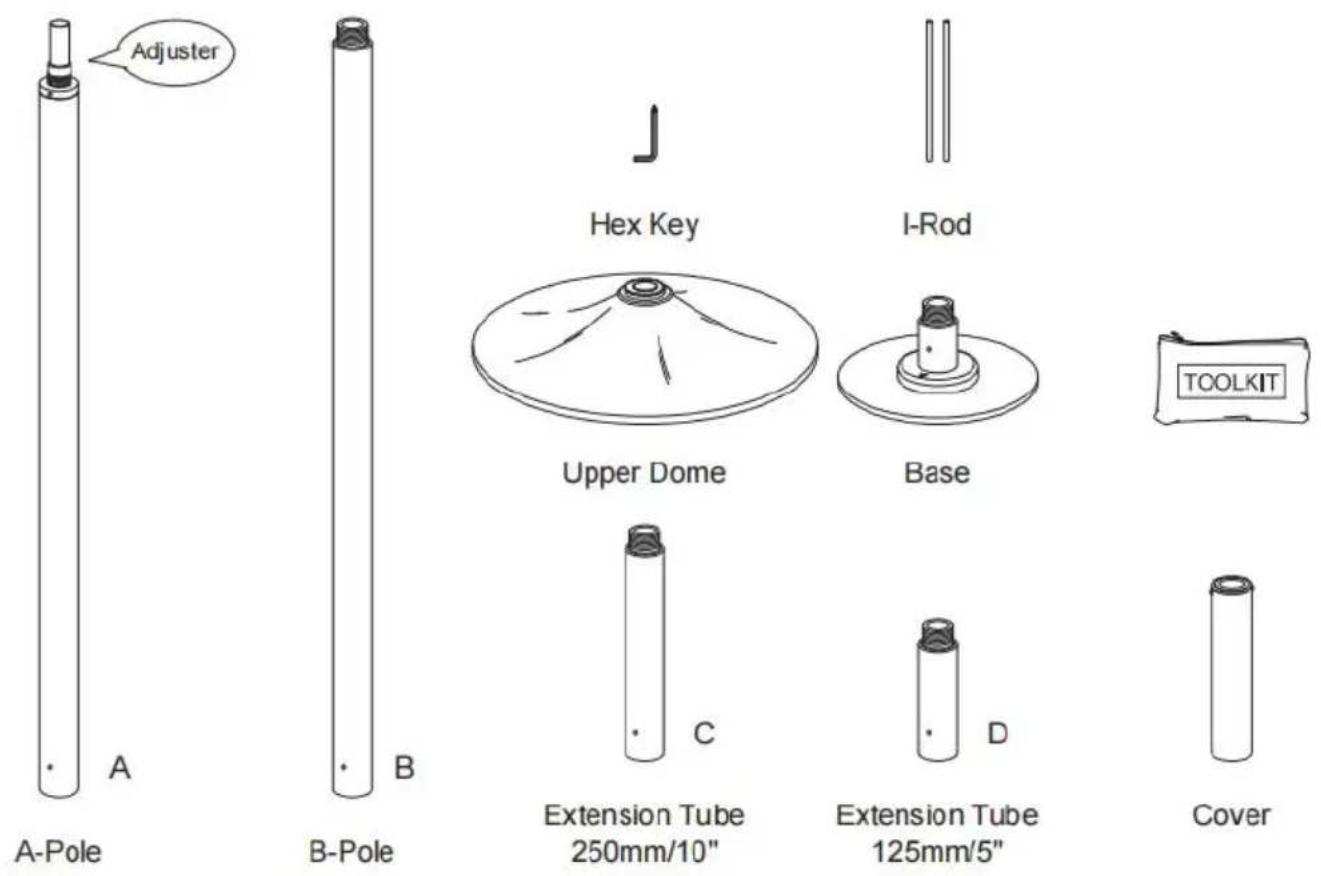
HM-590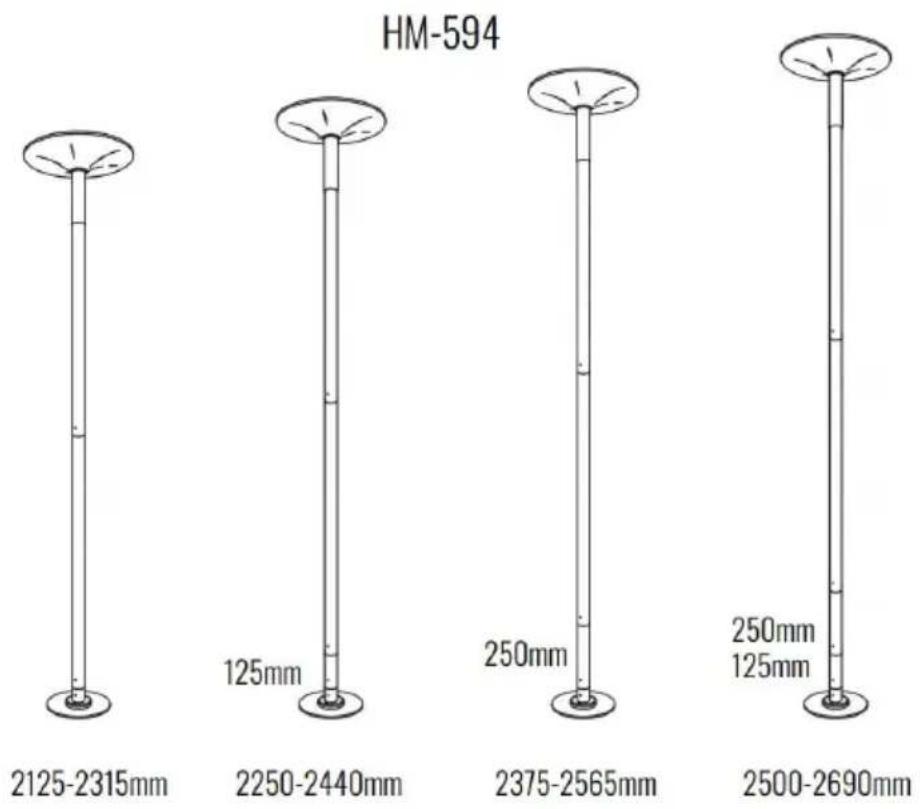

2155-2345mm
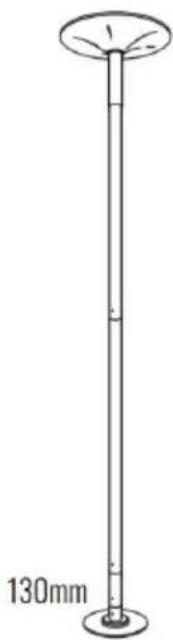
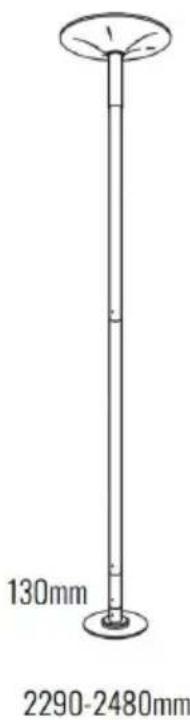
2290-2480mm
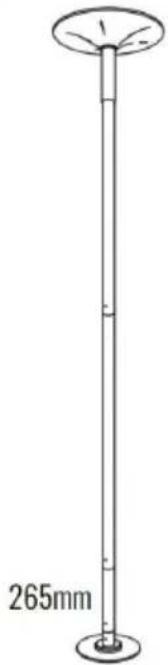
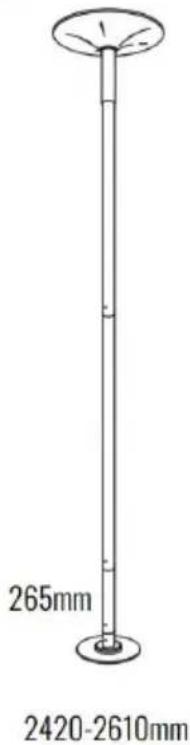
2420-2610mm
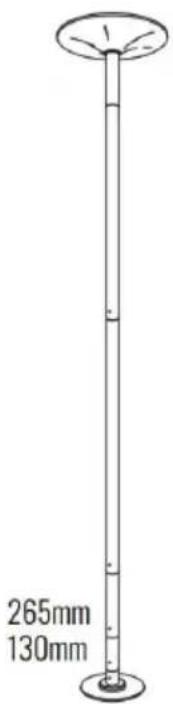
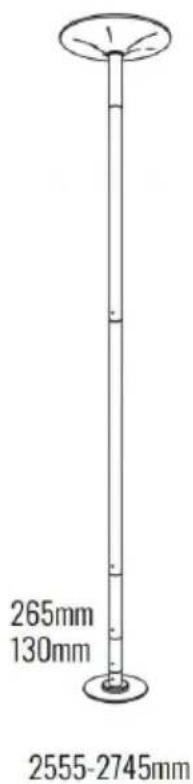
2555-2745mm
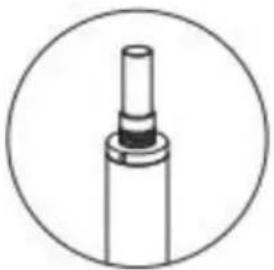
The adjuster has the capability of extending the pole by 190mm.
Each size change has an overlap.
Always increase the number of extensions used if possible.
Measure the height of your ceiling at the centre point of use and refer to the height chart on the left, which will show you the pole tubes/extensions used. Always match your ceiling height to the pole on the chart giving the maximum actual pole length.
PRIOR TO ASSEMBLY
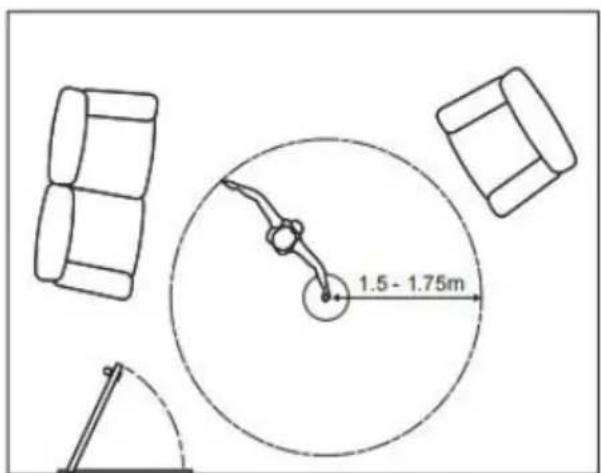
Find a suitable exercise and dance area. To use the pole properly, you need to be able to rotate around the pole with your arms outstretched without hitting or touching anything whilst rotating. Find the area by rotating an imaginary pole with your arms outstretched (Fig. 1). You can use a broom as an imaginary pole or measure a circle with a diameter of approx 3.0~3.5mtrs. This area will enable you to fully extend your arms.
Manoeuvres can be executed in a smaller space than the above, but for beginners the above space is recommended.
ASSEMBLY INSTRUCTIONS
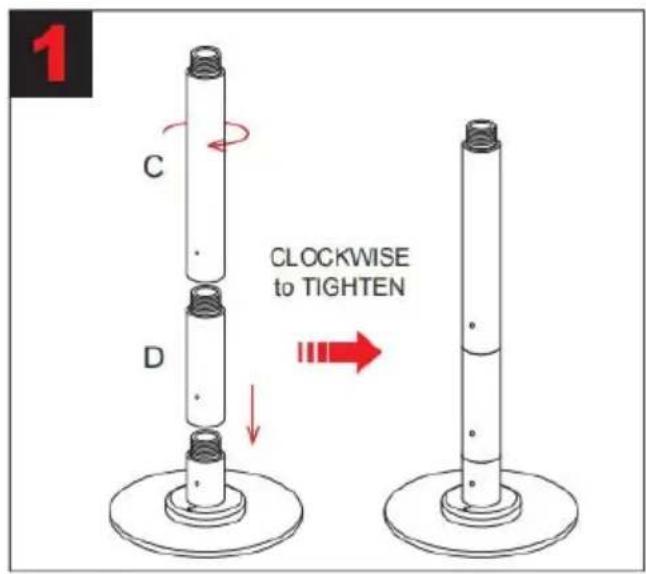
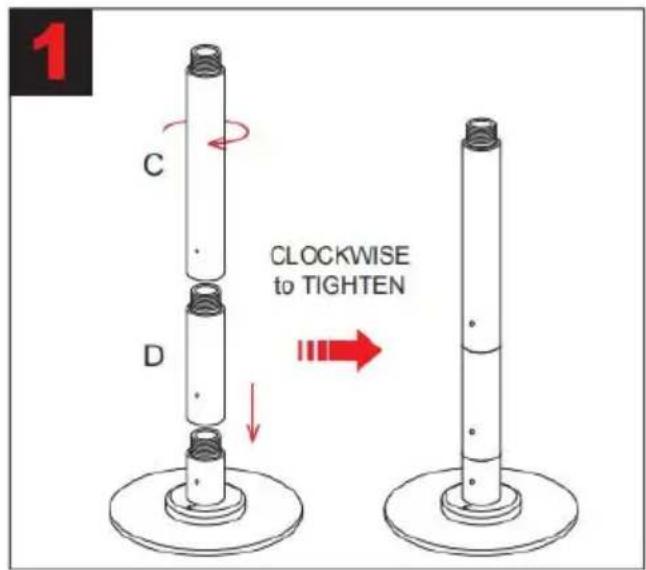
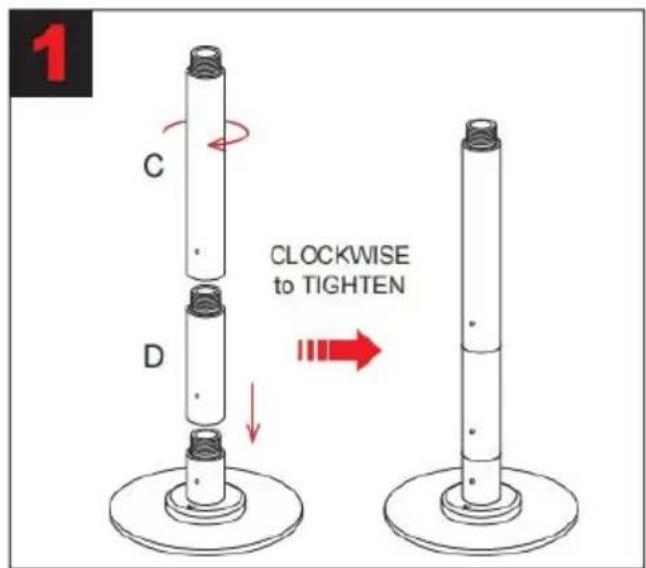
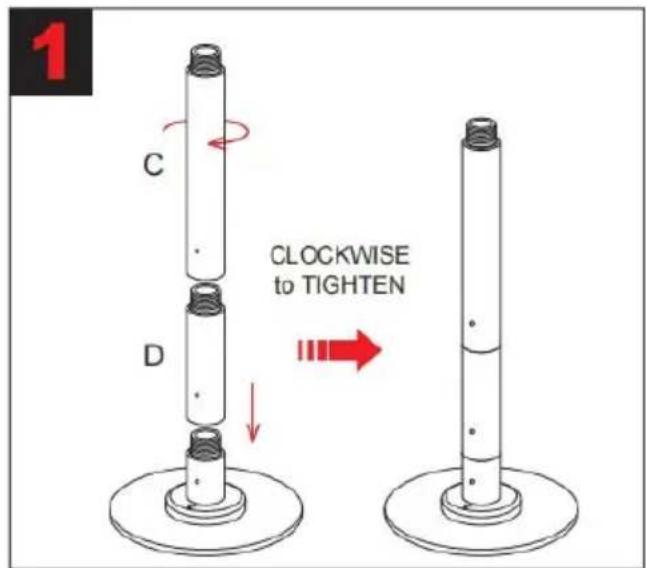
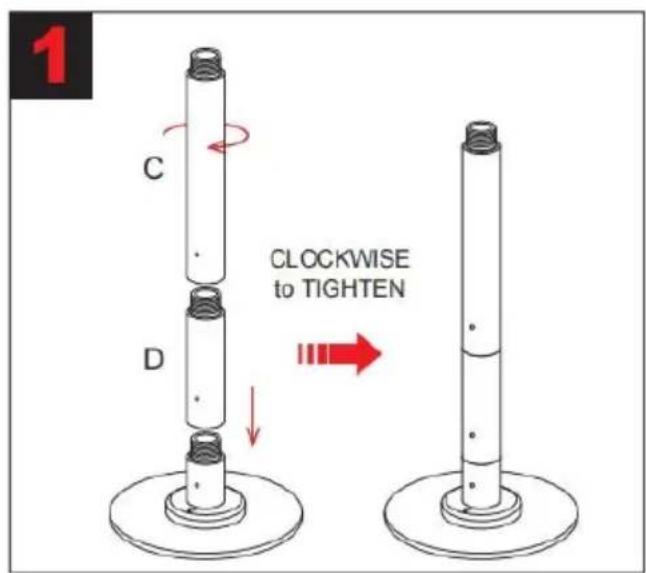
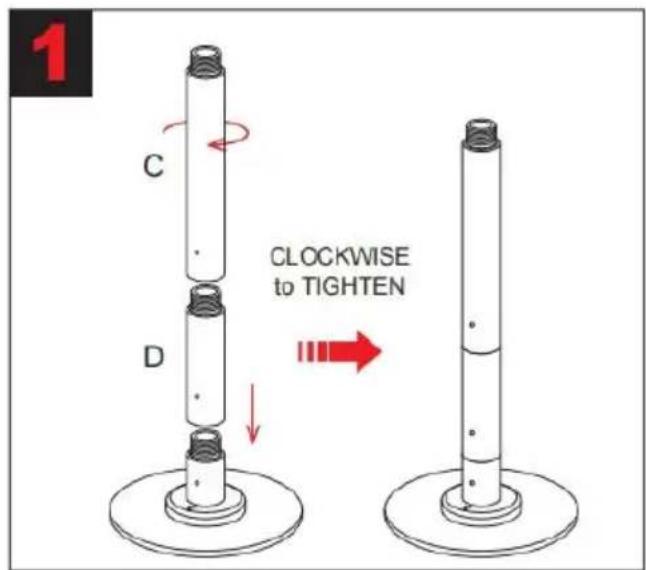
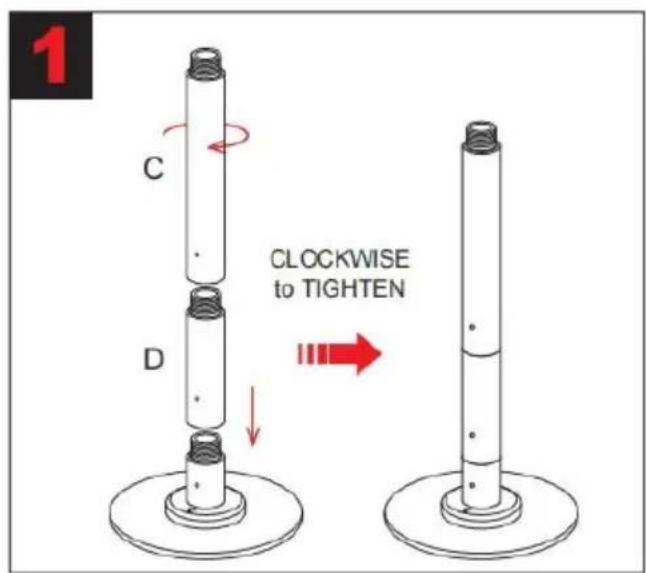
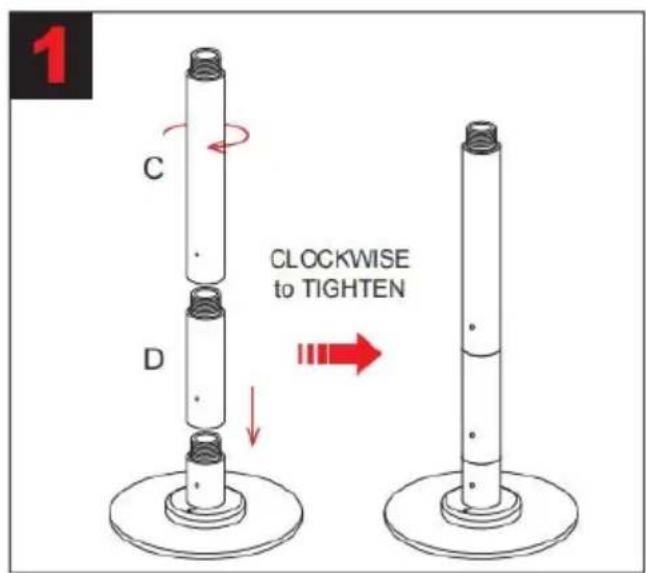
Connect the Extension Tube D to the Base shaft. Ensure the edges are connected tightly together.
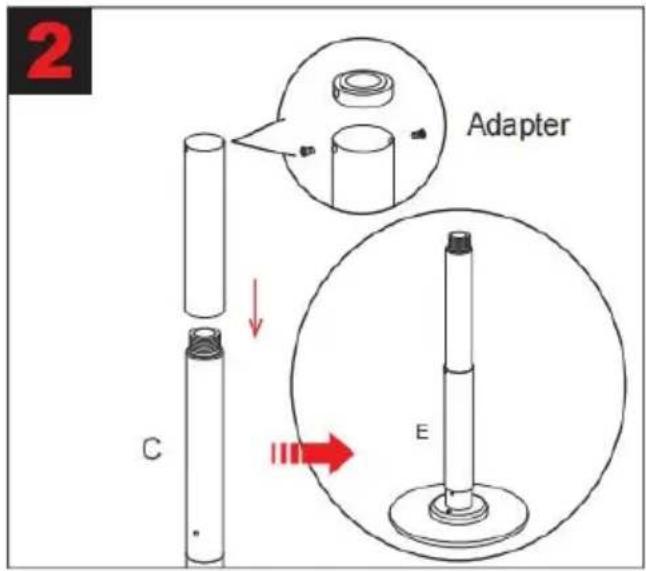
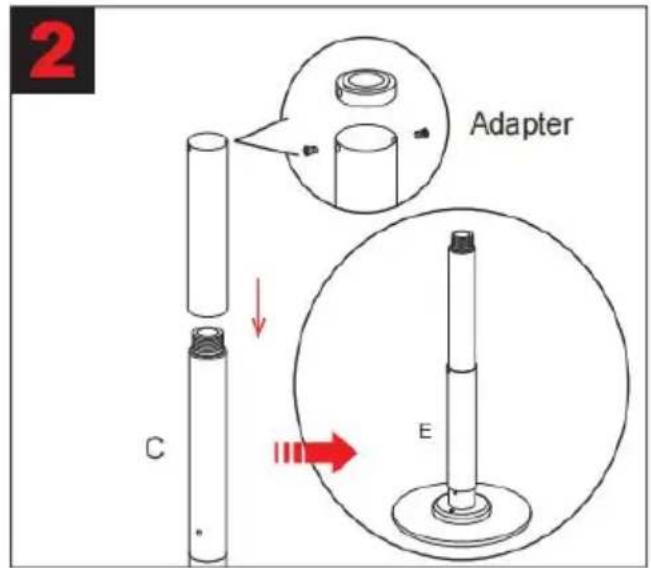
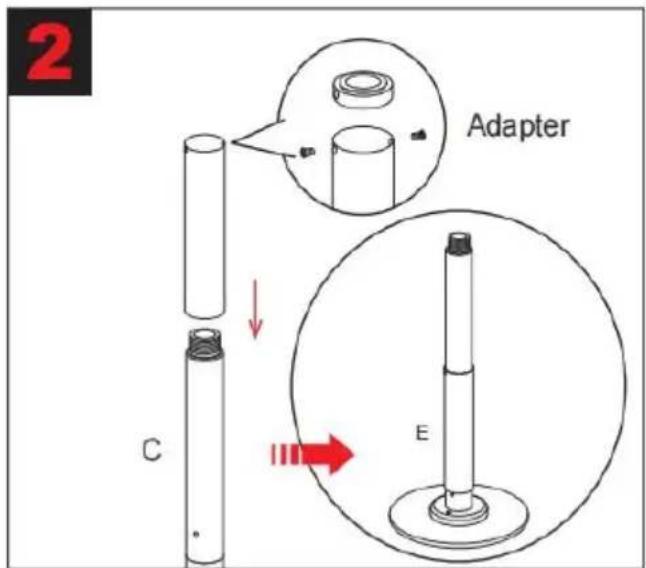
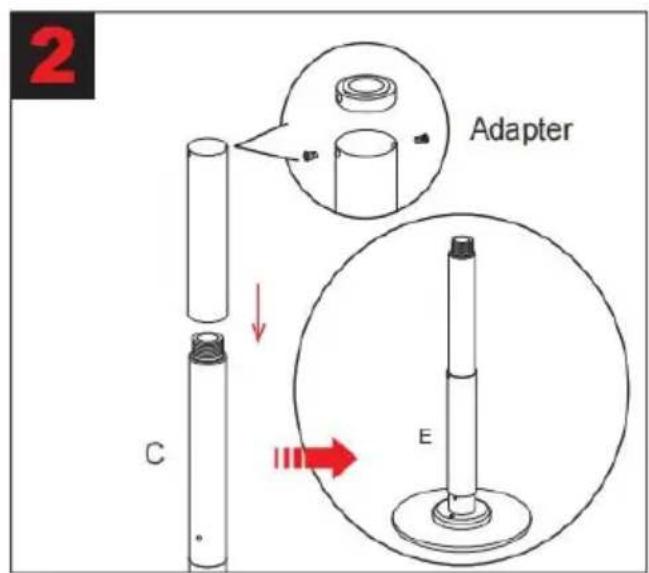
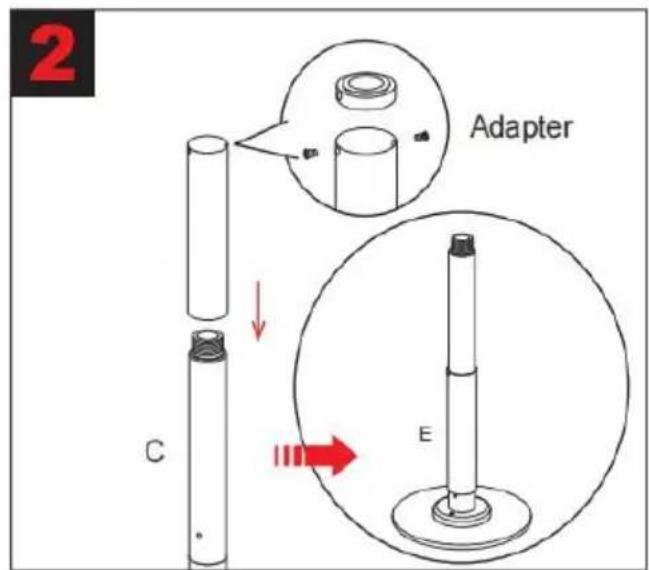
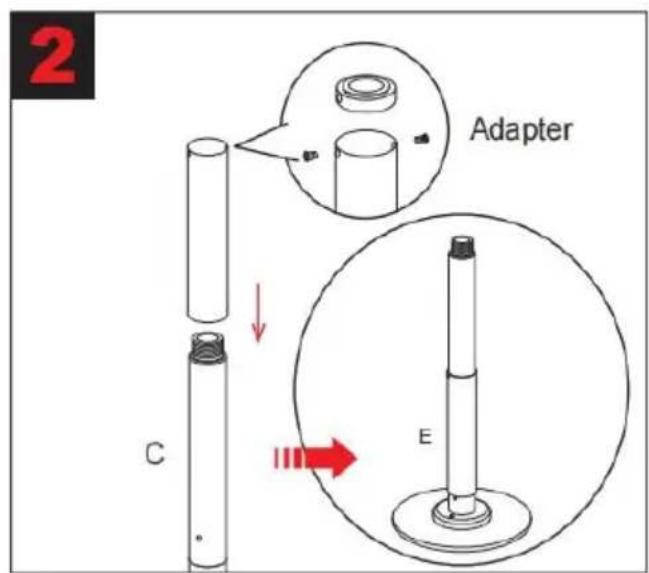
Remove the screws and the adapter from the Cover, and then slide it onto the Extension Tube C. (The screws will be re-assembled later.)
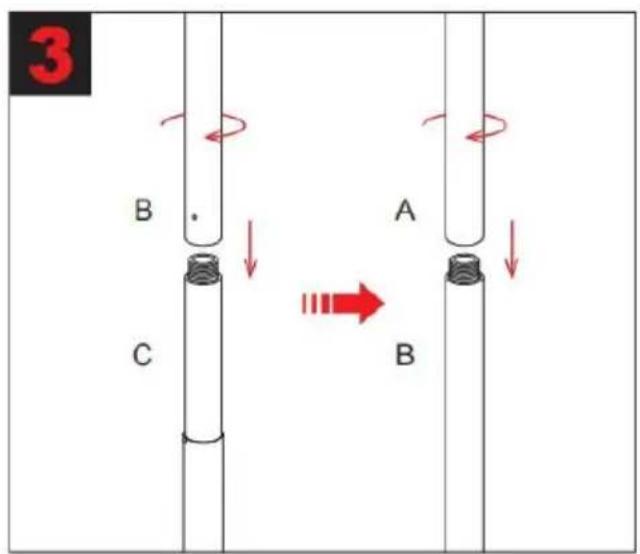
Connect the B-Pole to the Extension Tube C. Turn the
B-pole counter-clockwise until the adjuster is about 1.5" above the A-pole and the adjusting hole is visible.
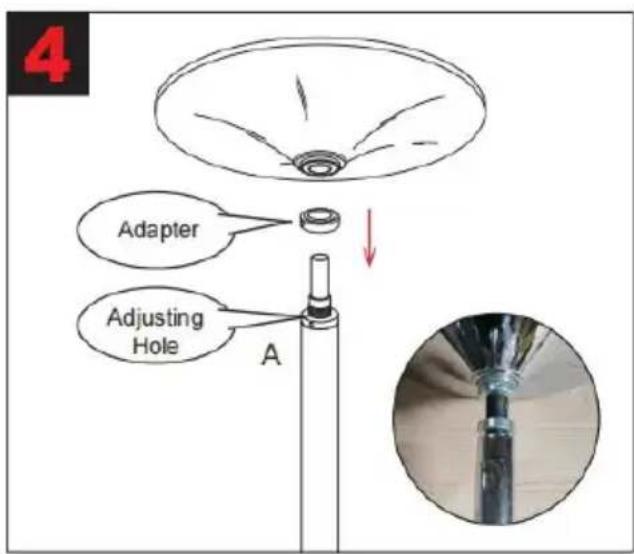
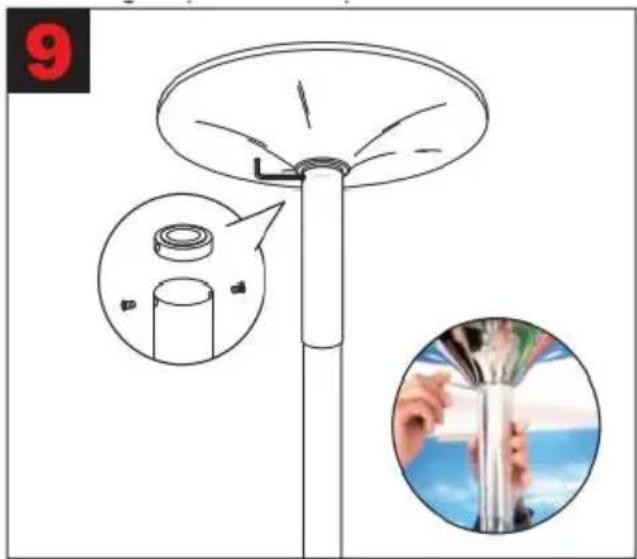
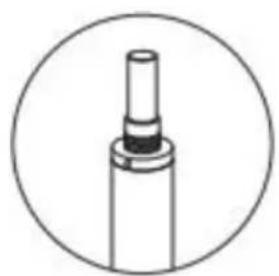
Once the B-Pole and A-Pole (or any additional extensions) are connected, insert the adapter into the adjuster and then attach the A-Pole to the upper dome.
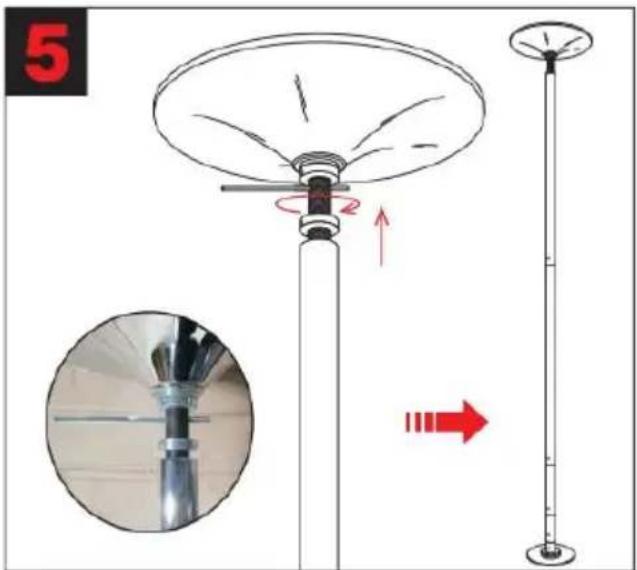
Rotate the A-pole counter-clockwise until no further
force can be applied to attach in place.
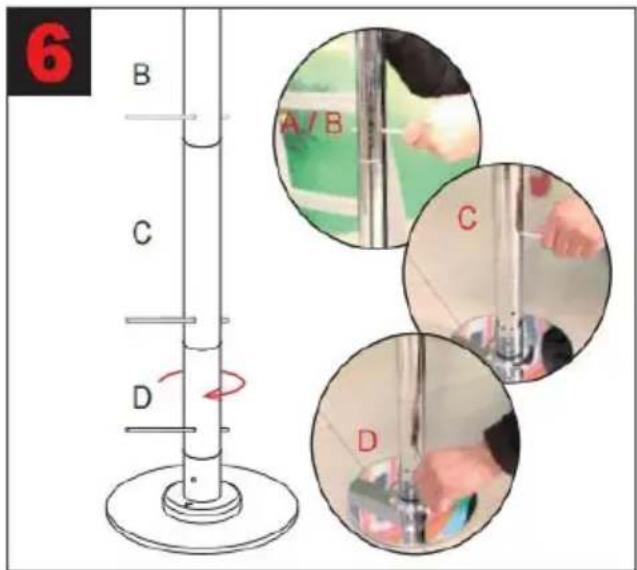
It is important to tighten all the sections progressively to secure the whole fixture, alternating between the poles and extension tubes, tightening clockwise.
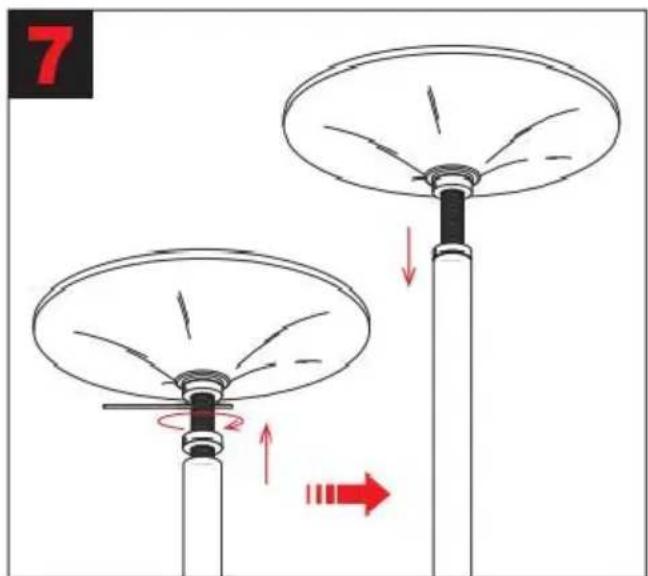
Rotate the pre-assembled nut located on the A-pole counter-clockwise, which will allow you to adjust it to its original place on the pole.
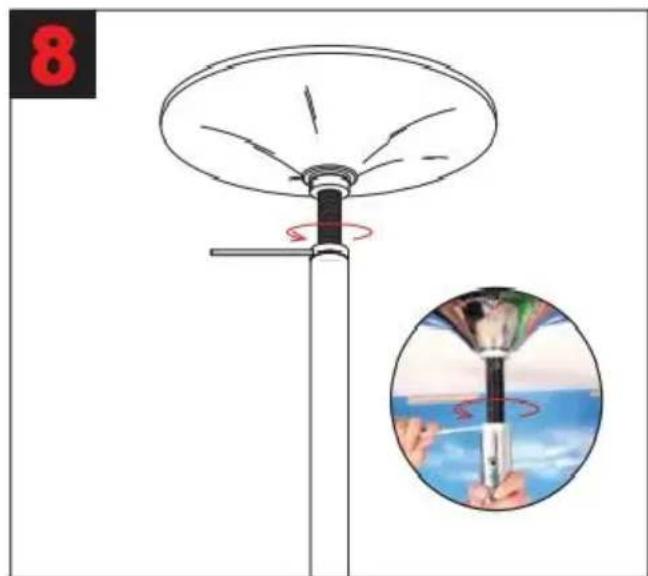
Tighten the nut by rotating it counter-clockwise with the I-Rod until no further force can be applied.
Push the Cover upwards and secure it with the two screws that were disassembled from the cover at step 2.
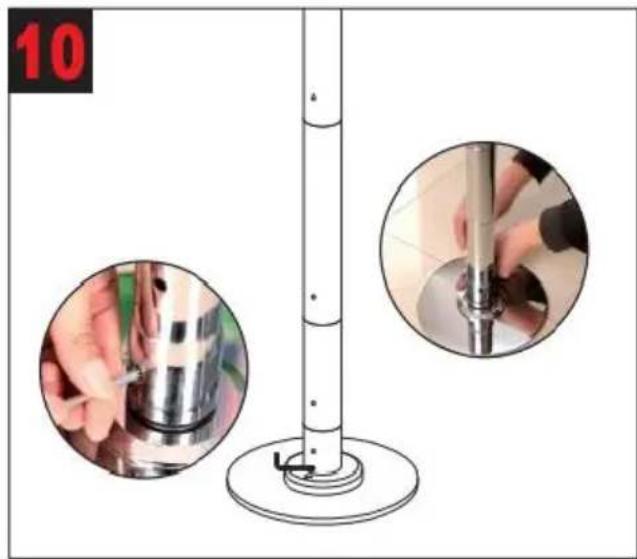
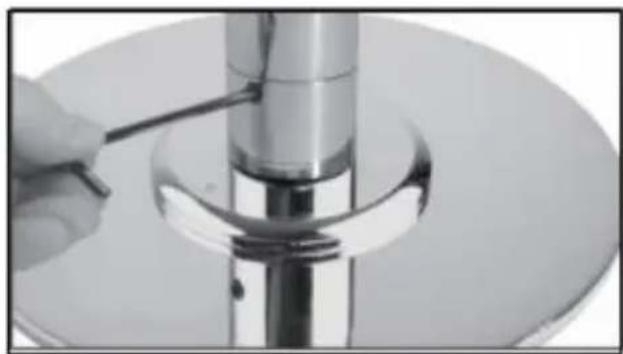
Loosen the Static/Spin screws on both sides of the Base shaft before use. DO NOT completely remove the screws.
The adjusting hole needs to be aligned with the "Y-Mark" on the base.
STATIC & SPINNING
The dance pole is in static mode after initial assembly.
To change the pole mode from static to spinning - loosen the Static/Spin screws on both sides of the Base shaft - DO NOT REMOVE COMPLETELY - the pole will now spin freely.
To return to static, fully tighten the Static/Spin screws on both sides of the Base shaft.
INSTALLATION TEST
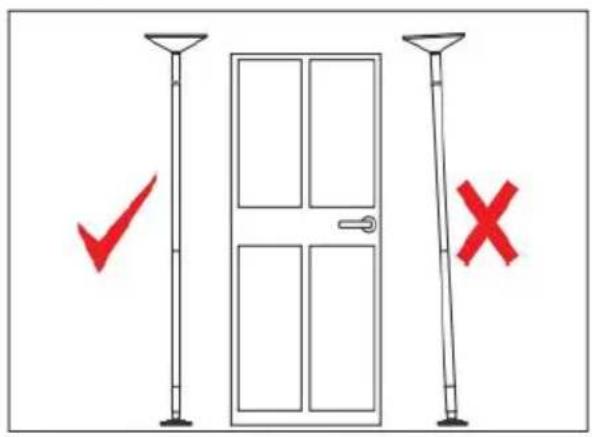
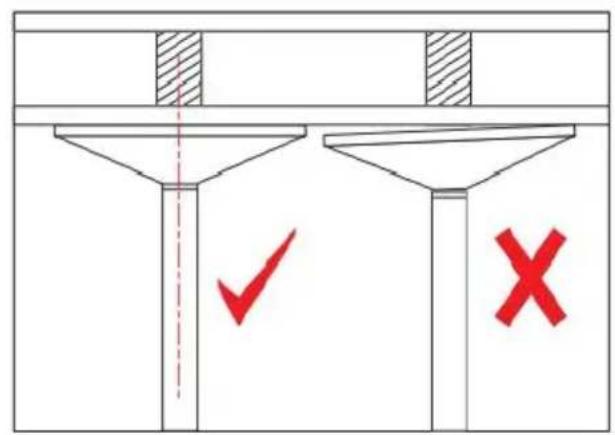
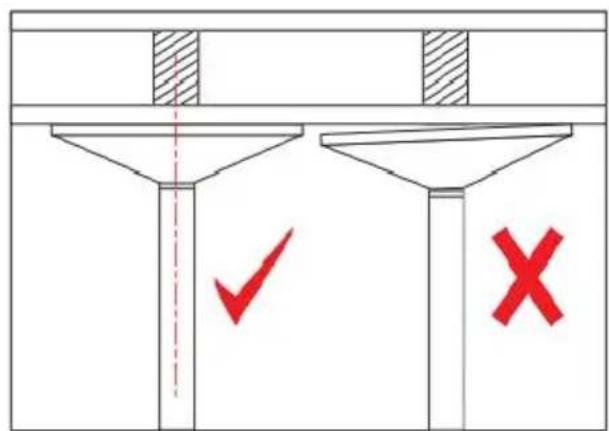
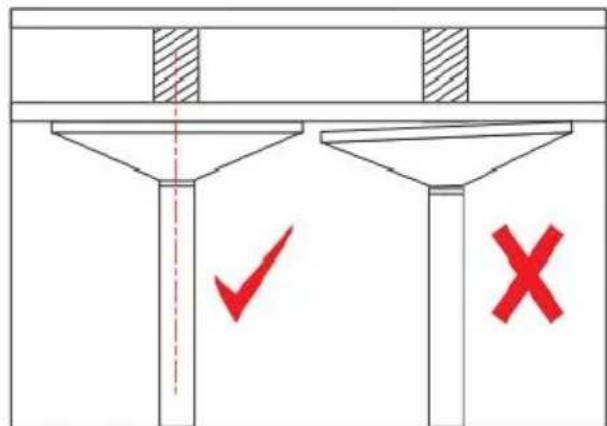
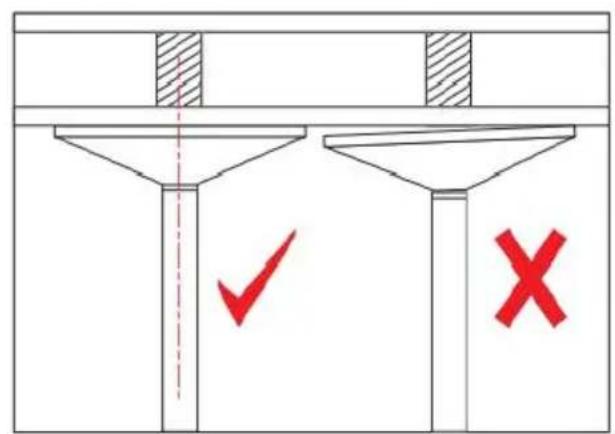
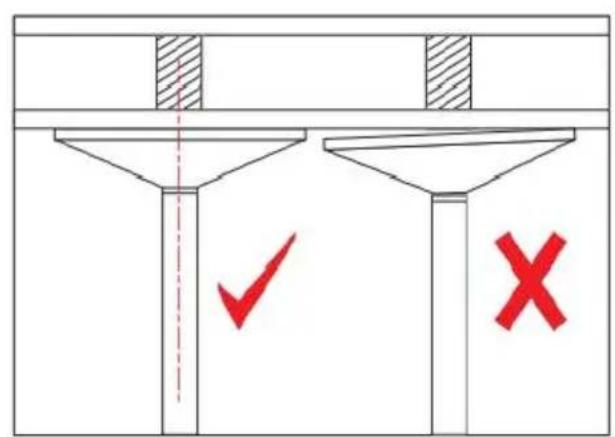
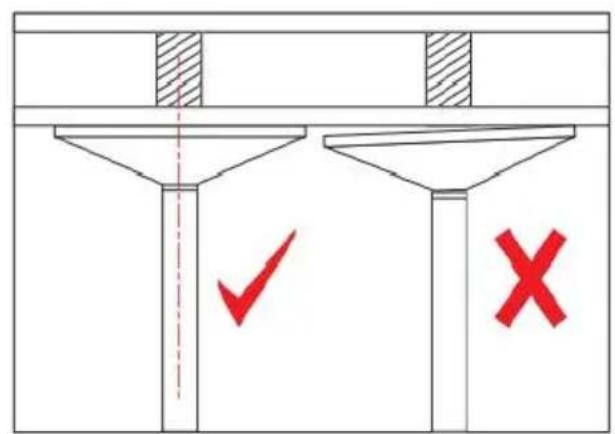
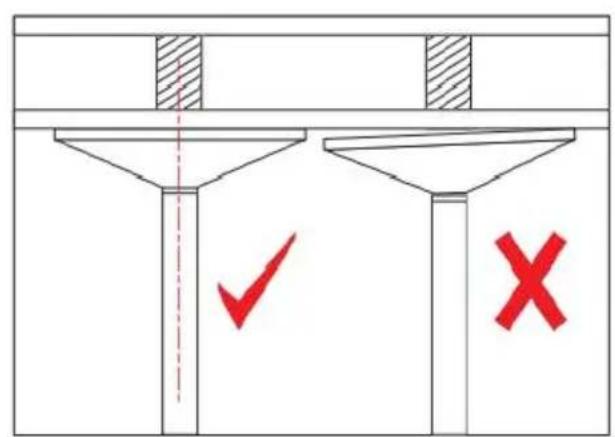
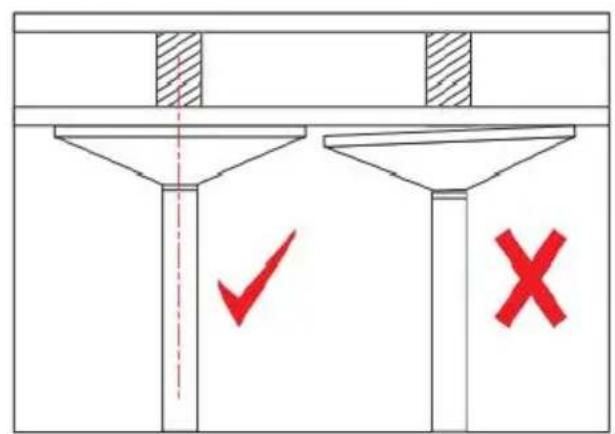
- Once the Upper Dome is against the ceiling and before it is tightened further, make sure that the pole is vertical.
- It is critical that the Upper Dome is flat against the ceiling. Do NOT expand the adjuster further until the upper dome is flat against the ceiling. If the Upper Dome is not flat, the plate could rotate, and slip or damage the ceiling.
WARNINGS
- NEVER use oils and/or lotion on your hands or body prior to using the pole. This is very DANGEROUS. The oil can transfer onto the pole, making it slippery and impossible to hold, and this could cause you or someone using the pole after you to have a serious accident.
- The dance pole SHOULD NOT be installed under false, suspended, or non-rigid ceilings.
- Carpet, wooden, or sprung floors can affect the stability of this product.
- Prior to installation, all shrink-wrap covering the pole tubes and parts must be removed. Please DO NOT use a sharp instrument/knife to do this, as damage may be caused.
- When assembled, the Dance Pole is heavy and at full height, NOT easy to handle. It is therefore MANDATORY/COMPULSORY that two people install the Dance Pole - i.e., 1 person should lift it into position and 1 person should hold the pole while the other rotates/expands the height adjuster.
- NEVER use your pole if you are in any doubt about its assembly, or how to use it. The dance pole may make noise when making spinning moves after term use. It's recommended to lubricate the corresponding joints.
PRIOR TO USE
- Once the pole feels tight and does not move, try practicing a turn with at least one foot on the floor. Re-tighten as necessary until there is no movement. Once you are certain that the pole has been installed safely, move with your feet off the ground.
- Misusing a pole can be dangerous not only to you but also anyone near the pole. The use of any pole is always at the user's discretion.
- Pole Exercise is extremely physical and uses muscles that you will not have used before, and therefore if you are not warmed up, muscle damage and strains can occur.
- Practice each basic move until you are happy with your ability to move before continuing on to the next one. If at any time you feel uncomfortable, your muscles hurt, or you are short of breath - take a break and try again later. In fact, it is better to rest between moves, let someone else try, and then progress on to the next. By the way - practice does make perfect!
NOTE
To continuously improve its products, VEVOR reserves the right to modify this information without prior notification.
Please contact customer service via www.vevor.com with any questions, comments, or concerns. Thank you for using VEVOR products in your home!
Manufacturer: Shanghaimuxinmuyeyouxiangongsi
Address: Baoshanqu Shuangchenglu 803long 11hao 1602A-1609shi Shanghai
Imported to USA: Sanven Technology Ltd. Suite 250, 9166 Anaheim F Rancho Cucamonga, CA 91730

SHUNSHUN GmbH
Römeräcker 9 Z2021, 76351
Unit 5 Albert Edward House, The
Pavilions Preston, United Kingdom
pooledas123@gmail.com
01772418127
Made In China
VEVOR®
TOUGH TOOLS, HALF PRICE
Technical Support and E-Warranty Certificate
www.vevor.com/support
VEVOR®
We continue to be committed to providing you with tools at competitive prices. "Save Half", "Half Price", or any other similar expressions used by us only represent an estimate of savings you might benefit from buying certain tools with us compared to top brands, and does not necessarily mean to cover all categories of tools offered. We kindly remind you to verify carefully when placing an order with us whether you are actually saving half in comparison with the top major brands.
MODEL: HM-594/HM-590

Have product questions? Need technical support? Please feel free to contact us:
Technical Support and E-Warranty Certificate
www.vevor.com/support
This is the original instruction. Please read all manual instructions carefully before operating. VEVOR reserves the right to interpret the user manual. The appearance of the product shall be subject to the product you received. Please forgive us that we won't inform you of any data changes on our product.
SAFETY WARNINGS AND PRECAUTIONS
ASSEMBLY INSTRUCTIONS
INSTALLATION TEST
WARNINGS
Unit 5 Albert Edward House, The
Pavilions Preston, United Kingdom
pooledas123@gmail.com
01772418127
www.vevor.com/support
VEVOR®
MODEL: HM-594 / HM-590
We continue to be committed to providing you with tools at competitive prices. "Save Half", "Half Price", or any other similar expressions used by us only represent an estimate of savings you might benefit from buying certain tools with us compared to top brands, and does not necessarily mean to cover all categories of tools offered. We kindly remind you to verify carefully when placing an order with us to ensure you are actually saving half in comparison with the top major brands.
MODEL: HM-594 / HM-590

Have product questions? Need technical support? Please feel free to contact us:
Technical Support and E-Warranty Certificate
www.vevor.com/support
This is the original instruction. Please read all manual instructions carefully before operating. VEVOR reserves the right to interpret the user manual. The appearance of the product shall be subject to the product you received. Please forgive us that we won't inform you of any changes to our product.
SAFETY WARNINGS AND PRECAUTIONS
ASSEMBLY INSTRUCTIONS
Connect the
Loosen the
INSTALLATION TEST
WARNINGS
Place, Rancho Cucamonga, CA 91730

SHUNSHUN GmbH
Römeräcker 9 Z2021, 76351
Unit 5 Albert Edward House, The
Pavilions Preston, United Kingdom
pooledas123@gmail.com
01772418127
www.vevor.com/support
VEVOR®
We continue to be committed to provide you tools with competitive price. "Save Half", "Half Price" or any other similar expressions used by us only represent estimate of savings you might benefit from buying certain tools with us compared to top brands and does not necessarily mean to cover all categories of tools offered. We kindly remind you to verify carefully when you are placing an order with us to ensure you are actually saving half in comparison with the top major brands.
MODEL: HM-594/HM-590

Have product questions? Need technical support? Please feel free to contact us:
Technical Support and E-Warranty Certificate
www.vevor.com/support
This is the original instruction. Please read all manual instructions carefully before operating. VEVOR reserves a clear interpretation of the user manual. The appearance of the product shall be subject to the product you received. Please forgive us that we won't inform you of any updates to our product data.
SAFETY WARNINGS AND PRECAUTIONS
ASSEMBLY INSTRUCTIONS
INSTALLATION TEST
WARNINGS
Unit 5 Albert Edward House, The
Pavilions Preston, United Kingdom
pooledas123@gmail.com
01772418127
Made in China
VEVOR®
TOUGH TOOLS, HALF PRICE
We continue to be committed to providing you with tools at competitive prices. "Save Half", "Half Price", or any other similar expressions used by us only represent an estimate of savings you might benefit from buying certain tools with us compared to top brands and does not necessarily mean to cover all categories of tools offered. We kindly remind you to verify carefully when placing an order with us to ensure you are actually saving half in comparison with the top major brands.
MODEL: HM-594/HM-590

Have product questions? Need technical support? Please feel free to contact us:
Technical Support and E-Warranty Certificate
www.vevor.com/support
This is the original instruction. Please read all manual instructions carefully before operating. VEVOR reserves a clear interpretation of the user manual. The appearance of the product shall be subject to the product you received. Please forgive us that we won't inform you of data changes on our product.
SAFETY WARNINGS AND PRECAUTIONS
ASSEMBLY INSTRUCTIONS
INSTALLATION TEST
WARNINGS
Unit 5 Albert Edward House, The
Pavilions Preston, United Kingdom
pooledas123@gmail.com
01772418127
Made in China
VEVOR®
TOUGH TOOLS, HALF PRICE
www.vevor.com/support
VEVOR®
MODEL: HM-594 / HM-590
We continue to be committed to providing you with tools at competitive prices. "Save Half", "Half Price", or any other similar expressions used by us only represent an estimate of savings you might benefit from buying certain tools with us compared to top brands, and does not necessarily mean to cover all categories of tools offered. We kindly remind you to verify carefully when placing an order with us to ensure you are actually saving half in comparison with the top major brands.
MODEL: HM-594 / HM-590

Have product questions? Need technical support? Please feel free to contact us:
Technical Support and E-Warranty Certificate
www.vevor.com/support
This is the original instruction. Please read all manual instructions carefully before operating. VEVOR reserves a clear interpretation of the user manual. The appearance of the product shall be subject to the product you received. Please forgive us that we won't inform you of any changes in data on our product.
SAFETY WARNINGS AND PRECAUTIONS
ASSEMBLY INSTRUCTIONS
INSTALLATION TEST
WARNINGS
Place, Rancho Cucamonga, CA 91730

SHUNSHUN GmbH
Römeräcker 9 Z2021, 76351
Unit 5 Albert Edward House, The
Pavilions Preston, United Kingdom
pooledas123@gmail.com
01772418127
Made in China
VEVOR®
TOUGH TOOLS, HALF PRICE
www.vevor.com/support
VEVOR®
We continue to be committed to provide you with tools at competitive prices. "Save Half", "Half Price" or any other similar expressions used by us only represent an estimate of savings you might benefit from buying certain tools with us compared to top brands and does not necessarily mean to cover all categories of tools offered. We kindly remind you to verify carefully when you are placing an order with us that you are actually saving half in comparison with the top major brands.
MODEL: HM-594/HM-590

Have product questions? Need technical support? Please feel free to contact us:
Technical Support and E-Warranty Certificate
www.vevor.com/support
This is the original instruction. Please read all manual instructions carefully before operating. VEVOR reserves a clear interpretation of the user manual. The appearance of the product shall be subject to the product you received. Please forgive us that we won't inform you of data on our product.
SAFETY WARNINGS AND PRECAUTIONS
ASSEMBLY INSTRUCTIONS
Step 2.
INSTALLATION TEST
WARNINGS
Unit 5 Albert Edward House, The
Pavilions Preston, United Kingdom
pooledas123@gmail.com
01772418127
Made in China
VEVOR®
TOUGH TOOLS, HALF PRICE
www.vevor.com/support
VEVOR®
We continue to be committed to providing you with tools at competitive prices. "Save Half", "Half Price", or any other similar expressions used by us only represent an estimate of savings you might benefit from buying certain tools with us compared to top brands, and does not necessarily mean that all categories of tools offered are covered. We kindly remind you to verify carefully when placing an order with us whether you are actually saving half in comparison with the top major brands.
MODEL: HM-594/HM-590

Have product questions? Need technical support? Please feel free to contact us:
Technical Support and E-Warranty Certificate
www.vevor.com/support
This is the original instruction. Please read all manual instructions carefully before operating. VEVOR reserves a clear interpretation of the user manual. The appearance of the product shall be subject to the product you received. Please forgive us that we won't inform you of data on our product.
SAFETY WARNINGS AND PRECAUTIONS
ASSEMBLY INSTRUCTIONS
INSTALLATION TEST
WARNINGS
Unit 5 Albert Edward House, The
Pavilions Preston, United Kingdom
pooledas123@gmail.com
01772418127
Made in China
VEVOR®
TOUGH TOOLS, HALF PRICE
www.vevor.com/support