E1819Z - Towel racks Vevor - Free user manual and instructions
Find the device manual for free E1819Z Vevor in PDF.

| Product Type | Bucket Towel Warmer |
| Brand | Vevor |
| Model | E1819Z |
| Dimensions (L × D × H) | 330 × 329 × 540 mm |
| Net Weight | 3.21 kg |
| Power Supply | AC 120V 60Hz (North America) / 220-240V ~50/60Hz (Europe, Australia) |
| Power | 465 W |
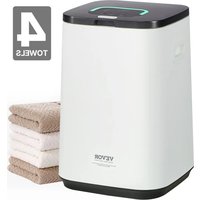
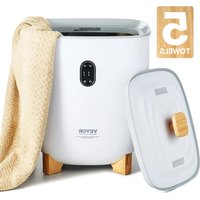
| Capacity | 20 L (approx. 2 large towels or 1 blanket) |
| Adjustable Heating Time | 20, 40, 60 or 90 minutes |
| Temperature Levels | Low, Medium, High |
| Hot Surface Indicator | Red light >40°C, blue light <40°C |
| Scent Diffuser | Scent disc holder included (disc provided) |
| Recommended Fabric Types | Cotton or cotton blend, dry only |
| Safety | Auto shut-off after cycle, grounded plug |
| Maintenance | Unplug, wipe with a soft dry cloth |
| Included Accessories | 1 bucket towel warmer, 1 scent disc, 3 desiccant bags, 1 warning label, 1 manual |
| Repairability | Contact Vevor support: ServiceClient@vevor.com |
| Warranty | Electronic warranty certificate available at www.vevor.com/support |
Frequently Asked Questions - E1819Z Vevor
User questions about E1819Z Vevor
0 question about this device. Answer the ones you know or ask your own.
Ask a new question about this device
Download the instructions for your Towel racks in PDF format for free! Find your manual E1819Z - Vevor and take your electronic device back in hand. On this page are published all the documents necessary for the use of your device. E1819Z by Vevor.
USER MANUAL E1819Z Vevor
Technical Support and E-Warranty Certificate www.vevor.com/support
TOWEL WARMER BUCKETS
MODEL:E1819Z
We continue to be committed to provide you tools with competitive price. "Save Half", "Half Price" or any other similar expressions used by us only represent of savings you might benefit from buying certain tools with us compared top brands and doses not necessarily mean to cover all categories of tools offered are kindly reminded to verify carefully when you are placing an order with us actually saving half in comparison with the top major brands.
VEVOR®
TOUGH TOOLS, HALF PRICE
TOWEL WARMER BUCKETS
MODEL:E1819Z
natural_image
Line drawing of a cylindrical container with lid and side legs, no text or symbols presentNEED HELP? CONTACT US!
Have product questions? Need technical support? Please feel from contact us:

CustomerService@vevor.com
This is the original instruction, please read all manual instruction carefully before operating. VEVOR reserves a clear interpretation user manual. The appearance of the product shall be subject to product you received. Please forgive us that we won't inform you there are any technology or software updates on our product.
PRODUCT PARAMETER
| Model | E1819Z | ||
| District | North America | Europe | Australia |
| Voltage | AC 120V 60Hz | AC 220-240V50/60Hz | AC 220-240V50/60Hz |
| Wattage | 465W | 465W | 465W |
| Capacity | 20L | ||
| Net Weight | 3.21kg | ||
| Product Size | 330*329*540mm | ||
PACKAGE DETAILS
| NO. | ACCESSORY NAME | QUANTITY |
| 1 | Towel Warmer Buckets | 1 |
| 2 | Fragrance Disc | 1 |
| 3 | Desiccant Bag | 1 |
| 4 | Warning Label | 1 |
| 5 | User Manual | 1 |
INSTRUCTION
Thank you for purchasing Towel Warmer Buckets.
With normal care and proper treatment, it will provide years of no service.
Please read all instructions before using this product.
Please retain this manual for future reference.
FEATURES
- The generous cavity has the capacity to hold two large bath tower personalthrow blanket.
- Provide 20/40/60/90 minutes of heating time.
- Set low/medium/high heating temperature.
- A disc holder for inserting a fragrance disc to add a fresh, odor-neutralizing scent to your towels and blankets.
CONTENTS
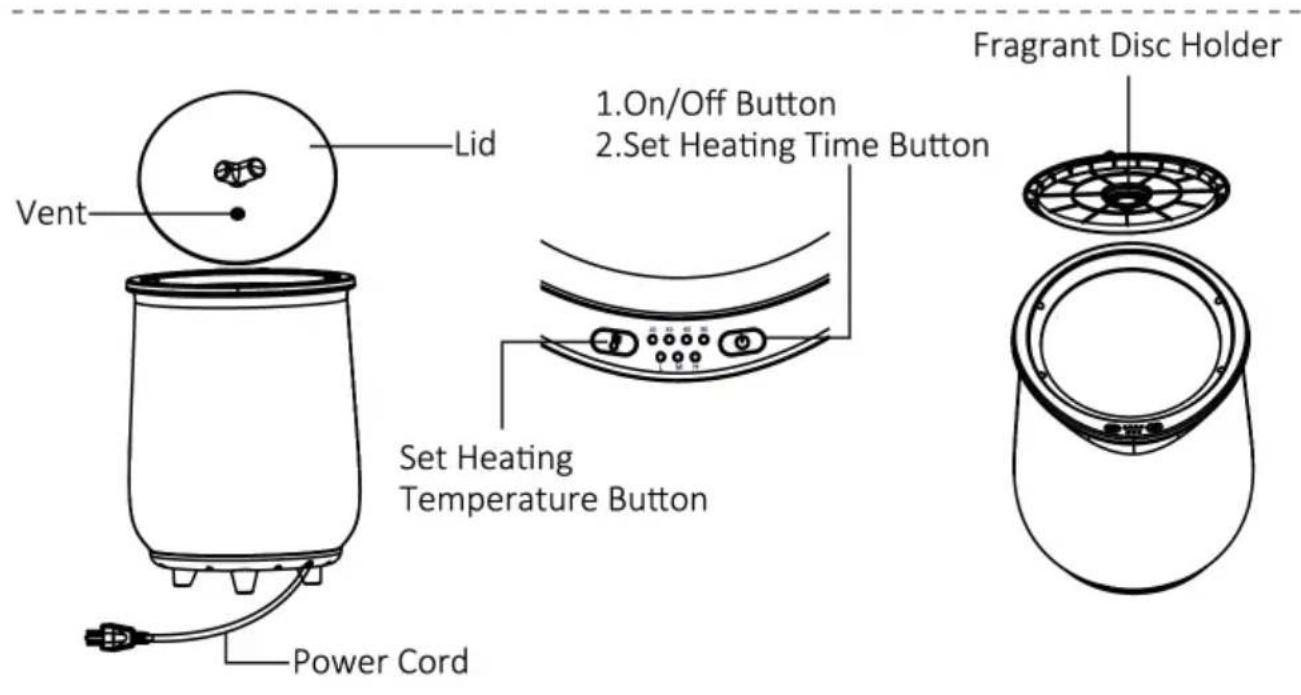
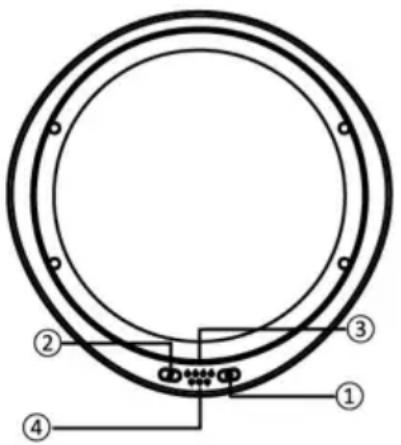
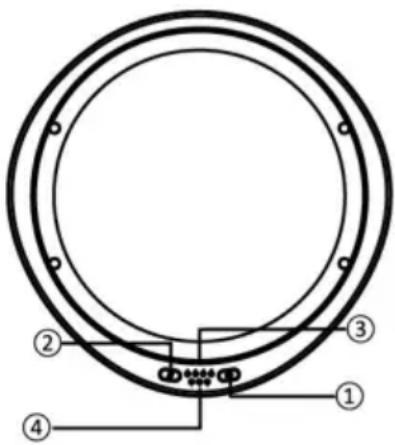
INSTRUCTIONS FOR INDICATORS
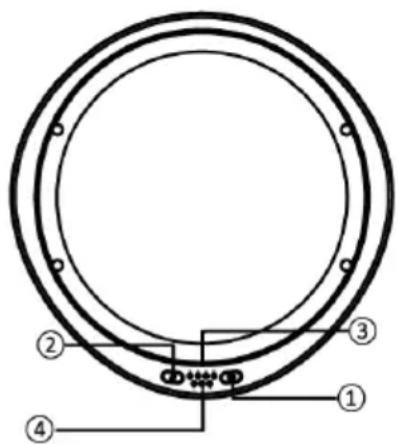
① Power switch button, long press to turn it on, and short press to select the heating time:20/40/60/90 minutes.
② Set the heating temperature level: Low/Medium/High.
③ Display heating time.
Red color means the temperature of the interior surface is higher than 40 °C, the INTERIOR SURFACE of the device is unsafe to touch; Blue color means the temperature of the interior surface is lower than 40 °C.
④ Display heating temperature level.
SETUP AND OPERATION
- Open the lid and remove any packaging contents.
- Place the Towel Warmer Buckets on a hard, dry and level surface.
- Insert the power cord into an electrical outlet.
NOTE: This Towel Warmer Buckets has a 3-prong grounding plug. To reduce the risk of electric shock, plug the power cord into a grounded (earthed) electrical outlet.
- Open the lid and place ONLY DRY towel (s) or a blanket inside.
NOTE: ① Use cotton or cotton blend towels or fabrics only.
② Placing damp or wet towels inside the product will damage it and might cause danger.
-
Close the lid.
-
Long press ON/OFF button to turn it on, and short press ON/OFF button to select the heating time of 20/40/60/90 minutes. Press the temperature button, you can set the heating temperature of the towel warmer: Low/Medium/High.
The default heating time is 20 minutes, high-temperature heating.
- 1-minute rapid heating, 6 minutes to reach a high temperature.
- Open the lid to take out the towel(s) or blanket.
*Note: To avoid damage to the product, gently open the lid when ta out items.
- Press the ON/OFF button at any time to stop or start the heating cycle.
- The product will automatically turn off after 20/40/60/90 minutes. The timers can be freely switched. Each time you press the timer button, working time counts again from 20/40/60 minutes.
- After the heating cycle is complete, the INTERIOR SURFACE of Towel Warmer Buckets will remain too hot to touch until turned off for minutes.

- Before plug please check and make sure the power cord undamaged.
- Do not use the wet hand to plug in the adapter.
- Please don't stand or sit on the product.
- When moving the product, please don't pull the power cord drag the product directly to avoid any damaged caused.
- Please don't let children and pets play the products for preventing any accident happened.
- Do not use the wet hand to pull out the power cord in avoid any electric shock.
- Do not use this product in a damp environment to avoid electric shock.
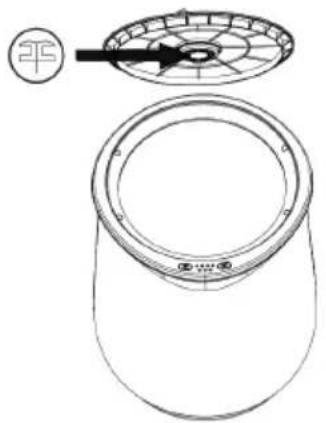
INSTRUCTIONS FOR FRAGRANCE DISC
This fragrance disc is additionally designed for some users who like aromatherapy tablets or essential oils when warming towels.
Note: Aromatherapy tablets or essential oils are not included with this product.
1 Remove the fragrance disc from its sealed plastic bag.
2 Slide it into the fragrance disc holder located on the underside of
natural_image
Technical line drawing of a mechanical component with a circular inset showing a cross-section view (no text or symbols)The fragrance disc is an innovative air fresher for your home, which also effectively eliminates odors.
TIPS FOR BEST RESULTS
- Use cotton or cotton blend towels or fabrics only.
- For fast and even heating, loosely pile one towel into the Towel Buckets. Tightly rolled or folded towels will take longer to heat thoroughly. Two towels will take longer to heat than one.
- Use only with DRY fabrics.
NOTE: Do NOT use with damp or wet articles.
- Avoid using delicate fabrics that cannot withstand high heat. Any indicating that a cool iron must be used may not be able to with the heat of the Towel Warmer Buckets, resulting in damage to the fabric the product.
- Once the heating cycle has begun, keep the lid closed. This will heat from escaping. Opening the lid midway may result in slower he times.
NOTE: Condensation on the lid and interior of the product is normal.
- When used with the Towel Warmer Buckets, the Fragrance Disc may warp over time.
- The Fragrance Disc can last for up to two years at room temperature. The longevity of the scent will decrease when exposed to heat from the Towel Warmer BuckeReplace the disc when you can't longer smell the scent.
Please read the following instructions carefully before
putting your device into use. Please retain these instructions for further reference!

WARNING
To reduce the risk of fire, electric shock or serious injury to when using the appliance, adhere to the following basic precautions:
- Always unplug the product from the electrical outlet immediately after use. Do not use the device for anything other than its intended use.
- Do not place or store the device where it can fall or be pulled into a tub or sink.
- Do not place or drop into water or other liquid. DO NOT IMMERSE IN WATER.
- Do not reach for the product after it has fallen into water. Unplug it immediately.
- Care should be taken so that objects do not fall into and/or liquids are not spilled onto the device.
- The device should never be left unattended when plugged in.
- Close supervision is necessary when this device is used near children or disabled persons.
- Only use the device for its intended use as described in this manual.
- Never operate the device if it has a damaged cord or plug, if it is not working properly or if it has been dropped, damaged or immersed in water.
- Keep the cord away from heated surfaces. Do not wrap the cord around the exterior of the device or let the cord hang over a ta or counter edge.
- Do not use outdoors.
- Do not alter the safety plug or use an extension cord with this
- Do not operate with a voltage converter.
- Do not touch hot surfaces and vent.
- Do not use accessory attachments not recommended by the manufacturer, as this may cause injuries.
- If the supply cord is damaged, it must be replaced by the manufacturing service agent or similarly qualified persons in order to avoid a hazard.
- This appliance can be used by children aged 8 years and above persons with reduced physical, sensory or mental capabilities or la of experience and knowledge if they have been given supervision instruction concerning use of the appliance in a safe way and understand the hazards involved. Children shall not play with the appliance. Cleaning and user maintenance shall not be made by children without supervision.
SAVE THESE INSTRUCTIONS
FCC INFORMATION
CAUTION: Changes or modifications not expressly approved by the pa responsible for compliance could void the user's authority to operate the equipment!
This device complies with Part 1S of the FCC Rules. Operation is su to the followingtwo conditions:
1) This product may cause harmful interference.
2) This product must accept any interference received, including interference that may cause undesired operation.
WARNING: Changes or modifications to this unit not expressly approve by the party responsible for compliance could void the user's authority operate the equipment.
Note: This equipment has been tested and found to comply with the for a Closs B digital device, pursuant to Part 15 of the FCC Rules. limits are designed to provide reasonable protection against harmful interference in a residential installation, This unit generates, uses, and radiate radio frequency
energy and if not installed and used in accordance with the instruction may cause harmful interference to radio communications. However, there is no guarantee that interference will not occur in a particular installation this equipment does cause harmful interference to radio or television reception, which can be determined by turning the equipment on, the is encouraged to try and correct the interference by one or more of following measures:
- Reorient or relocate the receiving antenna.
·Increase the separation between the equipment and receiver. - Connect the equipment to an outlet on a circuit different from that to the receiver is connected.
- Consult the dealer or an experienced radio/TV technician for help.
CARE AND MAINTENANCE
-Before cleaning, make sure the power supply is turned off and the been pulled from the socket.
-Use a soft dry cloth to wipe the product when the device is damp touch.
-Do not pull the power plug with wet hands.
- Do not use water washing the product, and do not spray the water liquid on the interior of the device.
Maintenance
-Make sure the power supply is turned off and the plug has been p out from the socket.
-Sweep off the dust. Keep the device clean and away from damp pla
-Store the device in a cool, dry place out of reach of children.
-Avoid contact with sharp edges or pointed objects which might cut o puncture the cover of the device.
CORRECT DISPOSAL
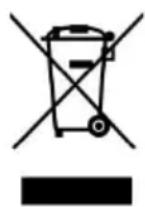
This product is subject to the provision of European Directive 2012/19/EC. The symbol showing a wheelie bin crossed through indicates that the product requires separate refuse collection in the European Union. This applies to the product and all
accessories marked with this symbol. Products marked as such may be discarded with normal domestic waste, but must be taken to a co-point for recycling electrical and electronic devices
VEVOR®
TOUGH TOOLS, HALF PRICE
Technical Support and E-Warranty Certificate
www.vevor.com/support
VEVOR®
TOUGH TOOLS, HALF PRICE
natural_image
Line drawing of a cylindrical container with lid and side legs, no text or symbols presentPOTRZEBUJESZ POMOCY? SKONTAKTUJ SIĘ Z NAMI!

natural_image
Technical line drawing of a mechanical component with a circular symbol and a circular arrow, no text or labels present.natural_image
Line drawing of a cylindrical container with lid and side legs, no text or symbols presentKundenservice@vevor.com
natural_image
Technical line drawing of a mechanical component with a circular inset showing a cross-section view (no text or symbols)www.vevor.com/support
VEVOR®
TOUGH TOOLS, HALF PRICE
natural_image
Line drawing of a cylindrical container with lid and side legs, no text or symbols presentBESOIN D'AIDE? CONTACTEZ-NOUS!

natural_image
Technical line drawing of a mechanical component with a circular inset showing a cross-section view (no text or symbols)natural_image
Line drawing of a cylindrical container with lid and side legs, no text or symbols presentHULP NODIG? NEEM CONTACT MET ONS OP!
Klantenservice@vevor.com
natural_image
Technical line drawing of a mechanical component with a circular symbol and a circular arrow, no text or labels present.garantiecertificaat www.vevor.com/support
VEVOR®
TOUGH TOOLS, HALF PRICE
natural_image
Line drawing of a cylindrical container with lid and side legs, no text or symbols presentBEHÖVER HJÄLP? KONTAKTA OSS!
INSTRUKTIONER FÖR INDIKATORER
natural_image
Technical line drawing of a mechanical component with a circular symbol and a circular arrow, no text or labels present.www.vevor.com/support
VEVOR®
TOUGH TOOLS, HALF PRICE
natural_image
Line drawing of a cylindrical container with lid and side legs, no text or symbols present
natural_image
Technical line drawing of a mechanical component with a circular inset showing a cross-section view (no text or symbols)natural_image
Line drawing of a cylindrical container with lid and side legs, no text or symbols present
natural_image
Technical line drawing of a mechanical component with a circular inset showing a cross-section view (no text or symbols)elettronica www.vevor.com/support