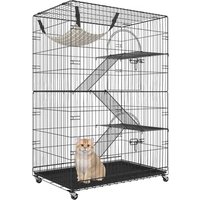
BSL-4C - Pets Vevor - Free user manual and instructions
Find the device manual for free BSL-4C Vevor in PDF.


| Product Type | Foldable Cat Cage |
| Brand | Vevor |
| Model | BSL-4C |
| Dimensions (L x W x H) | 76 x 51 x 61 cm |
| Weight | 8 kg |
| Material | Steel with Powder Coating |
| Color | Black |
| Recommended Use | Indoor and Outdoor (dry weather) |
| Capacity | Up to 2 adult cats |
| Main Functions | Double opening door, foldable design, tool-free assembly, removable bottom |
| Maintenance | Wipe with a damp cloth and mild soap |
| Cleaning | Removable plastic tray, washable with water |
| Safety | Smooth edges, sturdy door lock, reinforced stability |
| Included Accessories | Bottom tray, food bowl (depending on model) |
| Spare Parts and Repairability | Parts available on request via Vevor after-sales service |
| Warranty | 2 years |
| Country of Origin | China |
| General Information | Designed for small to medium cats, ideal for travel or rest |
Frequently Asked Questions - BSL-4C Vevor
User questions about BSL-4C Vevor
0 question about this device. Answer the ones you know or ask your own.
Ask a new question about this device
Download the instructions for your Pets in PDF format for free! Find your manual BSL-4C - Vevor and take your electronic device back in hand. On this page are published all the documents necessary for the use of your device. BSL-4C by Vevor.
USER MANUAL BSL-4C Vevor
Technical Support and E-Warranty Certificate www.vevor.com/support
INSTRUCTION FOR CAT CAGE
MODEL:BSL-4C
We continue to be committed to provide you tools with competitive price. "Save Half", "Half Price" or any other similar expressions used by us only represents an estimate of savings you might benefit from buying certain tools with us compared to the major top brands and does not necessarily mean to cover all categories of tools offered by us. You are kindly reminded to verify carefully when you are placing an order with us if you are actually saving half in comparison with the top major brands.
VEVOR®
TOUGH TOOLS, HALF PRICE
CAT CAGE
BSL-4C
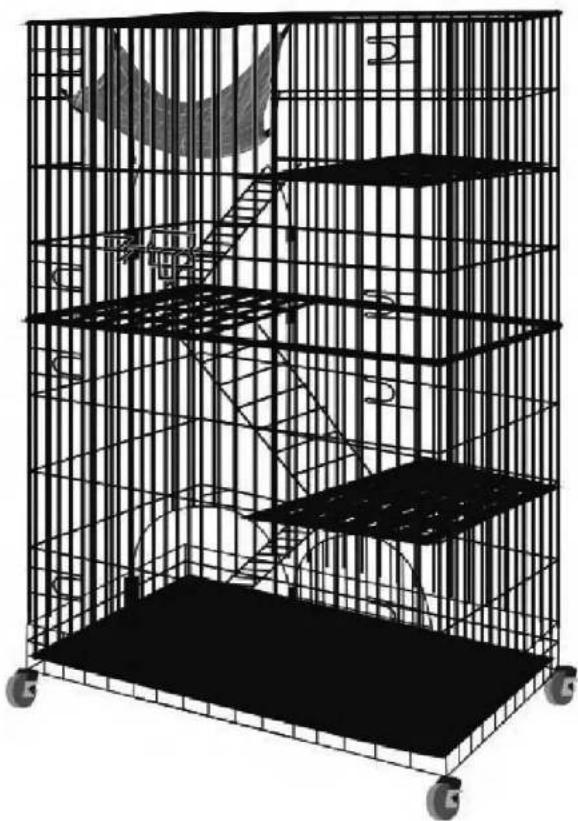
natural_image
3D wireframe model of a multi-level cage structure with wheels and labeled sections (no text or symbols beyond labels)NEED HELP? CONTACT US!
Have product questions? Need technical support? Please feel free to contact us:
Technical Support and E-Warranty Certificate www.vevor.com/support
This is the original instruction, please read all manual instructions carefully before operating. VEVOR reserves a clear interpretation of our user manual. The appearance of the product shall be subject to the product you received. Please forgive us that we won't inform you again if there are any technology or software updates on our product.
WARNING:
Read this material before using this product. Failure to do so can result in serious injury.
Assembly precautions
- Assemble only according to these instructions. Improper assembly can create hazards.
- In order to ensure your own safety, please make sure to ANSI-approved safety goggles and heavy-duty work gloves when installing this product.
- Keep the assembly area clean and well lit.
- Keep bystanders out of the area during assembly.
5.Do not assemble when tired or when under the influence of alcohol, drugs or medication.
6.Product capabilities apply to properly and completely assembled product only. - Assemble on a flat, level, hard and smooth surface capable of safely supporting a fully loaded cat cage.
Use precautions
TO PREVENT SERIOUS INJURY AND DEATH FROM TIPPING:
- DO NOT SIT OR STAND ON THIS ITEM.
- This product is not a toy. Do not allow children to play with or near this item.
Please keep small spare parts out of children's reach. - Use only on a flat, level, hard and smooth surface capable of safely supporting a fully loaded cat cage.
- Use as intended only.
- Inspect before every use; do not use if parts are loose or damaged.
SAVE THESE INSTRUCTIONS
SPECIFICATIONS
| Model | CAT CAGE |
| Product Size | 900×600×1330mm |
| Color | Black |
Components

Assembly Instructions
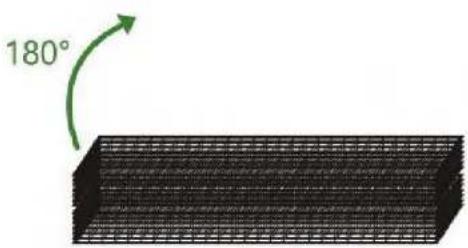
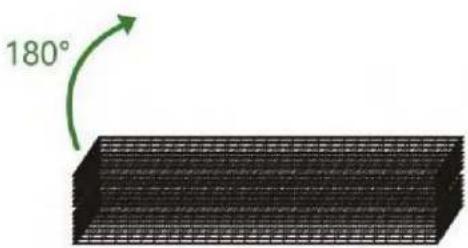
- Take out the folding pet cage from the package and place it flat on the ground.

natural_image
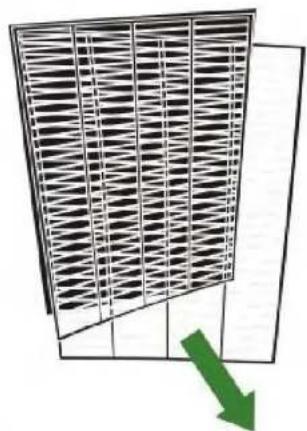
3D wireframe diagram of a rectangular box with internal cutouts and grid pattern (no text or symbols)- Continue to unfold the iron mesh sheets carefully to complete the basic frame of the cage.
natural_image
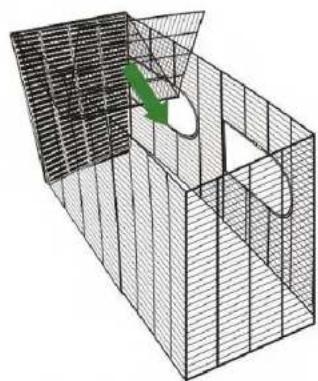
Diagram of a grid-patterned panel with a green downward arrow indicating a reduction or change (no text or symbols present)- Flip it 180 degrees to make it stand on the ground sideways, and then unfold the iron mesh sheets as the picture shows.
natural_image
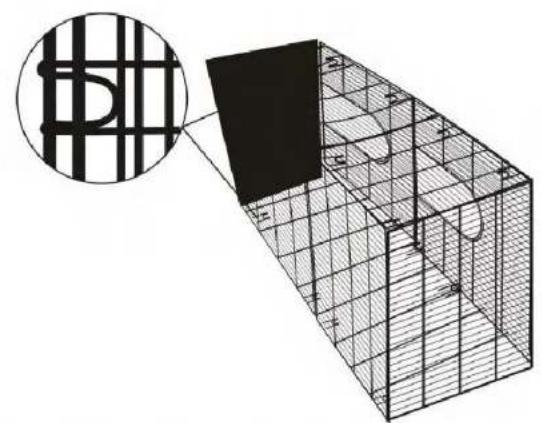
3D wireframe diagram of a grid structure with a green arrow indicating a point (no text or symbols)- Unfold the iron mesh sheets on both 2 sides and fasten them on the basic frame which has been completed on step 3.
natural_image
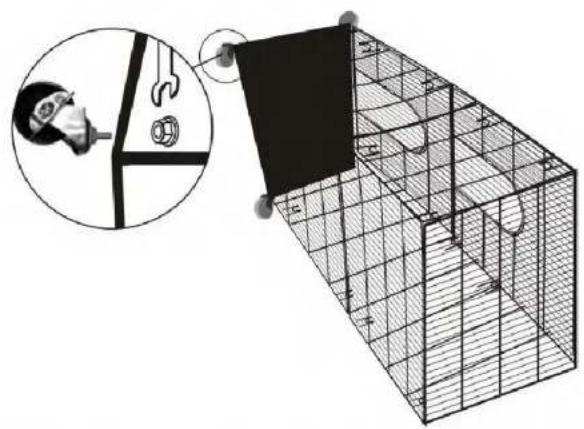
3D wireframe diagram of a modular cage structure with a magnified inset showing grid patterns (no text or symbols)- Buckle up the meshes on both sides as shown in the picture to complete the overall frame of the cage.
natural_image
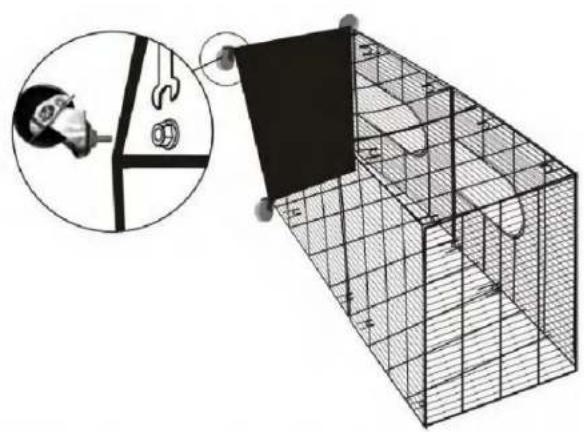
Diagram showing a person using a tool to connect a black panel on a wire cage, with an inset magnified view of the device (no text or symbols present)- Install the wheels on the bottom of the cage.(The tools are included in the packing.)
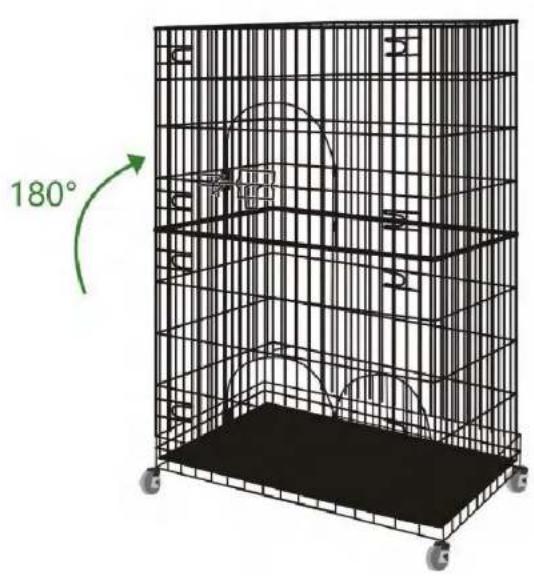
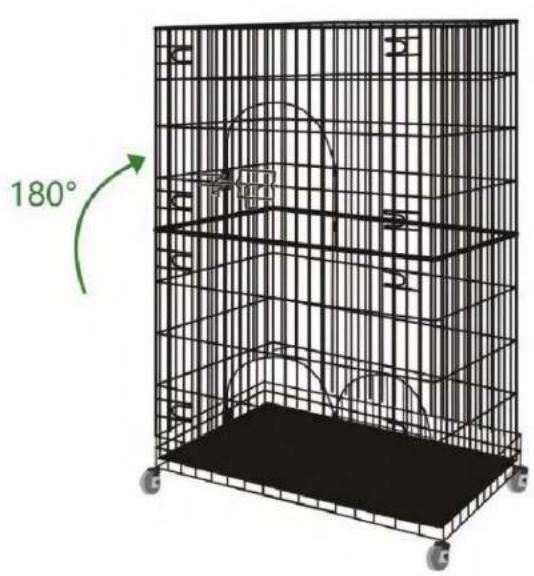
- Flip the cage 180 degrees to make it upright on the ground.
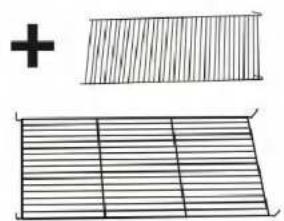
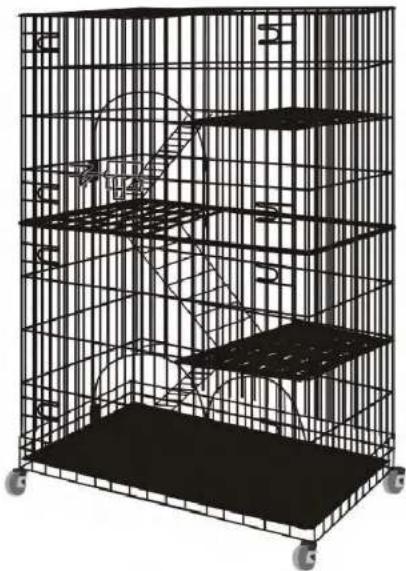
natural_image
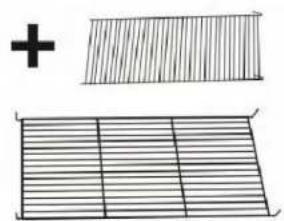
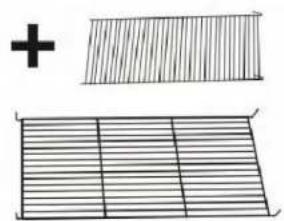
3D wireframe model of a multi-level cage structure with labeled sections (A, B, C, D) and wheels, no text or symbols present.- Put the platform sheets and the stair meshes on each tier of the cage.
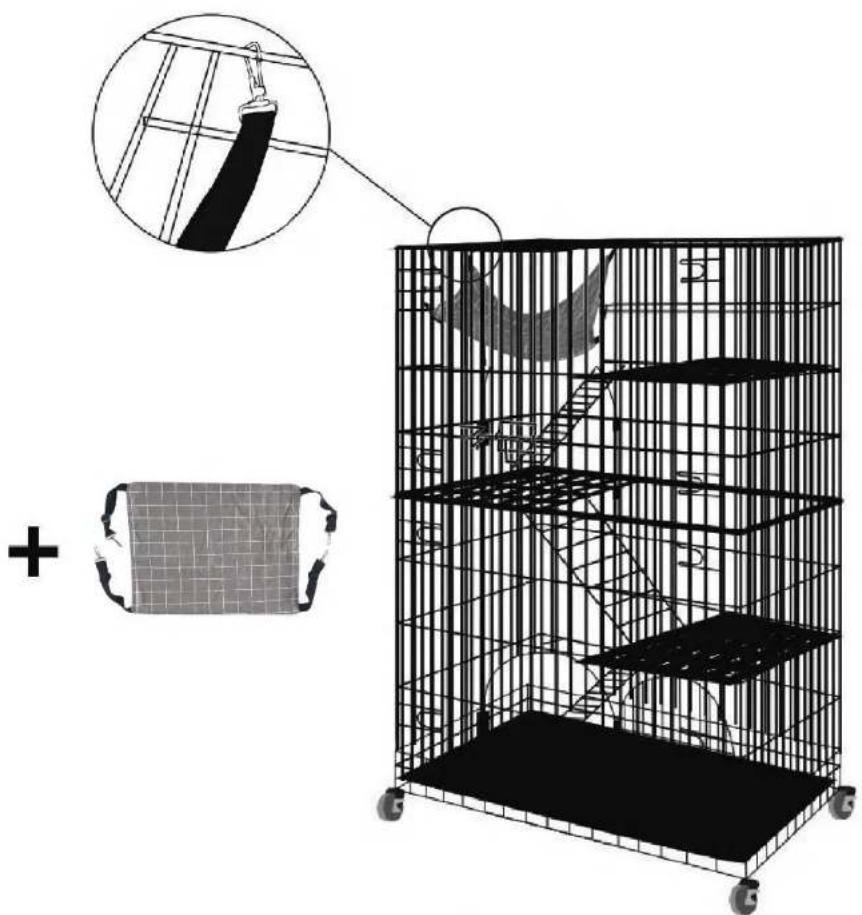
natural_image
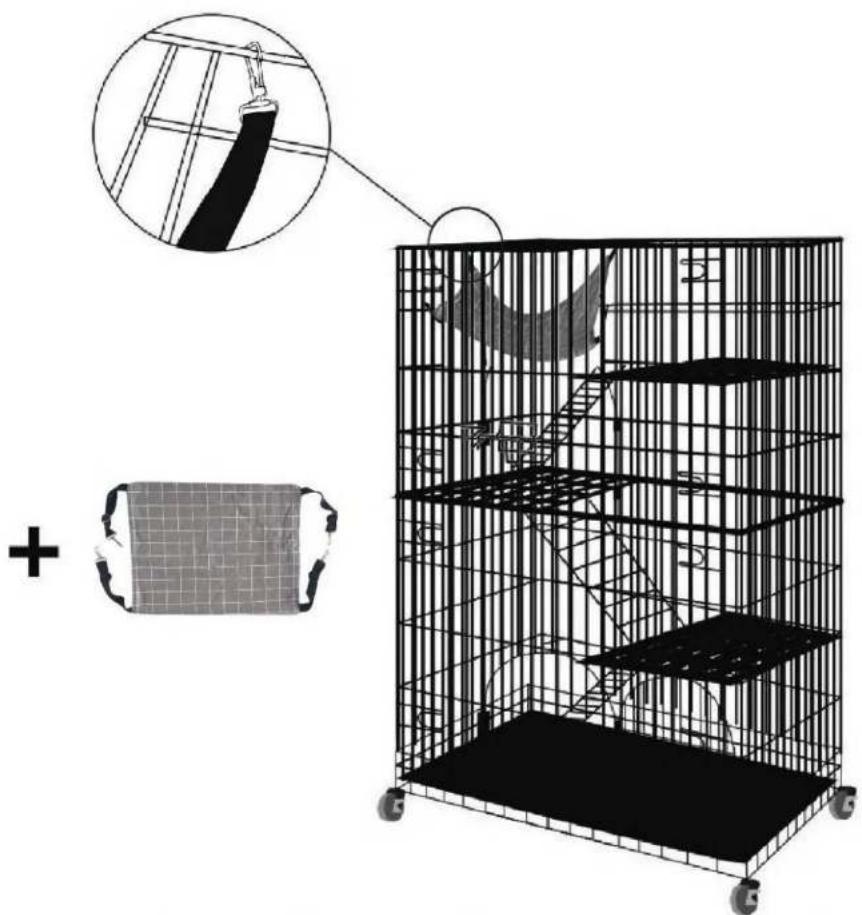
Illustration of a birdcage cage with a magnified inset showing fabric texture and a plus symbol (no text or symbols present)- At last, hang up the hammock and put the soft cushion into the cage to complete the whole installation.
Manufacturer: Shanghaimuxinmuyeyouxiangongsi
Address: Shuangchenglu 803nong11hao1602A-1609shi, baoshanqu, shanghai 200000 CN.
Imported to USA: Sanven Technology Ltd. Suite 250, 9166 Anaheim Place, Rancho Cucamonga, CA 91730
| EC | REP |
E-CrossStu GmbH
Mainzer Landstr.69, 60329 Frankfurt am Main.
| UK | REP |
YH CONSULTING LIMITED.
C/O YH Consulting Limited Office 147, Centurion House,
London Road, Staines-upon-Thames, Surrey, TW18 4AX
VEVOR®
TOUGH TOOLS, HALF PRICE
Technical Support and E-Warranty Certificate
www.vevor.com/support
VEVOR®
TOUGH TOOLS, HALF PRICE
Technical Support and E-Warranty Certificate www.vevor.com/support
INSTRUCTION FOR CAT CAGE
MODEL:BSL-4C
natural_image
3D wireframe model of a multi-level cage with wheels, no text or symbols visibleNEED HELP? CONTACT US!
Have product questions? Need technical support? Please feel free to contact us:
This is the original instruction, please read all manual instructions carefully before operating. VEVOR reserves a clear interpretation of our user manual. The appearance of the product shall be subject to the product you received. Please forgive us that we won't inform you again if there are any technology or software updates on our product.
WARNING:
Read this material before using this product. Failure to do so can result in serious injury.
Assembly precautions
- Assemble only according to these instructions. Improper assembly can create hazards.
- In order to ensure your own safety, please make sure to ANSI-approved safety goggles and heavy-duty work gloves when installing this product.
- Keep the assembly area clean and well lit.
- Keep bystanders out of the area during assembly.
5.Do not assemble when tired or when under the influence of alcohol, drugs or medication. - Product capabilities apply to properly and completely assembled product only.
- Assemble on a flat, level, hard and smooth surface capable of safely supporting a fully loaded cat cage.
Use precautions
TO PREVENT SERIOUS INJURY AND DEATH FROM TIPPING:
- DO NOT SIT OR STAND ON THIS ITEM.
- This product is not a toy. Do not allow children to play with or near this item.
Please keep small spare parts out of children's reach. - Use only on a flat, level, hard and smooth surface capable of safely supporting a fully loaded cat cage.
- Use as intended only.
- Inspect before every use; do not use if parts are loose or damaged.
SAVE THESE INSTRUCTIONS
SPECIFICATIONS
| Model | CAT CAGE |
| Product Size | 900×600×1330mm |
| Color | Black |
Components

Assembly Instructions
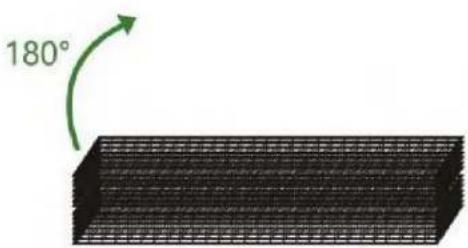
- Take out the folding pet cage from the package and place it flat on the ground.
natural_image
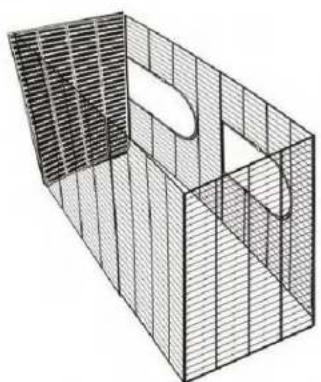
3D wireframe model of a rectangular box with internal cutouts and grid pattern (no text or symbols)- Continue to unfold the iron mesh sheets carefully to complete the basic frame of the cage.
natural_image
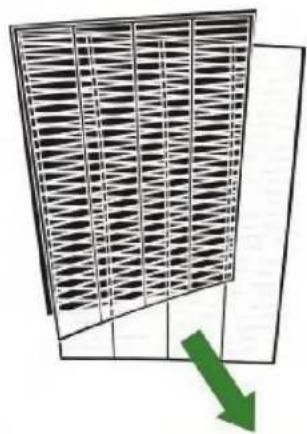
Diagram of a grid-like structure with a green arrow pointing downward (no text or symbols)- Flip it 180 degrees to make it stand on the ground sideways, and then unfold the iron mesh sheets as the picture shows.
natural_image
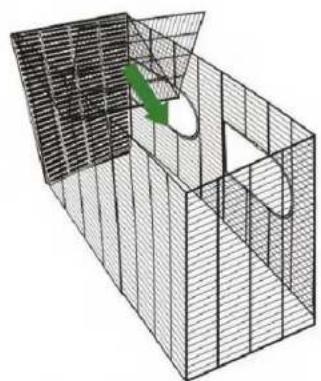
3D wireframe diagram of a grid structure with a green arrow indicating a point (no text or symbols)- Unfold the iron mesh sheets on both 2 sides and fasten them on the basic frame which has been completed on step 3.
natural_image
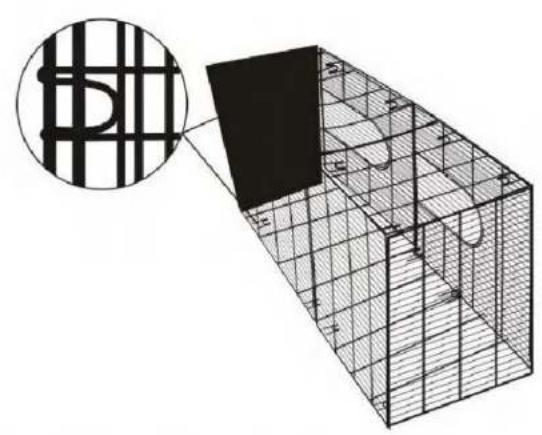
3D wireframe diagram of a modular structure with grid patterns and a magnified inset showing a grid pattern (no text or symbols)- Buckle up the meshes on both sides as shown in the picture to complete the overall frame of the cage.
natural_image
Illustration of a person using a tool to connect a wire fence with a black flag, next to a wire cage structure (no text or symbols)- Install the wheels on the bottom of the cage.(The tools are included in the packing.)
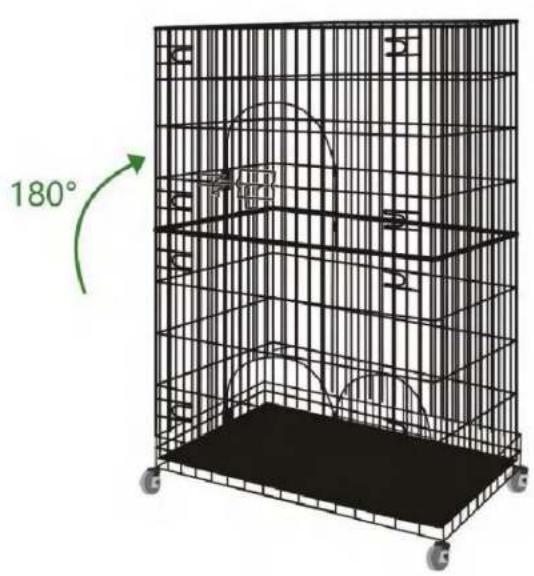
- Flip the cage 180 degrees to make it upright on the ground.
natural_image
Simple line drawing of a grid with an plus sign above it, no text or symbols present.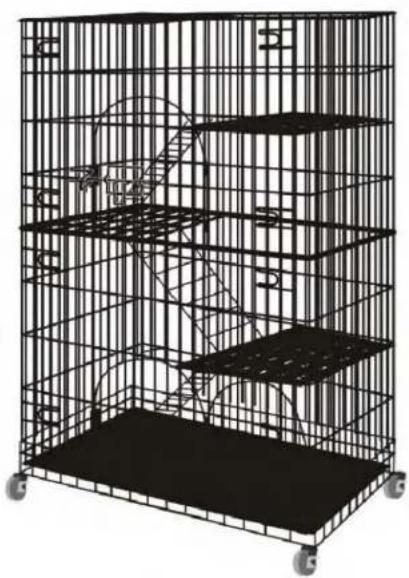
natural_image
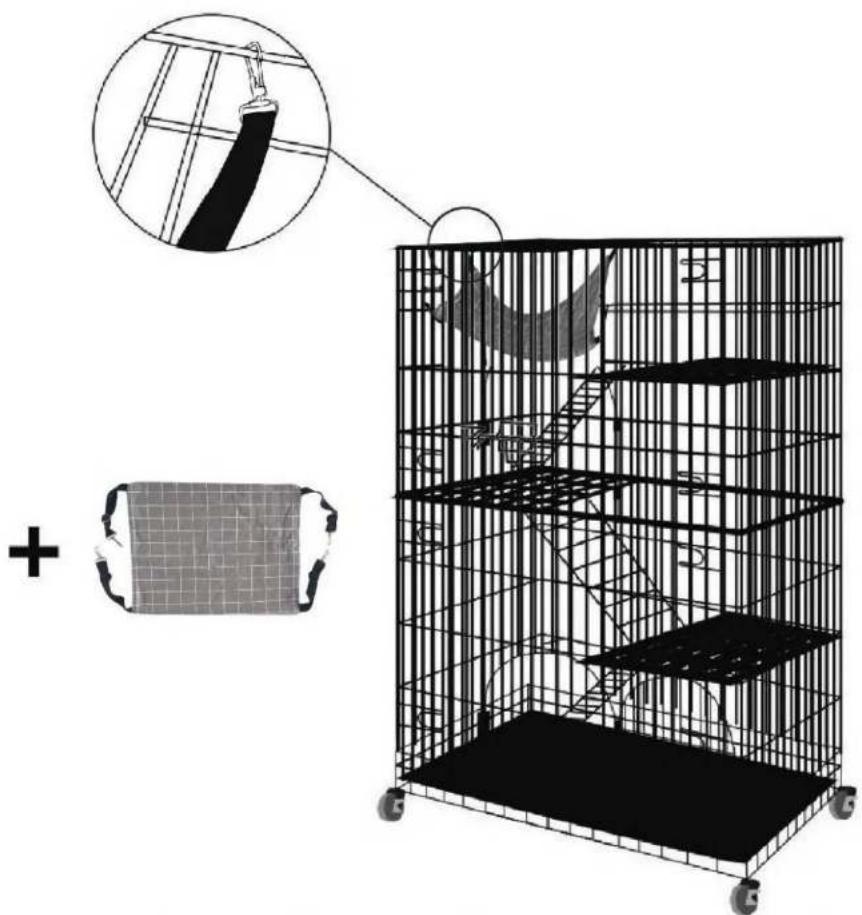
3D wireframe model of a multi-level cage with wheels, no text or symbols visible- Put the platform sheets and the stair meshes on each tier of the cage.
natural_image
Illustration of a wire cage with a magnified inset showing fabric texture and a plus symbol (no text or symbols present)- At last, hang up the hammock and put the soft cushion into the cage to complete the whole installation.
Hersteller: Shanghaimuxinmuyeyouxiangongsi
Adresse: Shuangchenglu 803nong11hao1602A-1609shi, baoshanqu, Shanghai 200000 CN.
Importiert in die USA: Sanven Technology Ltd. Suite 250, 9166 Anaheim Place, Rancho Cucamonga, CA 91730
| EC | REP |
E-CrossStu GmbH
Mainzer Landstr.69, 60329 Frankfurt am Main.
| UK | REP |
YH CONSULTING LIMITED.
C/O YH Consulting Limited Office 147, Centurion House,
London Road, Staines-upon-Thames, Surrey, TW18 4AX
VEVOR®
TOUGH TOOLS, HALF PRICE
Technical Support and E-Warranty Certificate
www.vevor.com/support
VEVOR®
TOUGH TOOLS, HALF PRICE
Technical Support and E-Warranty Certificate www.vevor.com/support
INSTRUCTION FOR CAT CAGE
MODEL:BSL-4C
natural_image
3D wireframe model of a multi-level cage with wheels, no text or symbols visibleNEED HELP? CONTACT US!
Have product questions? Need technical support? Please feel free to contact us:
This is the original instruction, please read all manual instructions carefully before operating. VEVOR reserves a clear interpretation of our user manual. The appearance of the product shall be subject to the product you received. Please forgive us that we won't inform you again if there are any technology or software updates on our product.
WARNING:
Read this material before using this product. Failure to do so can result in serious injury.
Assembly precautions
- Assemble only according to these instructions. Improper assembly can create hazards.
- In order to ensure your own safety, please make sure to ANSI-approved safety goggles and heavy-duty work gloves when installing this product.
- Keep the assembly area clean and well lit.
- Keep bystanders out of the area during assembly.
5.Do not assemble when tired or when under the influence of alcohol, drugs or medication. - Product capabilities apply to properly and completely assembled product only.
- Assemble on a flat, level, hard and smooth surface capable of safely supporting a fully loaded cat cage.
Use precautions
TO PREVENT SERIOUS INJURY AND DEATH FROM TIPPING:
- DO NOT SIT OR STAND ON THIS ITEM.
- This product is not a toy. Do not allow children to play with or near this item.
Please keep small spare parts out of children's reach. - Use only on a flat, level, hard and smooth surface capable of safely supporting a fully loaded cat cage.
- Use as intended only.
- Inspect before every use; do not use if parts are loose or damaged.
SAVE THESE INSTRUCTIONS
SPECIFICATIONS
| Model | CAT CAGE |
| Product Size | 900×600×1330mm |
| Color | Black |
Components

Assembly Instructions
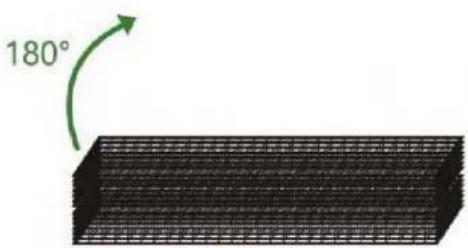
- Take out the folding pet cage from the package and place it flat on the ground.
natural_image
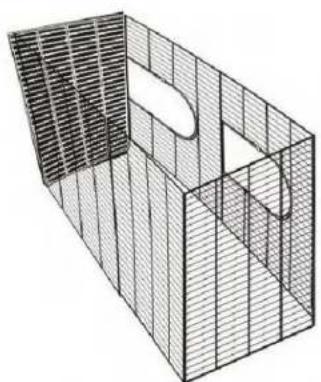
3D wireframe model of a rectangular box with internal cutouts and grid pattern (no text or symbols)- Continue to unfold the iron mesh sheets carefully to complete the basic frame of the cage.
natural_image
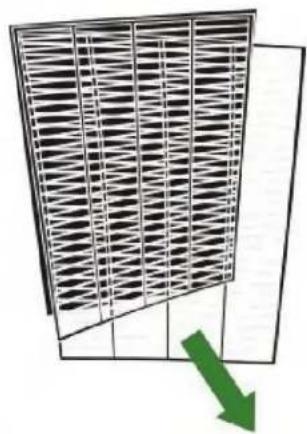
Diagram of a grid-like structure with a green arrow pointing downward (no text or symbols)- Flip it 180 degrees to make it stand on the ground sideways, and then unfold the iron mesh sheets as the picture shows.
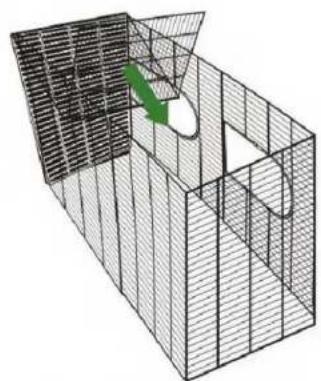
natural_image
3D wireframe diagram of a grid structure with a green arrow indicating a point (no text or symbols)- Unfold the iron mesh sheets on both 2 sides and fasten them on the basic frame which has been completed on step 3.
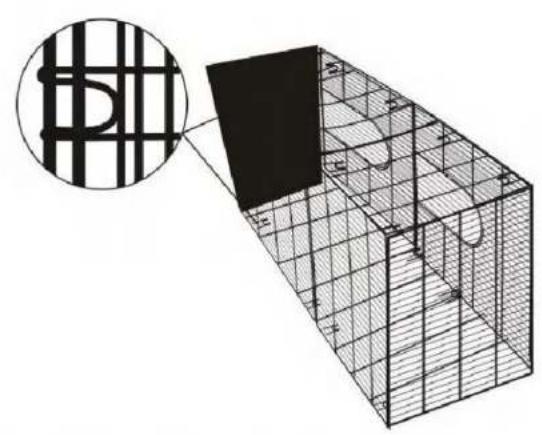
natural_image
3D wireframe diagram of a modular structure with grid patterns and a magnified inset showing a grid pattern (no text or symbols)- Buckle up the meshes on both sides as shown in the picture to complete the overall frame of the cage.
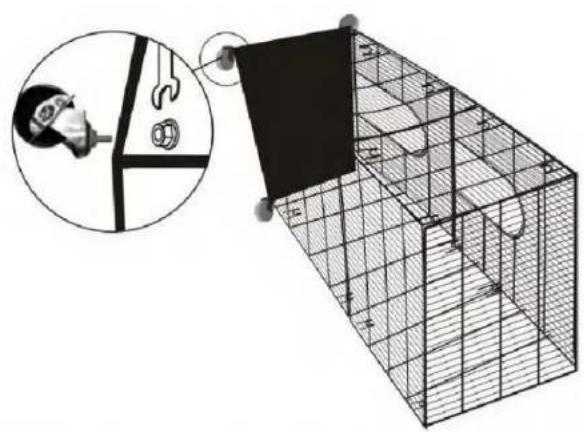
natural_image
Diagram showing a person using a tool to connect a wire fence to a wire cage, with an inset magnified view of the device (no text or symbols present)- Install the wheels on the bottom of the cage.(The tools are included in the packing.)
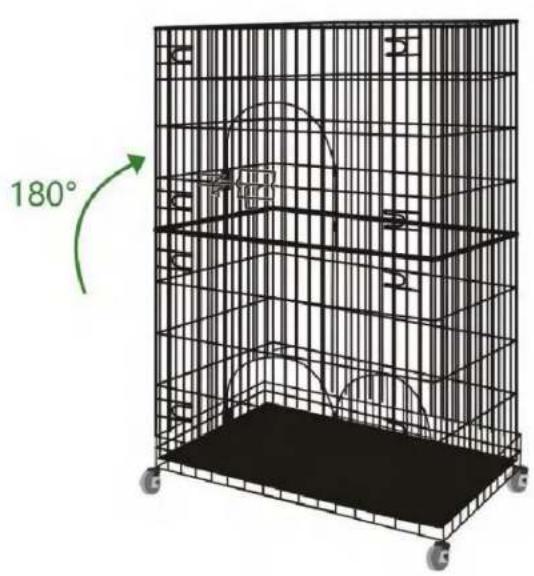
- Flip the cage 180 degrees to make it upright on the ground.
natural_image
Simple line drawing of a grid with an plus sign above it, no text or symbols present.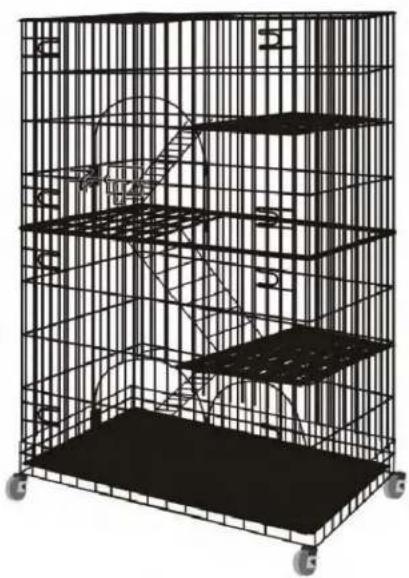
natural_image
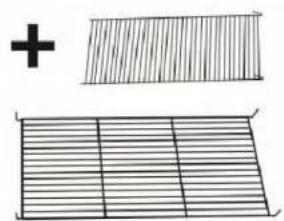
3D wireframe model of a multi-level cage structure with no visible text or symbols- Put the platform sheets and the stair meshes on each tier of the cage.
natural_image
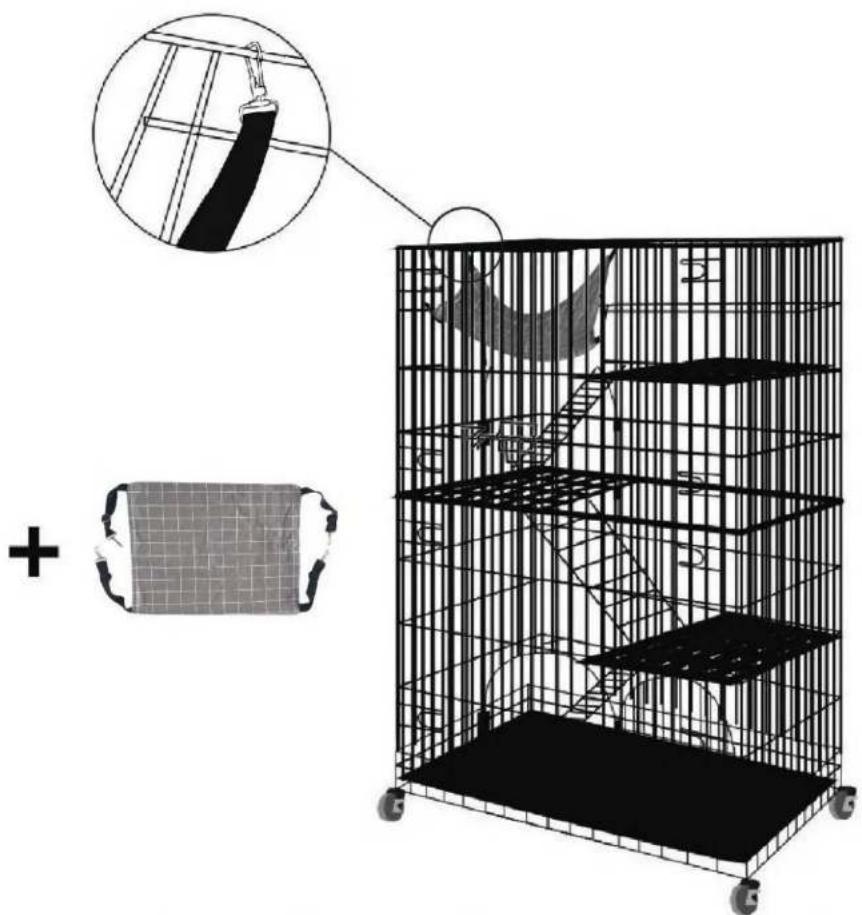
Illustration of a wire cage with a magnified inset showing fabric texture and a plus symbol (no text or symbols present)- At last, hang up the hammock and put the soft cushion into the cage to complete the whole installation.
Fabricant: Shanghaimuxinmuyeyouxiangongsi
Adresse : Shuangchenglu 803nong11hao1602A-1609shi, baoshanqu, shanghai 200000 CN.
C/O YH Consulting Limited Office 147, Centurion House,
Route de Londres, Staines-upon-Thames, Surrey, TW18 4AX
VEVOR®
TOUGH TOOLS, HALF PRICE
Technical Support and E-Warranty Certificate
www.vevor.com/support
VEVOR®
TOUGH TOOLS, HALF PRICE
Technical Support and E-Warranty Certificate www.vevor.com/support
INSTRUCTION FOR CAT CAGE
MODEL:BSL-4C
natural_image
3D wireframe model of a multi-level cage with wheels, no text or symbols visibleNEED HELP? CONTACT US!
Have product questions? Need technical support? Please feel free to contact us:
Technische ondersteuning en e-garantiecertificaat www.vevor.com/support
This is the original instruction, please read all manual instructions carefully before operating. VEVOR reserves a clear interpretation of our user manual. The appearance of the product shall be subject to the product you received. Please forgive us that we won't inform you again if there are any technology or software updates on our product.
WARNING:
Read this material before using this product. Failure to do so can result in serious injury.
Assembly precautions
- Assemble only according to these instructions. Improper assembly can create hazards.
- In order to ensure your own safety, please make sure to ANSI-approved safety goggles and heavy-duty work gloves when installing this product.
- Keep the assembly area clean and well lit.
- Keep bystanders out of the area during assembly.
5.Do not assemble when tired or when under the influence of alcohol, drugs or medication. - Product capabilities apply to properly and completely assembled product only.
- Assemble on a flat, level, hard and smooth surface capable of safely supporting a fully loaded cat cage.
Use precautions
TO PREVENT SERIOUS INJURY AND DEATH FROM TIPPING:
- DO NOT SIT OR STAND ON THIS ITEM.
- This product is not a toy. Do not allow children to play with or near this item.
Please keep small spare parts out of children's reach. - Use only on a flat, level, hard and smooth surface capable of safely supporting a fully loaded cat cage.
- Use as intended only.
- Inspect before every use; do not use if parts are loose or damaged.
SAVE THESE INSTRUCTIONS
SPECIFICATIONS
| Model | CAT CAGE |
| Product Size | 900×600×1330mm |
| Color | Black |
Components

Assembly Instructions
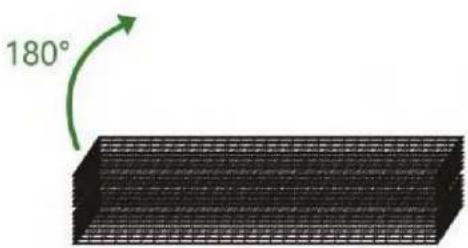
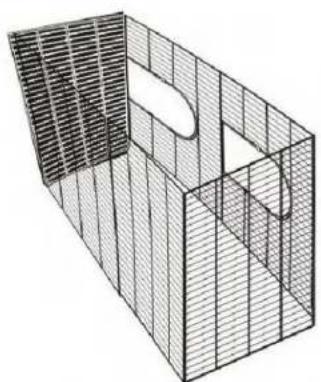
- Take out the folding pet cage from the package and place it flat on the ground.
natural_image
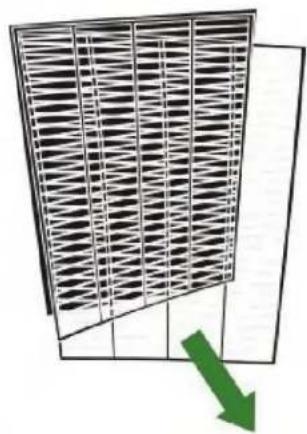
3D wireframe model of a rectangular box with internal cutouts and grid pattern (no text or symbols)- Continue to unfold the iron mesh sheets carefully to complete the basic frame of the cage.
natural_image
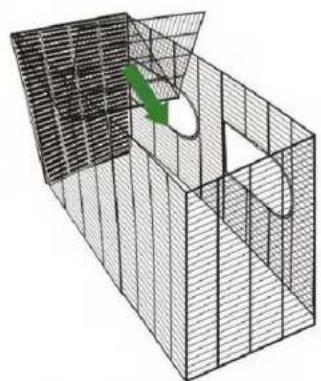
Diagram of a grid-like structure with a green arrow pointing downward (no text or symbols)- Flip it 180 degrees to make it stand on the ground sideways, and then unfold the iron mesh sheets as the picture shows.
natural_image
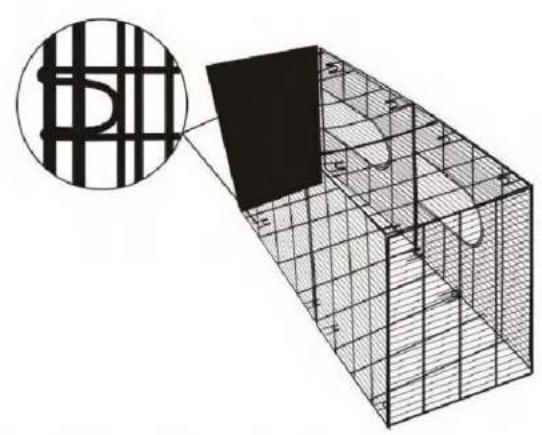
3D wireframe diagram of a grid structure with a green arrow indicating a point (no text or symbols)- Unfold the iron mesh sheets on both 2 sides and fasten them on the basic frame which has been completed on step 3.
natural_image
3D wireframe diagram of a modular structure with grid patterns and a magnified inset showing a grid pattern (no text or symbols)- Buckle up the meshes on both sides as shown in the picture to complete the overall frame of the cage.
natural_image
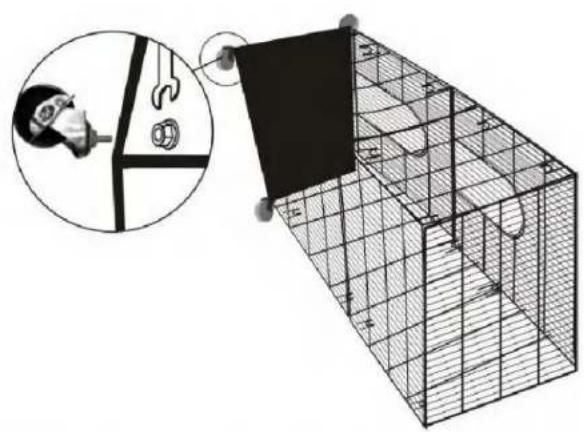
Diagram showing a person using a tool to connect a wire fence to a wire cage, with an inset magnified view of the device (no text or symbols present)- Install the wheels on the bottom of the cage.(The tools are included in the packing.)
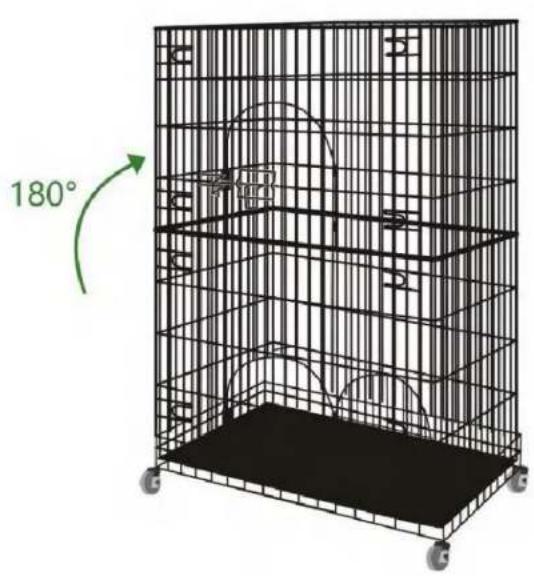
- Flip the cage 180 degrees to make it upright on the ground.
natural_image
Simple line drawing of a grid with an plus sign above it, no text or symbols present.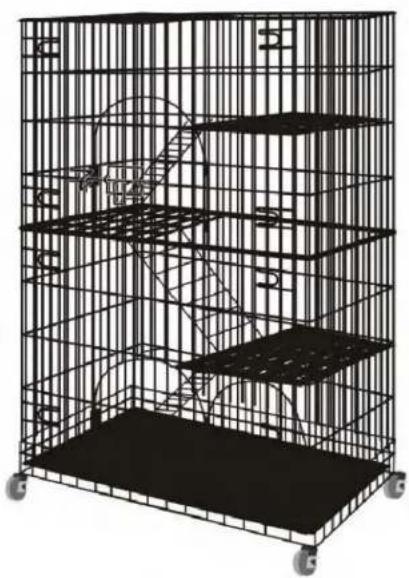
natural_image
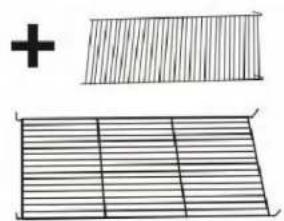
3D wireframe model of a multi-level cage with wheels, no text or symbols visible- Put the platform sheets and the stair meshes on each tier of the cage.
natural_image
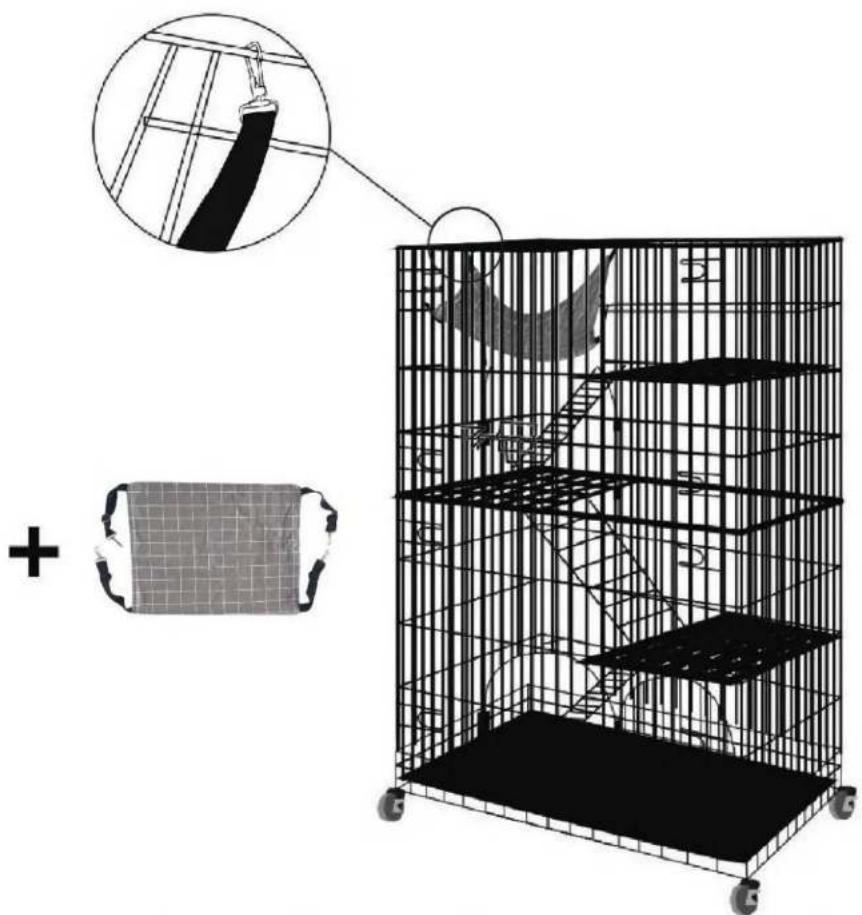
Illustration of a wire cage with a magnified inset showing fabric texture and a plus symbol (no text or symbols present)- At last, hang up the hammock and put the soft cushion into the cage to complete the whole installation.
Fabrikant: Shanghaimuxinmuyeyouxiangongsi
Adres: Shuangchenglu 803nong11hao1602A-1609shi, baoshanqu, shanghai 200000 CN.
C/O YH Consulting Limited Office 147, Centurion House,
Londen Road, Staines-upon-Thames, Surrey, TW18 4AX
VEVOR®
TOUGH TOOLS, HALF PRICE
Technical Support and E-Warranty Certificate
www.vevor.com/support
VEVOR®
TOUGH TOOLS, HALF PRICE
Technical Support and E-Warranty Certificate www.vevor.com/support
INSTRUCTION FOR CAT CAGE
MODEL:BSL-4C
natural_image
3D wireframe model of a multi-level cage with wheels, no text or symbols visibleNEED HELP? CONTACT US!
Have product questions? Need technical support? Please feel free to contact us:
This is the original instruction, please read all manual instructions carefully before operating. VEVOR reserves a clear interpretation of our user manual. The appearance of the product shall be subject to the product you received. Please forgive us that we won't inform you again if there are any technology or software updates on our product.
WARNING:
Read this material before using this product. Failure to do so can result in serious injury.
Assembly precautions
- Assemble only according to these instructions. Improper assembly can create hazards.
- In order to ensure your own safety, please make sure to ANSI-approved safety goggles and heavy-duty work gloves when installing this product.
- Keep the assembly area clean and well lit.
- Keep bystanders out of the area during assembly.
5.Do not assemble when tired or when under the influence of alcohol, drugs or medication. - Product capabilities apply to properly and completely assembled product only.
- Assemble on a flat, level, hard and smooth surface capable of safely supporting a fully loaded cat cage.
Use precautions
TO PREVENT SERIOUS INJURY AND DEATH FROM TIPPING:
- DO NOT SIT OR STAND ON THIS ITEM.
- This product is not a toy. Do not allow children to play with or near this item.
Please keep small spare parts out of children's reach. - Use only on a flat, level, hard and smooth surface capable of safely supporting a fully loaded cat cage.
- Use as intended only.
- Inspect before every use; do not use if parts are loose or damaged.
SAVE THESE INSTRUCTIONS
SPECIFICATIONS
| Model | CAT CAGE |
| Product Size | 900×600×1330mm |
| Color | Black |
Components

Assembly Instructions
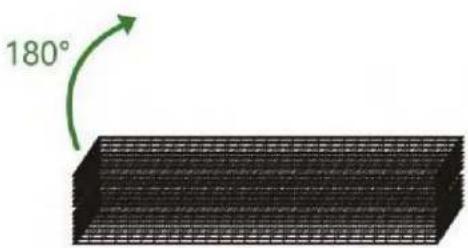
- Take out the folding pet cage from the package and place it flat on the ground.
natural_image
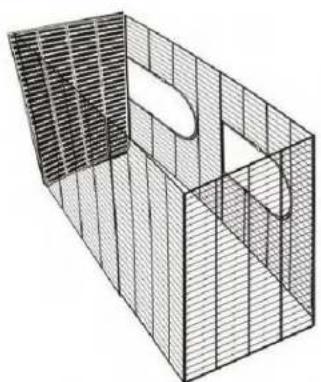
3D wireframe model of a rectangular box with internal cutouts and grid pattern (no text or symbols)- Continue to unfold the iron mesh sheets carefully to complete the basic frame of the cage.
natural_image
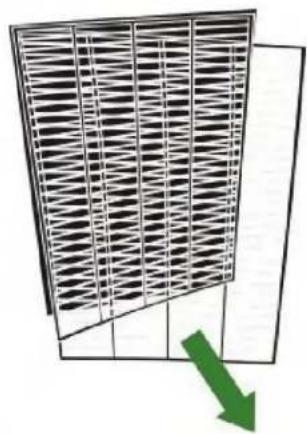
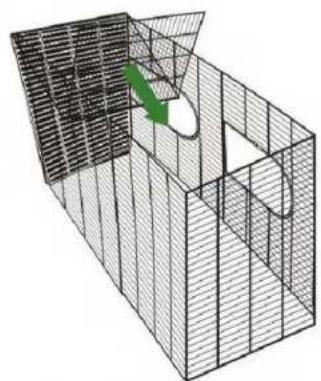
Diagram of a grid-like structure with a green arrow pointing downward (no text or symbols)- Flip it 180 degrees to make it stand on the ground sideways, and then unfold the iron mesh sheets as the picture shows.
natural_image
3D wireframe diagram of a grid structure with a green arrow indicating a point (no text or symbols)- Unfold the iron mesh sheets on both 2 sides and fasten them on the basic frame which has been completed on step 3.

natural_image
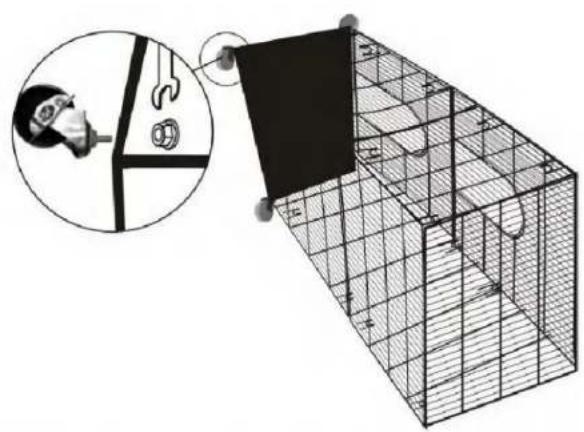
3D wireframe diagram of a modular structure with grid patterns and a magnified inset showing a grid pattern (no text or symbols)- Buckle up the meshes on both sides as shown in the picture to complete the overall frame of the cage.
natural_image
Illustration of a person using a tool to connect a wire fence with a black flag, next to a wire cage structure (no text or symbols)- Install the wheels on the bottom of the cage.(The tools are included in the packing.)
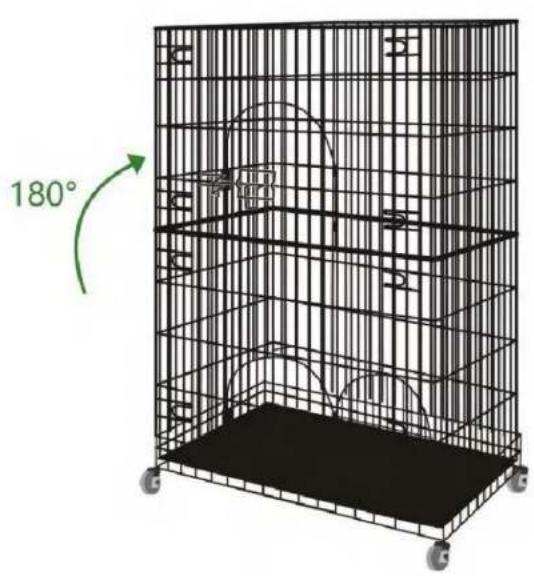
- Flip the cage 180 degrees to make it upright on the ground.
natural_image
Simple line drawing of a grid with an plus sign above it, no text or symbols present.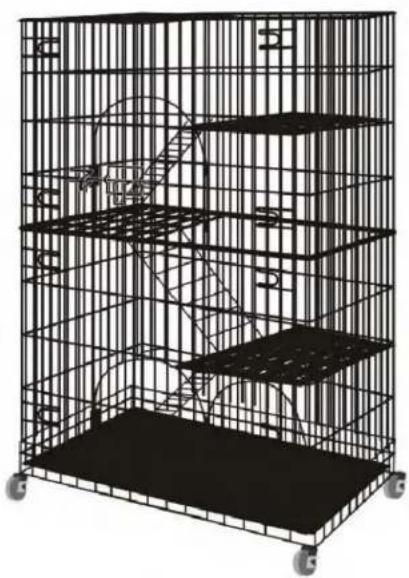
natural_image
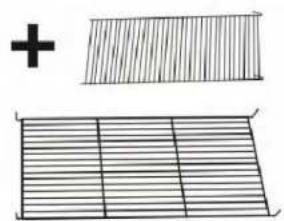
3D wireframe model of a multi-level cage with wheels, no text or symbols visible- Put the platform sheets and the stair meshes on each tier of the cage.
natural_image
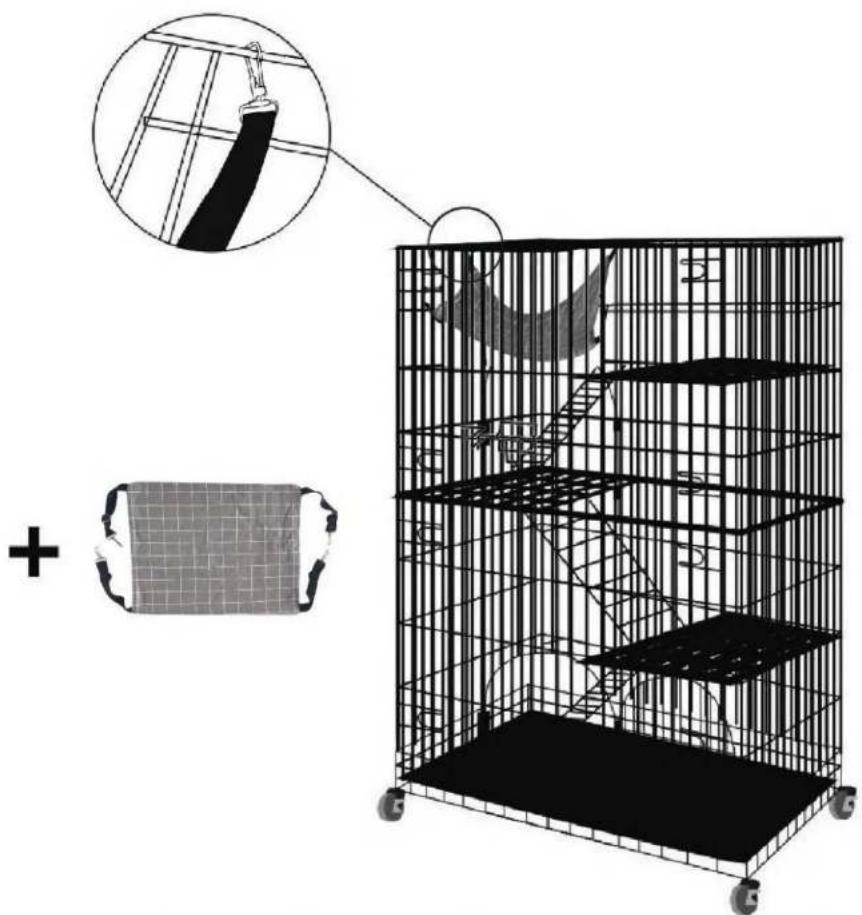
Illustration of a wire cage with a magnified inset showing fabric texture and a plus symbol (no text or symbols present)- At last, hang up the hammock and put the soft cushion into the cage to complete the whole installation.
Tillverkare: Shanghaimuxinmuyeyouxiangongsi
Adress: Shuangchenglu 803nong11hao1602A-1609shi, baoshanqu, shanghai 200000 CN.
Importerad till USA: Sanven Technology Ltd. Suite 250, 9166 Anaheim Place, Rancho Cucamonga, CA 91730
| EC | REP |
E-CrossStu GmbH
Mainzer Landstr.69, 60329 Frankfurt am Main.
| UK | REP |
YH CONSULTING LIMITED.
C/O YH Consulting Limited Office 147, Centurion House,
London Road, Staines-upon-Thames, Surrey, TW18 4AX
VEVOR®
TOUGH TOOLS, HALF PRICE
Technical Support and E-Warranty Certificate
www.vevor.com/support
VEVOR®
TOUGH TOOLS, HALF PRICE
Technical Support and E-Warranty Certificate www.vevor.com/support
INSTRUCTION FOR CAT CAGE
MODEL:BSL-4C
natural_image
3D wireframe model of a multi-level cage with wheels, no text or symbols visibleNEED HELP? CONTACT US!
Have product questions? Need technical support? Please feel free to contact us:
This is the original instruction, please read all manual instructions carefully before operating. VEVOR reserves a clear interpretation of our user manual. The appearance of the product shall be subject to the product you received. Please forgive us that we won't inform you again if there are any technology or software updates on our product.
WARNING:
Read this material before using this product. Failure to do so can result in serious injury.
Assembly precautions
- Assemble only according to these instructions. Improper assembly can create hazards.
- In order to ensure your own safety, please make sure to ANSI-approved safety goggles and heavy-duty work gloves when installing this product.
- Keep the assembly area clean and well lit.
- Keep bystanders out of the area during assembly.
5.Do not assemble when tired or when under the influence of alcohol, drugs or medication. - Product capabilities apply to properly and completely assembled product only.
- Assemble on a flat, level, hard and smooth surface capable of safely supporting a fully loaded cat cage.
Use precautions
TO PREVENT SERIOUS INJURY AND DEATH FROM TIPPING:
- DO NOT SIT OR STAND ON THIS ITEM.
- This product is not a toy. Do not allow children to play with or near this item.
Please keep small spare parts out of children's reach. - Use only on a flat, level, hard and smooth surface capable of safely supporting a fully loaded cat cage.
- Use as intended only.
- Inspect before every use; do not use if parts are loose or damaged.
SAVE THESE INSTRUCTIONS
SPECIFICATIONS
| Model | CAT CAGE |
| Product Size | 900×600×1330mm |
| Color | Black |
Components

Assembly Instructions
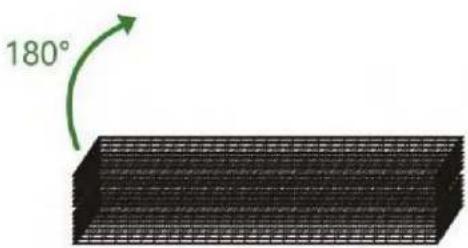
- Take out the folding pet cage from the package and place it flat on the ground.
natural_image
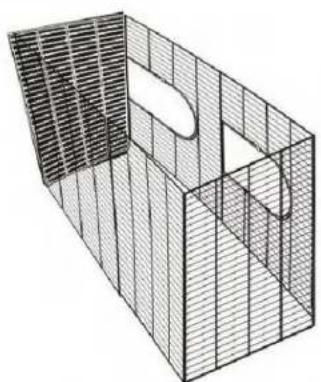
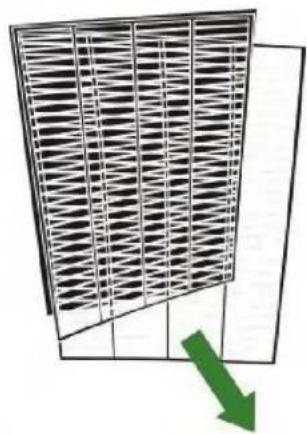
3D wireframe model of a rectangular box with internal cutouts and grid pattern (no text or symbols)- Continue to unfold the iron mesh sheets carefully to complete the basic frame of the cage.
natural_image
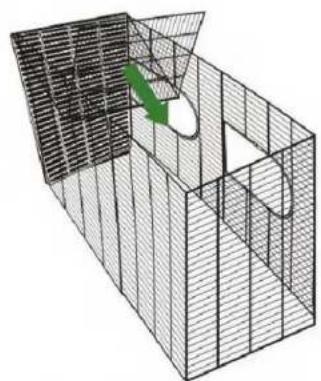
Diagram of a grid-like structure with a green arrow pointing downward (no text or symbols)- Flip it 180 degrees to make it stand on the ground sideways, and then unfold the iron mesh sheets as the picture shows.
natural_image
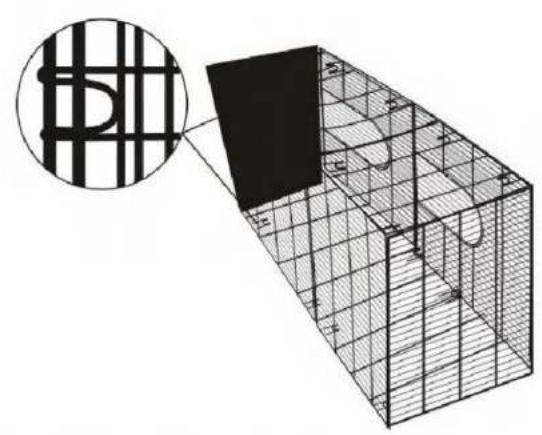
3D wireframe diagram of a grid structure with a green arrow indicating a point (no text or symbols)- Unfold the iron mesh sheets on both 2 sides and fasten them on the basic frame which has been completed on step 3.
natural_image
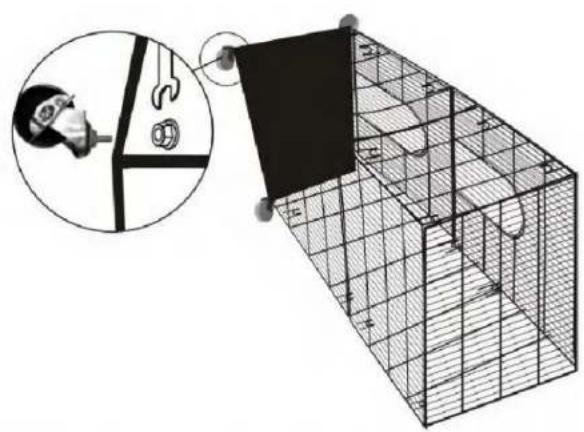
3D wireframe diagram of a modular structure with grid patterns and a magnified inset showing a grid pattern (no text or symbols)- Buckle up the meshes on both sides as shown in the picture to complete the overall frame of the cage.
natural_image
Illustration of a person using a tool to connect a wire fence with a black flag, next to a wire cage structure (no text or symbols)- Install the wheels on the bottom of the cage.(The tools are included in the packing.)
- Flip the cage 180 degrees to make it upright on the ground.
natural_image
Simple line drawing of a grid with an plus sign above it, no text or symbols present.
natural_image
3D wireframe model of a multi-level cage with wheels, no text or symbols visible- Put the platform sheets and the stair meshes on each tier of the cage.
natural_image
Illustration of a wire cage with a magnified inset showing fabric texture and a plus symbol (no text or symbols present)- At last, hang up the hammock and put the soft cushion into the cage to complete the whole installation.
Fabricante: Shanghaimuxinmuyeyouxiangongsi
Dirección: Shuangchenglu 803nong11hao1602A-1609shi, baoshanqu, shanghai 200000 CN.
Importado a EE. UU.: Sanven Technology Ltd. Suite 250, 9166 Anaheim Place, Rancho Cucamonga, CA 91730

E-CrossStu GmbH
C/O YH Consulting Limited Office 147, Centurion House,
Carretera de Londres, Staines-upon-Thames, Surrey, TW18 4AX
VEVOR®
TOUGH TOOLS, HALF PRICE
Technical Support and E-Warranty Certificate
www.vevor.com/support
VEVOR®
TOUGH TOOLS, HALF PRICE
Technical Support and E-Warranty Certificate www.vevor.com/support
INSTRUCTION FOR CAT CAGE
MODEL:BSL-4C
natural_image
3D wireframe model of a multi-level cage with wheels, no text or symbols visibleNEED HELP? CONTACT US!
Have product questions? Need technical support? Please feel free to contact us:
This is the original instruction, please read all manual instructions carefully before operating. VEVOR reserves a clear interpretation of our user manual. The appearance of the product shall be subject to the product you received. Please forgive us that we won't inform you again if there are any technology or software updates on our product.
WARNING:
Read this material before using this product. Failure to do so can result in serious injury.
Assembly precautions
- Assemble only according to these instructions. Improper assembly can create hazards.
- In order to ensure your own safety, please make sure to ANSI-approved safety goggles and heavy-duty work gloves when installing this product.
- Keep the assembly area clean and well lit.
- Keep bystanders out of the area during assembly.
5.Do not assemble when tired or when under the influence of alcohol, drugs or medication. - Product capabilities apply to properly and completely assembled product only.
- Assemble on a flat, level, hard and smooth surface capable of safely supporting a fully loaded cat cage.
Use precautions
TO PREVENT SERIOUS INJURY AND DEATH FROM TIPPING:
- DO NOT SIT OR STAND ON THIS ITEM.
- This product is not a toy. Do not allow children to play with or near this item.
Please keep small spare parts out of children's reach. - Use only on a flat, level, hard and smooth surface capable of safely supporting a fully loaded cat cage.
- Use as intended only.
- Inspect before every use; do not use if parts are loose or damaged.
SAVE THESE INSTRUCTIONS
SPECIFICATIONS
| Model | CAT CAGE |
| Product Size | 900×600×1330mm |
| Color | Black |
Components

Assembly Instructions
- Take out the folding pet cage from the package and place it flat on the ground.
natural_image
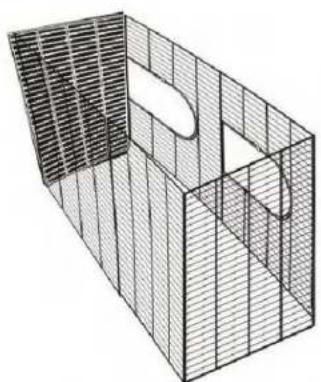
3D wireframe model of a rectangular box with internal cutouts and grid pattern (no text or symbols)- Continue to unfold the iron mesh sheets carefully to complete the basic frame of the cage.
natural_image
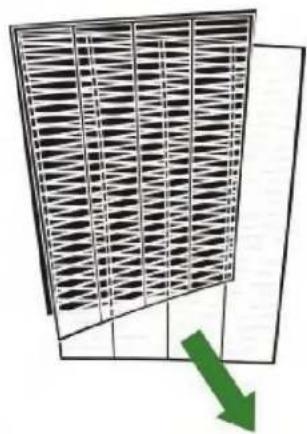
Diagram of a grid-like structure with a green arrow pointing downward (no text or symbols)- Flip it 180 degrees to make it stand on the ground sideways, and then unfold the iron mesh sheets as the picture shows.
natural_image
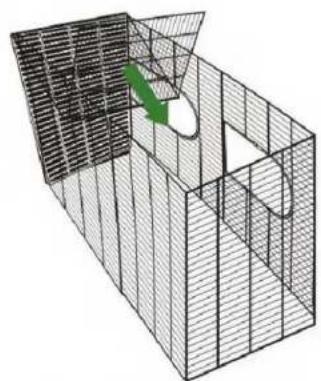
3D wireframe diagram of a grid structure with a green arrow indicating a point of interest (no text or symbols)- Unfold the iron mesh sheets on both 2 sides and fasten them on the basic frame which has been completed on step 3.
natural_image
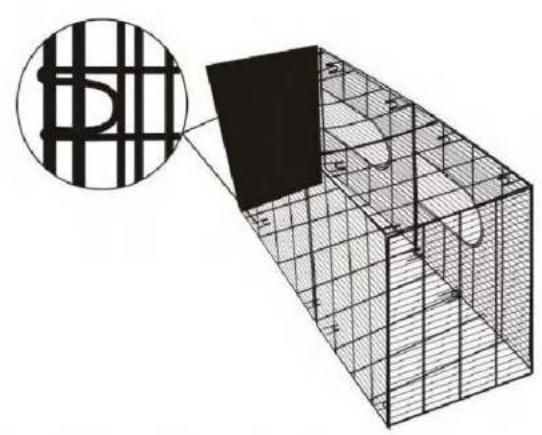
3D wireframe diagram of a modular structure with grid patterns and a magnified inset showing a grid pattern (no text or symbols)- Buckle up the meshes on both sides as shown in the picture to complete the overall frame of the cage.
natural_image
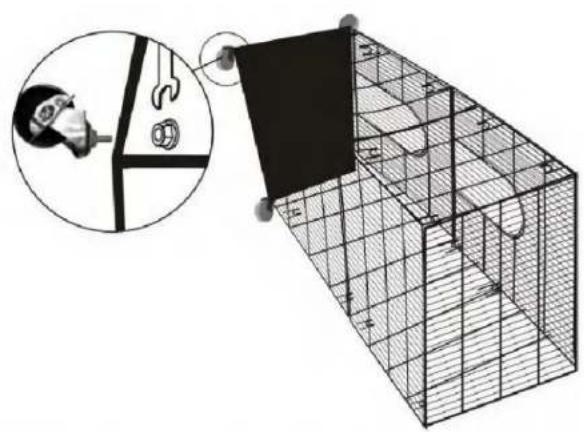
Illustration of a person using a tool to connect a wire fence with a black flag, next to a wire cage structure (no text or symbols)- Install the wheels on the bottom of the cage.(The tools are included in the packing.)
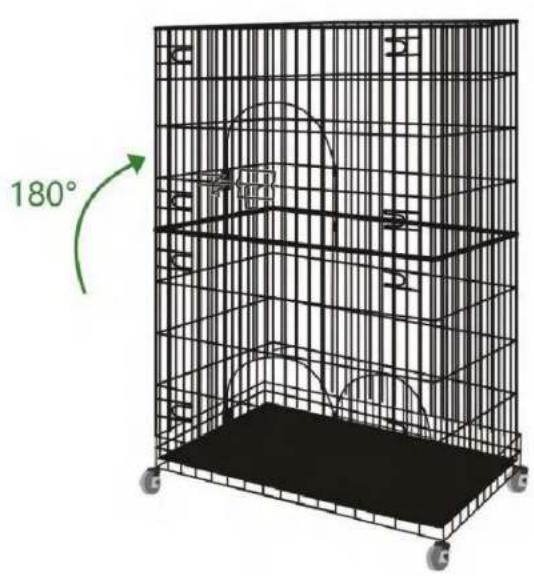
- Flip the cage 180 degrees to make it upright on the ground.
natural_image
Simple line drawing of a grid with an plus sign above it, no text or symbols present.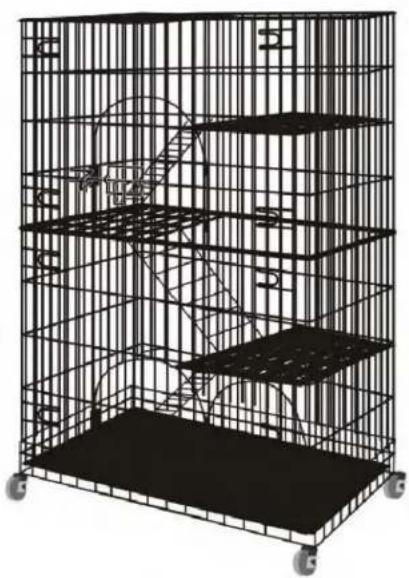
natural_image
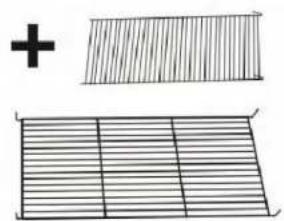
3D wireframe model of a multi-level cage with wheels, no text or symbols visible- Put the platform sheets and the stair meshes on each tier of the cage.
natural_image
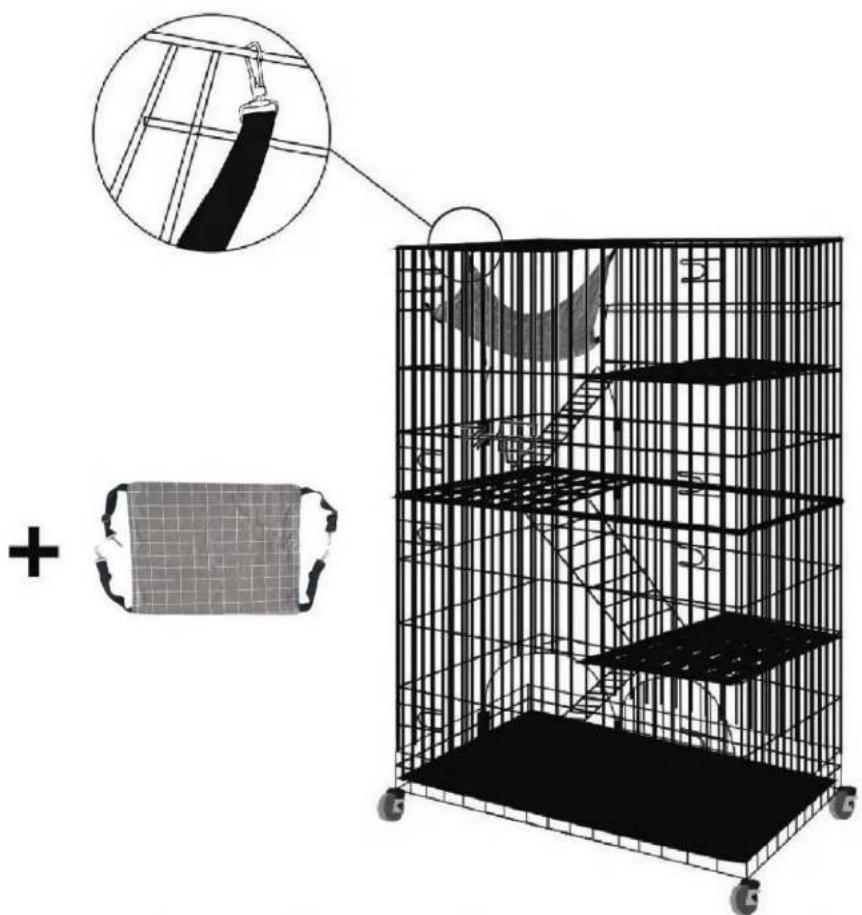
Illustration of a wire cage with a magnified inset showing fabric texture and a plus symbol (no text or symbols present)- At last, hang up the hammock and put the soft cushion into the cage to complete the whole installation.
C/O YH Consulting Limited Office 147, Centurion House,
Via Roma, 101, 00186 Roma, Italia
VEVOR®
TOUGH TOOLS, HALF PRICE
Technical Support and E-Warranty Certificate
www.vevor.com/support
VEVOR®
TOUGH TOOLS, HALF PRICE
Technical Support and E-Warranty Certificate www.vevor.com/support
INSTRUCTION FOR CAT CAGE
MODEL:BSL-4C
natural_image
3D wireframe model of a multi-level cage with wheels, no text or symbols visibleNEED HELP? CONTACT US!
Have product questions? Need technical support? Please feel free to contact us:
This is the original instruction, please read all manual instructions carefully before operating. VEVOR reserves a clear interpretation of our user manual. The appearance of the product shall be subject to the product you received. Please forgive us that we won't inform you again if there are any technology or software updates on our product.
WARNING:
Read this material before using this product. Failure to do so can result in serious injury.
Assembly precautions
- Assemble only according to these instructions. Improper assembly can create hazards.
- In order to ensure your own safety, please make sure to ANSI-approved safety goggles and heavy-duty work gloves when installing this product.
- Keep the assembly area clean and well lit.
- Keep bystanders out of the area during assembly.
5.Do not assemble when tired or when under the influence of alcohol, drugs or medication. - Product capabilities apply to properly and completely assembled product only.
- Assemble on a flat, level, hard and smooth surface capable of safely supporting a fully loaded cat cage.
Use precautions
TO PREVENT SERIOUS INJURY AND DEATH FROM TIPPING:
- DO NOT SIT OR STAND ON THIS ITEM.
- This product is not a toy. Do not allow children to play with or near this item.
Please keep small spare parts out of children's reach. - Use only on a flat, level, hard and smooth surface capable of safely supporting a fully loaded cat cage.
- Use as intended only.
- Inspect before every use; do not use if parts are loose or damaged.
SAVE THESE INSTRUCTIONS
SPECIFICATIONS
| Model | CAT CAGE |
| Product Size | 900×600×1330mm |
| Color | Black |
Components

Assembly Instructions
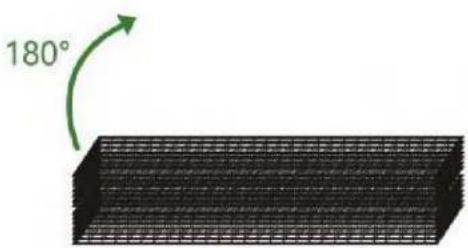
- Take out the folding pet cage from the package and place it flat on the ground.
natural_image
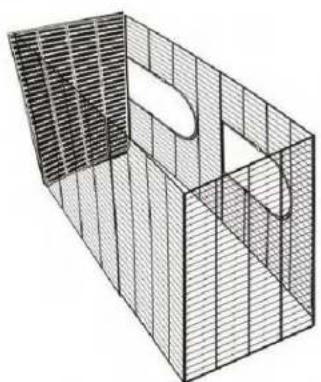
3D wireframe model of a rectangular box with internal cutouts and grid pattern (no text or symbols)- Continue to unfold the iron mesh sheets carefully to complete the basic frame of the cage.
natural_image
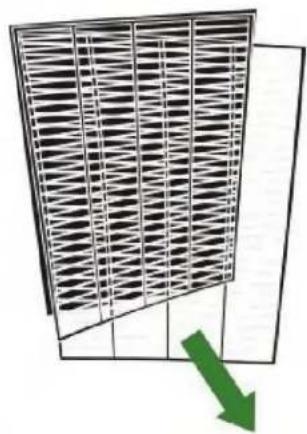
Diagram of a grid-like structure with a green arrow pointing downward (no text or symbols)- Flip it 180 degrees to make it stand on the ground sideways, and then unfold the iron mesh sheets as the picture shows.
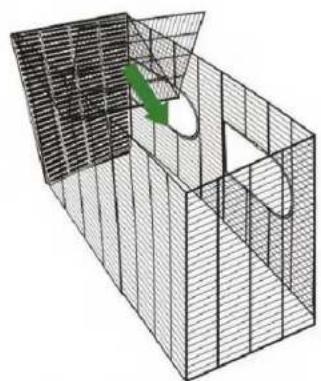
natural_image
3D wireframe diagram of a grid structure with a green arrow indicating a point of interest (no text or symbols)- Unfold the iron mesh sheets on both 2 sides and fasten them on the basic frame which has been completed on step 3.
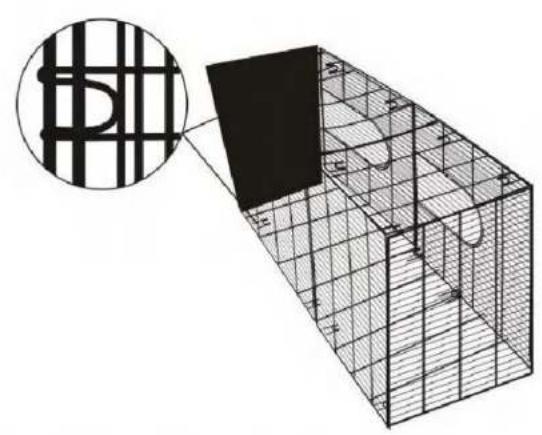
natural_image
3D wireframe diagram of a modular structure with grid patterns and a magnified inset showing a grid pattern (no text or symbols)- Buckle up the meshes on both sides as shown in the picture to complete the overall frame of the cage.
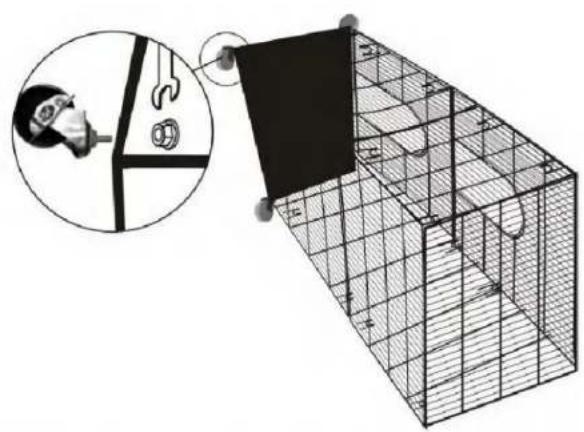
natural_image
Diagram showing a person using a tool to connect a wire fence with a black flag, alongside a wire mesh cage (no text or symbols)- Install the wheels on the bottom of the cage.(The tools are included in the packing.)
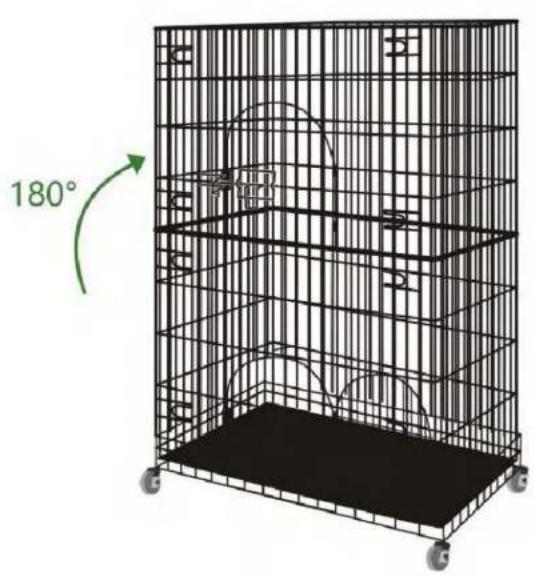
- Flip the cage 180 degrees to make it upright on the ground.
natural_image
Simple line drawing of a grid with an plus sign above it, no text or symbols present.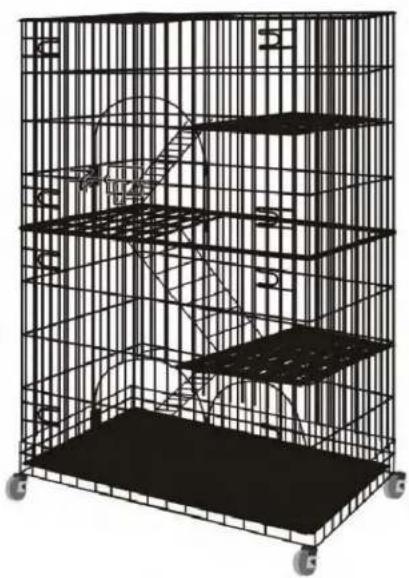
natural_image
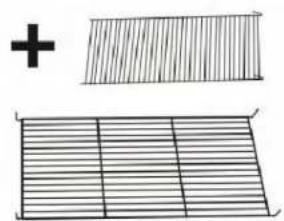
3D wireframe model of a multi-level cage with wheels, no text or symbols visible- Put the platform sheets and the stair meshes on each tier of the cage.
natural_image
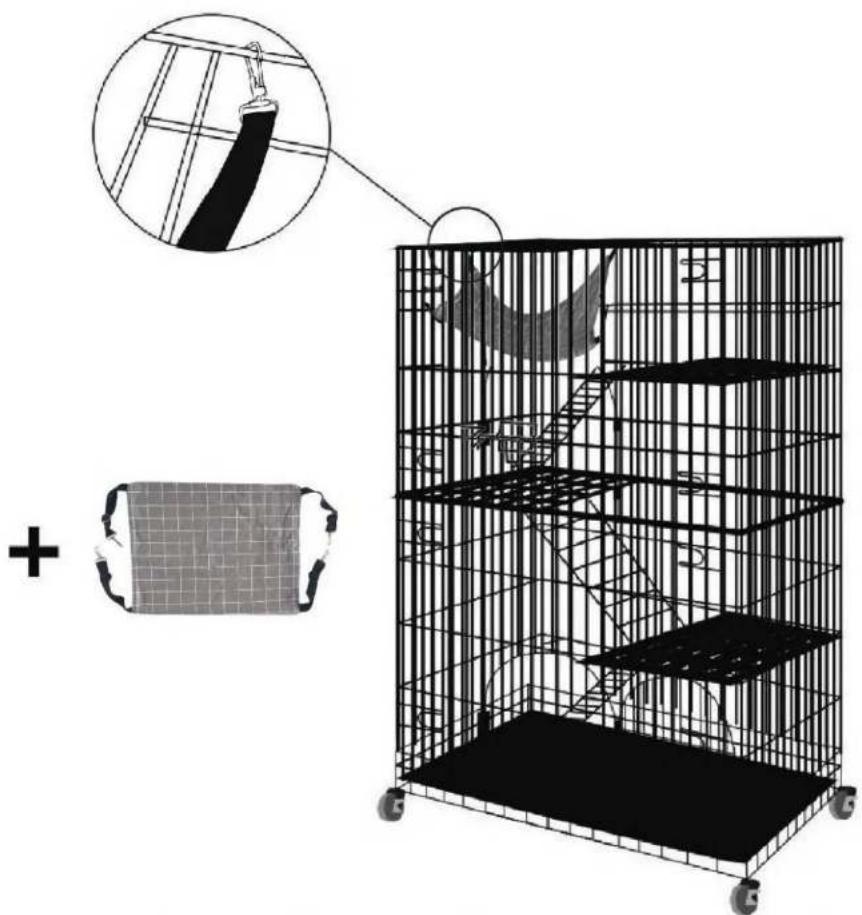
Illustration of a wire cage with a magnified inset showing fabric texture and a plus symbol (no text or symbols present)- At last, hang up the hammock and put the soft cushion into the cage to complete the whole installation.
Producent: Shanghaimuxinmuyeyouxiangongsi
Adres: Shuangchenglu 803nong11hao1602A-1609shi, baoshanqu, szanghaj 200000 CN.
Importowane do USA: Sanven Technology Ltd. Suite 250, 9166 Anaheim Place, Rancho Cucamonga, Kalifornia 91730
| EC | REP |
E-CrossStu GmbH
Mainzer Landstr.69, 60329 Frankfurt nad Menem.
| UK | REP |
YH CONSULTING LIMITED.
C/O YH Consulting Limited Office 147, Centurion House,
London Road, Staines-upon-Thames, Surrey, TW18 4AX
VEVOR®
TOUGH TOOLS, HALF PRICE
Technical Support and E-Warranty Certificate
www.vevor.com/support
Brand : Vevor
Model : BSL-4C
Category : Pets