Limas LFDW1446DFSS - Dishwasher Linarie - Free user manual and instructions
Find the device manual for free Limas LFDW1446DFSS Linarie in PDF.


User questions about Limas LFDW1446DFSS Linarie
0 question about this device. Answer the ones you know or ask your own.
Ask a new question about this device
Download the instructions for your Dishwasher in PDF format for free! Find your manual Limas LFDW1446DFSS - Linarie and take your electronic device back in hand. On this page are published all the documents necessary for the use of your device. Limas LFDW1446DFSS by Linarie.
USER MANUAL Limas LFDW1446DFSS Linarie
natural_image
Line drawing of a single kitchen appliance with control panel and door (no text or symbols)FR
text_image
Technical diagram of a 3D printer with labeled parts in Chinese, showing internal components and mounting base.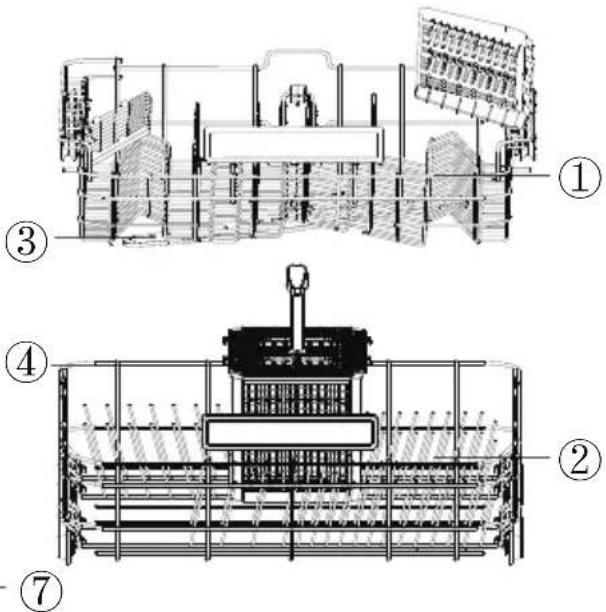
text_image
Technical diagram of a mechanical assembly with numbered components, showing cross-sectional views and labeled parts.natural_image
Generic document icon with no text or symbolsnatural_image
Simple line drawing of a funnel (no text or symbols)Entonnoir à sel
natural_image
Simple line drawing of a kitchen sink with a bowl and a rotating arrow (no text or symbols)A
text_image
Line drawing showing a hand pouring liquid into a glass bowl with a label indicating 'Water level' and 'Water level at 100%'.B
natural_image
Line drawing of a hand pouring liquid into a bowl on a stove (no text or symbols)C
natural_image
Line drawing of a kitchen sink with a hand cleaning a surface and a small bowl nearby (no text or symbols)D
natural_image
Simple line drawing of a kitchen sink with a button and arrow indicating rotation (no text or symbols)E
REMARQUE :
natural_image
Line drawing of a kitchen appliance with a tray, drawer, and side panel (no text or symbols)NOTE:
natural_image
Line drawing of a door with a circular dial and a button, showing internal components (no text or symbols)natural_image
Technical line drawing of a conveyor belt system with wheel wheels (no text or symbols)2
natural_image
Technical line drawing of a mechanical assembly with pulleys and gears (no text or symbols)(Selon le modèle)
(B)
natural_image
Technical line drawing of an industrial machine with no visible text or symbols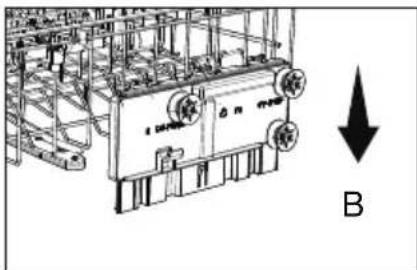
text_image
A DENTAL B(Selon le modèle)
ATTENTION :
text_image
Technical diagram of a mechanical or electrical component with numbered parts labeled 1 through 9.| Nombre | Objet |
| 1 | ASSIETTE DE SOUPE |
| 2 | POTEAU DU FOUR |
| 3 | BOL EN VERRE |
| 4 | PETIT POT |
| 5 | BOL DE MÉLAMINE |
| 6 | ASSIETTE ÀDÎNER |
| 7 | PLATTRE OVAL |
| 8 | DESSERT DISH |
| 9 | DESSERT PLATE |
natural_image
Line drawing of a mechanical assembly with a cup and tray, no text or symbols present1
natural_image
Line drawing of a hand holding a smartphone with a circular button on the screen (no text or symbols)2
natural_image
Line drawing of a hand holding a small mechanical component with an arrow indicating rotation (no text or symbols)3
natural_image
Line drawing of a hand using a tool to clean or wash a gas stove (no text or symbols present)4
natural_image
Diagram showing two views of a door mechanism with directional arrows indicating motion (no text or symbols)natural_image
Technical line drawing of a cabinet or storage unit with a top shelf and side compartments (no text or symbols)text_image
Back of dishwasher Mains Cable Water Inlet Drain Pipe Drain hose A B Drain Pipe Counter MAX 600mm φ 40mmnatural_image
Technical line drawing of a mechanical component with no visible text or symbolsAustralia hello@linarie.com.au www.linarie.com.au
Operating and installation instructions:
Original √ Translation
MKZ SALES
3 IMPASSE DES JARDINIERS
77400 LAGNY SUR MARNE
Linärie Contact
contact@linarie.fr
www.linarie.fr
The distribution and duplication of this document, as well as the use and disclosure of its contents are prohibited unless expressly authorised.
These operating and installation instructions have been drawn up with the greatest of care. But it cannot be ruled out that subsequent technical modifications have not yet been incorporated or the relevant content has not yet been adapted. Please accept our apologies in this eventuality. An updated version can be requested from our team. Subject to printing errors and mistakes.
© Linärie
All rights reserved.
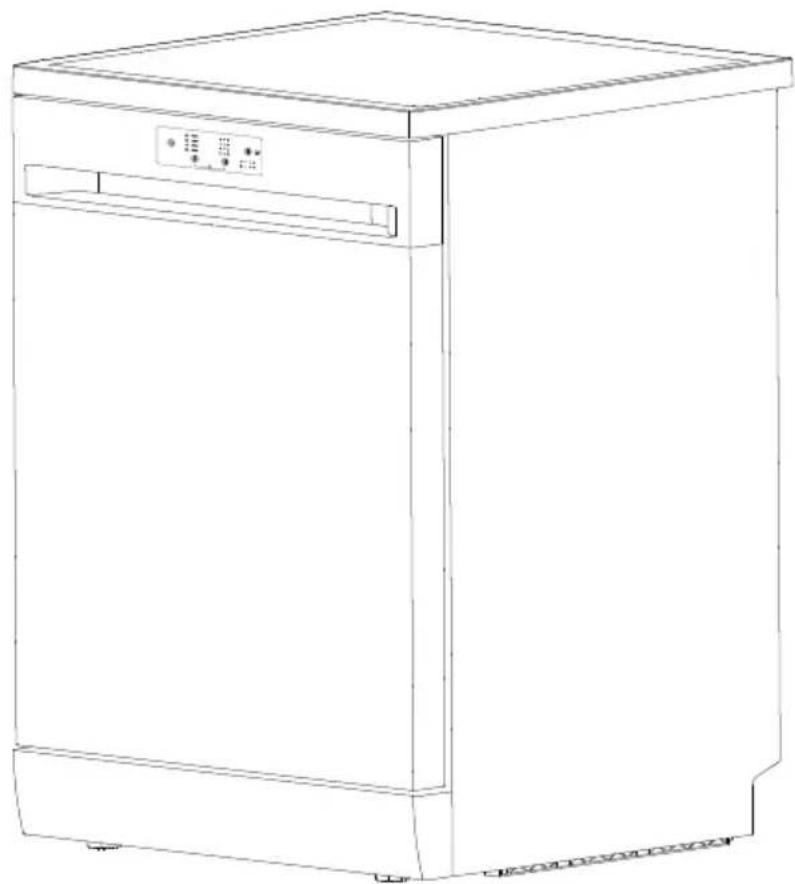
LIMAS
LFDW1446DFSB
LFDW1446DFSS
DISHWASHER
natural_image
Line drawing of a single kitchen appliance with control panel and door (no text or symbols)
Operation, Installation & Instruction Manual
Register your product online
CONGRATULATIONS
Congratulations and thank you for choosing Linärie to introduce a new comfort of cooking in your home. We are sure you will find your new appliance a pleasure to use and a great asset to your kitchen.
This appliance complies with all relevant safety requirements in Australia. Inappropriate use can, however, lead to personal injury and damage to property.
In order to operate the unit correctly and safely, please read this instruction manual carefully before installation and usage. This user manual which provides you with all required instructions related to safety, installation, use and maintenance of the appliance.
For future reference, please store this booklet in a safe place and ensure that all users are familiar with the contents. Pass them on to any future owner of the appliance.
Record Model & Serial Number
Model:
Serial Number
Register your product www.linarie.com.au
TABLE OF CONTENTS
Safety Instructions
Warning....01
Recommendations.... 04
Product overview 04
Control panel....07
Before First Use
A.Water Softener.... 10
B. Loading the Salt into the Softener.... 11
C. Using Detergent.... 14
D. Using rinse AID.... 15
Buzzer Sound On and Off.... 16
Loading the dishwasher racks
Dishes Not Suitable for Dishwasher Cleaning...... 17
Attention about loading the dishwasher racks.... 17
Removing the Dishes.... 18
Loading the Upper Basket.... 18
Adjusting the Upper Basket...... 19
Loading the Lower Basket...... 20
Washing programme
Turning on the Appliance....21
Change the Programme.... 21
Forget to Add Dish.... 22
Care and maintenance
Filtering System....24
Cleaning the Spray Arms....24 26
Caring for the Dishwasher....27
Cleaning the Door....27
Protect Against Freezing.... 27
How to Maintain Your Dishwasher Installation
Connection Of Drain Hoses 29
Position The Appliance.... 31
Troubleshooting TIPS
Before Calling for Service 32
Error codes 37
Technical Data Sheet
■ Safety Instructions

WARNING
When using your dishwasher, follow the precaution listed below:
●This section contains safety instructions that will help get protected against risk of personal injury or property damage. Our company
- shall not be responsible for damages that may arise when these instructions are not followed.
- Please read this manual thoroughly to ensure that you know how to safely and efficiently operate the extensive features and functions of your new appliance and retain it at a safe place near the appliance for your future reference. Use this appliance only for its intended purpose as described in this user manual. Warning
- and important safety instruction in this manual do not cover all possible conditions and situations that may occur. It is your responsibility to use common sense, caution, and care when installing, maintaining, and operating your dishwasher. The
- installation of this machine must be carried out by qualified professionals in a safe and suitable location that meets the installation requirements.
- Before setting up the appliance, check it for any externally visible damage. Under no circumstance should you use a damaged appliance. A damaged appliance could be dangerous.
- The machine must be grounded, and the electrical rating of the power supply must be compatible with the parameters on the machine nameplate. Always use a properly installed socket to prevent electric shock.
- Do not modify the plug provided with the appliance if it does not fit the outlet.
- The operating water pressure of this machine must be between 0.04 to 1.0 MPa. During installation, use new hose components to connect to the water source; old hose components should not be reused.
- Do not lean or climb on the open dishwasher door, to prevent damage.
- Do not place any heavy objects on or stand on the door when it is open. The appliance could tip forward.
- Close the dishwasher door after use to prevent accidents.
- Use only detergents, salt and rinse aid specifically designed for dishwashers.
- Do not put solvents in the dishwasher detergent compartment to prevent risk of explosion.
- Only put dishwasher safe items into the dishwasher. If in doubt, check with the manufacturer of the items.
- Take care when loading the dishwasher to observe the recommendations for best loading practice, and also to ensure that sharp objects such as knives must be loaded in the basket with their points down or placed in a horizontal position to prevent accidents.
- Do not open the dishwasher door when a programme is running. If it is necessary to do so, then open it only slightly to allow the dishwasher to pause the programme and prevent any water spilling out. Remember that the water in the dishwasher can be very hot when the programme is running.
- When the dishwasher is not in use, we recommend that you turn off the water supply at the supply tap and disconnect the main supply.
- If you are leaving the dishwasher for an extended period you should leave the door slightly open to prevent the formation of unpleasant smells.
- This appliance can be used by children aged from 8 years and above and persons with reduced physical, sensory or mental capabilities or lack of experience and knowledge if they have been given supervision or instruction concerning use of the appliance in a safe way and understand the hazards involved. Children shall not play with the appliance. Cleaning and user maintenance shall not be made by children without supervision. (For IEC60335-1)
- This appliance is not intended for use by persons (including children) with reduced physical, sensory or mental capabilities, or lack of experience and knowledge, unless they have been given supervision or instruction concerning use of the appliance by a person responsible for their safety. (For IEC60335-1) Packaging
● material could be dangerous for children!
- Children should be supervised to ensure that they do not play with the appliance.
- Children could get locked inside the appliance. Therefore, when disposing of an old appliance cut off the plug and set aside. Damage the door lock so that the door can no longer be closed.
- This appliance is for indoor household use only. To protect against the risk of electrical shock, do not immerse the unit, cord or plug in water or other liquid.
- Please unplug before cleaning and maintenance the appliance. Use a soft cloth moisten with mild soap, and then use a dry cloth to wipe it again.
- If the supply cord is damaged, it must be replaced by the manufacturer or its service agent or a similarly qualified person in order to avoid a hazard.
- The openings on bottom must not be obstructed by a carpet.
Recommendations
To save energy, in stand by mode, the appliance will switch of automatically after 3 minutes without any user interaction.
To reduce energy and water consumption, remove all dirt residues from the dishes prior to loading the dishwasher. Loading the dishwasher to the capacity indicated by the manufacturer will save energy and water.
Place hollow items (bowls, glasses and pans) face down in the basket.
Do not put dishes, cutlery or other items with tobacco ash, wax, lubricating grease or paint residues in the dishwasher.
It is not recommended to pre-rinse the tableware, as this leads to an increase in water and energy consumption.
Washing tableware in a household dishwasher usually uses less energy and water than washing up by hand.
Disposal
For disposing of package and the appliance please go to a recycling center. Therefore cut off the power supply cable and make the door closing device unusable.
Cardboard packaging is manufactured from recycled paper and should be disposed in the waste paper collection for recycling.
By ensuring this product is disposed of correctly, you will help prevent potential negative consequences for the environment and human health, which could otherwise be caused by inappropriate waste handling of this product.
For more detailed information about recycling of this product, please contact your local city office and your household waste disposal service.
DISPOSAL: Do not dispose this product as unsorted municipal waste.Collection of such waste separately for special treatment is necessary.
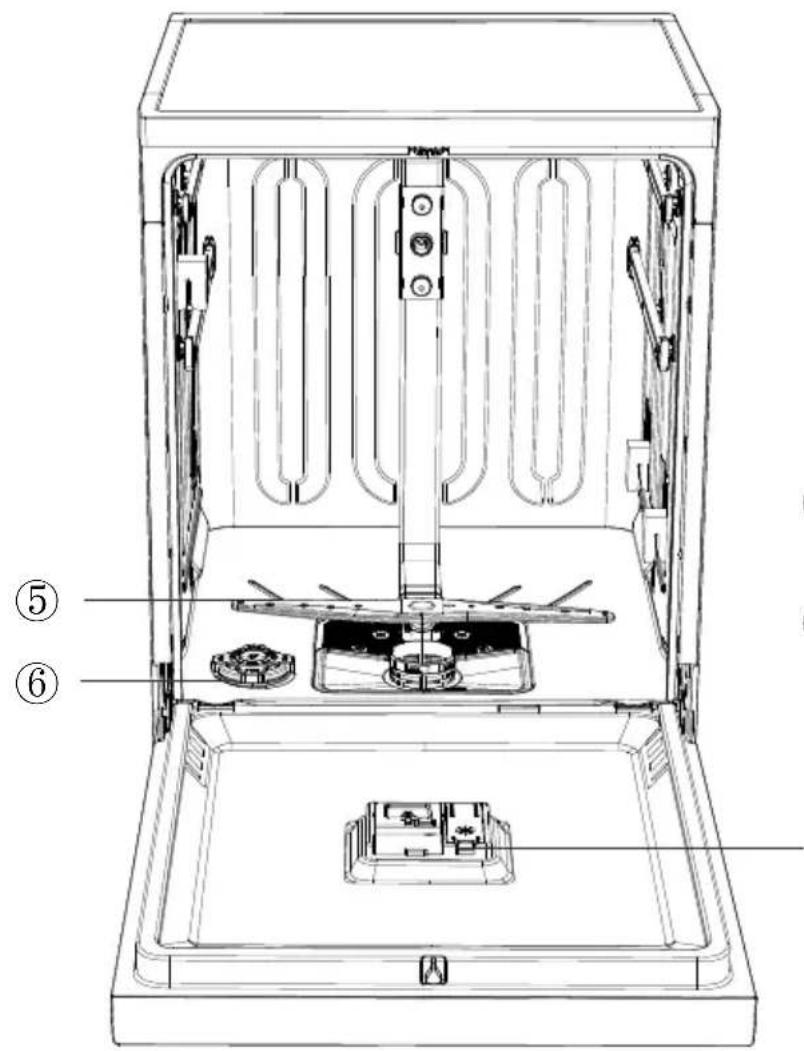
■ Product overview
The appearance of the item you receive may vary
text_image
Technical diagram of a 3D printer with labeled parts in Chinese, showing internal components and mounting base.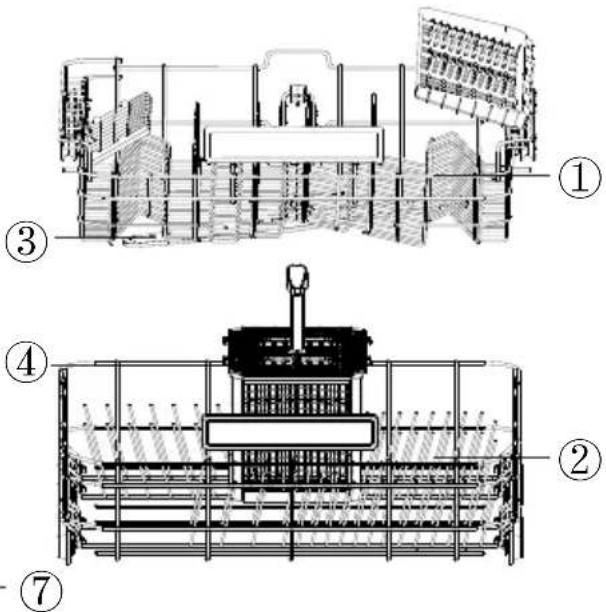
text_image
Technical diagram of a mechanical assembly with numbered components, showing cross-sectional views and labeled parts.| 1 Upper basket4 | Upper spray arm | Cutlery basketLower | |
| 5 Lower spray arm | DispenserSalt Container |
Tips:
- Each dishwasher has been subject to thorough quality control before leaving the factory in order to ensure reliability.
- You may find water droplets or water stains generated from our quality control in your new dishwasher.
- Place the cutlery basket in the lower dish rack. For the best performance, please install along the middle, as shown in the picture of interior trim parts.
- Please remove all package materials from the outside and inside of the dishwasher before installing.
Accessories
Accessories included
natural_image
Generic document icon with no text or symbolsUser Manual
Salt funnel

Water inlet pipe
flowchart
graph TD
    A["Power"] --> B["Programs"]
    B --> C["Delay Timer"]
    C --> D["Start/Pause"]
    E["Washing Cycle Lights"] --> F["3h"]
    F --> G["6h"]
    G --> H["9h"]
    H --> I["12h"]
    I --> J["Reset 3sec"]
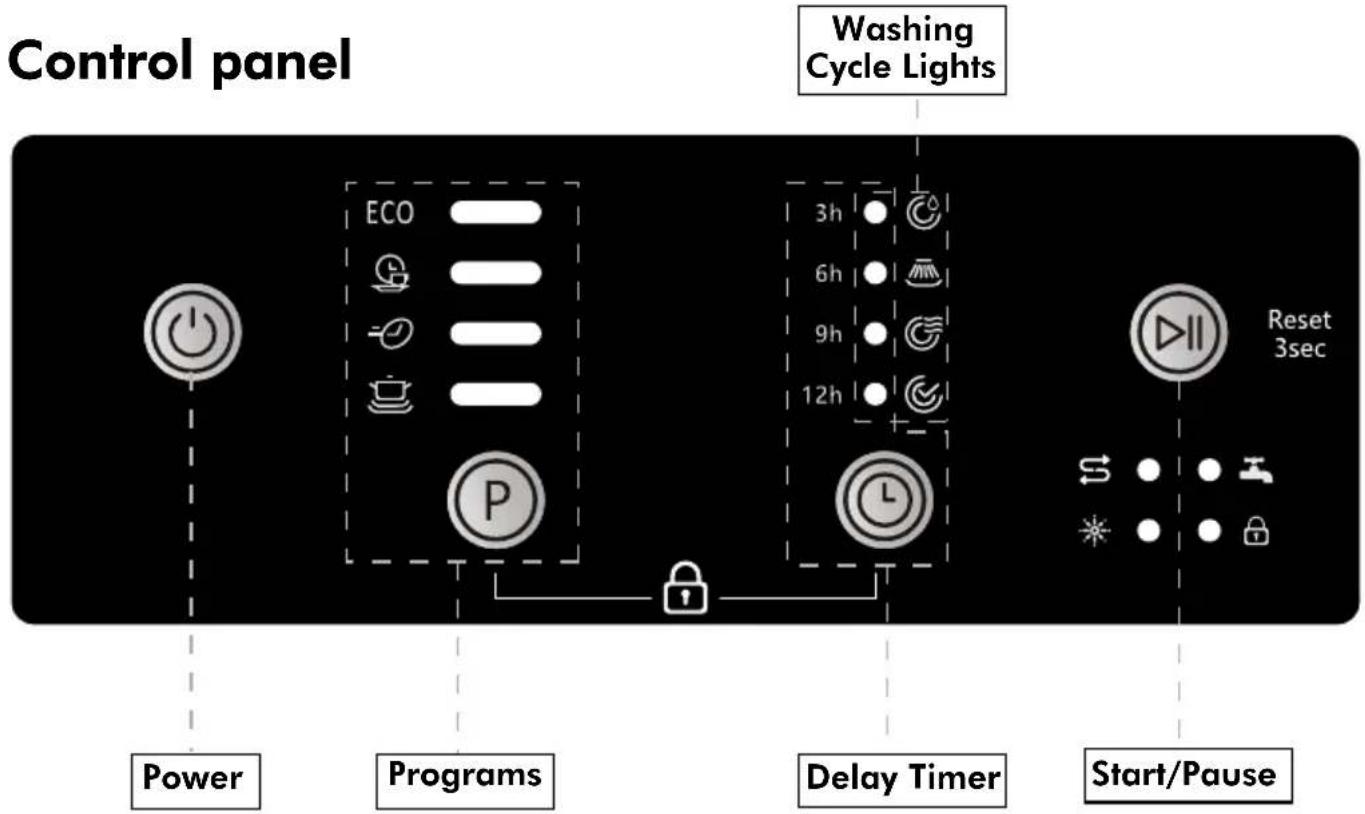
Operation(button)
| Button Description | |
| Power | Press this button to turn on your dishwasher. |
| Program | Press this button to select the appropriate washing program, the program indicator will be lit. |
| Delay Timer | Press the button to set the delay time. |
| Child lock | Hold down the program key and the delay key for three seconds at the same time, the child lock indicator lights up and enters the child lock state. All keys are locked. Repeat the above steps to exit the child lock state. |
| Start /Pause | Press this button to start/pause a program.*Reset:Press 3 seconds to cancel the existing program and select a new program. |
Indicator
| Program | ECO ECO Eco-friendly mode, saving energy and water, suitable for general cleaning needs.  DailyDaily cleaning mode,suitable for moderately contaminated tableware. Suitable DailyDaily cleaning mode,suitable for moderately contaminated tableware. Suitable  Quickfor cleaning the slightly sticky fresh food residues at the fastest speed. Quickfor cleaning the slightly sticky fresh food residues at the fastest speed. IntensivePowerful cleaning mode,suitable for dishes,pots and pans with heavy stains. IntensivePowerful cleaning mode,suitable for dishes,pots and pans with heavy stains. |
| Washing Cycle Indicator |  Start/WashIndicator blink while the program in washing cycle. Start/WashIndicator blink while the program in washing cycle. RinseIndicator blink while the program in rinse cycle. RinseIndicator blink while the program in rinse cycle. DryingIndicator blink while the program in drying cycle. DryingIndicator blink while the program in drying cycle. EndAfter the program is over, the indicator lights up for three minutes. EndAfter the program is over, the indicator lights up for three minutes. |
| Warning Indicator |  Rinse AidIf the indicator is lit,it means the dishwasher is low on dishwasher rinse aid and requires a refill. Rinse AidIf the indicator is lit,it means the dishwasher is low on dishwasher rinse aid and requires a refill. SaltIf the indicator is lit,it means the dishwasher is low on dishwasher salt and needs to be refilled. SaltIf the indicator is lit,it means the dishwasher is low on dishwasher salt and needs to be refilled. Water InletIf the indicator is lit,it means the water inlet is closed or blocked. Water InletIf the indicator is lit,it means the water inlet is closed or blocked. Child LockIf the indicator is lit,it means the child lock is on. Child LockIf the indicator is lit,it means the child lock is on. |
Program Table
The table below shows which programs are best for the levels off food residue on them. It also show various information about the programs. Consumption values and program duration are only indicative except for ECO program.
| Program | Description of Cycle | Time (min) | Temperature (°C) | Energy consumption (kWh) | Water consumption (L) |
 Intensive Intensive | Hot PrewashMain WashRinseDry HotRinseDrying | 175 | 67 | 1.79 14.7 | |
 Daily Daily | Main WashRinseDry Hot RinseDrying | 90 | 60 | 1.13 9.9 | |
 Quick Quick | Main WashRinseDry Hot Rinse | 29 | 40 | 0.15 | 6.6 |
 Eco Eco | Pre washRinseDry Hot RinseDrying | 246 | 58 0.949 | 11.8 |
■ Before First Use
Remove all the packaging materials from the interior of the dishwasher.
A. Set the water softener level as required by the water hardness in the area (see pages 10-12).
B.Add 500g of salt into the salt compartment and then fill with water to the top of the salt compartment.
C. Fill the rinse aid dispenser.
D. Fill in detergent.
A. Water Softener (Water hardness level setting)
The dishwasher is designed to allow for adjusting the amount of salt consumed based on the hardness of the water used. This is intended to optimize the level of salt consumption. To set the salt consumption proceed as below:
- Switch on the appliance;
- Within 60 seconds after the appliance was switched on, press the Start/Pause button for 5 seconds while the machine is in standby mode. This action will enter the setting mode, all washing cycle lights blink three times, then turn to the default softener level.
- Press the Start/Pause button to select the proper set according to your local environment, the sets will change in the following sequence: H1→H2 →H3→H4→H5→H6; After that, switch off the machine to save the settings. It is recommended that adjustments should be made in accordance with the following table.
*The manufacturer setting: H3
| Selector Position | Water Hardness | Indicators while setting Water hardness | Salt consumption(gram/cycle) | ||
| dH | dF | dE | |||
| H1 | 0-5 | 0-9 | 0-6 | H1  | 0 |
| H2 | 6-11 | 10-20 | 7-14 | H2  | 20 |
| H3(Default) | 12-17 | 21-30 | 15-21 | H3  + + | 30 |
| H4 | 18-22 | 31-40 | 22-28 | H4  | 40 |
| H5 | 23-34 | 41-60 | 29-42 | H5  + + | 50 |
| H6 | 35-55 | 61-98 | 43-69 | H6  + + | 60 |
Contact your local water board for information on the hardness of your water supply.
B. Loading the Salt into the Softener
The hardness of the water varies from place to place. If hard water is used in the dishwasher, deposits will form on the dishes and utensils.
The appliance is equipped with a special softener that uses salts specifically designed to eliminate lime and minerals from the water.
Always use salt intended for use with dishwasher.
The salt container is located beneath the lower basket and should be filled as follows:

Attention!
- Only use salt specifically designed for use in dishwashers! All other types of salt not specifically designed for use in a dishwasher, especially table salt, will damage the water softener. In case of damages caused by the use of unsuitable salt the manufacturer does not give any warranty nor is liable for any caused damages.
- Only fill with salt just before starting one of the complete washing programs.
This will prevent any grains of salt or salty water, which may have been split, remaining on the bottom of the machine for any period of time, which may cause corrosion.
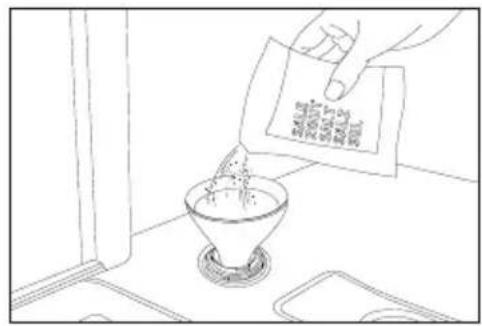
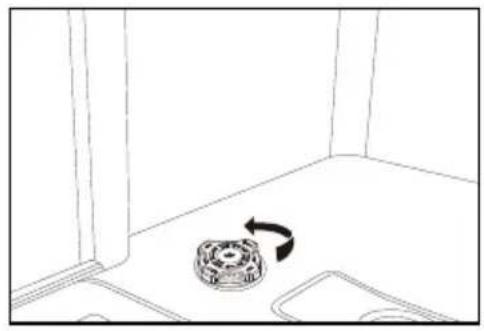
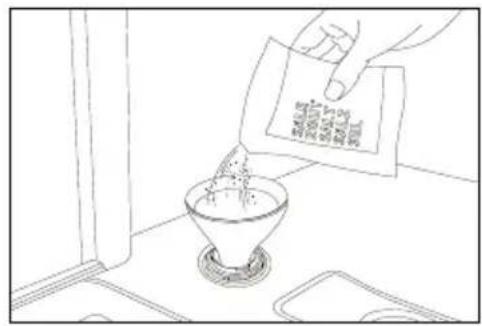
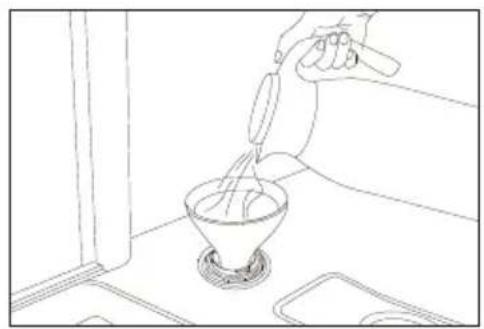
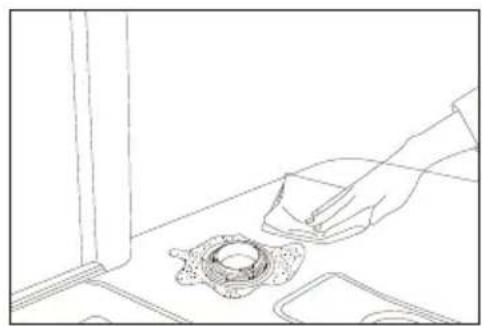
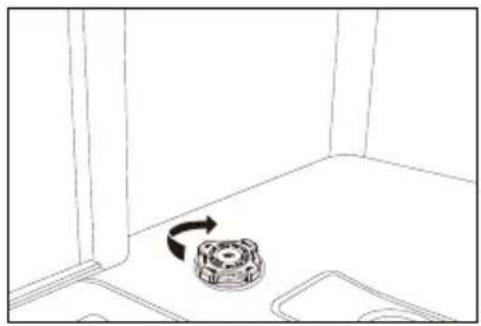
A. Remove the lower basket and then unscrew and remove the cap from the salt container.
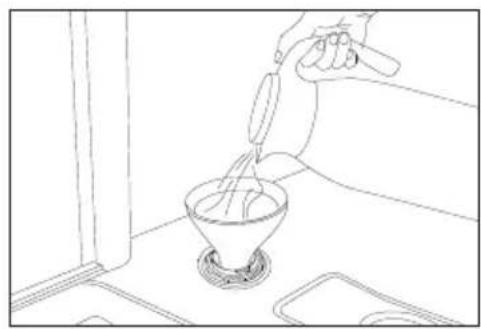
B. Place the end of the funnel (supplied) into the hole and introduce about 500g of salt. It is normal for a small amount of water to come out of the salt container.
C. If you are filling the container for the first time, fill full of its volume with water (around 700ml).
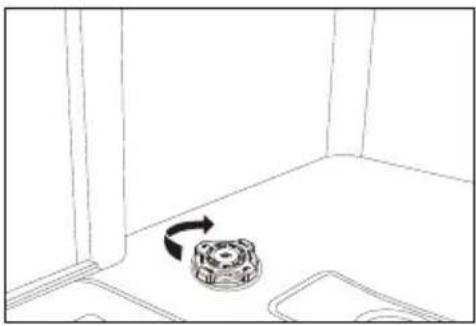
D. Carefully screw the cap back on.
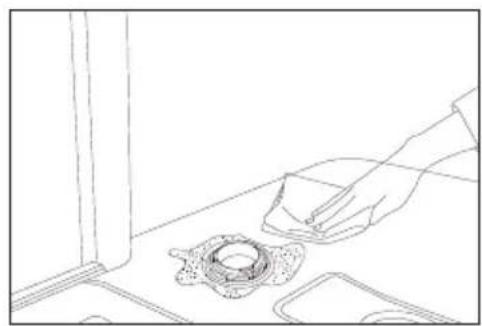
E. Usually, the salt warning light will be off after the salt container is filled with salt.
natural_image
Simple line drawing of a kitchen sink with a rotating button and arrow indicating rotation (no text or symbols)A
natural_image
Line drawing of a hand pouring liquid into a glass bowl on a counter (no text or symbols)B
natural_image
Line drawing of a hand pouring liquid into a bowl on a kitchen counter (no text or symbols)C
natural_image
Line drawing of a kitchen sink with a hand cleaning a surface and a small bowl nearby (no text or symbols)D
natural_image
Simple line drawing of a room corner with a small object on the floor and an arrow indicating rotation (no text or symbols)E
NOTE: ● The salt container must be refilled when the salt warning light in the control panel comes on. Though the salt container is filled enough, the indicator light may not black out before the salt fully dissolves.
- If there is no salt warning light in the control panel (for some models), you can judge when to load the salt into the softener by the cycles that the dishwasher has run.
- Be careful not to overfill the salt container and ensure that you wipe up any spillages.
C. Using Detergent
All dishwasher cycles require detergent in the detergent compartment. Add the correct amount of detergent for the selected cycle to ensure the best performance.
You should only use detergents designed specifically for use in dishwashers. Keep your detergent fresh and dry. Don't put powder detergent into the dispenser until you're ready to wash dishes.
⚠️ Never use soap, laundry detergent, or hand washing detergent in your dishwasher.
Do not swallow dishwasher detergent. Avoid breathing in the fumes. Dishwasher detergent contains irritants and caustic chemicals that can induce respiratory conditions. If you have swallowed dishwasher detergent or inhaled the fumes, seek medical attention immediately.
⚠️ Keep dishwasher detergent out of the reach of children.
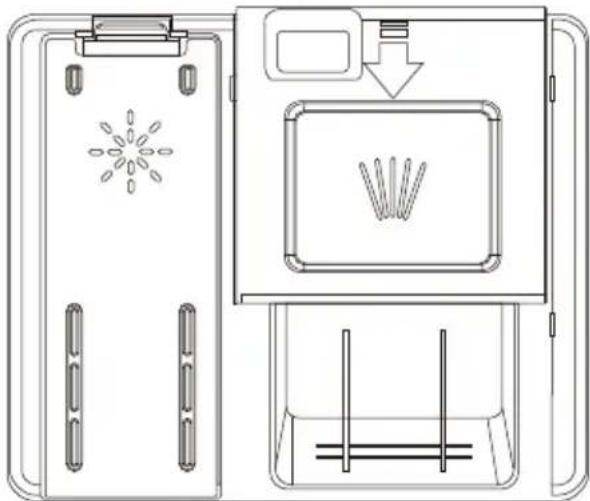
Filling the detergent dispenser
- Open the detergent compartment by pressing the button.
-
Add the recommended amount of detergent to the main wash detergent compartment. The main detergent compartment has lines to allow for specific amounts of detergent. These are marked at either 15ml or 25ml, depending on how dirty the dishes are. If your dishes are in need of an intensive wash, then add 5ml of detergent into the pre-wash section of the compartment.
-
Then close the detergent compartment by sliding the cover to the
direction of the arrow.
natural_image
Technical line drawing of a door with decorative patterns and a tray, showing no text or symbolsNOTE:
Please observe the manufacturer's recommendation on the detergent package.
D. Using rinse AID
Filling the rinse aid dispenser rinse aid helps to ensure better quality wash results and increased drying performance.
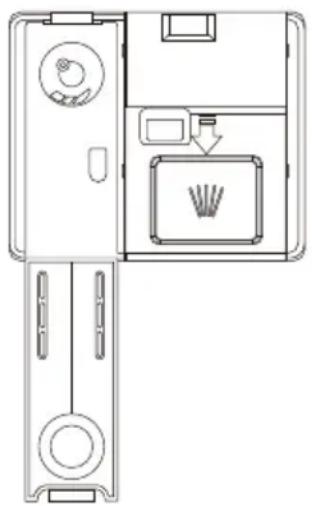
- To fill the rinse aid compartment, open the rinse aid compartment lid. Fill - the compartment with rinse aid to the MAX level and then close the lid. Be careful not to overfill the rinse aid compartment and ensure that you wipe up any spillages.
- Close the cover to lock the rinse aid compartment lid.
- Rinse aid is automatically added during the last rinse, ensuring thorough rinsing, spot and streak free drying.

Attention!
Only use branded rinse aid for dishwasher. Never fill the rinse aid dispenser with any other substances (e.g. dishwasher cleaning agent, liquid detergent). This would damage the appliance.
In order to change the rinse aid level, follow the steps below before turning on the machine:
- Press the Power button to switch on the dishwasher
-
Within 60 seconds after the appliance was switched on, press the Delay timer button for 5 seconds while the machine is in standby mode to enter the setting mode. All washing cycle lights blink three times, then turn to the default rinse aid level. The factory default set is R3.
-
To adjust the rinse aid level, press the Delay timer button, and with each press of the Delay timer button, the level will cycle through "R1→R2→R3→R4→R5."
-
After selecting the appropriate level, press the Power button to save the settings.
Buzzer Sound On and Off
| Indicators while setting rinse aid level | |
| R1 | |
| R2 | |
| R3 | + |
| R4 | |
| R5 | + |
natural_image
Technical line drawing of a door panel with a central button and directional arrow (no text or symbols)In default state, the buzzer sound is on.
- Switch on the appliance;
- Press the Program and Start buttons 3 seconds at the same time, buzzer sound is turned off, and the inner lamp does not light when the door is opened.
- Press the Program and Start buttons 3 seconds at the same time again, buzzer sound is turned on.
Note: This function only can be set in standby mode. After the appliance is powered off and reconnected, buzzer sound will be on by default.
■ Loading the dishwasher racks
For best performance of the dishwasher, follow these loading guidelines.

Attention!
Dishes Not Suitable for Dishwasher Cleaning:
- Temperature-sensitive plastic tableware, copper and tin-plated containers, aluminum and silverware.
- Exquisite glassware, decorative printed porcelain; utensils with attached crystal elements, etc.
- Items with absorbent properties (sponges, household fabric).
Attention before or after loading the dishwasher racks
Scrape off any large amounts of leftover food .It is not necessary to rinse the dishes under running water.If the tableware or cookware has food particles that are baked, burnt, or adhered, and are difficult to remove, it is recommended to soak them for a period of time before washing.Place objects in the dishwasher in the following order:
- Items such as cups, glasses, pots/pans, etc. Are stood upside down.
- Curved items, or those with recesses, should be at a slant so that water can run off.
- They are stacked securely and can not tip over.
-
They do not prevent the spray arms from rotating while washing takes place.
-
Place cutlery, chopsticks and small items in the cutlery tray. Vary small items should not be washed in the dishwasher as they could easily fall out of the racks.
Removing the Dishes
To prevent water dripping from the upper basket into the lower basket, we recommend that you empty the lower basket first and then the upper basket.
Loading the Upper Basket
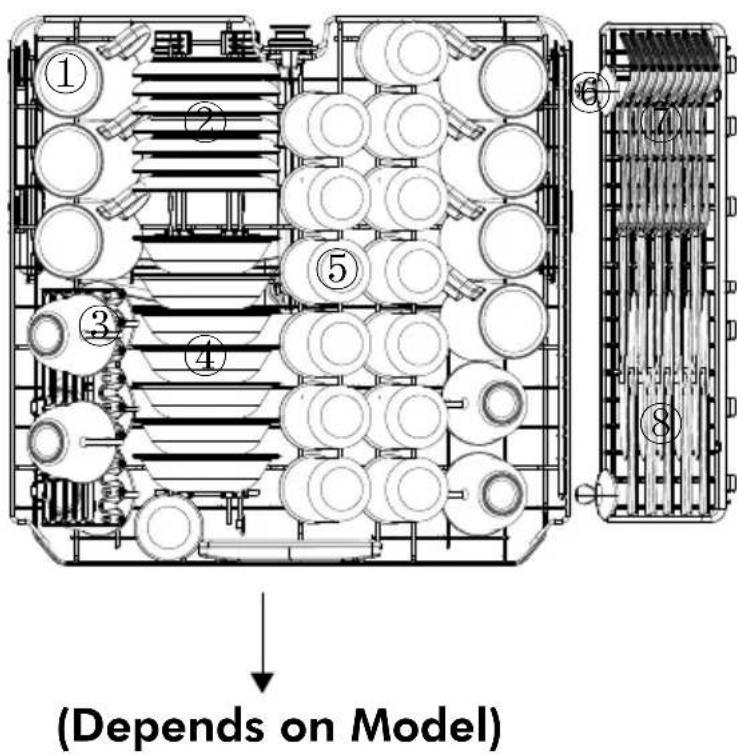
The upper basket is designed to hold more delicate and lighter dishware such as glasses, coffee and tea cup and saucers, as well as plates, small bowls and shallow pans (as long as they are not too dirty). Position the dishes and cookware so that they do not get moved by the spray of water. Always place glasses, cups & bowls upside down.
Upper Basket
text_image
(Depends on Model)| Number | Item |
| 1 | MUG |
| 2 | SAUCER |
| 3 | CUP |
| 4 | DESSERT BOWL |
| 5 | GLASS |
| 6 | SERVING-SPOON |
| 7 | FORK |
| 8 | TABLE-KNIFE |
Adjusting the Upper Basket
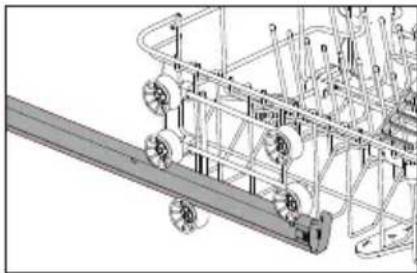
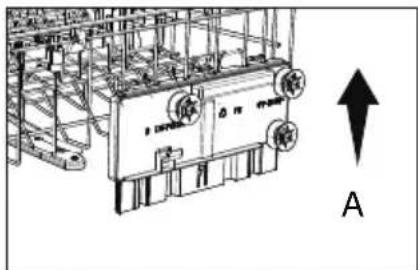
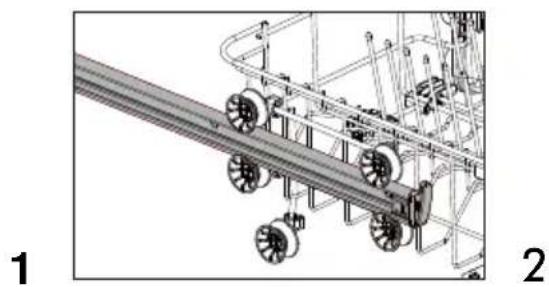
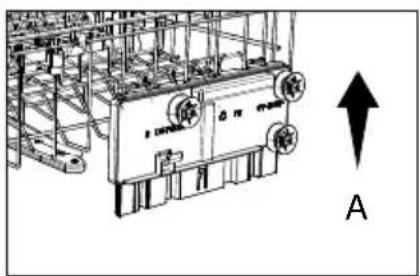
If needed, the height of the upper basket can be adjusted in order to create more space for large utensils either in the upper basket or lower basket. The upper basket can be adjusted for height by putting wheels of different height into the rails(A). Or pull the upper basket upwards to raise the upper rack, and pull it again to lower the upper basket(B). Long
items, serving cutlery, salad servers orknives should be placed on the shelf so that they do not obstruct the rotation of the spray arms. The shelf can be folded back or removed when not be required for use.
(A)
natural_image
Technical line drawing of a mechanical conveyor system with rollers and shafts (no text or symbols)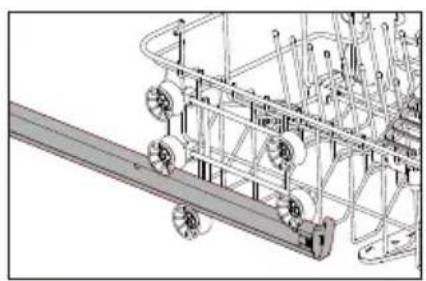
natural_image
Technical line drawing of a mechanical assembly with gears and rods (no text or symbols)(Depends on model)
(B)
text_image
Technical diagram of an industrial machine with labeled components and directional arrow indicator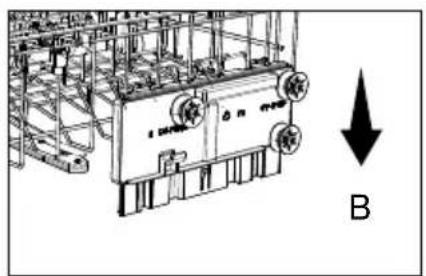
text_image
A DENTAL B(Depends on model)
CAUTION:
We recommend adjusting the height of the upper basket before loading dishes into the basket. If you adjust the basket after loading the dishes, you may damage the dishes.
Loading the Lower Basket
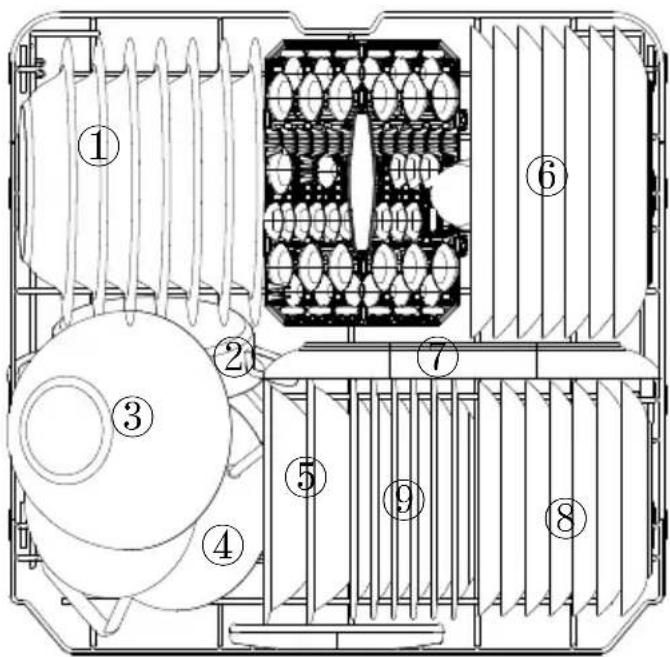
We recommend that you place large items which are most difficult to clean in to the lower basket: pots, pans, lids, serving dishes and bowls, as shown in the figure below.
It is preferable to place serving dishes and lids on the side of the baskets in order to avoid blocking the rotation of the top spray arm.
Pots, serving bowls, etc. must always be placed top down. Deep pots should be slanted to allow water to flow out.
The bottom basket features: fold down tine rows so that larger or more pots and pans can be loaded.
Lower Basket
text_image
Technical diagram of a mechanical or electrical component with numbered parts labeled 1 through 9.| Number | Item |
| 1 | SOUP PLATE |
| 2 | OVEN POT |
| 3 | GLASS BOWL |
| 4 | SMALL POT |
| 5 | MELAMINE BOWL |
| 6 | DINNER PLATE |
| 7 | OVAL PLATTER |
| 8 | DESSERT DISH |
| 9 | DESSERT PLATE |
■ Washing programme
Turning on the Appliance
Starting a wash program
- Draw out the lower and upper basket, load the dishes and push them back. It is recommended to load the lower basket first, then the upper one(see the section entitled "Loading the Dishwasher racks").
- Pour in the detergent (see the section entitled "Before first use").
- Insert the plug into the socket. The power supply is 220-240V AC 50 Hz, the specification of the socket is 10A 250 VAC. 50 Hz.
- Make sure that the water supply is turned on to full pressure. Close the door, press the Power button, Press the Program button to select a desired "Wash program". (See the section entitled "Program Table"). With a little force to ensure the door is properly closed.
NOTE: A click could be heard when the door is closed perfectly.
Change the Programme
-
Premise: A cycle that is underway can only be modified if it has only been running for a short time. Otherwise, the detergent may have already been released, and the appliance may have already drained the wash water. If this is the case, the detergent dispenser must be refilled (see the section entitled "Fill the detergent dispenser").
-
During the washing process, press the Power button to turn off the machine.
- Press the Power button again to turn on the machine, then you can change the programme to the desired cycle setting (see the section entitled "Program Table").
NOTE: If you open the door when washing, the machine will pauses and the state light blinking. When you close the door, the machine will keep on working after 10 seconds.
The 4 programme lights show the state of the dishwasher:
a) One of the programme lights on--> cycle running
b) One of the programme lights blinking -->pause
NOTE: If all the lights begin to glimmer, that indicates the machine is out of order, please turn off the main power and water supply before calling a service.
Forget to Add Dish
A forgotten dish can be added any time before the detergent cup opens.
- Press the Start/Pause button to stop the washing.
- After the spray arms stop working, you can open the door completely.
3.Add forgotten dishes. - Close the door the dishwasher will work after ten seconds.

WARNING!
It is dangerous to open the door when washing, because the hot water may scald you. If the door is opened while the dishwasher is running, the machine will stop automatically.
At the end of the wash program
After the program has finished running, the buzzer will emit three short beeps, sounding like "beep, beep, beep. At the same time the indicator light on for 3 minutes, and it will be extinguished if without any further operation, and the machine will be switched off automatically.

Open the door carefully. Hot steam may escape when the door is opened!
- Hot dishes are sensitive to knocks. The dishes should therefore be allowed to cool down around 15 minutes before removing from the appliance.
- Open the dishwasher's door, leave it ajar and wait a few minutes before removing the dishes. In this way they will be cooler and the drying will be improved.
Unloading the dishwasher
It is normal that the dishwasher is wet inside.
Empty the lower basket first and then the upper one. This will avoid water dripping from the upper basket onto the dishes in the lower one.
■ Care and maintenance
Before beginning any care or maintenance, you should always disconnect the appliance from the electricity supply, and also turn off the water supply.
Filtering System
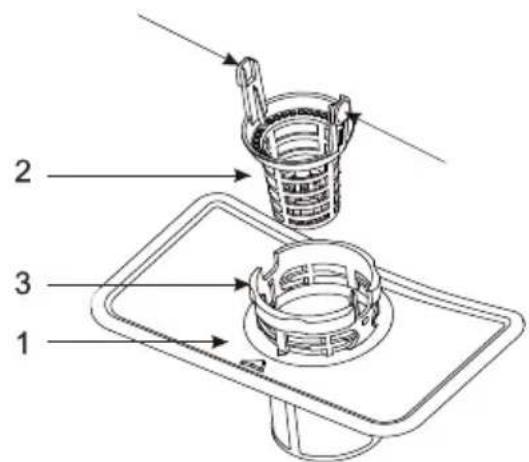
The filter system consists of a coarse filter, a flat filter and a micro filter.
-
Flat filter: Food and debris will be trapped by a special jet on the lower spray arm.
-
Coarse filter: Big debris, such as pieces of bone or glass, that could clog the drain will be trapped in the coarse filter. To remove an item caught in this filter, gently squeeze the taps on the top of this filter and lift it out.
-
Micro filter: This filter holds soil and food residue in the sump area and prevents it from being redeposit on the dishes during a cycle.
text_image
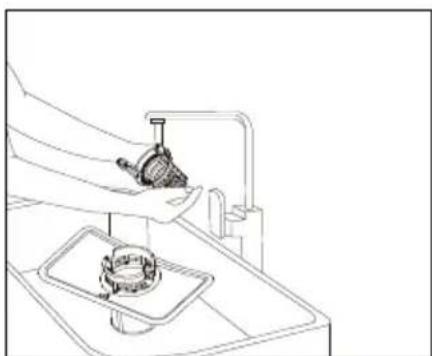
1 2 3⚠️ Inspect the filters for obstructions every time the dishwasher has been used.
By unscrewing the coarse filter, you can remove the filter system. Remove any food remnants and clean the filters under running water.
The filter can effectively prevent residues from tableware from falling into the washing system. However, food residues may sometimes clog the filter, affecting the washing performance. It is recommended to check the flat filter for food residues promptly after the washing program is completed and clean it if necessary.
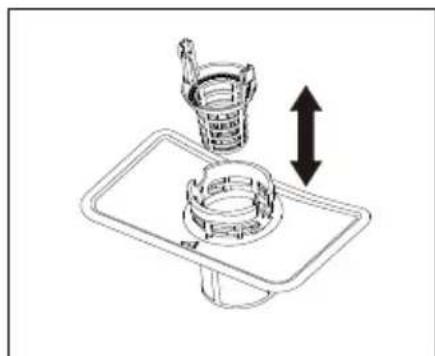
Additionally, it is advisable to dismantle and clean the filter at least once a week. The steps for cleaning the filter are as follows:
natural_image
Technical line drawing of a mechanical assembly with a cup and base plate, showing upward and downward motion arrows (no text or symbols)1
natural_image
Line drawing of a hand holding a smartphone with a circular button (no text or symbols)2
natural_image
Line drawing of a hand holding a small electronic device with an arrow indicating rotation (no text or symbols)3
natural_image
Line drawing of a hand using a tool to clean or wash a gas stove (no text or symbols present)4
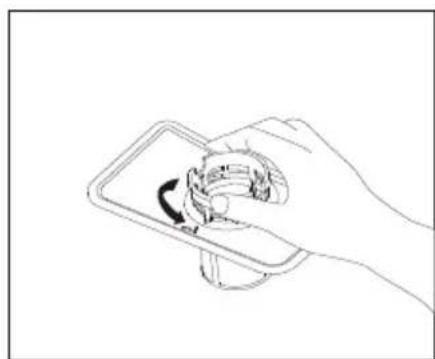
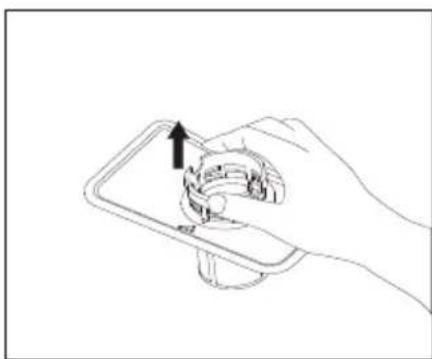
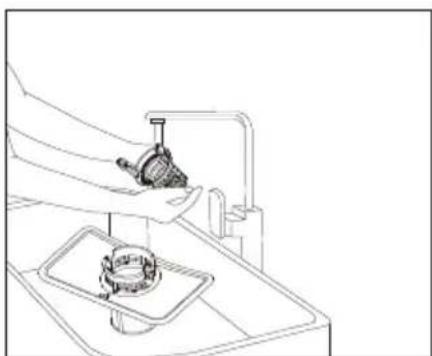
- Remove the coarse filter from the Micro filter
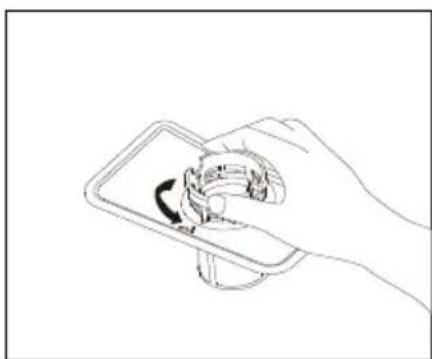
- Rotate the Micro filter counter clockwise
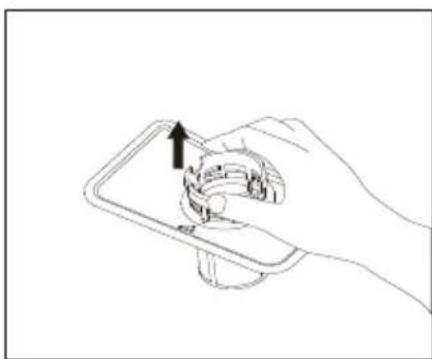
- Remove the Micro and flat filter set from the dishwasher compartment
- Clean the filters under running water
You should clean and rinse the filters thoroughly before replacing all the sections in reverse order to that above.
Please note:
● Never run a programme without the filters in place.
- Incorrect fitting of the filters may reduce wash performance and potentially damage your appliance.
- When cleaning the filters, don't knock on them. Otherwise, the filters could be contorted and the performance of dishwasher could be debased.
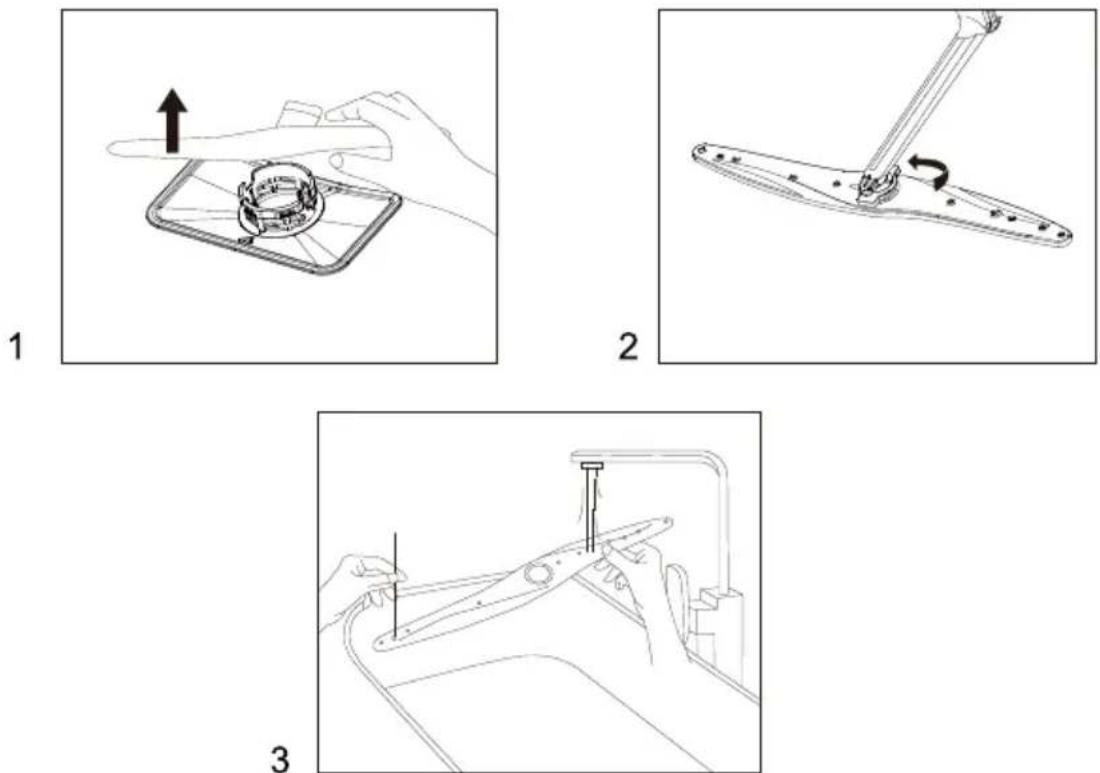
Cleaning the Spray Arms
It is necessary to clean the spray arms regularly for hard water chemicals will clog the spray arm jets and bearings.
-
Pull the lower spray arm upwards to remove it.
-
To remove the upper spray arm, first remove the clasp on the upper spray arm by turning it.
-
You should clean and rinse the spray arms thoroughly before replacing them.
Ensure that the upper spray arm clasp is securely tightened when refitting the upper spray arm.
Caring for the Dishwasher
To clean the control panel, use a lightly dampened cloth then dry thoroughly. To clean the exterior, use a good appliance polish wax. Never use sharp objects, scouring pads or harsh cleaners on any part of the dishwasher.
Cleaning the Door
To clean the edge around the door, you should use only a soft warm, damp rag. To prevent penetration of water into the door lock and electrical components, do not use a spray cleaner of any kind.
Also, never use abrasive cleaners or scouring pads on the outer surfaces because they will scratch the finish. Some papers towels can also scratch or leave marks on the surface.

WARNING!
Never use a spray cleaner to clean the door panel for it could damage the door lock and electrical components. It is not allowed to use the abrasive agent or some paper towel because of the risk of scratching or leaving spots on the stainless steel surface.
Protect Against Freezing
If your dishwasher is left in an unheated place during the winter, ask a service technical to:
- Cut off electrical power to the dishwasher.
- Turn off the water supply and disconnect the water inlet pipe from the water valve.
- Drain water from the inlet pipe and water valve. (Use a pan to catch the water)
- Reconnect the water inlet pipe to the water valve.
- Remove the filter in the tub and the bottom and use a sponge to use up water in sump.
■How to Maintain Your Dishwasher
After Every Wash
After every wash, turn off the water supply to the appliance and leave the door slightly ajar so that moisture and odors are not trapped inside.
Remove the Plug
Before cleaning or performing maintenance, always remove the plug from the socket. Do not run risks.
No Solvents or Abrasive Cleaning
To clean the exterior and rubber parts of the dishwasher, do not use solvents or abrasive cleaning products. Use only a cloth and warm soapy water. To remove spots or stains from the surface of the interior, use a cloth dampened with water and a little white vinegar, or a cleaning product made specifically for dishwashers.
When You Go on holiday
When you go on holiday, it is recommended that you run a wash cycle with the dishwasher empty and then remove the plug from the socket, turn off the water supply and leave the door of the appliance slightly ajar. This will help the seals last longer and prevent odors from forming in the appliance.
Moving the Appliance
If the appliance must be moved, try to keep it in the vertical position. If absolutely necessary, it can be positioned on its back.
Seals
One of the factors that cause odors to form in the dishwasher is food that remains trapped in the seals. Periodic cleaning with a damp sponge will prevent this.
Installation
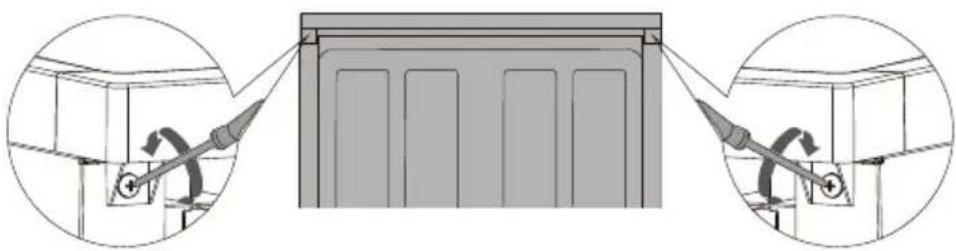
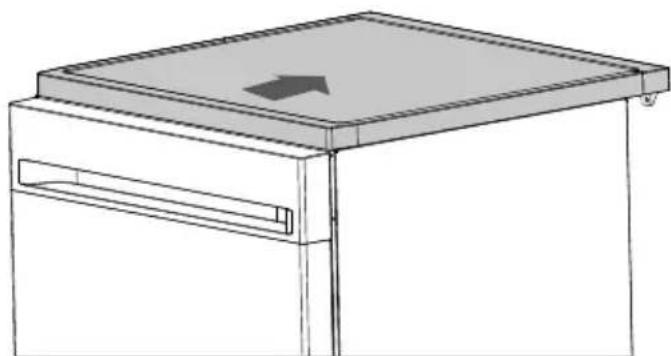
You can use your dishwasher under the counter according to your needs. To do this, you will need to remove the top plate on the dishwasher using the two screws at the back.
natural_image
Diagram showing two views of a cabinet or storage unit with directional arrows indicating movement, no text or symbols present.Remove the two screws at the back.
natural_image
Technical line drawing of a cabinet or storage unit with a top shelf and side compartments (no text or symbols)Push back to remove the top plate.
Connection Of Drain Hoses
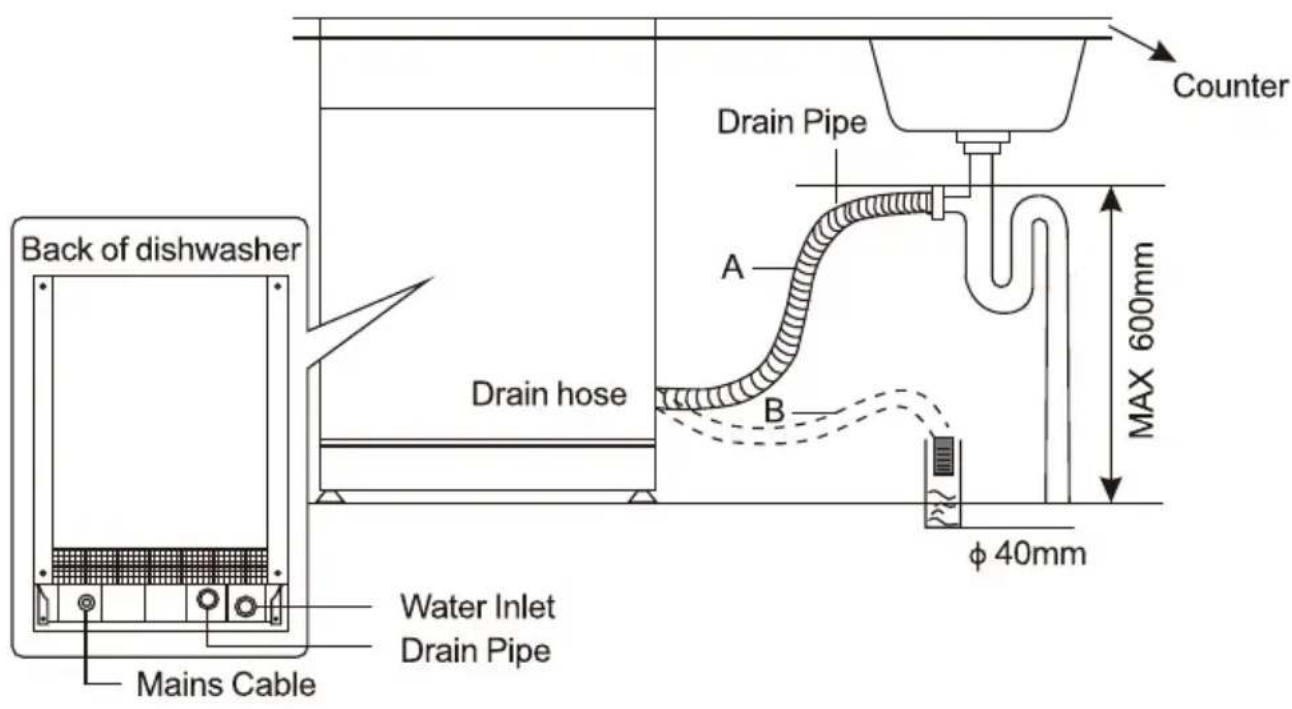
Insert the drain hose into a drain pipe with a minimum diameter of 4 cm , or let it run into the sink, making sure to avoid bending or crimping it. The height of drain pipemust be less than 600 mm . The free end of the hose must not be immersed in water to avoid the back flow of it.

Please securely fix the drain hose in either position A or position B
text_image
Back of dishwasher Mains Cable Water Inlet Drain Pipe Drain hose A B Drain Pipe Counter MAX 600mm φ 40mmHow to drain excess water from hoses
If the connection to the drain pipe is positioned higher than 600 mm, excess water may remain in the drain hose. It will be necessary to drain excess water from the hose into a bowl or suitable container that is held outside and lower than the sink.
Water outlet
Connect the water drain hose. The drain hose must be correctly fitted to avoid water leaks. Ensure that the water drain hose is not kinked or squashed.
Extension hose
If you need a drain hose extension, make sure to use a similar drain hose.
It must not be longer than 4 meters, otherwise the cleaning effect of the dishwasher could be reduced.
Syphon connection
The waste connection must beat a height less than 600 mm (maximum) from the bottom of the dishwasher.
Position The Appliance
Position the appliance in the desired location. The back should rest against the wall behind it, and the sides, along the adjacent cabinets or walls. The dishwasher is equipped with water supply and drain hoses that can be positioned either to the right or the left sides to facilitate proper installation.
⚠ Attention!
- Please place the dishwasher on a firm and flat ground.
- Do not install the dishwasher on an elevated surfaced.
Troubleshooting TIPS
Before Calling for Service
Reviewing the charts on the following pages may make you be free of calling for service.
| Problem Possible Causes | What To Do |
| Dishwasher doesn't run | Fuse blown, or the circuit breaker acted Replace fuse or reset circuit breaker. Remove any other appliances sharing the same circuit with the dishwasher. |
| Power supply is not turned on Make sure the dishwasher is turned on and the door is closed securely. Make sure the power cord is properly plugged into the wall socket. | |
| Water pressure is low Check that the water supply is connected properly and the water is turned on. | |
| Drain pump doesn't stop | Overflow The system is designed to detect an overflow. When it does, it shuts off the circulation pump and turns on the drain pump. |
| Noise | Some audible sounds are normal Sound from detergent cup opening. |
| Utensils are not secure in the baskets or something small has dropped into the basket To ensure everything is secured in the dishwasher. |
| Problem | Possible Causes | What To Do |
| Noise | Motor hums | Dishwasher has not been used regularly. If you do not use it often, remember to set it to fill and pump out every week, which will help keep the seal moist. |
| Suds in the tub | Improper detergent | Use only the special dishwasher detergent to avoidsuds. If this occurs, open the dishwasher and let suds evaporate. Add 1 gallon of cold water to the tub. Close and Iatch the dishwasher, then start the "pre-rinse" wash cycle to drain out the water... Repeat if necessary. |
| Spilled rinse agent | Always wipe up rinse agent spills immediately. | |
| Stained tub interior | Detergent with colorant was used | Make sure that the detergent is the one without colorant. |
| Dishes and flatware not clean | Improper program Improper basket loading | Select a stronger programme. Make sure that the action of the detergent dispenser and spray arms are not blocked by large dishware. |
| Spots and filming on glasses and flatware | 1Extremely hard water2Low inlet temperature3Overloading the dishwasher 4Improper loading 5Old or damp powder detergent6Empty rinse agent dispenserIncorrect dosage of detergent | To remove spots from glassware: 1Take out all metal utensils out of the dishwasher.2Do not add detergent.3Choose the longest cycle.4Start the dishwasher and allow it to run for about 18 to 22 minutes, then it will be in the main wash.5Open the door to pour 2 cups of white vinegar into the bottom of the dishwasher.6Close the door and let the dishwasher complete the cycle. If the vinegar does not work:Repeat as above, except use 1/4 cu p (60 ml)of citric acid crystals instead of vinegar. |
| Cloudiness on glassware | Combination of soft water and too much | Use less detergent if you have soft water and select a shortest cycle to wash the glassware and to get them clean. |
| Yellow or brown film on inside surfaces | Tea or coffee stains | Using a solution of 1/2 cup of bleach and 3 cups of warm water to remove the stains by hand.⚠ WARNINGYou have to wait for 20 minutes after a cycle to let the heating elements cool down before cleaning interior; otherwise, burns will happen. |
| Iron deposits in water can cause an overall film | You have to call a water softener company for a special filter. | |
| White film on inside surface | Hard water minerals | To clean the interior, use a damp sponge with dishwasher detergent and wear rubber gloves. Never use any other cleaner than dishwasher detergent for the risk of foaming or suds. |
| The Detergent dispenser lid cannot be closed properly | Clogged detergent re-sidue is blocking the catch | Clean the detergent from the catch. |
| Detergent left in dispenser cups | Dishes block detergent Cups | Re-loading the dishes properly. |
| Steam | Normal phenomenon | There is some steam coming through the vent by the door latch during drying and water draining. |
| Black or gray marks on dishes | Aluminum utensils have rubbed against dishes | Use a mild abrasive cleaner to eliminate those marks. |
| Water standing on the bottom of the tub | This is normal | A small amount of clean water around the outlet on thetub bottom keeps the water seal lubricated. |
| Dishwasher leaks | Overfill dispenser or rinse aid spills | Be careful not to overfill the rinse aid dispenser.Spilled rinse aid could cause oversudsing and lead to overflowing. Wipe away any spills with a damp cloth. |
| Dishwasher isn't level | Make sure the dishwasher is level. |
NOTE:
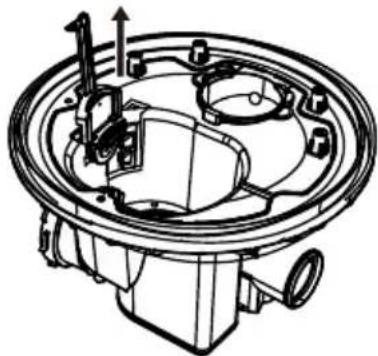
Olive seeds or similar objects may pass through the filter system and come to the drain pump area. In this case the drain pump becomes blocked and needs to be cleaned. Please remove the pump cover by pushing the tail outwards, then you can clear the pump impeller by yourself. After that please clip the cover back into position.
natural_image
Technical line drawing of a mechanical component with internal parts and flow indicators (no text or symbols)Improper maintenance of the machine may threaten the safety of users. Any repairs must be carried out by professionals.
Error codes
After the wash cycle is started, If there is a malfunction the dishwasher will display an error code. The following table shows possible error codes and the faults they represent, and the error indicator will keep flashing and beeping.
| Codes | Indicator Fault | |
| E1 |  ● ● | Overflow/leakage |
| E2 |  ● ● | Water inlet malfunction |
| E4 |  ● ● | Water distribution valve malfunction |
| E5 |  ● + ⬇ ● ● + ⬇ ● | Fan malfunction |
| E6 |  ● + ⬇● ● + ⬇● | Abnormal Heating |
| E7 |  ● + ⬇● + ⬇● ● + ⬇● + ⬇● | Thermistor open/short circuit |
| EA |  ● + ⬇● ● + ⬇● | Abnormal communication |
Attention!
For E2, please check Troubleshooting TIPS first before calling for service. For E1, turn off the main water supply before calling a service.
For E4,E5,E6,E7,EA please call for call for service .
■ Technical Data Sheet
| Linarie | |
| LFDW1446DFSB/LFDW1446DFSS | |
| Capacity | 14 place settings |
| Energy efficiency class | D |
| Annual energy consumption | 266kWh |
| Energy consumption of the standard cleaning cycle | 0.95kWh |
| Power consumption of off-mode | <0.5W |
| Power consumption of left-on mode | <1W |
| Annual water consumption | 3304liter |
| Standard cleaning cycle | Eco |
| Program duration of the standard cleaning cycle | 246 min |
| Noise level | 46dB(A) re 1 pW |
| Mounting | Freestanding |
| Could be built- in | Yes |
| Height | 84.5cm |
| Width | 60cm |
| Depth (with connectors) | 59cm |
| Power consumption | 1800-2200 W |
| Rated voltage / frequency | AC 220-240 V/ 50 Hz |
| Water pressure (flow pressure) | 0.4-10bar=0.04-1.0MPa |
| Water temperature | Max.75℃ |
LIKE TO KNOW MORE?
For further information on all Linärie appliances, or to obtain detailed dimension and installation information, phone or email our Customer Care team or visit our website:
Australia
hello@linarie.com.au
www.linarie.com.au
Follow Us
@Linarie.Appliances

© Linärie
Operating and installation instructions: Original √ Translation
Mart Online Services Pty Ltd. ACN 657 824 050
Linärie Contact hello@linarie.com.au www.linarie.com.au
The distribution and duplication of this document, as well as the use and disclosure of its contents are prohibited unless expressly authorised.
These operating and installation instructions have been drawn up with the greatest of care. But it cannot be ruled out that subsequent technical modifications have not yet been incorporated or the relevant content has not yet been adapted. Please accept our apologies in this eventuality. An updated version can be requested from our team. Subject to printing errors and mistakes.
© Linärie
All rights reserved.