HZ9092 - Chair Vevor - Free user manual and instructions
Find the device manual for free HZ9092 Vevor in PDF.

| Product Type | Spa Chair |
| Brand | Vevor |
| Model | HZ9092 |
| Maximum Load | 300 kg (not more than 30 minutes) |
| Usage | Indoor only |
| Number of persons for assembly | 2 |
| Cleaning | Soft dry cloth, do not use abrasive cleaner |
| Maintenance | Keep dry, avoid moisture |
| Safety precautions | Do not leave unattended, keep out of reach of children, do not use by persons with reduced capacities without supervision |
| Required location | Flat and stable surface |
| Spare parts provided | Yes, replacement parts included |
| Technical support | www.vevor.com/support |
| Warranty | Electronic warranty certificate available on the website |
| Accessories compatibility | Use only accessories provided or recommended by the manufacturer |
| Assembly instructions | Follow manual instructions, wear safety glasses and gloves |
| Recommended age | For adults only, do not let children play with it |
| Material | Not specified in the manual |
| Dimensions | Not specified in the manual |
| Weight | Not specified in the manual |
Frequently Asked Questions - HZ9092 Vevor
User questions about HZ9092 Vevor
0 question about this device. Answer the ones you know or ask your own.
Ask a new question about this device
Download the instructions for your Chair in PDF format for free! Find your manual HZ9092 - Vevor and take your electronic device back in hand. On this page are published all the documents necessary for the use of your device. HZ9092 by Vevor.
USER MANUAL HZ9092 Vevor
Technical Support and E-Warranty Certificate www.vevor.com/support
SPA CHAIRS
MODEL: HZ9092
We continue to be committed to provide you tools with competitive price. "Save Half", "Half Price" or any other similar expressions used by us only represent of savings you might benefit from buying certain tools with us compared top brands and does not necessarily mean to cover all categories of tools offered are kindly reminded to verify carefully when you are placing an order with us actually saving half in comparison with the top major brands.
MODEL: HZ9092
natural_image
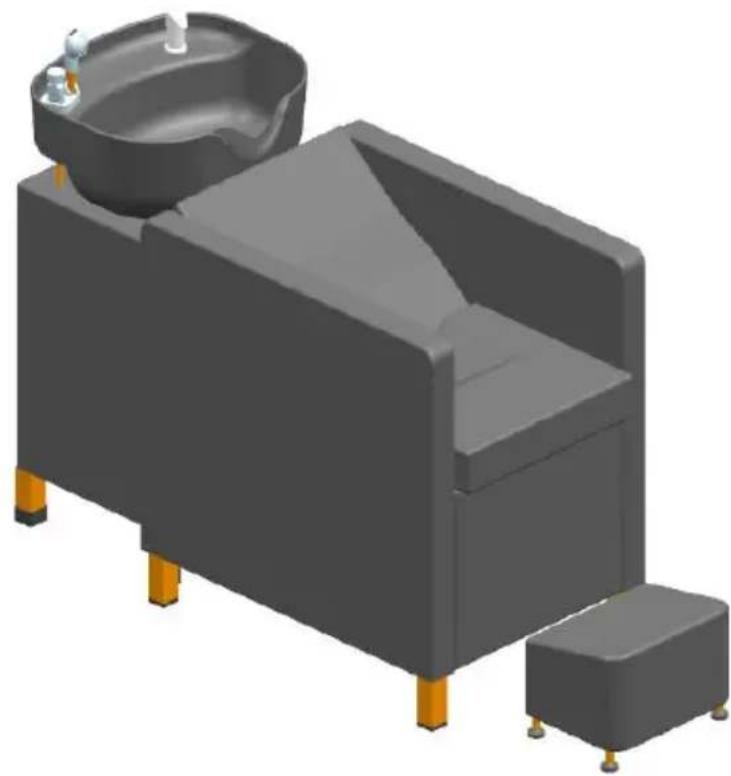
3D rendering of a small bathtub with a sink and side-mounted seat, no text or symbols visibleNEED HELP? CONTACT US!
Have product questions? Need technical support? Please feel fr contact us:
Technical Support and E-Warranty Certificate www. vevor. com/support
This is the original instruction, please read all manual instruction carefully before operating. VEVOR reserves a clear interpretation user manual. The appearance of the product shall be subject to product you received. Please forgive us that we won't inform your product if there are any technology or software updates on our product
Warning-To reduce the risk of injury, user must read instructions manual carefully.
Safety Warnings and Precautions
Thank you for using this product. In order to make sure that you can operate the machine correctly, read this instruction carefully before operation and keep it properly for future reference. Please be sure to the precautions and safety rules in this page to ensure your safe use manual will outline safety warnings and precautions, operating, maintenance and cleaning. The warnings and instructions reviewed in manual cannot cover all possible conditions and situations that may of Caution and common sense are not built into this product, since we that the uses will comply with these codes.
Please read ALL the instructions before using your machine.
- Do not let children, minors, and pets get close to or touch the machine.
- The maximum load of the product is 300Kg (no more than 30 minutes).
- Using any accessories or attachments that are not provided or recommend by the manufacturer may cause injury.
- Do not place the unit on or near hot air, electric burners or heaters.
- Do not apply this unit to any other purposes than the indicated usage.
- Do not place in a damp environment..
- KEEP IT OUT OF CHILDREN'S REACH.
- DO NOT CLEAN IT WITH ANY ABRASIVE MATERIAL.
- Never leave it unattended while in use.
- INDOOR USE ONLY.
- Keep away from cigarettes or other sources of fire.
- Sharp objects can damage the product.
- This appliance is not intended for use by persons (including children) with educated physical, sensory or mental capabilities, or lack of experience or knowledge, unless they have been given supervision or instruction concerning use of the appliance by a person responsible for their safety.
-
The product should be placed on a flat surface.
-
Assemble needs to follow these instructions. Incorrect assembly can be a hazard.
- Wear safety goggles and heavy-duty work gloves during assembly.
- Do not assemble when tired or when under the influence of alcohol, drug medication.
- Weight and other product properties only apply to correctly and completely assembled products.
- Keep the assembly area clean and well-lit.
- Keep bystanders out of the area during assembly.
- This product is not a toy. Do not allow children and pets to play with approach this item.
- Inspect before every use. Do not use it if parts are loose or damaged.
WARNING MULTIBOX DELIVERY
Your Spa Chairs set may arrive in multiple boxes and be delivered on different days by our trusted couriers. Please don't worry and patiently v for all your packages to arrive. Thank you!
Installation notes
- Please dispose of all plastic bags carefully and keep them away from chi and pets.
- Check all components provided according to the list in this manual. Make s you have all of the parts listed.
- Although paying particular attention when manufacturing this product, you may be careful during the assembly process to avoid being scratched by sharp ed
- Wear eye-protective goggles and protective gloves during assembly use.
- The product should be placed on a flat surface.
- The product requires two people to assemble.
- If uneven product gaps are found, they can be disassembled and adjusted
PARTS & FEATURES
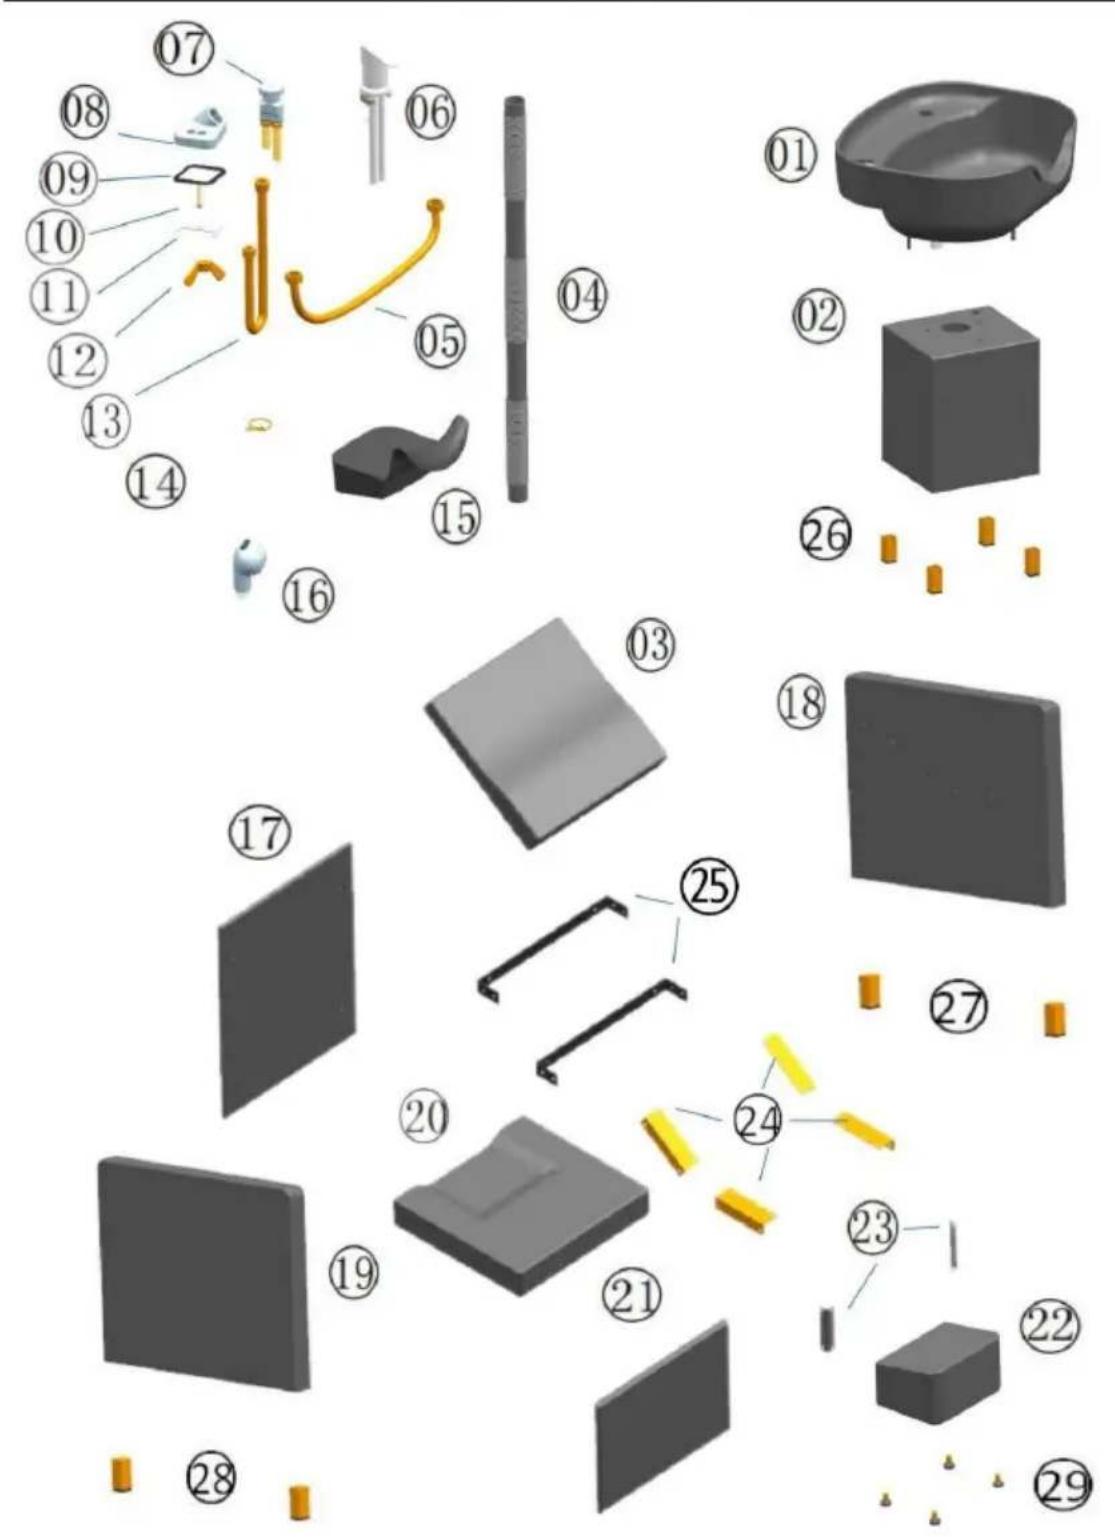
Note: the quantity of parts shown in the manual is the actual usage and the uparts are spare parts.
INSTALLATION INSTRUCTION
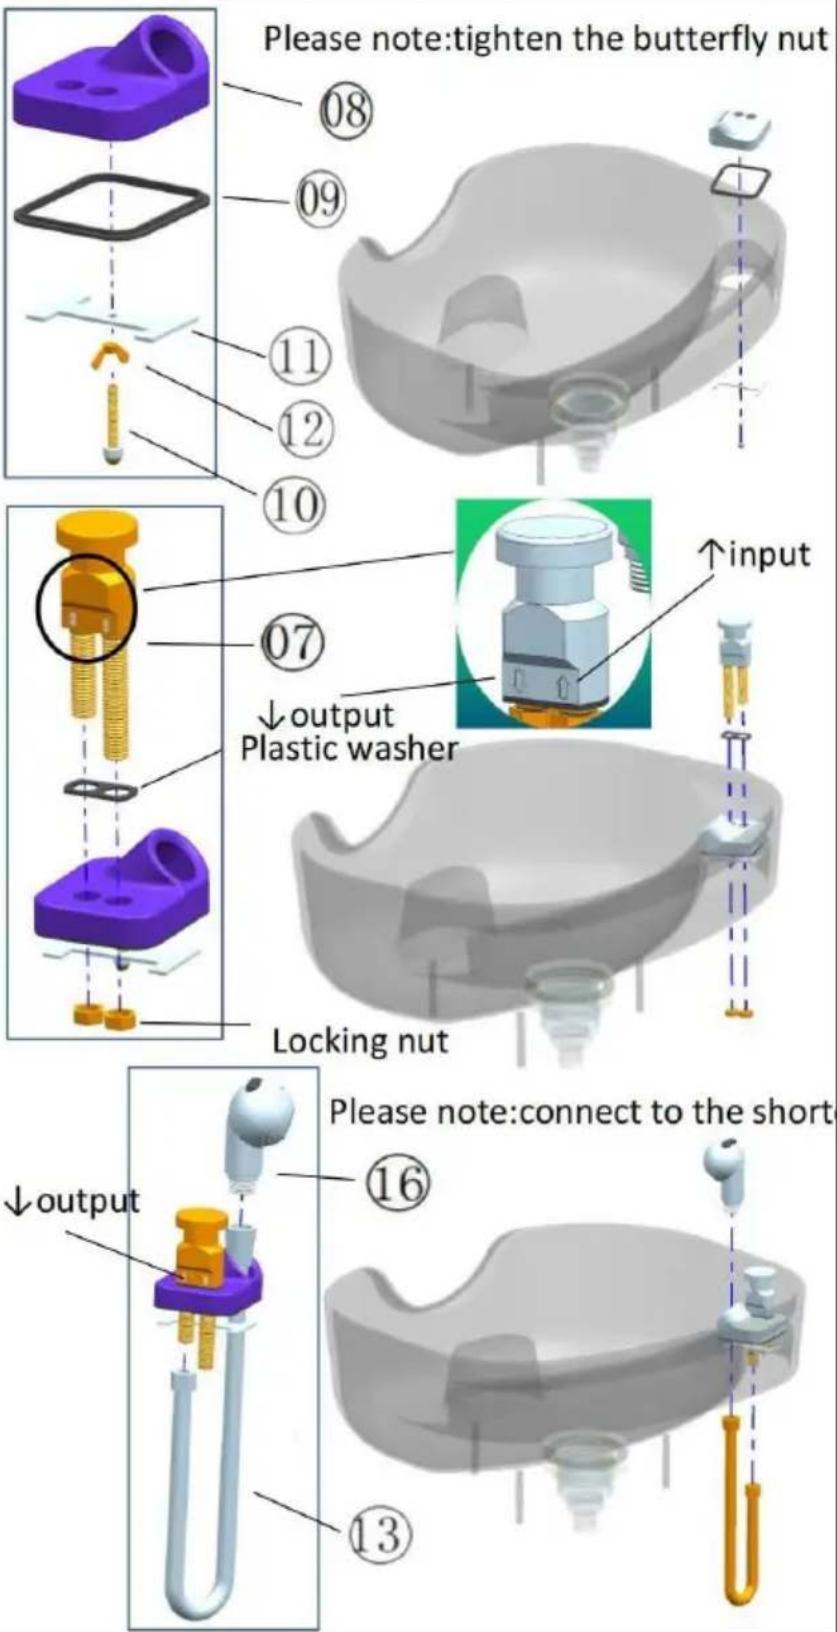
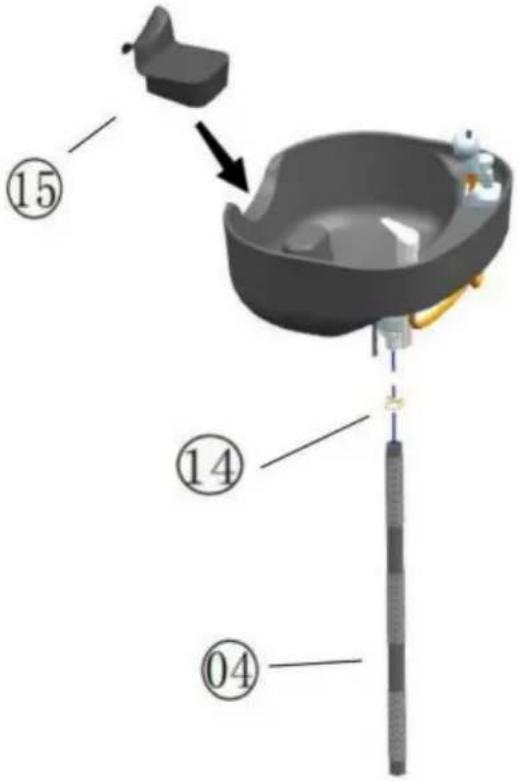
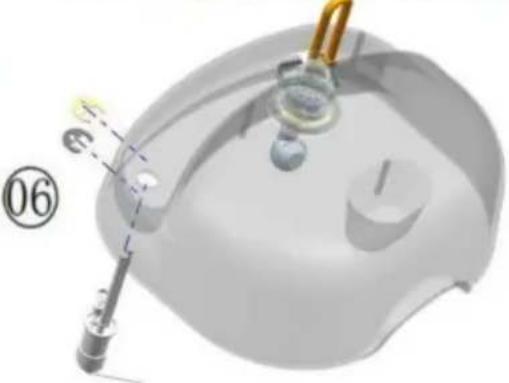
First: Install the basin (1)
Step 1: Install the base
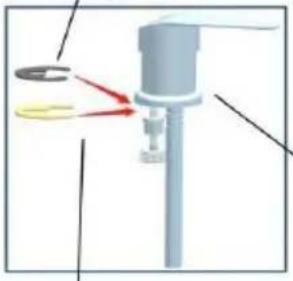
Step 2: Install the check valve
Step 3: Install the shower
Please follow the chart next to it
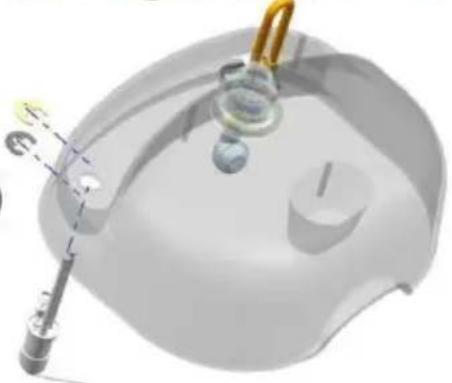
| Second : Install the basin(2) | plastic gasket | the two gaskets are the back |
 |  | |
| iron gasket | ||
 |  | |
 | ||
| Third: Install 2 types of fasteners | 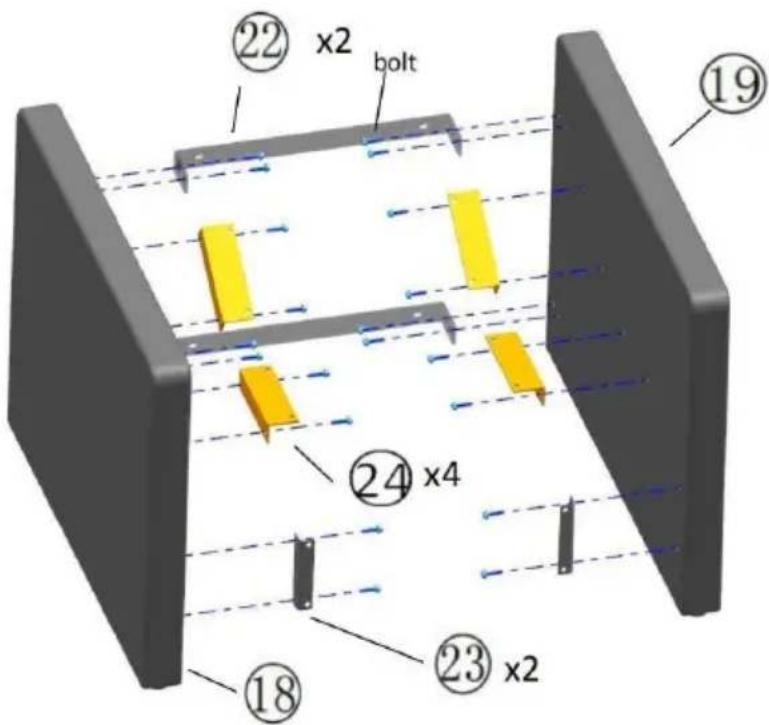 | |
| Step 1: Remove the bolts pre installed on the two handrails (18) and (19)Step 2: Use bolts to install 3 types of fasteners (22), (23), and (24), totaling 8 fasteners, onto the armrestPlease follow the chart next to it | ||
| Fourth: Install the front bumper | 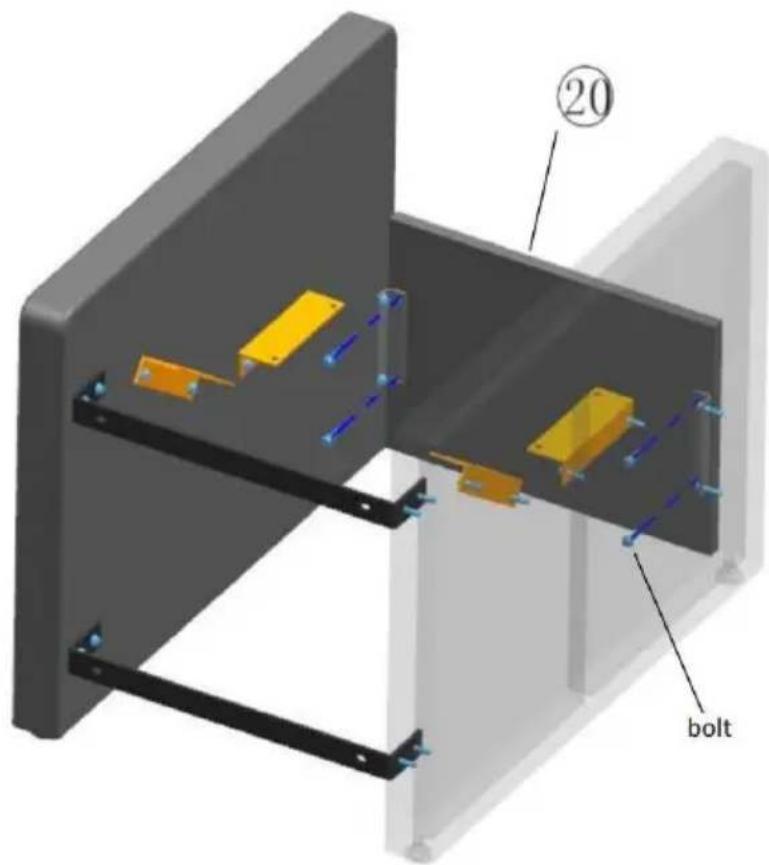 | |
| Step 1: Remove the 4 bolts pre installed on the front bumper (20)Step 2: Fix the front bumper (20) to the fixing part (23) with boltsPlease follow the chart next to it | ||
| Fifth: Install the seat | 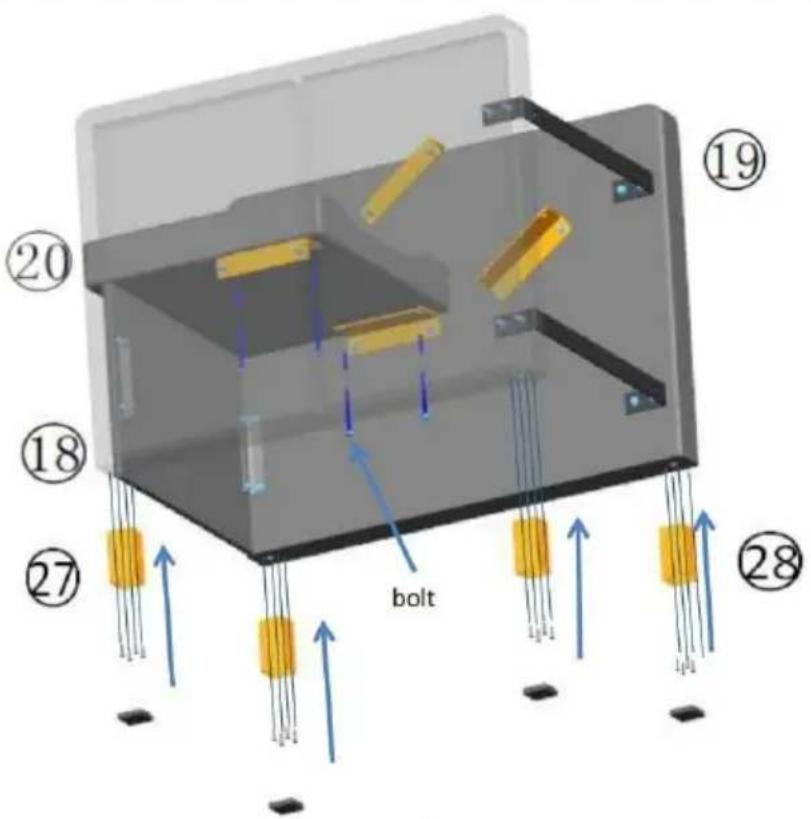 | |
| Step 1: Remove the bolts on (20)Step 2: Fix the seat to (24) with boltsStep 3: Fix (27) and (28) to (18) with self tapping screws and install foot plugsPlease follow the chart next to it | ||
| Sixth: Install the backrest | 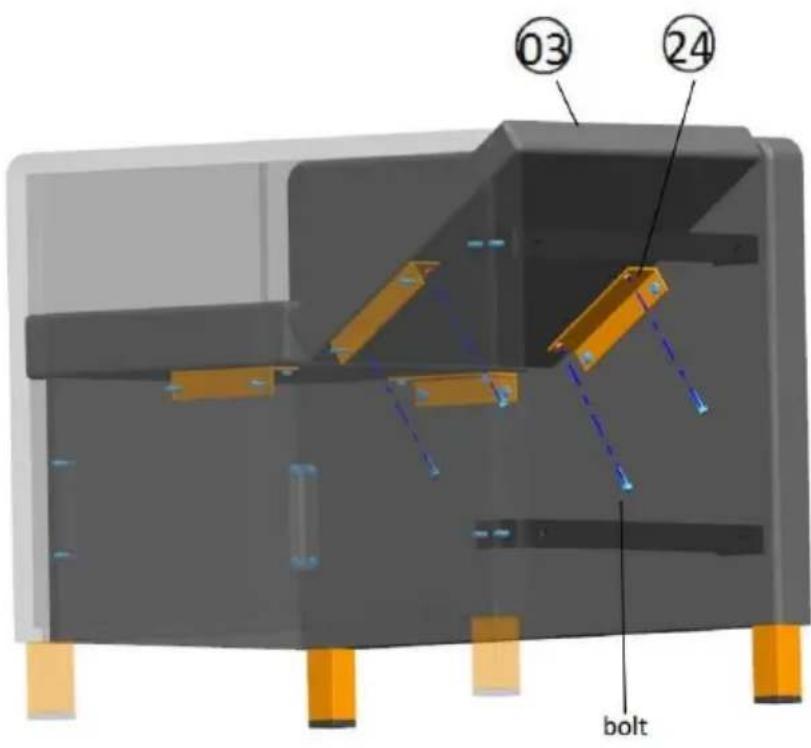 | |
| Step 1: Remove the bolts installed on the bucket rack (02) of the basinStep 2: Fix the bucket rack (02) and back baffle (21) onto the fixing part (22) with the removed boltsPlease follow the chart next to it | ||
| Seventh: Install the tailgate and basin frame |  | |
| Step 1: Remove the bolts installed on the water tank bucket frame (02)Step 2: Use the removed bolts to secure the bucket frame (02) and rear baffle (17) to the fixing piece (25)Step 3: Install (26) onto (02) using self tapping screws and install foot plugsPlease follow the chart next to it | ||
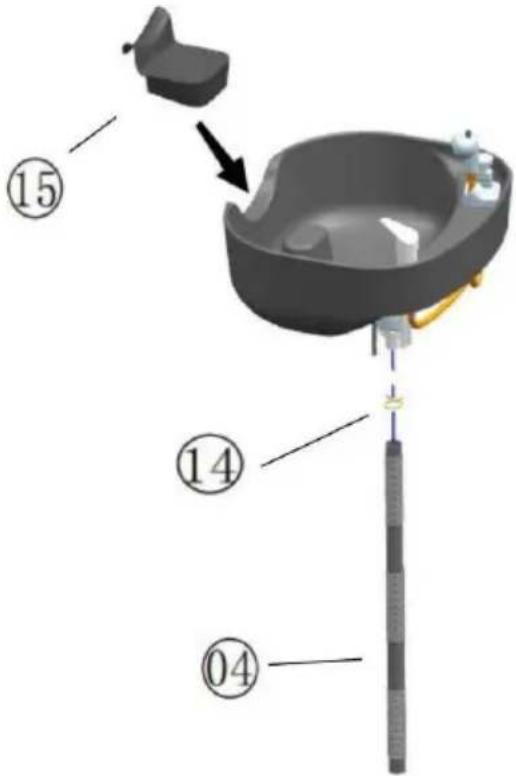
| Eighth: Install the basin and place the pedals | 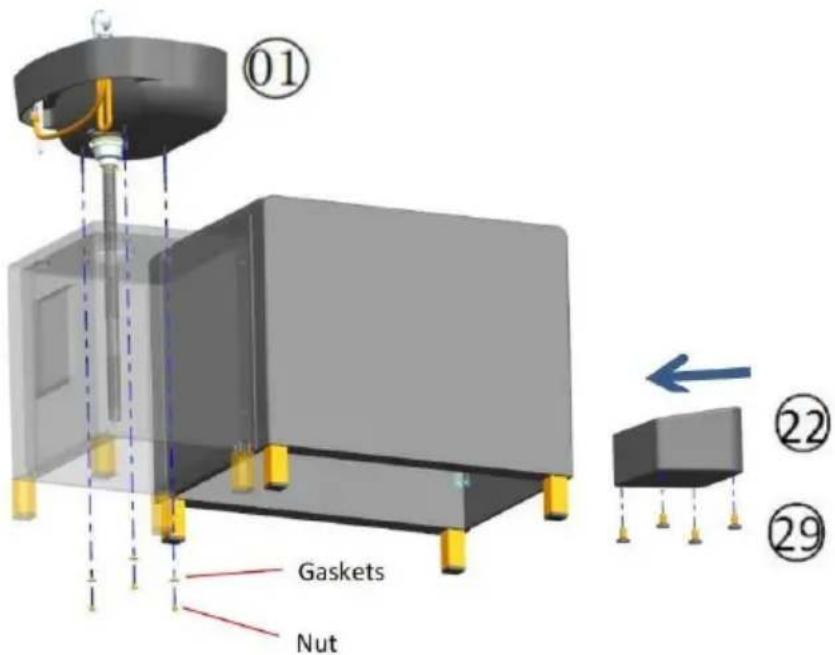 | |
| Step 1: Install the washbasin (01) onto the washbasin seat using 3 washers and 3 nutsStep 2: Install (29) onto (22)Step 1: Place the pedal in the position of the atlasPlease follow the chart next to it | ||
CLEANING AND STORAGE
- Wipe with a soft, dry cloth. Never use an abrasive cleanser or harsh pad clean with water or other liquids.
- Be sure to keep the product dry
- Children are not allowed to wipe the product to avoid tipping and falling
- Please keep the product dry. Moisture can cause products to become mol
Manufacturer: Shanghaimuxinmuyeyouxiangongsi
Address: Shuangchenglu 803nong11hao1602A-1609shi, baoshanqu, shanghai 200000 CN.
Imported to AUS: SIHAO PTY LTD. 1 ROKEVA STREETEASTWOOD NSW 2122 Australia
Imported to USA: Sanven Technology Ltd. Suite 250, 9166 Anaheim Place, Rancho Cucamonga, CA 91730
| UK | REP |
YH CONSULTING LIMITED.
C/O YH Consulting Limited Office 147,
Centurion House, London Road,
Staines-upon-Thames, Surrey, TW18 4AX
| EC | REP |
E-CrossStu GmbH
Mainzer Landstr.69,
60329 Frankfurt am Main.
VEVOR®
TOUGH TOOLS, HALF PRICE
Technical Support and E-Warranty Certificate
www. vevor. com/support
VEVOR®
TOUGH TOOLS, HALF PRICE
natural_image
3D rendering of a bathtub with a sink and seat, no text or symbols visibleBESOIN D'AIDE? CONTACTEZ-NOUS!
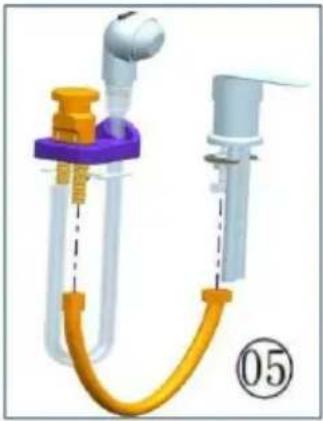
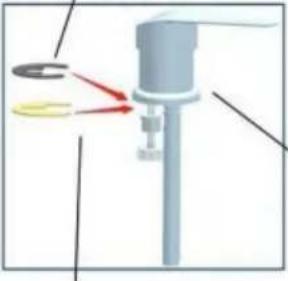
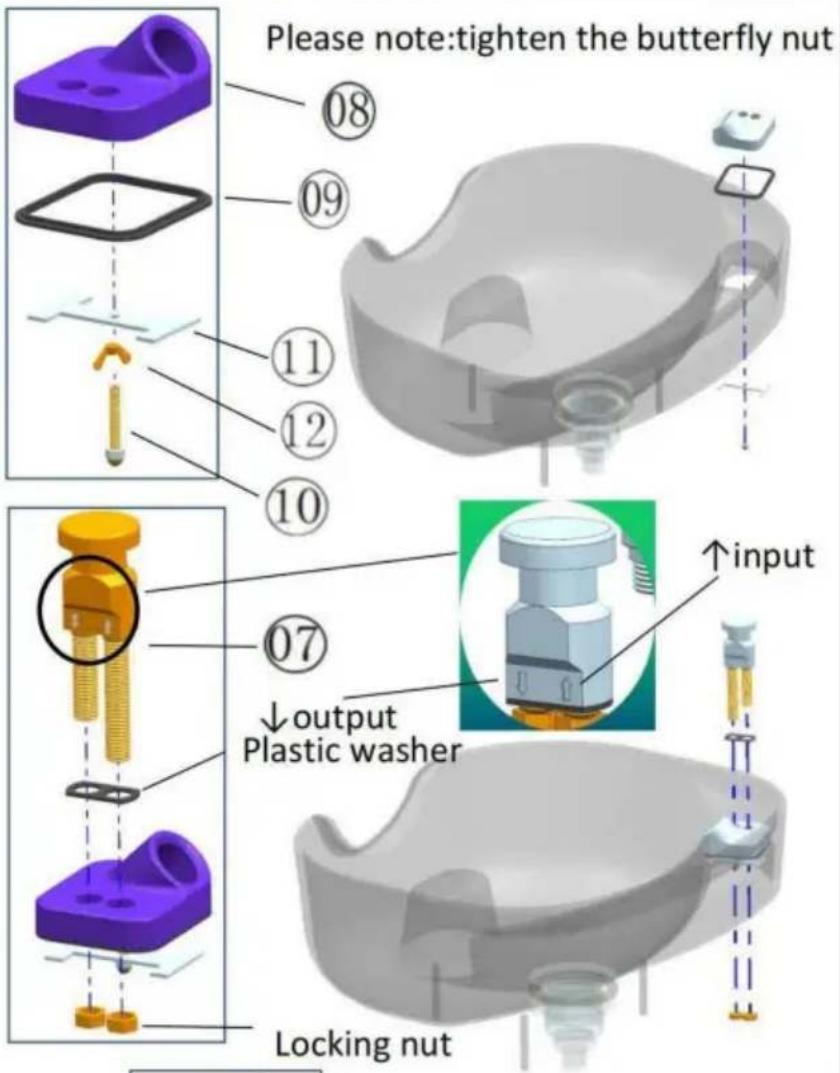
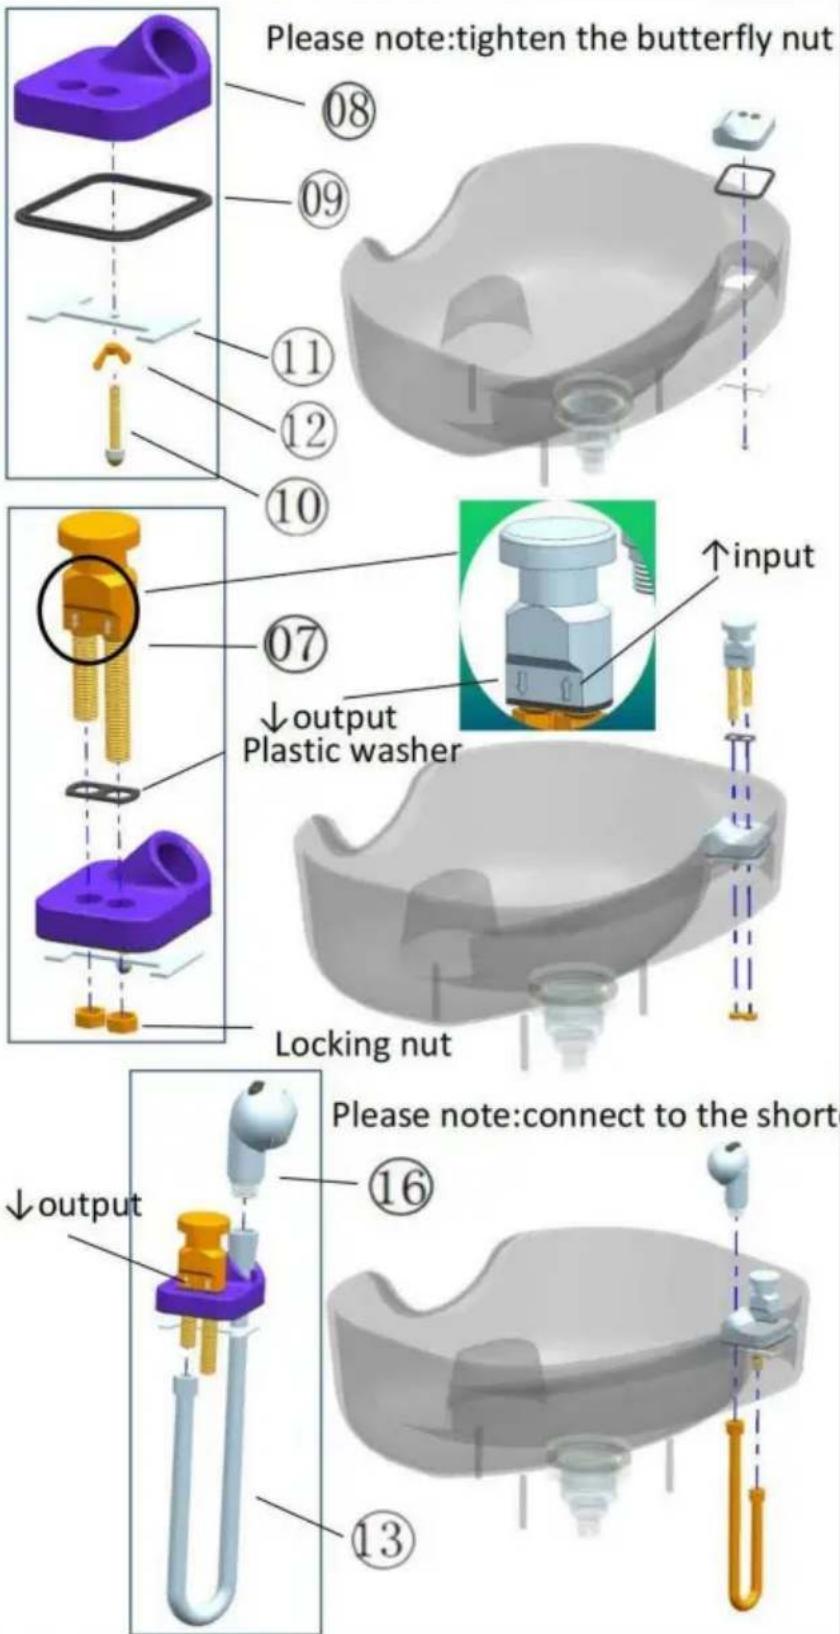
| First:Install the basin (1) | Please note:tighten the butterfly nut | |
| Step 1: Install the base Step 2: Install the check valve Step 3: Install the shower Please follow the chart next to it | 08 09 11 12 10 07 ↓output Plastic washer Locking nut | ↑input |
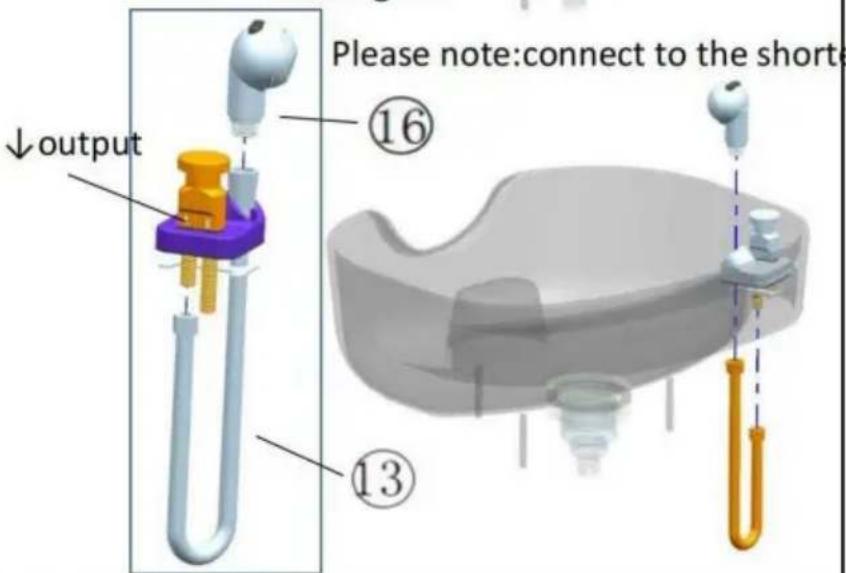
| ↓output | Please note:connect to the short | |
| Second : Install the basin(2) | plastic gasket | the two gaskets are the back |
 |  | |
| iron gasket | ||
 |  | |
 | ||
| Third: Install 2 types of fasteners | 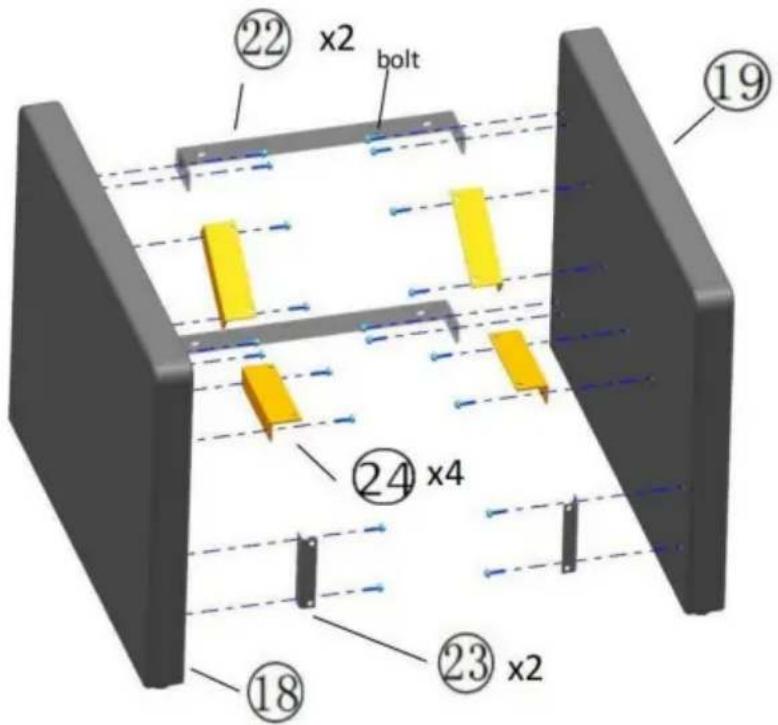 | |
| Step 1: Remove the bolts pre installed on the two handrails (18) and (19)Step 2: Use bolts to install 3 types of fasteners (22), (23), and (24), totaling 8 fasteners, onto the armrestPlease follow the chart next to it | ||
| Fourth: Install the front bumper | 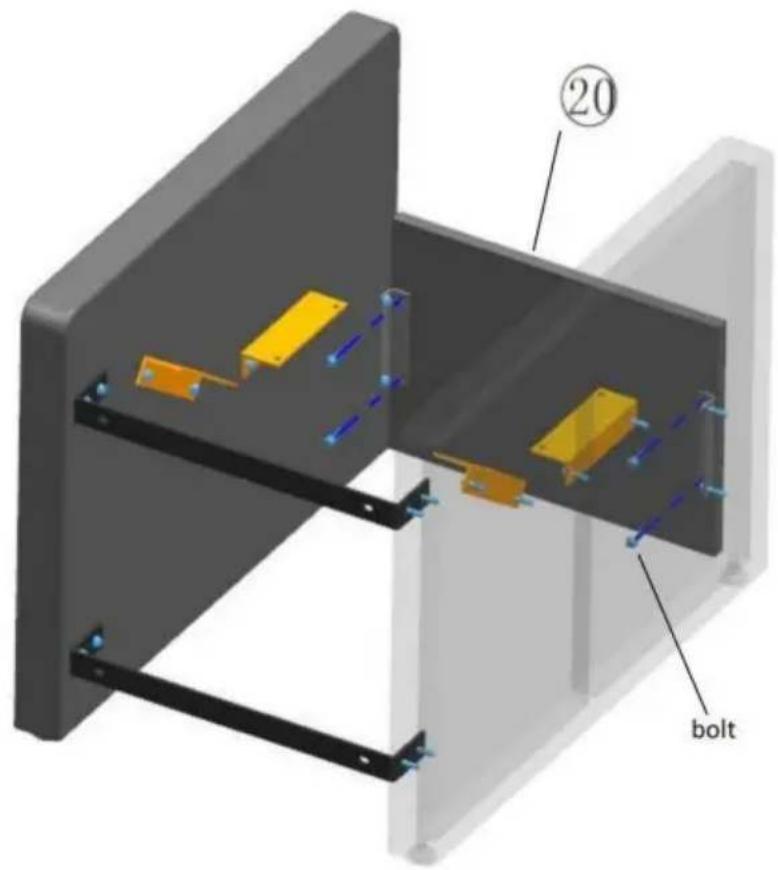 | |
| Step 1: Remove the 4 bolts pre installed on the front bumper (20)Step 2: Fix the front bumper (20) to the fixing part (23) with boltsPlease follow the chart next to it | ||
| Fifth: Install the seat | 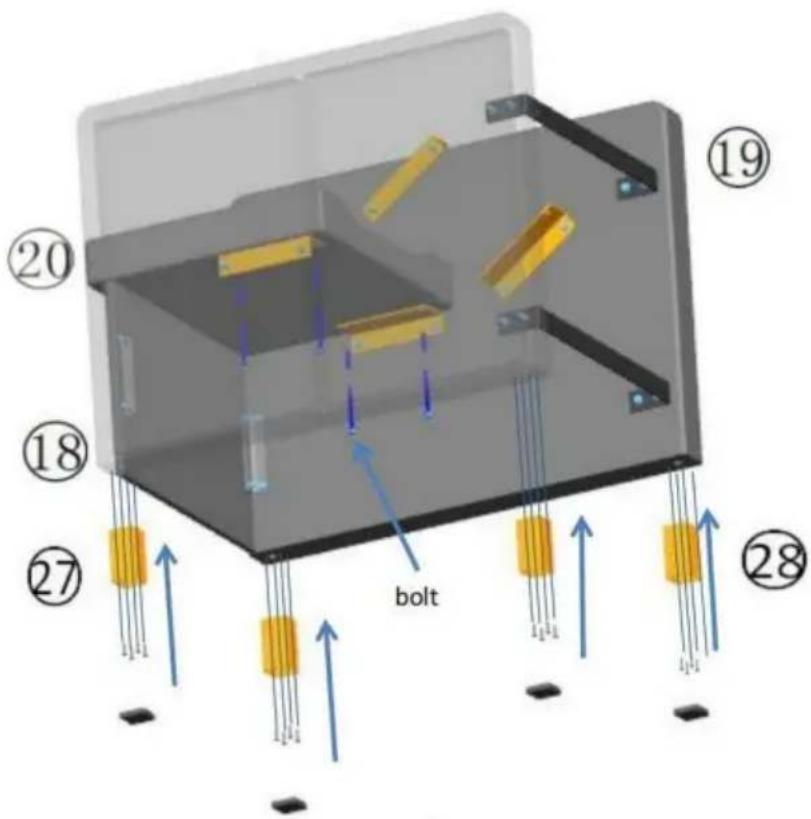 | |
| Step 1: Remove the bolts on (20)Step 2: Fix the seat to (24) with boltsStep 3: Fix (27) and (28) to (18) with self tapping screws and install foot plugsPlease follow the chart next to it | ||
| Sixth: Install the backrest |  | |
| Step 1: Remove the bolts installed on the bucket rack (02) of the basinStep 2: Fix the bucket rack (02) and back baffle (21) onto the fixing part (22) with the removed boltsPlease follow the chart next to it | ||
| Seventh: Install the tailgate and basin frame | 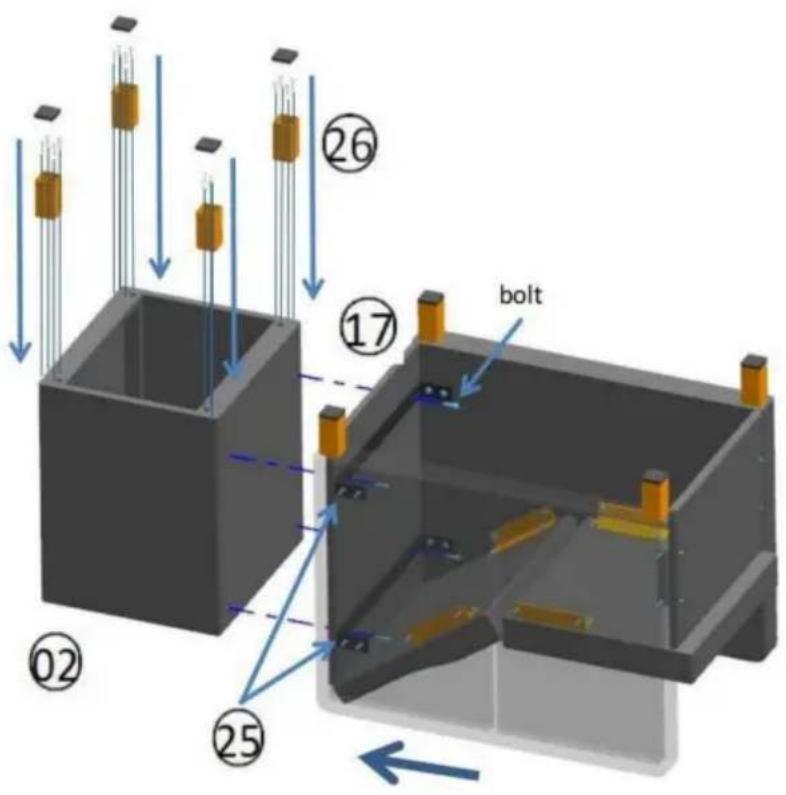 | |
| Step 1: Remove the bolts installed on the water tank bucket frame (02)Step 2: Use the removed bolts to secure the bucket frame (02) and rear baffle (17) to the fixing piece (25)Step 3: Install (26) onto (02) using self tapping screws and install foot plugsPlease follow the chart next to it | ||
| Eighth: Install the basin and place the pedals | 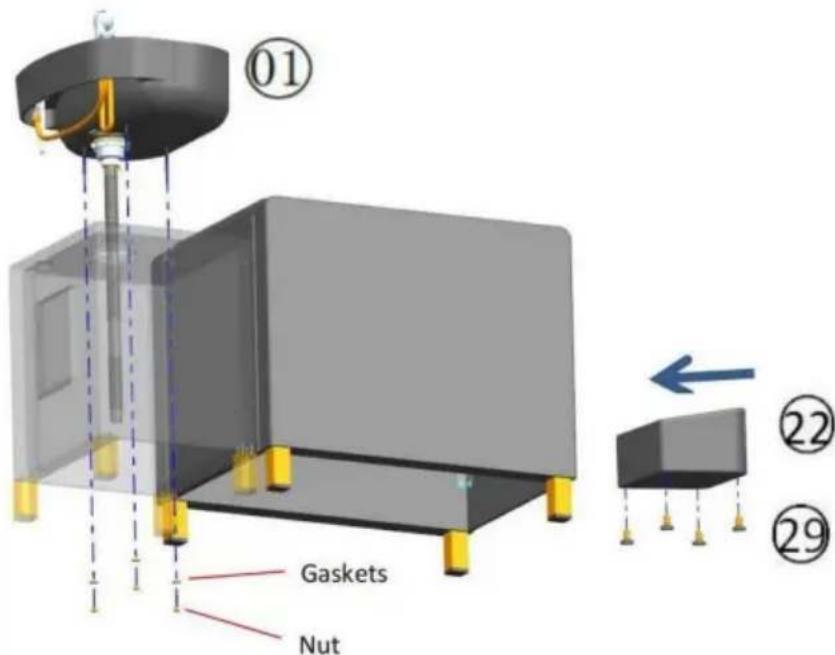 | |
| Step 1: Install the washbasin (01) onto the washbasin seat using 3 washers and 3 nutsStep 2: Install (29) onto (22)Step 1: Place the pedal in the position of the atlasPlease follow the chart next to it | ||
C/O YH Consulting Limited Bureau 147,
Staines-upon-Thames, Surrey, TW18 4AX

E-CrossStu GmbH
Mainzer Landstr.69,
natural_image
3D rendering of a bathtub with a sink and seat, no text or symbols visibleFirst: Install the basin (1)
Step 1: Install the base
Step 2: Install the check valve
Step 3: Install the shower
Please follow the chart next to it
| Second : Install the basin(2) | plastic gasket | the two gaskets are the back |
|  | |
| iron gasket | ||
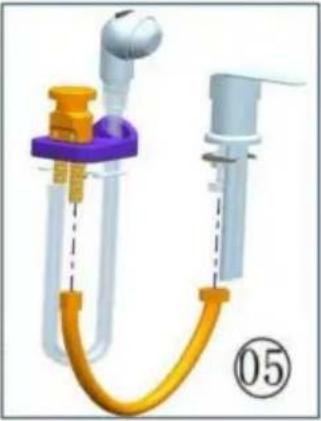 | | |
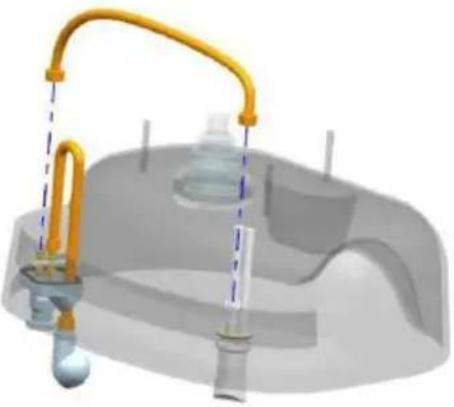
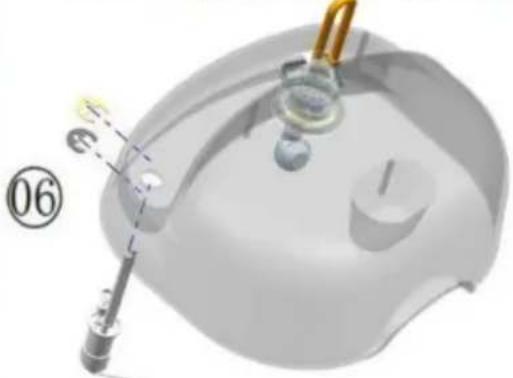
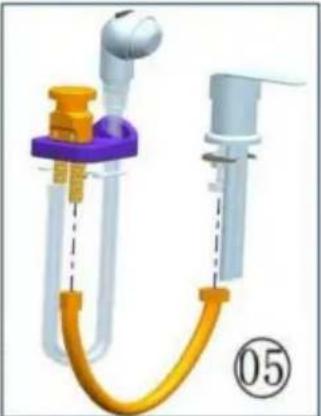
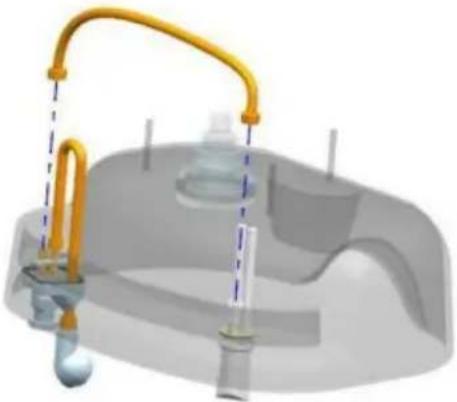
| Step 1: Install a faucet on the basin | ||
| Step 2: Connect the switch and check valve with the connecting pipe | ||
| Step 3: Install drainpipes on the pelvic floor | ||
| Please follow the chart next to it | ||
| ||
| Third: Install 2 types of fasteners | | |
| Step 1: Remove the bolts pre installed on the two handrails (18) and (19)Step 2: Use bolts to install 3 types of fasteners (22), (23), and (24), totaling 8 fasteners, onto the armrestPlease follow the chart next to it | ||
| Fourth: Install the front bumper | | |
| Step 1: Remove the 4 bolts pre installed on the front bumper (20)Step 2: Fix the front bumper (20) to the fixing part (23) with boltsPlease follow the chart next to it | ||
| Fifth: Install the seat | | |
| Step 1: Remove the bolts on (20)Step 2: Fix the seat to (24) with boltsStep 3: Fix (27) and (28) to (18) with self tapping screws and install foot plugsPlease follow the chart next to it | ||
| Sixth: Install the backrest | | |
| Step 1: Remove the bolts installed on the bucket rack (02) of the basinStep 2: Fix the bucket rack (02) and back baffle (21) onto the fixing part (22) with the removed boltsPlease follow the chart next to it | ||
| Seventh: Install the tailgate and basin frame | | |
| Step 1: Remove the bolts installed on the water tank bucket frame (02)Step 2: Use the removed bolts to secure the bucket frame (02) and rear baffle (17) to the fixing piece (25)Step 3: Install (26) onto (02) using self tapping screws and install foot plugsPlease follow the chart next to it | ||
| Eighth: Install the basin and place the pedals | | |
| Step 1: Install the washbasin (01) onto the washbasin seat using 3 washers and 3 nutsStep 2: Install (29) onto (22)Step 1: Place the pedal in the position of the atlasPlease follow the chart next to it | ||
C/O YH Consulting Limited Office 147,
Centurion House, London Road,
Staines-upon-Thames, Surrey, TW18 4AX

www.vevor.com/support
VEVOR®
TOUGH TOOLS, HALF PRICE
natural_image
3D rendering of a bathtub with a sink and seat, no text or symbols visible| First:Install the basin (1) | Please note:tighten the butterfly nut | |
| Step 1: Install the base Step 2: Install the check valve Step 3: Install the shower Please follow the chart next to it | 08 09 11 12 10 07 ↓output Plastic washer Locking nut | ↑input |
| ↓output | Please note:connect to the short | |
| Second : Install the basin(2) | plastic gasket | the two gaskets are the back |
| | |
| iron gasket | ||
| | |
| Step 1: Install a faucet on the basin | ||
| Step 2: Connect the switch and check valve with the connecting pipe | ||
| Step 3: Install drainpipes on the pelvic floor | ||
| Please follow the chart next to it | ||
| ||
| Third: Install 2 types of fasteners | | |
| Step 1: Remove the bolts pre installed on the two handrails (18) and (19)Step 2: Use bolts to install 3 types of fasteners (22), (23), and (24), totaling 8 fasteners, onto the armrestPlease follow the chart next to it | ||
| Fourth: Install the front bumper | | |
| Step 1: Remove the 4 bolts pre installed on the front bumper (20)Step 2: Fix the front bumper (20) to the fixing part (23) with boltsPlease follow the chart next to it | ||
| Fifth: Install the seat | | |
| Step 1: Remove the bolts on (20)Step 2: Fix the seat to (24) with boltsStep 3: Fix (27) and (28) to (18) with self tapping screws and install foot plugsPlease follow the chart next to it | ||
| Sixth: Install the backrest | | |
| Step 1: Remove the bolts installed on the bucket rack (02) of the basinStep 2: Fix the bucket rack (02) and back baffle (21) onto the fixing part (22) with the removed boltsPlease follow the chart next to it | ||
| Seventh: Install the tailgate and basin frame | | |
| Step 1: Remove the bolts installed on the water tank bucket frame (02)Step 2: Use the removed bolts to secure the bucket frame (02) and rear baffle (17) to the fixing piece (25)Step 3: Install (26) onto (02) using self tapping screws and install foot plugsPlease follow the chart next to it | ||
| Eighth: Install the basin and place the pedals | | |
| Step 1: Install the washbasin (01) onto the washbasin seat using 3 washers and 3 nutsStep 2: Install (29) onto (22)Step 1: Place the pedal in the position of the atlasPlease follow the chart next to it | ||
Importato in AUS: SIHAO PTY LTD. 1 ROKEVA STREETEASTWOOD
Nuovo Galles del Sud 2122 Australia
C/O YH Consulting Limited Ufficio 147,
Casa del centurione, London Road,
Staines-upon-Thames, Surrey, TW18 4AX

elettronica www.vevor.com/support
VEVOR®
TOUGH TOOLS, HALF PRICE
natural_image
3D rendering of a bathtub with a sink and seat, no text or symbols visible| First:Install the basin (1) | Please note:tighten the butterfly nut | |
| Step 1: Install the base Step 2: Install the check valve Step 3: Install the shower Please follow the chart next to it | 08 09 11 12 10 07 ↓output Plastic washer Locking nut | ↑input |
| ↓output | Please note:connect to the short | |
| Second : Install the basin(2) | plastic gasket | the two gaskets are the back |
| | |
| iron gasket | ||
| | |
| ||
| Third: Install 2 types of fasteners | | |
| Step 1: Remove the bolts pre installed on the two handrails (18) and (19)Step 2: Use bolts to install 3 types of fasteners (22), (23), and (24), totaling 8 fasteners, onto the armrestPlease follow the chart next to it | ||
| Fourth: Install the front bumper | | |
| Step 1: Remove the 4 bolts pre installed on the front bumper (20)Step 2: Fix the front bumper (20) to the fixing part (23) with boltsPlease follow the chart next to it | ||
| Fifth: Install the seat | | |
| Step 1: Remove the bolts on (20)Step 2: Fix the seat to (24) with boltsStep 3: Fix (27) and (28) to (18) with self tapping screws and install foot plugsPlease follow the chart next to it | ||
| Sixth: Install the backrest | | |
| Step 1: Remove the bolts installed on the bucket rack (02) of the basinStep 2: Fix the bucket rack (02) and back baffle (21) onto the fixing part (22) with the removed boltsPlease follow the chart next to it | ||
| Seventh: Install the tailgate and basin frame | | |
| Step 1: Remove the bolts installed on the water tank bucket frame (02)Step 2: Use the removed bolts to secure the bucket frame (02) and rear baffle (17) to the fixing piece (25)Step 3: Install (26) onto (02) using self tapping screws and install foot plugsPlease follow the chart next to it | ||
| Eighth: Install the basin and place the pedals | | |
| Step 1: Install the washbasin (01) onto the washbasin seat using 3 washers and 3 nutsStep 2: Install (29) onto (22)Step 1: Place the pedal in the position of the atlasPlease follow the chart next to it | ||
LIMPIEZA Y ALMACENAMIENTO
Casa Centurión, London Road,
Staines-upon-Thames, Surrey, TW18 4AX

E-CrossStu GmbH
Mainzer Landstr.69,
natural_image
3D rendering of a bathtub with a sink and seat, no text or symbols visiblePOTRZEBUJESZ POMOCY? SKONTAKTUJ SIĘ Z NAMI!
| First:Install the basin (1) | Please note:tighten the butterfly nut | |
| Step 1: Install the base Step 2: Install the check valve Step 3: Install the shower Please follow the chart next to it | 08 09 11 12 10 07 ↓output Plastic washer Locking nut | ↑input |
| ↓output | Please note:connect to the short | |
| Second : Install the basin(2) | plastic gasket | the two gaskets are the back |
| | |
| iron gasket | ||
| | |
| Step 1: Install a faucet on the basin | ||
| Step 2: Connect the switch and check valve with the connecting pipe | ||
| Step 3: Install drainpipes on the pelvic floor | ||
| Please follow the chart next to it | ||
| ||
| Third: Install 2 types of fasteners | | |
| Step 1: Remove the bolts pre installed on the two handrails (18) and (19)Step 2: Use bolts to install 3 types of fasteners (22), (23), and (24), totaling 8 fasteners, onto the armrestPlease follow the chart next to it | ||
| Fourth: Install the front bumper | | |
| Step 1: Remove the 4 bolts pre installed on the front bumper (20)Step 2: Fix the front bumper (20) to the fixing part (23) with boltsPlease follow the chart next to it | ||
| Fifth: Install the seat | | |
| Step 1: Remove the bolts on (20)Step 2: Fix the seat to (24) with boltsStep 3: Fix (27) and (28) to (18) with self tapping screws and install foot plugsPlease follow the chart next to it | ||
| Sixth: Install the backrest | | |
| Step 1: Remove the bolts installed on the bucket rack (02) of the basinStep 2: Fix the bucket rack (02) and back baffle (21) onto the fixing part (22) with the removed boltsPlease follow the chart next to it | ||
| Seventh: Install the tailgate and basin frame | | |
| Step 1: Remove the bolts installed on the water tank bucket frame (02)Step 2: Use the removed bolts to secure the bucket frame (02) and rear baffle (17) to the fixing piece (25)Step 3: Install (26) onto (02) using self tapping screws and install foot plugsPlease follow the chart next to it | ||
| Eighth: Install the basin and place the pedals | | |
| Step 1: Install the washbasin (01) onto the washbasin seat using 3 washers and 3 nutsStep 2: Install (29) onto (22)Step 1: Place the pedal in the position of the atlasPlease follow the chart next to it | ||
CZYSZCZENIE I PRZECHOWYWANIE
C/O YH Consulting Limited Biuro 147,
Dom Centuriona, London Road,
Staines-upon-Thames, Surrey, TW18 4AX
| Przedstaw ciel UE |
E-CrossStu GmbH
Mainzer Landstr.69,
60329 Frankfurt nad Menem.
VEVOR®
TOUGH TOOLS, HALF PRICE
natural_image
3D rendering of a bathtub with a sink and seat, no text or symbols visibleHULP NODIG? NEEM CONTACT MET ONS OP!
WAARSCHUWING MULTIBOX LEVERING
First: Install the basin (1)
Step 1: Install the base
Step 2: Install the check valve
Step 3: Install the shower
Please follow the chart next to it
| Second : Install the basin(2) | plastic gasket | the two gaskets are the back |
| | |
| iron gasket | ||
| | |
| ||
| Third: Install 2 types of fasteners | | |
| Step 1: Remove the bolts pre installed on the two handrails (18) and (19)Step 2: Use bolts to install 3 types of fasteners (22), (23), and (24), totaling 8 fasteners, onto the armrestPlease follow the chart next to it | ||
| Fourth: Install the front bumper | | |
| Step 1: Remove the 4 bolts pre installed on the front bumper (20)Step 2: Fix the front bumper (20) to the fixing part (23) with boltsPlease follow the chart next to it | ||
| Fifth: Install the seat | | |
| Step 1: Remove the bolts on (20)Step 2: Fix the seat to (24) with boltsStep 3: Fix (27) and (28) to (18) with self tapping screws and install foot plugsPlease follow the chart next to it | ||
| Sixth: Install the backrest | | |
| Step 1: Remove the bolts installed on the bucket rack (02) of the basinStep 2: Fix the bucket rack (02) and back baffle (21) onto the fixing part (22) with the removed boltsPlease follow the chart next to it | ||
| Seventh: Install the tailgate and basin frame | | |
| Step 1: Remove the bolts installed on the water tank bucket frame (02)Step 2: Use the removed bolts to secure the bucket frame (02) and rear baffle (17) to the fixing piece (25)Step 3: Install (26) onto (02) using self tapping screws and install foot plugsPlease follow the chart next to it | ||
| Eighth: Install the basin and place the pedals | | |
| Step 1: Install the washbasin (01) onto the washbasin seat using 3 washers and 3 nutsStep 2: Install (29) onto (22)Step 1: Place the pedal in the position of the atlasPlease follow the chart next to it | ||
REINIGING EN OPSLAG
C/O YH Consulting Limited Kantoor 147,
Centurionhuis, Londenweg,
Staines-upon-Thames, Surrey, TW18 4AX

E-CrossStu GmbH
Mainzer Landstr.69,
60329 Frankfurt am Main.
VEVOR®
TOUGH TOOLS, HALF PRICE
garantiecertificaat www.vevor.com/support
VEVOR®
TOUGH TOOLS, HALF PRICE
natural_image
3D rendering of a bathtub with a sink and seat, no text or symbols visibleBEHÖVER HJÄLP? KONTAKTA OSS!
| First:Install the basin (1) | Please note:tighten the butterfly nut | |
| Step 1: Install the base Step 2: Install the check valve Step 3: Install the shower Please follow the chart next to it | 08 09 11 12 10 07 ↓output Plastic washer Locking nut | ↑input |
| ↓output | Please note:connect to the short | |
| Second : Install the basin(2) | plastic gasket | the two gaskets are the back |
| | |
| iron gasket | ||
| | |
| Step 1: Install a faucet on the basin | ||
| Step 2: Connect the switch and check valve with the connecting pipe | ||
| Step 3: Install drainpipes on the pelvic floor | ||
| Please follow the chart next to it | ||
| ||
| Third: Install 2 types of fasteners | | |
| Step 1: Remove the bolts pre installed on the two handrails (18) and (19)Step 2: Use bolts to install 3 types of fasteners (22), (23), and (24), totaling 8 fasteners, onto the armrestPlease follow the chart next to it | ||
| Fourth: Install the front bumper | | |
| Step 1: Remove the 4 bolts pre installed on the front bumper (20)Step 2: Fix the front bumper (20) to the fixing part (23) with boltsPlease follow the chart next to it | ||
| Fifth: Install the seat | | |
| Step 1: Remove the bolts on (20)Step 2: Fix the seat to (24) with boltsStep 3: Fix (27) and (28) to (18) with self tapping screws and install foot plugsPlease follow the chart next to it | ||
| Sixth: Install the backrest | | |
| Step 1: Remove the bolts installed on the bucket rack (02) of the basinStep 2: Fix the bucket rack (02) and back baffle (21) onto the fixing part (22) with the removed boltsPlease follow the chart next to it | ||
| Seventh: Install the tailgate and basin frame | | |
| Step 1: Remove the bolts installed on the water tank bucket frame (02)Step 2: Use the removed bolts to secure the bucket frame (02) and rear baffle (17) to the fixing piece (25)Step 3: Install (26) onto (02) using self tapping screws and install foot plugsPlease follow the chart next to it | ||
| Eighth: Install the basin and place the pedals | | |
| Step 1: Install the washbasin (01) onto the washbasin seat using 3 washers and 3 nutsStep 2: Install (29) onto (22)Step 1: Place the pedal in the position of the atlasPlease follow the chart next to it | ||
RENGÖRING OCH FÖRVARING
C/O YH Consulting Limited Office 147,
Centurion House, London Road,
Staines-upon-Thames, Surrey, TW18 4AX
| EC | REP |
E-CrossStu GmbH
Mainzer Landstr.69,
60329 Frankfurt am Main.
VEVOR®
TOUGH TOOLS, HALF PRICE