
FM-01A - Electric glass washer Vevor - Free user manual and instructions
Find the device manual for free FM-01A Vevor in PDF.

| Product type | Electric glass washer for commercial use |
| Brand | Vevor |
| Model | FM-01A |
| Supply voltage | 120 V ~ 60 Hz |
| Power | Approximately 150 W (estimated) |
| Approximate dimensions (L x W x H) | 30 x 30 x 40 cm (estimated) |
| Net weight | Approximately 3.5 kg (estimated) |
| Number of brushes | 5 rotating brushes (1 long + 4 short) |
| Compatible glass diameter | From 2 to 3.9 inches (approx. 5 to 10 cm) |
| Recommended glass types | Wine glasses, beer glasses, whiskey glasses |
| Water supply | Place in a sink or basin filled with water (max level indicated) |
| Recommended detergent | Low-foaming detergent |
| Thermal protection | Automatic shut-off in case of overheating (5 to 10 minutes) |
| Motor protection rating | Water-resistant but not submersible |
| Plug type | Grounded plug (3 pins) |
| Cable length | Approximately 1.5 m (estimated) |
| Housing material | Plastic and metal (estimated) |
| Usage | Indoor use only, on flat and stable surface |
| Cleaning and maintenance | Wipe with a damp cloth; monthly cleaning with vinegar |
| Spare parts available | Replacement brushes (long and short) |
| Warranty | Manufacturer's warranty (electronic certificate available at www.vevor.com/support) |
| Certifications | Compliant with European Directive 2012/19/EC (WEEE) |
Frequently Asked Questions - FM-01A Vevor
User questions about FM-01A Vevor
0 question about this device. Answer the ones you know or ask your own.
Ask a new question about this device
Download the instructions for your Electric glass washer in PDF format for free! Find your manual FM-01A - Vevor and take your electronic device back in hand. On this page are published all the documents necessary for the use of your device. FM-01A by Vevor.
USER MANUAL FM-01A Vevor
Technical Support and E-Warranty Certificate www.vevor.com/support
ELECTRIC COMMERCIAL GLASS WASHER USER MANUAL
MODEL: FM-01A FM-01B FM-01C
We continue to be committed to provide you tools with competitive price. "Save Half", "Half Price" or any other similar expressions used by us only represents an estimate of savings you might benefit from buying certain tools with us compared to the major top brands and does not necessarily mean to co all categories of tools offered by us. You are kindly reminded to verify carefully when you are placing an order with us if you are actually Saving Half in comparison with the top major brands.
VEVOR®
TOUGH TOOLS, HALF PRICE
Electric Commercial Glass Washer
MODEL: FM-01A FM-01B FM-01C

natural_image
Technical line drawings of three mechanical devices with cylindrical components and mounting bases (no text or symbols)NEED HELP? CONTACT US!
Have product questions? Need technical support? Please feel free to contact us:
Technical Support and E-Warranty Certificate www.vevor.com/support
This is the original instruction, please read all manual instructions carefully before operating. VEVOR reserves a clear interpretation of user manual. The appearance of the product shall be subject to product you received. Please forgive us that we won't inform you and there are any technology or software updates on our product.
 | Warning-To reduce the risk of injury, user must re instructions manual carefully. |
 | CORRECT DISPOSALThis product is subject to the provision of European D 2012/19/EC. The symbol showing a wheelie bin cross through indicates that the product requires separate re collection in the European Union. This applies to the and all accessories marked with this symbol. Products as such may not be discarded with normal domestic w must be taken to a collection point for recycling electr electronic devices |
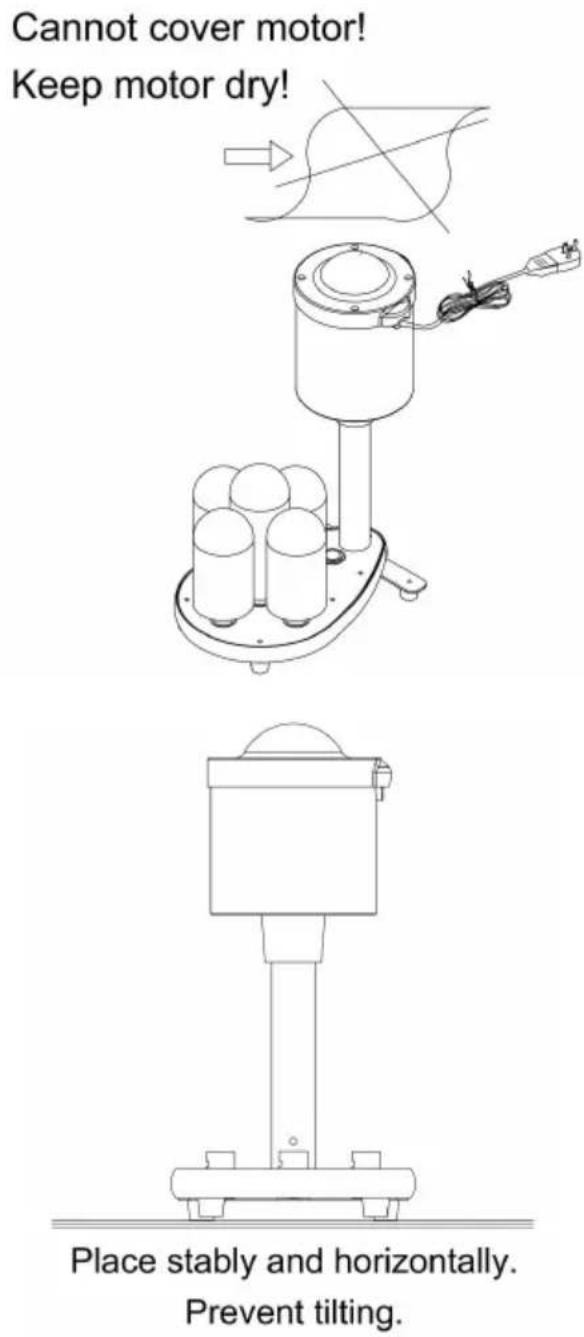
BEFORE USING YOUR GLASS WASHER
Before using your glass washer, please follow these simple instructions. Failing to do so may cause injury to the user damage the machine.
- Install the machine on a flat surface of a sink and make sure the is upright and stable. The bottom foot could adjust to make glass was stable condition.
- Assemble the brushes and check that they are securely in place.
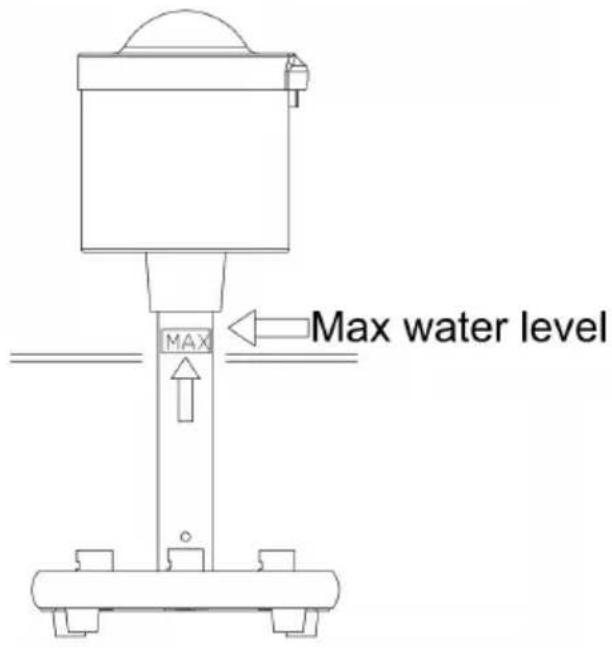
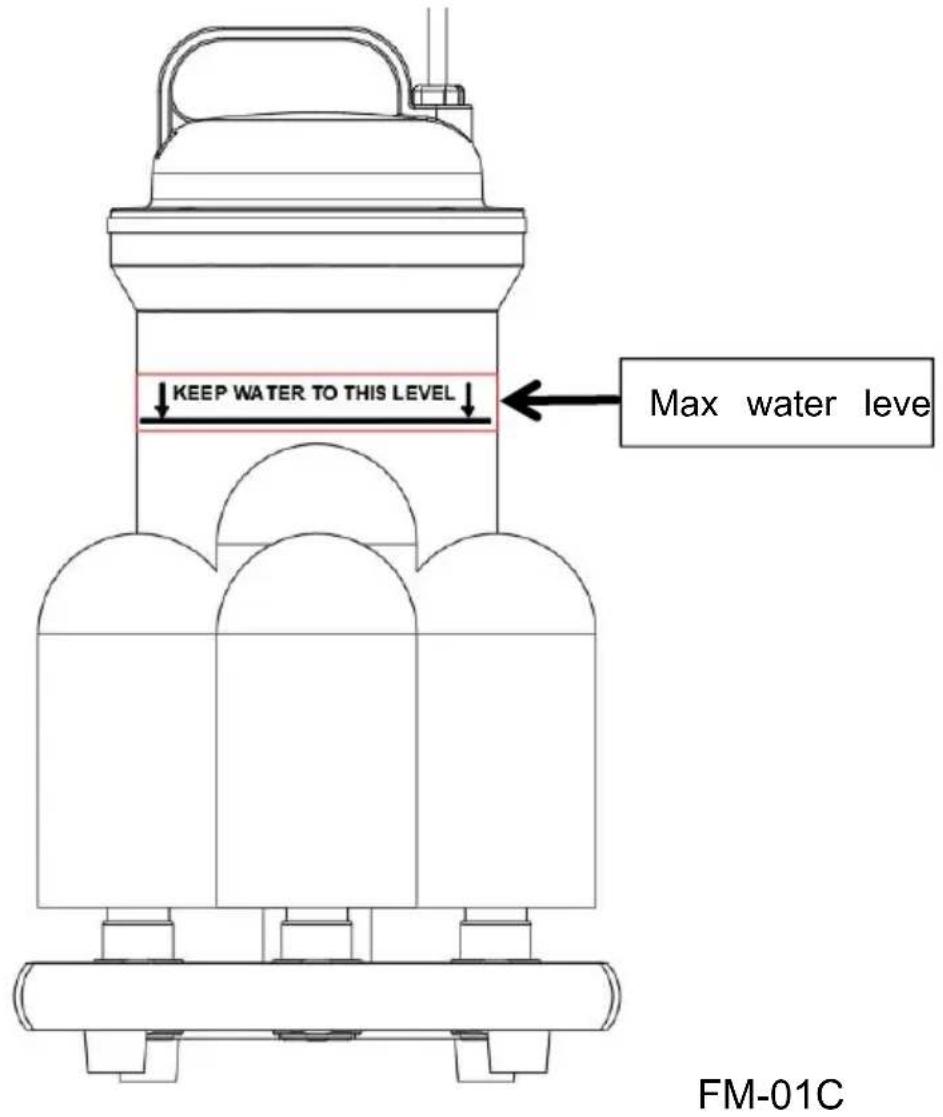
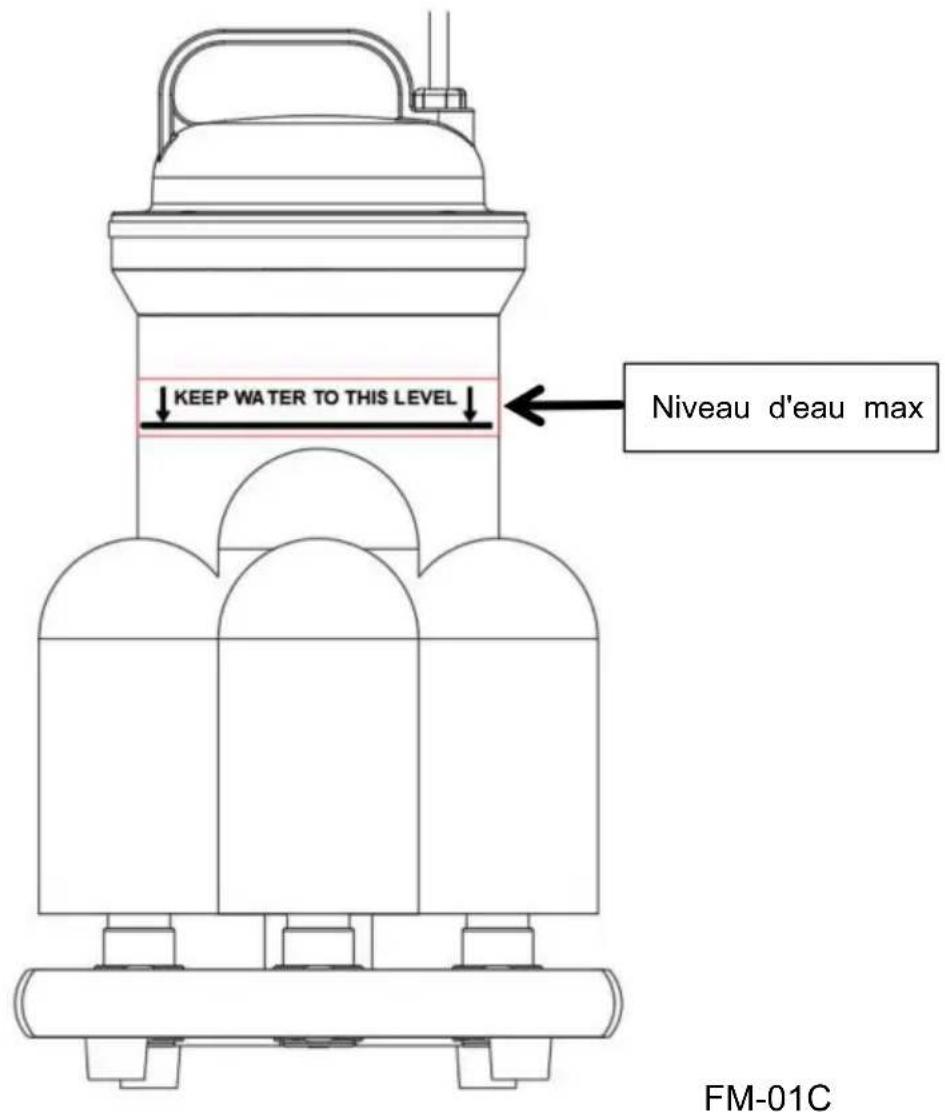
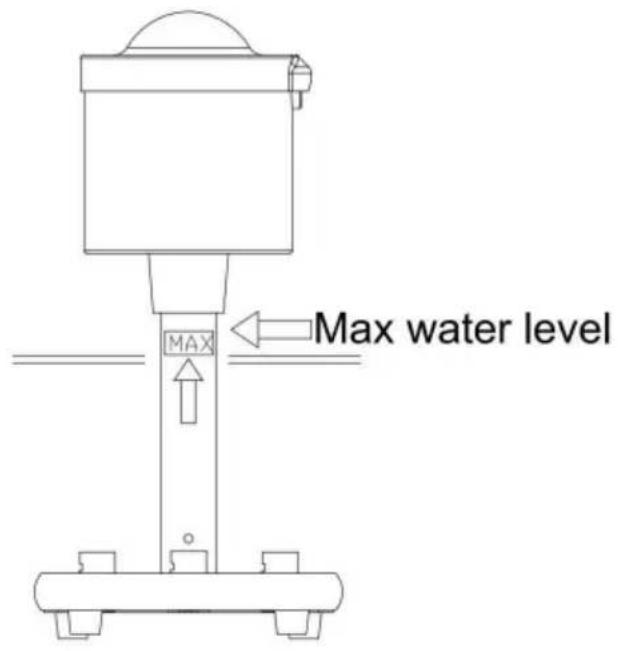
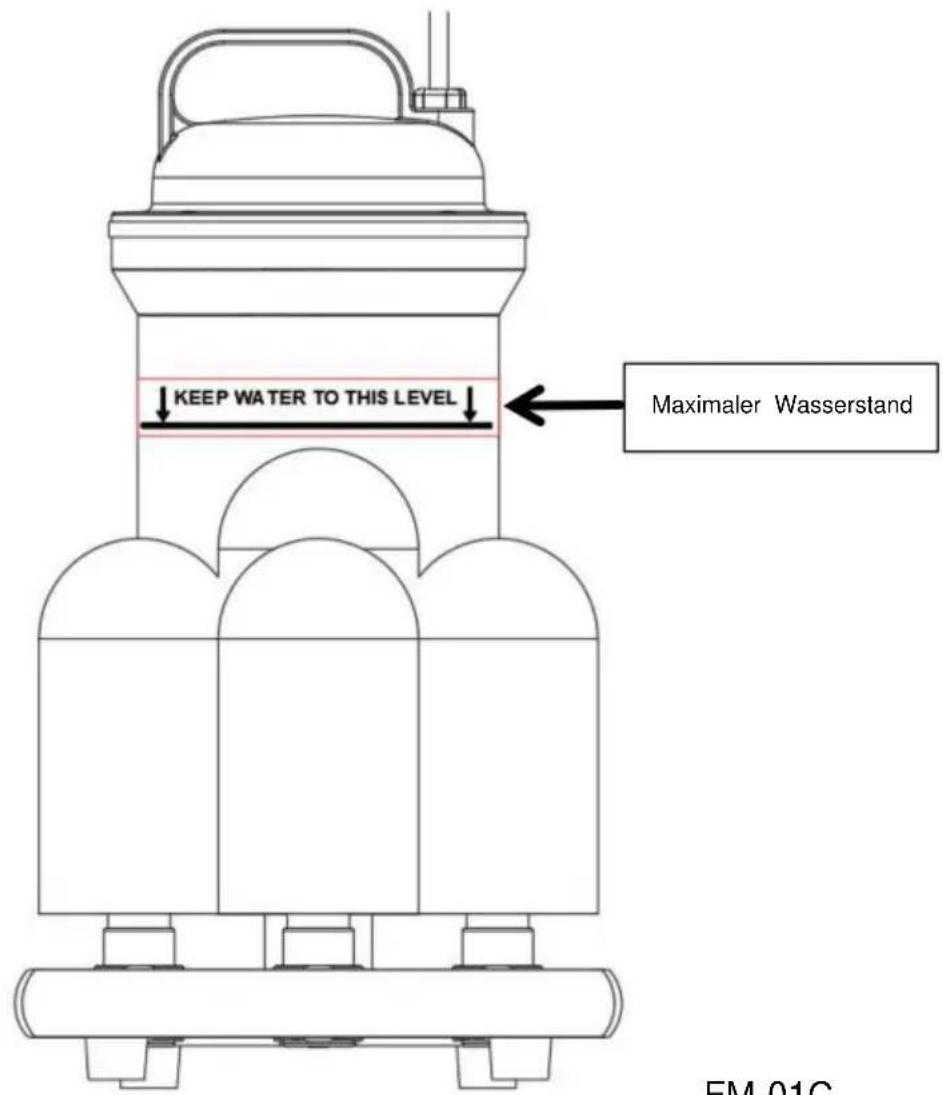
- Pour water into the sink and observe that the water level does not
- exceed the water line mark on the exterior tube(FM-01A/B).
- Add some detergent for washing.
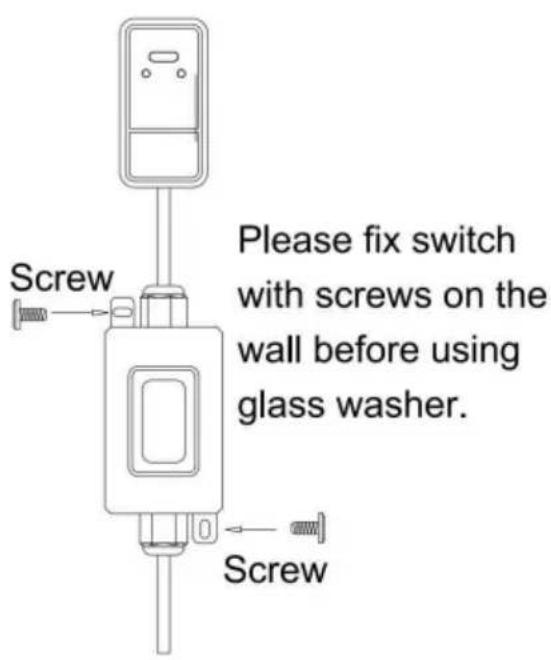
6.Plug the power cord in correctly. - The switch of this machine is in the middle of power cord to stay from water for better water resistant use(FM-01C).
WARNING: Do not overfill the sinks/tanks or fully submerse the glass washer motor.
WARNING: Plug the unit into grounded outlets only that match the u
voltage and frequency listed on the motor.
WARNING: Check the electric cord and plug to make sure it is clear dry before using. Keep the power cord away from the brushes and wash. Never use the machine if the power cord is cracked or damaged.
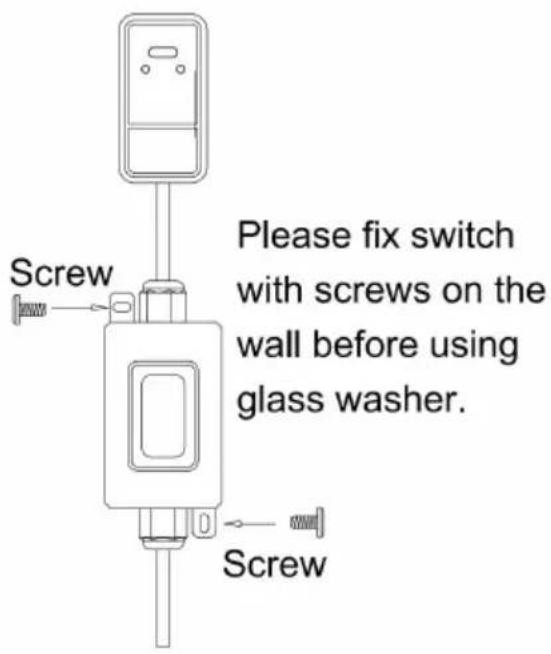
WARNING: The SWTICH must NOT contact the water, keep it dry.
CAUTION: Check and make sure the brushes are securely in place I turning on the machine.
CAUTION: Do NOT use the machine for any other purpose than its intended design.
For FM-01C only FM-01A & FM-01B

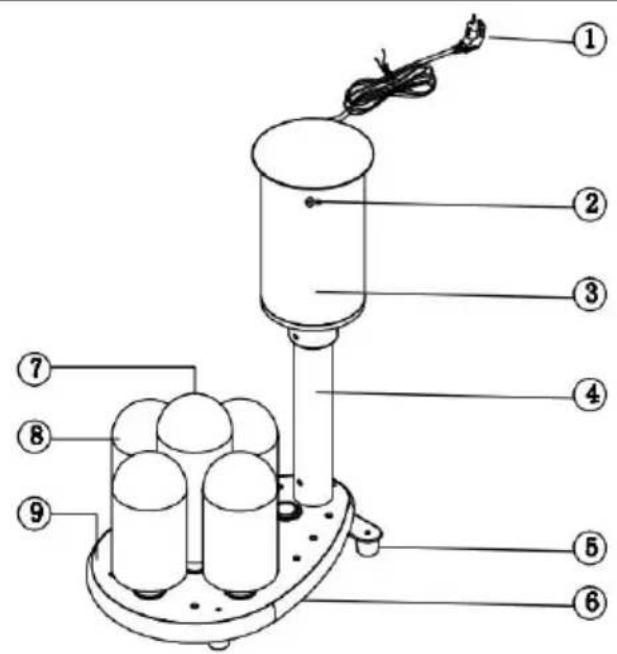
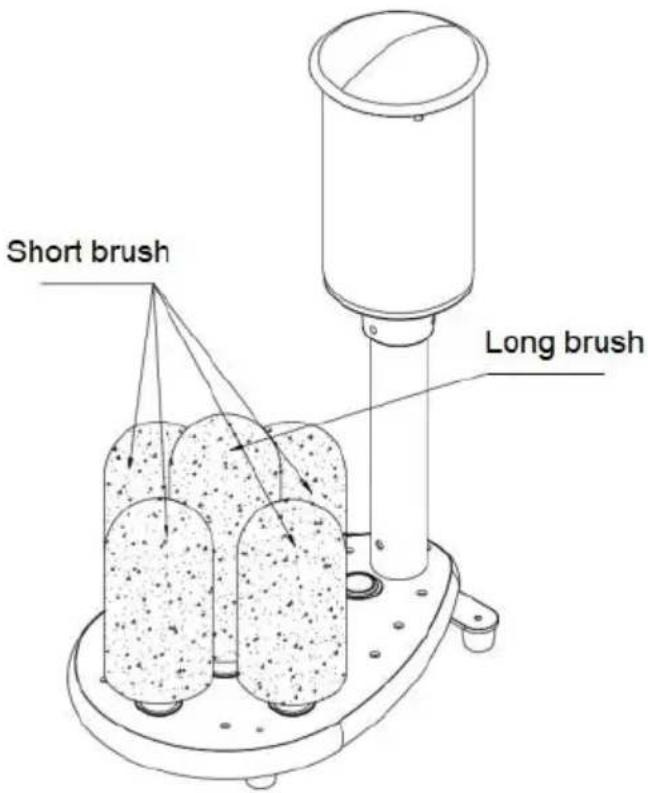
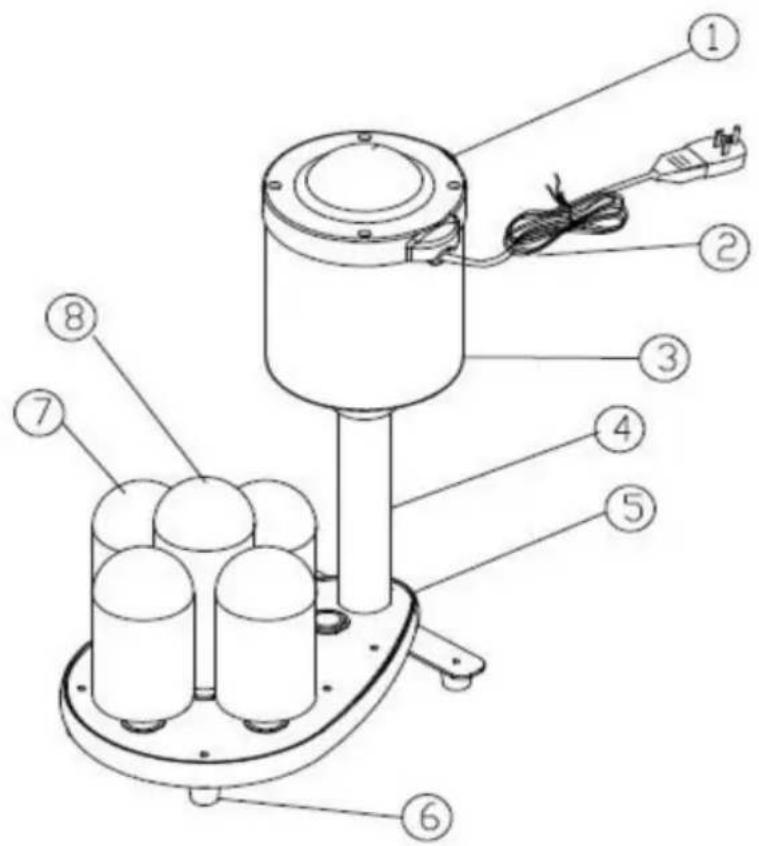
FM-01A
1, ON/OFF button
2, Power code
3, Motor
4, Supporting tube
5, Base board
6, Foot mat
7, Short brush
8, Long brush
FM-01B
1, Power code
2, ON/OFF button
3, Motor
4, Supporting tube
5, Foot mat
6, Base board
7, Long brush
8, Short brush
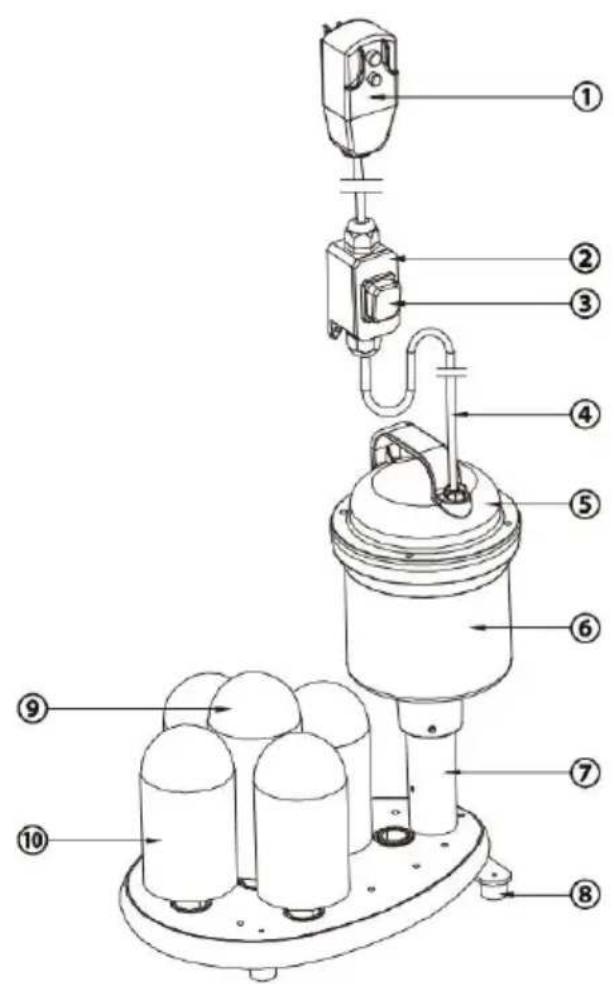
FM-01C
1, Ground fault circu interrupter (GFCI)
2, Waterproof box
3, Power switch
4, Power cord
5, Motor cover
6, Motor
7, Base board
8, Foot
9, Long brush
10, Short brush
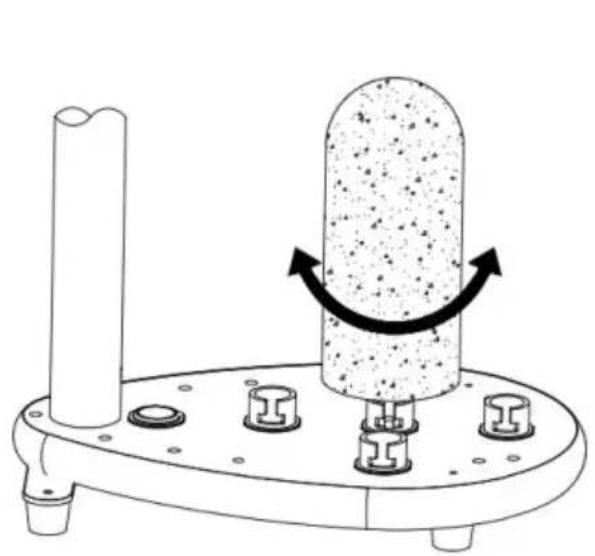
Brush installation guide

- The washer equipped with one long brush and four short brushes.
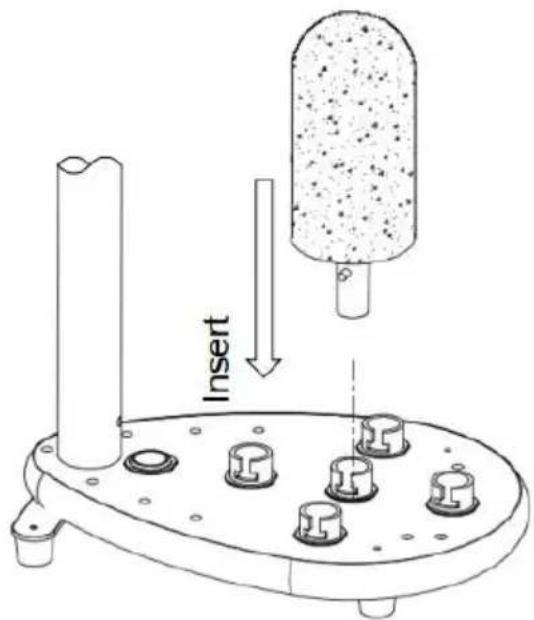
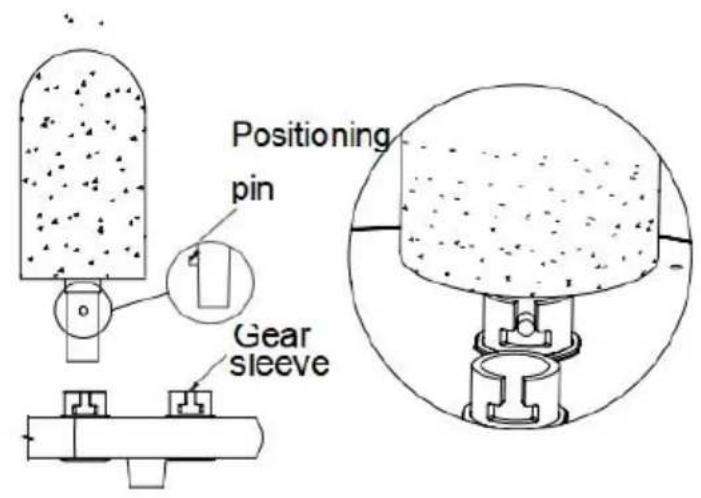
- As shown above, align the brush upward and downward with the sleeve on the base to install it. Note that the positioning pin must be installed in the slot of gear sleeve.
natural_image
Diagram of a mechanical press or stamping device with a cylindrical component and rotating button (no text or symbols)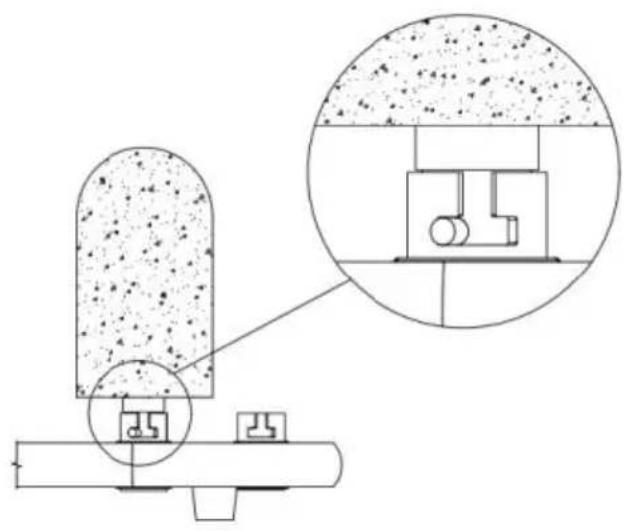
natural_image
Technical diagram showing a mechanical assembly with a cylindrical component and a magnified inset of a mechanical assembly (no text or symbols)- After positioning pin of the brush is installed into the slot of gear s rotate the brush (clockwise or counterclockwise) to make it stuck.
- Long brush install in the middle and four short brushes on the surrounding.
USING YOUR GLASS WASHER
Noisy is the Normal phenomenon when operating.
To start the glass washer, plug in the power cord and switch on the machine. When the brushes starts to spin, put the glass on top of t to wash. It is recommended to wash one glass at a time for the be results.
WARNING: Do not operate the machine out of water.
WARNING: Keep the machine upright. Do not use it if it is lying do
WARNING: Motor may get hot during and after operation; turn it off it's not in use.
WARNING: NEVER used in hot water.
WARNING: KEEP water away from the switch.
WARNING: ONLY use low-foaming detergent to avoid over foaming with operation.
WARNING: Water level must lower than the MAX line before operation
PROTECTION COMPONENT
FM-01A this glass washer includes a capacitor motor. To protect the electronic components inside, the machine will shut off (5-10 mins) automatically if it begins to overheat.
| Glass type | Available | Not Available |
| RED WINE GLASS (Applicable for the middle brush head) |  |  |
| BEER GLASS (Applicable for the surrounding brush head) | 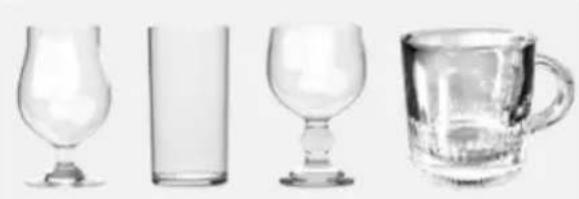 | 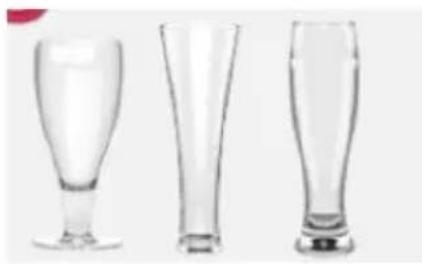 |
| WHISKEY GLASS (Applicable for the surrounding brush head) | 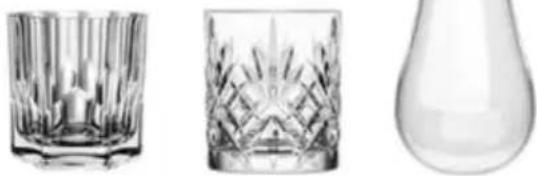 |  |
| CUPS DIAMETER: MIN 2 inches - MAX 3.9 inches | ||
CLEANING & MAINTAINING YOUR GLASS WASHER
To clean, first remove the power cord's plug from the wall outlet. Wa the glass washer to cool down. Use a damp cloth or sponge to ger down the unit. Avoid soaking the whole unit into water or washing it running water as this will cause serious damage to the unit.
When closing for the day, drain sink and wipe off machine, let the dry overnight.
After use for a month, remove the base cover that protects the gear. Immerse the machine in water, add 1/2 cup of vinegar. Operate the machine for 10 minutes, rinse thoroughly and replace the base cover.
IMPORTANT SAFETY INFORMATION
When using electrical appliances, basic safety precautions should always be followed, including the following:
-
READ ALL INFORMATION BEFORE USE.
-
For commercial only.
-
Do not touch hot surfaces.
-
The motor is water resistant but NOT SUBMERSIBLE. Do not put the product in sinks or tanks where there is a risk of falling over or sul the motor.
-
Unplug this unit when not in use and before cleaning.
-
Allow the unit to cool before putting on or taking off parts.
-
Do not operate this or any appliance with a damaged electrical core plug.
-
Do not operate this or any appliance after it has malfunctioned or damaged in any way.
-
Do not use outdoors.
-
Do not place on or near a hot gas or electric burner.
-
Disconnect the unit by turning the power switch to "OFF", then removing the electrical plug from the wall outlet.
-
Do not use appliance for any application other than intended use
-
Do not cover or wrap the motor of this unit when in operation.
- Do not allow this glass washer to touch or be covered by flamn material, such as curtains, draperies, walls, etc., when in operation.
- Do not clean with metal scouring pads as pieces can break off touch electrical components, heightening the risk of electrical shock.
- Do not cover exterior of this unit with metal foil as it may cause glass washer to overheat.
- Avoid scratching the surface or nicking the edges of this unit. Do put the slim or sharp articles beyond the unit.
- Turn the appliance off by turning the power switch button to the position.
- Note that the use of accessories not recommended by the manufacturer may result in injury.
- Children should be supervised to ensure that they do not play w glass washer.
- This appliance is not intended for use by persons (including child with reduced physical sensory or mental capabilities, or lack of experience and knowledge, unless they have been given supervision or instruction concerning use of the appliance by a person responsible for their safe 22. When using the appliance in shops, snack bars, hotels etc., checked voltage and outlet to make sure the appliance is correctly connected power.
- Install unit on a sink with flat surface that is well ventilated.
SAVE THESE INSTRUCTIONS
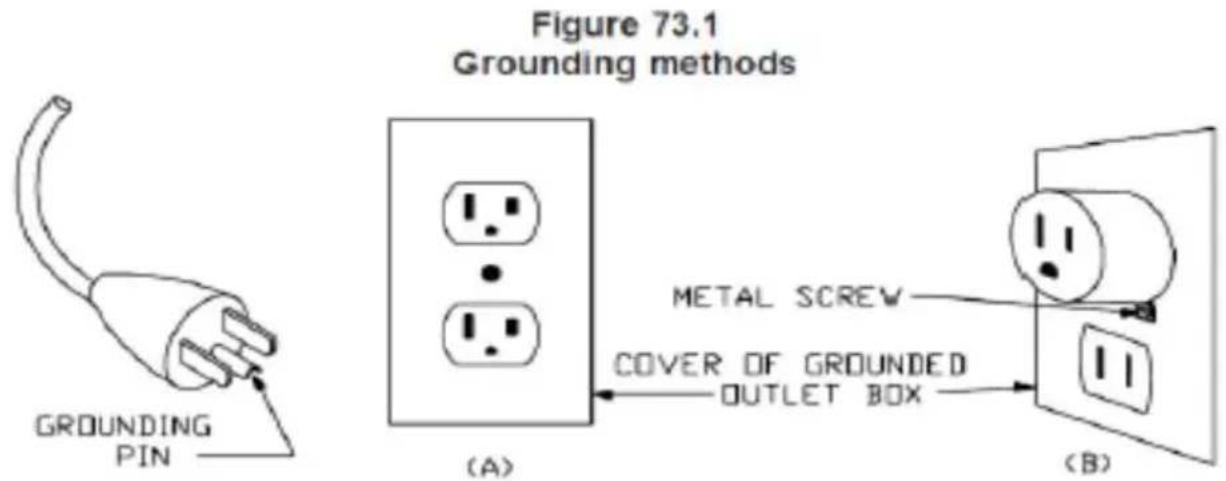
GROUNDING INSTRUCTIONS
This appliance must be grounded. In the event of malfunction or breakdown, grounding provides a path of least resistance for electric current to reduce the risk of electric shock. This appliance is equipped a cord having an equipment-grounding conductor and a grounding plug. The plug must be plugged into an appropriate outlet that is property installed and grounded in accordance with all local codes and ordinary DANGER-Improper connection of the equipment-grounding conductor can
result in a risk of electric shock. The conductor with insulation having outer surface that is green with or without yellow stripes is the equipment-grounding conductor. If repair or replacement of the cord or plug is necessary, do not connect the equipment-grounding conductor live terminal.
Check with a qualified electrician or serviceman if the grounding instructions are not completely understood, or if in doubt as to wheth appliance is properly grounded. Do not modify the plug provided with appliance- if it will not fit the outlet, have a proper outlet installed by qualified electrician.
This appliance is for use on a nominal 120 V circuit, and has a group plug that looks like the plug illustrated in sketch A in Figure 73.1. A temporary adaptor, which looks like the adaptor illustrated in sketches and C, may be used to connect this plug to a 2-pole receptacle as sketch B if a properly grounded outlet is not available. The temporary adaptor should be used only until a property grounded outlet can be installed by a qualified electrician. The green colored rigid ear, lug, and like, extending from the adaptor must be connected to a permanent g such as a property grounded outlet box cover. Whenever the adaptor used, it must be held in place by the metal screw.
A qualified electrician should be consulted if there is any doubt as to whether an outlet box is properly grounded.
NOTE: Save these instructions for future reference.
| Question | Possible cause | Solution |
| The glass easher does not work after being switched on. | 1.Electric connectors are loose. | Make sure glass washer is plugged in correctly.Be sure it is swito on. |
| There is a very loud noise when the glass washer is in use. | Brush not installed properly | Make sure the brush securely in place. |
| The brush spin cycle slow and the glasses are not wash properly | Check to see if something is jammed inside the brushes. | Clean up foreign matter |
| The brush loose or fracture | Check the brush is securely in place ar holder is in correct position. | Adjust brush positionReplace the old brushes regularly. |
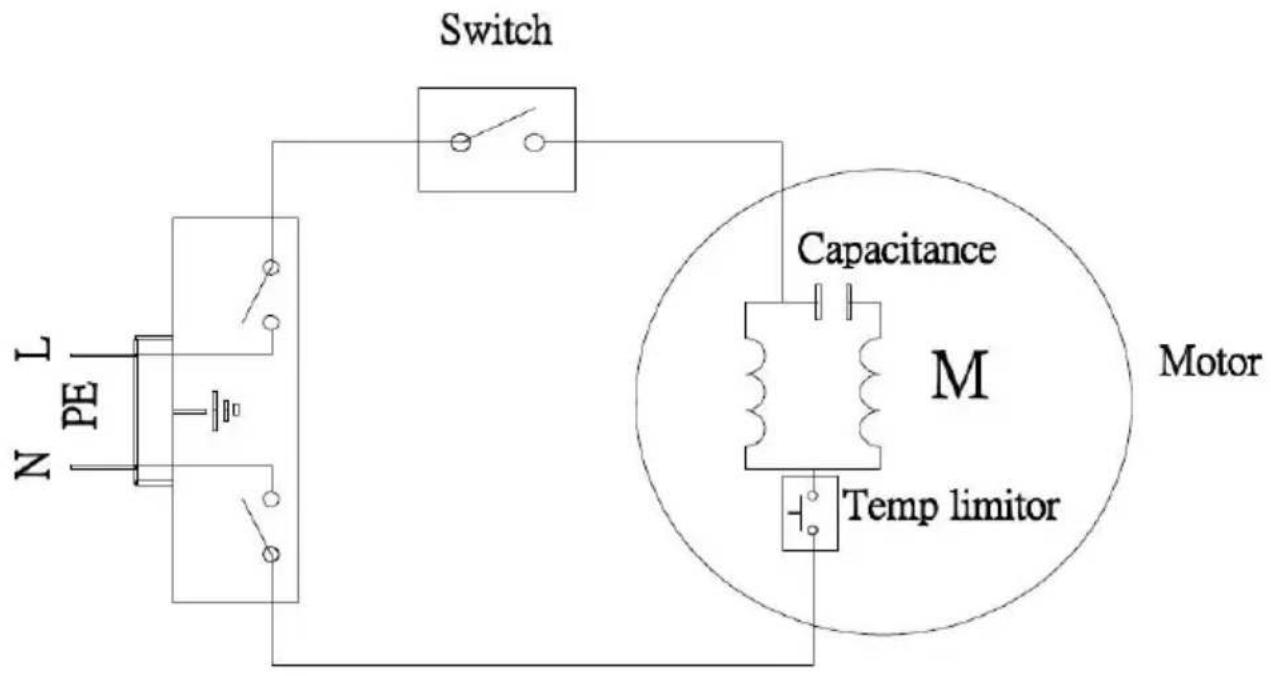
CIRCUIT DIAGRAM
Packing List
| No. | Item | Qty | Remark |
| 1 | Machine | 1 set | |
| 2 | Brush | 5 pcs | |
| 3 | Manual | 1 pcs |
VEVOR®
TOUGH TOOLS, HALF PRICE
Technical Support and E-Warranty Certificate
https://www.vevor.com/support
VEVOR®
TOUGH TOOLS, HALF PRICE
natural_image
Technical line drawing of a mechanical device with a cylindrical top and base (no text or symbols)Place stably and horizontally.
Prevent tilting.

FM-01A et FM-01B
IDENTIFICATION DES ÉLÉMENTS CLÉS
FM-01A
FM-01B
FM-01C
natural_image
Diagram of a mechanical device with a cylindrical component and rotating button, showing directional arrows (no text or symbols)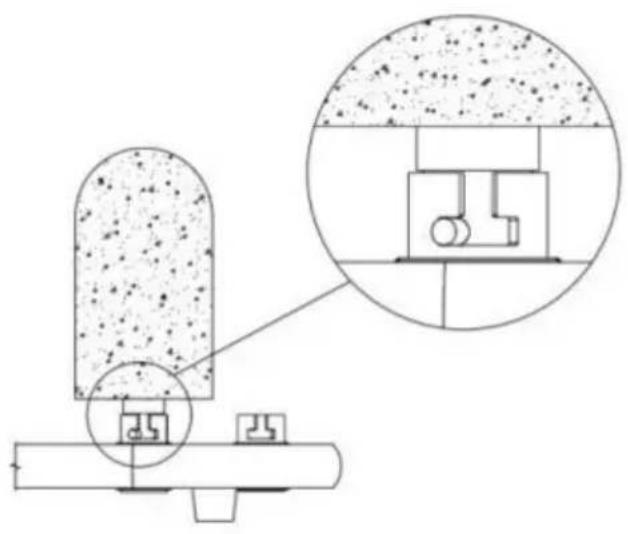
natural_image
Technical diagram showing a mechanical assembly with a cylindrical component and a magnified inset of a mechanical component (no text or symbols)Liste de colisage
natural_image
Technical line drawing of a mechanical device with a cylindrical top and base (no text or symbols)Place stably and horizontally.
Prevent tilting.
Nur für FM-01C
FM-01A und FM-01B
FM-01C
FM-01A
FM-01B
FM-01C
natural_image
Diagram of a mechanical device with a cylindrical component and rotating button, showing directional arrows (no text or symbols)
natural_image
Technical diagram showing a mechanical assembly with a cylindrical component and a magnified inset of a mechanical component (no text or symbols)Packliste
https://www.vevor.com/support


