CDSJ046-G - Juicer CIARRA - Free user manual and instructions
Find the device manual for free CDSJ046-G CIARRA in PDF.


User questions about CDSJ046-G CIARRA
0 question about this device. Answer the ones you know or ask your own.
Ask a new question about this device
Download the instructions for your Juicer in PDF format for free! Find your manual CDSJ046-G - CIARRA and take your electronic device back in hand. On this page are published all the documents necessary for the use of your device. CDSJ046-G by CIARRA.
USER MANUAL CDSJ046-G CIARRA
natural_image
Exterior view of a modern ciarro juice maker with two empty glasses (no text or symbols visible)Model Number:
CASJ046-G
CBSJ046-G
CDSJ046-G

ciarra
ciarra
Make life easier
Dear customer:
Thank you so much for your purchase, please read this instruction manual carefully before installation & use.
If you have any question, please contact us at:
E-mail: info@ciarraappliances.com
| ENGLISH | Instruction Manual | Page1-11 |
| DEUTSCH | Gebrauchsanweisung | Seite12-22 |
| FRANÇAIS | Manuel d'instruction | Page23-33 |
WARRANTY
This appliance has a two years warranty period. During this period the manufacturer is responsible for any failures that are the direct result of construction failure. When these failures occur, the appliance will be repaired or replaced if necessary. The warranty will not be valid when the damage to the appliance is caused by wrong use, not following the instructions or repairs executed by a third party. The guarantee is issued with the original till receipt. All parts, which are subject to wear, are excluded from the warranty.
RECYCLING INFORMATION
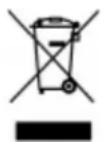
This symbol on the product or on its packaging indicates that this product may not be treated as household waste. Instead, it must be brought to the applicable collection point for recycling of electrical and electronic equipment. By ensuring this product is disposed of correctly, you will help prevent potential negative consequences for the environment and human health, which could otherwise be caused by inappropriate waste handling of this product. For more detailed information about recycling of this product, please contact your local city office, your household waste disposal service or the shop where you purchased the product. The packaging is recyclable. Please treat the packaging ecologically.

SAFETY INSTRUCTIONS
This appliance can be used by children aged from 8 years and above and persons with reduced physical, sensory or mental capabilities or lack of experience and knowledge if they have been given supervision or instruction concerning use of the appliance in a safe way and understand the hazards involved. Children shall not play with the appliance. Cleaning and user maintenance shall not be made by children unless they are older than 8 and supervised.
Keep the appliance and its cord out of reach of children less than 8 years.
This appliance is suitable to be used in a household environment and in similar surroundings such as:
a) Kitchen for personnel of shops, offices or other similar professional surroundings
b) Farms
c) Hotel or motel rooms and other surroundings with a residential character
d) Guest rooms or similar
e) Travel
Attention: This appliance cannot be used with an external timer or a separate remote control.
Read all instructions before use
- Before use check if the voltage indicated on the appliance corresponds with the voltage of your power net.
- Do not let the cord hang on a hot surface or over the edge of a table or counter top.
- Never use the appliance when the cord or plug is damaged, after malfunction or when the appliance is damaged. In that case, take the appliance to the nearest qualified service center for check-up and repair.
- Close supervision is necessary when the appliance is used by or near children.
- Care is needed when handling cutting blades, especially when removing the blade from the bowl, emptying the bowl and during cleaning.
• Appliances shall be potential injury from misuse. -
Switch off the appliance and disconnect from supply before changing accessories or approaching parts that move in use.
-
If the supply cord is damaged, it must be replaced by the manufacturer, its service agent or similarly qualified persons in order to avoid a hazard.
- Do not use the appliance if the rotating sieve or the protecting cover is damaged or has visible cracks.
- The use of accessories that are not recommended or sold by the manufacturer can cause fire, electrical shock or injuries.
• Never leave an operating appliance unattended. - Never place this appliance on or near a gas stove or electrical stove, in a hot oven or in a place where it may come into contact with a hot appliance.
- Do not use the appliance outdoors.
- A lways place the appliance on a steady, firm, dry and level surface, Never immerse the appliance, the cord or plug in water or other liquids to avoid fire, electrical shock or injuries.
- Never use the plug or the appliance with wet hands, Connect the appliance to an earthed socket. This appliance does not contain any parts that you can repair yourself. Always contact a qualified technician for check-up and repair of your appliance.
• Never fill the appliance with unknown foods.
• Make sure that the base of the appliance does not get wet. - If the screw press should get obstructed, put the juicer in 'rev' mode for about 2 to 3 seconds to let it turn in the opposite direction. After this, try to let the screw turn in the right direction again.
- Only use the food pusher to guide food into the juicer.
- Do not use the appliance for longer than 20 minutes continuously. The motor could overheat.
- If during use you notice a burnt smell or smoke, immediately stop using the juicer. Take the appliance to a service center for check-up and repair.
• Always use both hands to move the appliance. - Do not use water that is warmer than 65°C to rinse the appliance.
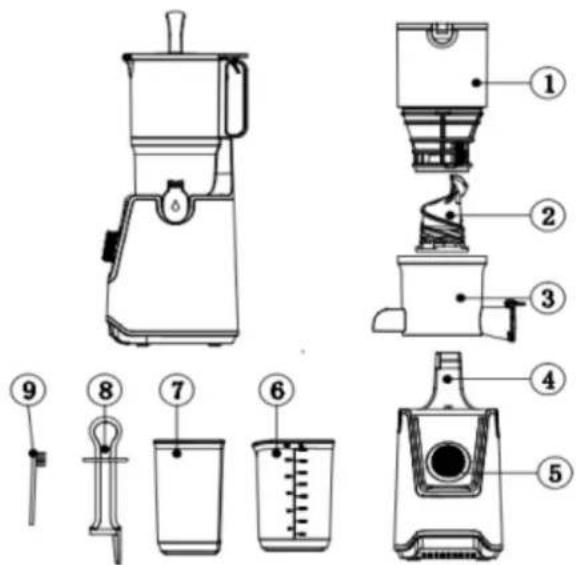
Parts and Functions
- Cover with fill opening and sieve
- Squeezing screw
- Squeezing Bow
- Motor block
- On/Off switch
- Juice cup
- Pulp cup
- Pusher
- Cleaning brush
text_image
Technical diagram of a blender with numbered parts for identification and assembly reference.BEFORE FIRST USE
Remove all parts from the packaging.
Wash all removable and washable parts, such as the pusher, cover, sieve, squeezing screw, bowl and measuring cups in warm soapy water, rinse and dry them thoroughly.
Caution: Never submerge the motor block in water!
Tip: The sieve can be cleaned with the cleaning brush
Positioning of the regular sieve:
Make sure the plug is not in the outlet and that the on/off switch is turned off prior to assembling the machine.
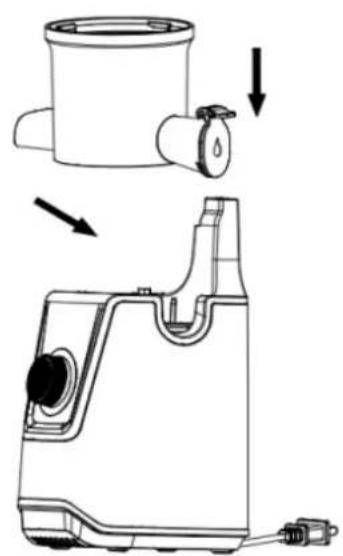
- Position the squeezing bowl on the motor block. Make sure the bowl is mounted properly on the axle of the motor block.
- Push the squeezing screw firmly into the centre of the bowl, making sure that it touches down the bottom, or else the cover will not close.
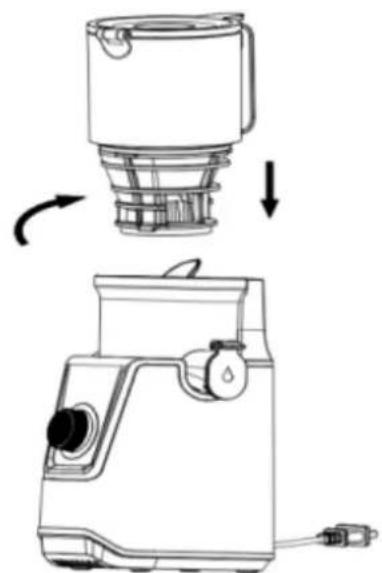
- Position the cover on the bowl and twist it until the cover clicks shut, making sure that the arrow ▲ on the cover aligns with the Lock on the lid.
- Position a measuring cup under the spout for the juice and a measuring cup under the spout for the pulp. The machine is now ready for use.
natural_image
Technical line drawing of a two-step cleaning or assembly process: top shows a cylindrical device with downward arrows indicating motion, bottom shows a hand holding a plug (no text or symbols)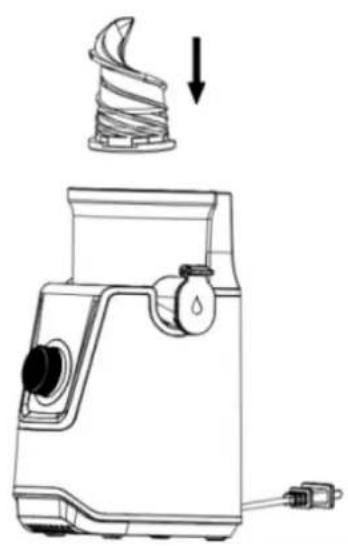
natural_image
Line drawing of a blender with a spiral-shaped top and water drop symbol (no text or labels)-
Position the squeezing bowl on the motor block; make sure the spout of the juice comply with the place of the motor block (the arrow marked) and push down
-
Push the squeezing screw firmly into the centre of the bowl, until you can't push.
natural_image
Line drawing of a kitchen blender with a side view showing the blade and handle (no text or symbols)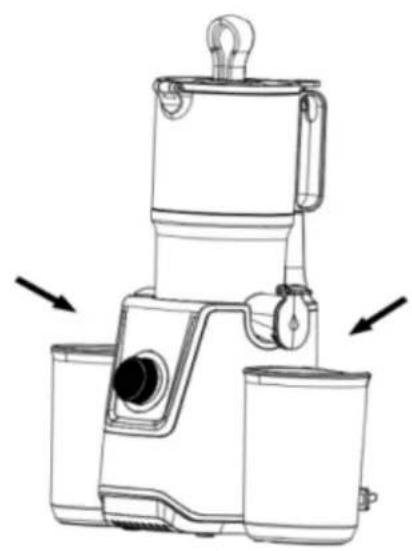
natural_image
Line drawing of a portable coffee maker with two cups and a handle, no text or symbols present-
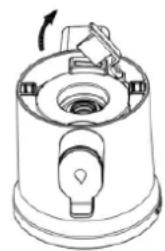
Position the cover into the bowl: Open the cup cover, position the chute on the bowl to align the ▲ to the “☐” and twist it clockwise until it clicks the safety lock. Please make sure that the arrow ▲ on “☐” the cover aligns with the Lock graphic on the Bowl.
-
Position a measuring cup under the spout for the juice and a measuring cup under the spout for the pulp.
Repeat these steps in reverse order when disassembling the machine as below:
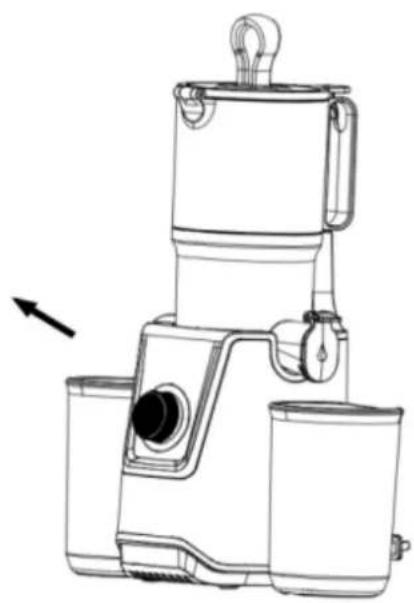 | 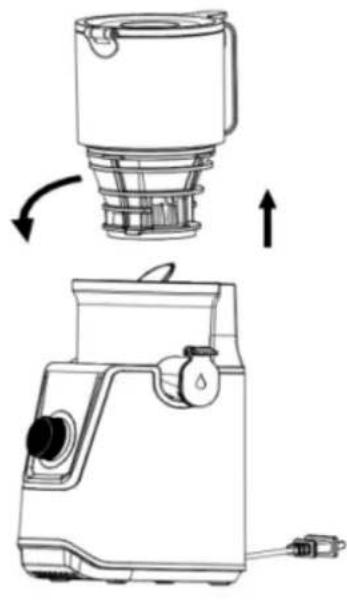 |
| 1. Remove the measuring cup:First, shut off the juice stop,then remove directly; | 2. Open the cup cover first, Remove the Chute. Turn the chute anti-clockwise until the ▲ aligns with the “ ☐” sign |
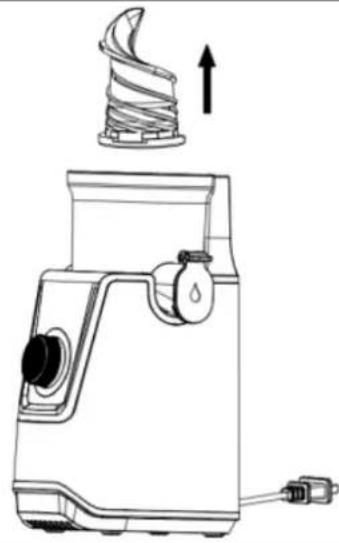 | 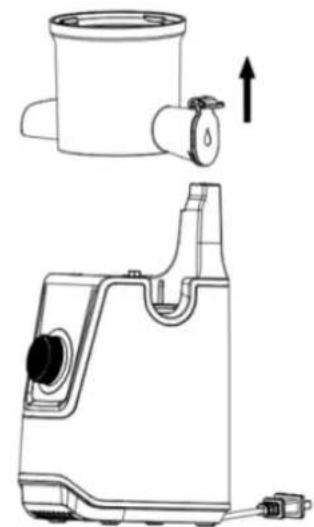 |
| 3. Remove the Squeezing Auger by pulling it out upward. If it is very hard, swing gently and pull. | 4. Remove the squeezing screw: Pull out the screw following the vertical direction; if it is too hard to pull,swing the screw slightly,then pull out. |
NOTE: This Juicer is not suitable for juicing very hard or fibrous and starchy fruits or vegetables such as Sugar Cane.
There are some fruits which contain too much starch to juice. They include Avocado, Bananas, Figs, Mango and Papaya, Dragon fruit, Strawberry, Grape without seeds. They will clog up the stainless steel sieve.
Foods that can be used for juicing:
| No. | Food | Weight (Kg) | Tips |
| 1 Apple 5 | |||
| 2 Pear 5 | |||
| 3 | Pomegranate | 5 | |
| 4 | Orange | 5 | |
| 5 | Watermelon | 5 | |
| 6 | Celery | 3 | Cut down to 5-10CM |
| 7 | Carrots | 5 |
INSTRUCTIONS FOR JUICES:
The On/Off switch has 3 positions:
On: I
Off: O
Reverse direction: R
Make sure that the machine is turned off (O) and put the plug in the outlet.
Position the 2 measuring cups under the 2 spouts.
Clean the fruit and vegetables and cut them into pieces.
CAUTION:
Remove hard pits or seeds prior to pressing to prevent possible damage to the squeezing screw.
The peel and pits/seeds must be removed from oranges, lemons, grapefruit and melons before use.
Turn on the on/off switch (I).
Insert the pieces of vegetable and/or fruit into the opening at the top of the cover.
Push the food down into the bowl using the pusher.
Tip: Begin with the harder fruit, and then squeeze the soft fruit.
Do not insert fingers or other foreign objects into the opening of the cover while the machine is in use. Use only the pusher, and not spoons, fork, sticks, etc.
Never use the machine with an empty bowl.
If the machine becomes stuck during use, turn the on/off switch to R and hold down the switch so that the machine turns in the opposite direction. This could remove any obstructions. Release the switch to stop the reverse movement. If this does not work, turn the machine off, remove the plug from the outlet and re-assemble the machine according to the instructions. Then try to start the machine again.
When the measuring cup is full (max. 600 ml) or when all the fruits and vegetables have been squeezed, turn the on/off switch off (O) and empty the measuring cups.
Note: If the machine overheats, it will turn off automatically. Turn the machine off (O). Wait 10 minutes and then turn the machine on again.
Never let the machine work for longer than 20 minutes at a time. Do not touch the on/off switch with wet hands.
If the cover becomes loosened from the bowl during use, the motor of the machine will automatically stop to prevent any hazards.
Juice that is not drunk immediately should always be stored in the refrigerator.
CLEANING AND MAINTENANCE
Remove the plug from the outlet and allow the machine too cool completely before cleaning.
Turn the cover loose from the bowl and disassemble the rest of the parts in reverse order of assembly.
Empty the measuring cups and clean the cover, the pusher, the sieve, the bowl, the squeezing screw and the measuring cups under running water. Use the cleaning brush to clean the sieve properly.
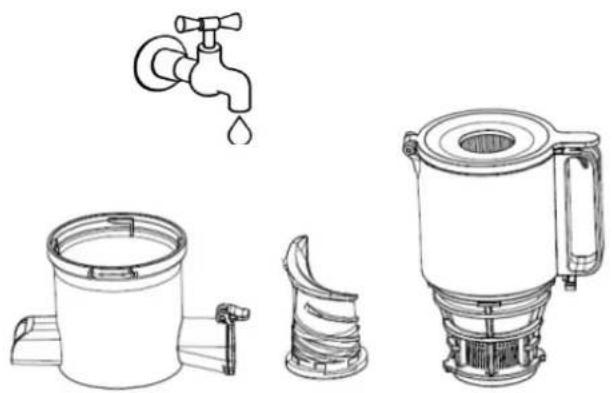
natural_image
Line drawings of three different kitchen appliances: a faucet, a water dispenser, and a coiled cooker (no text or labels present)CAUTION:
Do not use metal sponges, which could damage the machine.
The pusher may not be put in the dishwasher.
Be careful when you clean the sieve. The sieve is sharp.
Wipe the exterior of the motor block clean with a moist cloth. Never submerge the motor block in water!
Dry all parts thoroughly, re-assemble the machine and store it in a dry place.
Tips:
- Rinse all parts immediately after use;
- When some residues remain in the mouth of the pulp spout, please follow up below step:
Silicone valve
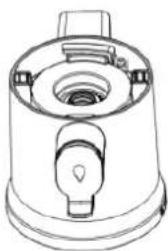
natural_image
Technical line drawing of a mechanical component with no visible text or symbolsPull to open
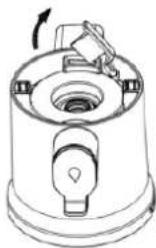
natural_image
Technical line drawing of a mechanical device with no visible text or symbolsPress the silicone valve to close it property and tightly after cleaning.
- To clean the seal ring in the center of the squeezing bowl, please follow the steps as below:
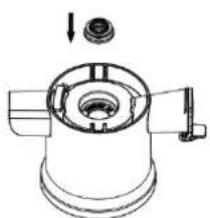
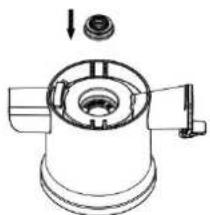
a) Turn the Squeezing Bowl upside down for easier handling, Push the seal ring out with your thumb (Fig a) and clean it with water.
b) After Cleaning, please put it back to the center hole. The small ribbed surface should be should face upward (Fig b) Make sure the groove of the seal ring well fit in the squeezing bowl.
c) The big flat size of the seal ring will be inside while the small and ribbed side is outside the Squeezing Bowl. (Fig c).
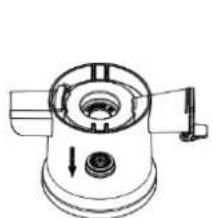
natural_image
Technical line drawing of a mechanical device with no visible text or symbolsFig a Fig b
natural_image
Technical line drawing of a mechanical component with no visible text or symbols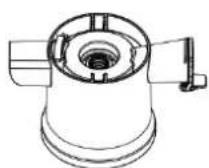
Fig c
USEFUL TIPS
| Item Warning | Reason | |
| 1 Not for Ice cube. | The ice cube is too hard.It may damage the squeezing parts. | |
| 2 | The ingredient with long fiber needs to be cut down to 5-10 cm thin strips or 3 x 3 cm cubes. | Long fiber food is easy to wind and block the spout. |
| 3 | The peel and pits/seeds must be removed from oranges, lemons, grapefruit and melons before use. | The hard pit or seeds may damage the squeezing parts. The peel may block the spout of pulp. |
| 4 | Do not use other accessory as a pusher. | It may damage the juicer and cause injury. |
| 5 | Each juicing cycle not longer than 20 minutes. | Working over time may cause damage to the motor. |
| 6 | Never put the spoon, chopsticks into the opening of the Chute, the juice and pulp spouts. | It may damage the juicer. |
TROUBLE SHOOTING
| Trouble | Cause | Solutions |
| The juicer stops running suddenly. | Too many ingredients put into the juicer. | Switch to "REV" position instantly to make the ingredients return upwards. If the machine still stops running, please clean the machine before use. |
| Hard fruits or vegetables have not been cut in small pieces. | Hard fruits and vegetables have not (such as carrot) shall be cut into thin strips or small cubes before putting into chute. | |
| The juice yield is low or juice flows out of the main housing. | The Bowl and the silicone valve are not installed properly. | Please re-install the Bowl silicone valve by referring to the installation method. |
| Abnormal noise | Parts cause extrusion sound during squeezing. | The sound is caused by extrusion of fruits and vegetables, which is normal phenomenon. |
| The Chute & Strainer Assembly cannot be opened | There is too much pulps inside the bowl. | Press switch to "REV" setting to eject the pulps backward. |
| There is hard foods stuck inside. | Press switch to "REV" to eject the object back ward. | |
| The pulp mess is stuck. | Pour water into the Chute to often the stuck pulp mess overnight. | |
| The container & accessories are dyed after use. | Dyed parts are due to natural color of specific fruits/veggies. | This is natural color and unavoidable. |
GARANTIE
RECYCLING-INFORMATIONEN
text_image
Technical diagram of a blender with numbered parts for identification and assembly reference.natural_image
Line drawings of various household appliances including a faucet, water dispenser, and a water filter (no text or labels)VORSICHT!
natural_image
Technical line drawing of a mechanical component with no visible text or symbols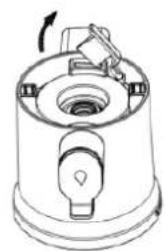
natural_image
Technical line drawing of a mechanical device with no visible text or symbolsnatural_image
Technical line drawing of a mechanical device with no visible text or symbolsAbb. a Abb. b
natural_image
Technical line drawing of a mechanical component with a knob and lever (no text or symbols)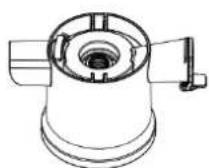
Abb. c
NÜTZLICHE TIPPS
text_image
Technical diagram of a blender with numbered parts for identification and assembly reference.AVANT LA PREMIÈRE UTILISATION
natural_image
Technical line drawing of a two-step cleaning or assembly process (no text or symbols)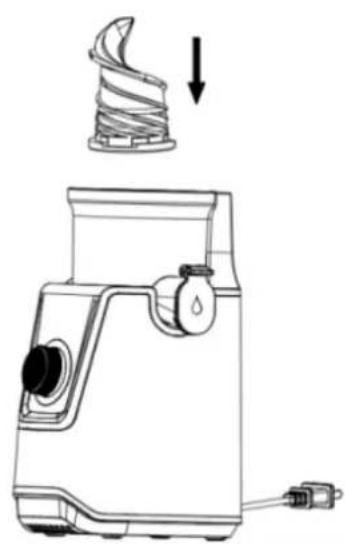
natural_image
Line drawing of a kitchen blender with a spiral-shaped handle and water drop symbol (no text or labels)natural_image
Line drawing of a blender with a side view showing the process (no text or symbols)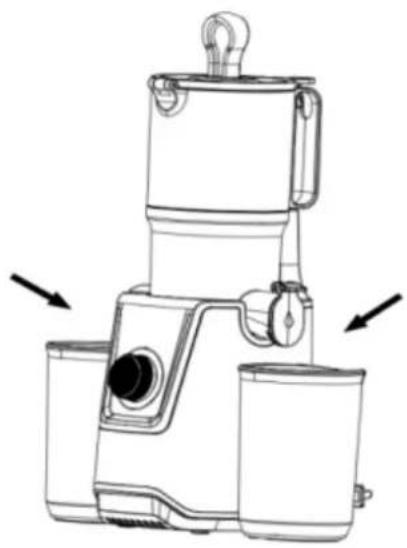
natural_image
Line drawing of a mechanical device with two ports and directional arrows indicating movement (no text or symbols)natural_image
Line drawings of four different kitchen appliances: a faucet, a water dispenser, a coiled tube, and a large蓄冷器 (no text or symbols present)ATTENTION :
natural_image
Technical line drawing of a mechanical component with no visible text or symbols