
CBCB4833 - Range hood CIARRA - Free user manual and instructions
Find the device manual for free CBCB4833 CIARRA in PDF.


User questions about CBCB4833 CIARRA
0 question about this device. Answer the ones you know or ask your own.
Ask a new question about this device
Download the instructions for your Range hood in PDF format for free! Find your manual CBCB4833 - CIARRA and take your electronic device back in hand. On this page are published all the documents necessary for the use of your device. CBCB4833 by CIARRA.
USER MANUAL CBCB4833 CIARRA
natural_image
Illustration of a pendant lamp with abstract blue and beige design (no text or symbols)Model Number:
CBCB4833
CBCY4833
CBCU4833

ciarra
ciarra
Make life easier
Dear customer:
Thank you so much for your purchase, please read this instruction manual carefully before installation & use.
If you have any question, please contact us at:
E-mail: info@ciarraappliances.com
Scan this QR code to get installation video:

text_image
QR code image with a central logo, likely linking to a digital resource or website.
CONTENTS
Safety 3-4
Specifications----5
Before Using the Cooker Hood ----6
Prepare for Installation ----7
Installation----8-15
Install the Hood----8-14
Carbon Filter Installation----15
Operation 16-20
Cleaning and Maintenance----21-23
Grease Filter----21
Carbon Filter 21
Stainless Steel Cleaning 21
Painted Finish Cleaning----21
LED Replacement----22-23
Troubleshooting----24
Environmental Protection 25
WARNING
TO REDUCE THE RISK OF FIRE, ELECTRIC SHOCK, OR INJURY TO PERSONS, OBSERVE THE FOLLOWING:
■ Use this unit only in the manner intended by the manufacturer. If you have questions, contact the manufacturer at the address or telephone number listed in the warranty.
■ Before servicing or cleaning unit, unplug or disconnect the cooker hood from the power supply.
This appliance is not intended for use by persons (including children) with reduced physical, sensory or mental capabilities, or lack of experience and knowledge, unless they have been given supervision or instruction concerning use of the appliance by a person responsible for their safety.
■ Installation work and electrical wiring must be done by a qualified person(s) in accordance with all applicable codes and standards, including fire-rated construction.
■ Sufficient air is needed for proper combustion and exhausting of gases through the flue (chimney) of fuel burning equipment to prevent back drafting.
■ When cutting or drilling into a wall or ceiling, do not damage electrical wiring and other hidden utilities.
■ Ducted fans must always be vented to the outdoors.
■ Ensure the requirements of the local authorities are adhered to concerning the discharge of exhaust air.
■ This unit must be grounded.
■ When applicable local regulations comprise more restrictive installation and/or certification requirements, the aforementioned requirements prevail on those of this document and the installer agrees to conform to these at his own expense.
■ Clean cooker hood frequently. Grease should not be allowed to accumulate on fans, filters or in exhaust ducts.

Warning: Failure to install the screws or fixing device in accordance with these instructions may result in electrical hazards.

WARNING
TO REDUCE THE RISK OF INJURY TO PERSONS IN THE EVENT OF A RANGE TOP GREASE FIRE, OBSERVE THE FOLLOWING\*:
- SMOTHER FLAMES with a close-fitting lid, cookie sheet or metal tray, then turn off the burner. BE CAREFUL TO PREVENT BURNS. IF THE FLAMES DO NOT GO OUT IMMEDIATELY, EVACUATE AND CALL THE FIRE DEPARTMENT.
- NEVER PICK UP A FLAMING PAN — You may be burned.
- DO NOT USE WATER, including wet dishcloths or towels — This could cause a violent steam explosion.
- Use an extinguisher ONLY if:
a) You own a Class ABC extinguisher and you know how to operate it.
b) The fire is small and contained in the area where it started.
c) The fire department has been called.
d) You can fight the fire with your back to an exit.
CAUTION
■ For indoor use only.
■ For general ventilating use only. Do not use to exhaust hazardous or explosive materials and vapors.
■ To avoid motor bearing damage and noisy and/or unbalanced fan blade, keep drywall spray, construction dust, etc. off cooker hood.
- Your hood motor has a thermal overload which will automatically shut off the motor if it becomes overheated. The motor will restart when it cools down. If the motor continues to shut off and restart, have the hood serviced.
- Always follows the cooking equipment manufacturer's requirements regarding the ventilation needs.
■ To reduce the risk of fire and to properly exhaust air, be sure to duct air outside — Do not exhaust air into spaces within walls or ceiling or into attics, crawl space or garage.
■ When installing, servicing or cleaning the unit, it is recommended to wear safety glasses and gloves.
■ Please read specification label on product for further information and requirements.
text_image
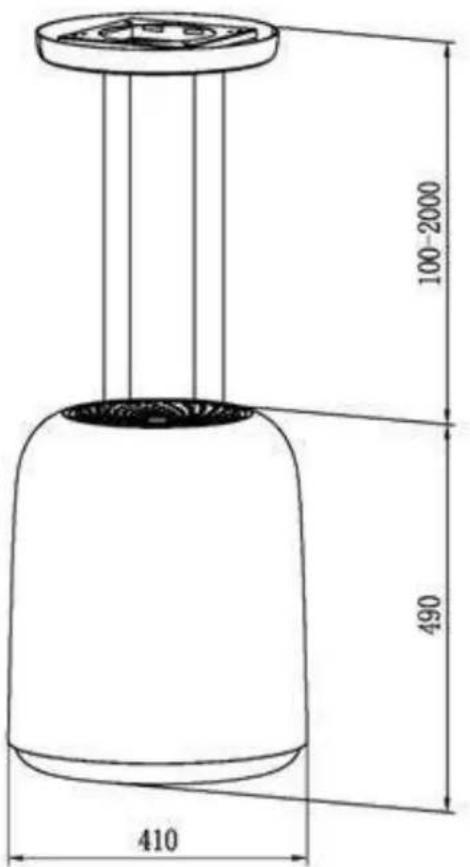
100-2000 490 410| Voltage 220V-240V~50Hz | |
| Power of Motor | 1×85W |
| Power of lamps | 1×8W+15W(Plasma) |
| Appliance Dimension | 410*410*2000mm MAX(W×D×H) |
| Note: The manufacturer reserves the right to change any technological improvement or modification without prior notice. | |
Before Using the Cooker Hood

CAUTION: Before proceeding to the installation, check if items are missing or damaged, contact the manufacturer.
Observe all governing codes and ordinances. Have a qualified technician install the cooker hood. It is the installer's responsibility to comply with installation clearances specified on the model/serial rating plate. The manufacturer declines all responsibility for improper installation and does not accept responsibility for appliance warranty in the event of damage caused by incorrect installation.
COMPONENTS:

Part 1: 6^*40mm Screws X 6
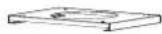
Part 6: Hanging Plate X1
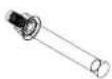
Part 2: Expansion Bolt X6
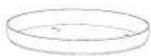
Part 7: Decorative Plate X1
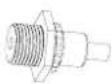
Part 3: Cable holder X 6
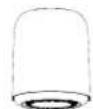
Part 8: Cooker Hood Body X1

Part 4: 1:1 Installation DiagramX 1
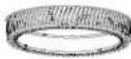
Part 9: HEPA Filter X1
Part 5: Installation Manual X1
YOU WILL BE NEEDING THESE TOOLS FOR INSTALLATION

- Protective Gloves

- Double Sided Tape or Tape
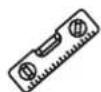
2.Spirit Level Ruler

- Cross-Head Screwdriver Set

- Measuring Tape

- Electric drill and 8mm drill
Prepare for Installation
Prepare for Installation:
a) Ventilation Mode
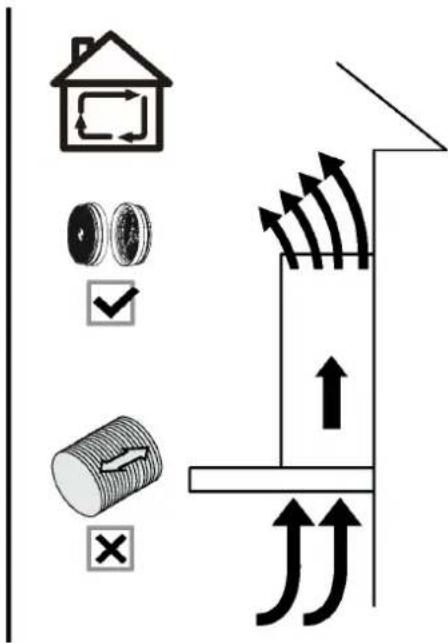
Recirculation Mode: Recirculating with carbon filter (required), the smells and odors can be filtered and vented through the top vented hole and the exhaust pipe is not required.
text_image
Diagram illustrating airflow or traffic flow with icons for home, coins, gear, and directional arrowsb) Before installation, don't connect the power.
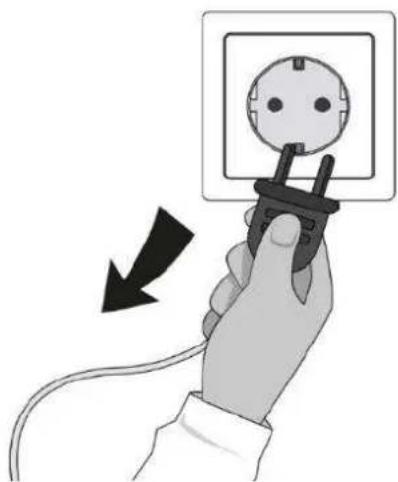
natural_image
Hand holding a wall socket with a plug, showing an electrical switch and cable (no text or symbols visible)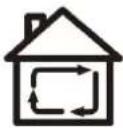
Install the Hood:
1) Remove all protective poly film from the hood and/or parts.
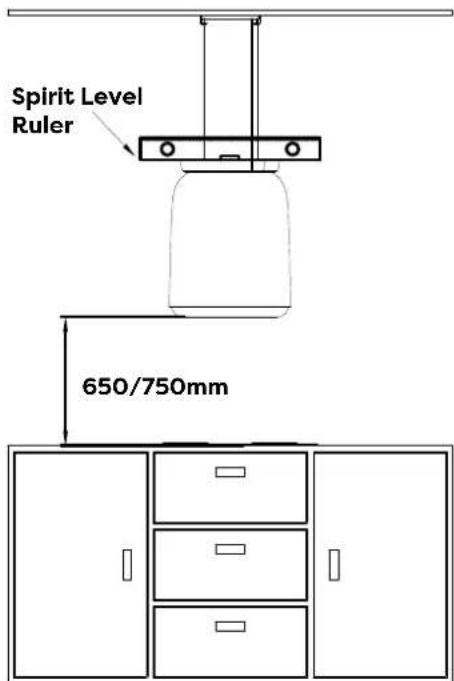
2) Recommend installation height: 65\~75cm above the cooktop for best extraction.
◆ Required height over gas hob: 750mm;
◆ Required height over electric hob: 650mm.
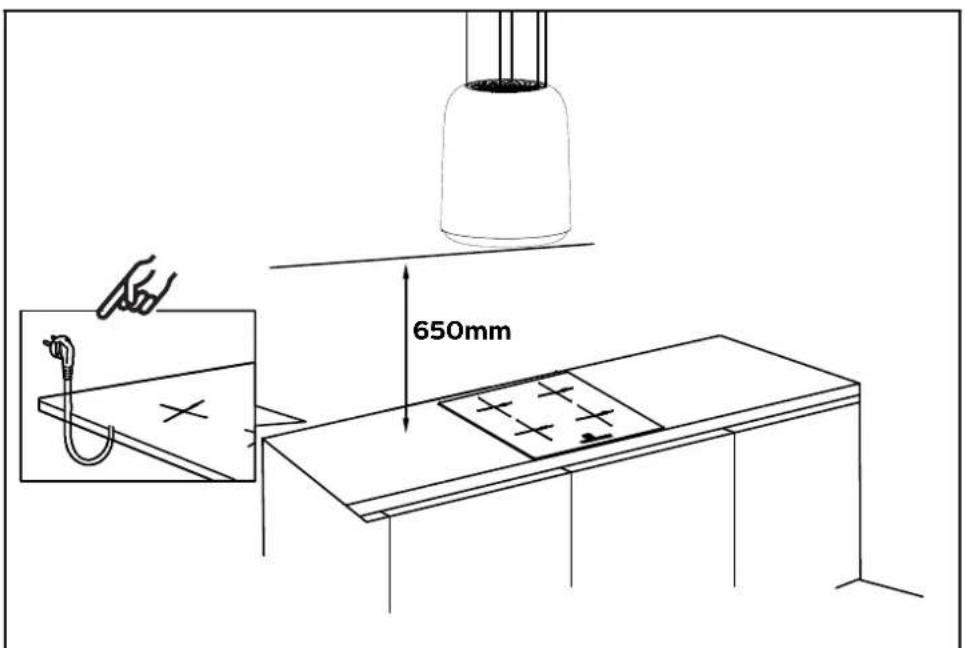
text_image
650mm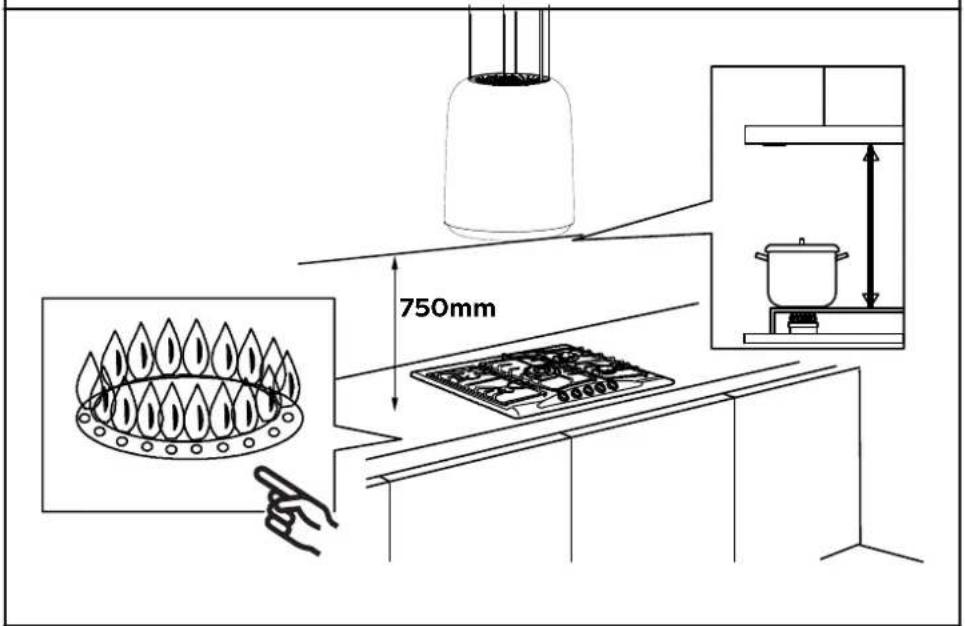
text_image
750mm3) Below is the 1:1 hole drilling installation drawing:
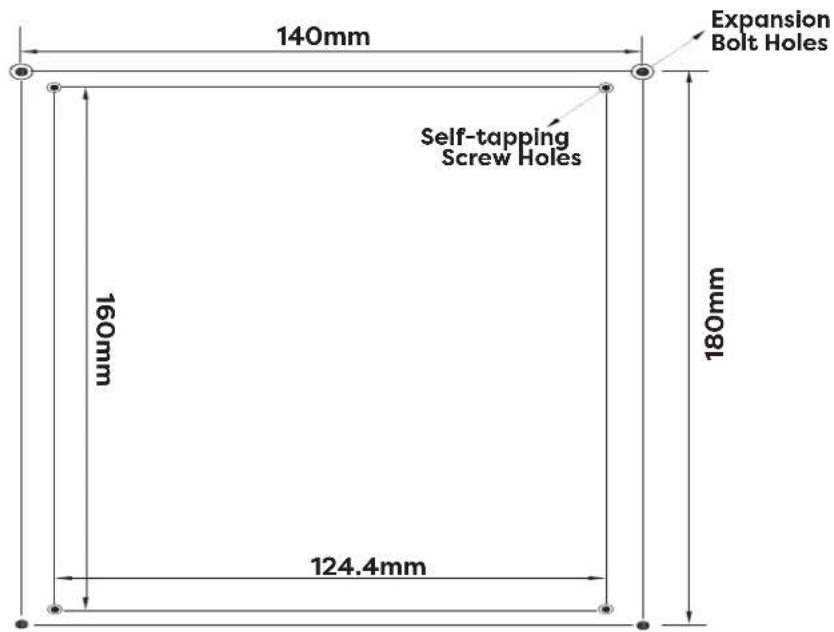
text_image
140mm Self-tapping Screw Holes Expansion Bolt Holes 160mm 124.4mm 180mm4) According to the 1:1 installation diagram, drill 4*∅8mm holes to accommodate the Hanging plate, tighten the bracket onto the ceiling with the Expansion bolt holes provided.
Attention: If the ceiling is made of wood, there is no need to drill holes, and the hanging plate are directly fixed on the ceiling with 4pcs 6*40mm Screws.
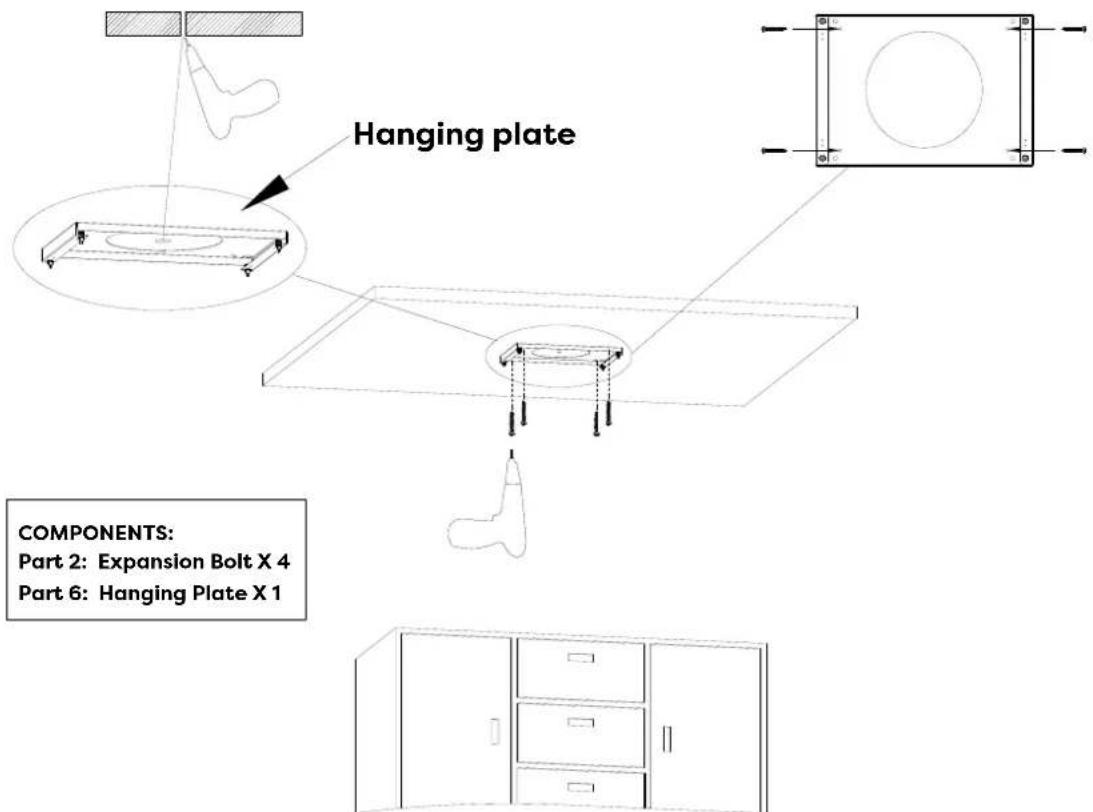
text_image
Hanging plate COMPONENTS: Part 2: Expansion Bolt X 4 Part 6: Hanging Plate X 1Installation
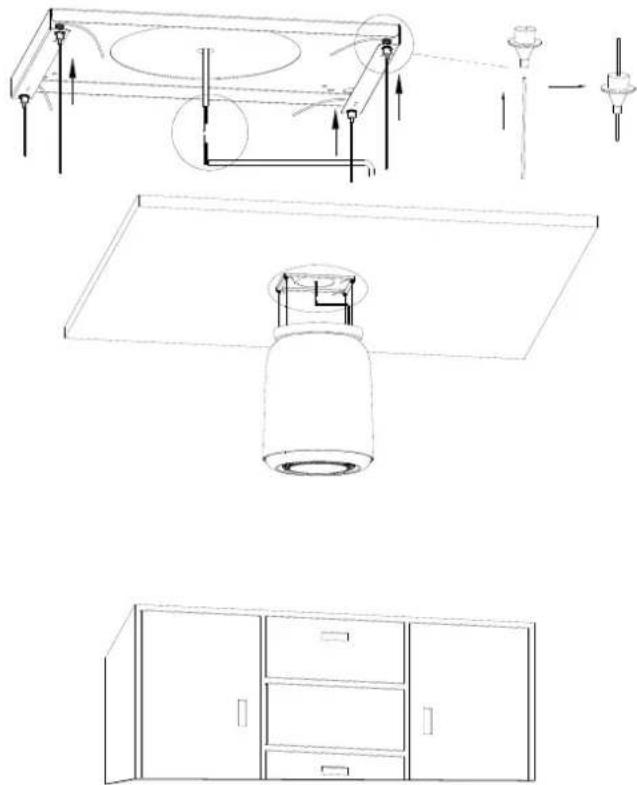
5) Put the four steel cables and the power cord through the decorative plate.
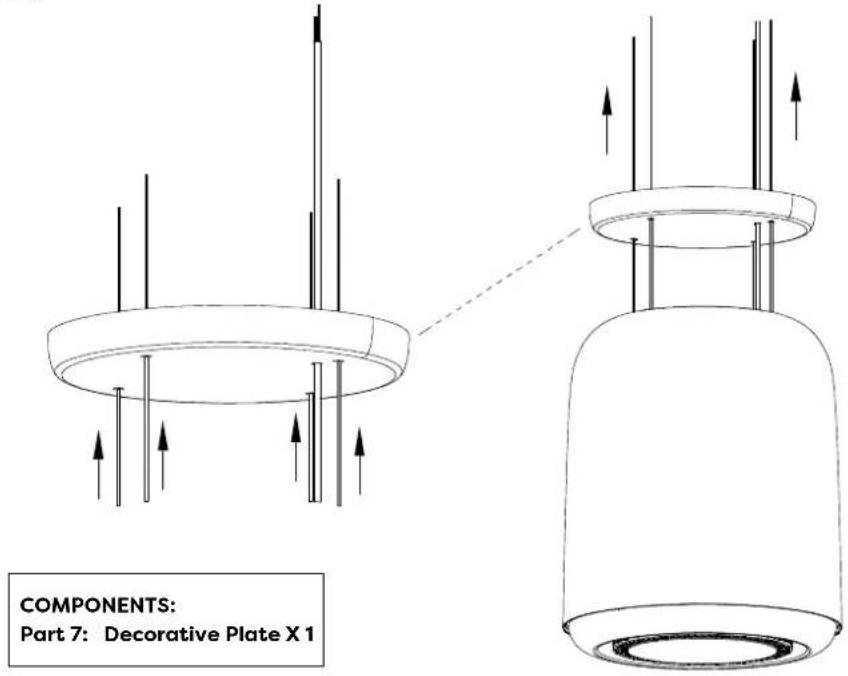
text_image
COMPONENTS: Part 7: Decorative Plate X 1NOTE: The cables can only be adjusted when the Cable holder tips are pressed.
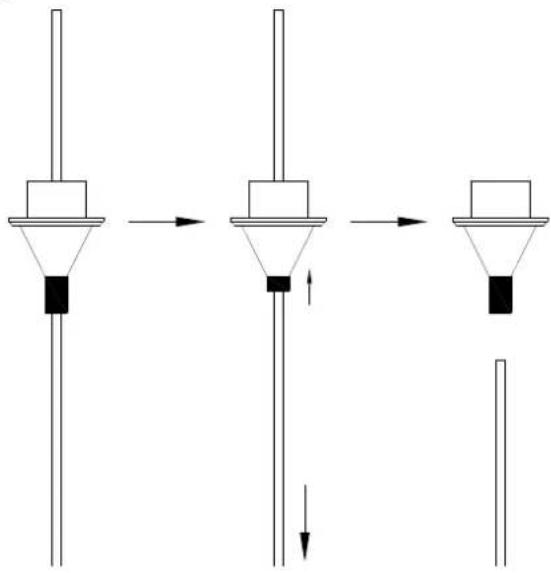
flowchart
graph TD
    A["Top Component"] --> B["Top Component"]
    B --> C["Bottom Component"]
    C --> D["Bottom Component"]
6) Lift the hood (At least two persons), Pass the four steel cables through the corresponding cable holder on the hanging plate. Adjust the height of the hood according to the actual scene, and the cable will be automatically locked by the cable holder.
natural_image
Technical line drawing of a ceiling fixture assembly (no text or symbols)7) Adjust the hight of those 4 Steel cables, and use a Spirit Level Ruler to adjust the hood to horizontal position.
text_image
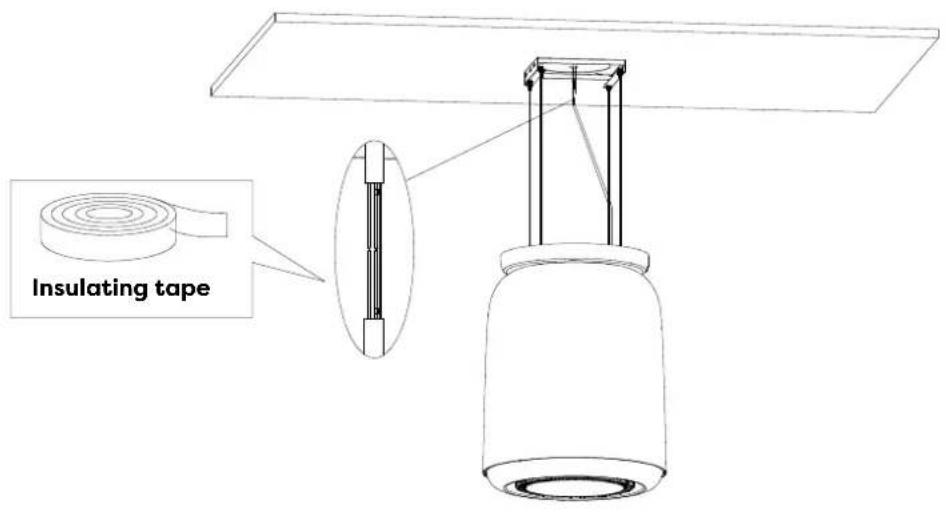
Spirit Level Ruler 650/750mm8) Connect the power cord of the hood.
If there is a power connector on the ceiling, you need to put the power cord through the Decorative plate, and connect the power cable to the power connector on the ceiling.
If there is no power connector on the ceiling, connect the power cable to the power connector (not necessarily need to put the power cord through the Decorative plate).
text_image
Insulating tape
natural_image
Line drawing of a cabinet with three drawers, one open and one closed (no text or symbols)
Attention:
Qualified electricians are required to install the power cord. Please pay attention to personal safety to prevent electric shock.
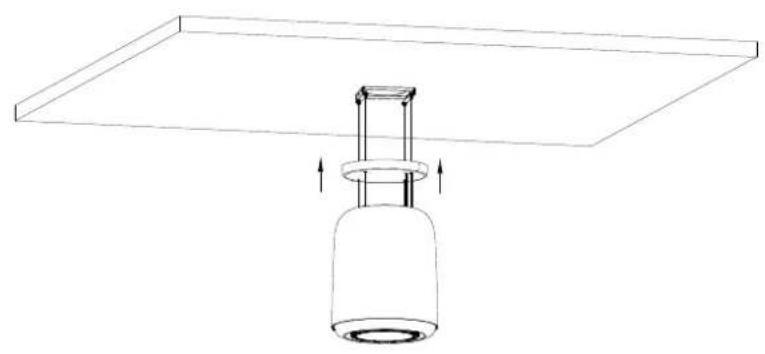
9) Push the Decorative plate up so it can be attached to the magnets from the Hanging plate.
natural_image
Simple line drawing of a lamp with a base and support structure, no text or symbols present
natural_image
Line drawing of a cabinet with three drawers and doors, showing an open lid and downward arrow (no text or symbols)
natural_image
Simple line drawing of a hanging cylindrical object mounted on a rectangular base (no text or symbols)
natural_image
Line drawing of a cabinet with three drawers on one side and two drawers on the other (no text or symbols)10) Turn the LED lights on/off, and test whether the functions are working properly.
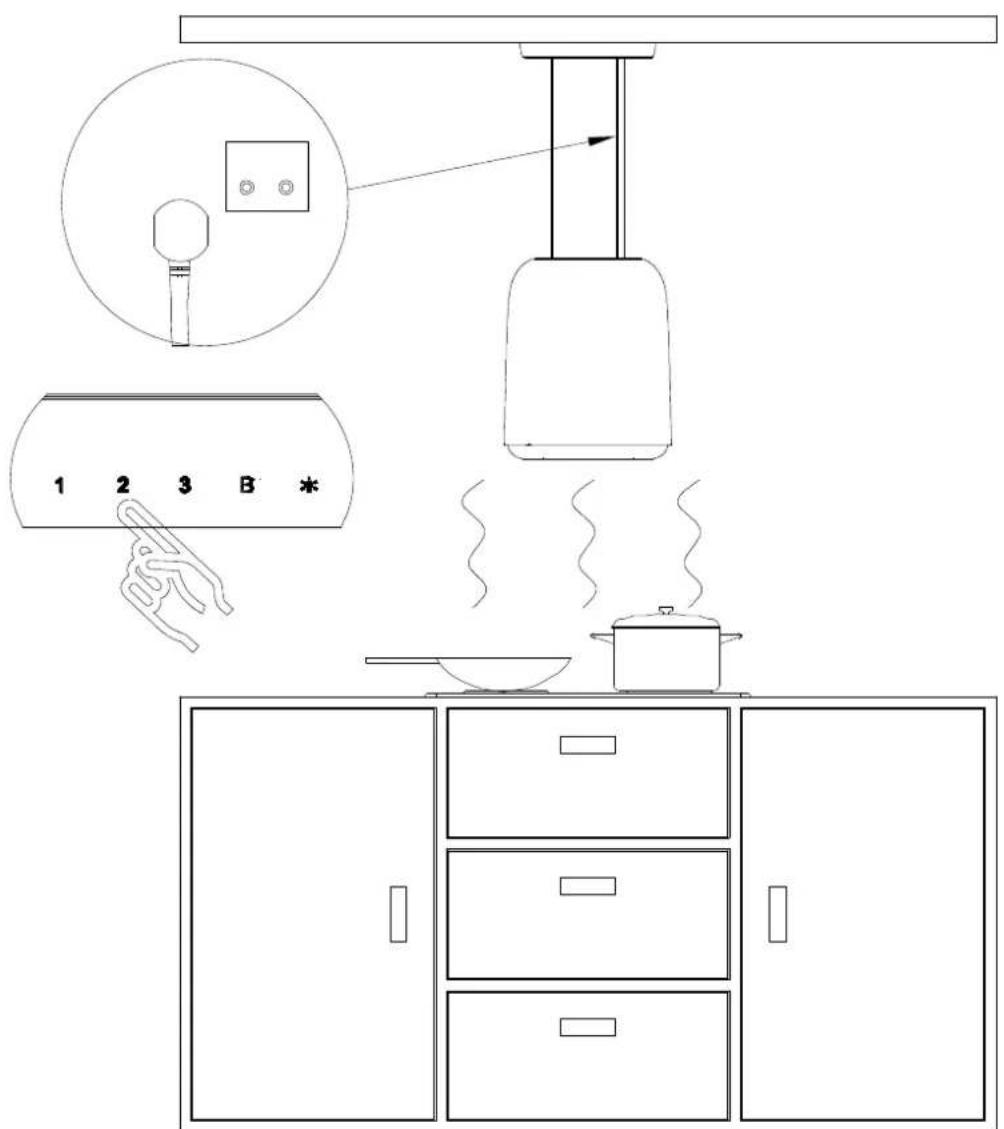
text_image
Diagram illustrating kitchen lighting and heating system with labeled components and a hand gesture pointing to a device.
HEPA Filter Installation (Purify Mode) :
HEPA (High efficiency particulate air Filter), H13 HEPA filters removes odors and captures up to 99.97% of 0.3μm particles, including pollen, dust, smoke and viruses.
- In order to install the HEPA filter, the grease filter should be detached first.
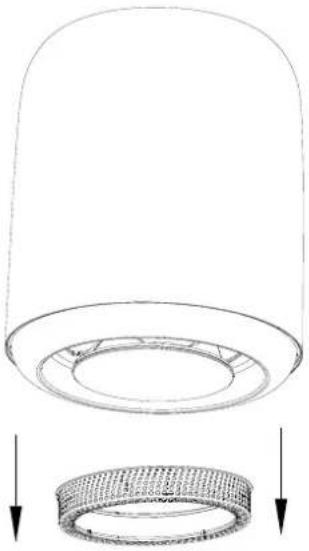
natural_image
Technical diagram showing a cylindrical component with a flange and a textured circular base, both with downward arrows indicating force or movement (no text or symbols present)- Place the HEPA filter into the unit and the magnetic suction device will automatically adsorb.
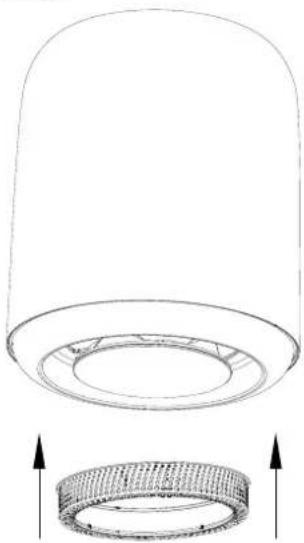
natural_image
Technical line drawing of a cylindrical component with a flange and a textured base, showing upward arrows (no text or symbols)NOTE:
Make sure the HEPA filter is securely locked.
When the HEPA filter is installed, the suction of the cooker hood will be reduced.
The carbon filter should be changed every 6 months depending on the conditions of use.
Always turn your hood on before you begin cooking to establish an airflow in the kitchen.
Electronic button
Operate the hood as follows:
1 2 3 B
STANDBY MODE
After plug in, When the buzzer makes a sound and all the indicator lights will be turned on for 1S then go out, the cooker hood will enter the standby mode. The [1] button indicator light continues to flash regularly. If there is no operation for 60s, the hood will go into sleep mode; If you need to operate, press any button briefly to start up the cooker hood.
When your cooker hood is in standby mode; you can easily switch on 1.2.3 speed level by pressing the corresponding speed level you want for 2 seconds, press the corresponding speed level button again, the cooker hood will go back to standby mode.
1 Low Speed button
For air ventilation with barely no noise; or simmering with very little smoke and steam.
2 Medium Speed button
For your everyday cooking purpose.
3 High Speed button
High-Speed for stir-fry or cooking with lots of smoke and grease produced.
B Booster button
Instant access to maximum suction power, jump to 3 speed after 10 minutes.
Light button
When lights are OFF, press this button once to turn ON the lights. Press this button again to turn OFF the lights.
When the light is turned on, long press the light key for 5 seconds to enter the RGB light setting mode, then short press the light key to adjust the colors, the color is white, yellow, orange, purple, blue, cyan and green in turn. If then no operation after 3 seconds, the RGB mode will exit.
Smart Life APP
Download and Installation of Smart Life APP
- You must use an Android phone or an iPhone to download and use this APP.
- Search "Smart Life" in the Googel Play store for Android or IOS App Store to download and install the APP.


Video Guide

text_image
QR code image containing an Apple logo at its center
text_image
QR code with Android logo in the center, likely linking to a website or app
text_image
DIARRAICooker Hood and Smart Life APP pairing
- When you log in to Smart Life APP for the first time, you need to create a new account. When creating a new account, follow the app's instruction to register.
- If you already have an account, you can use the existing account to log in.
- After logging in, follow the steps below to connect the cooker hood (the operating procedures of Android and IOS systems are the same)
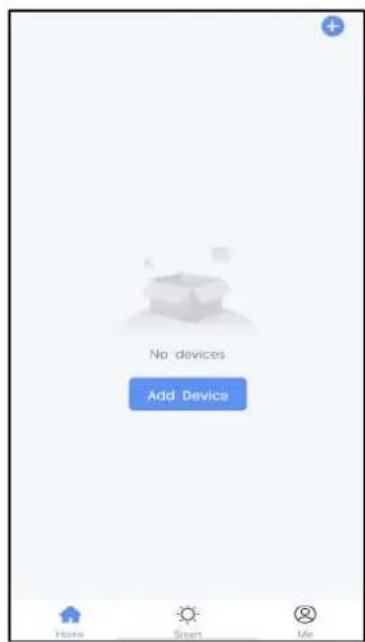
text_image
No devices Add Device Home Smart Me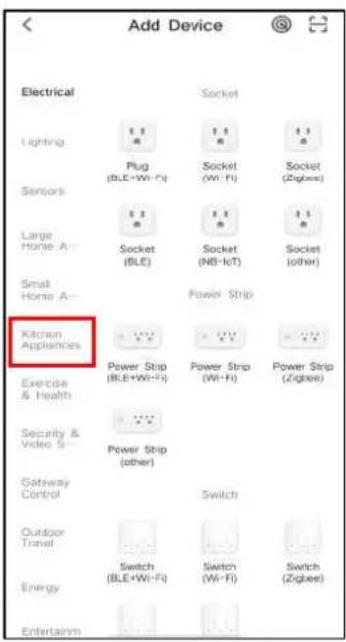
text_image
Add Device Electrical Lighting Sensors Large Home A- Small Home A- Kitchen Appliances Exercise & Health Security & Video S- Gateway Control Outdoor Travel Energy Entertainm Socket Plug (BLE+Wi-Fi) Socket (Wi-Fi) Socket (Zigbee) Socket (NB-IcT) Socket (other) Power Strip Power Strip (BLE+Wi-Fi) Power Strip (Wi-Fi) Power Strip (Zigbee) Switch Switch (BLE+Wi-Fi) Switch (Wi-Fi) Switch (Zigbee)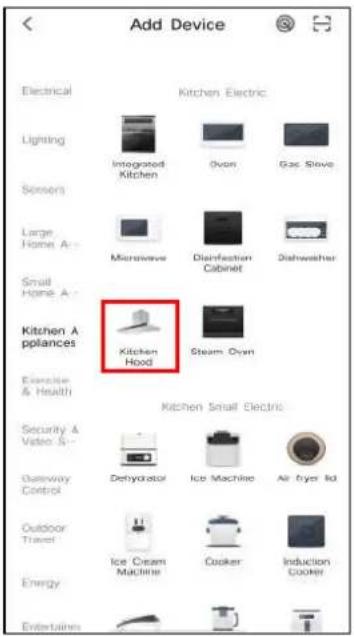
text_image
Add Device Electrical Lighting Sensors Large Home A- Small Home A- Kitchen Appliances Exercise & Health Security & Video S- Gateway Control Outdoor Travel Energy Entertainers Kitchen Electric Integrated Kitchen Ovan Gas Steve Microwave Disinfection Cabinet Dishwasher Kitchen Hood Steam Oven Kitchen Small Electric Dehydrator Ice Machine Air Fryer Kit Ice Cream Machine Cooker Induction Cooker-
Open the smart life app, Click Add Device.
-
Choose kitchen appliances from the menu bar on the left.
-
Choose kitchen hood.
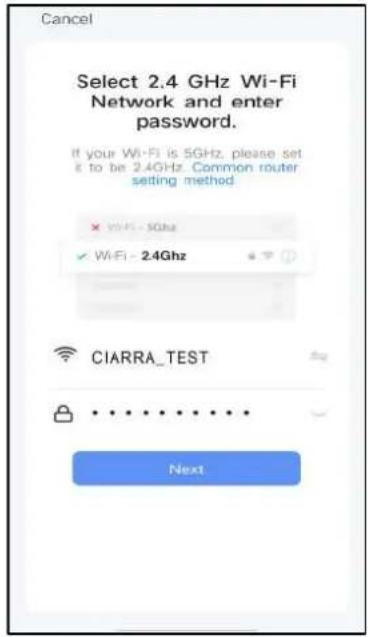
text_image
Cancel Select 2.4 GHz Wi-Fi Network and enter password. If your Wi-Fi is 5GHz, please set it to be 2.4GHz. Common router setting method × Wi-Fi - 5GHz ✓ Wi-Fi - 2.4GHz CIARRA_TEST Next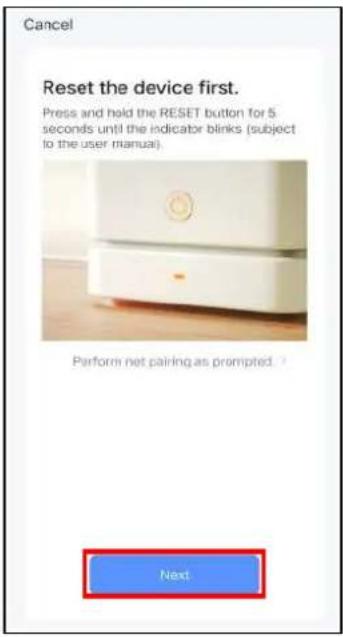
text_image
Cancel Reset the device first. Press and held the RESET button for 5 seconds until the indicator blinks (subject to the user manual). Perform net pairing as prompted. Next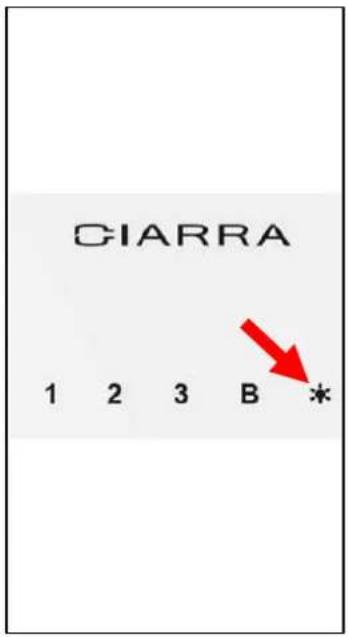
text_image
CIARRA 1 2 3 B * Red Arrow-
Connect your home Wi-Fi and enter the password, then click Confirm.
-
Click "Next" to go to the next step.
-
Press the "Light" button for 5 seconds, you will hear the beeping sound, and all button lights will be flashing, enter Wi-Fi pairing mode.
text_image
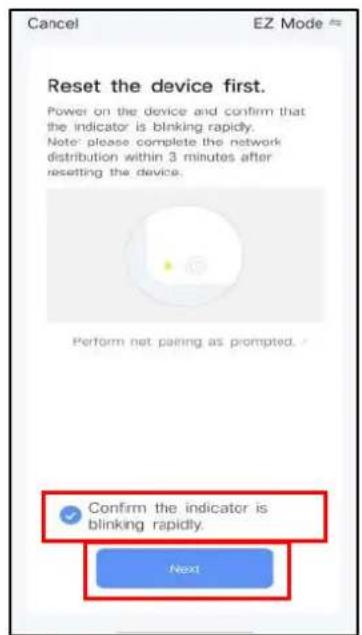
Cancel EZ Mode Reset the device first. Power on the device and confirm that the indicator is blinking rapidly. Note: please complete the network distribution within 3 minutes after resetting the device. Perform net pairing as prompted. Confirm the indicator is blinking rapidly. Next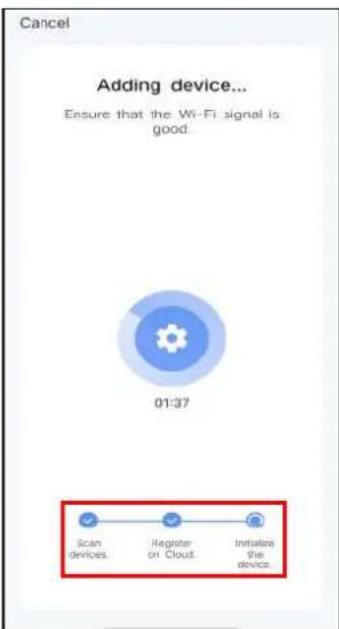
text_image
Cancel Adding device... Ensure that the Wi-Fi signal is good. 01:37 Scan devices. Register or Cloud. Initialize the device.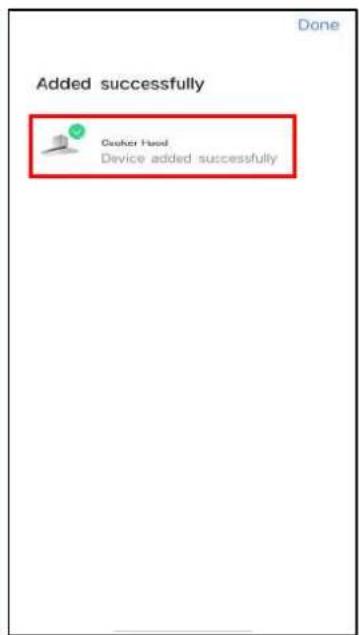
text_image
Added successfully Cleaner Head Device added successfully-
Click "Confirm the indicator is blinking rapidly" and chick "Next".
-
Adding device...
-
When you see this interface it means you have successfully connected your device.
text_image
CIARRA Third-Party Voice Services More > Alexa Google Assistant SmartThings Home Management Message Center FAQ & Feedback Featured Home Smart MS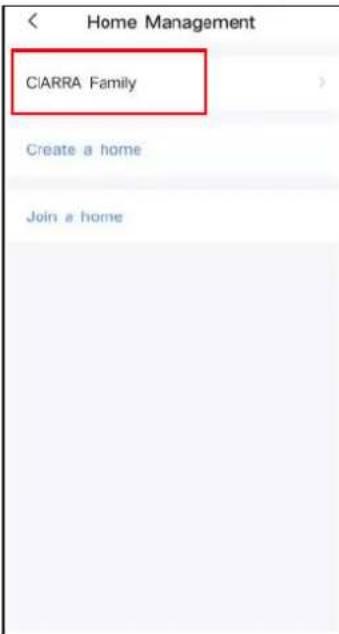
text_image
Home Management CIARRA Family Create a home Join a home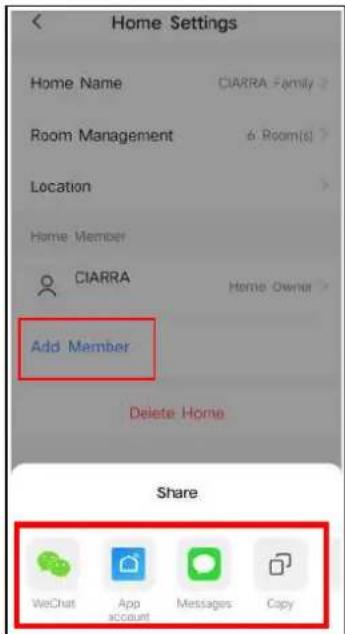
text_image
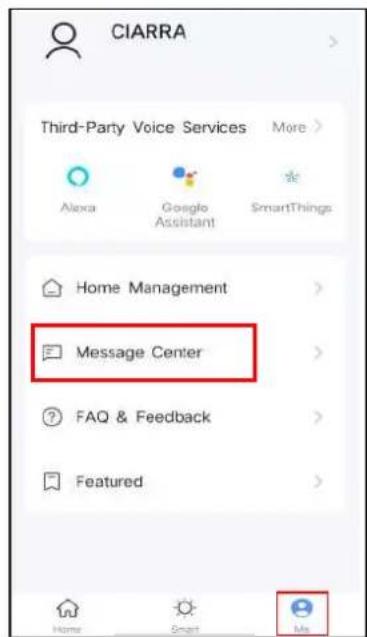
Home Settings Home Name CIARRA Family > Room Management 6 Room(s) > Location Home Member CIARRA Home Owner > Add Member Delete Home Share WeChat App account Messages Copy10.Click "Me" and select "Message Center".
-
You can create a home or join a home in this area. Click "my family management".
-
Select "Add members" and share to members, after members are successfully join the same family, they can remotely control "Cooker Hood" through WiFi.
The function of Plasma

CAUTION:
This appliance contains a UV emitter, Don't look straight at the light to prevent eyes damage.
Plasma+ System
Newest technology in the industry; any odor and harmful molecules pass through an electrified plasma environment with 3000V will be disintegrated and oxidised through the electrolysis reaction then the built in UV-C in the plasma+ system will assist in destroying the remaining harmful molecules, and effectively decomposes most of the grease, so that fresh air will be recirculated back to the kitchen and living room.
About operation interface:

ON/Off Button

Light
Light Button
When lights are OFF, press once to turn ON the lights. Press this button again to turn OFF the lights.

Purify
Plasma Button
Press once to turn ON the Plasma system. Press this button again to turn OFF the Plasma system.

RGBlight
RGB Light Button
Press this button to adjust the colors, the color is white, yellow, orange, purple, blue, cyan and green in turn.

Fan Speed Button
You can control the corresponding gears of 1-2-3-P on the cooker hood.


Quick Delay Setting
When cooker hood is working, you can set the delay timer through delay function.
Push this button, the cooker hood will stop working in 5 minutes.
Proper maintenance of the Cooker Hood will assure proper performance of the unit. Before cleaning unit, unplug or disconnect the cooker hood from the power supply.
GREASE FILTERS
The grease filters should be cleaned frequently. Can be cleaned in dishwasher under high temperature without using any detergent.
CARBON FILTER
The carbon filter should be changed every 2-4 months depending on the conditions of use. Replace more often if your cooking style generates lots of greases, such as stir frying. These filters are not washable and cannot be reused. Refer to installation instructions included with a carbon filter.
STAINLESS STEEL CLEANING
Do:
- Regularly clean it with a cloth or rag soaked with warm water and mild soap or liquid dish detergent.
- You may also use a specialized household stainless steel cleaner.
Don't:
- Use any steel or stainless-steel wool or any other scrapers to remove stubborn dirt.
- Use any harsh or abrasive cleansers.
- Let plaster dust or any other construction residues reach the hood. During construction/ renovation, cover the cooker hood to make sure no dust sticks to the stainless-steel surface.
Avoid when choosing a detergent:
- Any cleaners that contain bleach will attack stainless steel.
- Any products containing: chloride, fluoride, iodide, bromide will deteriorate surfaces rapidly.
- Any combustible products used for cleaning such as acetone, alcohol, ether, benzol, etc., are highly explosive and should never be used close to a range.
PAINTED FINISH CLEANING:
Clean with warm water and mild detergent only. If discoloration occurs, use a finish polish such as automotive polish. (DO NOT use a rough abrasive cleaner or porcelain cleaner.)
Cleaning and Maintenance
LED REPLACEMENT
■ Rectangle LED lamp:
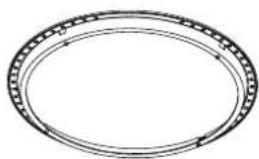
natural_image
Simple line drawing of a circular mechanical component with evenly spaced teeth (no text or symbols)
CAUTION:
Before cleaning or repairing and replacing accessories, please make sure to shut down the power before operation, so as to avoid electric shock, damage to human body and even endanger life safety!
- Turn off the hood and unplug the power outlet. Detach the grease filter in order for you to replace the LED lamp.
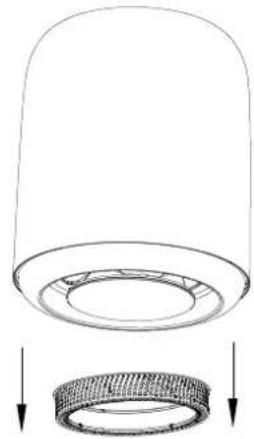
natural_image
Technical line drawing of a cylindrical component with a textured inner ring and two downward arrows indicating force or movement (no text or symbols)- Remove the four screws securing the light panel with a Phillips screwdriver and then remove the light panel assembly.
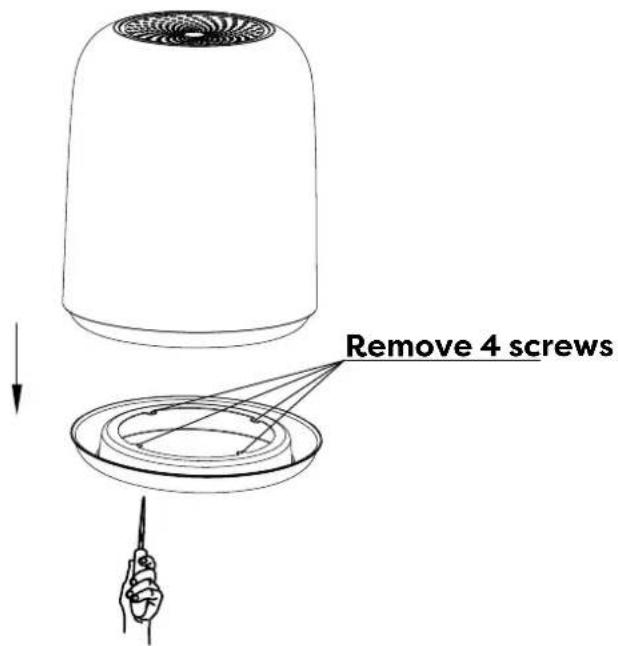
text_image
Remove 4 screwsCleaning and Maintenance
- Remove the four screws securing the LED strip with a Phillips screwdriver, then remove and replace the LED strip with a new one, relock the fixing screws and secure the light panel assembly to the hood.
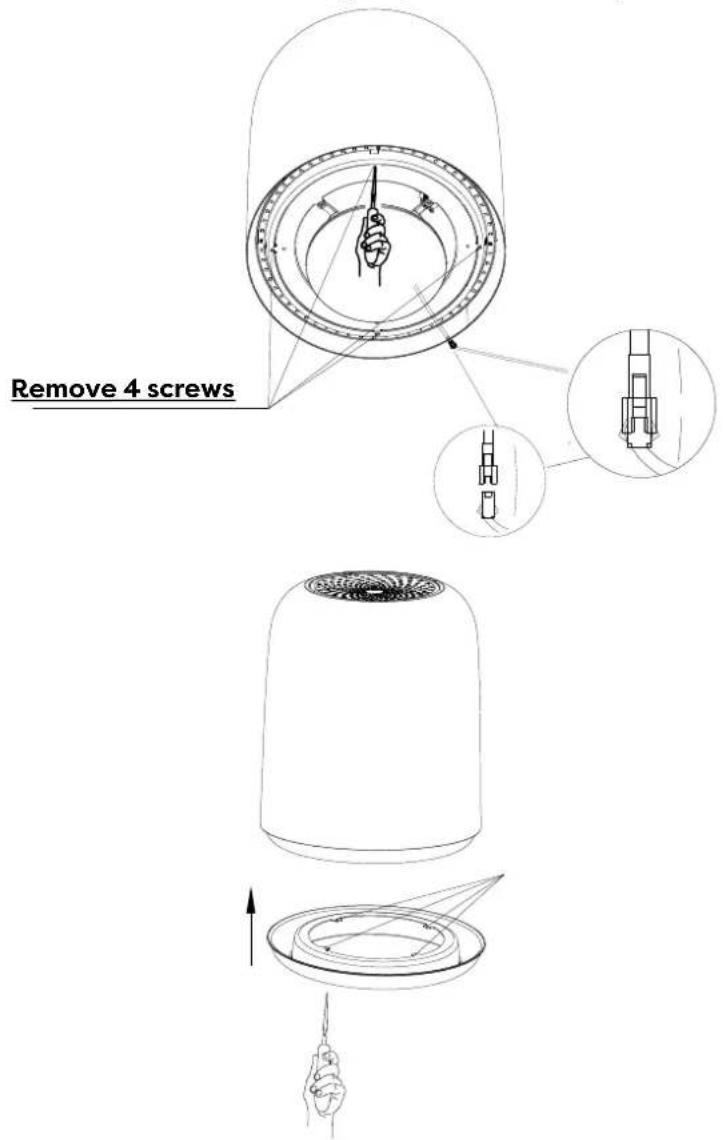
text_image
Remove 4 screws- Put the grease filter back on, you are good to go.
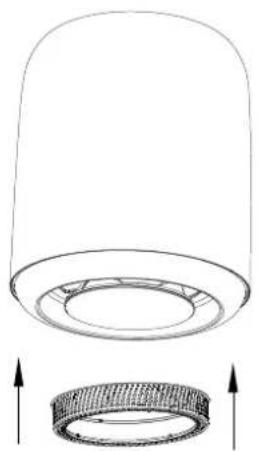
natural_image
Technical line drawing of a cylindrical component with a textured inner ring and a separate circular base with upward arrows (no text or symbols)Troubleshooting
| Problem | Possible Cause | Solution |
| Extractor hood does not turn on | No electrical supply | Make sure that range hood is plugged into powered outlet. Test outlet with other device if not working |
| My range hood has poor performance | Inadequate ventilation | Ensure that the kitchen is sufficiently ventilated to allow entry of fresh air |
| The range hood and cooktop are too far away from each other | Optimal distance is 65~75cm above the cooktop for best extraction | |
| Check and make sure the tape holding down the damper flaps at the vent hole are removed before use | Remove the tape holding down the damper | |
| Grease filters clogged with grease build-up | Clean the grease filters or replace the grease filters | |
| Carbon filters clogged with grease build-up | Replace new carbon filters | |
| Motor is running but no extraction | Please contact CIARRA Customer Care Service | |
| My range hood is noisy | Check inside the range hood for any loose debris and remove | Please contact CIARRA Customer Care Service |
| If the noise is from the motor, please contact our Customer Care Service | ||
| Lights are not working | Light is damaged | Replace with new LED lamp; remove grease filters, reach inside behind the control panel and locate the wire with clip behind the light housing. |
| The light wire terminal is loose | Reset the connection |
If problem persists after the above checks, please contact CIARRA Customer Care Centre for assistance.
Waste electrical products should not be disposed with household waste. Please recycle where facilities exist. Check with your Local Authority or retailer for recycling advice.
This appliance is marked according to the European directive 2012/19/EU on Waste Electrical and Electronic Equipment (WEEE).
By ensuring this product is disposed of correctly, you will help prevent potential negative consequences for the environment and human health, which could otherwise be caused by inappropriate waste handling of this product.
The symbol on the product indicates that this product may not be treated as household waste. Instead it shall be handed over to the applicable collection point for the recycling of electrical and electronic equipment.
Disposal must be carried out in accordance with local environmental regulations for waste disposal.
For more detailed information about treatment, recovery and recycling of this product, please contact your local city office, your household waste disposal service or the shop where you purchased the product.
ciarra
Make life easier
text_image
Diagram illustrating mechanical or electrical system components with icons for house, rollers, cylinder, and directional arrowsnatural_image
Hand holding a wall socket with a black arrow indicating clockwise motion (no text or symbols)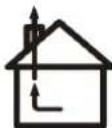
flowchart
graph TD
    A["Top Component"] --> B["Bottom Component"]
    B --> C["Bottom Component with Arrow Down"]
    C --> D["Bottom Component with Arrow Up"]
natural_image
Technical line drawing of a ceiling fixture assembly (no text or symbols)text_image
Spirit Level Ruler 650/750mmtext_image
Insulating tape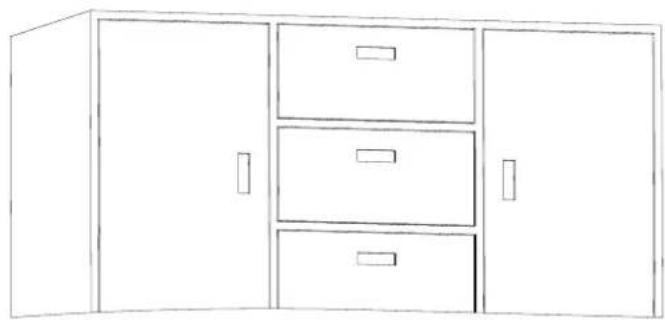
natural_image
Line drawing of a cabinet with three drawers and two doors (no text or symbols)
ACHTUNG:
text_image
Diagram illustrating kitchen lighting and heating system with labeled components and a hand gesture pointing to a device.
natural_image
Technical line drawing of a cylindrical component with a base and top view, showing internal structure and downward arrows (no text or symbols)natural_image
Technical line drawing of a cylindrical component with a textured inner ring and upward arrows indicating force or movement (no text or symbols)HINWEISE:
text_image
QR code image with a central Apple logo, likely for digital scanning and linking to online content.
text_image
QR code with Android logo in the center, likely linking to a website or app
text_image
DIARRATtext_image
No devices Add Device Home Start Me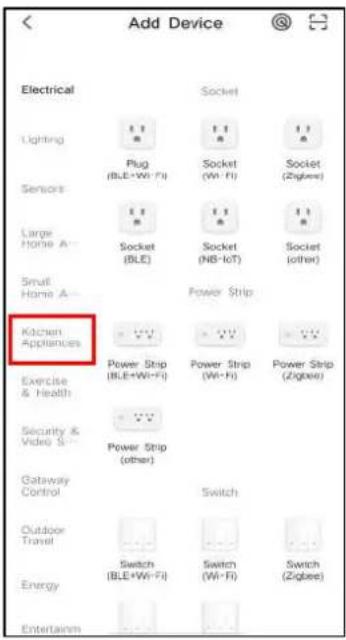
text_image
Add Device Electrical Lighting Sensors Large Home A Smull Home A Kitchen Appliances Exercise & Health Security & Video S Gateway Control Outdoor Transit Energy Entertainm Socket Plug (BLE+Wi-Fi) Socket (Wi-Fi) Socket (Zigbee) Socket (BLE) Socket (NB-IcT) Socket (other) Power Strip Power Strip (BLE+Wi-Fi) Power Strip (Wi-Fi) Power Strip (Zigbee) Power Strip (other) Switch Switch (BLE+Wi-Fi) Switch (Wi-Fi) Switch (Zigbee)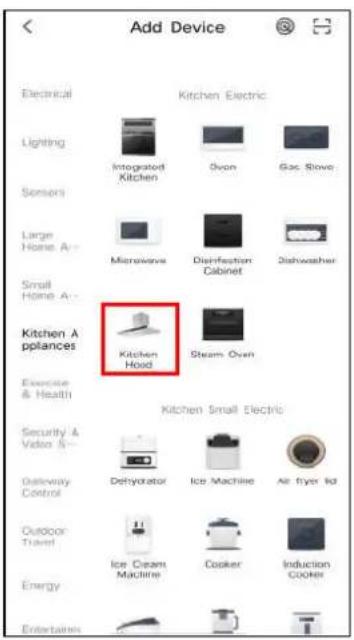
text_image
Add Device Electrical Lighting Sensors Large Home A- Small Home A- Kitchen Appliances Exercise & Health Security & Video S- Gateway Control Outdoor Travel Energy Entertain Kitchen Electric Integrated Kitchen Oxygen Gas Stove Microwave Disinfection Cabinet Dishwasher Kitchen Hood Steam Oven Kitchen Small Electric Dehydrator Ice Machine Air Fryer Kit Ice Cream Machine Cooker Induction COOHtext_image
Cancel Select 2.4 GHz Wi-Fi Network and enter password. If your Wi-Fi is 5GHz, please set it to be 2.4GHz. Common router setting method × Wi-Fi - 5GHz ✓ Wi-Fi - 2.4Ghz CIARRA_TEST Next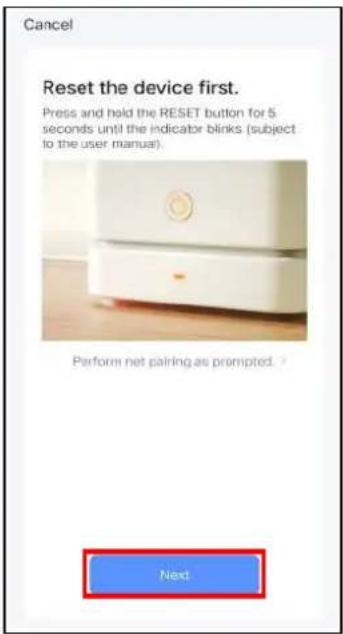
text_image
Cancel Reset the device first. Press and held the RESET button for 5 seconds until the indicator blinks (subject to the user manual). Perform net pairing as prompted. Next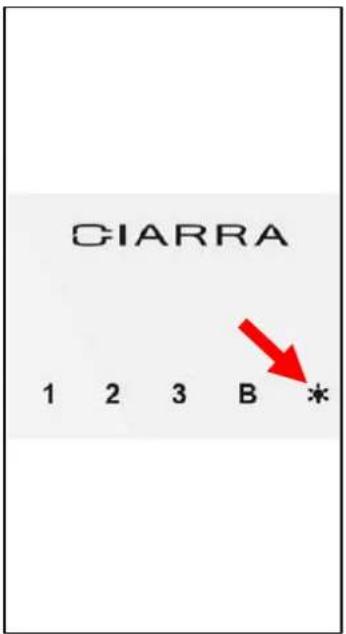
text_image
CIARRA 1 2 3 B * Red Arrowtext_image
Cancel EZ Mode Reset the device first. Power on the device and confirm that the indicator is blinking rapidly. Note: please complete the network distribution within 3 minutes after resetting the device. Perform net pairing as prompted. Confirm the indicator is blinking rapidly. Next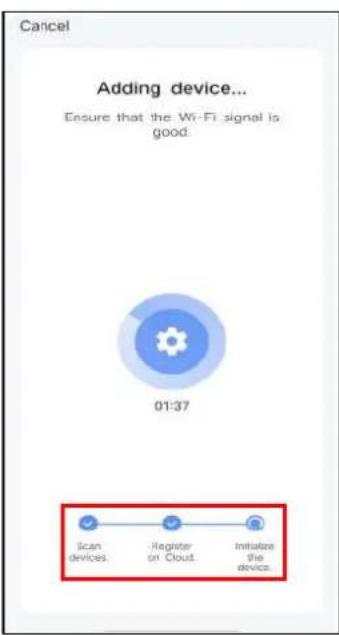
text_image
Cancel Adding device... Ensure that the Wi-Fi signal is good. 01:37 Scan devices. Register or Cloud. Initialize the device.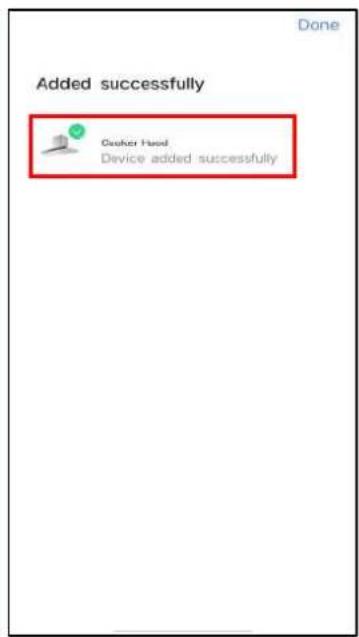
text_image
Added successfully Cleaner Head Device added successfullytext_image
CIARRA Third-Party Voice Services More > Alexa Google SmartThings Home Management Message Center FAQ & Feedback Featured Home Smart Ms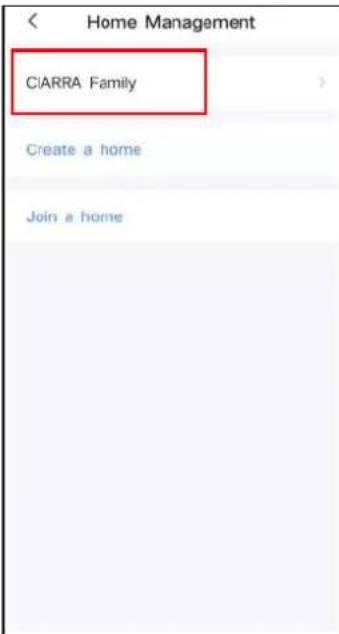
text_image
Home Management CIARRA Family Create a home Join a home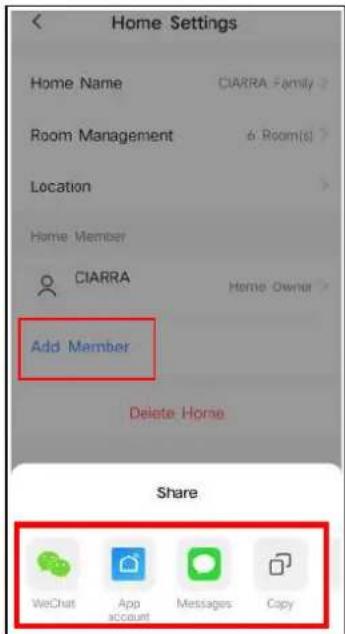
text_image
Home Settings Home Name CIARRA Family > Room Management 6 Room(s) > Location Home Member CIARRA Home Owner > Add Member Delete Home Share WeChat App account Messages Copynatural_image
Simple line drawing of a circular mechanical component with evenly spaced teeth (no text or symbols)natural_image
Technical line drawing of a cylindrical component with a textured inner ring and two downward arrows indicating force or movement (no text or symbols)natural_image
Technical line drawing of a cylindrical component with a flanged top and a textured bottom, showing upward arrows (no text or symbols)Störungssuche
text_image
Diagram illustrating airflow or mechanical system with icons for house, coins, cylinder, and directional arrowsnatural_image
Hand holding a plug inserted into an electrical socket, with a black arrow indicating the direction of insertion (no text or symbols present)
Installer la hotte (Evacuation):
flowchart
graph TD
    A["Top Component"] --> B["Bottom Component"]
    B --> C["Bottom Component with Arrow Down"]
    C --> D["Bottom Component with Arrow Up"]
natural_image
Technical line drawing of a ceiling fixture assembly (no text or symbols)text_image
Spirit Level Ruler 650/750mmMontage
text_image
Insulating tape
natural_image
Line drawing of a cabinet with three drawers and one door (no text or symbols)
Attention:
natural_image
Simple line drawing of a hanging bottle with a side shelf, no text or symbols present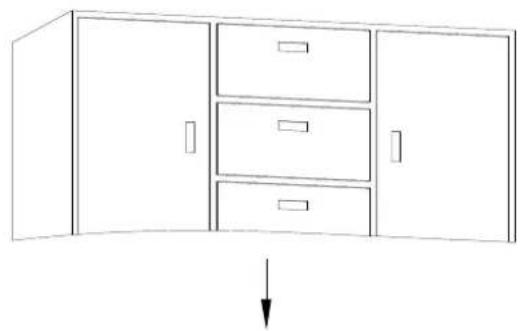
natural_image
Line drawing of a cabinet with three drawers and an open door, no text or symbols present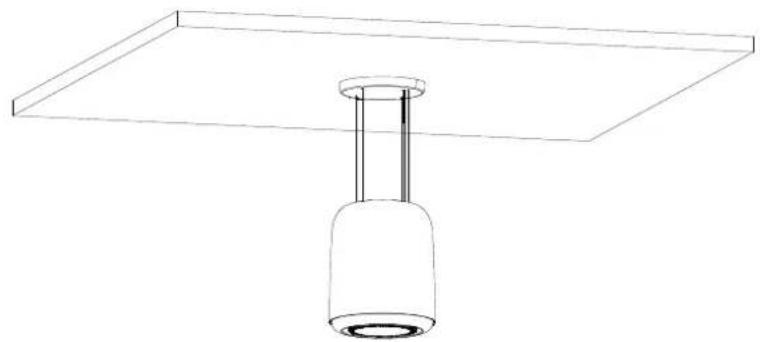
natural_image
Line drawing of a hanging lamp with a cylindrical base and rectangular frame (no text or symbols)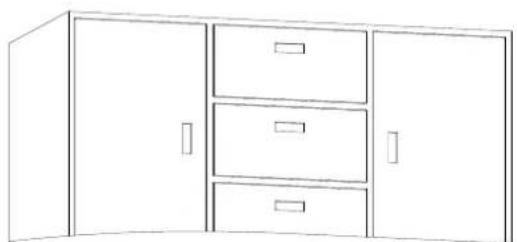
natural_image
Line drawing of a cabinet with three drawers and two doors (no text or symbols)text_image
Diagram illustrating kitchen lighting and heating system with labeled components and a hand gesture pointing to a device.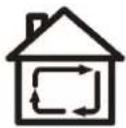
natural_image
Technical line drawing of a cylindrical component with a textured base and downward arrows indicating force or movement (no text or symbols)natural_image
Technical line drawing of a cylindrical component with a textured inner ring and upward arrows indicating force or movement (no text or symbols)REMARQUES:
text_image
QR code with central Apple logo, likely for digital scanning and linking to online content
text_image
QR code with Android logo in the center, likely for mobile app access or verification
text_image
CIARRATtext_image
No devices Add Device Home Smart Me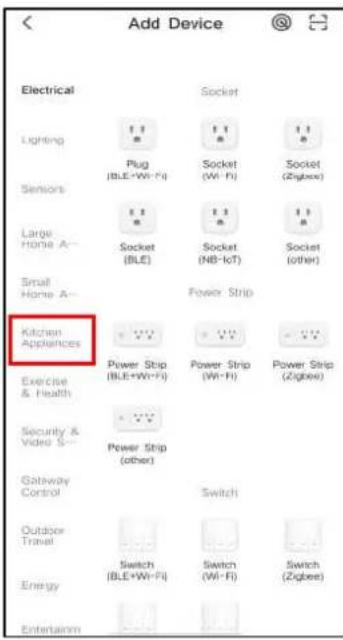
text_image
Add Device Electrical Socket Lighting Plug Socket Socket Sensors Plug Socket (Wi-Fi) (Zipbox) Large Home A Socket (BLE) Socket (NB-IoT) Socket (other) Small Home A Power Strip Kitchen Appliances Power Strip Power Strip Power Strip Exercise & Health Power Strip (BLE+Wi-Fi) (Wi-Fi) (Zipbox) Security & Video S Power Strip (other) Gateway Control Switch Outdoor Travel Switch (BLE+Wi-Fi) Switch (Wi-Fi) Switch (Zipbox) Energy Entertainment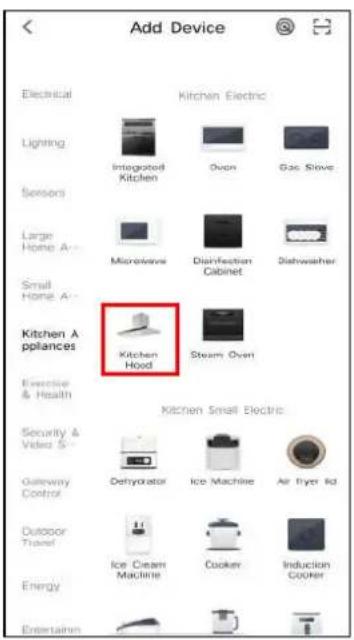
text_image
Add Device Electrical Lighting Sensors Large Home A- Small Home A- Kitchen Appliances Exercise & Health Security & Video S- Gateway Control Outdoor Travel Energy Entertain Kitchen Electric Integrated Kitchen Oven Gas Slave Microwave Disinfection Cabinet Dishwasher Kitchen Hood Steam Oven Kitchen Small Electric Dehydrator Ice Machine Air Fryer Rd Ice Cream Machine Cooker Induction Cookertext_image
Cancel Select 2.4 GHz Wi-Fi Network and enter password. If your Wi-Fi is 5GHz, please set it to be 2.4GHz. Common router setting method × Wi-Fi - 5GHz ✓ Wi-Fi - 2.4Ghz CIARRA_TEST Next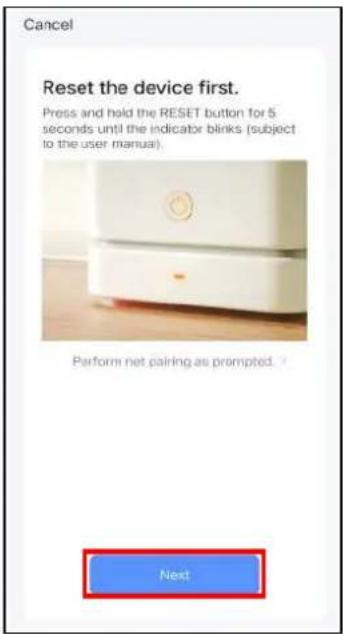
text_image
Cancel Reset the device first. Press and hold the RESET button for 5 seconds until the indicator blinks (subject to the user manual). Perform net pairing as prompted. Next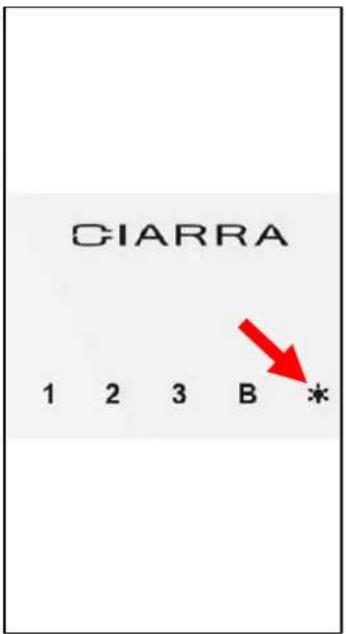
text_image
CIARRA 1 2 3 B * Red Arrowtext_image
Cancel EZ Mode Reset the device first. Power on the device and confirm that the indicator is blinking rapidly. Note: please complete the network distribution within 3 minutes after resetting the device. Perform net pairing as prompted. Confirm the indicator is blinking rapidly. Next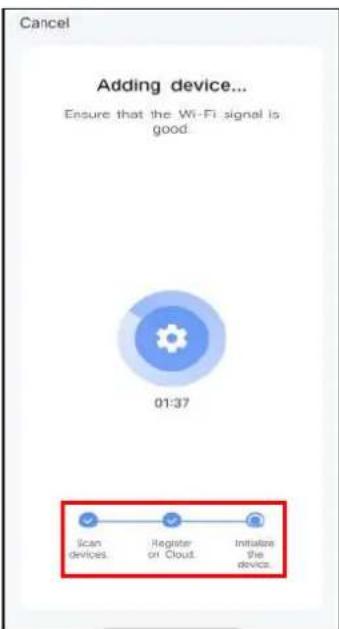
text_image
Cancel Adding device... Ensure that the Wi-Fi signal is good. 01:37 Scan devices. Register or Cloud. Initialize the device.
text_image
Added successfully Cleaner Head Device added successfullytext_image
CIARRA Third-Party Voice Services More > Alexa Google SmartThings Home Management Message Center FAQ & Feedback Featured Home Smart Ms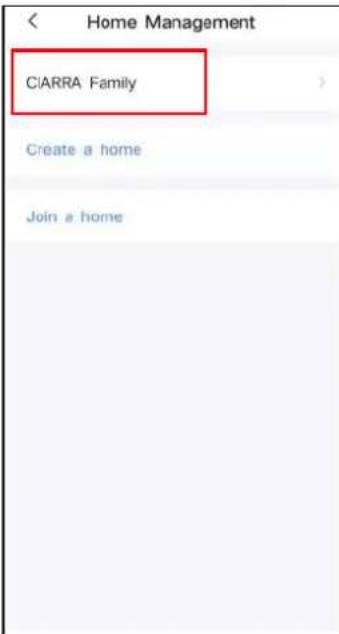
text_image
Home Management CIARRA Family Create a home Join a home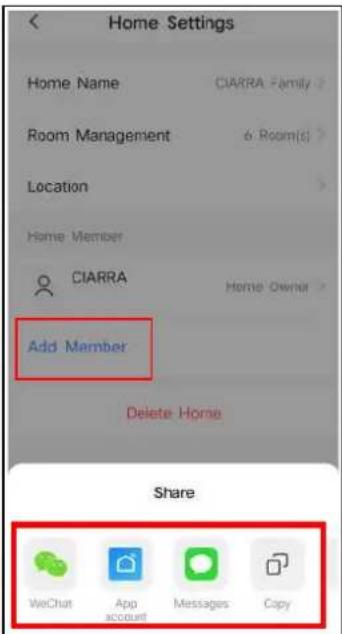
text_image
Home Settings Home Name CIARRA Family > Room Management 6 Room(s) > Location Home Member CIARRA Home Owner > Add Member Delete Home Share WeChat App account Messages Copynatural_image
Simple line drawing of a circular mechanical component with evenly spaced teeth (no text or symbols)
AVERTISSEMENT:
natural_image
Technical line drawing of a cylindrical component with a textured inner ring and a separate circular base with downward arrows indicating force or movement (no text or symbols)natural_image
Technical line drawing of a mechanical component with a cylindrical base and flange, showing upward force arrows (no text or symbols)Dépannage