Excellent 175 - Infrared panel Livn - Free user manual and instructions
Find the device manual for free Excellent 175 Livn in PDF.

| Product type | Infrared panel |
| Brand | Livn |
| Model | Excellent 175 (XB175-Wi-Fi) |
| Power | 175 W |
| Dimensions (W x H) | 30 x 60 cm |
| Power supply | 230 V ~ 50 Hz |
| Standby consumption | < 1 W |
| WiFi frequency | 2.4 GHz (2.400-2.4835 GHz) |
| Max RF power | 20 dBm |
| Installation | Wall-mounted (mounting kit included) or portable (optional feet) |
| Minimum safety distance | Front: 40 cm, sides: 20 cm, floor: 20 cm |
| Surface temperature | Approximately 95 °C |
| Control | Touch + remote control + smartphone app (Livn) |
| Functions | Adjustable thermostat, timer, child lock, open window detection, temperature calibration, beep disable |
| Connectivity | Built-in WiFi (2.4 GHz only) |
| Mobile app | Livn (iOS and Android) |
| Voice compatibility | Yes via smart scenarios |
| Heating type | Infrared radiation |
| Surface material | Glass |
| Available color | White or black |
| Warranty | 2 years |
| Cleaning | Soft damp cloth or glass cleaner; never immerse |
| Safety | Do not cover, do not use if glass is damaged, do not place under a socket |
| Manufacturing | China |
Frequently Asked Questions - Excellent 175 Livn
User questions about Excellent 175 Livn
0 question about this device. Answer the ones you know or ask your own.
Ask a new question about this device
Download the instructions for your Infrared panel in PDF format for free! Find your manual Excellent 175 - Livn and take your electronic device back in hand. On this page are published all the documents necessary for the use of your device. Excellent 175 by Livn.
USER MANUAL Excellent 175 Livn
natural_image
Simple line drawing of a rectangular panel or holder with a side clip, no text or symbols present.EN Instruction manual
NL Handleiding
Read the installation and operating instructions completely before starting any installation works and save the instructions for later use.
DESCRIPTION OF THE SYMBOLS
Before using this heater, please refer to the corresponding section in this instruction manual.

In accordance with European directives applicable to this product.
WARNING: in order to avoid the heater overheating, do not cover it.
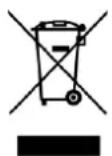
The crossed-out wheeled bin symbol indicates that the item should be disposed of separately from household waste. The item should be handed in for recycling in accordance with local environmental regulations for waste disposal. By
separating a marked item from household waste, you will help reduce the volume of waste sent to incinerators or land-fills and minimise any potential negative impact on human health and the environment.
SECTION 1 : SAFETY INSTRUCTIONS
TO REDUCE THE RISK OF FIRE, ELECTRIC SHOCK OR INJURY:
1.1 Product related safety warnings
- Livn infrared heaters operate at a surface temperature of around 95^ C when wall mounted. Do NOT touch the heater when switched on.
- Prolonged contact may cause injuries or burns.
- Do NOT cover the heater with anything. Covering may cause overheating and can result in fire.
- The heater should NOT be used to dry textiles and no objects shall be placed or leaned against the heater.
- Keep a distance of at least 40cm in the front and 20cm on the sides to any object, wall. Failure to do so will cause heat to build up behind the heater and will void your warranty.
- This heater is designed to be wall mounting, please don't mount them on the ceiling.
- This heater can be easily operated using your smartphone, via the same WLAN, via a different WLAN, or via a 3G or 4G mobile network. This makes it possible to operate your heater remotely, without your direct supervision. However, please make sure that all safety precautions stated in this manual must be taken even with remote operation.
1.2 Dangers for children and persons with limited abilities
- This appliance can be used by children aged from 8 years and above and persons with reduced physical, sensory or mental capabilities or lack of experience and knowledge if they have been given supervision or instruction concerning use of the appliance in a safe way and understand the hazards involved. Children shall not play with the appliance. Cleaning and user maintenance shall not be made by children without supervision.
• Children of less than 3 years should be kept away unless continuously supervised. - Children aged from 3 years and less than 8 years shall only switch on/off the appliance provided that it has been placed or installed in its intended normal operating position and they have been given supervision or instruction concerning use of the appliance in a safe way and understand the hazards involved. Children aged from 3 years and less than 8 years shall not plug in, regulate and clean the appliance or perform user maintenance
- CAUTION — Some parts of this product can become very hot and cause burns. Particular attention has to be given where children and vulnerable people are present.
- If the supply cord is damaged, it must be replaced by the manufacturer, its service agent or similarly qualified persons in order to avoid a hazard.
- Do NOT operate the heater in small rooms when occupied by people not capable of leaving the room by themselves. The surface of the heater can reach a surface temperature of up to 95°C, keep out of reach of children and disabled persons.
- Keep away babies and children from all packaging material such as plastic bags to avoid danger of suffocation.
1.3 Electric safety directions
- When installing, repairing or servicing the heater it must be turned off and disconnected from power. Before installation please check if the heater is free of damages.
- If the heater or the power cord is damaged in any form do NOT use the heater and contact your Livn dealer for repair or replacement. Repairs, maintenance or any changes must be carried out by an authorized Livn dealer.
- DO NOT attempt to repair the heater by yourself, this will void your warranty.
- If the heater has been dropped do NOT operate it and contact your Livn dealer to make sure it is free of any damages.
- This heater is designed to operate at 230V, 50Hz AC. If your supply mains do not comply with this, do NOT use the heater.
- The heater must not be located immediately below a socket-outlet.
- WARNING: the glass heater must not be used if the glass surface is damaged.
- WARNING: do not use this heater in small rooms when they are occupied by persons not capable of leaving the room on their own, unless constant supervision is provided.
SECTION 2: HOW TO CARE FOR YOUR LIVN HEATER
2.1 Cleaning
Always unplug your heater and let it cool down completely before cleaning. Never dip into water and never splash water on it. Clean the heater with a soft damp cloth. For glass models use a soft cloth and glass cleaner. Never use a wet cloth and make sure to dry the heater when clean with a dry cloth. Do not use any abrasive materials, solvents or harsh cleaning sponges as this could cause scratches or other irreparable damage. Before operating the heater again it must be completely dry.
2.2 Using/Working
Please note that the heater may discolour with use. This is due to airborne pollution and is not a fault. Do not cover your heater with a picture foil and do not paint or print the heater yourself. This might cause damage to the heating element and will void your warranty. If you notice any noise, smells, visible changes or exceptionally high temperatures please discontinue use and contact an authorised Livn dealer.
2.3 Repair
Repairs must be carried out by authorised Livn dealers or by Livn directly. If you attempt to alter the product or to proceed with any repairs yourself it will void your warranty.
2.4 Disposal
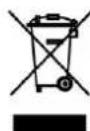
This marking indicates that this product should not be disposed with other household wastes throughout the EU. To prevent possible harm to the environment or human health from uncontrolled waste disposal, recycle it responsibly to promote the sustainable reuse of material resources. To return your used device, please use the return and collection systems or contact the retailer where the product was purchased. They can take this product for environmental safe recycling.

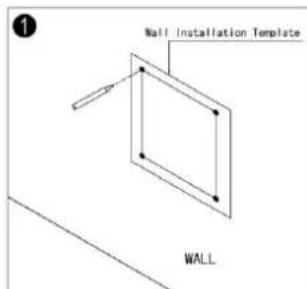
SECTION 3: MOUNTING INSTALLATION
Note: the kit supplied in the package is designed for mounting on a solid wall. If mounted onto other types of walls, you will need appropriate fixings (not supplied). Please make sure the wall is safe to mount. We highly recommend having the panel installed by a qualified electrician or installer authorized by Livn. The heater must be at least 20 cm removed from all objects, walls, etc.; the distance to the floor must be at least 20 cm.
natural_image
Simple line drawing of a mechanical clamp or bracket with a labeled wall (no text or symbols on the diagram itself)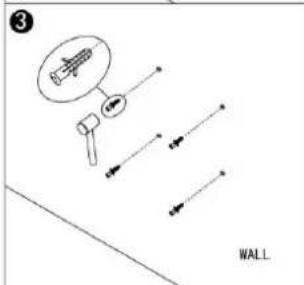
natural_image
Diagram of a rectangular panel with an arrow indicating direction, labeled 'WALL' at the bottom (no text or symbols on the panel itself)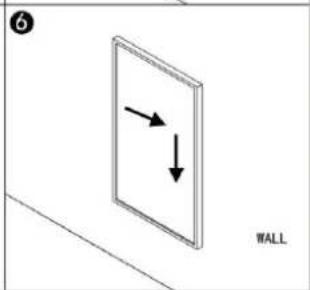
Step 1. Use the supplied template to mark the position of the holes on the wall.
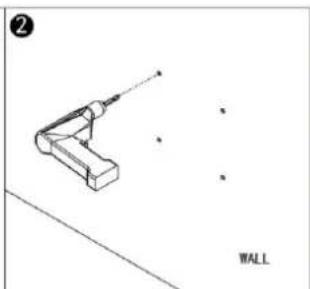
Step 2. Drill holes using an 8mm drill.
Step 3. Insert the dowels into the holes.
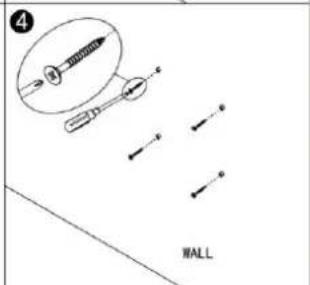
Step 4. Screw in the supplied screws to the wall.
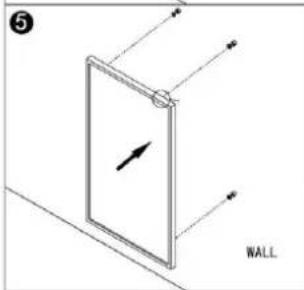
Step 5. Mount the panel on the screws.
Step 6. Move the panel to the left and then down until it's secured.
4.1 General introduction of the control system
The Excellent-Wi-Fi range has an integrated Wi-Fi control box, meaning there is no other additional thermostat needed to control the heater. Once the heater has been connected to the APP, the smartphone will take control and communicate with the control box. If your home internet is not working, it is still possible to operate the heater via the control box manually, once the heater is re-connected to the Wi-Fi, the smart phone will take control again.
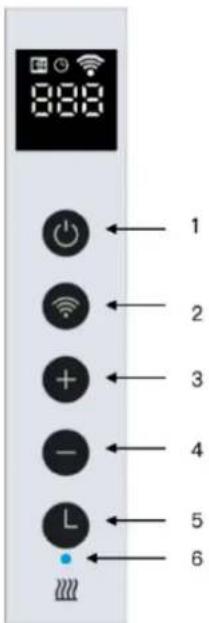
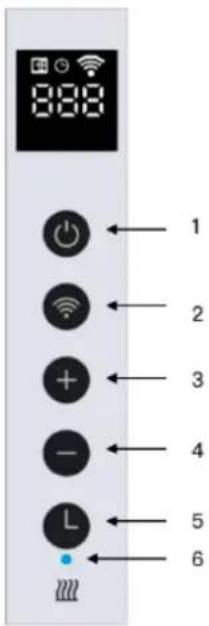
4.2 Buttons on the heater:
- Power button
- Wi-Fi button
- "+" button
- "-" button
- Timer button
- Heating status indicator
4.3 Screen display:
- Open window Sign
- Timer Sign
- Wi-Fi Sign
- Temperature

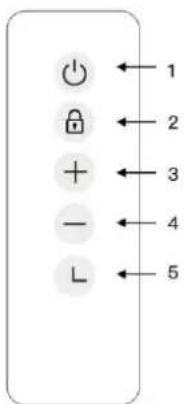
4.4 Remote control buttons:
- Power button
- Child lock button
-
- button
-
- button
- Timer button
4.5 Manual control via the button on the heater
4.5.1 Adjust desire temperature
Activate the power switch, press power button to power on the heater, adjust your desired temperature by pressing “-” or “+” button.
4.5.2 Countdown timer
Press timer button and "00H" will appear on the screen and you can set the desired countdown timer by pressing "-" and "+" button.
4.5.3 Child lock
Press and hold the "Power" button for 3 seconds, the screen will show "CL" to activate the child lock function, press and hold the "Power" button again to deactivate.
4.5.4 Open window detection
This heater is equipped with an open window detection function. If our control system detects that the room temperature decreases dramatically in short period when the heater is in the heating status, it will recognise that a window is open. The window sign on the screen will start to flash and the heater will power off for 30 minutes and get back to the previous setting automatically after 30 minutes.
If you would like to deactivate this function, please power on the heater, press and hold the “-” button on the heater for 5 seconds, and the open window sign on the screen will disappear accordingly. Follow the above operation again to activate it.
4.5.5 Temperature calibration
Power on the heater, Press and hold “+” button for 5 seconds to enter the temperature calibration, adjust the number by pressing “-” or “+” button, the calibration ranges from -5 to +5 degrees.
4.5.6 Wi-Fi reset
Power on the heater, press and hold "Wi-Fi" button for 5 seconds until the Wi-Fi indicator starts to flash to reset the Wi-Fi connection.
4.5.7 Wi-Fi function ON/OFF
Power on the heater, press and hold “Timer” button for 10 seconds to deactivate the Wi-Fi function of this heater and the Wi-Fi sign on the screen will disappear, long press “Timer” button for 10 seconds to activate it on again.
4.5.8 Mute the "Beep" Sound
If you would like to mute the "Beep" sound when operating the heater, please press the "Power" button until screen shows "OFF", press and hold the "-"button for 3 seconds to mute the "Beep" Sound, long press the "-" button to activate it again.
4.6 Remote controller operation
This heater also equipped with the remote controller, which you can use to operate:
- Set the desire room temperature
- Countdown timer
- Child lock (screen shows CL when child lock was activated)
4.7 Explore more with the APP
After connecting this device to the APP, you can have the easy operation:
- Set up the schedules for heating
- Turn on countdown timer
• Calibrate the temperature sensor - Mute the "beep" sound
• Using smart scenarios
• Voice control your heater
4.8 Wi-Fi and APP operation:
4.8.1 Download the Livn APP
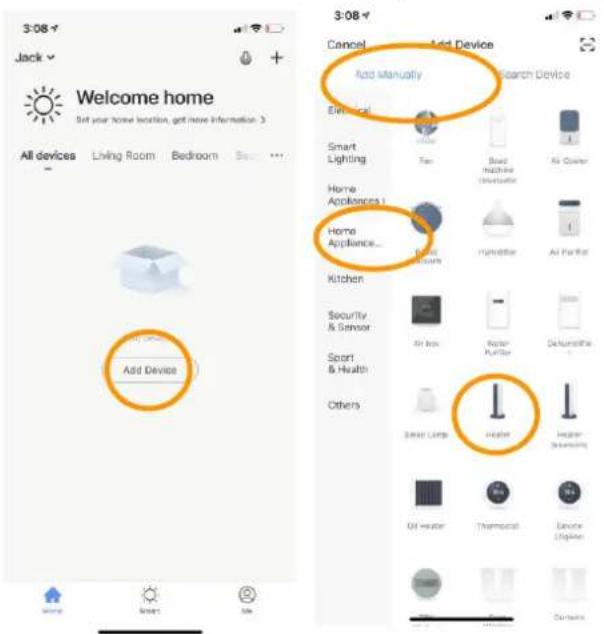
Scan the QR code to download the "Livn" APP or search "Livn" APP on APP store or Google play store to start the procedure to download the APP, open the APP and register with your phone number or Email address.
4.8.2 Connect to Wi-Fi:
Step 1: activate the Power switch, press the "Power" button, the Wi-Fi sign will start to flash rapidly, open the APP on your smart phone and add your device. Choose "Add Device", then "Add Manually", "Home Appliances (Small)" and then choose "Heater" to add the device.
Step 2: enter the Wi-Fi password of your home network. Please make sure your home Wi-Fi is working as well as keep the heater and smartphone as close as possible to the Wi-Fi router.
Please notice that this heater is only working with 2.4GHz Wi-Fi networks, it doesn't support 5GHz networks currently. Also, make sure your internet router has enough capacity to add a new device.
Step 3: wait till the connecting status shows 100% to finish the settings and the Wi-Fi signal on the control box will stop flashing.
If you still fail to establish a connection, please power off the heater and power it back on again after a few seconds. Long press the "Timer" button on the touch screen for 5 seconds until the Wi-Fi indicator is flashing slowly and repeat the connection process under the AP mode.
If above procedure is not working, please try to reset to the factory mode and try the connection again.
If all the above is not working and the Wi-Fi single light is flashing as expected, please try to disconnect an already connected smart device from your current Wi-Fi router and try to connect this heater to the Wi-Fi router.

SECTION 5: TECHNICAL SPECIFICATIONS
Panels covered by these instructions are listed in the table below.
| **Model | Power | Size | Mounting |
| 5962500 + 5962510 (XB175-Wi-Fi) | 175W | 30*60cm | Wall or *Portable |
| 5962520 + 5962530 (XB350-Wi-Fi) | 350W | 60*60cm | Wall or *Portable |
| 5962540 + 5962550 (XB500-Wi-Fi) | 500W | 60*90cm | Wall or *Portable |
| 5962560 + 5962570 (XB700-Wi-Fi) | 700W | 60*120cm | Wall or *Portable |
- Frequency band(s) in which the radio equipment operates: 2.400-2.4835GHz;
- Maximum radio-frequency power transmitted in the frequency band(s) in which the radio equipment operates: 20dBm.
*This heater is suitable for portable usage, however, the standing feet is not included in the package and need to be purchased separately.
| **Product reference | |
| Art. 5962500 Livn infrared panel Excellent 175 30x60cm whiteArt. 5962510 Livn infrared panel Excellent 175 30x60cm blackArt. 5962520 Livn infrared panel Excellent 350 60x60cm whiteArt. 5962530 Livn infrared panel Excellent 350 60x60cm blackArt. 5962540 Livn infrared panel Excellent 500 90x60cm whiteArt. 5962550 Livn infrared panel Excellent 500 90x60cm blackArt. 5962560 Livn infrared panel Excellent 700 120x60cm whiteArt. 5962570 Livn infrared panel Excellent 700 120x60cm black | EAN 8712757482528EAN 8712757482535EAN 8712757482542EAN 8712757482559EAN 8712757482566EAN 8712757482573EAN 8712757482580EAN 8712757482597 |
| Made in: China | |
SECTION 6: WARRANTY
Livn offers a 2 year manufacturing warranty on the heating panel.
Within the warranty period from date of purchase, Livn will repair or replace your heater where the fault is due to defects in workmanship or materials. Please contact your local Livn dealer in the event of a warranty claim and return the heater together with proof of purchase.
The warranty covers the repair or replacement of the heater only and Livn shall not be liable for any other occurring costs such as installation cost or any other consequential losses however incurred. Please note that tampering with or opening the heater in any way will void your warranty. The removal of the serial number on the back of the heater will also void this warranty. All labels on the back of the heater shall not be removed.
| ErP Information requirement for the electric local space heaters | |||||
| Models: 5962500 + 5962510 (XB175-Wi-Fi) | |||||
| Item | Sign | Value | Unit | Item | Unit |
| Heat output | Type of heat input, for electric storage local space heaters only (Select one) | ||||
| Nominal heat output | Pnom | 0.175 | kW | manual heat charge control, with integrated thermostat | No |
| Minimum heat output (indicative) | Pmin | 0.0 | kW | manual heat charge control with room and/or outdoor temperature feedback | No |
| Auxiliary electricity consumption | fan assisted heat output | No | |||
| At nominal heat output | elmax | 0.175 | kW | Type of heat output/room temperature control (select one) | |
| At minimum heat output | elmin | 0.0 | kW | Single stage heat output and no room temperature control | No |
| In Standby mode | eISB | 0.001 | kW | two or more manual stages, no room temperature control | No |
| with mechanic thermostat room temperature control | No | ||||
| with electronic room temperature control | No | ||||
| electronic room temperature control plus day timer | No | ||||
| electronic room temperature control plus week timer | Yes | ||||
| Other control options (multiple selection possible) | |||||
| room temperature control, with presence detection | No | ||||
| room temperature control, with open window detection | Yes | ||||
| with distance control option | No | ||||
| with adaptive start | No | ||||
| with working time limitation | No | ||||
| with black bulb sensor | No | ||||
| Models: 5962520 + 5962530 (XB350-Wi-Fi) | |||||
| Item | Sign | Value | Unit | Item | Unit |
| Heat output | Type of heat input, for electric storage local space heaters only (Select one) | ||||
| Nominal heat output | Pnom | 0.35 | kW | manual heat charge control, with integrated thermostat | No |
| Minimum heat output (indicative) | Pmin | 0.0 | kW | manual heat charge control with room and/or outdoor temperature feedback | No |
| Auxiliary electricity consumption | fan assisted heat output | No | |||
| At nominal heat output | elmax | 0.35 | kW | Type of heat output/room temperature control (select one) | |
| At minimum heat output | elmin | 0.0 | kW | Single stage heat output and no room temperature control | No |
| In Standby mode | eISB | 0.001 | kW | two or more manual stages, no room temperature control | No |
| with mechanic thermostat room temperature control | No | ||||
| with electronic room temperature control | No | ||||
| electronic room temperature control plus day timer | No | ||||
| electronic room temperature control plus week timer | Yes | ||||
| Other control options (multiple selection possible) | |||||
| room temperature control, with presence detection | No | ||||
| room temperature control, with open window detection | Yes | ||||
| with distance control option | No | ||||
| with adaptive start | No | ||||
| with working time limitation | No | ||||
| with black bulb sensor | No | ||||
| Models: 5962540 + 5962550 (XB500-Wi-Fi) | |||||
| Item | Sign | Value | Unit | Item | Unit |
| Heat output | Type of heat input, for electric storage local space heaters only (Select one) | ||||
| Nominal heat output | Pnom | 0.5 | kW | manual heat charge control, with integrated thermostat | No |
| Minimum heat output (indicative) | Pmin | 0.0 | kW | manual heat charge control with room and/or outdoor temperature feedback | No |
| Auxiliary electricity consumption | fan assisted heat output | No | |||
| At nominal heat output | elmax | 0.5 | kW | Type of heat output/room temperature control (select one) | |
| At minimum heat output | elmin | 0.0 | kW | Single stage heat output and no room temperature control | No |
| In Standby mode | eISB | 0.001 | kW | two or more manual stages, no room temperature control | No |
| with mechanic thermostat room temperature control | No | ||||
| with electronic room temperature control | No | ||||
| electronic room temperature control plus day timer | No | ||||
| electronic room temperature control plus week timer | Yes | ||||
| Other control options (multiple selection possible) | |||||
| room temperature control, with presence detection | No | ||||
| room temperature control, with open window detection | Yes | ||||
| with distance control option | No | ||||
| with adaptive start | No | ||||
| with working time limitation | No | ||||
| with black bulb sensor | No | ||||
| Models: 5962560 + 5962570 (XB700-Wi-Fi) | |||||
| Item | Sign | Value | Unit | Item | Unit |
| Heat output | Type of heat input, for electric storage local space heaters only (Select one) | ||||
| Nominal heat output | Pnom | 0.7 | kW | manual heat charge control, with integrated thermostat | No |
| Minimum heat output (indicative) | Pmin | 0.0 | kW | manual heat charge control with room and/or outdoor temperature feedback | No |
| Auxiliary electricity consumption | fan assisted heat output | No | |||
| At nominal heat output | elmax | 0.7 | kW | Type of heat output/room temperature control (select one) | |
| At minimum heat output | elmin | 0.0 | kW | Single stage heat output and no room temperature control | No |
| In Standby mode | eISB | 0.001 | kW | two or more manual stages, no room temperature control | No |
| with mechanic thermostat room temperature control | No | ||||
| with electronic room temperature control | No | ||||
| electronic room temperature control plus day timer | No | ||||
| electronic room temperature control plus week timer | Yes | ||||
| Other control options (multiple selection possible) | |||||
| room temperature control, with presence detection | No | ||||
| room temperature control, with open window detection | Yes | ||||
| with distance control option | No | ||||
| with adaptive start | No | ||||
| with working time limitation | No | ||||
| with black bulb sensor | No | ||||
4.4 Knoppen afstandsbediening: