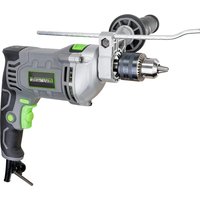
GHD1275B - Multitools Genesis - Free user manual and instructions
Find the device manual for free GHD1275B Genesis in PDF.


| Product Type | Hammer Drill |
| Brand | Genesis |
| Model | GHD1275B |
| Rated Voltage | 120 V ~ / 60 Hz |
| Rated Current | 7.5 A |
| No Load Speed | 0 – 2,800 rpm |
| Blows per Minute | 0 – 44,800 |
| Chuck Capacity | 13 mm |
| Cord Length | 2 m (6.5 ft) |
| Net Weight | 2.6 kg |
| Speed Control | Variable speed trigger with adjustment knob |
| Lock-on Button | Lock button |
| Direction Selector | Normal / Reverse rotation |
| Operating Modes | Drilling only, Hammer drilling |
| Auxiliary Handle | Yes, 360° adjustable |
| Depth Gauge | Yes, integrated in handle |
| Chuck Key | Included |
| Insulation | Double insulation (Class II) |
| Warranty | 2 years (excluding professional use) |
| Maintenance | Clean with dry cloth; lubrication not required |
| Repairability | Have it repaired by a qualified technician, use identical replacement parts |
| Safety | Mandatory wearing of ANSI Z87.1 safety glasses; hearing and respiratory protection recommended |
Frequently Asked Questions - GHD1275B Genesis
User questions about GHD1275B Genesis
0 question about this device. Answer the ones you know or ask your own.
Ask a new question about this device
Download the instructions for your Multitools in PDF format for free! Find your manual GHD1275B - Genesis and take your electronic device back in hand. On this page are published all the documents necessary for the use of your device. GHD1275B by Genesis.
USER MANUAL GHD1275B Genesis
natural_image
Black-and-white illustration of a Genesis electric drill (no text or symbols visible on the device body)TOLL-FREE HELP LINE: LIGNE D'ASSISTANCE SANS FRAIS : 888-552-8665 LÍNEA DE AYUDA GRATUITA:
www.genesispowertools.com

Look for this symbol to point out important safety precautions. It means attention!!! Your safety is involved.

WARNING: Read and understand all warnings, cautions and operating instructions before using this equipment. Failure to follow all instructions listed below may result in electric shock, fire and/or serious personal injury.

WARNING: The Operation of any power tool can result in foreign objects being thrown into your eyes, which can result in severe eye damage. Before beginning tool operation, always wear safety goggles or safety glasses with side shields and a full face shield when needed. We recommend Wide Vision Safety Mask for use over eyeglasses or standard safety glasses with side shields. Always wear eye protection which is marked to comply with ANSI Z87.1.
GENERAL SAFETY RULES
WARNING: Some dust created by power sanding, sawing, grinding, drilling, and other construction activities contains chemicals known to cause cancer, birth defects or other reproductive harm. Some examples of these chemicals are:
- Lead from lead-based paints.
- Crystalline silica from bricks and cement and other masonry products.
- Arsenic and chromium from chemically treated lumber.
Your risk from these exposures varies, depending on how often you do this type of work. To reduce your exposure to these chemicals: work in a well-ventilated area, and work with approved safety equipment, such as those dust masks that are specially designed to filter out microscopic particles.
WORK AREA SAFETY
- Keep your work area clean and well lit. Cluttered benches and dark areas invite accidents.
- Do not operate power tools in explosive atmospheres, such as in the presence of flammable liquids, gases, or dust. Power tools create sparks which may ignite the dust or fumes.
- Keep bystanders, children, and visitors away while operating a power tool. Distractions can cause you to lose control.
ELECTRICAL SAFETY
- Power tool plugs must match the outlet. Never modify the plug in any way. Do not use any adaptor plugs in any earthed (grounded) power tools. Double insulated tools are equipped with a polarized plug (one blade is wider than the other). This plug will fit in a polarized outlet only one way. If the plug does not fit fully in the outlet, reverse the plug. If it still does not fit, contact a qualified electrician to install a polarized outlet. Do not change the plug in any way. Double insulation
eliminates the need for the three-wire grounded power cord and grounded power supply system.
- Do not expose power tools to rain or wet conditions. Water entering a power tool will increase the risk of electric shock.
- Avoid body contact with earthed or grounded surfaces such as pipes, radiators, ranges and refrigerators. There is an increased risk of electric shock if your body is grounded.
- Do not abuse the cord. Never use the cord for carrying, pulling or unplugging the power tool. Keep cord away from heat, oil, sharp edges or moving parts. Damaged cords increase the risk of electric shock.
- When operating a power tool outside, use an extension cord suitable for outdoor use. These cords are rated for outdoor use and reduce the risk of electric shock.
- Do not use AC only rated tools with a DC power supply. While the tool may appear to work. The electrical components of the AC rated tool are likely to fail and rate a hazard to the operator.
PERSONAL SAFETY
- Stay alert, watch what you are doing, and use common sense when operating a power tool. Do not use tool while tired or under the influence of drugs, alcohol, or medication. A moment of inattention while operating power tools may result in serious personal injury.
- Use safety equipment. Always wear eye protection. Safety equipment such as dust mask, non-skid safety shoes, hard hat, or hearing protection for appropriate conditions will reduce personal injuries.
- Dress properly. Do not wear loose clothing or jewelry. Keep your hair, clothing and gloves away from moving parts. Loose clothes, jewelry or long hair can be caught in moving parts. Air vents may cover moving parts and should be avoided.
GENERAL SAFETY RULES
- Avoid accidental starting. Ensure the switch is in the "OFF" position before plugging in. Carrying power tool with your finger on the switch or plugging in a power tool that has the switch on invites accidents.
- Remove any adjusting keys or wrenches before turning the power tool on. A wrench or key that is left attached to a rotating part of the tool may result in personal injury.
- Do not overreach. Maintain proper footing and balance at all times. Loss of balance can cause an injury in an unexpected situation.
- If devices are provided for connection of dust extraction and collection facilities, ensure these are connected and properly used. Use of these devices can reduce dust related hazards.
- Do not use a ladder or unstable support. Stable footing on a solid surface enables better control of the tool in unexpected situations.
- Keep tool handles dry, clean and free from oil and grease. Slippery handles cannot safely control the tool.
TOOL USE AND CARE
- Secure the workpiece. Use clamp or other practical way to hold the workpiece to a stable platform. Holding the workpiece by hand or against your body is unstable and may lead to loss of control.
- Do not force the power tool. The tool will perform the job better and safer at the feed rate for which it is designed. Forcing the tool could possibly damage the tool and may result in personal injury.
- Use the correct power tool for the job. Don't force the tool or attachment to do a job for which it is not designed.
- Do not use a tool if the switch does not turn it on or off. Any tool that cannot be controlled with the switch is dangerous and must be repaired or replaced by an authorized service center.
- Turn the power tool off, and disconnect the plug from the power source and/or battery pack from the power tool before making any adjustments.
changing the accessories, or storing the tools. Such preventive safety measures reduce the risk of an accidental start up which may cause personal injury.
- Store idle tools out of reach of children and other inexperienced persons. It is dangerous in the hand of untrained users.
- Maintain power tools with care. Check for proper alignment and binding of moving parts, component breaks, and any other conditions that may affect the tool's operation. A guard or any other part that is damaged must be properly repaired or replaced by an authorized service center to avoid risk of personal injury.
- Only use recommended accessories. Using accessories and attachments not recommended by the manufacturer or intended for use on this type tool may cause damage to the tool or result in personal injury to the user. Consult the operator's manual for recommended accessories.
- Keep cutting tools sharp and clean. Properly maintained cutting tools with sharp cutting edges are less likely to bind and are easier to control.
- Feed the workpiece in the correct direction and speed. Feed the workpiece into a blade, cutter or abrasive surface against the direction of the cutting tool's direction of rotation only. Incorrectly feeding the workpiece in the same direction may cause the workpiece to be thrown out at high speed.
- Never leave the tool running unattended, turn the power off. Do not leave the tool until it comes to a complete stop.
SERVICE
- Have your power tool serviced by a qualified repair person using only identical replacement parts. This will ensure that the safety of the power tool is maintained.
- Service your power tool periodically. When cleaning a tool, be careful not to disassemble any portion of the tool since internal wires may be misplaced or pinched.
SAVE THESE INSTRUCTIONS
EXTENSION CORDS
If an extension cord is necessary, a cord with adequate size conductors that is capable of carrying the current necessary for your tool must be used. This will prevent excessive voltage drop, loss of power or overheating. Grounded tools must use 3-wire extension cords that have 3-prone plugs and receptacles.
NOTE: The smaller the gauge number, the heavier the cord.
| Recommended Minimum Wire Gauge for Extension Cords (120 Volt) | ||||||
| Nameplate Amperes(At Full Load) | Extension Cord Length (Feet) | |||||
| 25 50 | 75 100 | 150 | 200 | |||
| 0-2 18 18 | 18 18 16 | 16 | ||||
| 2-3.5 18 18 | 18 16 14 | 14 | ||||
| 3.5-5 18 18 | 16 14 12 | 12 | ||||
| 5-7 | 18 16 | 14 12 | 12 10 | |||
| 7-12 | 18 | 14 | 12 | 10 | 8 | 8 |
| 12-16 | 14 | 12 | 10 | 10 | 8 | 6 |

WARNING: Do not let comfort or familiarity with product (gained from repeated use) replace strict adherence to product safety rules. If you use this tool unsafely or incorrectly, you can suffer serious personal injury!

WARNING: Hold the tool by insulated gripping surfaces when performing an operation where the tool may contact hidden wiring or its own cord. Contact with a “live” wire will make exposed metal parts of the tool “live” and shock the operator!
- Do not leave the tool running unless hand held.
- Always use safety glasses or goggles. Ordinary eye or sun glasses are not safety glasses. use certified safety equipment. protective eye wear should comply with ansi z87.1 standards. use a dust mask or respirator for operations which generate dust.
- Wear ear/hearing protectors when using this tool for extended periods. Prolonged exposure to high intensity noise can cause hearing loss.
- Hold the tool firmly to prevent injury that may result from loss of control because of high rotational force.
- Always be sure you have firm footing and check to see no one is below when using the tool in high locations.
- Do not hold the tool or place your hands near the rotating chuck or drill bit. Contact with any moving parts may result in personal injury.
- Always check that the material being drilled is secure and clamped in place if necessary to prevent any movement. An unstable workpiece can cause the drill bit to bind, causing of control and injury.
- Never hold the workpiece in your hand, lap or against other parts of the body when drilling. Contact with the drill bit can cause injury.
- Always position the cord away from the rotating bit and DO NOT wrap the cord around your arm or wrist. If the cord is caught by the rotating bit or chuck, you may lose control of the drill and become entrapped by the cord, causing personal injury.
- When using the drill, DO NOT position yourself between the tool and a wall or post. If the bit jams or becomes bound in the workpiece, the sudden reaction torque of the tool could crush your hand, arm, or leg against a stationary object.
- If the bit jams or binds in the work, immediately release the trigger switch to prevent personal injury. Unplug the drill from the power source and then remove the drill bit from the work. Do not attempt to free the jammed drill bit by repeatedly starting and stopping the drill motor; this action could result in injury.
- Do not use dull or damaged bits and accessories. Dull or damaged bits are more likely to bind in the workpiece.
- Do not use bits larger than those recommended. They are more likely to jam, causing loss of tool control and personal injury. Large bits may also overload the drill, causing motor and gear damage.
- When removing the drill bit from the tool, avoid contact with skin. Allow sufficient time for the bit to cool down or use proper protective gloves to handle the bit or accessory. Drill bits and accessories may be hot after prolonged use.
- Wear cushioned gloves and take frequent rest breaks. Hammer drills can generate considerable vibration when in operation which may be harmful to your hands and arms.
- Use only percussion-type carbide tipped bits for hammer drilling and do not attempt cutting reinforcing rod with percussion-type bits.
- Check the tool and remove any chuck keys or adjusting wrenches before switching the tool "ON". Keys and wrenches can fly off at high speed striking you or a bystander, causing an injury.

WARNING: Read and understand all warnings, cautions and operating instructions before using this equipment. Failure to follow all instructions listed below may result in electric shock, fire, and/or serious personal injury.
SYMBOLS
IMPORTANT: Some of the following symbols may be used on your tool and appear throughout the manual. Please study them and learn their meaning for critical information to operate the tool safely.
| SYMBOL | DESCRIPTION SYMBOL | DESCRIPTION | SYMBOL DESCRIPTION | ION | |
| V | Volts | RPM | Revolutions per minute |  | Warning symbol. Precautions that involve your safety |
| A | Amperes | SPM | Strokes per minute |  | To reduce the risk of injury, read Operator's Manual before using this product |
| Hz | Hertz | OPM | Oscillations per minute |  | Wear safety glasses, ear protection and respiratory protection |
| W | Watts |  | Alternating current |  | Do not dispose with household waste |
| n_o | No Load Speed | 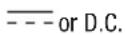 | Direct current Do not  | the running blade | |
| kg | Kilograms |  | Do not use in wet conditions |  | Class II Double Insulated construction |
| H | Hours |  | Battery cannot exceed 59°C |  Intertek Intertek | This symbol designates that this product is listed with U.S. and Canada requirements by ETL Testing Laboratories, Inc. |
| .../min | Per minute |  | Do not put battery in fire |
UNPACKING & CONTENTS
IMPORTANT: Due to modern mass production techniques, it is unlikely the tool is faulty or that a part is missing. If you find anything wrong, do not operate the tool until the parts have been replaced or the fault has been rectified. Failure to do so could result in serious personal injury.
CONTENT IN PACKAGE
| Description | Quantity |
| Hammer Drill | 1 |
| Chuck Key | 1 |
| Operator’s Manual | 1 |
| Description | Quantity |
| Auxiliary Handle | 1 |
| Depth Gauge | 1 |
SPECIFICATIONS
Rated Power 120V\~, 60Hz, 7.5A
No-Load Speed 0-2800 RPM
Blows Per Minute 0-44,800
Chuck....1/2" (13mm)
Cord Length 6.5 ft.
Net Weight 5.6 lb
PRODUCT OVERVIEW
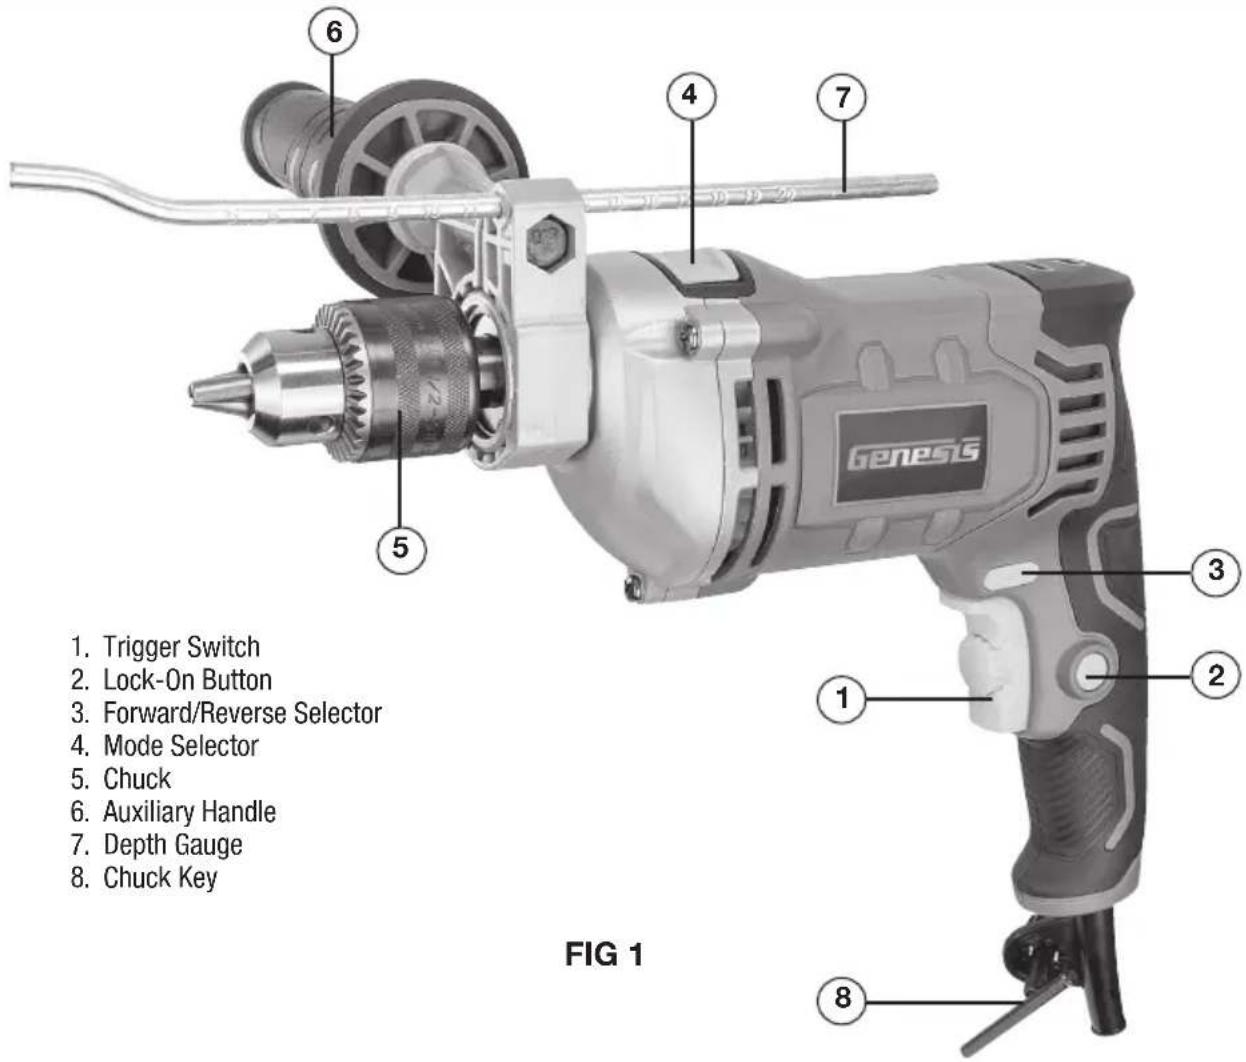
ASSEMBLY & ADJUSTMENTS

WARNING: Always be sure that the tool is checked off and unplugged before adjusting, installing essories, or checking a function of the tool.
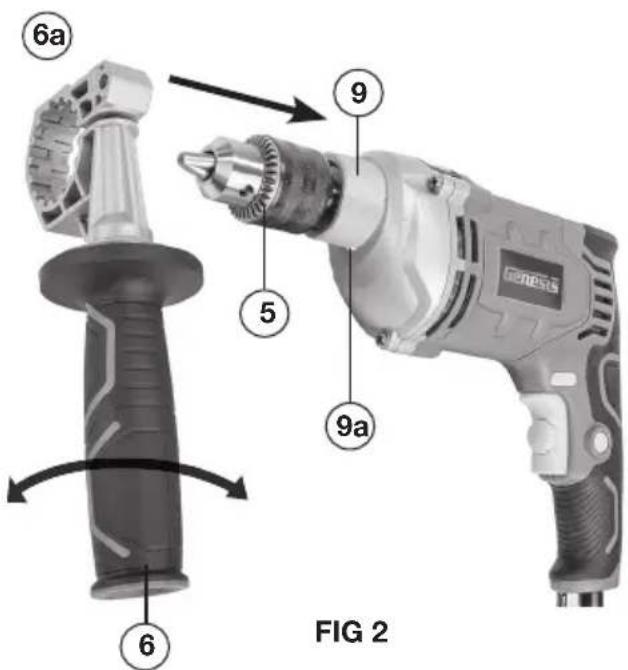
AUXILIARY HANDLE (FIG 2)
The hammer drill is equipped with an auxiliary handle (6) that can be used with either the left or right hand. The handle rotates 360^ around the drill collar (9), allowing placement in the most convenient position.
To Attach the Auxiliary Handle
- Loosen the handle assembly by turning the handle counterclockwise.
- Slide the auxiliary handle over the chuck (5) and onto the collar (9) behind the chuck in the desired position.
NOTE: A small square key (9a) on the bottom of the collar is designed to lock the auxiliary handle in place. Make sure the key engages one of the notches (6a) on the auxiliary handle.
- Tighten securely by turning the auxiliary handle clockwise.
ASSEMBLY & ADJUSTMENTS
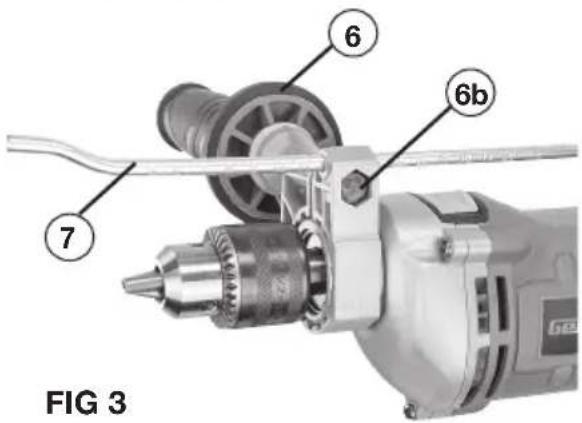
SETTING THE DEPTH GAUGE (FIG 3)
The auxiliary handle of your hammer drill features a metal rod (7) called the depth gauge. Setting the depth gauge allows you to drill holes to a consistent depth repeatedly.
To Set the Depth Gauge:
• Unplug the hammer drill.
- Turn the auxiliary handle counterclockwise (6) and push the hex head of bolt (6b) off its socket to release the depth gauge rod.
- Measure backward from the tip of the drill bit to the desired hole depth, then adjust the depth gauge so its tip aligns with this measurement.
- Tighten the auxiliary handle and lock the depth gauge by turning the handle clockwise.
INSTALLING AND REMOVING BITS
Inspect the drill bit shank and the drill's chuck jaws for dirt or foreign matter and clean them if necessary. Dirt on the drill bit shank or on the chuck jaws can cause misalignment or bit slippage during use. Drill bits larger than the hammer drill's maximum rated capacity may cause the motor to overload and/or gear damage.
To Install a Drill Bit:
• Unplug the hammer drill.
- Open the chuck jaws so the opening is slightly wider than the drill bit being installed.
- Position the drill so the chuck is pointing upward then insert the drill bit, allowing the bit to rest on the bottom of the chuck. For small bits, insert the drill bit so that the bottoms of its flutes are even with the top of the chuck jaws.
- Center the bit in the jaws and hand tighten the jaws by rotating the chuck collar clockwise, being sure the bit is properly aligned in the chuck jaws.
- Insert the chuck key into one of three holes in the chuck, turning the chuck key clockwise to securely tighten the chuck. Do not use a wrench, pliers, or means other than the chuck key to tighten or loosen the chuck.
To Remove the Drill Bit:
• Unplug the hammer drill.
- Loosen the chuck by inserting the chuck key into one of the three holes in the chuck and turn it counterclockwise.
- Remove the drill bit from the chuck.
WARNING: To prevent personal injury, always remove the chuck key from the chuck after each use.
OPERATION
WARNING: Always check that the power supply corresponds to the voltage on the rating name plate.
SWITCH ACTION (FIG 4)
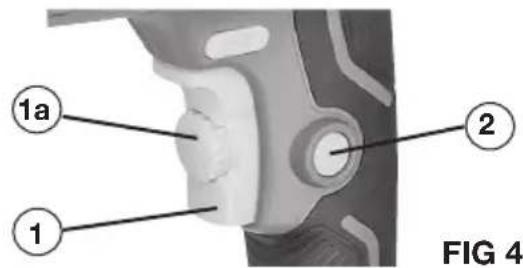
Your hammer drill is equipped with a variable-speed trigger switch (1) that features a speed control dial (1a). The speed control dial can be used to maintain the drill at a specific speed by rotating the dial clockwise to increase speed or counterclockwise to reduce speed.
To Start the Tool, depress the trigger switch and turn the dial to set the desired speed as described above. The drill will maintain this speed while the trigger is held. For extended drilling, engage the lock-on button (2) (refer to the 'LOCK-ON BUTTON' section) to reduce user fatigue.
To Stop the Tool, release the trigger switch if operating manually. If the lock-on button is engaged, press and release the trigger switch.
LOCK-ON BUTTON (FIG 4)
The Lock-On Button (2) is located on the handle of the drill beside the trigger switch. It allows you to operate the drill continuously at a preset speed without needing to hold down the trigger switch.
To Lock the Trigger "ON", pull the trigger switch back fully, depress the lock-on button and release the trigger.
To Unlock the Trigger, squeeze the trigger back completely, then release it without depressing the lock-n button.
OPERATION
FORWARD/REVERSE SELECTOR
Located above the trigger is the forward/reverse selector (3-FIG 1). This selector is designed to allow you to select the direction in which the drill chuck rotates. For drilling, hammer drilling and driving screws, the drill operates in the forward (clockwise) direction. Reverse (counterclockwise) rotation is typically used to back out a drill bit from a hole or for screw removal.
For Forward Rotation, push the selector to the left.
For Reverse Rotation, push the selector to the right.
WARNING: Do not change the direction of rotation until the tool comes to a complete stop. Moving the “forward/reverse” selector while the drill chuck is rotating can cause damage to the tool.
⚠ WARNING: Always check the direction of rotation before tool operation.
WARNING: This drill is not designed for hammering in the reverse or counter-clockwise direction. Failure to comply with this caution may cause property damage.
MODE SELECTOR
The mode selector (4-FIG 1) gives you the ability to operate this tool in two different modes. Drill only setting provides rotation only for driving screws and drilling holes in wood, metal, plastic and other non-concrete material. The rotation only mode is also used for stirring paint, sanding, wire brushing, etc. The second mode provides rotation and hammering action. Rotation with hammering action gives you the ability to bore holes in concrete, asphalt, tile, brick or other similar hard materials.
To Select the Drill Only Mode, move the selector completely to the right, so the drill symbol invisible.
To Select Hammering Action or Hammer Drill Mode, move the selector completely to the left, so the hammer symbol is visible.
NOTE: To engage the hammering mechanism, apply and maintain pressure on the bit. When pressure on the bit is released, the hammering action will stop and the rotation will continue until the tool is switched off.
NOTE: When using the hammer drill mode for drilling into any masonry material like concrete, we recommend that you use carbide-tipped percussion drill bits.
⚠ WARNING: Do not change the operating mode until the tool has come to a complete stop. Moving the mode selector while the drill is operating can cause damage to the tool.
APPLICATIONS
WARNING: Always wear safety goggles or safety glasses with side shields and unplug the tool before changing accessories or making adjustments. Failure to obey this warning may cause serious personal injury.
WARNING: Be prepared for a sudden and tremendous twisting force or kick back exerted by the tool. The tendency for the drill to grab or kick back in the opposite direction is caused by hole breakthrough, the hole becoming clogged with chips or concrete/masonry dust, or by striking hidden reinforcing bar embedded in the concrete.
WARNING: Always maintain a firm grip on both the auxiliary handle and switch handle during drilling and hammer drilling operations. Failure to be prepared may result in loss of tool control and possible serious injury.
WARNING: To prevent personal injury, always remove the chuck key from the chuck after each use.
WARNING: Always check the direction of rotation before operating the tool. The tool must be set for forward or clockwise rotation only. Failure to obey this caution may cause property damage.
DRILLING CONCRETE AND MASONRY PRODUCTS
- Unplug the hammer drill from the power source.
• Install the desired size drill bit and tighten the chuck. - (Important Note: Be sure to use percussion type carbide tipped drill bits.)
- Select the "hammer drill" mode.
- Move the forward/reverse selector to the forward position.
- Set the depth gauge if needed and position the auxiliary handle. Tighten the auxiliary handle.
- Secure the workpiece in a vise, with clamps or other means if necessary to keep the workpiece from spinning as the drill bit rotates.
- Mark the location(s) on workpiece where the holes are to be drilled.
- Be sure you are wearing appropriate eye protection, hearing protection, and respiratory protection. You may
want to wear gloves with padded palms to minimize vibration to hands and arms.
- Before plugging the hammer drill into a power source, make sure the "Lock-On" button is not engaged and the trigger switch operates properly.
- Plug the hammer drill into a power source.
- Position the drill bit at the desired location for the hole.
- Hold the drill firmly, apply moderate downward pressure and slowly pull the trigger switch.
- Keep the tool in position, preventing the drill bit from wandering. (If the hammer drill bounces or “dances” on the workpiece, increase the downward pressure on the drill.)
- Increase the drill speed as the hole becomes established, maintaining steady and firm downward pressure. (Do not force the tool or apply side pressure, which may cause the hole to become elongated.)
- To prevent the hole from clogging with dust or chips that bind the drill bit, occasionally pull the bit partially out of the hole while the tool is running to help clear accumulated debris from the bit flutes. Do not use water to settle the dust since it will clog the bit flutes causing the bit to bind in the hole.
- If the bit strikes reinforcing bar, stop the tool and remove the bit from the hole. Do not attempt drilling through the reinforcing bar.
- When hole is drilled to the desired depth, withdraw the bit from the hole, and turn the drill off by releasing the trigger switch.
- After drilling is completed, you may find the hole partially filled with dust. Use a “blow-out bulb” or compressed air to clean the dust from the hole. (Note: Use a mask or respirator to prevent inhalation of the dust created by drilling or clearing holes in concrete or similar materials.)
DRILLING IN WOOD, COMPOSITE MATERIALS AND PLASTICS
Although most “twist” drill bits are designed for drilling into metal, they are the most common bit used for boring holes in wood, wood composites and plastics. There are many types of drill bits available that may be more appropriate or designed specifically for boring the type of hole you desire. Additional drill bits to choose from include: spade bits, brad bits, self-feed bits, hole saws, circle cutters, multi-spur bits and fastener bits, to name just a few! Woodworking publications and tool supply store personnel are good sources to help you select the drill bit that best satisfies your needs.
- With the tool unplugged, install the appropriate bit into the chuck and tighten the chuck.
- Place the forward/reverse switch in the forward position.
- Mark the location(s) on workpiece where the holes are to be drilled.
- Secure the workpiece with clamps or other means.
- Wear safety goggles or safety glasses with side shields. Wear a dust mask or respirator to prevent inhalation of wood dust.
DRILLING IN METAL
NOTE: Use good, quality high-speed steel twist drill bits.
- With the drill unplugged, install the bit and perform the pre-drilling checks as stated in the preceding wood drilling section.
- To make starting the hole easier and keep the bit from "walking" on the workpiece, use a center punch to make a small impression in the metal. Place the drill bit tip into the impression and start the drill by slowly depressing the trigger switch. Apply only enough pressure to keep the bit cutting into the metal.
WARNING: DO NOT FORCE the tool.
Too much pressure may cause bits to break, resulting in bodily injury. Excessive pressure will cause bits to overheat, damaging the drill bit. Too little pressure keeps the bit from cutting, dulling the bit edges due to excessive friction.
- If drilling large holes, first drill a smaller hole and then enlarge it to the desired size.
- Using lubricants, such as oil on the point will help cool the bit, increase drilling action and extend drill bit life.
- Clamp a backing block to the workpiece to prevent binding and distortion when the bit breaks through the metal.
MAINTENANCE
CLEANING
Avoid using solvents when cleaning plastic parts. Most plastics are susceptible to damage from various types of commercial solvents and may be damaged by their use. Use clean cloths to remove dirt, dust, oil, grease, etc.

WARNING: Do not at any time let brake s, gasoline, petroleum-based products, penetrating etc., come in contact with plastic parts. Chemicals damage, weaken or destroy plastic which may lt in serious personal injury.
Electric tools used on fiberglass material, wallboard, spackling compounds, or plaster are subject to accelerated wear and possible premature failure because the fiberglass chips and grindings are highly abrasive to bearings, brushes, commutators, etc. Consequently, we do not recommended using this tool for extended work on these types of materials. However, if you do work with any of these materials, it is extremely important to clean the tool using compressed air.
LUBRICATION
This tool is permanently lubricated at the factory and requires no additional lubrication.
TWO-YEAR WARRANTY
This product is warranted free from defects in material and workmanship for 2 years after date of purchase. This limited warranty does not cover normal wear and tear or damage from neglect or accident. The original purchaser is covered by this warranty and it is not transferable. Prior to returning your tool to store location of purchase, please call our Toll-Free Help Line for possible solutions.
THIS PRODUCT IS NOT WARRANTED IF USED FOR INDUSTRIAL OR COMMERCIAL PURPOSES. ACCESSORIES INCLUDED IN THIS KIT ARE NOT COVERED BY THE 2 YEAR WARRANTY.
TOLL-FREE HELP LINE
For questions about this or any other GENESISTM Product, please call Toll-Free: 888-552-8665.
Or visit our web site: www.genesispowertools.com
©Richpower Industries, Inc. All Rights reserved
Richpower Industries, Inc.
736 Hampton Road
Williamston, SC 29697
Printed in China, on recycled paper

Richpower Industries, Inc.
736 Hampton Road
Williamston, SC USA
www.genesispowertools.com
- Look for this symbol to point out important safety precautions. It means attention!!! Your safety is involved.
- GENERAL SAFETY RULES
- WORK AREA SAFETY
- ELECTRICAL SAFETY
- PERSONAL SAFETY
- TOOL USE AND CARE
- SERVICE
- SAVE THESE INSTRUCTIONS
- EXTENSION CORDS
- SYMBOLS
- UNPACKING & CONTENTS
- SPECIFICATIONS
- PRODUCT OVERVIEW
- ASSEMBLY & ADJUSTMENTS
- AUXILIARY HANDLE (FIG 2)
- To Attach the Auxiliary Handle
- SETTING THE DEPTH GAUGE (FIG 3)
- To Set the Depth Gauge:
- INSTALLING AND REMOVING BITS
- To Install a Drill Bit:
- To Remove the Drill Bit:
- OPERATION
- SWITCH ACTION (FIG 4)
- LOCK-ON BUTTON (FIG 4)
- FORWARD/REVERSE SELECTOR
- MODE SELECTOR
- APPLICATIONS
- DRILLING CONCRETE AND MASONRY PRODUCTS
- DRILLING IN WOOD, COMPOSITE MATERIALS AND PLASTICS
- DRILLING IN METAL
- WARNING: DO NOT FORCE the tool.
- MAINTENANCE
- CLEANING
- LUBRICATION
- TWO-YEAR WARRANTY
- TOLL-FREE HELP LINE
Brand : Genesis
Model : GHD1275B
Category : Multitools