JBS-1000BK - Blender Brentwood - Free user manual and instructions
Find the device manual for free JBS-1000BK Brentwood in PDF.

User questions about JBS-1000BK Brentwood
0 question about this device. Answer the ones you know or ask your own.
Ask a new question about this device
Download the instructions for your Blender in PDF format for free! Find your manual JBS-1000BK - Brentwood and take your electronic device back in hand. On this page are published all the documents necessary for the use of your device. JBS-1000BK by Brentwood.
USER MANUAL JBS-1000BK Brentwood
natural_image
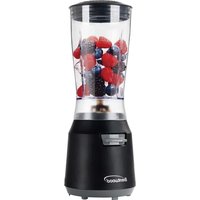
Black blender with visible control buttons and brand logo (no text or symbols on body)Operating and Safety Instructions
FOR INDOOR HOUSEHOLD USE ONLY
When using this or any other electrical appliance, always follow these basic safety precautions, especially when children are present.
READ ALL THE INSTRUCTIONS BEFORE USE.
WARNING: To reduce the risk of fire, electric shock, serious personal injury and property damage, please note the following:
- Ensure your blender matches your home's electrical supply. Using the wrong voltage may damage the appliance or pose a fire hazard.
- Before each use, inspect the blender for any visible damage. If any parts are broken or damaged, do not use the blender and refer to the warranty policy on page 9 for guidance.
- Unplug the blender from the outlet when it is not in use, especially before assembling, disassembling, or cleaning, to prevent accidental start-ups and reduce electrical hazards.
- Do not put the motor base in water or any other liquid. Wipe it down with a damp cloth instead. Moisture can damage the internal electrical components and create a risk of shock.
- Before turning on the blender, make sure all parts—jar, lid, blade base—are correctly fitted and securely locked into place to avoid leaks or malfunctions.
- Only fill the blender up to the maximum fill line marked on the jar. Overfilling can cause the mixture to spill out or stress the motor, leading to damage or safety hazards.
- Always double-check that the lid is on tightly before turning on the blender to avoid spills or splattering of ingredients, especially when blending liquids.
- Hard items like ice, frozen fruits, or nuts can put extra strain on the motor, dull the blades, or crack the jar. To reduce the risk, cut the ingredients into smaller pieces and add some liquid before blending.
- If blending hot items, remove the center of the lid to let steam escape and cover it with a towel to prevent splashes.
- Lightly hold the lid in place while blending, especially with full or high-speed blending. Pressure from ingredients can occasionally cause the lid to lift.
- Begin blending on a low setting and gradually increase to the desired speed. This prevents sudden surges that can splash ingredients or cause motor strain.
- Do not run the blender for long continuous periods. If blending in batches, let the motor cool down in between to prevent overheating and burnout.
-
Running the motor without any contents inside can overheat the blades and motor, shortening the lifespan of the blender and potentially causing damage.
-
Do not insert your fingers, spoons, or any tools into the blender jar while it is operating. Always turn it off and unplug it before using a spatula or scraper.
- Always wait until the blades stop spinning completely before removing the lid or taking off the jar from the base. This helps avoid accidental injury.
- Wash the jar, lid, and blades promptly after use to prevent food from hardening and sticking. This also helps prevent odor buildup and bacteria growth.
- Blades are extremely sharp. Use a small brush or sponge on a stick to clean around them instead of using your hands, which can get cut easily.
- After washing, make sure all parts—especially the blade base—are thoroughly dried before reassembling or storing to avoid rust and maintain hygiene.
- Always store and use the blender out of reach of children. If children are helping in the kitchen, closely supervise them to prevent injuries.
SPECIAL INSTRUCTIONS:
- Overheat protection is a safety feature designed to prevent the blender from reaching dangerously high temperatures that could damage the blender or pose safety risks. If it happens, follow these safety precautions to ensure safe handling and avoid damage or injury:
- Immediately switch off the blender using the power button. If there is no response, unplug it from the power source.
- Allow the blender to sit untouched and cool naturally. This could take anywhere from 5 to 20 minutes.
- Once the blender has cooled, check the cause of the overheating. Below are the common causes:
■ Running the blender for too long without breaks.
■ Blending thick or dense mixtures without enough liquid.
■ Overloading the blender jar.
■ Blades getting jammed or obstructed.
■ Poor ventilation around the blender base.
- Plug it back in and turn it on again. If the blender operates normally, the overheat protection just did its job.
- If issues persist, refer to the warranty policy on page 9 for guidance.
- A short power supply cord is provided to reduce the risk of becoming entangled in or tripping over a longer cord. Using an extension cord with the blender is not recommended. However, if one must be used:
- The marked electrical rating of the extension cord must be at least as great as that of the blender.
○ Arrange the extension cord so that it does not drape over the countertop or tabletop where it can be tripped over or pulled.
WARNING: The blender is equipped with a polarized plug (one blade is wider than the other) to reduce the risk of electrical shock, which is a safety feature. The plug is designed to fit into a polarized outlet in only one direction. If you are unable to insert the plug into the outlet, try reversing it. If the plug still does not fit, contact a qualified electrician. Never use the plug with an extension cord unless you can fully insert the plug into the extension cord. Do not alter the plug or attempt to bypass its safety features.

text_image
WARNINGFOR HOUSEHOLD USE ONLY! PLEASE READ INSTRUCTIONS BEFORE USE & SAVE FOR FUTURE REFERENCE.
text_image
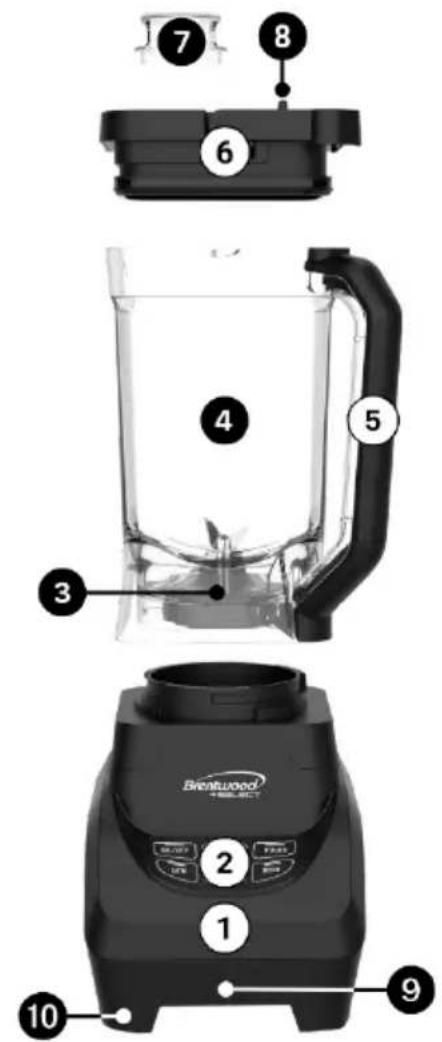
7 8 6 4 5 3 2 1 10 9 Breatwood| 1 | Base |
| 2 | Control Panel |
| 3 | Blade Assembly |
| 4 | Jar (2L/68oz) |
| 5 | Handle |
| 6 | Lid with Handle |
| 7 | Measuring Cap (30mL/1oz) |
| 8 | Lid Unlock Button |
| 9 | Cord Storage (Bottom) |
| 10 | Anti-Slip Feet |
| Control Panel | |
| ON/OFF | Turns the blender on or off. |
| Used to start, stop, or interrupt any blending process. | |
| LOW | Activates the lower speed. |
| Ideal for gentle blending tasks such as:Soft fruits and vegetablesMixing liquidsLight batters and saucesStarting a blend gradually before increasing speed | |
| ICE CRUSH | Designed to break down ice and other hard, frozen ingredients. |
| Uses short, high-power bursts to shatter ice cubes efficiently. | |
| Great for:Frozen drinks like smoothies and slushiesChopping ice without damaging the motor or bladesPreparing frozen fruits for blending | |
| SMOOTHIE | A pre-programmed or dedicated mode for making smooth, creamy blends. |
| Typically cycles through different speeds automatically for the best consistency. | |
| Ideal for:·Fruit and vegetable smoothies·Protein shakes·Blended yogurt or milk-based drinks | |
| PULSE | Provides short bursts of maximum power if the button is held. |
| Gives you more control for coarse or quick blending. | |
| Ideal for:·Chopping ingredients like onions or nuts·Mixing chunky salsas·Breaking up ice or starting thick blends | |
| HIGH | Activates the higher speed. |
| Used for powerful blending tasks that need more force and faster blade movement. | |
| Ideal for:·Crushing ice·Blending frozen fruits·Making nut butters, thick smoothies, or purees | |
BEFORE USING THE PROFESSIONAL ELECTRIC BLENDER
- Check that the blender and all its parts—the base, jar, lid, and measuring cap—are present and undamaged.
- To disassemble the blender:
a. Measuring cap: Rotate it counterclockwise until it stops, then pull it up from the lid.
b. Lid: Push the lid unlock button toward the measuring cap—the handle will lift up suddenly. Then, gently pull the lid up and off the jar using the handle.
c. Jar: Using the handle, rotate the jar counterclockwise, then lift it straight up from the base.
NOTE: The blade assembly is not removable.
- Wash and dry the jar, lid, and measuring cap using warm, soapy water; then rinse and dry each part thoroughly.
WARNING: Do not immerse the blender in water or any other liquid. Only the jar and measuring cap are dishwasher safe.
- Wipe the base with a clean, damp cloth to remove any dust or residue.
- To reassemble the blender:
a. Jar: Place it onto the base with the handle positioned on the right side, then rotate the jar clockwise using the handle to secure.
b. Lid: Press it firmly into the top of the jar with the handle positioned on the right side. Then, push the handle down until you hear a click—this locks the lid in place and prevents it from being removed.
c. Measuring cap: Insert it into the lid and rotate it clockwise to secure.
USING THE PROFESSIONAL ELECTRIC BLENDER
- Place the blender on a flat, stable surface.
- Remove the lid and add the ingredients into the jar.
- Place the lid back securely and plug in the power cord.
- Press the "ON/OFF" button to turn on the blender, then choose your desired mode.
- After blending, remove the lid and lift the jar off the base to pour the blended ingredients into a glass.
- If blending more, quickly rinse the jar before adding new ingredients.
- If finished, press the "ON/OFF" button to turn off the blender, unplug the power cord for safety and place the jar in the sink for cleaning.
CLEANING AND MAINTENANCE
- To disassemble the blender:
a. Measuring cap: Rotate it counterclockwise until it stops, then pull it up from the lid.
b. Lid: Push the lid unlock button toward the measuring cap—the handle will lift up suddenly. Then, gently pull the lid up and off the jar using the handle.
c. Jar: Using the handle, rotate the jar counterclockwise, then lift it straight up from the base.
NOTE: The blade assembly is not removable.
- Wash and dry the jar, lid, and measuring cap using warm, soapy water; then rinse and dry each part thoroughly.
WARNING: Do not immerse the blender in water or any other liquid. Only the jar and measuring cap are dishwasher safe.
- Wipe the base with a clean, damp cloth to remove any residue.
- To reassemble the blender:
a. Jar: Place it onto the base with the handle positioned on the right side, then rotate the jar clockwise using the handle to secure.
b. Lid: Press it firmly into the top of the jar with the handle positioned on the right side. Then, push the handle down until you hear a click—this locks the lid in place and prevents it from being removed.
c. Measuring cap: Insert it into the lid and rotate it clockwise to secure.
- Store the blender in a dry, safe place until next use.
ONE YEAR LIMITED WARRANTY
Write down the following information about this appliance to better help you obtain assistance or service if you ever need it.
CUSTOMER RECORD
Date of Purchase: ____ Store/Dealer: ____
Model/Item No: ____
THIS WARRANTY APPLIES TO THE APPLIANCES PURCHASED AND USED IN THE CONTINENTAL U.S. AND CANADA ONLY. This is the only express warranty for this appliance and is in lieu of any other warranty or condition. This appliance is warranted to be free from defects in material and workmanship for a period of one (1) year from the date of original purchase. During this period, your exclusive remedy is repair or replacement of this appliance, at our option. However, you are responsible for all costs associated with returning this appliance or part to us under this warranty to you. If this appliance or part is no longer available, we will replace it with a similar one of equal or greater value. This warranty does not cover glass, filters, wear from normal use, use not in conformity with the printed directions or damage to this appliance resulting from accident, alteration, abuse or misuse. THIS WARRANTY EXTENDS ONLY TO THE ORIGINAL CONSUMER PURCHASER. KEEP THE ORIGINAL SALES RECEIPT, AS PROOF OF PURCHASE IS REQUIRED TO MAKE A WARRANTY CLAIM. This warranty is void if this appliance is used for other than single-family household use or subjected to any voltage and waveform other than what is specified on the rating label (e.g., 120V 60Hz). We exclude all claims for special, incidental and consequential damages caused by breach of express or implied warranty. All liability is limited to the amount of the purchase price. Every implied warranty, including any statutory warranty or condition of merchantability or fitness for a particular purpose, is disclaimed except to the extent prohibited by law, in which case such warranty or condition is limited to the duration of this written warranty. This warranty gives you specific legal rights. You may have other legal rights that vary depending on where you live. Some states do not allow limitations on implied warranties or special, incidental or consequential damages, so the foregoing limitations may not apply to you. To make a warranty claim, do not return this appliance to the store.
TO OBTAIN WARRANTY SERVICE AND/OR TROUBLESHOOTING INFORMATION:
Call Customer Service at 1-888-903-0060 in the U.S.
Monday through Friday: 9:00am – 5:00pm PST.
U.S. Customers Please Email: warranty@brentwoodus.com
Canadian Customers Please Email: canada.warranty@brentwoodus.com
Go Online at www.brentwoodus.com
PRECAUCIONES IMPORTANTES

© 2025 Brentwood Appliances, Inc.