JB-199 - Blender Brentwood - Free user manual and instructions
Find the device manual for free JB-199 Brentwood in PDF.

User questions about JB-199 Brentwood
0 question about this device. Answer the ones you know or ask your own.
Ask a new question about this device
Download the instructions for your Blender in PDF format for free! Find your manual JB-199 - Brentwood and take your electronic device back in hand. On this page are published all the documents necessary for the use of your device. JB-199 by Brentwood.
USER MANUAL JB-199 Brentwood
text_image
Brentwood® Appliances© 2021 Brentwood Appliances, Inc.
MULTI PRO-BLENDER
LICUADORA MULTI-PRO / MÉLANGEUR PROFESSIONNEL
Model No.: JB-199

natural_image
Assorted kitchen blender units including a plastic blender, black plastic cup, and black plastic holder (no text or symbols visible)Operating and Safety Instructions
FOR INDOOR HOUSEHOLD USE ONLY
When using this or any other electrical appliance, always follow these basic safety precautions, especially when children are present.

READ ALL INSTRUCTIONS BEFORE USE
WARNING-To reduce the risk of fire, electric shock, serious personal injury and proper damage please note the following:
- This product is not intended for use by children. Keep the product out of the reach of children and pets. Extra caution is necessary when using this appliance near children.
- Always ensure the product is unplugged from the electrical outlet and allowed to cool before assembling, disassembling, relocating, or cleaning it.
- Do not leave the product unattended while it is in use. Always unplug the product from the electrical outlet when not in use.
- Do not immerse the Base, Power Cord, or Plug of this product in or expose the Power Cord or Plug to water or other liquids.
- Do not touch hot surfaces. Use handles or knobs when handling product. Use protective oven mitts or gloves when removing the Lid or handling hot containers to avoid burns or personal injury.
- Take proper precautions to prevent burns, fire, or personal or property damage as this appliance generates heat and steam during use.
- Do not use attachments not recommended or sold by the product manufacturer. Attachments, when furnished, may become hot during use. Allow any attachments to cool before handling them.
- Do not place on or near a hot gas or electric burner, in a heated oven, or other heated surfaces.
- Use extreme caution when moving an appliance containing hot food, water, or other liquids.
- Use the product in a well-ventilated area. Keep at least 4-6 inches of space on all sides of the product to allow adequate air circulation.
- Use appliance on a table or flat surface. Keep the product away from curtains, wall coverings, clothing, dishtowels, or other flammable materials.
- Do not plug or unplug the product from the electrical outlet with a wet hand.
- This product is intended solely for non-commercial, non-industrial, household use in cooking of food for human consumption; do not use the product outdoors or for any other purpose.
- Do not operate the product empty.
- Do not let cord hang over edge of table or counter where it may be tripped over or pulled. Do not allow cord to touch hot surfaces.
- Do not operate the product if it has a damaged or cut Power Cord or plug, if wires are exposed, if it malfunctions, if it is dropped or damaged, or if the Motor Housing is dropped in or exposed to water.
- This product has no user-serviceable parts. Do not attempt to examine or repair this product yourself. Please review the Warranty Policy on Page 8.
- Do not put any stress on the power cord where it connects to the product, as the power cord could fray and break.
SPECIAL INSTRUCTIONS:
- Keep hands and utensils out of container while blending to reduce the risk of severe injury to the blender or a personal injury. A scraper may be used but only when blender is not running.
- To reduce the risk of injury, always completely assemble the blade and cup before placing on the Power Base.
- Never Microwave with the blade or solid lid still attached. Remove the blade or solid lid and twist on a Shaker/Steamer top.
- Do not defrost frozen beverages in Blender Cups. Even if the container is open, pressure can build up. This can cause the container to burst, possibly resulting in injury.
- A short power supply cord is provided to reduce the risk of becoming entangled in or tripping over a longer cord. An extension cord is not recommended for use with this product, but if one must be used:
— The marked electrical rating must be at least as great as that of the product.
- If the product is of a 3-prong grounding type, the extension cord must be a grounding-type 3-wire cord.
- Arrange the extension cord so that it will not drape over the countertop or tabletop where it can be tripped over or pulled.
WARNING: This product is equipped with a polarized plug (one blade is wider
than the other blade) to reduce the risk of electrical shock. This is a saf feature. The plug will fit into a polarized outlet only one way. If you are unable to insert the plug into the electrical outlet, try reversing the plug. If the plug still does not fit, contact a qualified electrician. Never use the plug with an extension cord unless you can fully insert the plug into the extension cord. Do not alter the plug. Do not attempt to defeat the safety purpose of the polarized plug.
Before First Use
IMPORTANT: Please check all packaging material carefully before discarding as there may be accessory parts contained within the packaging material.
- Before use, wash all the cups and accessories in warm soapy water. Rinse and dry well.
Attention: First use may cause a slight odor or small smoking upon heating, it is normal. This is a result of the heating element chemical reaction. It quickly goes away.
SAVE THESE INSTRUCTIONS
FOR FUTURE REFERENCE
Parts:
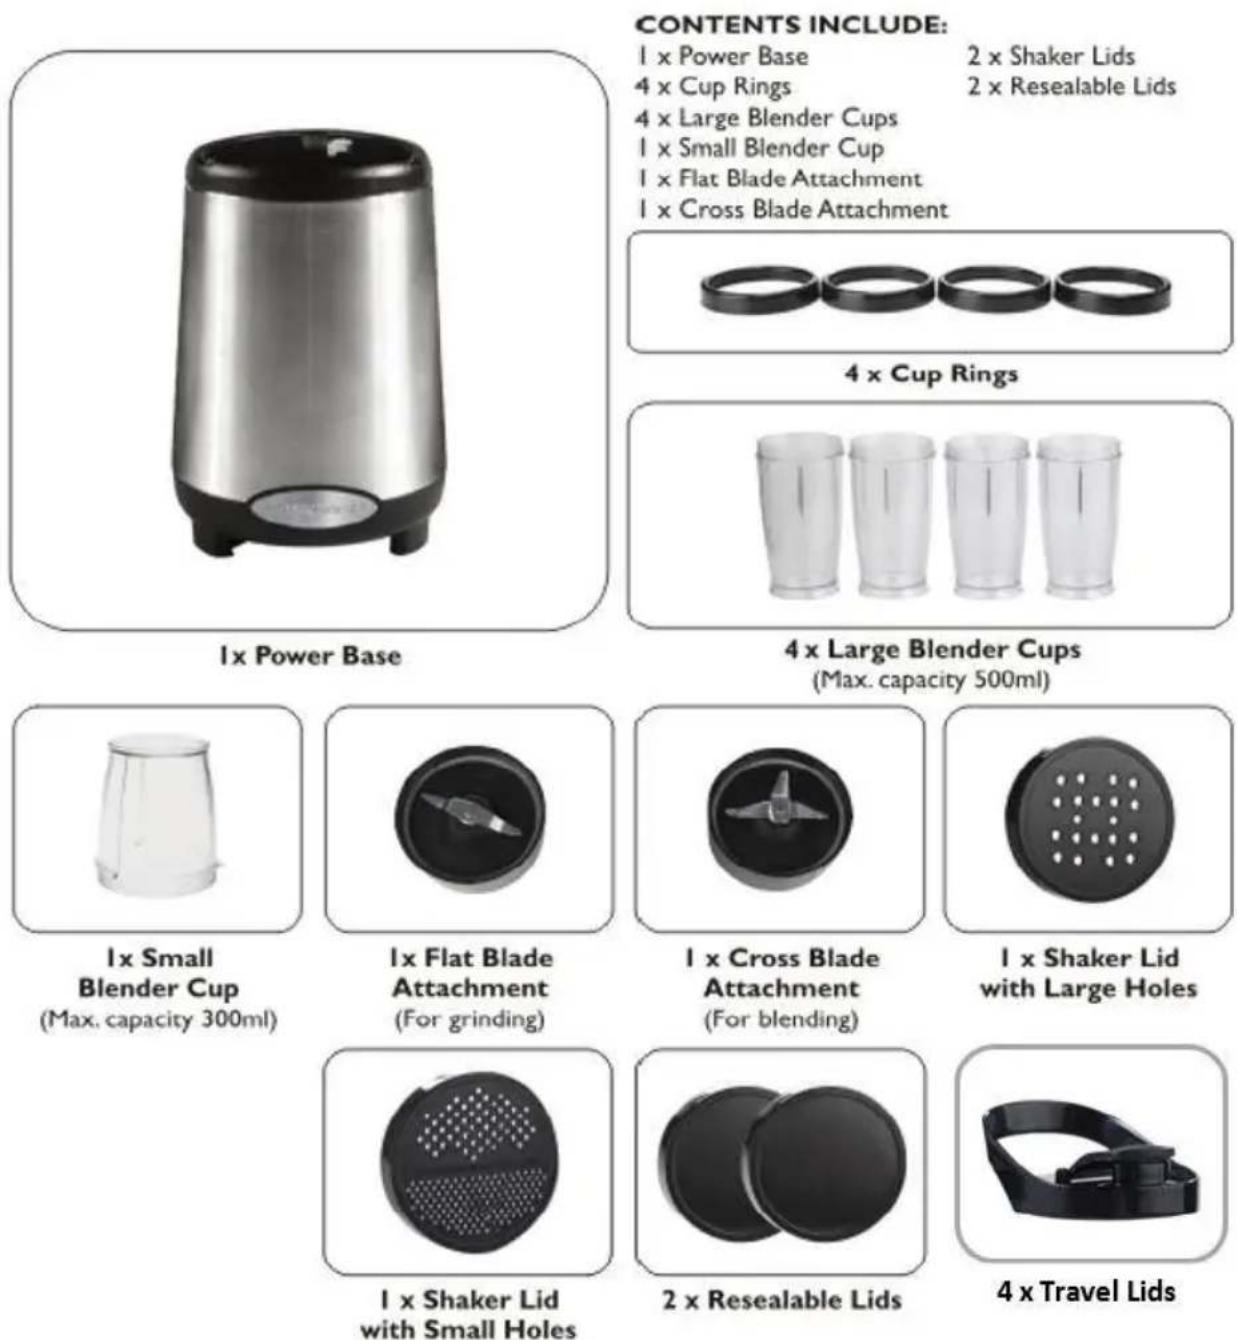
CONTENTS INCLUDE:
1 x Power Base 2 x Shaker Lids
4 x Cup Rings 2 x Resealable Lids
4 x Large Blender Cups
I x Small Blender Cup
I × Flat Blade Attachment
I x Cross Blade Attachment
Large & Small Blending Cups
Allows you to make and serve drinks is the same cup. These cups can also be used to mix, cook, and store your ingredients.
Power Base
The Power Base is the heart of the Multi Pro-Blender. Place on the Blending Cups onto the High-Torque Power Base and press down.
Blades
Cross Blade: For Chopping, grating, and blending foods like onions, cheeses, meats, vegetables, and fruit.
Flat Blade: For whipping cream and grinding hard foods like coffee beans and spices. Both are dishwasher safe and contain a plastic gasket for an airtight fit.
NOTE: Check blade after dishwashing to ensure gasket is still inside as the heat from some dishwashers can cause them to become loose.
Lids and Lips Rings
Lip Rings: Cover threads of cup for comfort.
Sport Lid: Flip top sports lid with handle makes it convenient to take your favorite smoothie on the go.
Re-sealable Lids: Fits right on short and tall Blending cups to keep leftovers fresh for days.*
*Note: Do not use in Microwave
Shaker / Steam Lids: For steaming foods in the microwave. The one with large holes is for coarse ingredients like cheese, while the other is for finely ground spices. (Can also be used as a strainer)
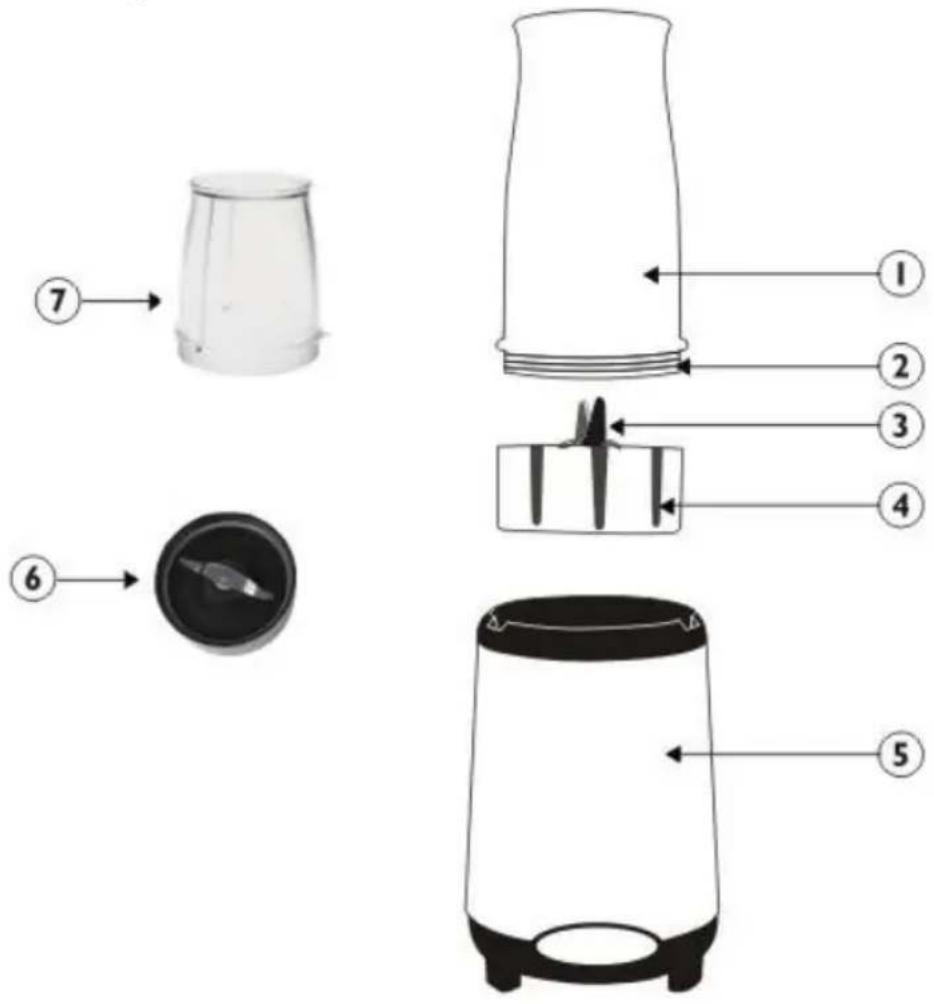
text_image
Diagram of a blender with labeled parts including a plastic cup, handle, and motor casing- Blender Cup
-
Power Base
-
Thread 6. Additional Blade Collar
-
Blades 7. Small Blender Cup
-
Blade Collar
Using Your Multi Pro-Blender:
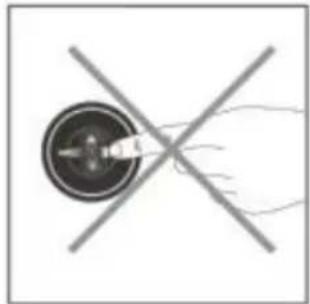
WARNING: Avoid contact with moving parts.
- Load Ingredients into the Large or Small Blending Cups. Do not overload and always cut ingredients into smaller pieces.
- Twist on the Cross or Flat Blade until the blade and cup have a tight seal.
- Connect blender cup to the Power Base, blade attachment end onto the top of the base. Blender will START as soon as the blender cup is twisted into position. Align the tabs on blender cup to the power base before twisting clockwise until it locks into position.
Note: Do not blend for more than one minute at a time.
- To STOP, turn cup counterclockwise until it stops. Switch power off before removing the blender cup from the Power Base.
- Turn Blender Cup around so that the blade attachment end is facing up. Unscrew the blade attachment off the cup. Attach appropriate lid or ring and Enjoy!
natural_image
Cross-shaped diagram with a central circular object and radiating lines, no text or symbols present.
natural_image
Illustration of a blender with a black lid and white body, showing internal structure (no text or symbols)
natural_image
Illustration of a kitchen blender with a glass top and black base (no text or symbols)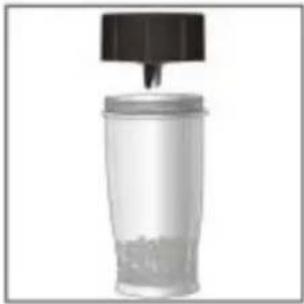
natural_image
Close-up of a small glass bottle with a black cap and liquid, no visible text or symbolsCleaning Your Multi Pro-Blender:
WARNING: Always unplug the product and allow it to cool before cleaning or storing it.
NOTICE: To avoid damaging the product, do not use abrasive cleaners or scoring pads.
Caution! Do not submerge in water and always unplug before cleaning.
- Remove the Blending cup from the Power Base.
- Blending Cup, Blades, and Lid can all be washed with warm soapy water and a nonabrasive sponge.
- To clean the Power Base, wipe the surfaces with a soft, damp cloth. Do not immerse Power Base in water or any other liquid.
• Dry all parts thoroughly before storing or using again.
| Recipe | Ingredients | Instructions |
| Breakfast Smoothie | 2/3 Cup Fresh or Frozen Blueberries1⁄2 Cup Organic Vanilla Yogurt1 Banana, sliced1⁄2 Cup Cold Fruit Juice, Your Choice1 Tablespoon Wheat Germ | Load all ingredients into Blending cup and blend with cross blade until smooth. |
| Protein Shake | 1 Cup Low Fat Milk1⁄2 Cup Plain Low-Fat Yogurt1⁄4 cup Natural Berry Juice1 Banana, sliced2Tbsp. Protein Powder1tsp. Wheat Germ1Tbsp. HoneyPinch of Nutmeg (Optional) | Load all ingredients into Blending cup and blend with Cross Blade until smooth. |
| Green Machine | 1 Cup Kale, chopped2 Broccoli Florets1 Celery Stalk, sliced1 Lemon Slice1⁄2 Green Bell Pepper, sliced1/8 Green Apples, sliced1⁄2 Cup waterGinger, to taste | Load all ingredients into Blending cup and blend with Cross Blade until smooth. |
| Ground Coffee | Coffee Beans of your choice | Load ingredients into small Blending cup and blend with Flat Blade until desired consistency. |
| Tomato Soup | 1 Large Tomato, sliced1 Garlic Clove, sliced1⁄2 Cup Chicken or Vegetable Stock1/3 Cup Cream (Milk or Nonfat Yogurt)Makes 1 Bowl | 1. Load Tomato, garlic, and Stock into Tall Blending Cup.2. Twist on Shaker / Steamer Top and Microwave for 2-3 minutes.3. Open cup and attach Cross Blade and bler until smooth. Enjoy. |
| Basil Pesto | 1⁄2 Cup Fresh Basil Leaves4 Large Garlic Cloves1/3 Cup Shredded Romano Cheese3 Tbsp. Pine Nuts2 tsp. Minced Parsley1⁄2 Tsp. Salt1⁄4 Cup Plus 1 Tbsp. Extra Virgin Olive Oil | Load ingredients into small Blending cup and blend with Cross Blade attachment until desired consistency. |
ONE YEAR LIMITED WARRANTY
Write down the following information about your appliance to better help you obtain assistance or service if you ever need it.
CUSTOMER RECORD
Date of Purchase ____ Store/Dealer ____
Model/Item No: ____
THIS WARRANTY APPLIES TO PRODUCTS PURCHASED AND USED IN THE CONTINENTAL U.S. AND CANADA ONLY. This is the only express warranty for this product and is in lieu of any other warranty or condition. This product is warranted to be free from defects in material and workmanship for a period of one (1) year from the date of original purchase. During this period, your exclusive remedy is repair or replacement of this product, at our option; however, you are responsible for all costs associated with returning the product to us and our returning a product or component under this warranty to you. If the product or component is no longer available, we will replace with a similar one of equal or greater value. This warranty does not cover glass, filters, wear from normal use, use not in conformity with the printed directions, or damage to the product resulting from accident, alteration, abuse, or misuse.
THIS WARRANTY EXTENDS ONLY TO THE ORIGINAL CONSUMER PURCHASER. KEEP THE ORIGINAL SALES RECEIPT, AS PROOF OF PURCHASE IS REQUIRED TO MAKE A WARRANTY CLAIM.
This warranty is void if the product is used for other than single-family household use or subjected to any voltage and waveform other than what is specified on the rating label (E.G., 120V\~60Hz). We exclude all claims for special, incidental, and consequential damages caused by breach of express or implied warranty. All liability is limited to the amount of the purchase price. Every implied warranty, including any statutory warranty or condition of merchantability or fitness for a particular purpose, is disclaimed except to the extent prohibited by law, in which case such warranty or condition is limited to the duration of this written warranty. This warranty gives you specific legal rights. You may have other legal rights that vary depending on where you live. Some states do not allow limitations on implied warranties or special, incidental, or consequential damages, so the foregoing limitations may not apply to you. To make a warranty claim do not return this appliance to the store.
TO OBTAIN WARRANTY SERVICE AND/OR TROUBLESHOOTING INFORMATION:
Call Customer Service at 1-888-903-0060 in the U.S.
Monday through Friday: 9:00am – 5:00pm PST.
U.S. Customers Please Email: warranty@brentwoodus.com
Canadian Customers Please Email: canada.warranty@brentwoodus.com
Go online at www.brentwoodus.com
natural_image
Simple line drawing of a glass cup with a numbered arrow pointing to it (no text or symbols on the cup itself)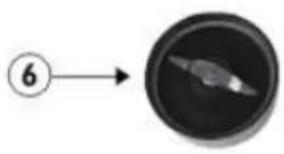
natural_image
Simple diagram showing a numbered circle pointing to a circular object with a pointer (no text or symbols)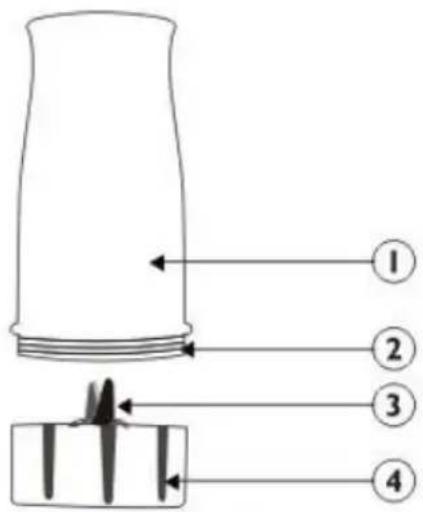
text_image
Diagram of a mechanical component with numbered parts and directional arrows indicating flow or movement.
natural_image
Simple line drawing of a cylindrical container with a label pointing to the side (no text or symbols on the object itself)natural_image
Four-step illustration of a blender being added to a small container, showing step-by-step cleaning and packaging (no text or symbols)Limpieza del Multi Pro-Blender:
RECOMMANDATIONS ADDITIONNELLES:
text_image
Diagram of a mechanical component with numbered parts labeled 1 to 4, showing internal structure and assembly.natural_image
Simple line drawing of a cylindrical container with a label pointing to the side (no text or symbols on the object itself)Tasses à mélanger
natural_image
Cross-shaped diagram with a central circular object and radiating lines, no text or symbols present.
natural_image
Illustration of a blender with a black lid and white base (no text or symbols)
natural_image
Illustration of a kitchen blender with a glass top and black base (no text or symbols)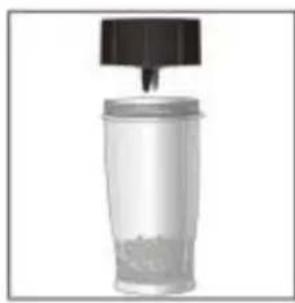
natural_image
Close-up of a small glass plastic container with a black lid and cap, containing granular material (no text or symbols visible)© 2021 Brentwood Appliances, Inc.