1AC-4182C-WS-N - Surveillance Camera ZOSI - Free user manual and instructions
Find the device manual for free 1AC-4182C-WS-N ZOSI in PDF.


User questions about 1AC-4182C-WS-N ZOSI
0 question about this device. Answer the ones you know or ask your own.
Ask a new question about this device
Download the instructions for your Surveillance Camera in PDF format for free! Find your manual 1AC-4182C-WS-N - ZOSI and take your electronic device back in hand. On this page are published all the documents necessary for the use of your device. 1AC-4182C-WS-N by ZOSI.
USER MANUAL 1AC-4182C-WS-N ZOSI
natural_image
Pure technical line drawing of a cylindrical mechanical component with concentric circular grooves (no text or symbols)4-in-1 Security Camera
Day/Night
INSTRUCTION MANUALZ18
Introduction
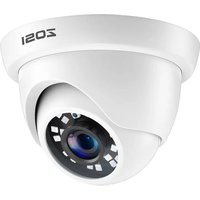
Thank you for purchasing this CCTV camera from ZOSI. This camera can operate in almost all light conditions, from bright daylight (provided it's not irradiated directly by the sun) to pitch darkness.
The camera is very sensitive to light and therefore can make use of even a tiny little of light to create an image of what it captured. When it is in low light, this comes out as a black and white image.
In total darkness or near-total darkness environment, the camera uses built-in infrared LEDs to illuminate the area in front of it. This light is invisible to the human eye, although you might notice a faint red glow coming from the front of the camera, which is normal phenomenon.
In day or well-lit environment, the IR Cut Filter feature of the camera can filter out wavelengths of light that is useless to cameras in order to provide a clear color image.
Important note: All jurisdictions have specific laws and regulations relating to the use of came-ras. Before using any camera for any purpose, it is the buyer's responsibility to be aware of all applicable laws and
regulations that prohibit or limit the use of cameras. And also buyer must comply with the applicable laws and regulations.
Warning: Modifications not approved by the party responsible for compliance could void user's authority to operate the equipment.
Important safety instructions
1) Make sure product is installed correctly and fastened stably.
2) Do not operate it if wires and terminals are exposed.
Choosing a Location for this Camera
To get optimal effect from camera, where you install cameras is pivotal. You should consider the distance between the camera and its subject to ensure you obtain a good view of the areas in focus. Also think about the appropriate mounting places (e.g., under the eaves of a roof is a good choice) where it won't be either an easy target for vandals or affected by constant light reflections of moving vehicles (which can cause falsely triggered motion detection). There are numerous factors you should consider when choosing a location to mount your camera, not merely where you want to monitor it.
To mount the camera
Place the camera in the location where you want to mount it, and mark screw holes on its surface to fix the screws. Then, using proper screws for the surface where you prepare to fix the camera. Screw the camera stably into the place.
If you're going to mount camera on a wooden surface, then screw the camera directly to the surface. If you're going to mount camera on a masonry surface (bricks, concrete or similar), then you'll need to use the included wall plugs.
Mounting the Camera
The camera can be mounted onto a flat, vertical surface using screws. The surface must have sufficient strength to hold the camera. Materials such as hardwood, brick or masonry are good options. You can mount the camera onto a metal surface, but you'll need to supply your own mounting hardware.
Position the Cables
- When setting your cable, try to avoid winding it on objects with sharp angles.
- Don't put your cable close to live electrical wiring. AC electricity will generate radio "noise", which can interfere with camera's signal.
- All wiring and connectors must be insulated in suitably. Meanwhile, they also should be protected from moisture and sunlight because they are not of weather resistant.
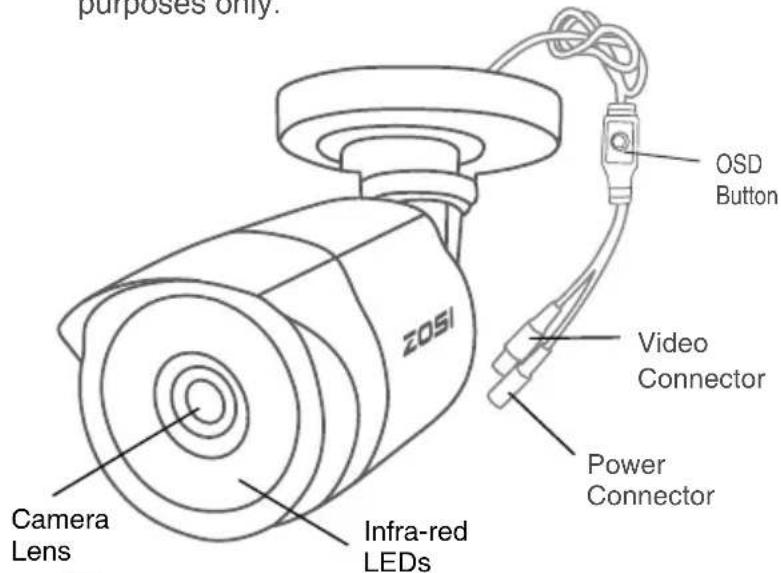
Please note, model shown is for illustration purposes only.
text_image
purposes only. ZOSI Camera Lens Infra-red LEDs OSD Button Video Connector Power ConnectorMounting the Camera
text_image
ZOSI 1 2 3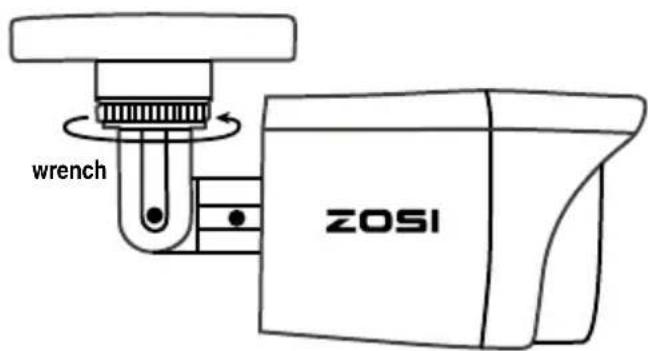
text_image
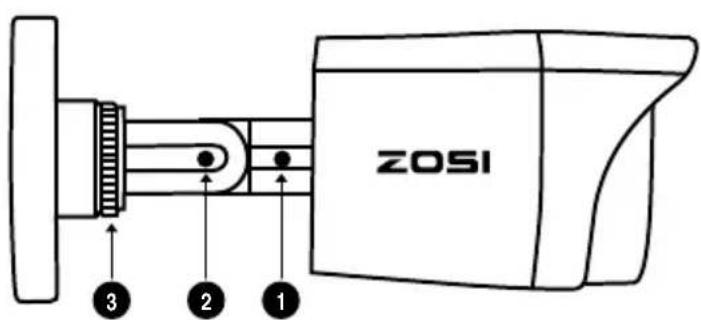
wrench ZOSI1 Using screwdriver to loosen the screw, and then rotate the camera.
2 Loosening the screw, and then adjust the elbow joint.
3 Attach the neck of the stand with the mounting base, and then rotate the stand by loosening the radial joint locking ring. Once stand in position, tighten the ring again.
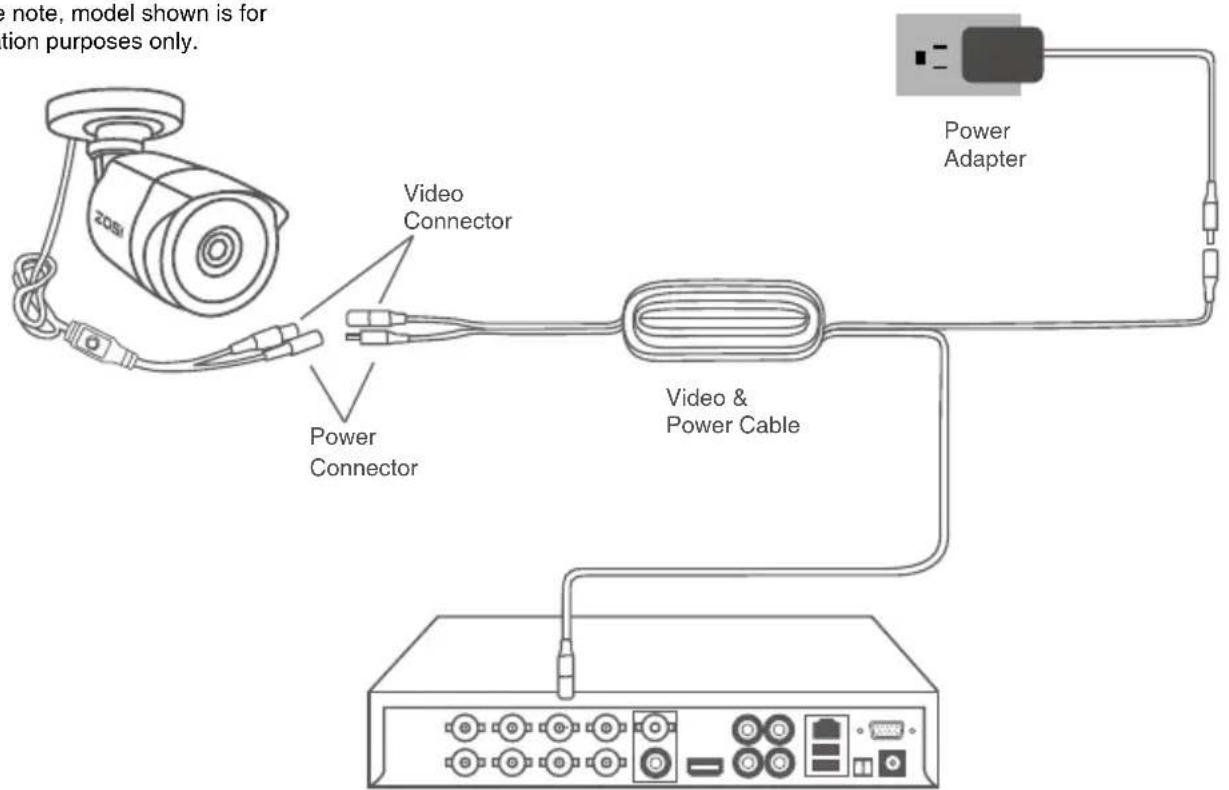
Connection Guide
Please note, model shown is for illustration purposes only.
text_image
note, model shown is for tion purposes only. Video Connector Power Connector Video & Power Cable Power AdapterOSD Button
text_image
UP L R DOWN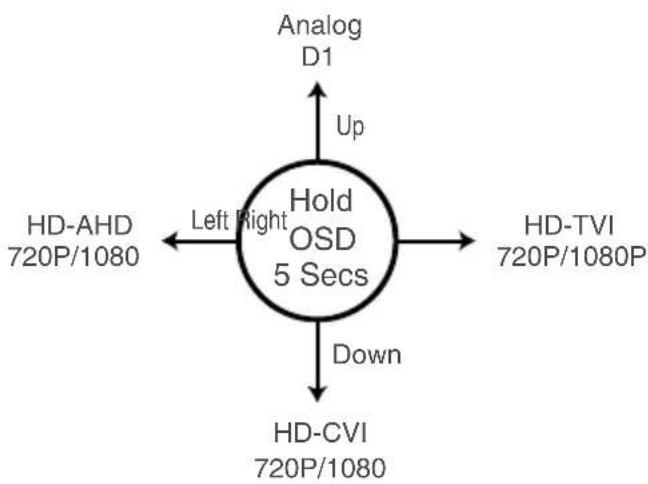
flowchart
graph TD
    A["Analog D1"] --> B["Hold OSD 5 Secs"]
    C["HD-AHD 720P/1080"] --> B
    D["HD-CVI 720P/1080"] --> B
    E["Up"] --> B
    F["Down"] --> B
    G["Left Right"] --> B
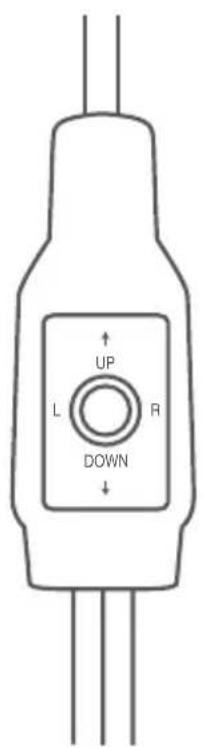
Change camera mode by OSD button when camera power on. Press the button on OSD menu:
Switch to AHD: Press Left button for 5 Seconds
Switch to TVI: Press Right button for 5 Seconds
Switch to CVBS: Press Upward button for 5 Seconds
Switch to CVI: Press Downward button for 5 Seconds
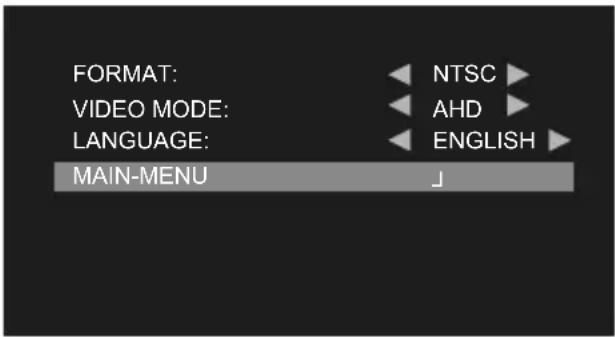
MAIN MENU
text_image
FORMAT: VIDEO MODE: LANGUAGE: MAIN-MENU NTSC AHD ENGLISH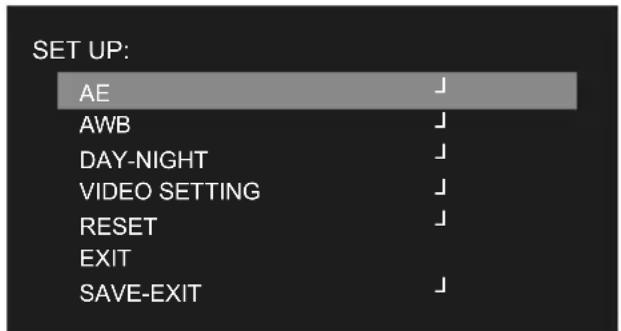
text_image
SET UP: AE AWB DAY-NIGHT VIDEO SETTING RESET EXIT SAVE-EXIT| AE Automatic Exposure# | |
| AWB White Balance# | |
| DAY-NIGHT # | |
| VIDEO SETTING # | |
| LANGUAGE ENGLISH/ 中义 | |
| RESET RESET | |
| EXIT # | |
| SAVE-EXIT SAVE&END# | |
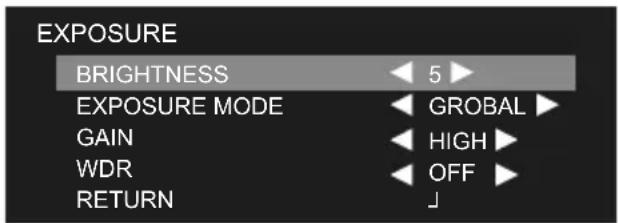
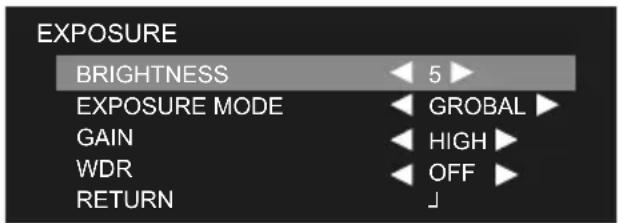
Automatic Exposure
- BRIGHTNESS
text_image
EXPOSURE BRIGHTNESS 5 EXPOSURE MODE GLOBAL GAIN HIGH WDR OFF RETURN ↓White Balance
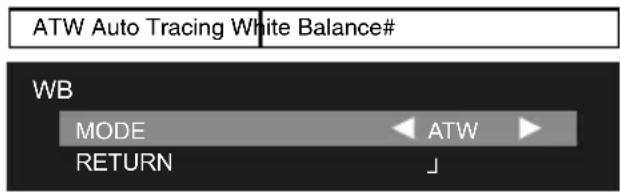
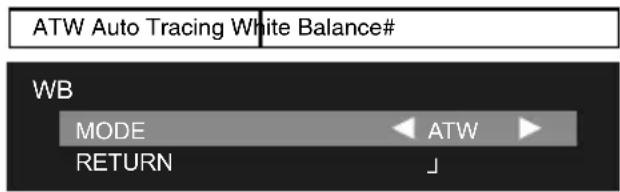
- MODE
text_image
ATW Auto Tracing White Balance# WB MODE ← ATW RETURN ↓-
RETURN RET#
-
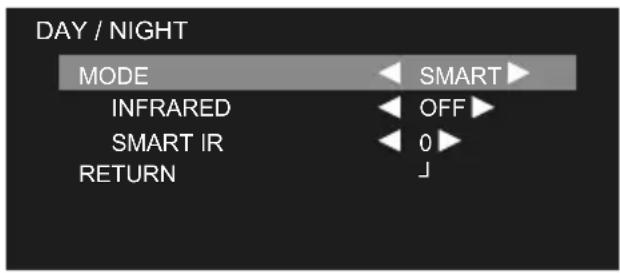
MODE
text_image
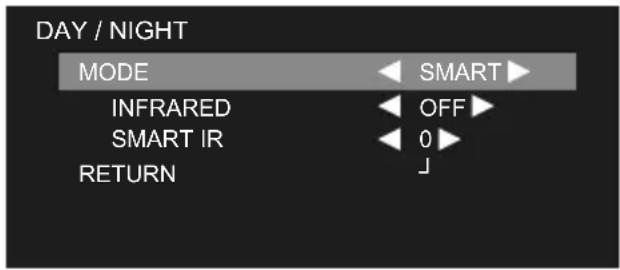
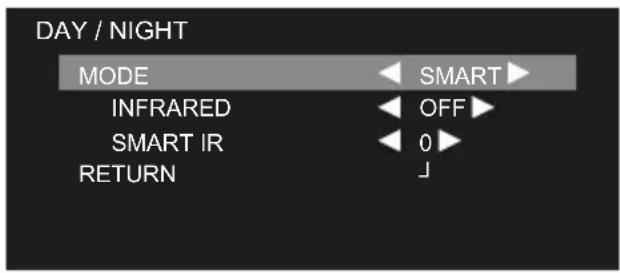
DAY / NIGHT MODE SMART INFRARED OFF SMART IR 0 RETURN JMODE EXT/AUTO/COLOR/B-W#
- INFRARED
- SMART IR
- RETURN RET#
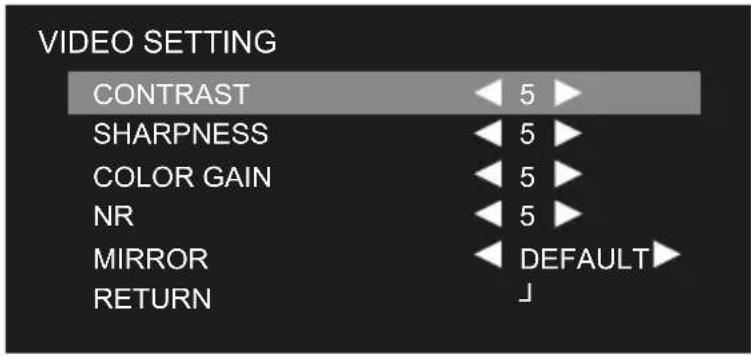
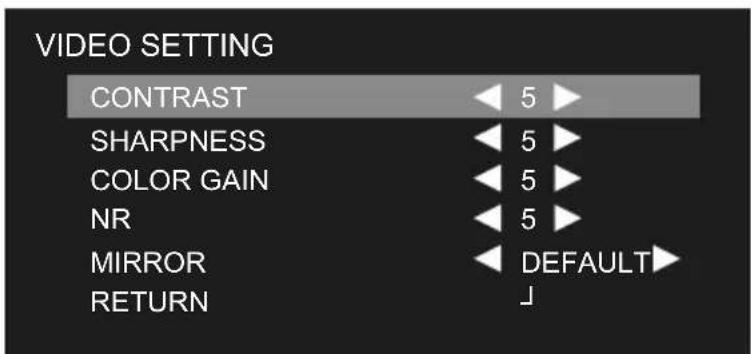
VIDEO SETTING
text_image
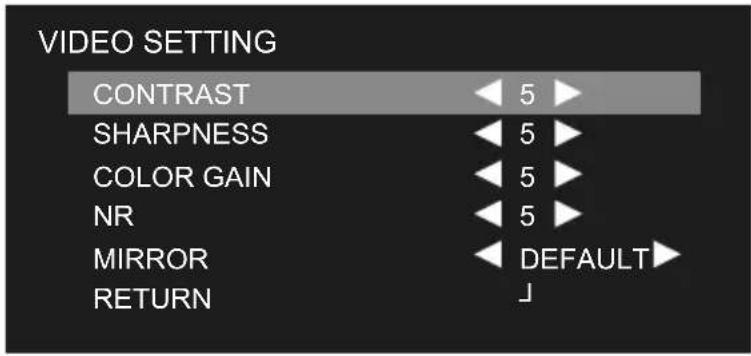
VIDEO SETTING CONTRAST 5 SHARPNESS 5 COLOR GAIN 5 NR 5 MIRROR DEFAULT RETURN ↓| CONTRAST 1-50 | |
| SHARPNESS 1-20 | |
| COLOR GAIN 1-20 | |
| NR 1-15 | |
| MIRROR DEFAULT | |
| RETURN ON/OFF |
Troubleshooting
Q: Video Loss display on my monitor where is supposed to display image?
A: 1. Check whether the extension cable (power and video) is securely connected to the camera.
- Check whether the video output from the camera is securely connected to the video input channel on the DVR.
- Check whether the power from the camera is firmly connected to power supply.
- If the camera mode don't match your DVR, there are two methods to adjust it.
(1) Press the "Down" button of OSD Joystick for five seconds, if still no picture appear, continue to press "Left", "Right", "Up" button in sequence, each for five seconds. Until the signal match your DVR.
(2) Make sure the camera has same signal with DVR. Use OSD Joystick to switch your camera's mode, and make it corresponding with your DVR's video mode.
Limited Warranty Terms & Conditions
ZOSI Communications warrants this product against defects in workmanship, and all material will be warranted for a period of one year from its original purchase date. You must present your receipt as proof of purchase date for warranty validation. Any unit which proves defective during the stated period will be repaired without charge for components or labor. Replaced at the sole discretion of ZOSI. The end user is responsible for all freight charges when it is necessary to send the product to ZOSI's repair center. The end user is responsible for all shipping costs when shipping product from any country other than the origin country.
The warranty does not cover any incidental, accidental or consequential damages arising from the inability use of this product. End user should take responsibility for any costs associated with the fitting or removal of this product caused by tradesman or other person. This warranty applies to the original purchaser of the product only, and it is forbidden to transfer product to any third party. It will make all warranties voided if there are unauthorized end users or third party modify any component or misuse evidence or abuse the device.
By law some countries do not allow limitations on certain exclusions in this warranty. Where applicable by local laws, regulations and legal rights will take precedence.
Instrucciones
text_image
wrench ZOSItext_image
SET UP: AE AWB DAY-NIGHT VIDEO SETTING RESET EXIT SAVE-EXIT| AE Automatic Exposure# | |
| AWB White Balance# | |
| DAY-NIGHT # | |
| VIDEO SETTING # | |
| LANGUAGE ENGLISH/ 中文 | |
| RESET RESET | |
| EXIT # | |
| SAVE-EXIT SAVE&END# | |
text_image
ATW Auto Tracing White Balance# WB MODE ← ATW RETURN ↓-
RETURN RET#
-
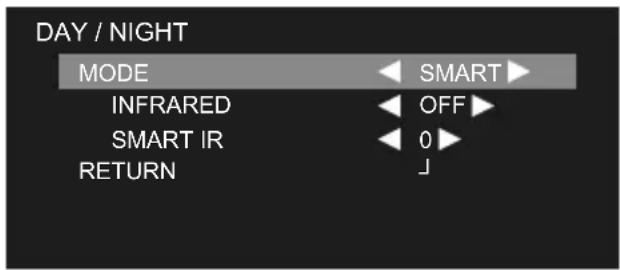
MODE
text_image
DAY / NIGHT MODE SMART INFRARED OFF SMART IR 0 RETURN JMODE EXT/AUTO/COLOR/B-W#
- INFRARED
- SMART IR
- RETURN RET#
text_image
wrench ZOSItext_image
SET UP: AE AWB DAY-NIGHT VIDEO SETTING RESET EXIT SAVE-EXIT| AE Automatic Exposure# | |
| AWB White Balance# | |
| DAY-NIGHT # | |
| VIDEO SETTING # | |
| LANGUAGE ENGLISH/ 中文 | |
| RESET RESET | |
| EXIT # | |
| SAVE-EXIT SAVE&END# | |
text_image
ATW Auto Tracing White Balance# WB MODE ← ATW RETURN ↓- RETURN RET#
TAG-NACHT
- MODE
text_image
DAY / NIGHT MODE SMART INFRARED OFF SMART IR 0 RETURN ⊥MODE EXT/AUTO/COLOR/B-W#
- INFRARED
- SMART IR
- RETURN RET#
Videoeinstellungen
text_image
VIDEO SETTING CONTRAST 5 SHARPNESS 5 COLOR GAIN 5 NR 5 MIRROR DEFAULT RETURN| CONTRAST 1-50 | |
| SHARPNESS 1-20 | |
| COLOR GAIN 1-20 | |
| NR 1-15 | |
| MIRROR DEFAULT | |
| RETURN ON/OFF |
Fehlersuche
text_image
wrench ZOSItext_image
SET UP: AE AWB DAY-NIGHT VIDEO SETTING RESET EXIT SAVE-EXIT| AE Automatic Exposure# | |
| AWB White Balance# | |
| DAY-NIGHT # | |
| VIDEO SETTING # | |
| LANGUAGE ENGLISH/ 中文 | |
| RESET RESET | |
| EXIT # | |
| SAVE-EXIT SAVE&END# | |
Automatic Exposure
- BRIGHTNESS
text_image
EXPOSURE BRIGHTNESS 5 EXPOSURE MODE GLOBAL GAIN HIGH WDR OFF RETURN ↓White Balance
- MODE
text_image
ATW Auto Tracing White Balance# WB MODE ← ATW RETURN ↓-
RETURN RET#
-
MODE
text_image
DAY / NIGHT MODE SMART INFRARED OFF SMART IR 0 RETURN JMODE EXT/AUTO/COLOR/B-W#
- INFRARED
- SMART IR
- RETURN RET#
VIDEO SETTING
text_image
VIDEO SETTING CONTRAST 5 SHARPNESS 5 COLOR GAIN 5 NR 5 MIRROR DEFAULT RETURN| CONTRAST 1-50 | |
| SHARPNESS 1-20 | |
| COLOR GAIN 1-20 | |
| NR 1-15 | |
| MIRROR DEFAULT | |
| RETURN ON/OFF |
FAQ
text_image
wrench ZOSItext_image
SET UP: AE AWB DAY-NIGHT VIDEO SETTING RESET EXIT SAVE-EXIT| AE Automatic Exposure# | |
| AWB White Balance# | |
| DAY-NIGHT # | |
| VIDEO SETTING # | |
| LANGUAGE ENGLISH/ 中文 | |
| RESET RESET | |
| EXIT # | |
| SAVE-EXIT SAVE&END# | |
text_image
ATW Auto Tracing White Balance# WB MODE ← ATW RETURN ↓-
RETURN RET#
-
MODE
text_image
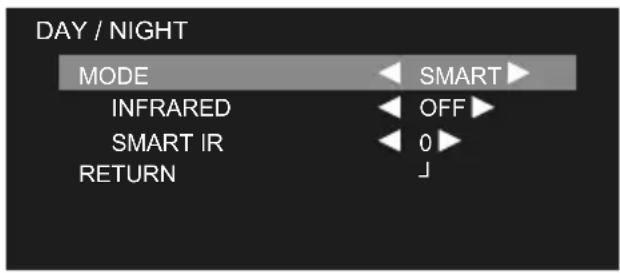
DAY / NIGHT MODE SMART INFRARED OFF SMART IR 0 RETURN JMODE EXT/AUTO/COLOR/B-W#
- INFRARED
- SMART IR
- RETURN RET#
VIDEO SETTING
text_image
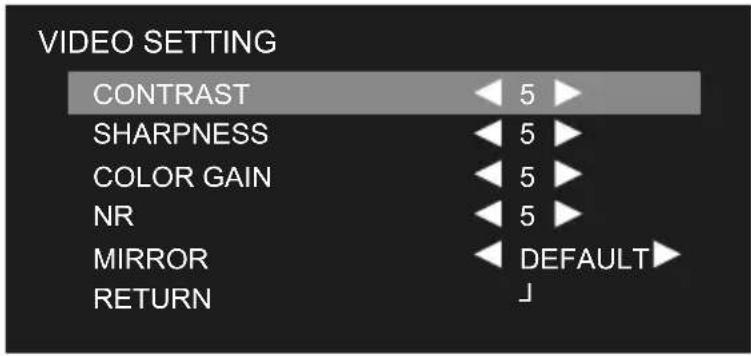
VIDEO SETTING CONTRAST 5 SHARPNESS 5 COLOR GAIN 5 NR 5 MIRROR DEFAULT RETURN| CONTRAST 1-50 | |
| SHARPNESS 1-20 | |
| COLOR GAIN 1-20 | |
| NR 1-15 | |
| MIRROR DEFAULT | |
| RETURN ON/OFF |
service@zositech.com
All rights reserved. No part of this publication may be reproduced by any means without written permission from ZOSI. The information in this publication is believed to be accurate in all respects.
ZOSI cannot assume responsibility for any consequences resulting from the use thereof. The information contained herein is subject to change without notice. Revisions or new editions to this publication may be issued to incorporate such changes.