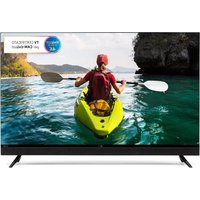
SONIC50FL4KSMV13 - Television TELE System - Free user manual and instructions
Find the device manual for free SONIC50FL4KSMV13 TELE System in PDF.


| Brand | TELE System |
| Model | SONIC50FL4KSMV13 |
| Product type | LED TV 4K Ultra HD |
| Screen size | 126 cm (49.5 inches) - 16:9 |
| Resolution | 3840 x 2160 (Ultra HD) |
| Contrast ratio | 5000:1 |
| Brightness | 200 cd/m² |
| Viewing angle | 178° horizontal / 178° vertical |
| Reception system | DVB-T/T2, DVB-C, DVB-S/S2 |
| HDMI connectivity | 3 x HDMI (v1.4) |
| USB connectivity | 2 x USB 2.0 (compatible FAT32/NTFS, media player) |
| Audio/video input | 1 x RCA (CVBS + Stereo Audio) |
| Digital audio output | 1 x COAXIAL |
| Headphone output | 3.5 mm jack |
| Common interface | 1 x CI/CI+ |
| Network | 1 x LAN RJ45 (Ethernet 10/100) |
| Wi-Fi | IEEE 802.11 b/g/n, 2.4 GHz + 5 GHz |
| Audio power | 40 W |
| Power supply | 100-240 V, 50/60 Hz |
| Power consumption (max) | 135 W |
| Standby consumption | < 0.5 W |
| Dimensions with stand (WxHxD) | 1111 x 742 x 243 mm |
| Dimensions without stand (WxHxD) | 1111 x 681 x 74 mm |
| Wall mount | VESA 200 |
| Supplied accessories | 1 standard remote control, 1 EASY remote control, 1 user manual |
| Main functions | Smart TV, HbbTV, USB media player, parental control, electronic guide |
| Care and cleaning | Clean the screen with a soft, dry cloth. Do not use chemical products. |
| Safety | Use in a dry indoor environment. Do not open the casing. Do not block ventilation slots. |
Frequently Asked Questions - SONIC50FL4KSMV13 TELE System
User questions about SONIC50FL4KSMV13 TELE System
0 question about this device. Answer the ones you know or ask your own.
Ask a new question about this device
Download the instructions for your Television in PDF format for free! Find your manual SONIC50FL4KSMV13 - TELE System and take your electronic device back in hand. On this page are published all the documents necessary for the use of your device. SONIC50FL4KSMV13 by TELE System.
USER MANUAL SONIC50FL4KSMV13 TELE System
The following inputs and outputs are available behind the TV:
- Headphone output: 3.5mm jack.
- CI/CI: CI/CI Common Interface module slot.
- USB 2.0 (x2): USB2.0 ports for Mediaplayer function
- HDMI1, HDMI2, HDMI3 (v.1.4): to connect an AV source.
- RF IN (T2/C): Antenna input (IEC) for terrestrial (DVB-T/T2) or cable (DVB-C).
- RF IN (S2): Satellite RF Antenna Input (type F).
- RCA: Audio-video input for connection of RCA devices (CVBS - Stereo LR).
- Audio Out: Digital audio output.
- LAN: Ethernet port (RJ45) required for SmartTV/HbbTV functions.
- Power (230VAC, 50Hz)
Remote Control
Place 2 AAA batteries (not supplied) in the remote control compartment respecting the correct polarities. Exhausted batteries must be disposed of separately from household waste and bring to any point of sale or collection.
WARNINGS
To prevent corrosive liquid leakage from damaging the remote control, it is advisable to remove the batteries if you believe you will not use the device for a long time.
Avoid using different types of batteries such as new and used batteries at the same time.
First installation
Connect the antenna cable (terrestrial and/or satellite) and the ethernet cable (if available).
After turning on the TV, perform the first installation as from wizard, use the arrows and OK keys to select and confirm:
Step 1. Select the OSD Language;
Step 2. Connecting to the network (cable or wireless)';
a. Cable: the connection to the network is established without any kind of intervention;
b. Wireless: Select use WiFi, then choose the WiFi network you want to connect to the TV and enter the password (press OK to invoke virtual keyboard), confirm selecting Connect;
Step 3. Select the Country;
Step 4, 5. Terms of service and Conditions (it is possible to skip those steps, but some functionalities could be not available);
Step 6. Select the operative mode. In case of TV selection, TV will ask to set the channel scanning;
Step 7. Set and confirm PIN (the PIN is requested in some setting submenus);
Step 8. TV asks the channel scanning (terrestrial and/or satellite). Please refer to par. 1.1.
Main functions
1.1 Channel scanning
In order to enter in Channel Search menu: Menu – Settings – Channel – Auto Scan (enter PIN):
1) Select the source from the Antenna Type (Earth, Cable, or Satellite). Multiple selection is allowed;
2) Satellite:
a) Select the operator (Tivusat or Standard)
b) Select antenna system (Single LNB, DiSEqC, Unicable)
c) Select satellite (ITALY default value: Hotbird 13°East)
3) Terrestrial:
a) Select the channel ordering (LCN)
b) Scanning mode: DTV
4) Start scanning
NOTE
If you choose to use the LCN (terrestrial) or TivùSat (satellite) function, a channel list with a predefined sort order will be created at the end of the search.
Viewing encrypted channels requires the use of a dedicated conditional access module (CAM) and its smart-card (CA) to be purchased separately.
1.2 Channel list
At the end of the scan a channel list will be created (for each front-end), pressing CH.LIST button, the user can navigate and edit the channel list; for example, create a FAV list, add some channels to HOMEPAGE, filter the channel list and edit it (moving or deleting).
If both terrestrial and satellite channels has been scanned and saved, via channel list it is possible to move from a TV mode (terrestrial) to the other (satellite): press RIGHT arrow key, the available options will be listed, select and confirm the wanted one, back to the channel list with LEFT arrow key and select a wanted channel for its watching.
The Channel list menu is available also from OSD user menu (menu button).
1.3 Antenna system configuration (Sat)
The default settings include the configuration of a single LNB fixed antenna system, receiving the signal from the Hotbird 13-E satellite.
In the case of different antenna system, you need to change the configuration, modifying the parameters in the Channels/Scan/LNB menu.
NOTES AND WARNINGS
The TV is compatible with universal single converter, multi-satellite DiSEqC (1.0 - 1.2) and multi-user SCR/dCSS/Unicable systems.
Incorrect antenna configuration can result in some or all channels not loading. we recommend that you contact a professional installer for installation.
The Signal Level and Quality indicators refer to the selected satellite Trasponder on the screen. Make sure that it is valid/updated and really active.
It is not recommended to avoid connecting the TV to the satellite signal via the via-the-radar antenna connector (LNB Out/Loop Through) of an external satellite receiver because both devices cannot operate at the same time.
In the case of a system with LNB SCR: each TV/receiver connected to the same system must use a different SCR channel.
To connect multiple receiving devices to an SCR system, do not use the loop through antenna connection of an external satellite receiver, but use a dedicated external signal party.
1.4 Smart (Home) mode
The Home menu, also accessible directly from the Home button of the remote control, allows you to access the following features:
- Application management and use;
- Navigation browser,
- Selection of input sources/modes:
- Access to the system settings
WARNINGS
To take advantage of SMART TV features, you need to connect your TV to the internet.
1.5 Factory reset (reset)
Resets all settings to the initial condition.
Accessible from the Home menu > Settings > Support > Reset to Factory Default > enter PIN.
The user can keep the channel list with the personal preference/modification and/or the FAVORITE list flagging the option before the restoring.
WARNING
Restoring factory settings clears all customizations made by the user, including stored channels, downloaded applications, and changed settings. In addition, confirming the reset, the TV will perform a full system restart, then display the first installation wizard on screen
1.6 E-Manual
The extended user manual is available in MENU > Setting > Support > E-Manual. The digital version is reachable via QR code (on the top-right corner) for the reading or downloading on your mobile device.
Technical specifications
| Panel | Format | 49,5" - 16:9 wide (126 cm) |
| Resolution | 3840 x 2160 (Ultra HD) | |
| Contrast | 5000:1 | |
| Brightness | 200 (cd/m2) | |
| Viewing angle | 178°/178° (Horizontal/Vertical) | |
| Inputs | HDMI | x3 - HDMI |
| A/V in | x1 - CVBS + Audio LR | |
| USB | x2 - USBv2.0, compatible FAT32e NTFS, Media player function | |
| Audio output | COAXIAL | |
| LAN | x1 - RJ45, Ethernet 10/100 | |
| TV Signals | RF input (DTT) | x1- 75 Ω, type IEC, VHF/UHF 7MHz/8MHz |
| RF input (SAT) | x1 - 75 Ω, F type | |
| Common Interface | x1 - CI / Cl+ | |
| Video | MPEG-2, MPEG-4, H.265 | |
| Audio | MPEG-1 layer 1/2, MPEG-2 layer 2/AC3/EAC3 | |
| Speaker | 40 W | |
| General | Power Supply | 100-240V, 50/60Hz |
| Power Consum | <0,5W in Standby; 135 W max | |
| USB supported | AVI/MP4/MKV,WenM,3GPP,MPEG transport stream, FLV | |
| Wi-Fi | IEEE b/g/n, 2,4GHz + 5GHz | |
| TV dimensions | with supports | 1111 x 742 x 243 mm |
| without supports | 1111 x 681 x 74 mm | |
| Standard wall bracket | VESA 200 | |
| Included Accessories | x1 standard remote control, x1 EASY remote control unit, x1 instruction manual | |
Simplified EU conformity declaration
The manufacturer, TELE System Digital s.r.l., states that the radio equipment type of SMART TV named SONIC50FL4KSMV13 complies with the 2014/53/EU directive.
The full text of the EU compliance declaration is available at the following Internet address: https://www.telesystem.it/CE
Entrées et sorties
For detailed information, please visit the TELE System Digital Srl website

Advance
Covered by one or more claims of the patents listed at patentlist.hevcadvance.com
TELE System Digital Srl


Brand : TELE System
Model : SONIC50FL4KSMV13
Category : Television