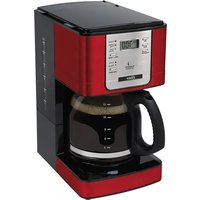
BVSTDC4401RD - Coffee machine OSTER - Free user manual and instructions
Find the device manual for free BVSTDC4401RD OSTER in PDF.


| Product Type | Drip coffee maker |
| Brand | Oster |
| Model | BVSTDC4401RD |
| Capacity | 12 cups (approx. 1.8 L) |
| Carafe Type | Glass carafe (model 4401) |
| Warming Plate | Non-stick, keeps warm for 2 hours |
| Filter Basket | Removable, compatible with Oster permanent filters and 10-12 cup paper filters |
| Pause 'n Serve | Allows you to pour a cup during brewing (up to 30 seconds) |
| Water Level Indicator | Shows the amount of water in the reservoir |
| Brew Strength Selector | Choice between Fuerte (strong) and Regular (normal) |
| Programmable Clock | Digital display with hour/minute setting and AM/PM indicator |
| Freshness Timer | Displays time elapsed since brewing ended (up to 2 hours) |
| Delayed Brewing | Programmable up to 24 hours in advance |
| Automatic Cleaning Cycle | Descaling with white vinegar; Limpiar indicator lights up |
| Power Cord | Retractable (adjustable length) with built-in cord storage |
| Daily Maintenance | Removable parts dishwasher safe (top rack): carafe, lid, filter basket, permanent filter |
| Safety | Automatic shut-off after 2 h; do not immerse in water; protected hot surfaces |
| Repairability | Repairs only by Oster Authorized Service Center |
| Included Accessories | Oster permanent filter, glass carafe with lid |
Frequently Asked Questions - BVSTDC4401RD OSTER
User questions about BVSTDC4401RD OSTER
0 question about this device. Answer the ones you know or ask your own.
Ask a new question about this device
Download the instructions for your Coffee machine in PDF format for free! Find your manual BVSTDC4401RD - OSTER and take your electronic device back in hand. On this page are published all the documents necessary for the use of your device. BVSTDC4401RD by OSTER.
USER MANUAL BVSTDC4401RD OSTER
natural_image
Two black-and-white models of coffee cookers with digital display and control buttons, no visible text or symbols on the devices themselves.MODELS/MODÈLES MODELOS
BVSTDC4401 & BVSTDC4402
INSTRUCTION MANUAL
PROGRAMMABLE COFFEE MAKER
READ ALL INSTRUCTIONS BEFORE USING THIS APPLIANCE
MANUEL D'INSTRUCTIONS
CAFETIERE PROGRAMMABLE
LIRE TOUTES LES INSTRUCTIONS AVANT D' UTILISER CET APPAREIL
MANUAL DE INSTRUÇÕES
CAFETEIRA PROGRAMÁVEL
LEIA TODAS AS INSTRUÇÕES ANTES DE USAR ESTE APARELHO
IMPORTANT SAFEGUARDS
To reduce the risk of fire, electric shock and/or injury to persons, basic safety precautions should always be followed when using electrical appliances, including the following:
- READ ALL INSTRUCTIONS BEFORE USING THE COFFEE MAKER.
- ⚠️ DO NOT touch the coffee maker's hot surfaces. Use handles or knobs.
- To protect against electric shock, DO NOT immerse the power cord, power plug or coffee maker in water or in any other liquid.
- Turn the coffee maker off and unplug the power cord from the power source when the coffee maker and clock are not in use and before cleaning. Allow the coffee maker parts to cool before putting on or taking off parts and before cleaning the appliance.
- DO NOT operate any appliance with a damaged power cord or power plug, or operate it after the appliance malfunctions, or has been damaged in any manner. Take this appliance only to the nearest Authorized Oster® Service Center for examination, repair or adjustment.
- The use of accessory attachments other than those recommended by the manufacturer may cause hazards or injuries.
- DO NOT use the coffee maker outdoors.
- DO NOT let the power cord hang over edge of table or counter, or allow it to come into contact with hot surfaces.
- DO NOT place this coffee maker on or near a hot gas stove or electric burner or in a heated oven.
- To disconnect the coffee maker, turn it off, then remove the power plug from the power supply.
- Place the appliance on a hard, flat level surface to avoid interruption of airflow underneath the coffee maker.
- Avoid contact with any moving parts.
- This coffee maker is designed for household use only.
- DO NOT use appliance for other than intended use.
- This appliance is not intended for use by persons (including children) with reduced physical, sensory or mental capabilities, or lack of experience and knowledge, unless they have been given supervision or instruction concerning use of the appliance by a person responsible for their safety. Children should be supervised to ensure that they DO NOT play with the appliance.
- Close supervision is necessary when any appliance is used by or near children, or incapacitated individuals.
- This appliance is not intended to be operated by means of an external timer or separate remote-control system.
- This appliance is intended to be used in household and similar applications such as: staff kitchen areas in shops, offices and other working environments farm houses by clients in hotels, motels and other residential type environments bed and breakfast type environments.
DECANTER (MODEL 4401 ONLY)/ THERMAL CARAFE (MODEL 4402 ONLY) USE AND CARE
Follow the instructions below to reduce or eliminate the chance of breaking the decanter/ thermal carafe:
- This decanter/ thermal carafe was designed for use only with your Oster® coffee maker and therefore must never be used on a range top or in any oven, including a microwave oven.
• DO NOT set a hot decanter/ thermal carafe on a wet or cold surface. -
DO NOT use a cracked decanter/ thermal carafe or a decanter/ thermal carafe having a loose or weakened handle.
-
DO NOT clean the decanter/ thermal carafe with abrasive cleaners, steel wool pads or other abrasive materials.
• Discard the carafe immediately if it is ever boiled dry. - Protect the carafe from sharp blows, scratches or rough handling.
NOTE: Scalding may occur if the lid is removed during brewing cycles. WARNING! To reduce the risk of fire or electric shock, do not remove any service covers.
There are no user serviceable parts inside the coffeemaker. Only authorized personnel should repair the coffeemaker. Please read ALL of the instructions in this manual carefully before you begin to use this appliance. Proper care and maintenance will ensure a long life and a trouble-free operation for this appliance. Please save these instructions and refer to them for cleaning and care tips.
SAVE THESE INSTRUCTIONS
SPECIAL CORD SET INSTRUCTIONS
- A short power supply cord is provided to reduce the hazards resulting from a person or pet becoming entangled in, or tripping over, a longer cord.
- An extension cord may be purchased and used if care is exercised in its use.
- If an extension cord is used, the marked electrical rating of the extension cord must be at least the same or higher than that of your appliance. The resulting extended cord must be arranged so that it will not drape over a countertop or tabletop where it can be pulled on by children or tripped over accidentally.
You can customize the length of the power cord so that it is the exact length you desire. To increase the length of the power cord: grasp the power cord (not the power plug) and gently lift it out of the slot, then pull it away from the coffeemaker. To decrease the length of the power cord: grasp the power cord (not the power plug), lift it out of the slot and gently feed it into the coffeemaker. Lock the cord in the slot when finished.
DESCRIPTION OF THE APPLIANCE
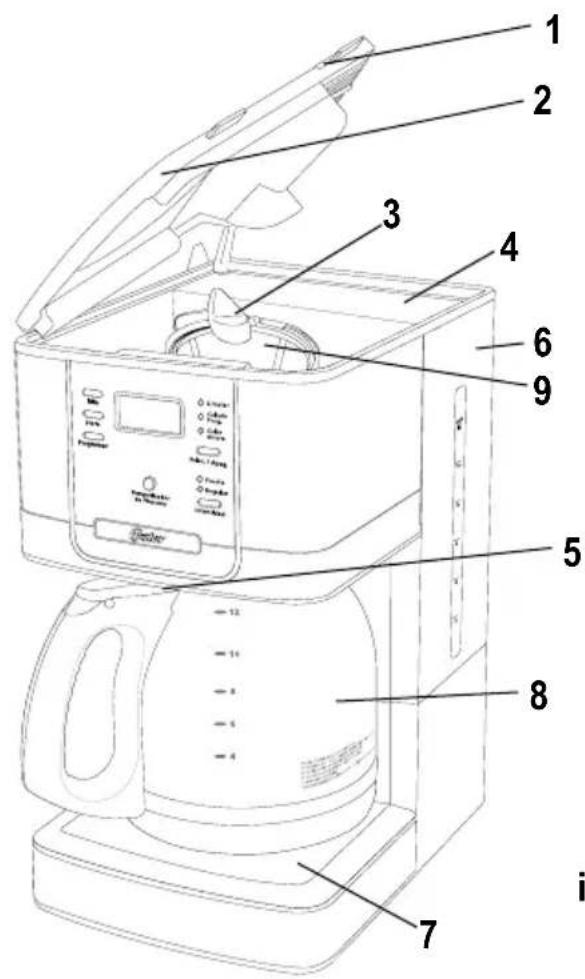
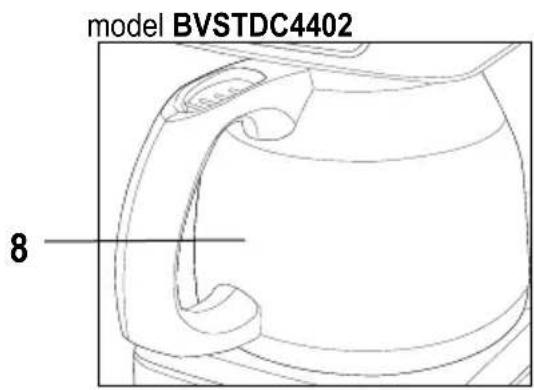
- Water Reservoir Lid
- Filter Basket Lid
- Shower Head
- Water Reservoir
- Pause 'n Serve
- Water Window
- Warming Plate (model 4401 only)/Platform (model 4402 only)
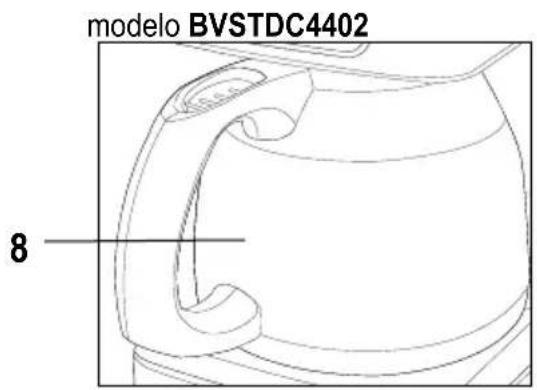
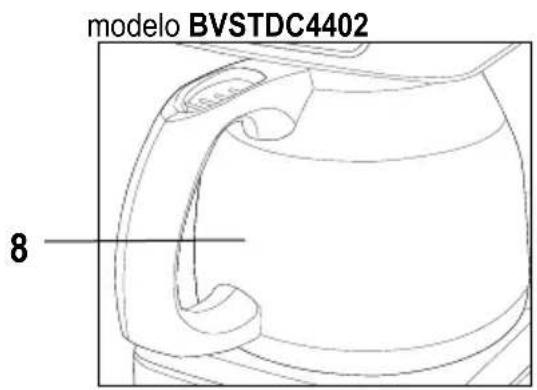
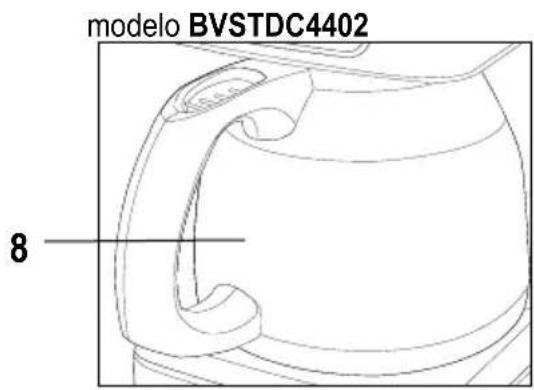
- Decanter (model 4401 only)/ Thermal Carafe (model 4402 only)
- Removable Filter Basket
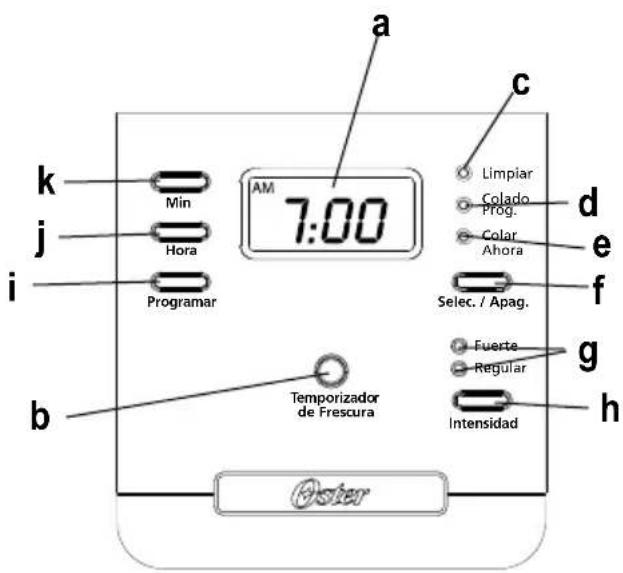
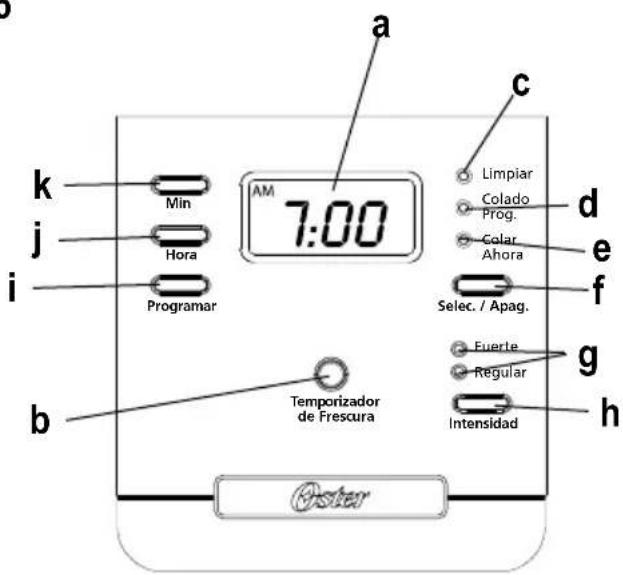
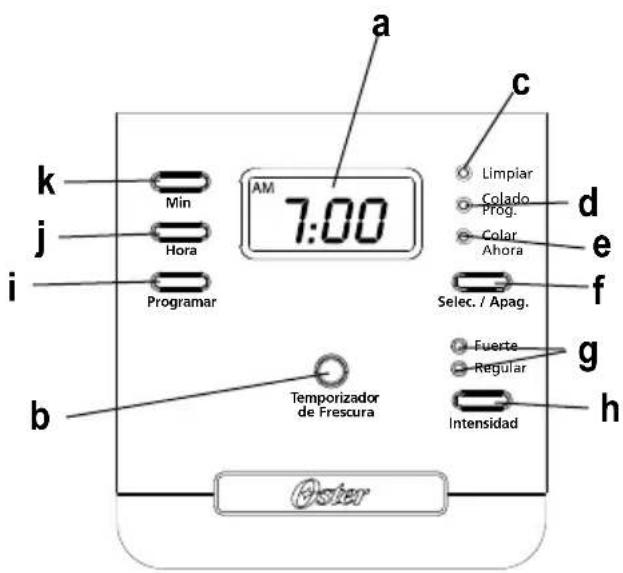
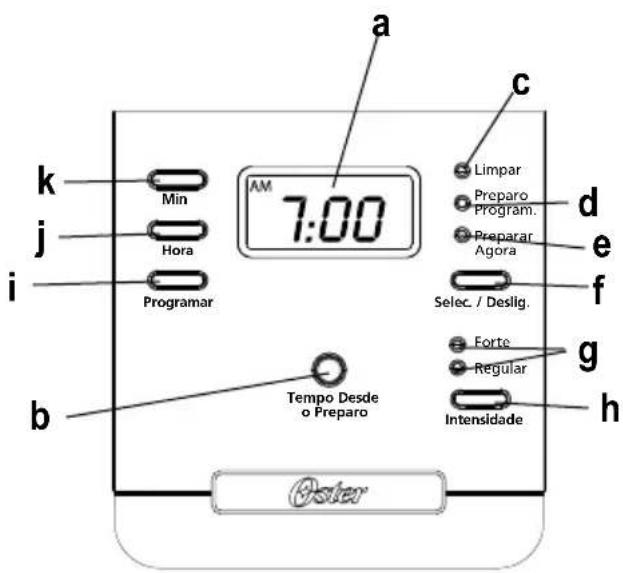
Control Panel
a. Clock Display / Fresh Brew Timer "Temporizador de Frescura" Display
b. Clock Display/ Fresh Brew Timer "Temporizador de Frescura" Button
c. Clean Cycle "Limpiar" Indicator
d. Delay Brew "Colado Prog." Indicator
e. Brew Now "Colado Ahora" Indicator
f. Select/ Off "Selec./Apag." Button
g. Brew Strength Indicators (strong "Fuerte" and regular "Regular")
h. Brew Strength "Intensidad" Button
i. Set Delay "Programar" Button
j. Hour "Hora" Button
k. Minute "Min." Button
COFFEE MAKER FEATURES AND BENEFITS
Your new Oster ^® coffee maker has the following features:
- Brewing Capacity – 12 Cups – glass decanter (model 4401 only)/8 Cups – thermal carafe (model 4402 only).
- Removable Filter Basket – The filter basket pulls out for fast and easy cleaning and filling.
- Pause ‘n Serve – Can’t wait for the coffee to finish brewing? The Pause ‘n Serve feature allows you up to 30 seconds to pour a cup of coffee while the coffee maker is still brewing. Carefully remove the carafe and the Pause ‘n Serve feature will be automatically activated, temporarily stopping the flow of coffee into the decanter/carafe.
- Water Window – Show amount of water in the reservoir for accurate filling.
- Non-Stick Warming Plate (model 4401 only) – This feature allows you to keep your coffee hot after brewing. The non-stick attribute prevents the decanter from sticking to the surface of the warming plate.
- Brew Strength Selector – Adjusts the brewing time to create a more full-flavored coffee.
- Cord Storage – Safely stores excess cord to keep your countertop neat.
• Programmable Controls:
Clock – The clock serves as a handy kitchen clock and allows you to set the Delay Brew Timer feature and functions as the fresh brew timer feature.
Fresh Brew Timer feature – Lets you know how long your coffee has been waiting for you.
Delay Brew – Would you like to wake up to a fresh pot of coffee? The timer allows you to preset when you would like the coffee maker to automatically begin brewing your coffee, up to 24 hours in advance.
Special Cleaning Cycle – Enables you to easily maintain and clean mineral deposits from your coffee maker.
BEFORE USING YOUR COFFEE MAKER FOR THE FIRST TIME
Make sure your first cup of coffee is as good as can be by cleaning your Oster ^® coffee maker before its first use. Just follow these simple steps:
- Wash the decanter/ thermal carafe, decanter/ thermal carafe lid, the filter basket and the permanent filter in a mixture of mild detergent and water. Rinse each thoroughly (please refer to the Description of the Appliance).
- Replace all the parts and attach the water reservoir. Then, run a brew cycle with water only, without adding coffee and coffee filter.
- When brewing is complete, turn your coffee maker off, discard the water in the thermal carafe and rinse the carafe, carafe lid, and filter basket.
Your coffee maker is now ready to use. Enjoy it!
SETTING THE CLOCK AND DELAY BREW TIME
To Set the Clock:
- Plug the power cord into a standard electrical outlet. The clock will flash on the control panel to indicate that the time has not been set yet.
- Press and hold the hour "Hora" and minute "Min." buttons until you reach the current time. The AM or PM indicator will light at the bottom of the display (Figure 1 & 2).
The clock is now set!
NOTE: Pressing any button before setting the clock will cause the clock to start keeping time from 12:00 a.m. You must set the clock if you want to use the Delay Brew feature.
To Set the Delay Brew Time:
While the display is in the clock mode, simply press the set delay "Programar" button (Figure 3) and, set the brew time by pressing the hour "Hora" and minute "Min" buttons (Figure 1). The AM or PM indicator will light at the bottom of the clock display.
Within a few seconds the display will change to the current time.
The Delay Brew Time is now set!
NOTE: To activate the delay brew cycle, see the Brewing Coffee Later section.
To check the programmed time, push the set delay "Programar" button. The display will show the time you have programmed the coffee to brew. If you press the set delay "Progamar" button again or wait a few seconds, the display will switch back.
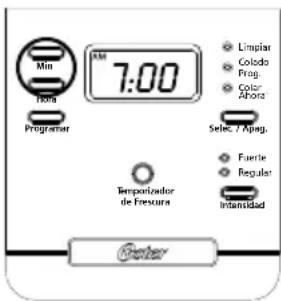
figure 1
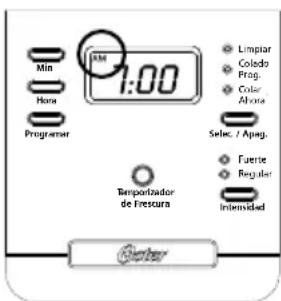
Selecting and Measuring Ground Coffee
For best results, use a level tablespoon for ground coffee measurement.
Make sure you use medium grind coffee for a perfect brew.
A. Suggested Coffee Measurement Chart
| To Brew Ground Coffee | |
| 12 Cups 9 tbsp. | |
| 10 Cups 7.5 tbsp. | |
| 8 Cups 6.5 tbsp. | |
| 6 Cups 4.5 tbsp. | |
| 4 Cups 3 tbsp. | |
| 1 level tablespoon (tbsp) = 5 gr./0.17 oz.1 cup = 5 fl. oz. (148 mL) of brewed coffeeUse more or less coffee to suit your taste. | |
B. Adding Water and Ground Coffee
- Open the brew basket lid. For your convenience you can lift out the removable filter basket.
- Place a 10–12 cup paper basket-style filter or the permanent filter into the removable filter basket.
NOTE: If using paper filters, it is important that the sides of the filter fit flush against the side of the filter basket. If filter collapse occurs, dampen the filter before placing in the filter basket and adding ground coffee and water.
- Add the desired amount of coffee and gently shake to level the coffee. See the "Suggested Coffee Measurement Chart".
- Be sure the removable filter basket is properly centered and all the way down in the brew basket and close the lid.
- Fill the decanter/ thermal carafe with cold, fresh water to the desired capacity (1 cup equals 148 mL). For easy and accurate filling, the water markings on the glass decanter/ thermal carafe show the amount of water needed to make the corresponding desired number of cups. Do not fill past the "12-cup MAX line" (model 4401 only)/ "8-cup MAX line" (model 4402 only) or water will flow out of the coffee maker.
NOTE: The amount of coffee brewed will always be slightly less than the amount of water poured in the water reservoir. This is due to the minimum absorption of water by the coffee grounds.
- Lift the water reservoir lid and pour the water into the water reservoir. Close the lid and place the empty decanter/thermal jar onto the warmer plate/platform.
NOTE: If the glass decanter/ thermal carafe is not in place then the coffee maker will not brew and the grounds will overflow from the filter basket. An overflow may cause personal injury or damage to property.
CAUTION: To reduce the risk of damaging the glass decanter/ thermal carafe and/or the risk of personal injury, do not add cold water to the decanter/ thermal carafe if the same is already hot. Allow the glass decanter/ thermal carafe to cool before using.
BREWING COFFEE NOW
- After completing the steps in the "Adding Water and Coffee" section and with the thermal carafe and the filter basket securely in place, turn the coffee maker on by pressing the select "Selec./Apag." button once (Figure 4). The brew now "Colar Ahora" light will turn on and pulse to signal that the coffee maker is on and brewing.
- To enjoy a more full flavored cup of coffee, press the Brew Strength "Intensidad" button once. The strong "Fuerte" brew strength light will turn on. The coffee maker will remain in the brew strength you have selected until you change it back to regular "Regular" strength by pressing the brew strength button or until you unplug the unit (Figure 5).
- After the used coffee grounds have cooled, carefully remove the filter basket and discard them.
NOTE: Always allow the coffee maker to cool down before cleaning.
-
Prior to making a second pot of coffee, turn the coffee maker off. This will reset the fresh brew timer feature. To turn the coffee maker off, press the select "Selec./Apag." button until all lights turn off.
-
Make sure the glass decanter/ thermal carafe is empty before starting to brew coffee.
- Be sure to turn your coffee maker off when no longer using it.
NOTE: Scalding may occur if the lid is open during brewing cycles.
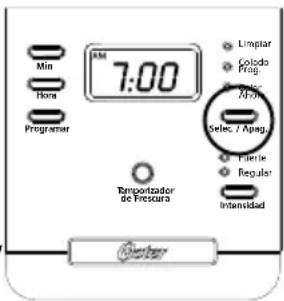
figure 4
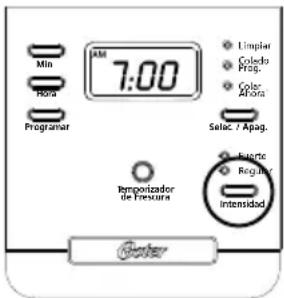
figure 5
THE FRESH BREW TIMER FEATURE
The fresh brew timer feature lets you know how long your coffee has been waiting for you. At the start of the brew cycle, the fresh brew timer feature will automatically be activated and the clock display will change to show the time since brewing began.
Press the fresh brew time “Temporizador de Frescura” button once (Figure 6) to go back to the clock function (while on the clock mode, the fresh brew timer feature will keep counting). The display will automatically change back to the clock after 2 hours or when the unit is turned off.
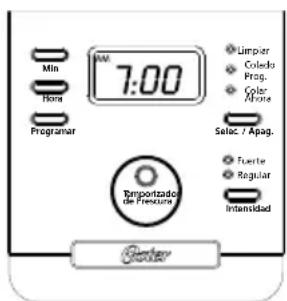
figure 6
NOTE: The brew now “Colar Ahora” light must be on for the fresh brew timer feature to operate. The time and delay brew time cannot be set when the fresh brew time is displayed.
BREWING COFFEE LATER
- You must first set the time for when you would like the coffee maker to begin brewing your coffee as described in "Setting the Clock and the Delay Brew Timer" section.
- Prepare your coffee maker as described in the "Adding Water and Ground Coffee" section.
- To activate the delay brew function and program your coffee maker to brew coffee at a later time, press the select "Selec./Apag." button twice (Figure 7). The delay brew "Colado Program." light will illuminate. The coffee maker is now set to automatically brew coffee at the

figure 7
pre-set time. At this time the brew strength light will turn on. You can select the strength that you desire by pressing the brew strength "Intensidad" button.
- At the pre-set time, the brew now "Colar Ahora" light will turn on and the delay brew "Colado Program." light will turn off, indicating the brewing has started in the selected brew strength. The fresh brew timer feature will start.
- The coffee maker warming plate (model 4401 only) will keep your coffee hot for 2 hours and then automatically turn off. For model 4402, the unit will turn off at the end of the brew cycle.
NOTE: Scalding may occur if the lid is open during brewing cycle.
As a safety feature, your coffee maker will NOT start again automatically the next day. If you want your coffee to brew at the same time the following day, simply add a new filter, coffee and water and set delay brew, by repeating Steps 2 and 3 above.
To cancel delay brew:
Press the select "Selec./Apag." button until all lights turn off.
CLEANING AND MAINTAINING YOUR COFFEE MAKER
Daily Cleaning
Always unplug the coffee maker and allow it to cool before cleaning.
Remove the filter basket, permanent filter, glass decanter/ thermal carafe and glass decanter/ thermal carafe lid and wash them in a solution of hot water and mild liquid soap.
Never use abrasive cleansers, steel wool pads or other abrasive materials. Dishwasher top safe parts: glass decanter (model 4401 only) and lid, filter basket and permanent filter.
CAUTION! Never immerse the coffee maker itself in water, in any other liquid or place in the dishwasher.
Regular Cleaning and Maintenance
Decalcifying your Oster® coffee maker minerals (calcium/limestone) found in water will leave deposits in your coffee maker and affect its performance. It's recommended that you regularly remove these deposits using vinegar.
- Prepare a solution using 1 L of undiluted white household vinegar may be used to clean.
- Pour the vinegar into the water reservoir.
- Place an empty 10–12 cup basket-style paper filter or the permanent filter that came with the unit into the filter basket and place the brew basket back in place.
- Place the empty glass decanter/ thermal carafe back in the unit.
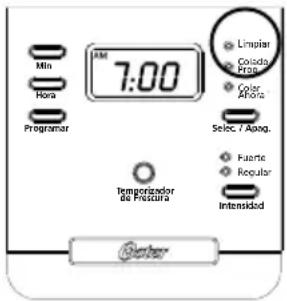
- Press the select "Selec./Apag." button until the clean "Limpiar" indicator light turns on (Figure 8). For your convenience the cleaning cycle is automatic. The entire cycle will take 45–60 minutes to complete.
During the cleaning your coffee maker will:
a. Slow brew approx. 3 cups of cleaning solution.
b. Pause for 30 minutes (the clean "limpiar" light will remain on to alert you that the process is active).
c. After 30 minutes, your coffee maker will brew the remainder of the cleaning solution.
d. When complete, the clean "Limpiar" light will turn off and your coffee maker will turn off.
- Discard the cleaning solution and rinse the glass decanter/ thermal carafe thoroughly with clean water.
- Fill the water reservoir with clean, fresh water.
- Place the empty glass decanter/ thermal carafe back on the coffee maker.
- Remove and discard the paper filter used during the cleaning cycle. If the permanent was used during cleaning, remove it and rinse it thoroughly before replacing it in the filter basket.
- Begin brewing and allow the full brew cycle to complete.
- Repeat steps 5 through 9 one more time.
Your coffee maker is now clean and ready to brew the next pot of delicious, hot coffee!
Suggested Decalcifying Interval
| Type of Water Cleaning | Frequency |
| Soft Water Every 80 Brew Cycles | |
| Hard Water Every 40 Brew Cycles | |
| or when red light is flashing | |
Cleaning the Glass Decanter/ Thermal Carafe
Hard water can leave a whitish stain inside the glass decanter/ thermal carafe, and coffee may then turn this stain brown.
To remove glass decanter/ thermal carafe stains:
- Fill the decanter/ carafe with a solution of equal parts water and vinegar and let the solution stand in it for approximately 20 minutes.
- Discard the solution, then wash and rinse the glass decanter/ thermal carafe.
DO NOT use harsh abrasive cleaners that may scratch the glass decanter/ thermal carafe.
TROUBLESHOOTING YOUR COFFEE MAKER
Your coffee maker has been carefully designed to give you many years of trouble-free service. In the unlikely event that your new coffee maker does not operate satisfactorily, please review the following potential problems and try the steps recommended BEFORE you call or take it to an Authorized Oster® Service Center.
| PROBLEM POSSIBLE CAUSE SOLUTION | ||
| The brew now “Colar Ahora” light does not light up | ·The appliance is unplugged.·There’s a power outage. | ·Plug unit in.·Wait for power to be restored. |
| The coffee is not brewing ·The appliance is unplugged.·There’s a power outage.·Not enough water in water reservoir.·The filter basket is not properly inserted.·The glass decanter/ thermal carafe is not placed all the way on the warming plate/ platform. | ·Plug unit in.·Wait for power to be restored.·Fill water reservoir above minimum level marking.·Insert filter basket correctly.·Place glass decanter/ thermal carafe correctly on warming plate/ platform. | |
| The coffee maker only brews water | ·There are no coffee grounds in the filter basket. | ·Add the desired amount of coffee to the filter. |
| The coffee maker brews slowly ·The coffee maker needs cleaning. | ·Clean coffee maker as described in “cleaning and maintaining” section. | |
| The filter basket overflows ·The filter basket is not properly inserted.·The glass decanter/ thermal carafe is not placed all the way on the warming plate/ platform.·Too many coffee grounds were place in the filter.·The glass decanter/ thermal carafe was removed from the warming plate/ platform for more than 30 seconds. | ·Insert filter basket correctly.·Place glass decanter/ thermal carafe correctly on warming plate/ platform.·Remove filter and discard ground. If using paper filter, replace it. If using permanent filter, rinse it. Begin brewing process again.·Turn off and unplug the unit. Allow it to cool. Wipe up spill | |
| The coffee is not hot ·There is a power outage. ·Wait for power to be restored. | ||
| The coffee tastes bad ·Coffee grounds other than for an automatic drip coffee maker was used.·The ground coffee-to-water ratio was unbalanced.·The coffee maker needs cleaning. | ·Use coffee grounds recommended for automatic drip coffee makers.·Use correct ground coffee-to-water ratio.·Clean coffee maker as described in “Maintaining your coffee maker” section. | |
| The grounds are in the coffee ·The filter is not properly seated in the basket.·The filter collapsed. | ·Seat filter properly described within the filter basket.·Remove filter and replace. | |
| The brew now “Colar Ahora” led is flashing fast | ·Glass decanter/ thermal carafe is not placed all the way on the warming plate/ platform.·Not enough water in water reservoir. | ·Place glass decanter/ thermal carafe correctly on warming plate/ platform.·Fill the water reservoir above minimum level marking. |
CONSIGNES IMPORTANTES
NOTE: Scalding may occur if the lid is open during brewing cycles.
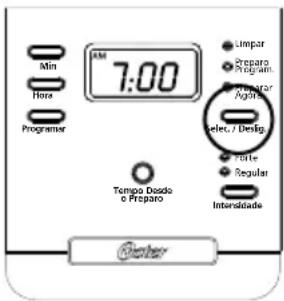
figura 4
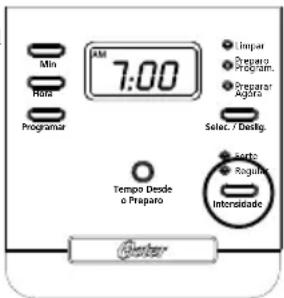
figura 5
CLEANING AND MAINTAINING YOUR COFFEE MAKER
Limpeza diária
The following information is intended for Mexico only
CAFETERA PROGRAMABLE OSTER®
MODELOS: BVSTDC4401, BVSTDC4401-013,
BVSTDC4402, BVSTDC4402-013
© 2011 Sunbeam Products, Inc. All rights reserved. Distributed by Sunbeam Latin America, LLC, 5200 Blue Lagoon Drive, Suite 470, Miami, FL 33126. One year limited warranty – please see insert for details.
- IMPORTANT SAFEGUARDS
- DECANTER (MODEL 4401 ONLY)/ THERMAL CARAFE (MODEL 4402 ONLY) USE AND CARE
- SAVE THESE INSTRUCTIONS
- SPECIAL CORD SET INSTRUCTIONS
- DESCRIPTION OF THE APPLIANCE
- Control Panel
- COFFEE MAKER FEATURES AND BENEFITS
- BEFORE USING YOUR COFFEE MAKER FOR THE FIRST TIME
- SETTING THE CLOCK AND DELAY BREW TIME
- To Set the Clock:
- To Set the Delay Brew Time:
- Selecting and Measuring Ground Coffee
- Suggested Coffee Measurement Chart
- Adding Water and Ground Coffee
- BREWING COFFEE NOW
- THE FRESH BREW TIMER FEATURE
- BREWING COFFEE LATER
- To cancel delay brew:
- CLEANING AND MAINTAINING YOUR COFFEE MAKER
- Daily Cleaning
- Regular Cleaning and Maintenance
- Cleaning the Glass Decanter/ Thermal Carafe
- TROUBLESHOOTING YOUR COFFEE MAKER
- CONSIGNES IMPORTANTES
- Limpeza diária
Brand : OSTER
Model : BVSTDC4401RD
Category : Coffee machine