EPIH 5120 - Heating QLIMA - Free user manual and instructions
Find the device manual for free EPIH 5120 QLIMA in PDF.

| Product type | Electric wall heater |
| Brand | Qlima |
| Model | EPIH 5120 (Sereno) |
| Nominal power | 2000 W (2 kW) |
| Supply voltage | 230 V ~ 50 Hz |
| Control type | Electronic with weekly timer |
| Connectivity | Wi-Fi 2.4 GHz (Smart model) |
| Compatible app | Smart Life |
| Open window detection | Yes |
| Key lock | Yes |
| Frost protection | Yes (maintains 7°C) |
| Seasonal energy efficiency | 96.0% |
| Operating modes | Automatic and Manual |
| Timer | 7 days, 24 hours |
| Program copy function | Yes |
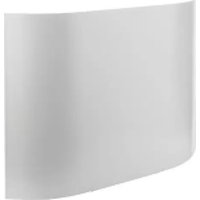
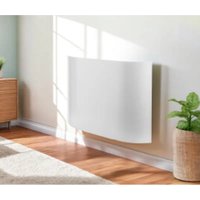
| Installation | Wall-mounted (wall fixing) |
| Minimum height from floor | 250 mm |
| Minimum distance in front | 500 mm |
| Minimum distance above | 100 mm |
| Heating type | Natural convection |
| Maintenance | Vacuum on grilles, damp cloth |
| Repairs | To be handled by an authorized technician |
Frequently Asked Questions - EPIH 5120 QLIMA
User questions about EPIH 5120 QLIMA
0 question about this device. Answer the ones you know or ask your own.
Ask a new question about this device
Download the instructions for your Heating in PDF format for free! Find your manual EPIH 5120 - QLIMA and take your electronic device back in hand. On this page are published all the documents necessary for the use of your device. EPIH 5120 by QLIMA.
USER MANUAL EPIH 5120 QLIMA
natural_image
3D rendering of a white curved mechanical component with a small digital display on the right side (no text or symbols visible)| D | BEDIENUNGSANLEITUNG | 2 |
| DK | BETJENINGSMANUAL | 10 |
| E | MANUAL DE INSTRUCCIONES | 18 |
| FIN | KÄYTTÖOHJE | 26 |
| F | MANUEL D'UTILISATION | 34 |
| GB | USER MANUAL | 42 |
| N | BRUKSANVISNING | 50 |
| NL | GEBRUIKERSHANDLEIDING | 58 |
| I | MANUALE D'USO | 66 |
| S | INSTRUKTIONSBOK | 74 |
| SLO | UPORABNIŠKI PRAVILNIK | 82 |
⚠️ ACHTUNG
natural_image
Technical diagram showing mechanical assembly with three views: top view, side view, and close-up of a component (no text or symbols)natural_image
Technical line drawing of a wall-mounted panel with an inset showing a close-up of the component (no text or symbols)B. BORTSKAFFELSE AF PRODUKTET
FORSIGTIG
natural_image
Technical illustration of mechanical assembly with three views: front view, side view, and close-up of a component (no text or symbols)D. ELEKTRISK FORBINDELSE
natural_image
Technical line drawing of a wall-mounted air conditioner unit with an inset showing the internal structure (no text or symbols)BESKRIVELSE AF KONTROLFUNKTIONER TIL DISPLAY
PRECAUCIÓN
natural_image
Technical line drawing of a wall-mounted panel with an inset showing a close-up of the component (no text or symbols)DESCRIPCION DE LA PANTALLA

VAROITUS
natural_image
Technical illustration showing mechanical assembly steps: bracket, panel, and close-up views of a device (no text or symbols)D. SÄHKÖLITÄNTÄ
natural_image
Technical line drawing of a wall-mounted panel with an inset close-up showing a bracket detail (no text or symbols)VALITSE MANUAALITILA
B. MISE AU REBUT DU PRODUIT
ATTENTION
natural_image
Technical line drawings of mechanical components with no visible text or symbolsD. CONNEXION ÉLECTRIQUE
natural_image
Technical line drawing of a wall-mounted panel with a magnified inset showing a connector detail (no text or symbols)DESCRIPTION DES CONTRÔLES DE L'ÉCRAN
![Qlima MODE ECO PROG 20:0 °C [Alma] 1 3](/content/2026/04/730117/images/98c5ee6e400bdb51c080ecac2b5f4cd57f4867635bc50edd29fe6660ca5e60bb.jpg)
A. SAFETY INSTRUCTIONS
Read the safety precautions before operation and installation of the appliance.
To prevent death or injury to the user, other people and property, the following instructions must be followed. Incorrect operation due to ignoring of instructions may cause death, harm or damage
Read this manual carefully before installing or operating your new product. Make sure to save this manual for future reference.
Explanation of the words/symbols of warning, caution, danger
| ⚠ WARNING | indicates that improper handling could have dramatic consequences like death, serious injury, etc. |
| ⚠ CAUTION | this symbos indicates the possibility of property damage or serious consequences |
| ∅ DANGER | indicates that wrongfully operating will most definitely result in a hazardous/life threatening situation. |
The appliance must be installed and operated in accordance with national and local legislation and European union standards.
WARNING
- This appliance is not intended for use by persons (including children) with reduced physical, sensory or mental capabilities, or lack of experience and knowledge, unless they have been given supervision or instruction concerning use of the appliance by a person responsible for their safety.
- Children should be supervised to ensure that they do not play with the appliance. Children may not play with the appliance.
- Children must be supervised around the unit at all times.
- This appliance can be used by children aged from 8 years and above and person with reduced physical, sensory or mental capabilities or lack of experience and knowledge if they have been given supervision or instruction concerning use of the appliance in a safe way and understand the hazards involved.
- Cleaning and user maintenance shall not be made by children without supervision.
- In order to avoid overheating, do not cover the appliance.
- The appliance should not be located directly under a wall socket.
- The appliance must not be used if the panels are damaged.
- Do not use this appliance in the immediate surroundings of a bath, a shower or a swimming pool.
- Do not use this appliance if it has been dropped.
- Do not use if there are visible signs of damage to the appliance.
- Use this appliance on a horizontal and stable surface, or fix it to the wall, as applicable.
- Installation must be performed according to the installation instructions. Improper installation can cause water leakage, electrical shock, or fire.
- Use only the included accessories, parts and specified tools for the installation.
- The unit must be kept free from obstruction to ensure proper function and to mitigate safety hazards.
- Do not modify the length of the power cord or use an extension cord to power the unit.
- Do not share a single outlet with other electrical appliances. Improper power supply can cause fire or electrical shock.
- This appliance is only to be used to heat indoor living spaces in residential houses. Only install it in residential houses, indoors and in a dry location. Exposure to water can cause electrical components to short circuit.
- Do not install the unit in a location that may be exposed to combustible gas, as this could cause fire.
- If the appliance has wheels to facilitate moving. Make sure not to use the wheels on thick carpet or to roll over objects, as these could cause tipping.
- Do not operate a appliance that has been dropped or damaged. Return to an authorized service facility for examination and/or repair or discard the unit.
- Do not touch the appliance with wet or damp hands or when barefoot.
- If the appliance is knocked over during use or layed horizontally, turn off the appliance and unplug it from the main power supply immediately. Visually inspect the appliance to ensure there is no damage and wait 24 hours. If you suspect the appliance is damaged, contact a technician or customer service for assistance.
- In a thunderstorm, the power must be cut off to avoid damage to the machine due to lightning. Your appliance should be used in such a way that it is protected from moisture. e.g. condensation, splashed water, etc. Do not place or store your appliance where it can fall or be pulled into water or any other liquid. Unplug immediately if it occurs.
- Have any repairs and/or maintenance carried out by a recognized service engineer only.
- Do not use harsh detergents, solvents, or similar items to clean the unit. Use a soft cloth for cleaning.
CAUTION
- If the supply cord is damaged, it must be replaced by the manufacturer, its service agent or similarly qualified persons in order to avoid a hazard.
- Prior to cleaning or other maintenance, the appliance must be disconnected from the supply mains.
- Do not run the cord under the carpet. Do not cover the cord with throw rugs, runners, or similar coverings. Do not place the cord under furniture or appliances. Place the cord away from traffic area and where it will not be tripped over.
- The appliance must be installed in accordance with national wiring regulations.
- Do not cover or obstruct the inlet or outlet grilles.
- Do not use this product for functions other than those described in this instruction manual.
- Disconnect the power if any irregularities appear, such as strange sounds, smell or smoke.
- Only use your fingers to press the buttons on the control panel.
- Do not operate or stop the appliance by inserting or pulling out the power cord plug.
- Always transport your appliance in a vertical position and stand on a stable, level surface during use.
- Turn off the product when not in use and unplug the appliance.
- Do not use the appliance in places where the humidity level exceeds 95% .
- Do not expose the appliance to extreme heat, cold or to direct sunlight.
- Do not use the appliance outdoors.
B. DISPOSING OF THE PRODUCT

In the EU this symbol indicates that this product should be disposed accordingly to the EU-WEEE legislation. Do not dispose of electrical appliances as unsorted municipal waste, use separate collection facilities.
Contact your local government for information regarding the collection systems available. If electrical appliances are disposed of in landfills or dumps, hazardous substances can leak into the groundwater and get into the food chain, damaging your health and well-being. When replacing old appliances with new ones, the retailer is legally obligated to take back your old appliance for disposal at least for free of charge. Pleasedispose any batteries according to the local collection facilities.
C. INSTALLATION INSTRUCTIONS
Please make sure to mount the appliance in the closed proximity of a power socket.
In a kitchen or bathroom, the connection box should be placed at least 25 cm from the floor.
In addition to the rules set out in this manual, the installation must comply with all current European, national and local standards.
CAUTION
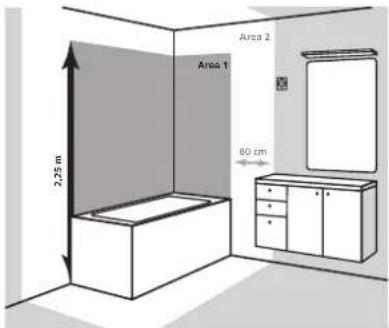
When fitting a EPIH radiator in a bathroom these instructions have to be followed:
• NEVER install the appliance in area 1.
- NEVER install the appliance in area 2 if the user can have access to it from the shower or bathtub.
- NEVER install the appliance under a wall socket. The wall socket must be placed behind, beside or below the radiator
To ensure the safety of your installation, you must:
- Place any objects (furniture, armchairs) at least 50 cm from the front of the appliance to allow air to circulate;
- Position the bottom of the appliance at the recommended height (see diagram below);
- Position a shelf at least 50 cm from the top of your radiator;
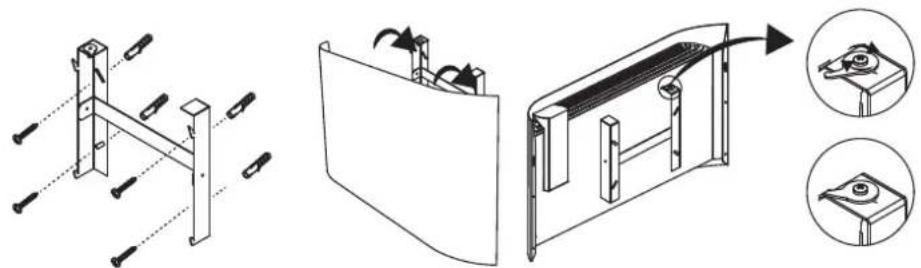
Mount the appliance to the wall using the screws provided. Most walls will also require to use drywall anchors (these are not provided in the package) - make sure to select the correct dry wall anchors for your wall. Search for expertise/advise if in doubt.
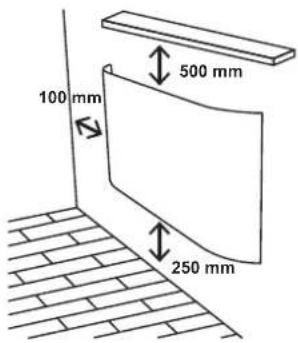
When mounting the appliance on the wall, please observe the minimum distances shown in the following diagram:
Once you have chosen a location for the appliance, remove the radiator from its packaging. The radiator is supplied with the wall bracket inserted. Using a screwdriver, turn the safety pin to release the wall bracket.
Support the bracket on the wall using it as a template. Take care to keep it completely horizontal. The following diagrams show an example of how to fix the bracket to the wall, depending on the chosen distance from the floor (min. 250 mm).
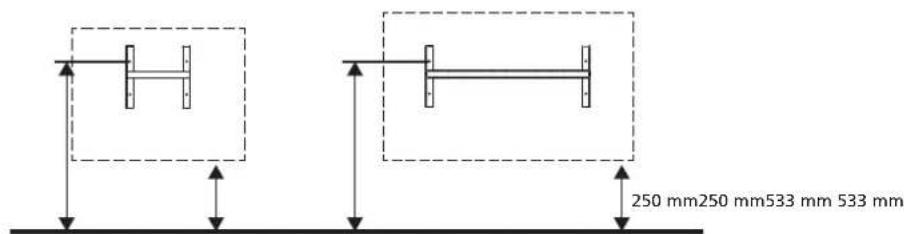
Once the appliance is attached, use a screwdriver to turn the safety pin until it is inserted into the tab and tighten the screw
natural_image
Technical line drawings of mechanical components with no visible text or symbolsD. ELECTRICAL CONNECTION
The technical characteristics of your radiator are shown on its rating label. Please make a note of these before installing it or requesting any after-sales service.
Connection to the mains supply must be made in compliance with:
• The voltage indicated on this label;
• The conventional colors:
- Blue: neutral
- Brown: phase
The appliance must be supplied with a 230V - 50Hz power supply.
If the supply cable is damaged, it must be replaced by the manufacturer, its after-sales service or a similarly qualified person in order to avoid any danger.
E. USE
SWITCHING ON THE RADIATOR
The radiator is fitted with a switch, located on the right-hand side of the control box. The radiator is supplied with the switch in position I (on).

natural_image
Technical line drawing of a wall-mounted air conditioner unit with an inset showing the internal structure (no text or symbols)DISPLAY CONTROL DESCRIPTION
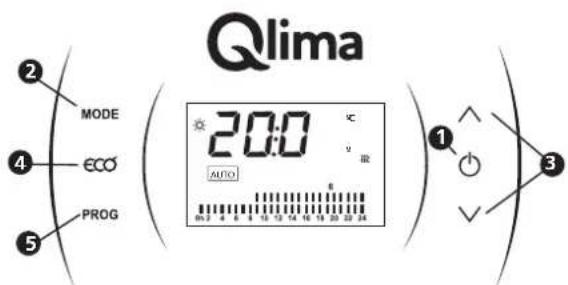
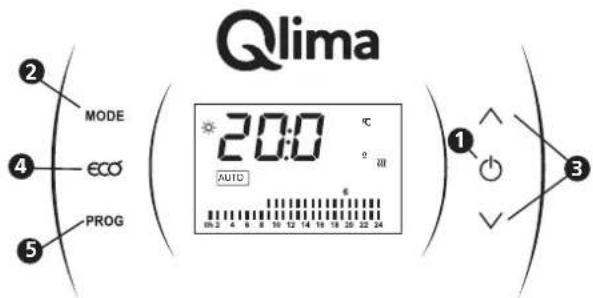
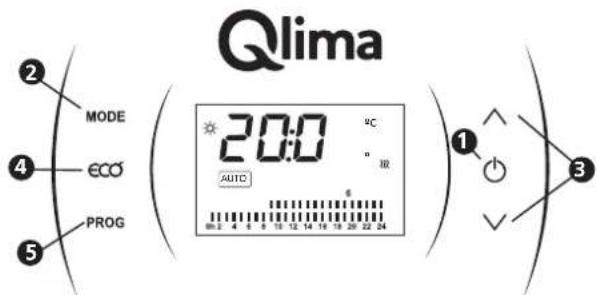
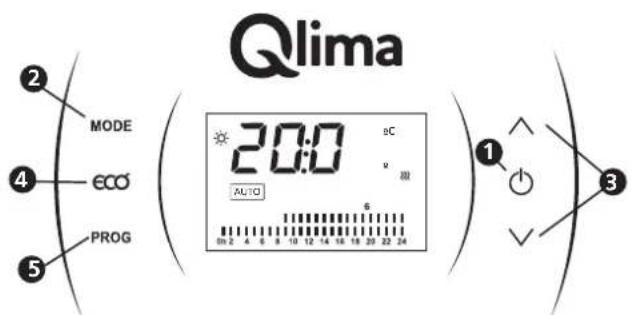
The six keys, visible on the right and left hand side of the screen can be activated by pressing them.
- The On/Off key: can be used to turn the appliance on or off. And can also be used to validate or confirm certain procedure actions
- The MODE key is used for changing from one working mode to another by short pressings on it, the resulting mode is shown in the screen.
- Arrow keys can be used to increase or decrease several values as temperature, time digits, etc.
- ECO key is a shortcut to reduce the current set temperature in manual mode with 3°C. It is a good option for short absences or as set temperature during the night. Note: The ECO shortcut can only be enabled when it is working in manual mode. You can also increase or decrease the eco temperature by pressing the up or down arrow keys.
- The PROG key will show up directly on program settings. We will see this later.
On the display screen you will also find valued information. Just a brief description of the icons and general info you can find on the screen:
DISPLAY CONTROL INSTRUCTIONS
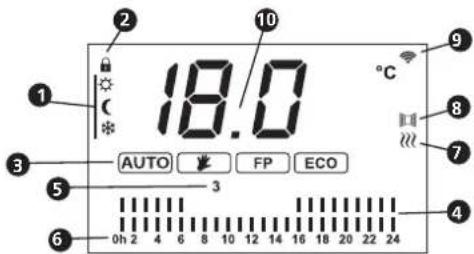
- Temperature working mode icons: comfort, eco or frost protection
- Keys locked for safety reasons
- Working mode
- Temperature setting program
- Day setting program
- Time setting program
- Heating Icon
- Open window detector is activated
- WI-FI signal
- Set temperature
SELECT WORKING MODES
EPIH appliances have two working modes, press the MODE button (at the left side frame of the thermostat panel) to change the working mode. At first, check that the thermostat is turned on.
When the MODE button is pressed, the display will show two options:
- AUTO mode AUTO By selecting this mode, the set temperature automatically varies from a predefined setting based on 3 temperatures (comfort, eco or frost protection). Bars on the display indicate hourly and daily temperature programming.
- Manual. By choosing this mode, the setting temperature van be selected and will not change unless wanted.
SELECT MANUAL MODE
By pressing the MODE key, the automatic mode can be changed to manual mode. Press the button of manual, then this icon will appear on the screen:
By using the arrow keys the desired comfort temperature can be selected.
When the manual mode is set, the economy mode can be activated by pressing the ECO button ECO
The temperature in ECO mode can also be adjusted by using the arrow buttons
SELECT AUTOMATIC MODE
Press the MODE button to activate automatic mode. This icon will appear on the display . AUTO
The programming settings should be installed as follows:
SETTING THE DATE AND TIME
Press and release PROG button key. The day of the week will blink on screen. In the example the number 4 appears, what means that the day four (thursday) is on screen.
By pressing arrow keys moving forward or backward the number from the day of the week can be selected. We press key ⏻ to confirm.
Once the day of the week is confirmed, the hour digits start to flash. These can be changed by pressing the arrow buttons and then confirmed with the button.
Once the hour digits are confirmed, the minute digits start flashing. These can also be changed by pressing the arrow buttons and then confirmed with the button.
When this is installed, it switches directly to weekly and daily programming.
If programming is not necessarily required, the MODE button can be pressed twice to avoid it.
SETTING THE DAILY PROGRAM
There are three different operating temperatures that can be set in the daily program. These can be assigned to each hour. Each hour, the following three options can be chosen from:
- Comfort temperature, a sun icon ⚙️ appears on the display. This is selected as the desired room temperature. - Economy temperature, the moon icon ⬇ will appear on the screen. This is often used at night or during short absences. This working temperature is always 3 degrees lower than the comfort temperature.
- Frost protection, the ice icon * will appear on the screen. This is the standby temperature, this prevents the room temperature from falling below 7 degrees.
Once setting the date and time is complete, the appliance can be further installed. After setting the time and date and then deciding to go out, the following steps should be followed:
Press the MODE button, after this the day of the week will start flashing on the display. This can be confirmed with the ⏻ button. Then the hour digits will start flashing, which can also be confirmed with the ⏻ , and the same will happen with the minutes.
This will cause the first day of the week to appear on the display. If it is desired to start this day program, this can be confirmed with the button. Using the arrow keys, the desired day can be selected and this can be confirmed when the correct day has been selected.
Programming starts at 0h, using the arrow keys to choose between comfort temperature (two dashes), eco-temperature (one dash) or frost protection (no dashes). This can be confirmed with the ⏻ key, and this will be the same for every hour until the 24h is reached. When confirmed with the ⏻ key, the second day of the week will appear on the display.
This process can be repeated for day 2, or it can be chosen to select another day where a program is to be set.
The program of one day can be copied to another day: the copy function can be selected by pressing the PROG key until "COPY" appears on the screen (further explanation is given below).
confirm completion of programming with ⏻ then exit by pressing the MODE button.
COPY FUNCTION
As mentioned earlier, this function allows copying a previously programmed day to another day.
Start from the beginning: turn on the thermostat and press PROG a few times until the word "COPY" appears on the screen. This is the sequence:
When ""COPY"" appears on the screen, the day can be selected with the arrow keys whose program is to be copied. To confirm, press the ⏻ button.
After this, the word ""to"" appears on the screen. Using the arrow keys, the number of the day can be selected which to copy. To confirm, press the button again.
KEY LOCK FUNCTION
This feature comes in handy to prevent unintended interventions on the thermostat or to limit its use.
To lock the thermostat, press both the MODE key and the up arrow key for a few seconds until a small lock icon appears on the screen.
To unlock the thermostat, follow the same steps.
OPEN WINDOW FUNCTION
The appliance has a built-in sensor that detects a sudden drop in temperature.
This function is activated when the temperature in the room drops by 3^ C in 5 minutes, the appliance will then switch off automatically.
This function remains active until the temperature stabilises, after that it will also switch back on automatically.
When this function is activated, a small window icon appears on the screen.
INSTALLATION OF THE WI-FI MODE FOR WIRELESS MANAGEMENT
The appliance can be regulated by using a smartphone app. The app communicates the appliance via the internet using the home router.
| Parameter Description | |
| Working frequency 2.400 to 2.4835 GHz | |
| Conducted power 13 dBm to 23 dBm | |
| Wireless standard IEEE 802.11b/g/n (channels 1 to 14) | |
| Data transmission rate 11b: 1, 2, 5.5, 11 (Mbps) | |
| Antenna type PCB antenna with a peak gain of 2.54 dBi | |
- Enable bluetooth and WiFi on your phone or tablet. Use your phone to scan the QR code App store to download and install the app.
- Open the app and sign in.
- Scan the QR code matching process. ② in the app in the top right corner to add a heater. Press the "ECO" button for 3 seconds to activate the Wi-Fi
- Follow the instructions in the app.
① or search "Smart life" in Google play or
1

2

NOTE:
The appliance supports 2.4 GHz Wi-Fi networks only. Check your network frequency, contact your Internet provider or refer to your wireless router manual.
• If the appliance is having trouble connecting to the Wi-Fi network, it may be too far from the router.
• The Wi-Fi connection may be interrupted because of the home network and/or surrounding wireless environment.
- The Wi-Fi connection may not work depending on the Internet provider.
Make sure the appliance is plugged into a power outlet and placed near a Wi-Fi router. It is important that the Wi-Fi network the appliance will be connected to is a 2.4 GHZ network.
Enable bluetooth and WiFi on your phone or tablet. Use your phone to search "Smart life" in Google play or App store to download and install the app. Follow the steps in the app that indicate how the appliance gets connected.
If no Wi-Fi network available: the appliance can be operated manually on its control display.
First, plug in the main cable to the wall socket and click the switch at the right upper side of the appliance.
Hereby, PVG declares that the devices EPIH 16xx y EPIH 51xx are in compliance with Directive 2014/53/EU.
The full text of the EU declaration of conformity is available at the following internet address: https://www.qlima.com/ or https://www.pvg.eu/
F. TROUBLESHOOTING
| Problem Probable cause | Solution | |
| The appliance does not heat up | The appliance is in energy-saving mode | Due to the thermal inertia, the appliance transfers heat to the room; should you need more temperature, increase the appliance temperature. |
| The room does not reach the desired temperature | Incorrect setting of the set temperature | Check the set temperature on the display to verify it is the desired temperature |
| Improper sizing The power is not the adequate for the place in which it has been installed | ||
| Excessive height | Make sure the system is installed at the recommended height or rise set temperature to compensate probe reading | |
| Input and output grids are obstructed | Do not place anything on top of the radiator and do not install it inside a hole made in the septum | |
| The radiator does not operate | Set temperature below room temperature | Rise the radiator's set temperature until it is 1 degree above the room temperature |
| Control panel switch and protection down | Check that the automatic limiter in the installation is not down. If it is down put it up.Make sure the installation is correct and that there are independent lines for the heating system with a 2.5 mm^2 cable gauge and a maximum power of 3500 w | |
| Switch is off Set the switch in position I. | ||
| Program is OFF Check that the set program is the chosen one or set the one you desire. | ||
| The radiator stains the walls | Radiator located at a very low height | The minimum height from the floor to the radiator's lower part must be at least 25 cm. |
| Dust accumulation in the lower grid. | Vacuum it. The vacuuming should be done at the beginning of each heating season. | |
| Type of painting on the wall Paints with a high content in rutile are likely to darken | ||
| Blocked buttons No response from operating buttons | Press buttons MODE and ∧ simultaneously for 3 seconds | |
G. MAINTENANCE
The floor should be kept clean to avoid stains on the wall due to a convection effect at the appliance.
Always make sure the radiator openings are completely clean and are fully open. Check this weekly and clean if openings are not completely open
At the beginning of the heating season, the underside of the appliance should be vacuumed. This is important because dust can accumulate in the lower grille, this can affect the natural convection airflow and cause stains on the wall.
The appliance can be cleaned with a damp cloth or Soapy water.
H. WARRANTY

This section of the manual outlines the terms and conditions of the guarantee for the appliance you have purchased. Scan the QR-code below that directs you to the full information and your rights regarding the product warranty. Please read the information specified on the weblink carefully. If there is no warranty support for your country, then please contact your local dealer.
To prevent unnecessary expense, we recommend that you always first carefully consult the instructions for use. Please call the after sales number if these instructions do not provide a solution.
Should the intructions not be sufficient, see the back of the manual for your country's after-sales number.
I. ERP TABLE
| Contact details | PVG Holding BV, Kanaalstraat 12c, 5347KM Oss, The Netherlands | |||||||
| Model identifier(s) EPIH | ||||||||
| Item Symbol Value Value Value Value | Value Value Unit | |||||||
| Ovido EPIH 1610 | Ovido EPIH 1615 | Ovido EPIH 1620 | Sereno EPIH 5110 | Sereno EPIH 5115 | Sereno EPIH 5120 | |||
| Heat output | ||||||||
| Nominal heat output | P_nom | 1,000 1,500 | 0 2,000 1,000 | 1,500 2,000 kW | ||||
| Minimum heat output (indicative) | P_min | 1,000 1,500 | 0 2,000 1,000 | 1,500 2,000 kW | ||||
| Maximum continuous heat output | P_max,c | 1,000 1,500 | 0 2,000 1,000 | 1,500 2,000 kW | ||||
| Power Consumption | ||||||||
| In off-mode | P_0 | 0,00 W | ||||||
| In standby mode | P_sm | 0,46 W | ||||||
| In idle mode | P_idle | 0,46 W | ||||||
| In networked standby mode | P_nsm | 0,46 W | ||||||
| Standby mode with display of information or status | [Yes] | |||||||
| Seasonal space heating energy efficiency | ns 96.0 % | |||||||
| Type of heat output/room temperature control | ||||||||
| Single stage heat output and no room temperature control | [no] | |||||||
| Two or more manual stages, no room temperature control | [no] | |||||||
| Mechanic thermostat room temperature control | [no] | |||||||
| Electronic room temperature control | [no] | |||||||
| Electronic room temperature control plus day timer | [no] | |||||||
| Electronic room temperature control plus week timer | [yes] | |||||||
| Other control options | ||||||||
| Room temperature control, with presence detection | [no] | |||||||
| Room temperature control, with open window detection | [yes] | |||||||
| Distance control option | [yes] | |||||||
| Adaptive start control | [no] | |||||||
| Working time limitation | [no] | |||||||
| Black bulb sensor | [no] | |||||||
| Self-learning functionality | [no] | |||||||
| Control accuracy | [yes] | |||||||
A. SIKKERHETSINSTRUKSJONER
B. AVHENDING AV PRODUKTET

FORSIKTIG
natural_image
Technical illustration showing mechanical assembly steps: bracket, panel, and fan assembly (no text or symbols)D. ELEKTRISK TILKOBLING
natural_image
Technical line drawing of a wall-mounted panel with an inset showing a close-up of the component (no text or symbols)BESKRIVELSE AV SKJERMKONTROLL
INNSTILLING AV DATO OG KLOKKESLETT
C. INSTALLATIE INSTRUCTIES
LET OP
natural_image
Technical illustration of a mechanical assembly with exploded and assembled views (no text or symbols)D. ELEKTRISCHE AANSLUITING
natural_image
Technical line drawing of a wall-mounted panel with a magnified inset showing a close-up detail (no text or symbols)BESCHRIJVING DISPLAYBEDIENING

FUNCTIE RAAM STAAT OPEN
F. PROBLEEMOPLOSSING
ATTENZIONE
natural_image
Technical illustration of mechanical assembly with exploded view and close-up views (no text or symbols)ACCENSIONE DEL RADIATORE
natural_image
Technical line drawing of a wall-mounted panel with an inset showing a close-up of the component (no text or symbols)DESCRIZIONE DEL CONTROLLO DEL DISPLAY
B. KASSERA PRODUKTEN
FÖRSIKTIGHET
natural_image
Technical line drawings of mechanical components with no visible text or symbolsD. ELEKTRISK ANSLUTNING
natural_image
Technical line drawing of a wall-mounted device with a magnified inset showing internal components (no text or symbols)DISPLAY KONTROLL BESKRIVNING

The programming settings should be installed as follows:
INSTÄLLNING AV DATUM OCH TID
FUNKTION FÖR NYCKELLÅS
POZOR
natural_image
Technical illustration of mechanical assembly with three views: front view, side view, and close-up (no text or symbols)D. ELEKTRIČNI PRIKLJUČEK
natural_image
Technical line drawing of a wall-mounted panel with a magnified inset showing a close-up detail (no text or symbols)OPIS NADZORA PRIKAZA

Distributed in Europe by PVG Holding B.V.
Benötigen Sie weitere Informationen oder treten Probleme auf, besuchen Sie bitte unsere Website www.qlima.com, oder setzen Sie sich mit unserem Kundendienst in Verbindung (T: +31 412 694 694).
For alle yderligere oplysninger eller ved eventuelle problemer med apparatet henvises til www.qlima.com eller det lokale Kundecenter (T: +45 77 34 33 30).
Si necesita información o si tiene algún problema, visite nuestra página Web www.qlima.es, o póngase en contacto con el servicio cliente (T: +34 916 113 113).
F Si vous souhaitez obtenir des informations supplémentaires ou si vous rencontrez un problème, rendez-vous sur notre site Web (www.qlima.fr / www.fr.qlima.be) ou contactez notre service client (T : +33 2 32 96 73 18) support.convectors@pvg.eu.
FHN Jos haluat huoltoapua, lisätietoja tai laitteen kanssa tulee ongelmia, tutustu verkkosivustoon osoitteessa www.qlima.com tai kysy neuvoa PVG kuluttajapalvelukeskuksesta (T: +45 77 34 33 30).
If you need information or if you have a problem, please visit the our website (www.qlima.com) or contact our sales support (T: +31 412 694 694).
① Per informazioni e in caso di problemi, visitate il sito Web www.qlima.it oppure contattate il Centro Assistenza Clienti (T: +39 0571 628 500).
Hvis du trenger informasjon, eller hvis du har et problem med produktet, kan du gå til nettsidene www.qlima.com. Alternativt kan du kontakte med PVG' forbrukertjeneste (T: +45 77 34 33 30).
Als u informatie nodig hebt of als u een probleem hebt, bezoek dan de onze website (www.qlima.nl / www.qlima.be) of neem contact op met de afdeling sales support (T: +31 412 694 694 / +32 (0)3 326 39 39).
Se necessitar de informações ou se tiver problemas, visite o Web site www.qlima.es ou contacte o Centro de Assistência (T: +34 916 113 113).
PL W przypadku problemów i w celu uzyskania szczegółowych informacji odwiedź stronę internetową Qlima dostępną pod adresem www.qlima.com lub skontaktuj się z Centrum kontaktów Qlima (T: +48 48 613 00 70)
^6 Om du behöver service eller information eller har problem med apparaten kan du besöka www.qlima.com eller kontakta Qlima kundtjänst (T: +45 77 34 33 30).
SLO Če želite dodatne informacije, obiščite spletno mesto podjetja na naslovu www.qlima.si ali pokličite na telefonsko (T: +386 (0)41 674 139).