
Intensium RO6675 - Vacuum Cleaner ROWENTA - Free user manual and instructions
Find the device manual for free Intensium RO6675 ROWENTA in PDF.

| Product type | Bagless vacuum cleaner |
| Brand | Rowenta |
| Model | Intensium RO6675 |
| Category | Vacuum cleaner |
| Filtration | HEPA filter (RS-RT3186), black foam filter (RS-RT3184), microfilter (RS-RT3185) |
| Separation system | Cyclonic with separator, grid and compartment |
| Dust container | Transparent, with max fill level and carrying handle |
| Power control | Mechanical on the handle, 3 positions: Soft, High, Turbo |
| Included accessories | Hose with handle, telescopic tube, all-floor nozzle, crevice nozzle, upholstery nozzle, brush, accessory clip (depending on model) |
| Cord length | Approx. 8 meters (estimate) |
| Cord rewinder | Rewind pedal |
| On/Off pedal | Yes |
| Carrying handle | Yes, on the container and on the body |
| Casters | Yes |
| Parking position | Yes, tube storage at the back |
| Motor protection | Overheating protection |
| Filter maintenance | Foam filter: every 6 months; microfilter: every 3 months; HEPA: once a year or if damaged |
| Container cleaning | After each use, wash with clean water |
| Use | Household use only |
| Spare parts | Available at Rowenta Authorized Service Centers |
Frequently Asked Questions - Intensium RO6675 ROWENTA
User questions about Intensium RO6675 ROWENTA
0 question about this device. Answer the ones you know or ask your own.
Ask a new question about this device
Download the instructions for your Vacuum Cleaner in PDF format for free! Find your manual Intensium RO6675 - ROWENTA and take your electronic device back in hand. On this page are published all the documents necessary for the use of your device. Intensium RO6675 by ROWENTA.
USER MANUAL Intensium RO6675 ROWENTA
natural_image
Black and white photo of a Rowente vacuum cleaner with open handle and branding (no visible text or symbols on device body)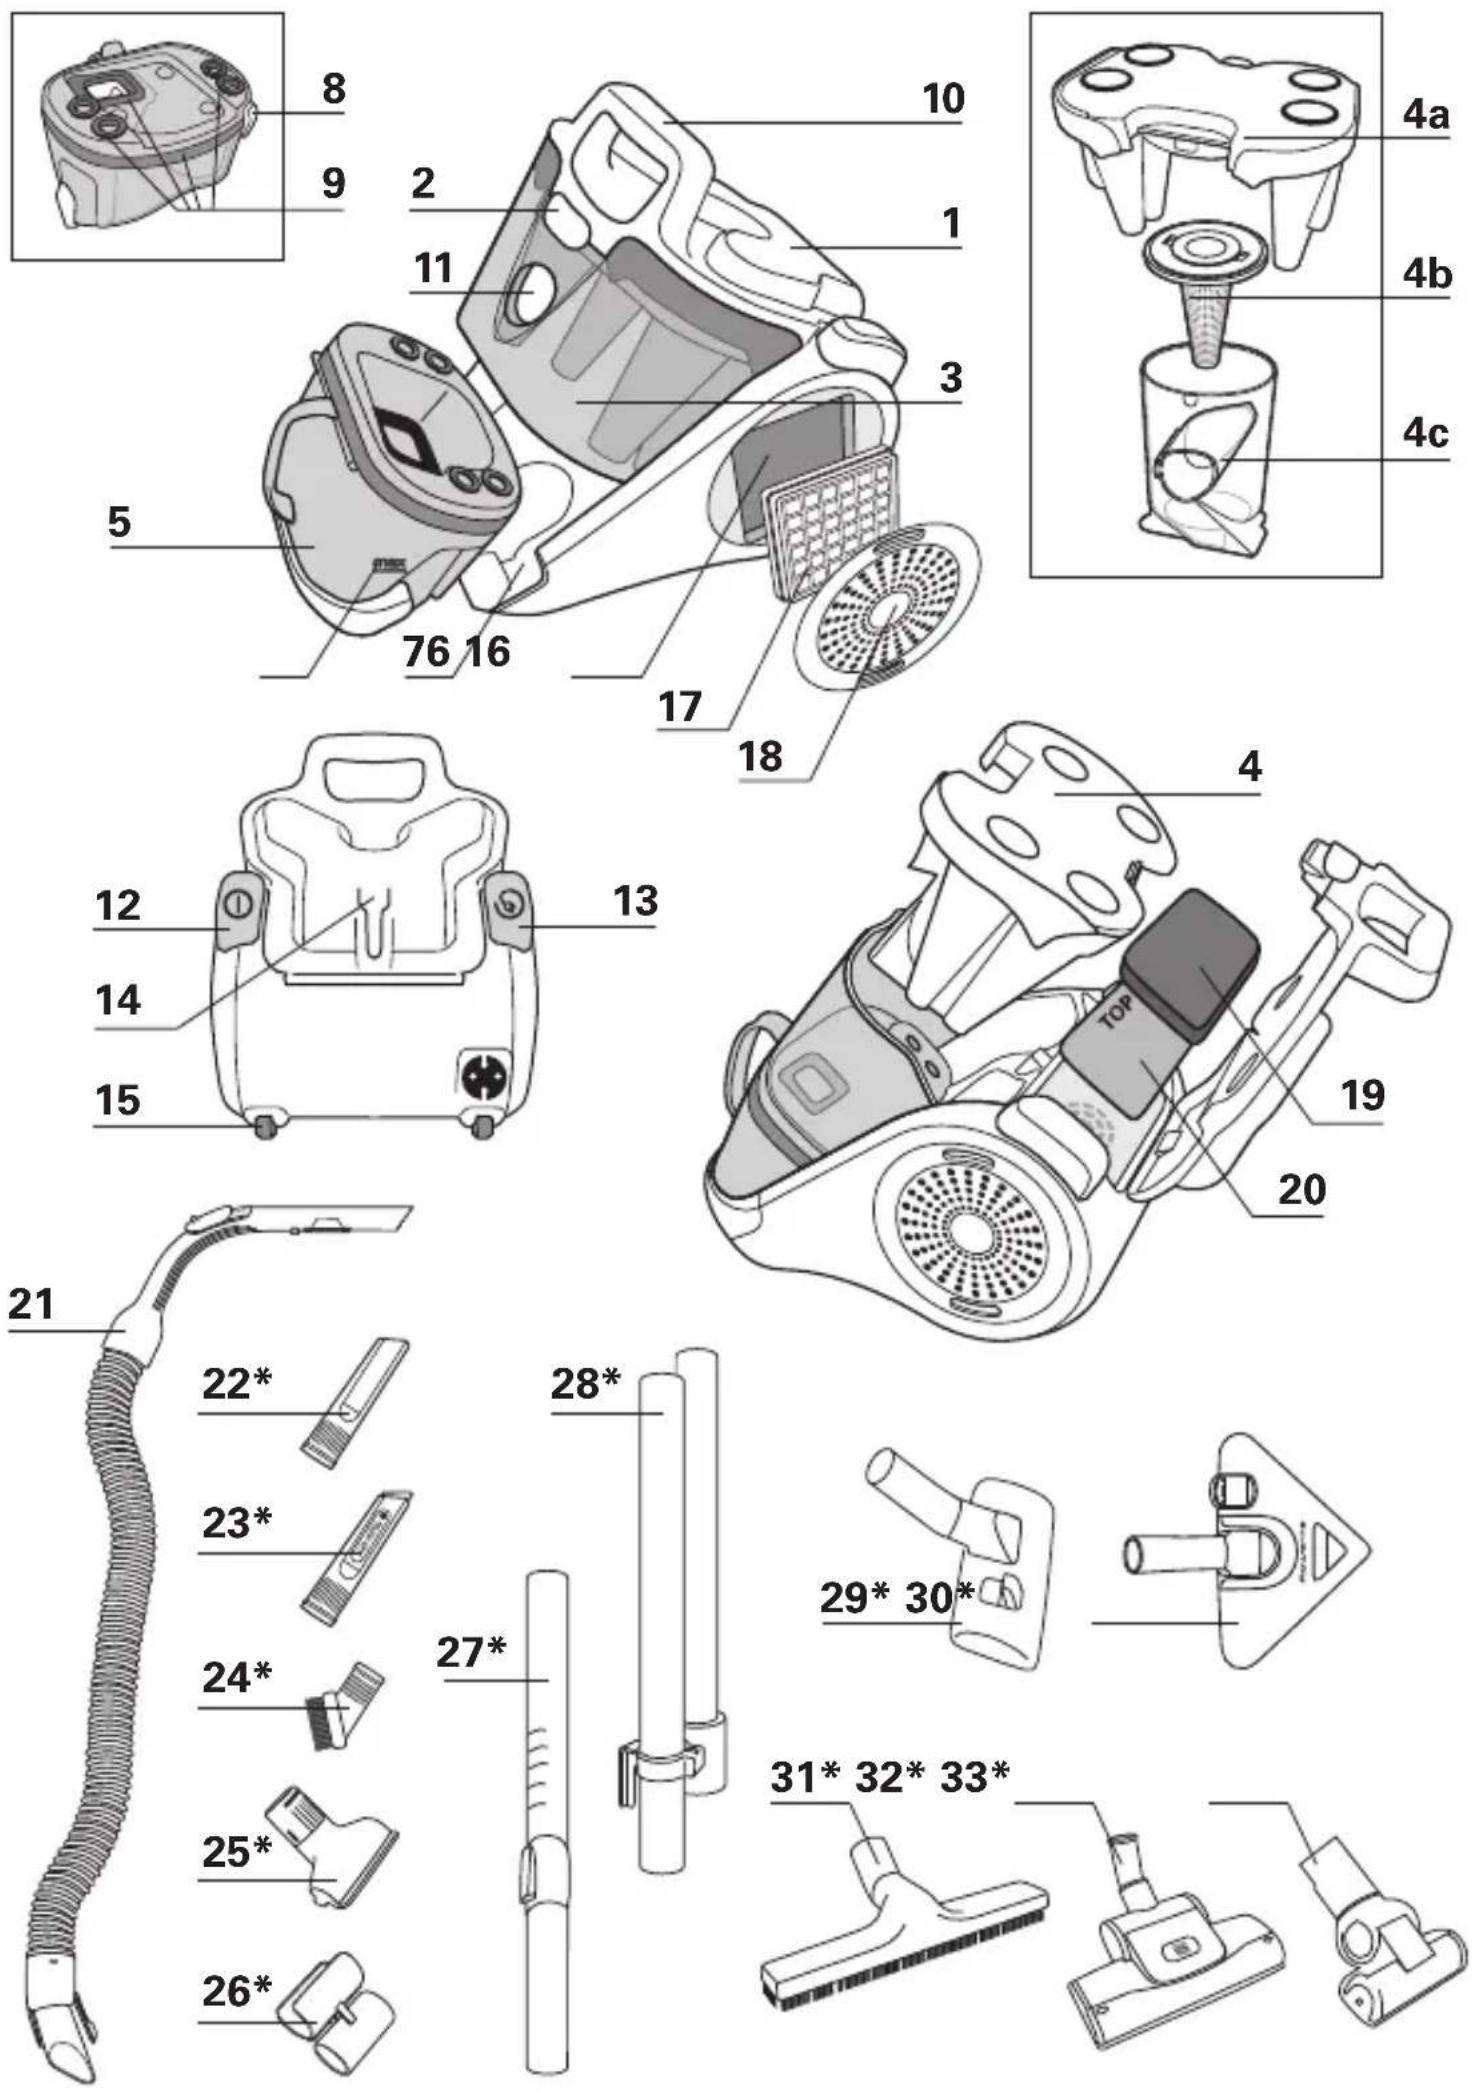
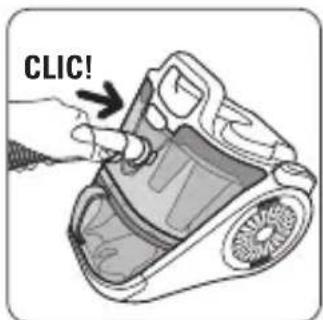
Fig.1
natural_image
Illustration of a hand holding a tool with three buttons and arrows indicating movement or assembly (no text or symbols)Fig.2 Fig.3 Fig.4
natural_image
Illustration of hands holding a tool with directional arrows indicating movement (no text or symbols)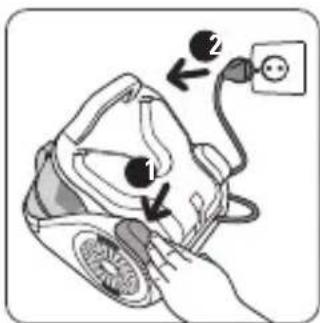
natural_image
Illustration of hands using a tool to adjust or install a device component, with a black arrow indicating the process (no text or symbols present)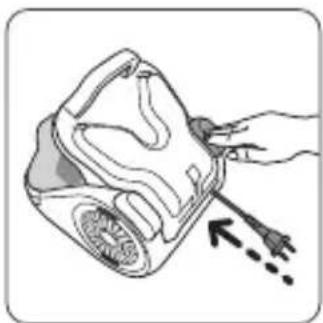
natural_image
Illustration of a hand holding a medical device with an arrow pointing to it (no text or symbols present)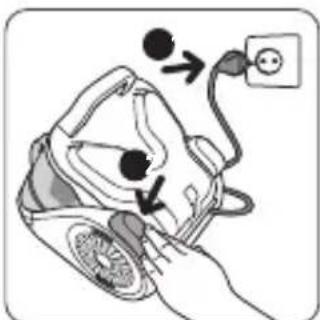
Fig.5 Fig.6 Fig.7 Fig.8
natural_image
Illustration of a hand holding a small object with an arrow indicating rotational motion (no text or symbols)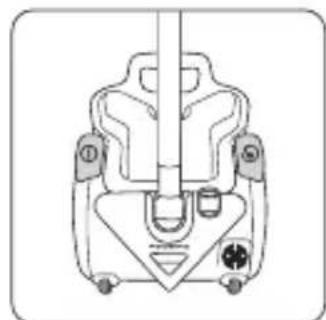
natural_image
Technical line drawing of a mechanical component with no visible text or symbols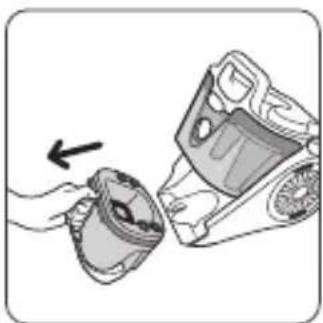
natural_image
Illustration of a hand holding a mechanical component with an arrow indicating motion (no text or symbols)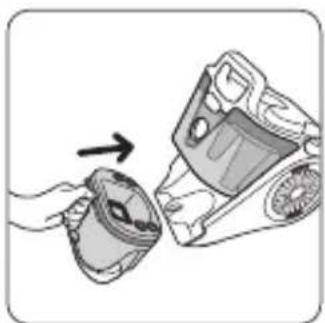
natural_image
Illustration of a hand holding a mug and a device with an arrow pointing to it (no text or symbols present)
natural_image
Line drawing of a hand pointing at a device with buttons and a display (no text or symbols)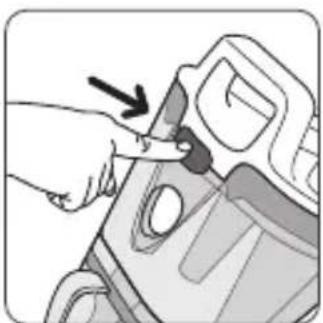
natural_image
Illustration of a hand inserting a small object into a device component (no text or symbols visible)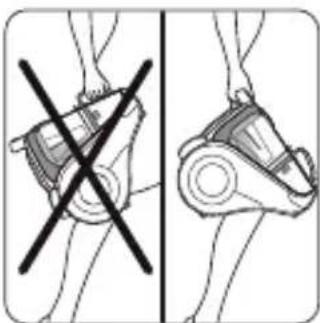
natural_image
Diagram showing two views of a mechanical device with a crossed-out black cross, no text or symbols present.Fig.9 Fig.10 Fig.11 Fig.12
natural_image
Illustration of a hand pouring liquid into a container with granular material (no text or symbols)Fig.13 Fig.14 Fig.15 Fig.16
natural_image
Line drawing of a hand holding a device with a spring-like object inside (no text or symbols)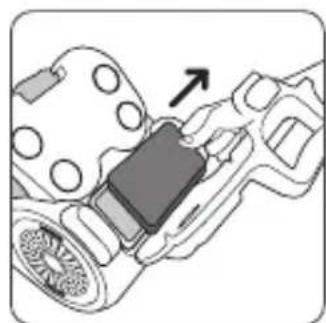
natural_image
Mechanical assembly diagram showing a belt switch mounted on a housing (no text or symbols visible)
natural_image
Illustration of a hand holding a mug and a device with an arrow pointing to it (no text or symbols present)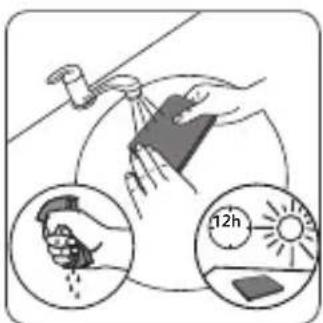
natural_image
Illustration of a hand pressing down on a car interior with a black arrow indicating the action (no text or symbols present)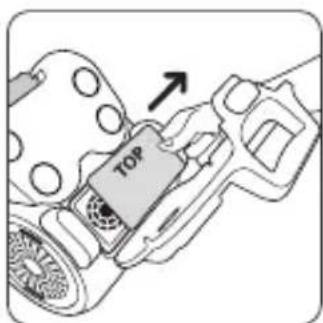
natural_image
Illustration of a hand holding a tool interacting with a mechanical device (no text or symbols visible)Fig.17 Fig.18 Fig.19 Fig.20
natural_image
Illustration of a hand cleaning a large spherical object with a tool, accompanied by a magnified view showing time measurement (12h) and a solar panel on the ground.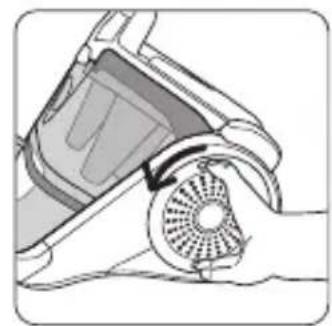
natural_image
Illustration of a hand using a vacuum cleaner to lift a circular fan (no text or symbols visible)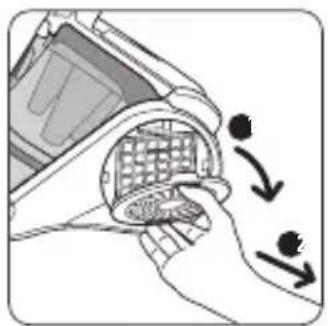
natural_image
Illustration of a hand holding a computer monitor with a grid-patterned screen, showing a curved arrow indicating rotation (no text or symbols present)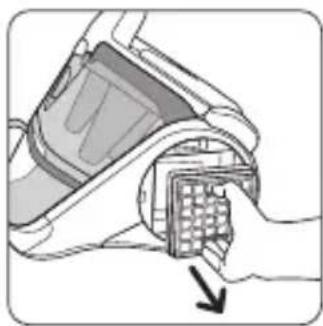
natural_image
Illustration of a hand inserting a device into a grid (no text or symbols visible)Fig.21 Fig.22 Fig.23 Fig.24
natural_image
Illustration of hands using a griddle to spread small particles into a container (no text or symbols)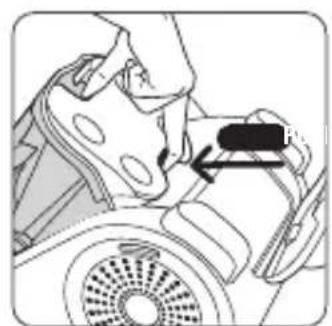
natural_image
Mechanical assembly diagram showing a hand operating a component with a black arrow indicating direction (no text or symbols present)
natural_image
Illustration of a person in a wheelchair with an arrow indicating direction (no text or symbols)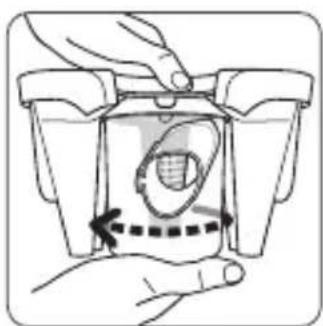
natural_image
Illustration of a hand holding a container with a dashed arrow indicating a motion or force (no text or symbols present)Fig.25 Fig.26
natural_image
Illustration of a hand holding a mechanical component with a downward arrow indicating motion (no text or symbols)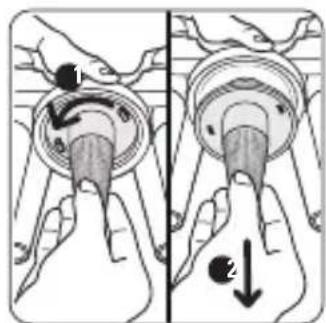
Fig.27 Fig.28
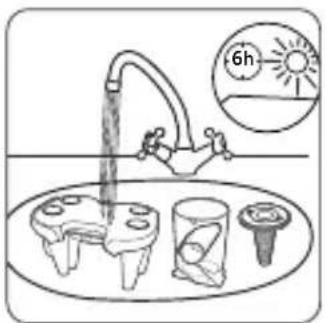
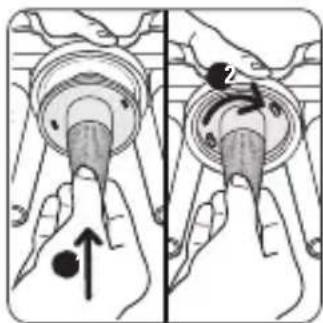
Fig.29 Fig.30

natural_image
Illustration of a hand holding a mechanical component with an arrow indicating force or movement (no text or symbols present)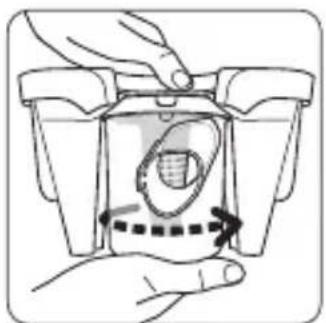
natural_image
Illustration of a hand pressing down on a mechanical component with arrows indicating motion (no text or symbols)Fig.31
natural_image
Illustration of a person in motion, possibly a robot or vehicle, with no visible text or symbolsFig.32
Fig.35 Fig.34 Fig.33
GARANTIE
- This appliance is for domestic use only; in the event of inappropriate use that does not comply with the instructions, the company shall take no liability and the warranty shall be null and void.
SAFETY RECOMMENDATIONS
For your safety, this appliance complies with all enforceable standards and regulations (Low Voltage Directives, Electromagnetic Compatibility, Environment, etc.).
1 • Conditions of use
Your vacuum cleaner is an electrical device: it must be used under normal conditions of use.
Use and store the appliance out of reach of children.
Never leave the appliance operating without supervision.
Do not hold the sucker attachment or tube close to your eyes and ears.
Do not use your vacuum cleaner on the wet surfaces, water or liquids of whatever kind, hot substances, extremely fine substances (plaster, cement, ash ...), large sharp objects (broken glass), products that are harmful (solvents, paint strippers ...), corrosive (acids, cleaning fluids...), flammable and explosive (petroleum or alcohol-based).
Never immerse the appliance in water, do not spray water onto the appliance and do not store it outdoors.
Do not use the appliance: if it has fallen and has visible damage or appears to be working abnormally. In this
- Read the instructions for use carefully before using your appliance for the first time: in the event of any use that does not comply with the instructions, Rowenta shall accept no liability.
case, do not open the appliance, but send it to the closest Approved Service Centre or contact the Rowenta Consumer Service (see contact information on the last page).
2 • Power supply
Check that the power voltage for your vacuum cleaner corresponds to that of your mains installation.
Disconnect the appliance by removing the plug from the wall socket, not by pulling on the cord: immediately after use, before each change of accessory, before each cleaning, maintenance or filter change operation.
Do not use the appliance if the power cord is damaged. To avoid danger, the whole reel and power cord unit of your vacuum cleaner must be replaced by an Approved Service Centre because special tools are needed to carry out any repairs safely.
3 • Repairs
Repairs are to be performed only by specialists with original spare parts.
Repairing an appliance oneself may constitute a danger to the user.
DESCRIPTION
1 Lid of the vacuum cleaner
2 Lid opening button
3 Front
4 Separation system
a Separator with cones
b Air/dust separation grid
c Separation compartment
5 Dust compartment
6 Dust compartment filling maximum level
7 Dust compartment housing
8 Dust compartment opening button
9 Dust compartment joints
10 Carrying handle
11 Suction opening
12 On/Off pedal
13 Cord winder pedal
14 Parking position
15 Rollers
16 HEPA filter housing
17 HEPA filter capsule (RS-RT3186)
18 Air outlet grid
19 Black foam filter (RS-RT3184)
20 Microfilter (RS-RT3185)
Accessories
21 Flexible pipe with extra-long power nozzle and mechanical power regulator*
22 Crevice tool*
23 Telescopic crevice tool*
24 Brush*
25 Upholstery nozzle*
26 Accessory clip*
27 Telescopic tube*
28 Extension tubes*
29 All floor nozzle*
30 Delta nozzle*
31 Parquet nozzle*
32 Turbobrush*
33 Mini Turbobrush*
*Depending on model:
this is either equipment specific to certain models or available as an optional accessory.
1 • Unpacking
Unpack your appliance, keep your warranty card and read the instructions for use carefully before using your appliance for the first time.
2 • Tips and precautions
Before each use, the cord should be unwound completely. Make sure that it does not get stuck or run against sharp edges.
If you are using an extension cord, make sure it is in perfect condition and that it suitable for the power of your vacuum cleaner. Never unplug the appliance by pulling on the cord.
Do not move the vacuum cleaner by pulling on the cord, the appliance must be moved by its carrying handle. Do not use the cord or the flexible hose to lift the appliance.
Stop and disconnect your vacuum cleaner after each use. Always stop and unplug your vacuum cleaner before maintenance or cleaning.
This appliance is not designed to be used by people (including children) with a physical, sensory or mental impairment, or people without
knowledge or experience, unless they are supervised or given prior instructions concerning the use of the appliance by someone responsible for their safety.
Children must be supervised to ensure that they do not play with the appliance.
Your vacuum cleaner is equipped with a protective device that prevents the engine overheating. In some cases (using the power nozzle on chairs, seats...), the protective device is triggered and the vacuum cleaner may emit an unusual noise which is not at all serious.
Use only original Rowenta accessories and filters. Make sure all the filters are in place.
Never operate the vacuum cleaner without the filtration system (foam, microfilter and filter).
Never put the foam and the microfilter into the vacuum cleaner before they are completely dry.
In the event that you find it difficult to obtain accessories and filters for this vacuum cleaner, contact the Rowenta customer service (see contact information on the last page).
USE
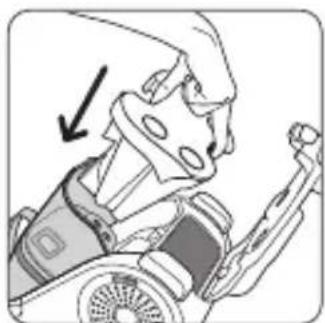
1 • Assembly of the parts of the appliance
Clip the nozzle of the hose into the suction inlet located on the front of the vacuum cleaner (fig. 1). To remove it, unclip the nozzle and pull.
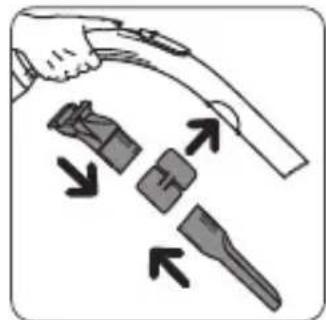
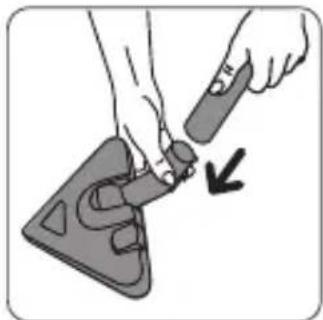
Attach the accessory clip to the power nozzle (fig.2) and fix the accessories to it (fig.2).
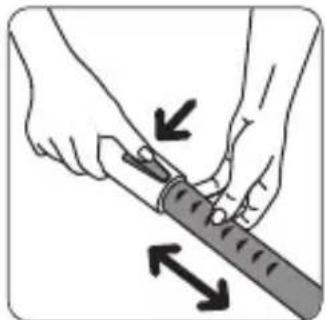
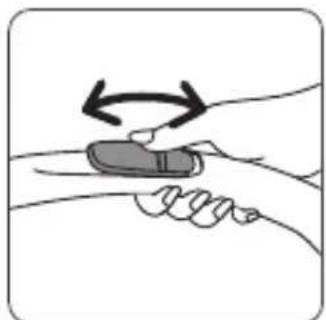
Assemble the telescopic tube* or extension tubes*. Adjust it to the desired length (fig.3).
Fit the desired accessory to the end of the tube (fig.4).
- For rugs and carpets: use the nozzle in the retracted brush position or the turbobrush* – (animal hair).
- For parquet and smooth floors: use the nozzle in brush position or, for a better result, use the parquet nozzle*.
- For corners and areas which are difficult to reach: us the crevice tool*.
- For furniture: use the upholstery nozzle*.
ATTENTION Always stop and unplug your vacuum cleaner before changing accessories.
2 • Connecting the cord and starting the appliance
Unwind the power cord completely, plug your vacuum cleaner in and press the On / Off pedal
ATTENTION Never operate the vacuum cleaner without the filtration system (foam, microfilter and filter).
(fig.5).
Adjust the suction power with the mechanical power regulator* on the power nozzle: open the slider on the power nozzle to manually reduce suction power, e.g.: on fragile
surfaces... (fig.6).
3 • Storing and transporting the appliance
After use, stop your vacuum cleaner by pressing the On / Off pedal and unplug it (fig.7). Rewind the power cord by pressing the cord winder pedal (fig.8).
CLEANING AND MAINTENANCE
The air we breathe contains particles that may be allergens: mite larvae and droppings, mould, pollen, smoke and animal residues (hair, skin, saliva, urine). The smallest particles penetrate deep into the respiratory system where they can cause inflammation and cause lung impairment. HEPA filters (High Efficiency Particulate Air) are used to filter out the smallest particles.
With the HEPA filter, the air released back into the room is healthier than the air that is vacuumed.
IMPORTANT Always stop and unplug your vacuum cleaner before maintenance or cleaning. Regularly check and clean all of your vacuum cleaner and the various filters.
ATTENTION Never operate the vacuum cleaner without the filtration system (foam, microfilter and filter).
1 • Empty the dust compartment (5)
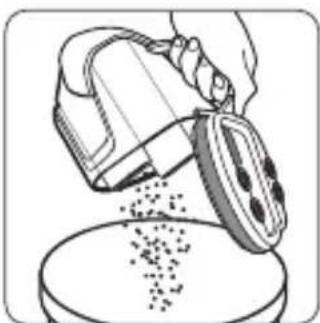
Empty the dust box after each use as follows: Take the dust compartment by the handle and pull it (fig.11).
Press the dust compartment opening button (fig.12) and then empty it (fig.13).
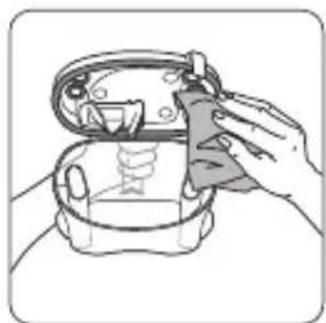
Clean the edges of the dust compartment with a cloth (fig.14).
Put the dust compartment back in place (fig.15).
ATTENTION Never exceed the maximum level given on the dust compartment.
Carry your vacuum cleaner easily thanks to its carry handle (10). Do not carry your vacuum cleaner by the dust compartment handle (fig.9).
When you store your vacuum cleaner, place the tube in his housing at the rear of your appliance (fig.10).
2 • Clean the dust compartment joints
Remove the dust compartment (fig.11). Clean the dust compartment joints with a cloth (fig.14).
Replace the dust compartment (fig.15).
3 • Clean the black foam filter (19)
IMPORTANT Every 6 months or when the suction is no longer satisfactory, wash the black foam filter.
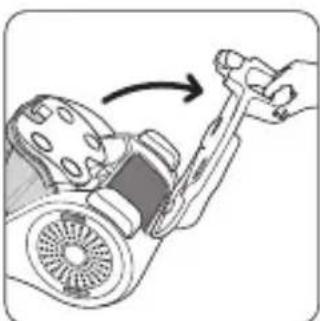
Press the lid opening button (fig.16). Tilt the lid back cover (fig.17).
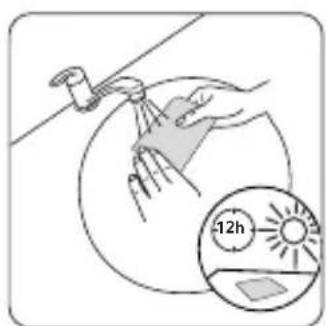
Remove the black foam filter (fig.18) then wash and wring it (fig.19). Leave it to dry for at least 12 hours before putting it back.
ATTENTION Leave the black foam filter to dry and make sure it is thoroughly dry before putting it back in the appliance.
Replace the black foam filter and close the lid.
4 • Clean the microfilter (20)
IMPORTANT Every 3 months, wash the microfilter.
Press the button to open the lid (fig.16). Tilt the lid back (fig.17).
Remove the black foam filter (fig.18) and then remove the microfilter (fig.20).
Wash the microfilter (fig.21). Leave it to dry for at least 12 hours before putting it back.
ATTENTION Leave the microfilter to dry and make sure it is thoroughly dry before putting it back in the appliance.
Replace the microfilter and the black foam filter and close the cover.
5 • Clean the HEPA filter (17)
IMPORTANT If after cleaning the black filter foam and microfilter, your vacuum cleaner does not resume its previous performances, clean the HEPA filter. Otherwise, clean the HEPA filter once a year.
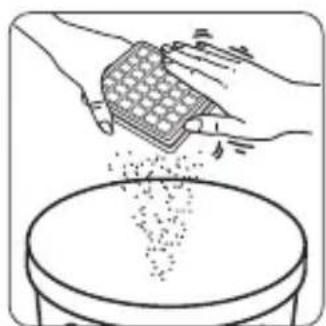
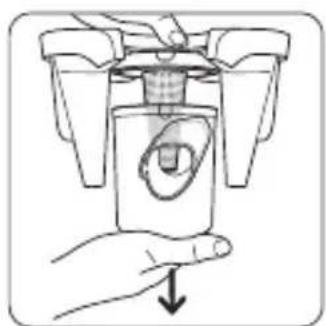
Unlock the air outlet grid on the side of the appliance by rotating it slightly to the left (fig.22) and remove it by pulling it (fig.23). Remove the HEPA filter from its housing (fig.24). Clean the HEPA filter by knocking it gently over a dustbin (fig.25). Put it back in its housing. Replace the air outlet grid and lock it by rotating it slightly clockwise.
IMPORTANT If the HEPA filter is damaged, replace it. The HEPA filter is available in Authorised Service Centres.
6 • Clean the separator (4)
Open the lid of the vacuum cleaner (fig.16-17).
Press the separator button (fig.26) and remove the separation system (fig.27).
Remove the separation compartment (4c) by turning it slightly to the left (fig.28) then separate the two components (fig.29).
Remove the separation grid (4b) (fig.30).
Wash the components (4a +4 b +4 c) in clear water.
Leave them to dry for 6H (fig.31).
Put the parts of the filtration system (4) back in place:
- replace the separation grid (4b) on the separator (4a) (fig.32)
- replace the separation compartment (4c) on the unit (4a + 4b) (fig.33-34)
- then replace the entire separation system (4a+4b+4c) in the vacuum (fig.35) and close the lid.
7 • Clean your vacuum cleaner
Wipe the body of the vacuum cleaner and the accessories with a soft damp cloth, then dry using a dry cloth.
Wash the dust compartment with water, then dry with a dry cloth.
IMPORTANT Do not use detergents or any corrosive or abrasive products. The transparency of the dust compartment and/or the front and/or lid may change over time. This does not affect performance.
ATTENTION Do not wash the vacuum lid under water. Clean it with a soft damp cloth.
TROUBLESHOOTING
IMPORTANT As soon as your vacuum cleaner stops performing efficiently, and before making any checks, stop it by pressing on the On/Off pedal.
If your vacuum cleaner does not start
- The appliance is not powered. Make sure the appliance is properly connected.
If there is no suction
- An accessory, the tube, the flexible hose, the separator (4a), the air/dust separation grid (4b) or the separation compartment (4c) are blocked: unblock them.
- The black foam filter (19) is saturated: clean it.
- The microfilter (20) is saturated: clean it.
- The HEPA filter (17) is saturated: clean it by tapping it over a dustbin. If the HEPA filter is damaged, replace it.
If your vacuum cleaner is not vacuuming properly or is making a whistling noise
- An accessory, the tube, the flexible hose, the separator (4a), the air/dust separation grid (4b) or the separation compartment (4c) are partially blocked: unblock them.
- The dust compartment is full: empty it and wash it.
- The vacuum cleaner lid is not properly positioned: close the lid tightly.
- The dust compartment is poorly positioned: put it back properly.
- The mechanical power regulator* on the power nozzle is open: close it.
If the separator is filled
- The dust is accumulating in the separator compartment (4c): make sure nothing is blocking the duct between the separator compartment and the dust compartment. Make sure nothing is obstructing the inlets to the dust compartment.
- The inlets to the dust compartment are obstructed: remove the dust compartment and empty it.
Clean the dust compartment joints.
If the floor nozzle is difficult to move
- Close the mechanical power regulator* on the power nozzle.
If the power cord does not wind up completely
- The cord slowed down as it was winding up: bring the cord back out and press the cord winder pedal again.
If the problem persists, take your vacuum cleaner to the nearest Rowenta Approved Service Centre. See the list of Rowenta Approved Service Centres or contact the Rowenta Consumer Service (see contact information on the last page).
| ACCESSORIES* USE | INSTALLATION OF THE ACCESSORY | WHERE TO BUY IT | |
Flexible pipe with High Control power nozzle and 3-position power regulator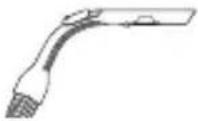 | To set the suction power, 3 positions: Soft - High - Turbo | Connect the flexible hose on the vacuum cleaner. | Rowenta Approved Service Centres (see list of addresses attached) |
Brush | For cleaning furniture. | Fit the brush to the end of the power nozzle. | |
Crevice tool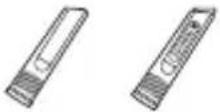 | For corners and areas which are difficult to reach | Fit the crevice tool or telescopic crevice tool to the end of the power nozzle. | |
Upholstery nozzle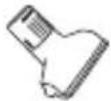 | For cleaning furniture. | Fit the upholstery nozzle to the end of the tube or the power nozzle. | |
Parquet nozzle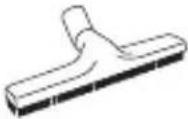 | For fragile floors. | Fit the parquet nozzle to the end of the tube. | |
Delta nozzle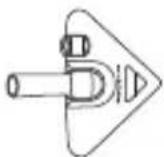 | For cleaning carpets, rugs and smooth floors. | Fit the Delta nozzle to the end of the tube. | |
Turbobrush | To remove threads and animal hair embedded in rugs and carpets. | Fit the turbobrush to the end of the tube. | |
Mini turbobrush | For deep cleaning of upholstery fabrics. | Fit the mini turbobrush to the end of the tube. |
ENVIRONMENT
- In accordance with existing regulations, any appliance that is out of service must be rendered permanently inoperable: disconnect and cut the power cord before discarding the appliance.
Environmental protection first!
①Your appliance contains valuable materials which can be recovered or recycled.
Leave it at a local civic waste collection point so that it can be recycled.
GARANZIA
9 Tolmu laeka sooned
10 Kandmiskäepide
11 Sisseimemise ava
12 On/Off pedaal
13 Juhtme kerimise pedaal
14 Seisuasend
15 Rullid
16 HEPA filtri ümbris
17 HEPA filtri kapsel (RS-RT3186)