
HID540X - Ice Maker Scotsman - Free user manual and instructions
Find the device manual for free HID540X Scotsman in PDF.


User questions about HID540X Scotsman
0 question about this device. Answer the ones you know or ask your own.
Ask a new question about this device
Download the instructions for your Ice Maker in PDF format for free! Find your manual HID540X - Scotsman and take your electronic device back in hand. On this page are published all the documents necessary for the use of your device. HID540X by Scotsman.
USER MANUAL HID540X Scotsman
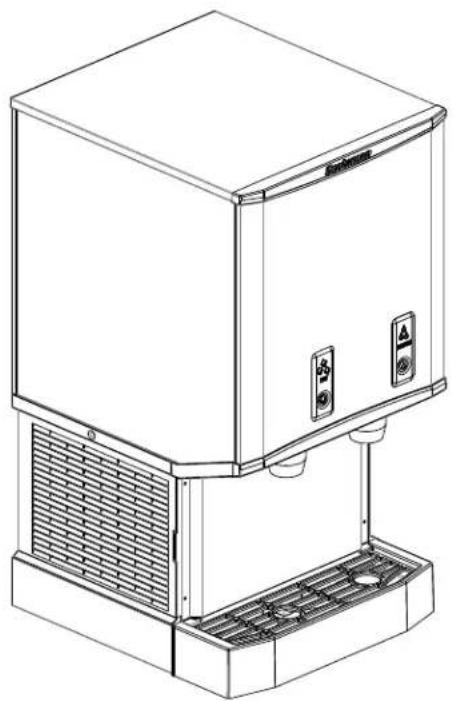
Installation and User's Manual for Meridian Ice Maker-Dispensers models
HID312X, HID525X and HID540X
natural_image
Line drawing of a modern water dispenser with control panel and ventilation grilles (no text or symbols)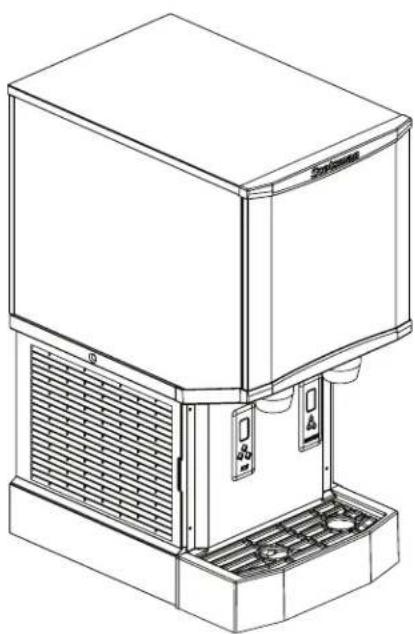
natural_image
Line drawing of a refrigerant appliance with ventilation grilles and control panel (no text or symbols)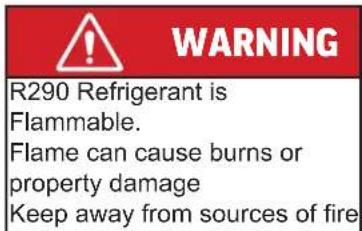
text_image
WARNING R290 Refrigerant is Flammable. Flame can cause burns or property damage Keep away from sources of fire
text_image
Warning sign depicting a flame symbol in yellow and black on a triangleImportant Safety Information. Make sure to read through fully to avoid severe injury or death.
This ice machine contains FLAMMABLE refrigerant and improper use can result in fire or explosion. Do not use cigarettes, vapes, or cellphones near pipes or cables, as it can be a source of ignition or spark.
This ice machine must not be installed next to equipment with an open ignition source (ie. open flames, an operating gas appliance, or electric heater).
Do not store explosive substances such as aerosol cans with a flammable propellant in this appliance.
WARNING: In order to reduce flammability hazards the installation of this appliance must only be carried out by a suitably qualified person.
Do not install next to anything that continuously vibrates, avoiding excessive vibrations or pulsations.
Install in a well ventilated environment and ensure ventilation and outlets are not obstructed.
Properly secure electrical wiring and cabling for the machine to minimize wear and vibrations.
Keep fire extinguisher nearby in case of emergencies.
WARNING: Cancer and Reproductive Harm. Visit www.P65Warnings.ca.gov for details.
Use a Scotsman recommended technician certified to repair R290 equipment.
Install ONLY Scotsman factory service parts. Use of non-OEM parts can be dangerous due to the design changes needed to safely use R290 refrigerant.
HID312X, HID525X and HID540X Installation and User's Manual
Introduction
The ice maker-dispensers covered in this manual were designed to be the finest on the market. Their design is a result of Scotsman's long experience in ice maker-dispensers.
This manual includes the information needed to install, start up and operate the machine. Because there are three models covered, be sure that any instructions apply to your unit.
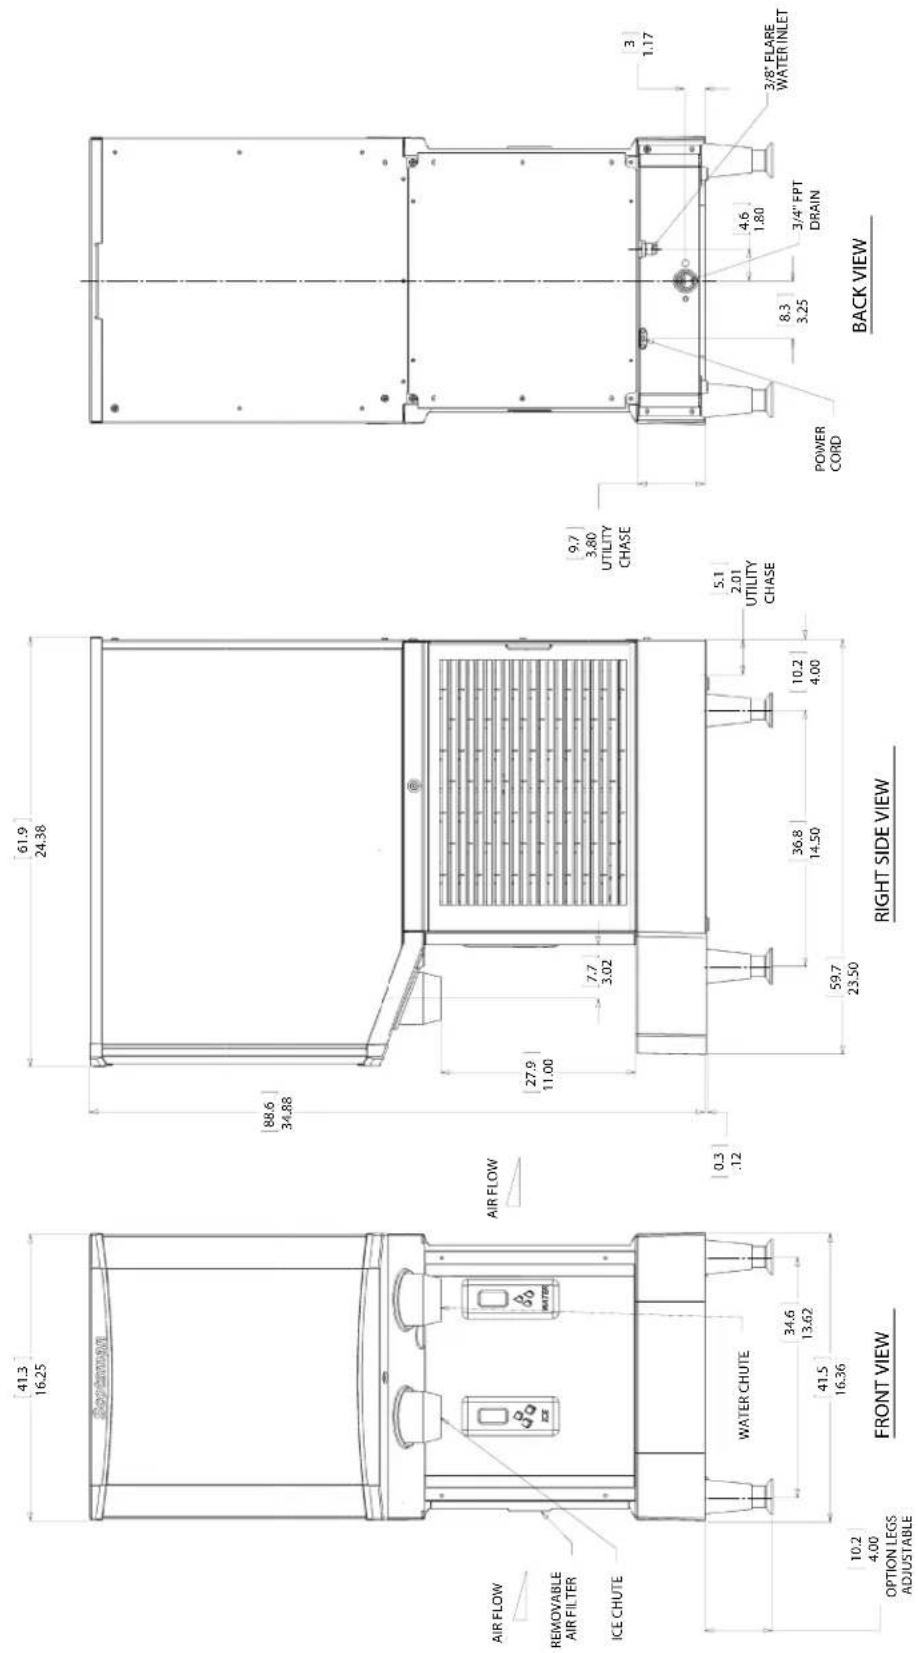
HID312X is 16" wide and 34.9 " tall. It is only available as an air cooled model.
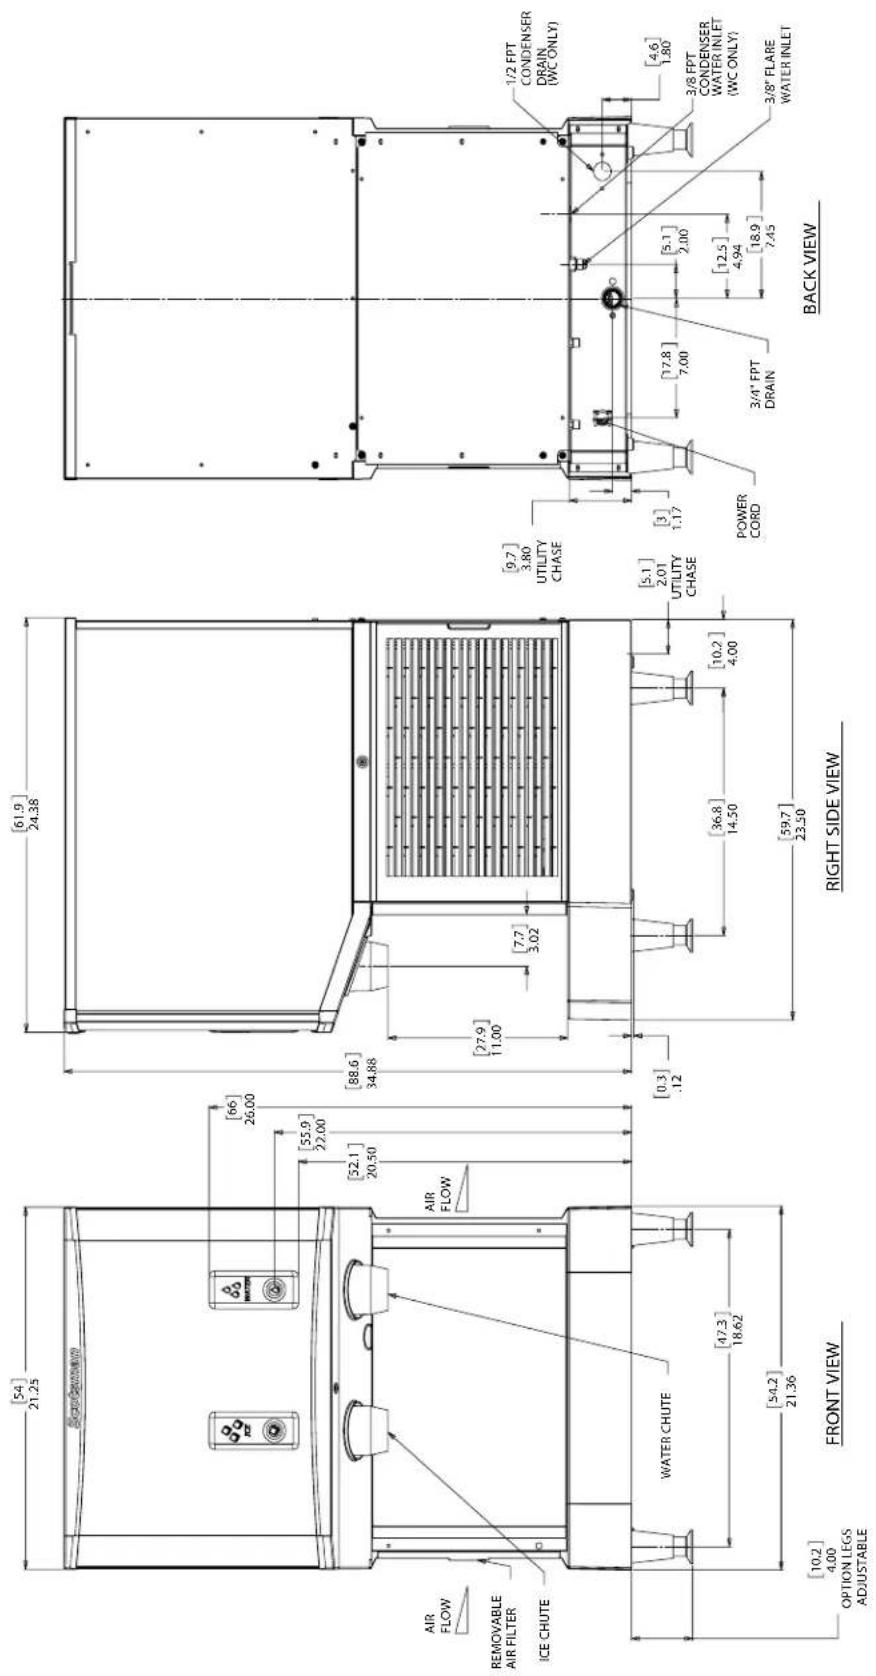
HID525X is 21" wide and 34.9" tall. It is available as an air cooled model or as a water cooled model.
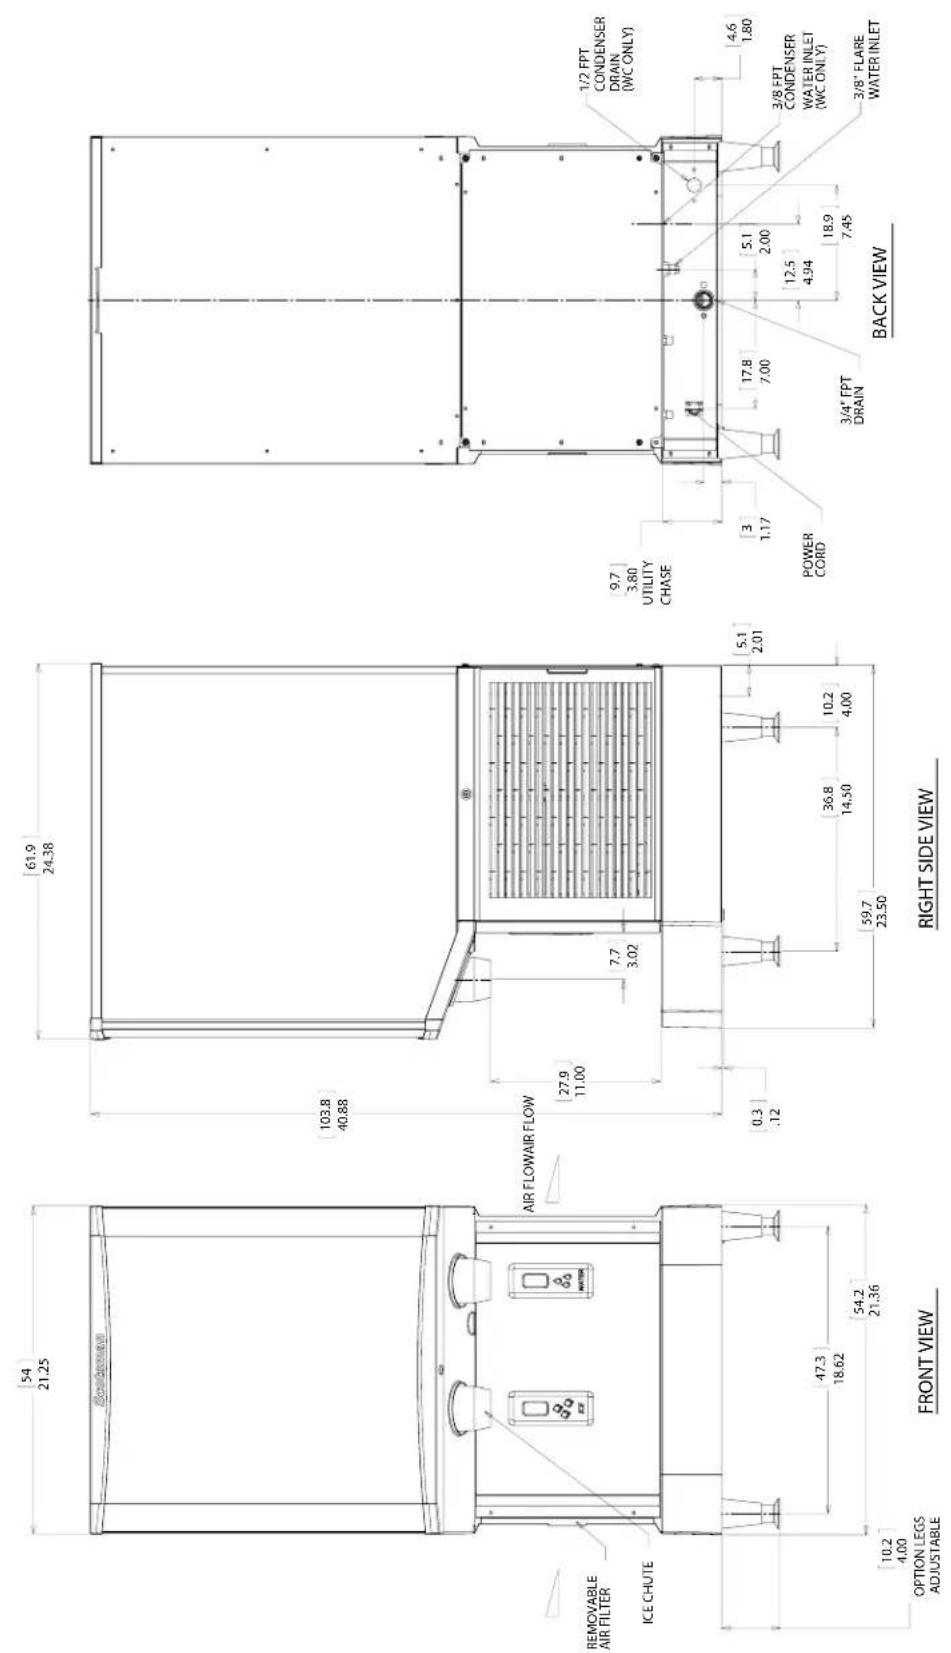
HID540X is also 21" wide, but it is 40.9" tall. it is also available either air or water cooled.
Observe any caution or warning notices. They are important and provide notice of potential hazards. Keep this manual for future reference.
If additional technical information is needed, go to Scotsman's website, www.scotsman-ice.com to download a service manual.
Note: This is a commercial product. If service is needed on a unit in a residence, use a commercial service company. Locate one at the website above.
Contents
Specifications Page 2
Models Page 3
HID312X Cabinet Drawing Page 4
HID525X Cabinet Drawing Page 5
HID540X Cabinet Drawing Page 6
Placement.... Page 7
Counter Installations...... Page 8
Machine Stands / Legs Page 9
Component Location Page 10
Installation - Plumbing ...... Page 11
Installation - Electrical...... Page 12
Initial Start Up Page 13
Operation: Ice and Water Vending ...... Page 14
Controller Page 15
Maintenance and Cleaning...... Page 16
Air Filter Page 17
Maintenance and Cleaning - Dispensing Bin Components Page 18
Ice Level Controls...... Page 19
Ice Making and Ice Dispensing System Cleaning Instructions...... Page 20
Other Maintenance.... Page 22
Basic Troubleshooting Page 23
Controller Diagnostics Page 24
Decommissioning Page 25
HID312X, HID525X and HID540X Installation and User's Manual
Specifications
The ice maker-dispenser is designed to be installed indoors, in a controlled environment. Although it can operate in a wide range of air and water temperatures, it will provide the best performance if not subject to extremes.
Air Temperature Limitations
• Maximum: 100°F. or 38°C
• Minimum: 50^ F. or 10^ C
Water Temperature Limitations
• Maximum: 100°F. or 38°C
• Minimum: 40^ F. or 4.4^ C
Water Pressure, potable
• Maximum: 80 PSI or 5.5 bar
• Minimum: 20 PSI or 1.3 bar
Water Pressure, condenser inlet
• Maximum: 145 PSI or 10 bar
- Minimum: 20 PSI or 1.3 bar; can be as low as 5 PSI or .3 bar if clean & supplied with 45^ . water)
Condenser GPM
- 70^ . water: .25 GPM or .95 LPM
- 50^ . water: .15 GPM or .57 LPM
Water Conductivity:
• Minimum: 10 microsiemens/cm
RO water may be supplied to the potable water system, but if it has less than the above conductivity, the water level sensor will not detect water and the unit will not make ice.
Deionized water will not work and isn't recommended.
Voltage
• Maximum: 126 Minimum: 104
Operating the machine outside of any of the above limitations is considered abuse. Any resulting damage is not covered by warranty and could cause a complete loss of warranty coverage.
Warranty Information
The warranty statement for this product is provided separately from this manual. Refer to it for applicable coverage. In general, warranty covers defects in material or workmanship. It does not cover maintenance, corrections to installations, or situations when the machine is operated in circumstances that exceed the limitations printed above.
This is a commercial model, if installed in a residence some commercial service companies may not be able to service it on site.
Fill out the Warranty Registration Card shipped with the unit and mail it in, or scan the QR code to register the machine on the Scotsman warranty website:
Product Information
The product is an ice maker-dispenser. It is designed to be installed on a counter top or on a specific machine stand.
- All models require a drain. An internal drain basin separates the ice storage bin's drain from the drip tray drain.
- A backflow preventer may be required by local plumbing codes.
- Has a 7.5 ft. power cord with NEMA 5-15P plug.
• Air cooled models flow air left to right and include a cleanable air filter. - Legs are optional. Thread size 3/8-16.
- Special models are required for wall mounting.
- Two different dispensing methods are available:
Touch-free models utilize infra-red sensors to trigger ice and water dispensing.
Button activated dispensing models trigger ice and water dispensing via finger press buttons.
- For available options and kits, see sales literature.
Scotsman Ice Systems are designed and manufactured with the highest regard for safety and performance. They meet or exceed the standards of UL60335-2-89 and NSF.
Scotsman assumes no liability or responsibility of any kind for products manufactured by Scotsman that have been altered in any way, including the use of any part and/or other components not specifically approved by Scotsman.
Scotsman reserves the right to make design changes and/or improvements at any time. Specifications and design are subject to change without notice.
| Model | Series | Dispensing Type | Electrical | Condenser | Typical Amp Draw | Max Fuse Size |
| HID312AX-1 | A | Touch Free | 115/60/1 | Air | 4.5-5 | 15 |
| HID312ABX-1 | A | Button Activated | 115/60/1 | Air | 4.5-5 | 15 |
| HID525AX-1 | A | Touch Free | 115/60/1 | Air | 5.8-7 | 15 |
| HID525WX-1 | A | Touch Free | 115/60/1 | Water | 5.8-7 | 15 |
| HID525ABX-1 | A | Button Activated | 115/60/1 | Air | 5.8-7 | 15 |
| HID525WBX-1 | A | Button Activated | 115/60/1 | Water | 5.8-7 | 15 |
| HID525AX-32 | A | Touch Free | 208-230/60/1 | Air | 3.1-3.3 | 15 |
| HID540AX-1 | A | Touch Free | 115/60/1 | Air | 5.8-7 | 15 |
| HID540WX-1 | A | Touch Free | 115/60/1 | Water | 5.8-7 | 15 |
| HID540ABX-1 | A | Button Activated | 115/60/1 | Air | 5.8-7 | 15 |
| HID540WBX-1 | A | Button Activated | 115/60/1 | Water | 5.8-7 | 15 |
text_image
[54] 21.25 Air FLOW REMOVABLE AIR FILTER ICE CHUTE [66] 26.00 [55.9] 22.00 [52.1] 20.50 [88.6] 34.88 AIR FLOW [27.9] 11.00 [7.7] 3.02 [0.3] .12 [47.3] 18.62 [54.2] 21.36 [10.2] 4.00 OPTION LEGS ADJUSTABLE FRONT VIEW RIGHT SIDE VIEW BACK VIEW [9.7] 3.80 UTILITY CHASE [5.1] 2.01 UTILITY CHASE [3] 1.17 POWER CORD [17.8] 7.00 [5.1] 2.00 [12.5] 4.94 [18.9] 7.45 [4.6] 1.80 3/8 FPT CONDENSER WATER INLET (WC ONLY) 3/8" FLARE WATER INLETJanuary 2025
HID312X, HID525X and HID540X Installation and User's Manual
Placement
The location of the equipment should be selected with care. Consideration should be given to allow adequate space on the sides for air cooled models to breathe.
Minimum clearances for air cooled models:
- 6" at each side
- 2" above, 10" more to allow auger removal when ceiling is fixed.
- 6" at the back.
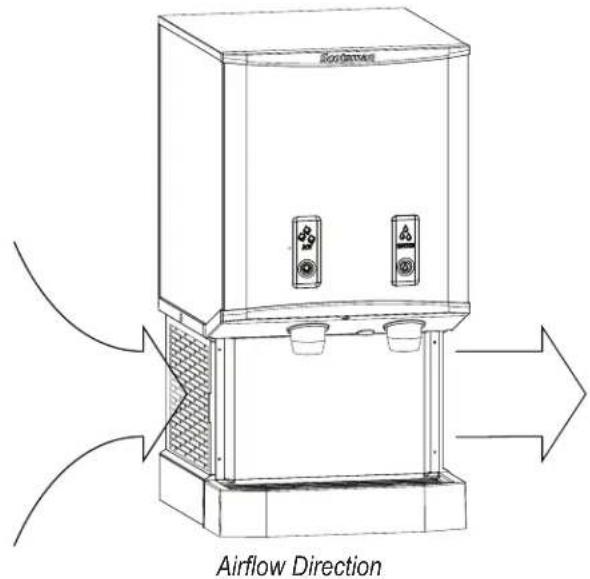
Air cooled models circulate air left to right. More space than the minimum at the sides will maximize performance.
text_image
AIRFLOW DIRECTIONThe power outlet should be located within the length of the supplied power cord. If placed on a counter, the counter must be strong enough to support the weight of the unit. Space above the cabinet should be allowed for service and maintenance. If legs will be used, allow space for the total cabinet height.
Air cooled models in a small room will require ventilation to exhaust the heat they produce. They also produce some added noise from the fan. Noise sensitive areas should consider water cooled equipment or the machine located where the noise from ice making is not objectionable.
Touch-Free dispensing models should avoid areas with nearby infrared emitters or a window that allows sunlight to shine on a dispensing sensor which may cause the unit to dispense without a container to trigger it.
Cafeteria applications.
The unit can be placed in a cafeteria line for ice and water. As some users sometimes dispense too much ice, high volume use may require the drip tray to be occasionally cleared of spilled ice.
Unpack
- Separate the carton from the shipping pallet.
- Remove any strapping holding the cabinet to the pallet.
- Inspect for hidden shipping damage. If any is found, retain carton and notify carrier for potential claim. Shipping damage is not covered by warranty.
- Remove bolts holding machine to pallet. Use caution to not tip unit too far when removing bolts.
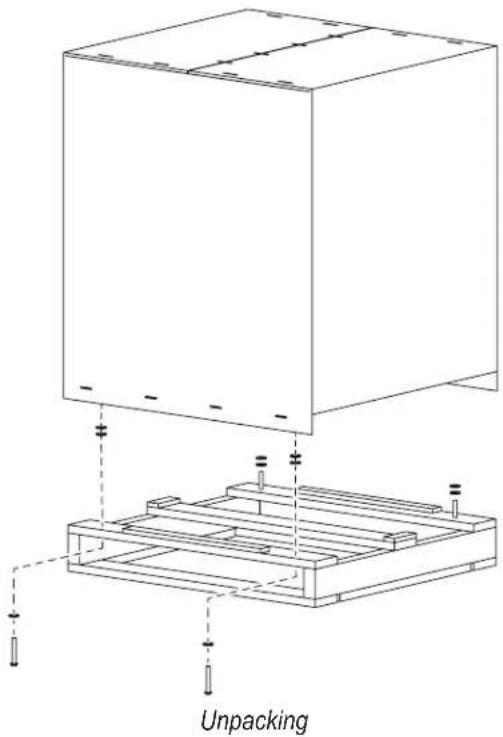
text_image
Unpacking- Remove plastic covering the drip tray.
- Remove the protective plastic covering the panels. The longer the protective plastic is left on the panel, the harder it will be to remove it.
- Place unit on machine stand or counter. If on machine stand, secure the cabinet to the machine stand with the required fasteners.
HID312X, HID525X and HID540X Installation and User's Manual
Counter Installations
Units placed on a counter must either use legs or be sealed to the counter top with food grade sealant per local codes. To avoid disturbing the seal, complete the installation prior to sealing.
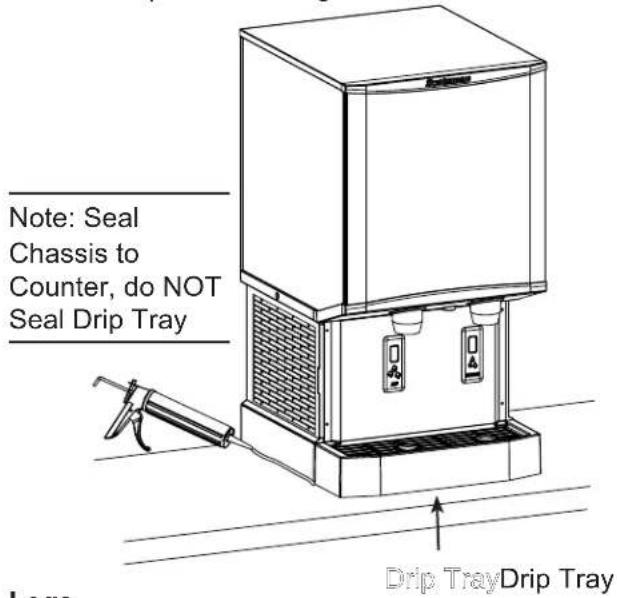
text_image
Note: Seal Chassis to Counter, do NOT Seal Drip Tray Drip Tray Drip TrayLegs
4" legs are optional for counter top applications. They are NOTNOT to be used on the HIDX dispenser when it is placed on a machine stand.
Note: Use only legs of 4" minimum height.
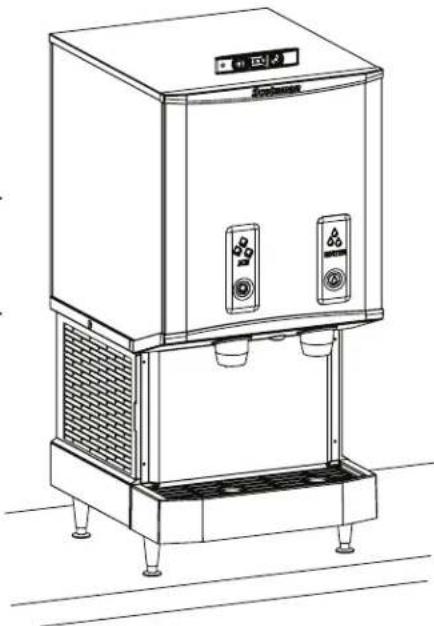
natural_image
Line drawing of a dual-chamber water heater with control panel and vent, no text or symbols presentSet Up
The drip tray and cup rest are shipped in place. There is no need to attach or remove them. It is a good idea to remove the front panels and inspect for any loose or rubbing parts prior to installation.
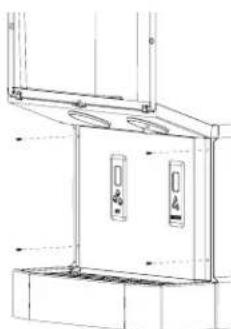
Panel Removal
Remove one screw at bottom of upper front panel, swing bottom of panel forward and lift off the unit. On button activated dispensing models, rest the panel on the drip try and unplug button connector to fully remove panel.
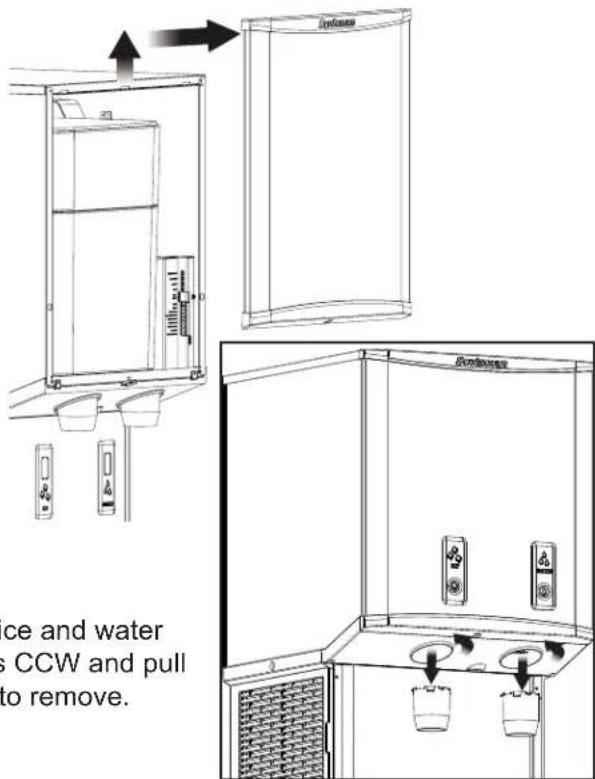
text_image
ce and water s CCW and pull to remove.Twist ice and water chutes CCW and pull down to remove.
Remove four screws from sides of lower front panel, pull forward slightly lift off the unit. On Touch-Free dispensing models, rest it on the drip tray and unplug sensor connector to fully remove panel.
natural_image
Technical line drawing of a cabinet or enclosure with mounting holes and doorways (no text or symbols)Pre-Start Inspection
Level the cabinet front to back and left to right.
Confirm there are no loose or rubbing parts.
Return splash panel and chutes to unit.
HID312X, HID525X and HID540X Installation and User's Manual
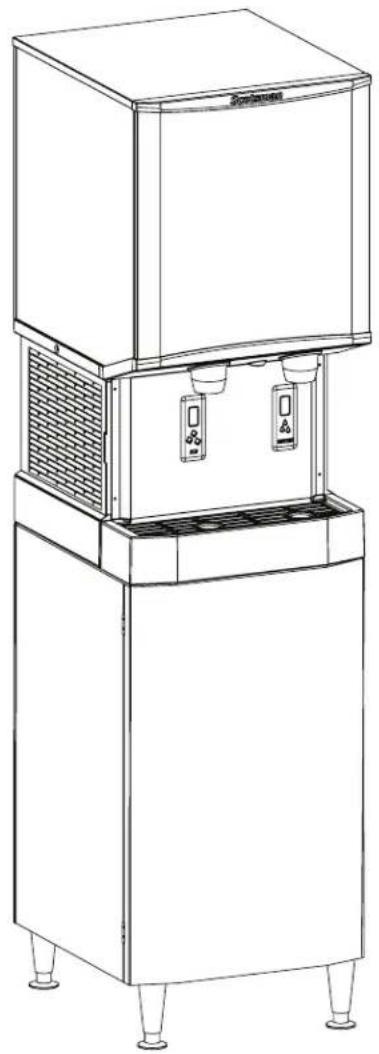
Machine Stands / Legs
Scotsman manufactures two machine stands for the HIDX dispensers: a 16" wide model and a 21" wide model. The prior machine stands are not suitable for use with the HIDX models and their use is not recommended.
Machine stand for HID312X: HST16-A and HST16B-A
Machine stand for HID525X: HST21-A and HST21B-A
Machine stand for HID540X: HST21-A and HST21B-A
Adjustable legs for All: KLP24A (Set of 4) 4" Adjustable legs.
natural_image
Line drawing of a water dispenser with control panel and vent, no text or symbols present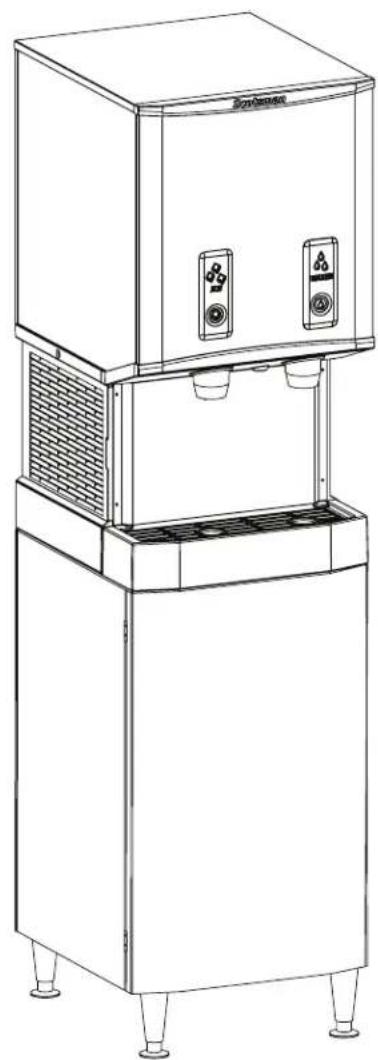
natural_image
Line drawing of a water dispenser with control panel and side legs (no text or symbols)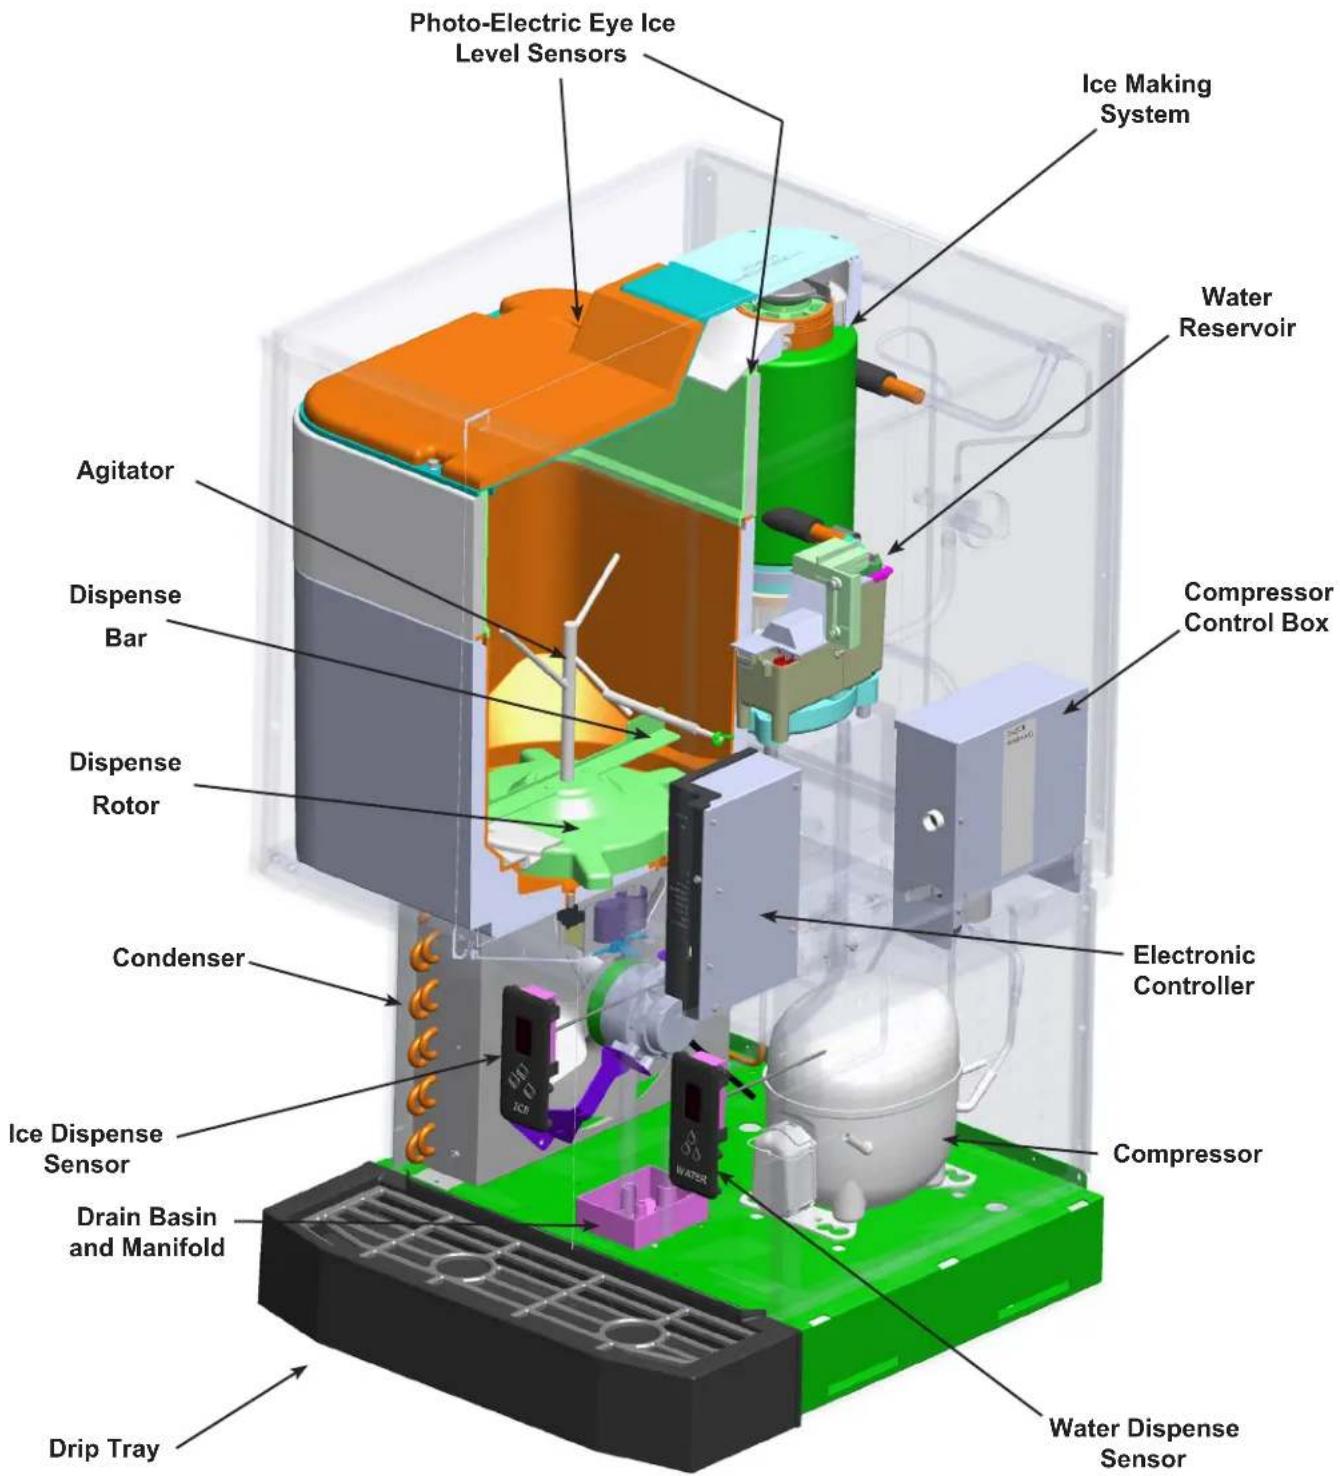
text_image
Photo-Electric Eye Ice Level Sensors Ice Making System Water Reservoir Agitator Disperse Bar Disperse Rotor Condenser Electronic Controller Compressor Water Dispense Sensor Ice Dispense Sensor Drain Basin and Manifold Drip TrayHID312X, HID525X and HID540X Installation and User's Manual
Installation - Plumbing
Installation should be done by an experienced ice machine installer. To locate one, call the number on the back of this manual or go to Scotsman's website www.scotsman-ice.com to identify a local distributor or service company.
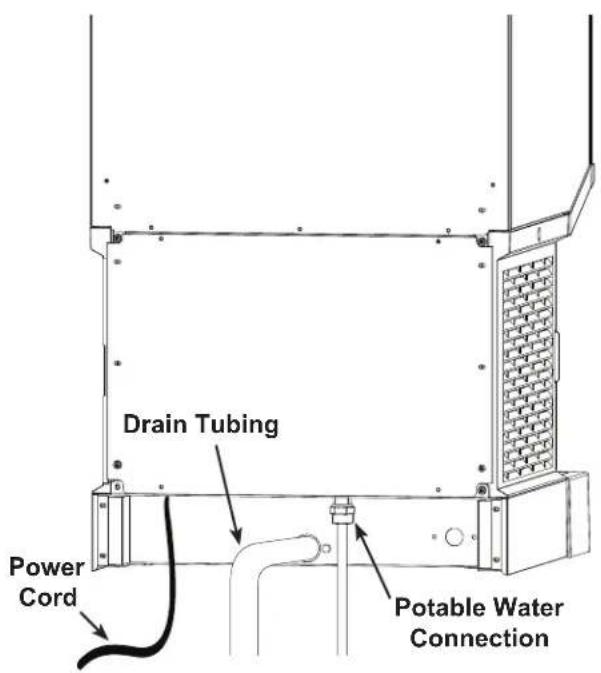
The machine will require power, water and drain. Locate the water supply fitting on the lower back of the cabinet and obtain the correct fitting to connect the water supply.
Plumbing Fittings:
- Potable water inlet: 3/8 male flare.
• Cabinet drain: 3/4 FPT.
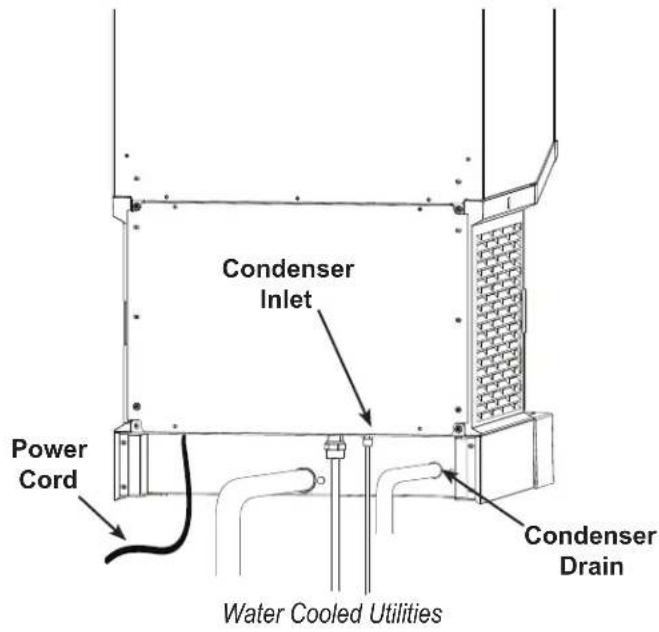
• Water cooled condenser inlet: 3/8 FPT.
• Water cooled condenser drain: 1/2 FPT
text_image
Drain Tubing Power Cord Potable Water ConnectionAir Cooled Utilities
Connect drain tubing to the central drain fitting at the back of the cabinet. Use 3/4" rigid tubing of a material which meets local codes. The drain basin in the machine will act as an internal vent. No additional vent should be required unless there is a very long horizontal run. Drain tubing must pitch down 1/4 inch per foot to the building drain. Insulation of drain tubing is recommended for most environments.
Water cooled models:
Connect water or coolant supply (if using recirculating system) to the condenser inlet.
Connect drain (or return if a recirculating system) to the condenser drain. Use only rigid tubing. Do not vent this drain tube.
text_image
Condenser Inlet Power Cord Condenser Drain Water Cooled UtilitiesAll models:
Connect the potable water supply to the inlet at the bottom back of the unit. 3/8" OD tubing recommended. Water filters may be used but are not required.
Electrical Supply - 115 volt models
Plug the unit into a dedicated 15 amp outlet. The unit must be the only device on the circuit. Confirm the outlet is properly grounded and is in good condition. Worn outlets should be replaced as they can cause erratic operation of equipment. Do not use an extension cord. Do not cut off the ground plug on the power cord.
Ground fault outlets are not recommended. If ground fault is required, a ground fault breaker should be used.
This ice machine should be installed on a dedicated circuit with a properly sized HACR-rated breaker or fuse. No other devices or appliances should be connected to the same circuit with the ice machine. Installing a unit on a shared circuit can cause product malfunctions or damage to the unit. The proper circuit size can be found on the unit data tag listed as "MAX FUSE OR HACR TYPE CIRCUIT BREAKER". Never allow the fuse size to exceed the maximum fuse size listed on the data tag.
The use of a ground fault circuit interrupter (GFCI) or arc-fault circuit interrupter (ARCI) can lead to nuisance trips and is not recommended for use on most appliances, including our equipment.
If local codes or other specifications require the use of ground fault circuit interrupters, a properly rated HACR GFCI or ARCI circuit breaker should be used. An outlet type GFCI or ARCI is not recommended for ice machines and other refrigeration equipment due to more frequent nuisance trips of the GFCI or ARCI.
Always check with your local electrical inspector about the specific code requirements in your area for GFCI or ARCI breakers and GFCI or ARCI receptacles. Use the services of a licensed electrician when needed and conform to local and national codes.
Follow All Local Codes - This Unit Must Be Grounded. Do not use extension cords and do not disable or bypass ground prong on electrical plug.
Position the unit in its final location.
Level the unit front to back and left to right.
Seal to the counter top as required per local codes.
HID312X, HID525X and HID540X Installation and User's Manual
Initial Start Up
Final check list:
- Is the icemaker-dispenser installed indoors, in a location where the air and water temperatures are controlled, and where they do not go beyond design limitations?
- Is there an electrical disconnect (switch or plug as required) within sight of the installed machine? Is the machine on a separate circuit? Has the voltage been checked and compared to nameplate requirements?
- Have all of the plumbing connections been made and checked for leaks?
- Has the machine been leveled?
- Is there a minimum of 3 inches of clearance at the left and right sides of an air cooled machine?
- Is there clearance at the top and back of the machine for service and utility connections?
- Is there a water shut off valve installed near the machine?
Start Up
- Remove upper front panel
- Open the water hand valve, observe that water enters the water reservoir, fills and then shuts off. Check for leaks. Repair any leaks before going any further.
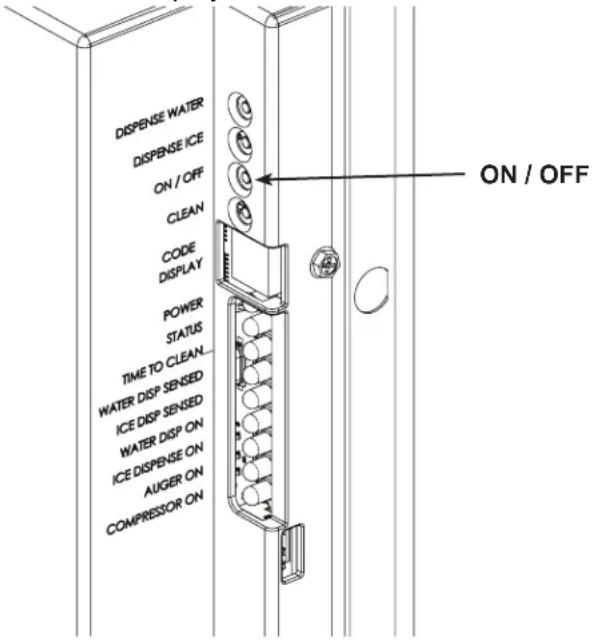
- Switch electrical supply on. Lights on controller will flash and then the power light will remain on. The code display will show a.
text_image
DISPENSE WATER DISPENSE ICE ON / OFF CLEAN CODE DISPLAY POWER STATUS TIME TO CLEAN... WATER DISP SENSED ICE DISP SENSED WATER DISP ON ICE DISPENSE ON AUGER ON COMPRESSOR ON ON / OFF-
Push and release the ON/OFF button. The machine will start the ice making process. The code display will show F. Air cooled models will discharge warm air out the right side, water cooled models will discharge warm (about 110^ F.) water out of the condenser drain.
-
In minutes ice will begin to fall into the dispensing bin. Check ice dispensing:
Touch-Free dispensing models: hold a container in front of the Touch-Free ice sensor (just below the ice delivery spout). Ice should flow from the spout when a container is present, and stop dispensing when the container is removed.
Button activated dispensing models: press the ice button for 2-3 seconds and release. Ice will flow when button pressed and stop when released.
- Check water dispensing:
Touch-Free dispensing models: hold a container in front of the Touch-Free water sensor. Water will flow when a container is present and stop when it is removed.
Button activated dispensing models: press the water button for 2-3 seconds and release. Water will flow when button pressed and stop when released.
-
Push the ON/OFF button to switch machine off.
-
Unplug or disconnect electrical power.
-
Remove the top panel and the top of the ice storage bin. Scoop out any ice in the bin and sanitize the interior of the ice storage bin by wiping it with a locally approved sanitizer or a mixture of 1 ounce of household bleach to 2 gallons of water. Allow to air dry.
-
Reconnect electrical power.
-
Push the ON/OFF button to switch machine on.
-
Replace all covers and panels.
-
Give the owner/user the user manual. Instruct them in the operation and maintenance requirements of the unit. Make sure they know who to call for service.
-
Fill out the Customer Evaluation and Warranty Registration form, and mail it in to Scotsman or register the unit at Scotsman's website (www.scotsman-ice.com).
HID312X, HID525X and HID540X Installation and User's Manual
Operation: Ice and Water Vending
During ice making, soft ice is compressed through a die and then broken off into irregular lengths. It will not be clear and, because of melting, when dispensed it will not be uniform in size or shape.
text_image
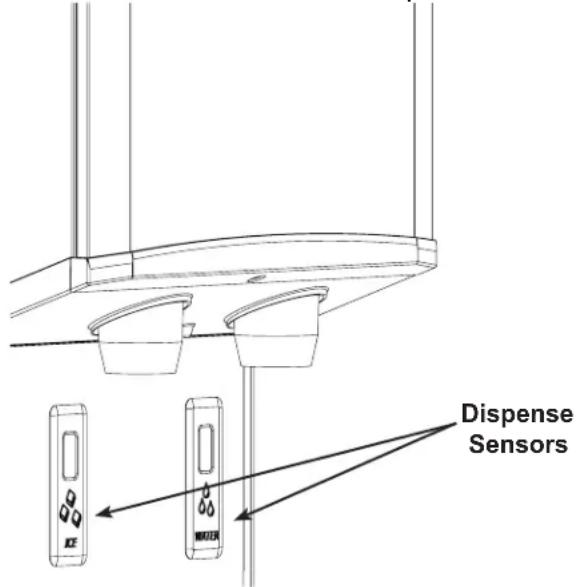
Dispense Sensors ICE WATERDispensing takes place when the Touch-Free sensor's infrared beam bounces back to the sensor from a container placed directly in front of it, or when the ice/water button is pressed on button activated dispensing models.
Note: For Touch-Free sensors, place a container 1" away from the lens to trigger dispensing activation. Any placement farther or closer, or fully blocking the lens, will not activate dispensing.
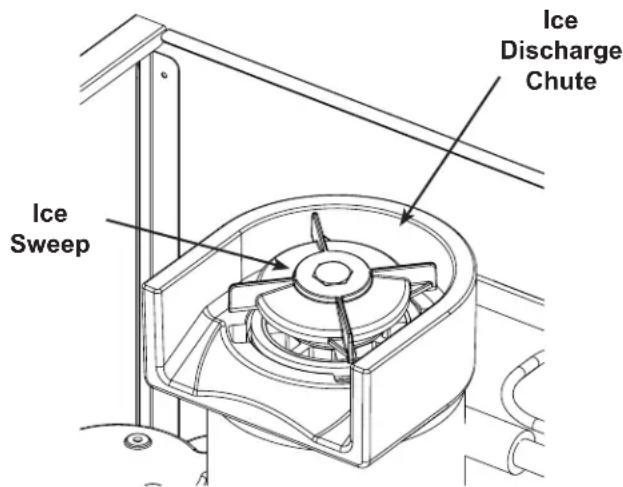
If the container is in front of the Touch-Free sensor on the left side or the ice button is pressed, the ice dispensing rotor will rotate and sweep ice over the ice dispensing chute. Ice will continue to discharge out this chute as long as the rotor is turning. It stops when the rotor stops.
If the user does not remove the container from in front of the sensor or does not release the button, the machine will stop dispensing ice after 24 seconds.
If the container is in front of the Touch-Free sensor on the right side or the water button is pressed, the inlet water valve will open and water will flow into the container.
If the user does not remove the container from in front of the senor or does not release the button, the machine will stop dispensing water after 20 seconds. Note: Water may dispense cloudy and then clear up in the glass. That is normal due to air in the water and is not an indicator of any malfunction.
Other notes:
- An occasional drip may be seen from the ice dispense chute. This is normal and is from ice melting inside the chute. A continuous stream of water from the ice chute indicates a restricted bin drain.
- Clear containers (glass or plastic) may not always activate the dispense sensors. In these cases, reposition your hand to activate the sensor.
- The drip tray is not a sink and cannot tolerate garbage. Coffee and soda should not be discarded into it. Debris like stirring straws that are discarded into the drip tray will likely cause a drain back up and need to be removed as soon as they are found. To minimize the risk of a clogged drain do not allow anything other than water to go down the drain.
- Both dispensing and ice making are disabled when the unit is switched off at the controller.
text_image
Vending Disable Switch
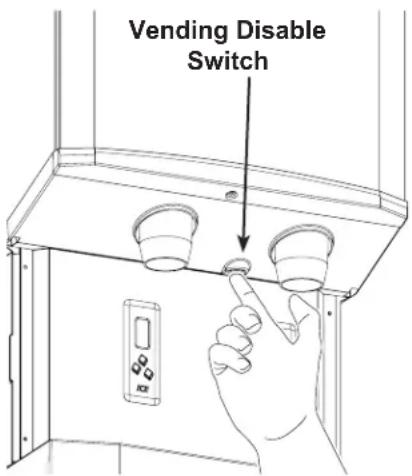
- Splash panel wipe-off. Wiping the splash panel could result in unintended dispensing. To avoid that, a disable button has been provided. It is recessed into the bottom of the chute panel. Push and release it to disable dispensing for 60 seconds.
Noise
This is a commercial ice machine. It contains a powerful compressor, heavy duty gear reducer and, if air cooled, a fan that moves a lot of air. It will produce some noise when it is making ice. Every effort was made during its design to minimize the sound level but some noise during operation is unavoidable.
HID312X, HID525X and HID540X Installation and User's Manual
Controller
All models use the same control system.
The electronic controller operates the compressor (with fan motor), auger drive motor, dispense drive motor and inlet water solenoid valve. It monitors:
- Reservoir water availability
- Storage bin ice level
- Call for ice dispense
- Call for water dispense
- Refrigeration pressure
- Dispense enable / disable
- Auger motor speed
- Auger motor rotation
- Any installed control options
Many of these are used to ensure that the machine does not damage itself during use. For example, it is critical that it not attempt to make ice without water. So if the water sensor is dry, the machine will not make ice.
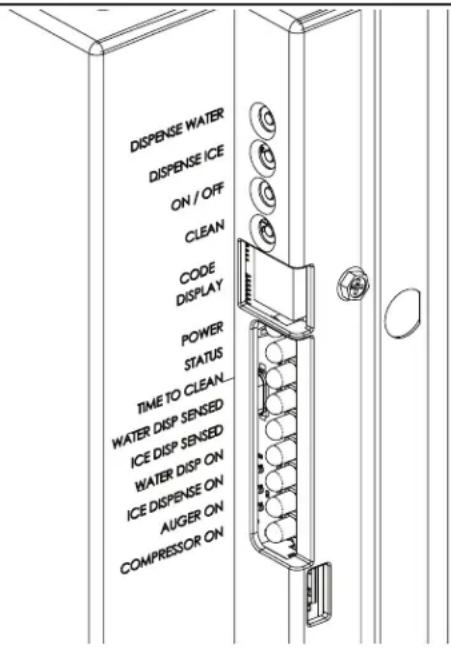
Switches - there are four switches:
- Dispense water - To test water dispensing
- Dispense ice - To test ice dispensing
- ON/OFF - To switch the machine on or off. Holding it in to shut off will stop ice making immediately.
- Clean - To engage the clean mode
Indicators - there are nine LEDs:
• Power - Glows when controller has power
- Status - Glows when in ice making mode
- Time to Clean - Glows when it is time to clean the machine
- Water Dispense Sensed - Glows when the water dispense sensor has been triggered or water button pressed*
- Ice Dispensed Sensed - Glows when the ice dispense sensor has been triggered or ice button pressed*
- Water Dispense - Glows when the inlet water solenoid valve has been powered*
- Ice Dispense - Glows when the ice dispense motor has been powered*
- Auger - Glows when the auger motor is on
- Compressor - Glows when the compressor is on
text_image
DISPENSE WATER DISPENSE ICE ON / OFF CLEAN CODE DISPLAY POWER STATUS TIME TO CLEAN... WATER DISP SENSED ICE DISP SENSED WATER DISP ON ICE DISPENSE ON AUGER ON COMPRESSOR ON* If blinking, the water or ice dispensing time limit has been met.
There is also a code display, the codes are:
0 - - - off
F - - - ice making
b - - - bin full
E - - - controller error
C - - - clean mode
d - - - test mode
/ - - - auger rotation direction wrong
2 - - - auger speed too slow
3 - - - no water sensed
4 - - - high refrigerant pressure
If a number code is triggered, the controller will stop ice making. A blinking code means it is a temporary condition. Example: A blinking F occurs during the ice making restart process; it stops blinking when the compressor starts.
The controller will automatically restart from a water interruption or power interruption or when a refrigerant pressure switch has automatically reset.
To reset the control when it has been manually locked out, push and release the ON/OFF button to shut it off and then push and release it again to switch it on.
Note: The compressor will not restart for 2 minutes from the time it was shut off.
HID312X, HID525X and HID540X Installation and User's Manual
Maintenance and Cleaning
There are five areas of maintenance:
- Drip tray and drain system
- Air cooled condenser filter and condenser
- Ice dispense bin and rotor
- Photo eye ice level control
- Ice making water system
Drip Tray
It is important to keep the drip tray clean of trash. Remove any as soon as it is noticed. Pour hot water into the tray on a regular basis to keep the drain open.
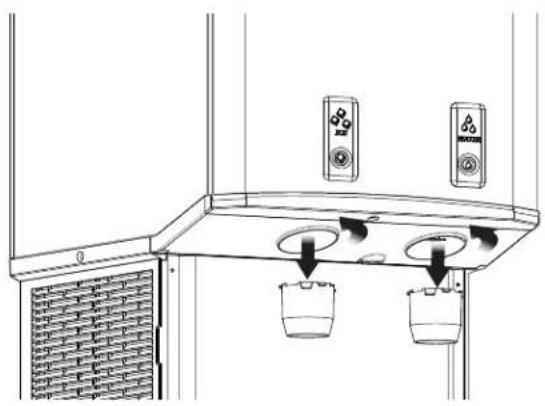
Over time the drip tray and cup rest may become coated with scale or dirt. It can be removed to be scrubbed at a wash sink.
- Remove upper front panel. On button activated dispensing models, rest the panel on the drip tray and unplug button connector to fully remove panel.
- Shut the machine off.
- Twist dispense chutes clockwise and pull down to remove.
natural_image
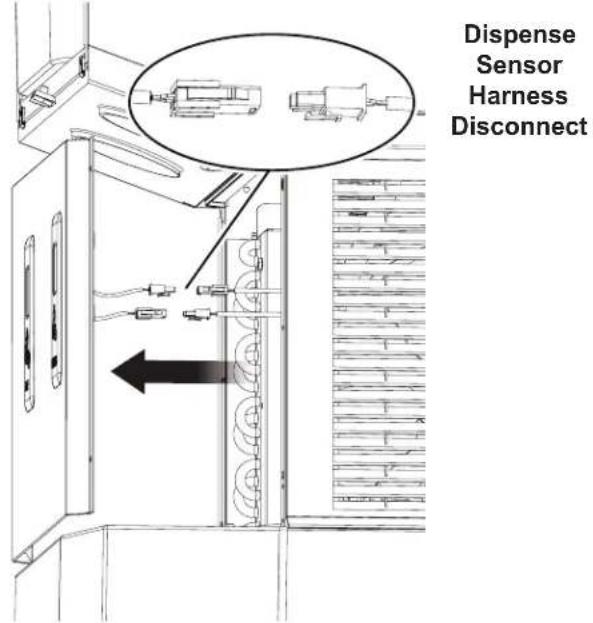
Diagram of a water level control system with two water level sensors and two buckets, no text or symbols present.- Remove screws holding lower front panel to unit. On Touch-Free dispensing models, unplug lower panel sensors at the harness connection. Set panels aside.
text_image
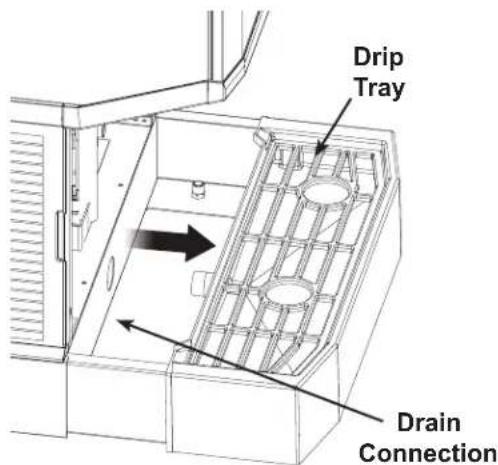
Dispense Sensor Harness Disconnect- Pull the sink forward to disconnect it from the drain. Plug the drain fitting with a cloth to keep it from leaking while the drip tray is being cleaned.
text_image
Drip Tray Drain Connection- Wash out the drip tray and dispense chutes. Use ice machine scale remover if needed to dissolve scale.
- Reverse to reassemble. Be sure drip tray is pushed back fully into place. Insert chutes and rotate CCW until they snap into place and stop.
HID312X, HID525X and HID540X Installation and User's Manual
Air Filter
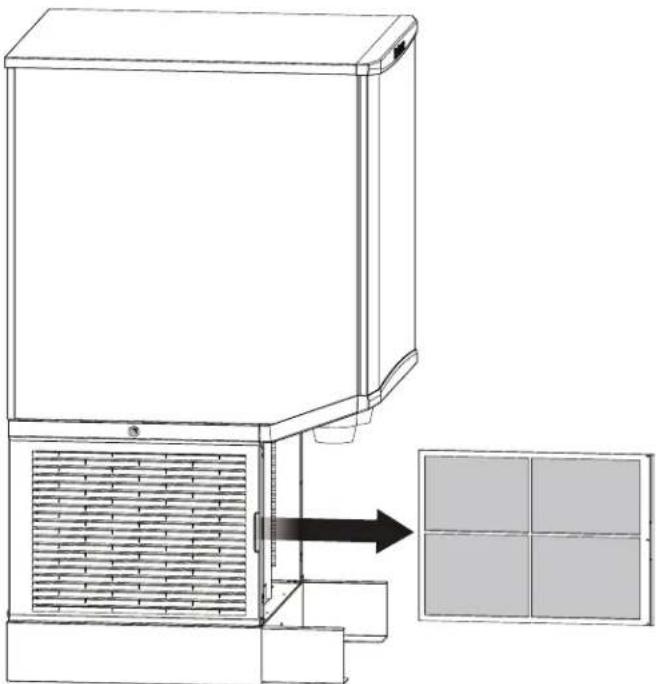
The air filter on the left side of the cabinet will capture significant dust and lint during operation. As the dirt builds up, it begins to restrict air flow and causes the refrigeration system to work longer to make ice. Clean the air filter regularly.
To remove the air filter, pull it forward from the louvers. Do not leave it out for extended periods of time.
To clean, wash it at a utility sink. Return it to the unit when clean.
natural_image
Technical line drawing of a mechanical device with a grid panel inset showing four panels (no text or symbols)Condenser.
The condenser fins may need cleaning too. Remove the left side air grill and brush any lint and dirt off the surface of the condenser. Vacuum any remaining dirt. Do not damage the fins of the condenser during cleaning.
natural_image
Technical line drawing of an industrial machine with cooling unit and fan assembly (no text or symbols)Remove Top Panel
natural_image
Technical line drawing of a mechanical device with internal components and directional arrows (no text or symbols)Remove Bin Cover and Ice Delivery Chute
HID312X, HID525X and HID540X Installation and User's Manual
Maintenance and Cleaning - Dispensing Bin Components
The ice storage bin and rotor must be cleaned and sanitized on a regular basis (at least as often as the ice making system is cleaned). Hand tools and hand protection (like rubber gloves) are recommended for this procedure.
Note: Some steps overlap with the procedure on the next page. This procedure can be independent of the ice making system cleaning or can be part of it.
Bin Cleaning Procedure
- Remove upper front panel. On button activated dispensing models, rest the panel on the drip try and unplug button connector to fully remove panel.
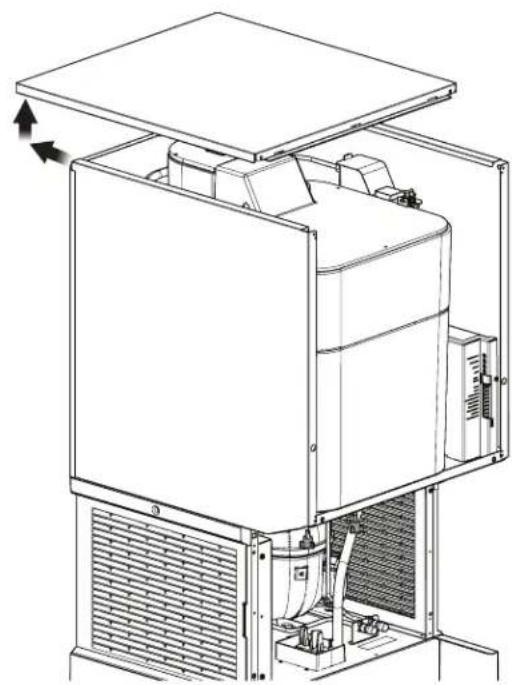
- Remove top panel.
- Shut machine off.
- Vend or melt out all ice.
Note: Only add 16 oz water to the bin at a time, as excess water will drain out the spout.
- Disconnect ice level control at harness.
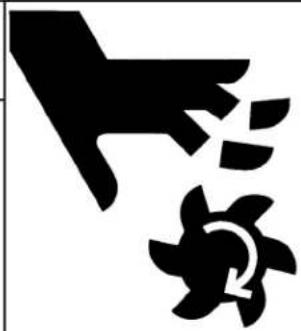
CAUTION
Moving parts hazard. Risk of personal injury. Disconnect electrical power before proceeding.
natural_image
Abstract black silhouette of a bird and a fan-like shape (no text or symbols)- Unplug or disconnect unit from electrical power.
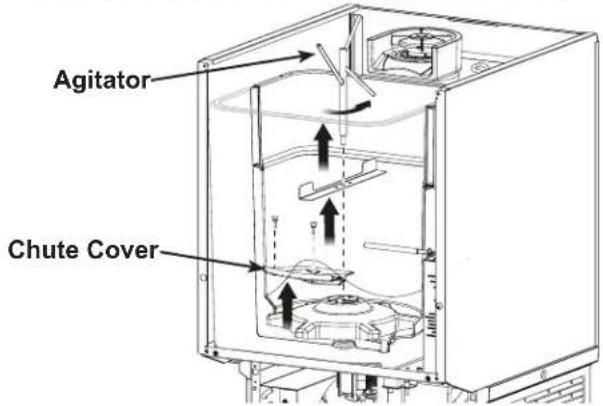
- Remove ice storage bin cover, set aside.
- Remove agitator (rotate CCW), set aside.
- Remove 2 thumbscrews & chute cover, set aside.
text_image
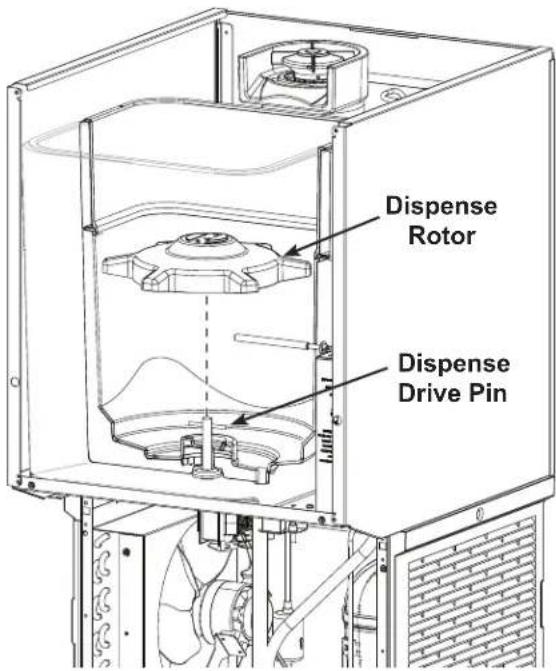
Agitator Chute Cover- Lift up and remove dispense rotor, set aside.
text_image
Dispense Rotor Dispense Drive Pin- Mix a solution of ice machine scale remover, such as Scotsman Clear 1 and potable water per the directions supplied with the scale remover.
- Use a clean cloth and wash all the interior surfaces of the bin and the bin cover, agitator bar, chute cover and dispense rotor with the ice machine scale remover solution. Rinse with clear water.
- Mix a 2 gallon solution of locally approved sanitizer. A possible sanitizer solution is one packet of Stera Sheen Green Label and 2 gallons of warm (95° to 105°F.) potable water.
- Use a new clean cloth and wipe all the interior surfaces of the bin and the bin cover, agitator bar, chute cover and dispense rotor with the sanitizer solution.
- Return all parts to their original positions and secure them with their original fasteners.
- Reconnect electrical power and restart the machine.
HID312X, HID525X and HID540X Installation and User's Manual
Ice Level Controls
Clean if the controller indicates bin full and there is no ice between the sensors.
- Remove upper front and top panels.
- Shut machine off.
- Disconnect ice level controls at connector.
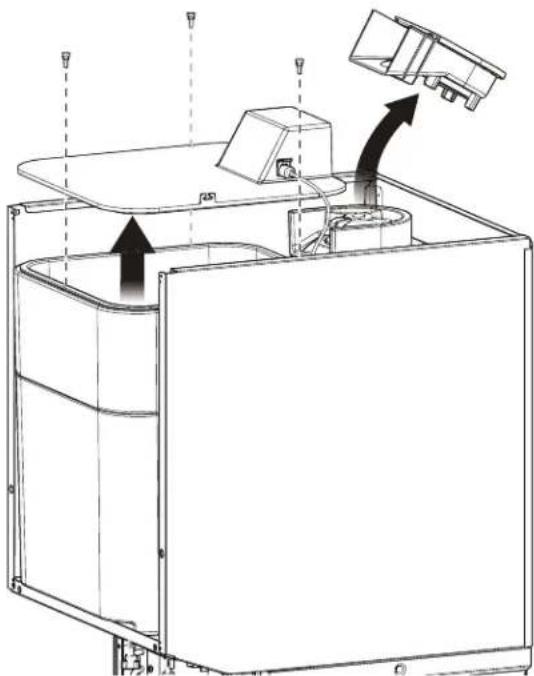
- Remove 3 screws and ice storage bin cover.
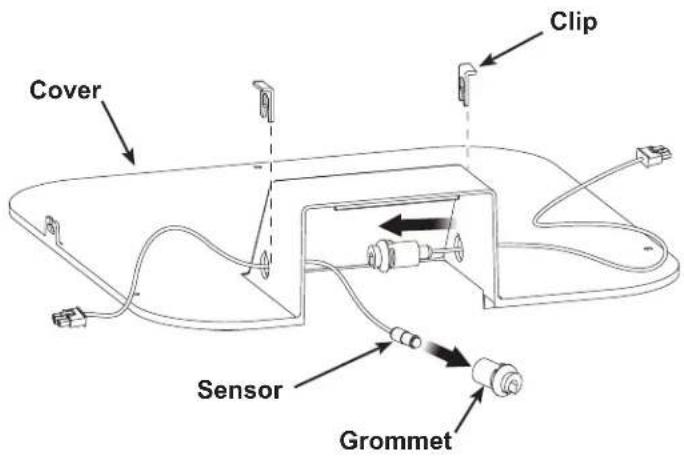
- Pull each sensor grommet clip up and off.
text_image
Clip Cover Sensor Grommet- Push grommets out of bin top.
- Pull each sensor out of its rubber grommet. Pull on the part of the sensor closest to the grommet, not the wire.
- Wipe the sensor lenses clean with a soft, clean cloth. Caution - do not scratch the lens. If there is mineral scale on the lens, ice machine scale remover will be needed to wipe them clean.
- Return each sensor to a grommet, push it in until it snaps into place.
- Reverse the rest of the steps to reassemble.
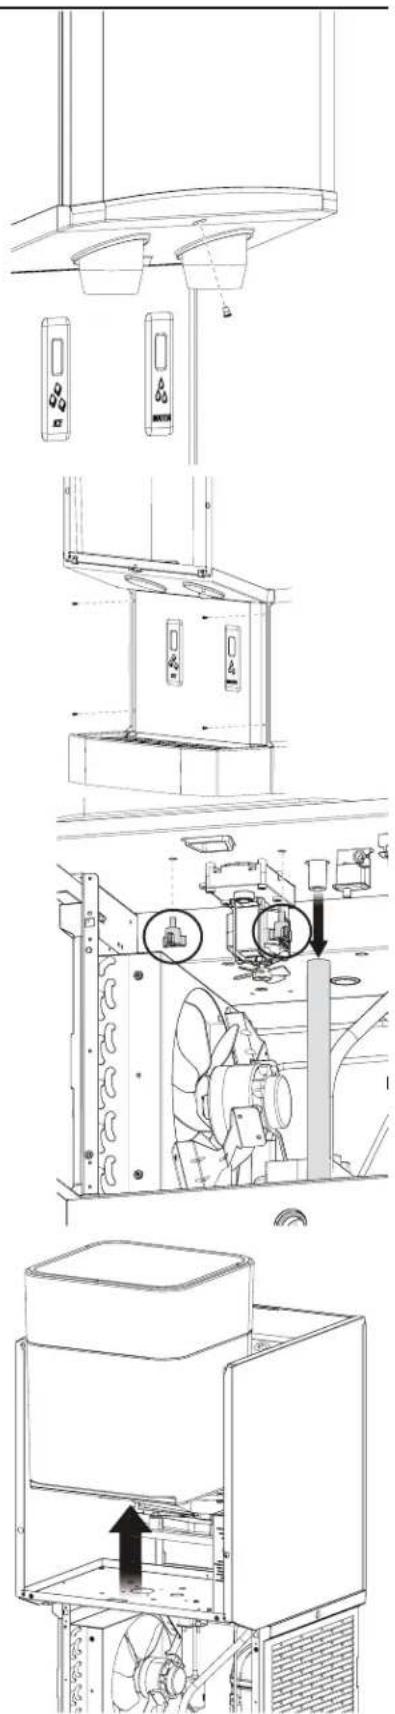
Dispensing Bin
The dispensing bin may be removed for cleaning or to provide service access to other components.
-
Go thru steps 1 thru 10 of the Bin Cleaning Procedure above.
-
Remove ice sweep.
-
Remove ice delivery chute and chute cover.
-
Remove dispense motor drive pin.
-
Twist and remove the water and ice dispense chutes.
-
Remove the chute mounting panel.
-
Remove splash panel. On Touch-Free dispensing models, disconnect sensors from harness and set panel aside.
-
Locate two 3 prong knob bolts under the bin. Remove them.
-
Locate bin drain and disconnect it from bin fitting.
-
Lift the bin up and off the chassis. Clean as needed.
text_image
Technical diagram showing a multi-step installation of an air conditioner unit with labeled components and directional arrows indicating assembly or inspection.HID312X, HID525X and HID540X Installation and User's Manual
Ice Making and Ice Dispensing System Cleaning Instructions
Hand tools, cleaning supplies and hand protection are recommended for this procedure.
Frequency: Recommended minimum time between cleanings is 6 months. To aid in determining if the machine has not been cleaned in 6 months, a Time To Clean light will glow after 6 months of power up time. Cleaning the machine with the following process will reset that light and the timer that controls it. More frequent cleanings may be required based on the mineral content of the water, run time and potential airborne contamination.
- Remove both front panels, disconnecting sensors or buttons where required.
- Push ON/OFF button to shut ice making off.
- Shut water supply off.
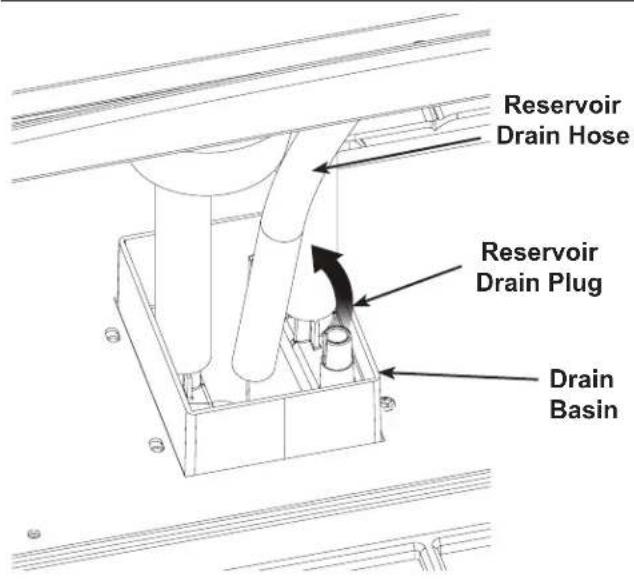
- Drain water from ice making system by pulling reservoir drain hose from plug at drain basin and return to plug when drained.
Note: Drain into drain basin in base of unit. Sink must be attached to unit throughout this process.
text_image
Reservoir Drain Hose Reservoir Drain Plug Drain Basin- Remove reservoir cover and fill with hot (110-120 degree F.) water, wait 2 minutes and drain water from ice making system by pulling reservoir drain hose from plug and return hose to plug when drained.
-
Mix a solution of 12 ounces of Scotsman Clear 1 ice machine scale remover and 12 ounces of clean, potable water.
-
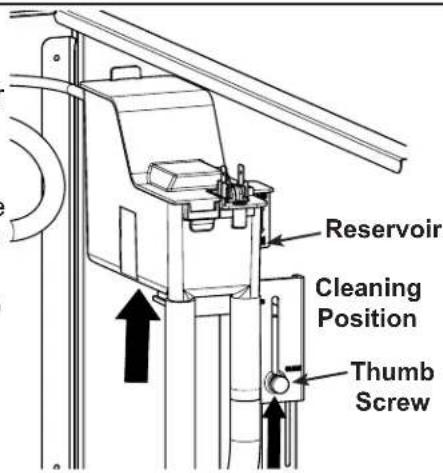
Loosen thumb screw holding water reservoir to post.
- Lift water reservoir to the top of the post and re-secure with the thumb screw.
- Remove cover from water reservoir.
- Vend all ice from dispenser.
- Remove dispense bin cover.
- Remove ice discharge chute cover from top of ice making system.
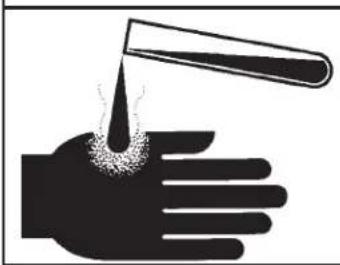
- Pour cleaning solution into reservoir. Caution: Solution is highly acidic. Use rubber gloves and DO DO NOT SPILLNOT SPILL.
text_image
Reservoir Cleaning Position Thumb ScrewCAUTION
natural_image
Silhouette of a hand holding a test tube with a droplet falling from it, no text or symbols presentScotsman Ice Machine Cleaner contains acids. These compounds may cause burns.
If swallowed, DO NOT induce vomiting. Give large amounts of water or milk. Call Physician immediately. In case of external contact, flush with water.
KEEP OUT OF THE REACH OF CHILDREN
CAUTION
Moving parts hazard. Risk of personal injury. Disconnect electrical power before proceeding.

natural_image
Abstract black-and-white graphic with two stylized shapes and a curved arrow, no text or symbols present.HID312X, HID525X and HID540X Installation and User's Manual
- Push the Clean button. The unit will operate the auger motor for 30 minutes and then stop.
Note: Stop at any time by pushing the ON/OFF button.
- Disconnect unit from electrical power.
- Drain the scale remover solution from the water system by pulling the reservoir drain hose from its plug. Return it to the plug when drained.
- Pour 24 ounces of clean, potable water into the reservoir.
- Drain the water from the water system by pulling the reservoir drain hose from its plug and return it to the plug when drained.
- Mix a solution of 4 ounces of ice machine scale remover and 16 ounces of potable water. Use this scale remover solution to wash out the water reservoir cover, ice discharge chute, ice chute cover, ice delivery chute, storage bin cover and inside of the ice storage bin. Also wash the sink, drip tray, grill, Drain Basin and Manifold with this solution. Pour half down the bin drain and the rest into the sink / drip tray to flush out their drains and Drain Basin.
Sanitize now.
- Create a solution of sanitizer by mixing 2 gallons (8 liters) of clean warm potable water (105°-115° F) with one 2 oz packet os SteraSheen Green Label.
- Pour the sanitizer solution into the reservoir until it is full (level with the molded line on the side).
- Reconnect electrical power.
- Push the ON/OFF button to make ice for 10 minutes. Add more sanitizer to the reservoir to keep it full while making ice.
- Push the ON/OFF button to stop making ice.
- Disconnect electrical power.
- Remove the ice outlet cover, dispense rotor and ice dispenser agitator from the bin. Wash them with the sanitizer solution.
- Wash all inside surfaces of the ice storage bin and ice discharge chute with the sanitizer solution.
-
Wash the ice discharge chute cover, ice sweep, metal area below the ice sweep and ice dispense chute with the sanitizer solution.
-
Wash the sink, drip tray, grill, Drain Basin and Manifold with the sanitizer solution. Pour remaining sanitizer into the bin and sink. Do not overfill bin.
- Drain sanitizer from ice making system by pulling reservoir drain hose from plug and return hose to plug when drained.
- Loosen thumb screw holding water reservoir to post and lower the water reservoir to the top of the slot, retighten thumb screw.
- Return the chute cover, dispense rotor and agitator to the inside of the storage bin. Secure with the original fasteners.
- Return the ice dispense chute and water reservoir cover to their original positions and secure them with their original fasteners.
- Reconnect water and electrical power to the machine.
- Push the ON/OFF button to restart ice making.
- Operate machine for 5 minutes and then push the ON/OFF button to stop ice making.
- Pour 16 oz of warm (95° to 105°F.) potable water into the bin. Repeat until the ice has been melted.
- Return the dispense bin cover to the machine and secure with the original screws.
- Push the ON/OFF button to resume ice making.
- Return all panels to their normal positions and secure with the original screws.
text_image
Ice Discharge Chute Ice SweepHID312X, HID525X and HID540X Installation and User's Manual
Other Maintenance
Upper Bearing and Water Seal Inspection
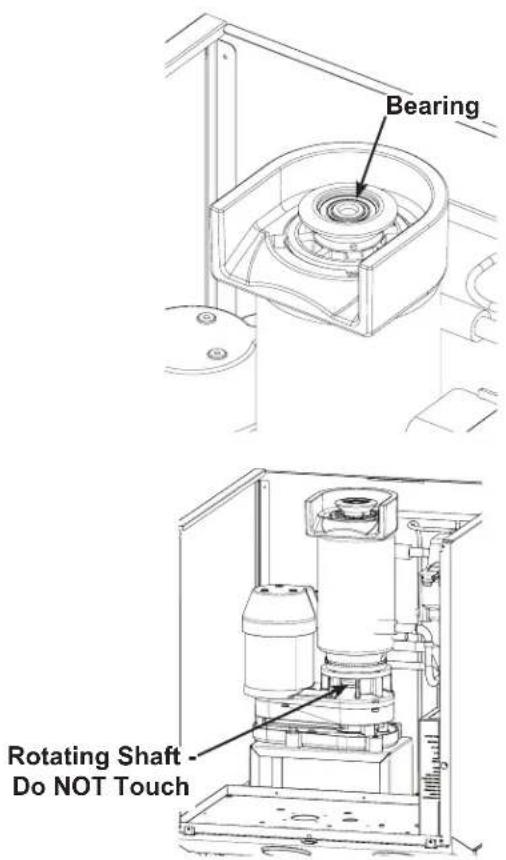
The auger in the ice making system is centered by bearings at the top and bottom. It is also sealed from leaking by a water seal at the bottom. The upper bearing and water seal should be checked at least twice a year.
The bearings are permanently lubricated and need no maintenance. They can be visually checked for obvious wear or damage but there is no need to add lubrication.
Auger motor bearings and the gear reducer are also permanently lubricated and need no maintenance.
The bottom of the ice making system should be checked for water leaks. Water draining from the bottom is an indication of a water seal leak. Immediate repair is required when a water seal leak is discovered.
Caution Caution: Moving parts hazard. Do not touch the rotating shaft at any time.
text_image
Bearing Rotating Shaft Do NOT TouchBasic Troubleshooting
See the separate HIDX service manual for more advanced troubleshooting information.
| Symptom Possible Cause Probable Correction | ||
| No ice is dispensed No ice | in bin Unit in Off mode. Rem | move upper front panel. Check controller code, push ON/OFF button to restart. |
| No water to unit. Controller shows code 3. Restore water supply. | ||
| No power to unit, power light on controller is off. Restore power. | ||
| High pressure control opened. Controller shows code 4, water interrupted to water cooled model. Restore water and reset controller. | ||
| Ice level control sensing full bin falsely. Controller shows 5. Clean ice level control sensors. | ||
| Dispense motor not turning R | remove upper front panel, check controller indicator lights. Hold container in front of sensor or push ice button, does the Ice Dispense Sensed light glow? If no, sensor is not detecting the container or button is not operating. If yes, does the Ice Dispense light glow? If yes, push Dispense Ice button on controller. Does the motor activate? If yes, go to next row. If no, check for voltage at motor. If no voltage, replace controller. If voltage at motor, replace motor. | |
| Dispense motor working, but ice in bin not moving | Agitator or rotor not turning, remove all ice and inspect for damage to agitator and rotor. | |
| No water is dispensed No | water to unit Restore water | |
| Water valve not opening Rem | move upper front panel, check controller indicator lights. Hold container in front of sensor or push water button, does the Water Dispense Sensed light glow? If no, sensor is not detecting the container or button is not operating. If yes, does the Water Dispense light glow? If yes, push Dispense Water button on controller. Does the water valve activate? If no, check for voltage at valve. If no voltage, replace controller. If voltage at valve, replace valve. | |
| Water drips from spout May be normal A few drops per minute is normal | ||
| Dispensed water is cloudy, but clears up in a few minutes | Air in the water This is normal | and can vary depending upon how much air is in the water. May be improved by lowering water pressure to the unit. |
| Water stream is not uniform or splashes excessively when dispensed | Aerator is not installed Machi | nes manufactured in 2020 or earlier do not have an aerator that regulates a smooth stream and cuts down on splashing. Conversion kit 16-1246-21 installs easily and is compatible with all HIDX models. |
| Aerator is clogged | Machines manufactured in 2021 or later include an aerator. The aerator may become clogged and should be replaced. Service kit 16-1246-22 includes a replacement aerator and required key tool. | |
HID312X, HID525X and HID540X
Installation and User's Manual
Controller Diagnostics
| Code or Light Action Probable Cause Suggested Action | ||
| 0 | Unit manually switched off If desired, switch unit on | |
| F | Freeze mode None, unit is making ice | |
| b | Bin sensors sense bin full Check if bin is full | |
| E | Corrupted memory Replace controller | |
| C | Clean mode Continue clean mode | |
| d | Test mode None, allow unit to finish test mode | |
| 1 | Auger motor rotated auger backwards | Replace auger motor. Check water seal area for leaks, replace seal if leaking. |
| 2 | Auger motor stalled or operating slowly | Clean ice making system and retry |
| 3 | No water in reservoir Restore water. | If there is water, is it too pure? Are sensor wires connected? |
| 4 | High pressure cut out open Check fan | an motor on air cooled or water supply on water cooled |
| Water dispense sensed light blinking | Container positioned in front of water dispense sensor or button pressed for more than 24 seconds | Normal, controller has a time limit for dispensing. Remove container. |
| Water dispense light blinking | ||
| Ice dispense sensed light blinking C | Container positioned in front of ice dispense sensor or button pressed for more than 20 seconds | |
| Ice dispense light blinking | ||
| Status light is on Unit is in ice making mode Normal, may not be making ice if bin is full | ||
| Time to Clean light is on | Unit has not been cleaned for at least 6 months | Clean unit |
| Water Dispensed Sensed light is on | A container is in front of the sensor or the water button is pressed | Normal during water dispensing |
| Ice Dispensed Sensed light is on | A container is in front of the sensor or the ice button is pressed | Normal during ice dispensing |
| Water Dispense light is on | Water solenoid has been activated | Normal during water dispensing |
| Ice Dispense light is on | Bin drive motor has been activated | Normal during ice dispensing |
| Auger light is on | Auger motor is active | Normal when making ice |
| Compressor light is on | Compressor is active | Normal when making ice |
HID312X, HID525X and HID540X Installation and User's Manual Decommissioning
Only qualified technicians familiar with R290 refrigerant should decommission a machine, as special tools and containers are required for the removal, transportation, and disposal of this highly flammable substance.
• Before attempting the procedure:
* Ensure that all protective gear is present and used throughout the procedure.
* Make sure recovery equipment and containers are available and ready for use. All containers used for recovery must be rated for R290 refrigerant and must be labeled as such.
* Weigh any refrigerant prior to reclaiming.
- Maintain safety through standard operating procedures as outlined on page 20 of this document. Be sure to follow local, state, and federal guidelines for proper disposal.
- Do not fill containers more than 80% and do not exceed the pressure limits of the container. Make sure the machine to be decommissioned is in satisfactory working order and that the electrical components of the machine are properly sealed to prevent ignition.
- Recovered refrigerant should not be charged into another refrigerating system or mixed in another container.
- Make sure to safely transport the refrigerant in line with standard operating procedures.
- All recovered refrigerant must be returned to refrigerant supplier for proper disposal.
- If compressor or compressor oils are removed ensure it has been removed to an acceptable level so the flammable refrigerant does not remain in the lubricant.
Scotsman®
Ice Systems
natural_image
Line drawing of a modern water dispenser with control panel and ventilation grilles (no text or symbols)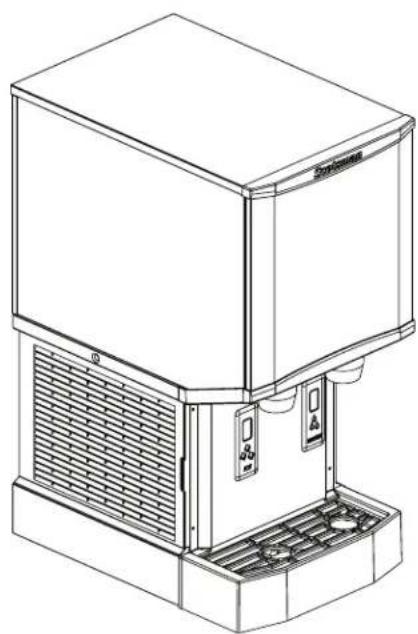
natural_image
Line drawing of a refrigerant appliance with ventilation grilles and control panel (no text or symbols)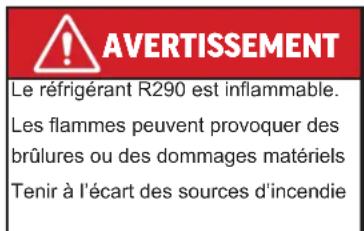
text_image
Warning sign depicting a flame symbol in yellow and black on a white backgroundnatural_image
Technical line drawing of a rectangular enclosure with supporting base and mounting feet (no text or symbols)Déballage
natural_image
Line drawing of a water heater appliance with control panel and side-mounted fans (no text or symbols)Installation
natural_image
Technical line drawing of a mechanical assembly with mounting brackets and control panel (no text or symbols)Supports/pieds de la machine
natural_image
Line drawing of a water dispenser with two control valves and a top panel (no text or symbols)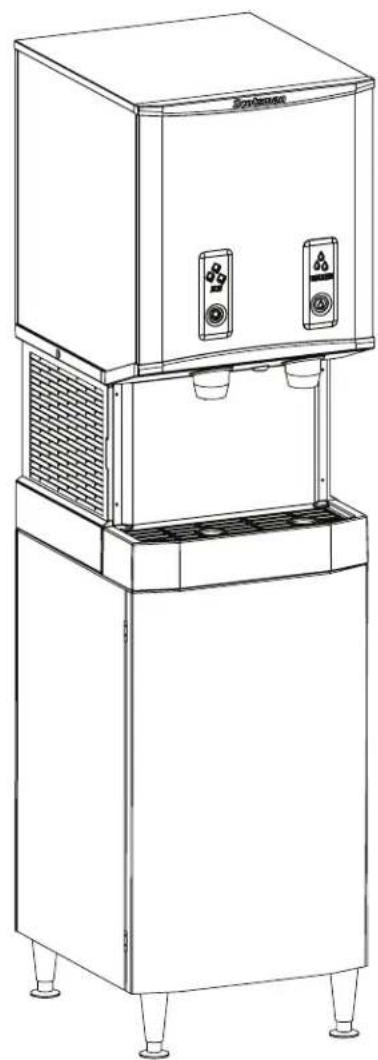
natural_image
Line drawing of a water dispenser with control panel and side legs (no text or symbols)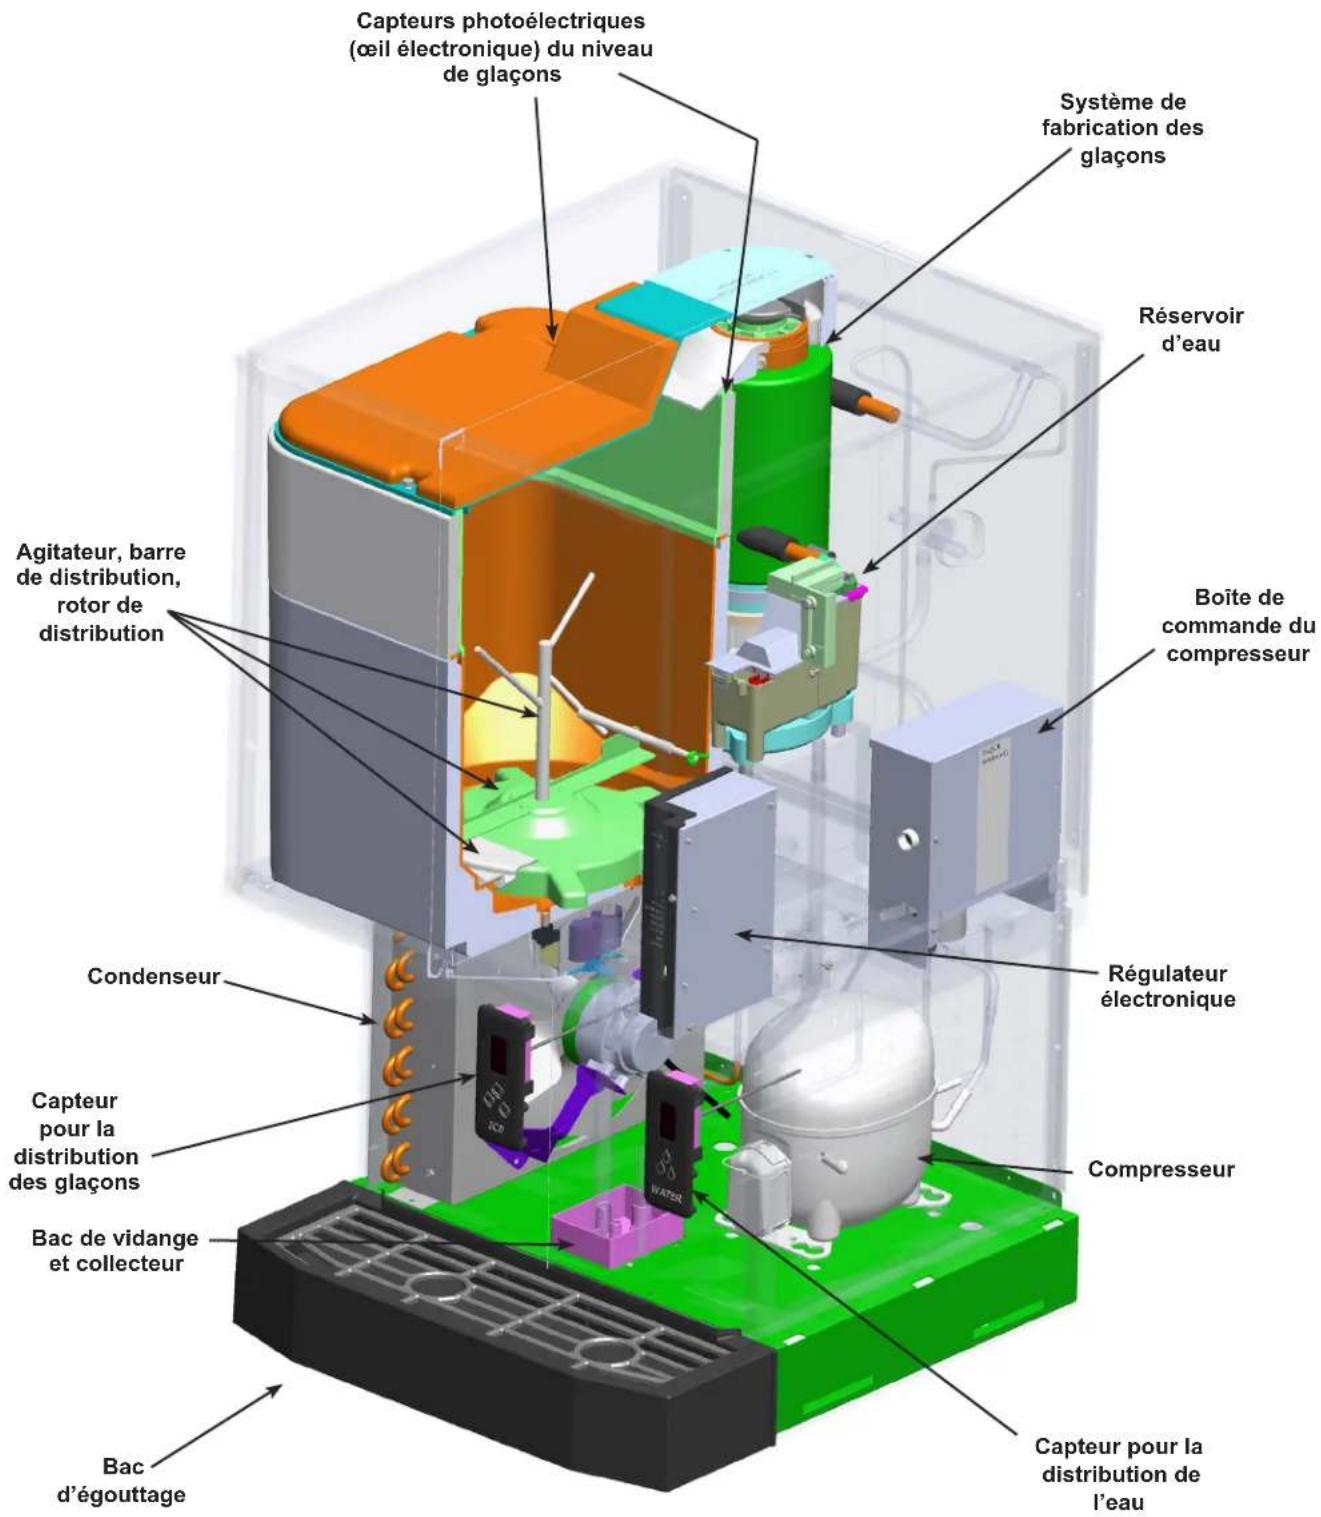
text_image
DISPENSE WATER DISPENSE ICE ON / OFF CLEAN CODE DISPLAY POWER STATUS TIME TO CLEAN... WATER DISP SENSED ICE DISP SENSED WATER DISP ON ICE DISPENSE ON AUGER ON COMPRESSOR ON MARCHE/ ARRÊTtext_image
DISPENSE WATER DISPENSE ICE ON / OFF CLEAN CODE DISPLAY POWER STATUS TIME TO CLEAN... WATER DISP SENSED ICE DISP SENSED WATER DISP ON ICE DISPENSE ON AUGER ON COMPRESSOR ONnatural_image
Diagram of a water level control system with two water level sensors and three cups, no text or symbols presentnatural_image
Technical line drawing of a mechanical assembly with internal components and a magnified inset showing two connected components (no text or symbols present)natural_image
Technical line drawing of a mechanical device with a grid panel inset showing a directional arrow (no text or symbols)Condenseur
natural_image
Technical line drawing of an industrial machine with cooling unit and fan assembly (no text or symbols)natural_image
Technical line drawing of a mechanical device with internal components and directional arrows (no text or symbols)natural_image
Abstract black-and-white graphic with stylized shapes resembling a hand and a fan-like shape (no text or symbols)natural_image
Technical line drawings of a refrigerator interior showing internal components and airflow direction (no text or symbols)natural_image
Technical line drawing of a mechanical assembly with no visible text or symbols101 Corporate Woods Parkway
Vernon Hills, IL 60061
800-726-8762
www.scotsman-ice.com