
UL 400 AT - Lamp BRENNENSTUHL - Free user manual and instructions
Find the device manual for free UL 400 AT BRENNENSTUHL in PDF.

| Product Type | Rechargeable Outdoor LED Lamp |
| Brand | Brennenstuhl |
| Model | UL 400 AT |
| Protection Rating | IP44, IK08 |
| Protection Class | III |
| Dimensions (H x W x L) | 66 x 66 x 300 mm |
| Weight | 500 g |
| Battery Type | 1x 18650 Li-Ion 3.6V / 3000 mAh (replaceable) |
| Charging | USB-C, 5 V / 2 A |
| Maximum Battery Life | 24 hours |
| Operating Temperature | -10°C to +40°C |
| Functions | Dimmer (10-100%), 3 color temperatures, red light, SOS, tripod, flashlight, power bank 5V/2A |
| Light Source | Non-replaceable LED, energy class D |
| Package Contents | Lamp, carrying case, USB-C to USB-C cable |
| Maintenance | Clean with a soft, dry cloth; do not immerse |
| Disposal | Recycle according to WEEE directive; batteries separately |
| Spare Parts | Replaceable 18650 battery; non-replaceable light source |
Frequently Asked Questions - UL 400 AT BRENNENSTUHL
User questions about UL 400 AT BRENNENSTUHL
0 question about this device. Answer the ones you know or ask your own.
Ask a new question about this device
Download the instructions for your Lamp in PDF format for free! Find your manual UL 400 AT - BRENNENSTUHL and take your electronic device back in hand. On this page are published all the documents necessary for the use of your device. UL 400 AT by BRENNENSTUHL.
USER MANUAL UL 400 AT BRENNENSTUHL
Akku LED Outdoor Lampe Rechargeable LED outdoor lamp
UL 400 AT
EN Operating instructions 5
FR Mode d'emploi 8
Akku LED Outdoor Lampe UL 400 AT
INBETRIEBNAHME
Operating instructions
Rechargeable LED outdoor lamp UL 400 AT
Attention: Please read these instructions for use carefully before using the product.
Always use the latest version. You can find them on our website.
SAFETY INSTRUCTIONS
Please observe the general safety instructions enclosed with the product, which can also be found at service.brennenstuhl.com
The product is not IP44 (protected against foreign bodies and splash water)
- during the charging process
- while using the USB output
The light source cannot be replaced; if it loses its function, the entire luminaire must be disposed of.
The luminaire contains a light source of energy efficiency class D - 0172640197
TECHNICAL DATA
Protection class: III
Protection class/impact resistance: IP44, IK08
Operating temperature: -10°C to +40°C
Storage temperature: -10°C to +40°C
| Type UL 400 AT | |
| Battery type (replaceable) 1x 18650 Li-Ion / 3.6 V / 3.000 mAh | |
| Charging input connector USB C | |
| Charging input 5 V/2 A | |
| Powerbank 5 V/2 A | |
| Charging time ~ 3 h | |
| Lighting time | max. 24 h |
| Dimensions | 66 mm x 66 mm x 300 mm |
| Weight | 500 g |
This product is suitable for indoor and outdoor lighting purposes.
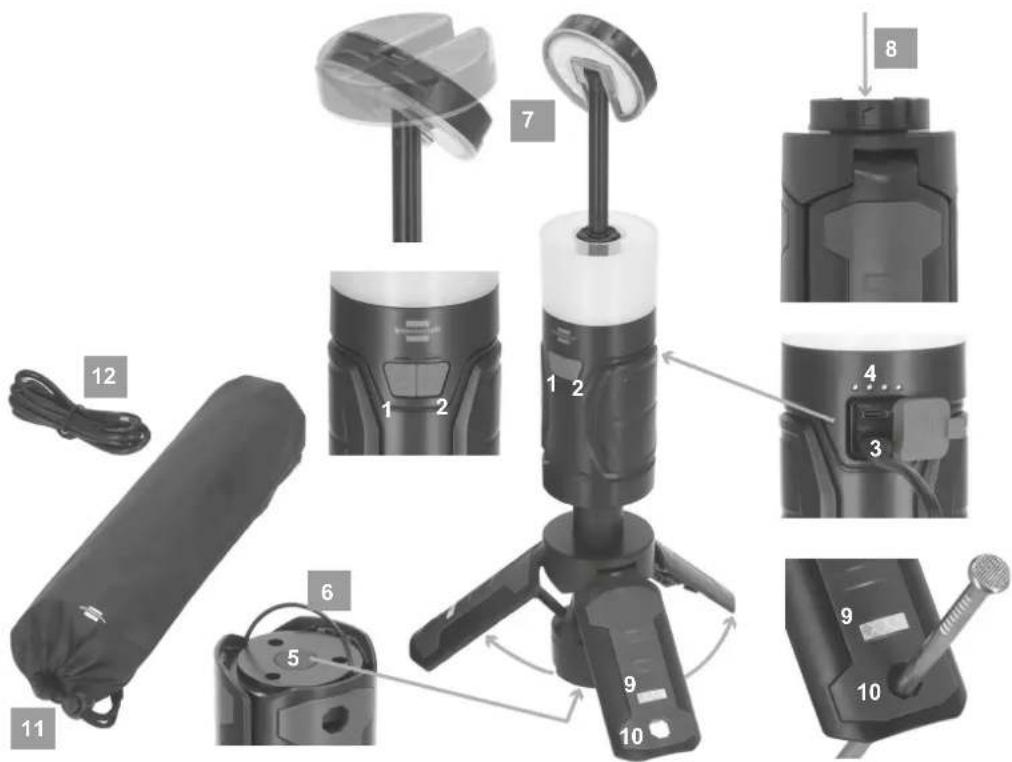
OPERATING PARTS
① On/Off switch
② Set colour temperature
③ Power bank
④ Battery/level indicator
⑤ Open feet button
6 Brackets
⑦ Spotlight head
⑧ Compartment for battery
9 Fluorescent label
10 Hole for peg
11 Bag
12 USB cabel
COMMISSIONING
The product is supplied as a 360° hand/stand lamp.
The light can be switched on and off with the switch (1) and dimmed variably from 10-100% and back by pressing and holding.
Variable dimming takes place in every white colour temperature level.
The different light levels can be set by briefly pressing 50%/100%/red light/SOS.
The lower the light output setting, the longer the light duration.
If a switch position remains unchanged for longer than 5 seconds, pressing it again will always switch it to the "off" state.
The light can be suspended by folding out the bracket (6) at the bottom of the light.
STATIC FUNCTION
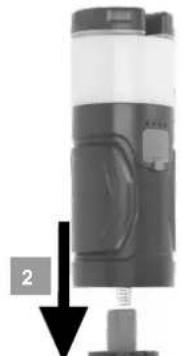
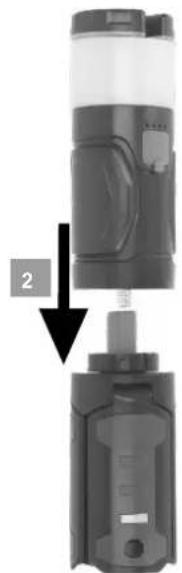
To adjust the spotlight head (7) to the desired height, simply pull the spotlight head (7) upwards.
The 3 feet can be opened by pressing the button (5).
Also ensure that the surface is level.
You can ensure better stability by using pegs that fit into the holes (10) in the feet.
The fluorescent labels (9) on each foot ensure that you can see the unfolded feet better in the dark.
The feet can simply be folded back in by pressing all 3 feet together.
TORCH FUNCTION
To use the light as a torch, pull the spotlight head (7) out slightly, turn it 180° and push it back into its original position.
BATTERY LEVEL INDICATOR
The battery level indicator (4) appears automatically when the device is switched on.
If all 4 LEDs light up, the battery is fully charged.
CHARGING THE BATTERY
-
To ensure optimum function, we recommend that the battery is fully discharged and fully recharged the first time it is used.
-
The charging socket is located on the back of the light under the cap. Please use the upper charging socket, labelled Input, to charge the light.
-
The battery level indicator (see description above) shows the charge status of the battery.
-
If the battery is not used for a longer period of time, charge it approximately every 3 months to ensure a long battery life.
-
The product can be operated while charging. Function depends on the version.
-
After charging, be sure to close the charging socket again with the sealing cap.
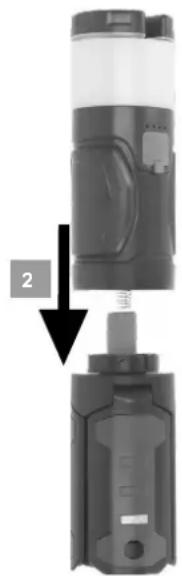
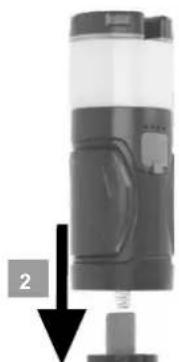
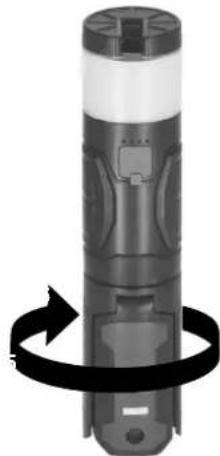
REPLACING THE BATTERY
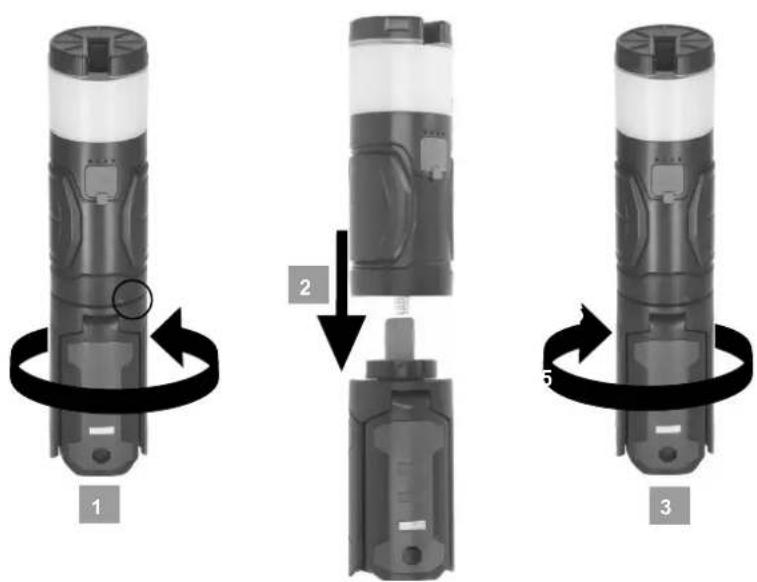
-
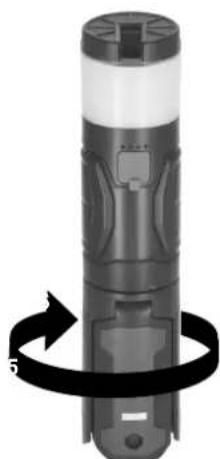
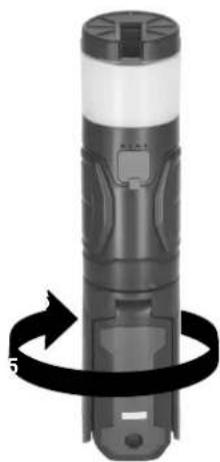
Hold the upper light body firmly and turn the foot section to the left. You will also see the symbol with the closed lock and the open lock on the housing. Turn from the closed lock symbol to the open lock symbol.
-
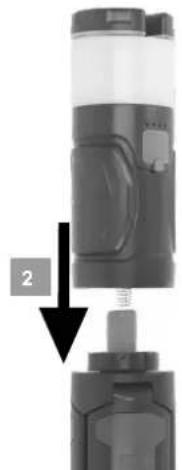
The standard battery in the foot section can now be removed.
-
Make sure that you reinsert the appropriate standard battery in the correct position (see marking).
-
Now place the upper luminaire body back on the base and make sure that the arrow on the base matches the open lock symbol on the upper luminaire body. Then hold the foot section firmly and turn the upper lamp body to the left.
Turn from the open lock symbol to the closed lock symbol.
POWERBANK FUNCTION
The product has a power bank function that can be used to charge devices with 5V/2A.
To do this, use the lower charging socket under the cap on the back, which is labelled Output.
SCOPE OF DELIVERY
Light, Bag, USB C/C cable

EU DECLARATION OF CONFORMITY

UKCA DECLARATION OF CONFORMITY
The declaration of conformity is deposited with the manufacturer.
DISPOSAL

Dispose of electrical appliances in an environmentally friendly manner! Electrical appliances should not be disposed of with household waste!
In accordance with European Directive 2012/19/EU on waste electrical and electronic equipment, used electrical appliances must be collected separately and recycled in an environmentally friendly manner.
You can find out how to dispose of your old appliance from your local authority.

Batteries and accumulators must not be disposed of in the household waste!
As a consumer, you are legally obliged to hand in all batteries and accumulators at a collection point in your community/urban district or in the trade, so that they can be disposed of in an environmentally friendly manner, otherwise there are possible risks to the environment and human health.
For further information, we recommend the Service/FAQs section on our homepage www.brennenstuhl.com

Mode d'emploi
MISE EN SERVICE
CE DÉCLARATION DE CONFORMITÉ UE
INSCHRIJVING
flowchart
graph TD
    A["1: Cylinder"] --> B["2: Inserted Component"]
    B --> C["3: Assembly with Arrow 5"]
    C --> D["4: Reassembly with Arrow 2"]
    D --> E["5: End"]
flowchart
graph TD
    A["1: Display with circular arrow"] --> B["2: Inserted device"]
    B --> C["3: Rotation of device"]
    C --> D["4: Rotation of device"]
Luz, Bolsa, Cable USB C/C
natural_image
Illustration of a cylindrical device with a black arrow indicating rotational motion (no text or symbols)1
natural_image
Mechanical device with a numbered arrow indicating assembly or step (no visible text or symbols)
natural_image
Black-and-white illustration of a cylindrical device with a curved arrow indicating rotational motion (no text or symbols)3
KOMISIONÁŘSTVÍ
MEGBÍZÁS
natural_image
Illustration of a cylindrical device with a circular arrow indicating rotation or motion (no text or symbols)1
natural_image
Close-up of a mechanical device with a black component and a black arrow pointing to a small component (no visible text or symbols)
natural_image
Black-and-white illustration of a cylindrical device with a curved arrow indicating rotational motion (no text or symbols)3
GÖREVLENDİRME
KOMISSIO
Luz, Bolsa, Cabo USB C/C
KOMMITSEERIMINE
COMMISSIONING
Výrobok sa dodáva ako 360° ručná/stojanová lampa.
KOMISIONIRANJE
natural_image
Illustration of a cylindrical device with a black arrow indicating rotation around its body (no text or symbols present)1
natural_image
Two views of a mechanical device with a labeled component (no text or symbols visible)
natural_image
Illustration of a cylindrical device with a black ribbon and arrow indicating rotational motion (no text or symbols)3
natural_image
Close-up of a cylindrical device with a black arrow indicating rotational motion (no text or symbols visible)1
natural_image
Two views of a mechanical device with a labeled component (no text or symbols visible)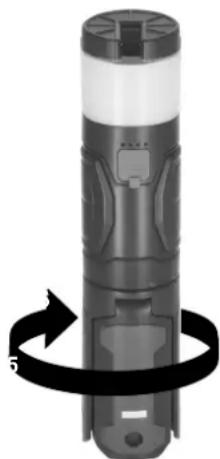
natural_image
Black-and-white illustration of a cylindrical device with a black ribbon and arrow indicating rotation (no text or symbols)3
IGANGKJ∅RING
Produktet leveres som en 360° hånd-/standerlampe.
natural_image
Close-up of a cylindrical device with a black ribbon and circular arrow indicating rotation (no text or symbols)1
natural_image
Close-up of a cylindrical mechanical device with a black arrow pointing to a small component (no visible text or symbols)
natural_image
Illustration of a cylindrical device with a black ribbon and arrow indicating rotational motion (no text or symbols)3

- Akku LED Outdoor Lampe Rechargeable LED outdoor lamp
- Akku LED Outdoor Lampe UL 400 AT
- INBETRIEBNAHME
- Operating instructions
- Rechargeable LED outdoor lamp UL 400 AT
- SAFETY INSTRUCTIONS
- TECHNICAL DATA
- OPERATING PARTS
- COMMISSIONING
- STATIC FUNCTION
- TORCH FUNCTION
- BATTERY LEVEL INDICATOR
- CHARGING THE BATTERY
- REPLACING THE BATTERY
- POWERBANK FUNCTION
- SCOPE OF DELIVERY
- EU DECLARATION OF CONFORMITY
- UKCA DECLARATION OF CONFORMITY
- DISPOSAL
- Dispose of electrical appliances in an environmentally friendly manner! Electrical appliances should not be disposed of with household waste!
- Batteries and accumulators must not be disposed of in the household waste!
- Mode d'emploi
- MISE EN SERVICE
- CE DÉCLARATION DE CONFORMITÉ UE
- INSCHRIJVING
- KOMISIONÁŘSTVÍ
- MEGBÍZÁS
- GÖREVLENDİRME
- KOMISSIO
- KOMMITSEERIMINE
- KOMISIONIRANJE
- IGANGKJ∅RING
Brand : BRENNENSTUHL
Model : UL 400 AT
Category : Lamp