USER MANUAL CLUB-UV450 AFX
natural_image
Line drawing of a multi-lens LED projector with control panel and indicator lights (no text or symbols on the device itself)

View the product on our website and download the multilanguage manual
DMX Channels - p. 2
GB - User Manual - p. 3
| Mode/Channel | Value | Function |
| CH09 | CH05 | | |
| 1 | 1 | | Dimmer |
| 0..255 | Dimmer 0%...100% |
| 2 | 2 | | Shutter |
| 0..31 | Shutter closed |
| 32..63 | shutter open |
| 64..95 | Strobe effect slow to fast |
| 96..127 | shutter open |
| 128..159 | Pulse-effect in sequences slow to fast |
| 160..191 | shutter open |
| 192..223 | Random strobe effect slow to fast |
| 224..255 | shutter open |
| 3 | 3 | | ALL UV |
| 0..255 | 0-100% All UV dimmer from dark to bright |
| 4 | 4 | | Macro RUN |
| 0..19 | No function |
| 20..39 | Macro Run 1 |
| 40..59 | Macro Run 2 |
| 60..79 | Macro Run 3 |
| 80..99 | Macro Run 4 |
| 100..119 | Macro Run 5 |
| 120..139 | Macro Run 6 |
| 140..159 | Macro Sound 1 |
| 160..179 | Macro Sound 2 |
| 180..199 | Macro Sound 3 |
| 200..219 | Macro Sound 4 |
| 220..239 | Macro Sound 5 |
| 240..255 | Macro Sound 6 |
| 5 | 5 | | Macro Speed |
| 0..255 | Macro Speed from Slow To Fast |
| 6 | | | UV of Led 1 |
| 0..255 | 0-100% UV of Led 1 dimmer from dark to bright |
| 7 | | | UV of Led 2 |
| 0..255 | 0-100% UV of Led 2 dimmer from dark to bright |
| 8 | | | UV of Led 3 |
| 0..255 | 0-100% UV of Led 3 dimmer from dark to bright |
| 9 | | | UV of Led 4 |
| 0..255 | 0-100% UV of Led 4 dimmer from dark to bright |
USER MANUAL
UNPACKING INSTRUCTIONS
Immediately upon receiving a fixture, carefully unpack the carton, check the contents to ensure that all parts are present and have been received in good condition. Notify the freight company immediately and retain packing material for inspection if any parts appear to be damaged from shipping or the carton itself shows signs of mishandling. Keep the carton and all packing materials. In the event that a fixture must be returned to the factory, it is important that the fixture be returned in the original factory box and packing.
CONTENTS OF THE CARTON
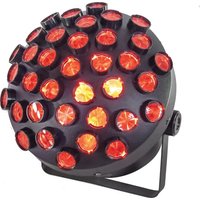
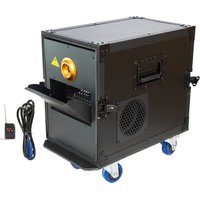
• 1 pc. CLUB-UV450
- 1 pc. power cable
- 1 pc. signal cable
• 1 pc. user manual
EXPLANATION OF SYMBOLS ON THE SILKSCREEN

The triangle containing a lightning symbol is used to indicate whenever your health is at risk (due to electrocution, for example).

An exclamation mark in a triangle indicates particular risks in handling or operating the appliance.

Class I, must be connected to an earthed mains outlet

The unit complies with UK standards

For indoor use only

Minimum distance between the appliance and other objects

WARNING: UVA rays are harmful to health. Do not look directly at the rays and avoid pro-
CAUTION DO NOT OPEN THE HOUSING SHOCK HAZARD
Please read this manual carefully before operating this product.
SAFETY RECOMMENDATIONS
- Please read these instructions carefully, they include important information about the installation, usage and maintenance of this product.
- Please keep this User Guide for future reference. If you sell the unit to another user, be sure that he also receives this instruction booklet.
- Always make sure that you are connecting to the proper voltage, and that the line voltage you are connecting to is not higher than that stated on the bottom of the fixture.
- The appliance is part of class I and must exclusively connected to an earthed mains outlet.
- To prevent risk of fire or shock, do not expose fixture to rain or moisture. Make sure there are no flammable materials close to the unit while operating.
- The unit must be installed in a location with adequate ventilation, at least 20in (50cm) from adjacent surfaces. Be sure that no ventilation slots are blocked.
- For indoor use only
- The minimum distance luminaire from that part of the luminaire or lamp to the lighted object is 0.5m.
- The max. ambient temperature (Ta) is 40^ . Don't operate the fixture at higher temperatures.
- In the event of a serious operating problem, stop using the unit immediately. Never try to repair
the unit by yourself. Repairs carried out by unskilled people can lead to damage or malfunction. Please contact the nearest authorized technical assistance center. Always use the same type of spare parts.
- Make sure the power cord is never crimped or damaged.
- Never disconnect the power cord by pulling or tugging on the cord.
- Avoid direct eye exposure to the light source while it is on as sensitive persons may suffer an epileptic shock (especially meant for epileptics)!
• The product is for decorative purposes only and not suitable as a household room illumination.
- If the external flexible cable or cord of this luminaire is damaged, it shall be exclusively replaced by the manufacturer or his service agent or a similar qualified person in order to avoid a hazard
• The lenses, housing or ultraviolet filter must be replaced if they are visibly damaged.
- The light source is not replaceable. It it is faulty, the product must be discarded.
DISCONNECT DEVICE
Where the MAINS plug or an appliance coupler is used as the disconnect device, the disconnect device shall remain readily operable.
INSTALLATION
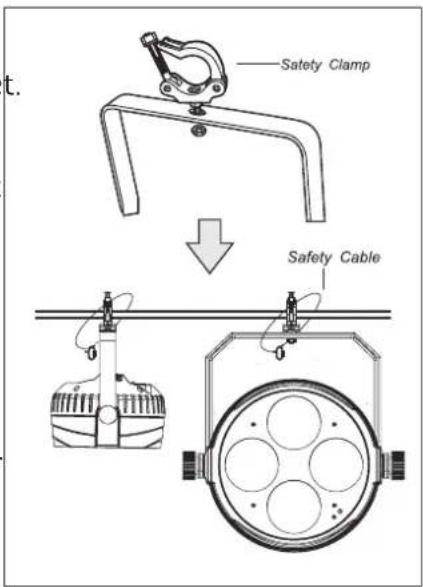
The unit should be mounted via its screw holes on the bracket. Always ensure that the unit is firmly fixed to avoid vibration and slipping while operating. Always ensure that the structure to which you are attaching the unit is secure and is able to support a weight of 10 times of the unit's weight.
The installation must always be secured with a secondary safety attachment, e.g. an appropriate safety rope.
Never stand directly below the device when mounting, removing or servicing the fixture.
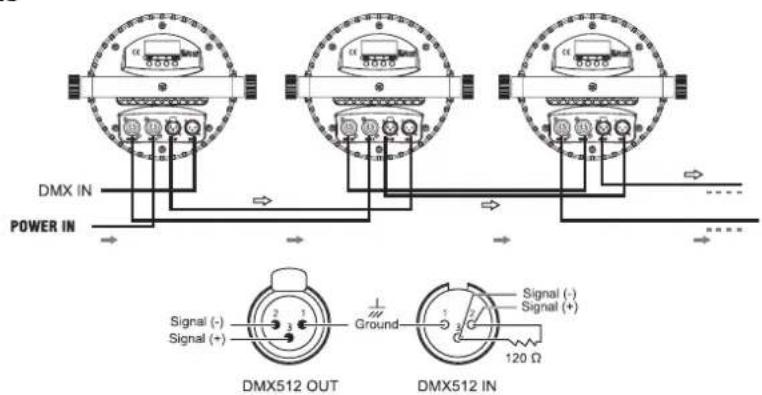
DMX CONNECTION
Connect an XLR cable to the male 3-pin XLR output of your controller and the other side to the female 3-pin XLR input of the light. You can chain multiple lights together through serial linking
The cable needed should be two core, screened cable with XLR input and output connectors.
text_image
Safety Clamp
Safety Cable
text_image
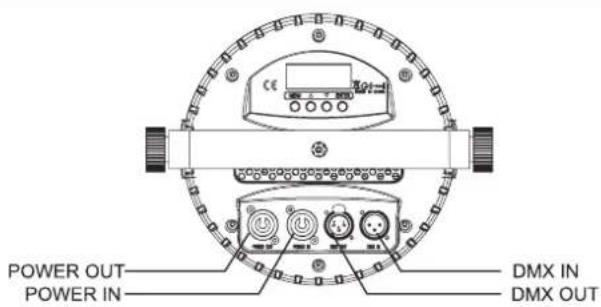
POWER OUT
POWER IN
DMX IN
DMX OUT
CABLE CONNECTORS
text_image
DMX IN
POWER IN
Signal (-)
Signal (+)
DMX512 OUT
Ground
Signal (-)
Signal (+)
120 Ω
DMX512 IN
flowchart
graph TD
    A["EN"] --> B["Dashed Arrow"]
Cabling must have a male XLR connector on one end and a female XLR connector on the other end. Termination reduces signal errors. To avoid signal transmission problems and interference, it is always advisable to connect a DMX signal terminator.
CAUTION
Do not allow contact between the common and the fixture's chassis ground. Grounding the common can cause a ground loop, and your fixture may perform erratically. Test cables with an ohm meter to check correct polarity and to make sure the pins are not grounded or shorted to the shield or each other.
CONTROL PANEL
The control panel is the mechanism for configuring the settings. It has a small LCD screen and four buttons, which are described hereafter.