OCEALED22120B2 - Remote control OCEANIC - Free user manual and instructions
Find the device manual for free OCEALED22120B2 OCEANIC in PDF.

| Product type | Remote control for LED TV |
| Brand | Oceanic |
| Model | OCEALED22120B2 (remote control associated with TV LE-2229D) |
| Power supply | 2 LR03 (AAA) batteries not included |
| Range | Approximately 8 meters within the TV's reception area |
| Main functions | Power on/standby, channel selection, volume control, menu, source, picture/sound modes, teletext, multimedia functions (play, pause, fast forward, etc.) |
| Number of keys | More than 40 keys |
| Color keys | Red, Green, Yellow, Cyan (for teletext and DVB-T functions) |
| Multimedia keys | Play, Pause, Stop, Previous/Next track, Rewind, Fast forward, Timeshift, REC |
| Numeric keys | 0-9 to enter channel number |
| Material | ABS plastic |
| Dimensions (approx.) | Approximately 21 x 4.5 x 2.5 cm |
| Weight (without batteries) | Approximately 80 g |
| Compatibility | Oceanic TV OCEALED22120B2 (LE-2229D) |
| Maintenance | Clean with a soft, dry cloth. Do not use chemical products. |
| Safety instructions | Do not expose to excessive heat, water, or moisture. Remove batteries if not used for an extended period. Dispose of used batteries in appropriate collection bins. |
| Repairability | No user-serviceable parts. In case of failure, contact after-sales service. |
Frequently Asked Questions - OCEALED22120B2 OCEANIC
User questions about OCEALED22120B2 OCEANIC
0 question about this device. Answer the ones you know or ask your own.
Ask a new question about this device
Download the instructions for your Remote control in PDF format for free! Find your manual OCEALED22120B2 - OCEANIC and take your electronic device back in hand. On this page are published all the documents necessary for the use of your device. OCEALED22120B2 by OCEANIC.
USER MANUAL OCEALED22120B2 OCEANIC
OCEALED22120B2
oceanic
AVERTISSEMENTS ET CONSEILS DE SECURITE IMPORTANTS
- EN (translated from the original)
natural_image
Illustration of a remote control with a pointer and angle markings (no text or symbols on the device itself)Insertion des piles
natural_image
Isometric technical diagram of a mechanical component with internal channels and mounting brackets (no text or symbols)natural_image
Technical line drawing of a mechanical or electrical component with no visible text or symbolsnatural_image
Top-down line drawing of a computer setup with monitor, keyboard, and wall panels (no text or symbols)1
natural_image
Top-down schematic of a room layout with furniture and fixtures (no text or labels)2

flowchart
graph TD
    A["•"] --> B["•"]
    B --> C["•"]
    C --> D["•"]
    D --> E["•"]
    E --> F["•"]
    F --> G["•"]
    G --> H["•"]
    H --> I["•"]
    I --> J["•"]
    J --> K["•"]
    K --> L["•"]
    L --> M["•"]
    M --> N["•"]
    N --> O["•"]
    O --> P["•"]
    P --> Q["•"]
    Q --> R["•"]
    R --> S["•"]
    S --> T["•"]
    T --> U["•"]
    U --> V["•"]
    V --> W["•"]
    W --> X["•"]
    X --> Y["•"]
    Y --> Z["•"]
    Z --> AA["•"]
    AA --> AB["•"]
    AB --> AC["•"]
    AC --> AD["•"]
    AD --> AE["•"]
    AE --> AF["•"]
    AF --> AG["•"]
    AG --> AH["•"]
    AH --> AI["•"]
    AI --> AJ["•"]
    AJ --> AK["•"]
    AK --> AL["•"]
    AL --> AM["•"]
    AM --> AN["•"]
    AN --> AO["•"]
    AO --> AP["•"]
    AP --> AQ["•"]
    AQ --> AR["•"]
    AR --> AS["•"]
    AS --> AT["•"]
    AT --> AU["•"]
    AU --> AV["•"]
3
Remarques:
Réglage Auto

FR-21
Menu Chaînes


Information du Signal
Réglage Automatique
Configuration Parabole
Réglage du bruit
Mode HDMI
Menu Verrouillage
Verrouillage Chaîne
Langue Sous-titres
natural_image
Symbol of a trash bin crossed with two crossed lines and a solid black rectangle below (no text or labels)EXCLUSIONS DE GARANTIE
IMPORTANT WARNINGS AND SAFETY ADVICE
We encourage you to read this user guide carefully and completely before installing and using your device.
It is important that this user guide is kept with the device for any new consultation. If this unit is to be transferred to another person, make sure that the user guide follows the unit so that the new user can be informed of the operation of the unit. In this user guide, the following symbols are used:
 | Important information about your personal safety and how to avoid damage to the device |
 | General information and advice |
 | Environmental information |
 | Fire hazard |
 | Risk of electric shock |
Important safety instructions – please read carefully and keep for future reference

natural_image
Warning symbol of a lightning bolt inside a triangle (no text or numbers)To reduce the risk of fire or electric shock, do not expose this product to water, rain or moisture. To prevent the risk of electric shock, do not remove the cover or back of this product. In case of product failure, only qualified personnel can repair. There are no user-serviceable parts inside.
CAUTION!
Dangerous tension inside the product ! Do not open. Risk of electric shock ! No parts can be repaired by the end-user. Only qualified personnel can repair and maintain this product.
If the electric cord is damaged, it must be replaced by the manufacturer or qualified after-sales personnel in order to avoid any danger.
The product must be installed in accordance with local laws.
Damaged batteries must be properly disposed. In order to protect the environment, please dispose the batteries properly, in accordance with local laws (information is available at your reseller).
Remote control batteries (not included) shall not be exposed to excessive heat (e.g. from sun or fire).
Where to install the product
- Place the product on a straight, rigid and stable place. Do not place the product on a carpet.
- Do not place the product on top of another that may cause overheating (for example, a receiver or amplifier).
- Do not place anything underneath the product (for example, CDs or magazines).
Proper ventilation
- Place the product in a sufficiently-aerated place to avoid overheating. Allow at least 10cm spacing at the back and top of the product, and 5cm spacing on both sides to prevent overheating.
- Do not place items such as newspapers, tablecloth, curtains, in front of the ventilating openings.
Do not expose the product to high temperatures, moisture, water and dust.
- The apparatus shall not be exposed to dripping or splashing. No object filled with liquids, such as vases, shall be placed on the apparatus.
- Do not place other items close to this product that may damage it (for example, objects containing water or lightened candles).
- No naked flame sources, such as lighted candles, should be placed on the apparatus.
Electric supply
- Please unplug the product in case of prolonged non-use.
- If the supply cable is damaged, it must be replaced by the manufacturer or qualified after-sales personnel to avoid any danger.
- This appliance is to be used on temperate climate. Don't use the apparatus in tropical climates
- This product must be connected to an electrical supply 100-240V \~ 50/60Hz.
- The mains plug is used as the disconnect device, so the disconnect device shall remain readily operable
WARNING
Never place a television set in an unstable location. A television set may fall, causing serious personal injury or death. Many injuries, particularly to children, can be avoided by taking simple precautions such as:
- Using cabinets or stands recommended by the manufacturer of the television set.
- Only using furniture that can safely support the television set.
- Ensuring the television set is not overhanging the edge of the supporting furniture.
- Not placing the television set on tall furniture (for example, cupboards or bookcases) without anchoring both the furniture and the television set to a suitable support.
-
Not placing the television set on cloth or other materials that may be located between the television set and supporting furniture.
-
Educating children about the dangers of climbing on furniture to reach the television set or its controls.
- In case this television set is to be relocated to a different location, please keep in mind and apply the above safety instructions.
Information about the meaning of the conformity marking

The CE marking indicates that the product meets the main requirements of the European Directives 2014/35/EU (Low Voltage), 2014/30/EU (Electromagnetic Compatibility), 2011/65/EU (Restriction of the use of certain hazardous substances in electronic equipment), 2014/53/EU (Radio equipment).
Technical Specification:
Name: Television Product
Net Weight: 4Kg
Operation Temperature: 0°C\~35°C
TV Reception System: DVB-T/C
Auto Standby
In order to save energy, the electricity consumption of this product has been reduced in both operation mode and standby mode. Furthermore, if no operation is carried out for four consecutive hours, the unit will automatically enter standby mode. Simply press the Standby button on the remote control to switch the unit back to operation mode.
Product Introduction
Congratulations! You have chosen the latest generation high definition television. Endowed with high display quality and light weight, it is power-saving and radiationless with high sensitivity television reception. The new generation television will bring you safe & comfortable brand new visual experience. Thank you for purchasing and using our products!
Accessories
User manual x1
Remote control x1
| Symbol | Description |
 | For indoor use onlyTo identify electrical equipment designed primarily for indoor use. |
SUMMARY
Important warnings and safety advice....1
Control Panel....9
Connecting Cables....10
Remote Control....13
Base Installation....16
Wall Mounting Instructions....17
First Time Installation....18
-
Channel....19
-
Picture....22
-
Sound....24
-
Time....26
-
Lock....27
-
Setup....30
-
Screen....32
-
Photo....34
-
Music....35
-
Movie....36
-
Text....37
Troubleshooting....38
Technical data sheet....40
Disposal of the device....44
Warranty....45
This user guide is available in the following languages:
- FR (original version)
- EN (translated from the original)
Any other translation would be a translation of the original version.
This user guide, any modifications or any new version, is available on our website.
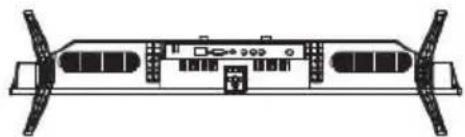
CONTROL PANEL

CONNECTING CABLES
Installing your TV
Place your TV on a surface that can support the weight of the TV.
To avoid danger, do not expose the TV near water or source of heat (such as the sun, candles, heat spreader), do not block the ventilation slots in the back of the TV.
Connect the antenna and start
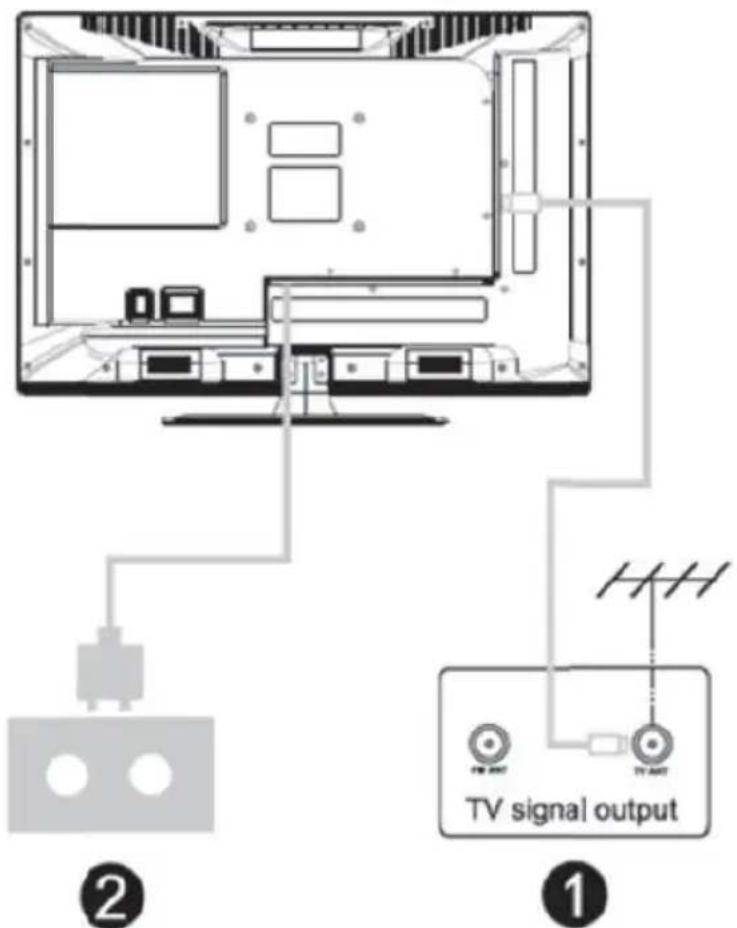
-
Connect the target from the antenna to the input jack on the rear of the television.
-
Connect the TV plug into the socket.
Set On TV
Press the POWER (Power) button on the TV, the LED glows green. In standby mode (red light), press the POWER (Power) button on the remote control to turn on the TV.
Note : Photo for illustrative purposes only.
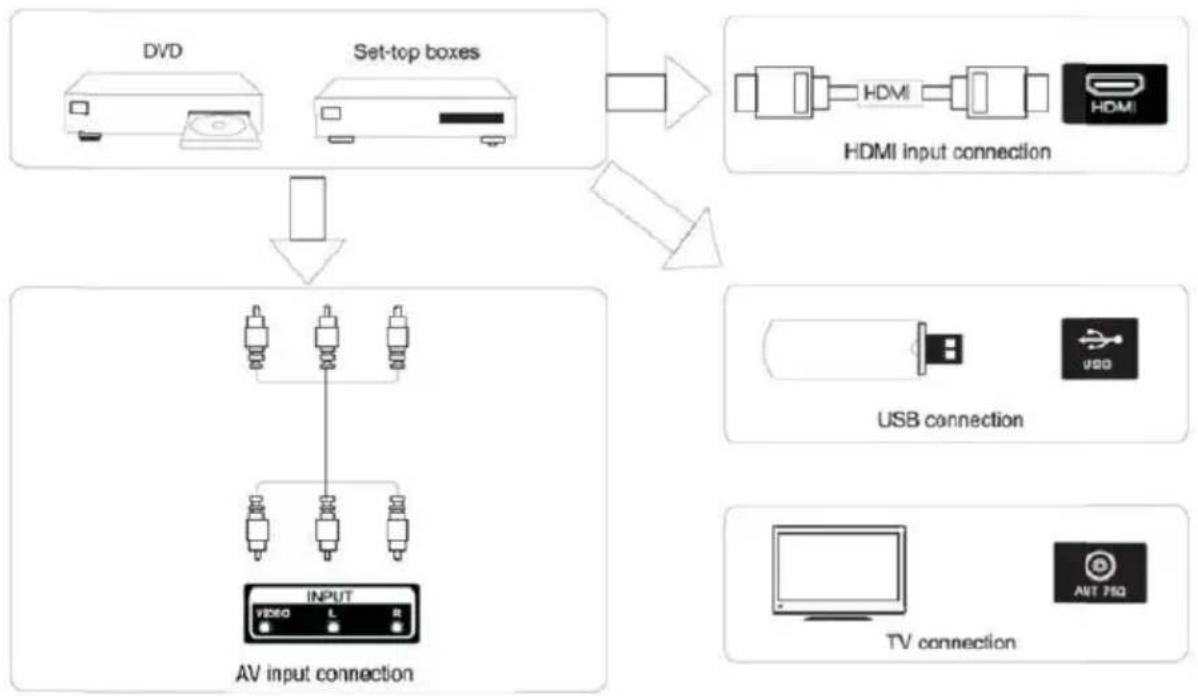
Diagram of external devices connection
flowchart
graph TD
    A["DVD"] --> C["Set-top boxes"]
    B["HDMI"] --> C
    C --> D["AV input connection"]
    E["USB"] --> D
    F["TV"] --> D
    D --> G["INPUT"]
    style A fill:#f9f,stroke:#333
    style B fill:#f9f,stroke:#333
    style C fill:#ccf,stroke:#333
    style D fill:#cfc,stroke:#333
    style E fill:#fcc,stroke:#333
    style F fill:#cff,stroke:#333
    style G fill:#ffc,stroke:#333

flowchart
graph TD
    A["AV input connection"] --> B["Device 1"]
    A --> C["Device 2"]
    A --> D["Device 3"]
    A --> E["Device 4"]
    B --> F["Output"]
    C --> F
    D --> F
    E --> F
    style A fill:#f9f,stroke:#333
    style F fill:#bbf,stroke:#333
Buttons and display connections
▶ TV buttons
Note : The following is only a block diagram. The actual position and arrangement of the di different models can be different.

(1): Activate / deactivate the power supply.
SOURCE : Input Select the external signal.
MENU : A ffi drying the main menu and confirmation of the selection of a menu item.
CH +/- : Channel selection.
VOL +/- : Adjust the volume.
Terminal interface
Note : Here are the di ff erent terminal interfaces as well as the position and disposition. Can diff anaging based on di ff erent models.
 | AV inputInput of external AV signal and right audio channel / left relevant |  | Output HEADPHONESWhen headphones are plugged in, the speakers are disabled. |
 | CI SLOTThe Common Interface (CI) from the entrance of the card reader requires a Conditional Access Module (CAM) used to pay television. | 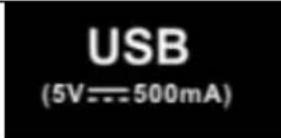 | USB inputOnly for updating the software. |
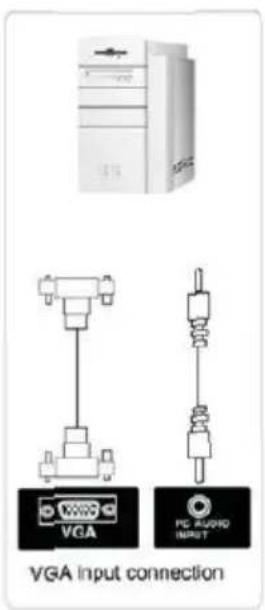
 | AUDIO PCVGA and audio input if VGA |  | COAXIAL outputConnect the SPDIF receiver. |
 | HDMI inputDigital signal input from the HDMI video connector. |  | VGAPC analog signal input |
 | AntennaConnect the antenna input / tv cable (75 / VHF / UHF) |  | DC 12VDC 12V car only. A converter / power adapter DC12V is not included and must be purchased by the user. |
REMOTE CONTROL
- STANDBY : Turn on the TV and put it in standby mode.
- MUTE : Cup and restores the sound.
- 0 \~ 9: To enter the channel number.
- RECALL : Displays the last viewed channel.
- CH. LIST: Displays the channel list.
- PIC.MODE: Directly select the different picture modes.
S. MODE: Directly select various sound modes.
SLEEP: Setting the sleep time.
MENU: Selects a menu.
SOURCE: Displays the list of sources of the input signal.
- ▲ / ▼: Decrease / increase the value of the option.
◀ / ▶: Selects the previous function / next option.
ENTER: Confirm your selection or displays the current mode.
TO LEAVE: Returns to TV viewing from any menu.
DISPLAY: Displays information on the status of the system defined by the current user.
- VOL + / VOL-: Increases / decreases sound level.
CH + / CH-: Selects a program.
AUDIO : Press AUDIO to change the audio mode.
REC.LIST: Displays the list of recorded programs.
REC: Starts recording of the current DVB-T channels.
TIMER: Enter the setup menu of the recorder time.
TIMESHIFT: Press TIMESHIFT button when
you want to pause; again, press the TIMESHIFT button to resume the television program.
- HOLD: Maintains the current page.
SIZE: Change the size of the current page.
INDEX: A ffi che list page numbers of the major television programs.
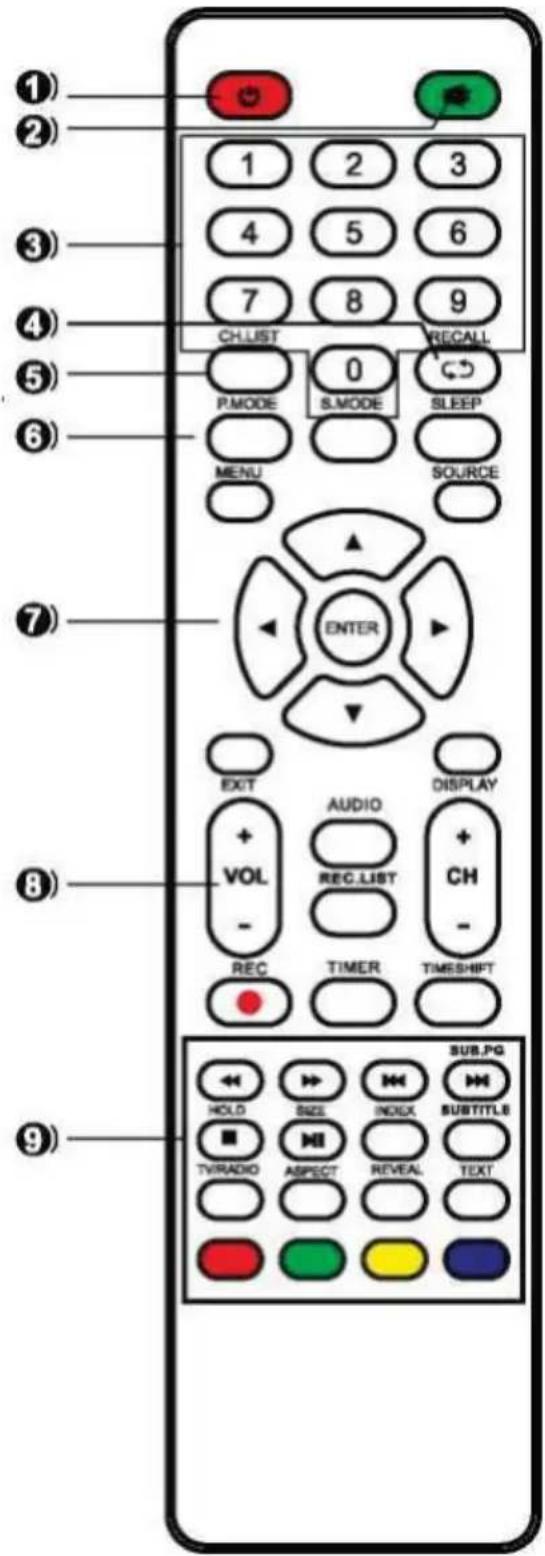
SUBTITLE: Remind your favorite digitally subtitles.
SUBPAGE: A ffi che under the current -page.
TV / RADIO: Switch between DVB-T and RADIO. (Digital Radio is not available (V / KAUIU) in countries such as France)
ASPECT: Select the format for the appearance.
▶ : Reading.
II : Pause.
■ : Stop.
: Moves to the previous track or chapter.
: Moves to the next track or chapter.
← : Quick return.
: Fast forward.
RED:
GREEN:
YELLOW:
CYAN:
Available in the following modes: teletext, DVB-T and TV.
Note:

The remote control shall be applied in effective reception scope of the television. Make the remote control point towards the infrared receiver of the television and ensure that there are no obstacles. Its normal operation distance will be shortened in direct sunlight or lamplight. Be careful to use the remote control. avoid falling off or being trampled or splashed with liquids.
Inserting the batteries
| 1Open the remote casing. | 2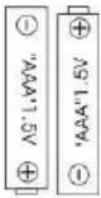 Insert two LR03 batteries (AAA) observing the +/- indicators (plaice not included). Insert two LR03 batteries (AAA) observing the +/- indicators (plaice not included). |
| 3Close the housing | Remarks:- Remove the batteries from the remote in case of prolonged non-use.- Wash your hands after handling the batteries.- Remove the batteries in collection bins (please ask your dealer) to protect the environment.Note: Batteries are not included. |
Auto Standby
The energy consumption of this device in operation mode and in the standby mode has been reduced. Therefore, if no action is recorded after four hours, the unit will automatically enter standby mode. Simply press.
BASE INSTALLATION
The TV comes with its separate furniture carrier. To install the TV table stand, please complete the installation by following the instructions below.
- The panel can be easily scratched, so be sure to: Place a soft cloth on the table and place the TV face down on the cloth.
Note: Always first unplug the power cord when installing / removing the stand. - Take the base. Please align the base screw holes and the TV and insert the screws into the holes in the base and tighten.
Note: To make sure the TV is stable, please lock all the screws.
Support for some TV models is designed with snap type, easy to install, slamming into the groove of the support instead of the screw.
natural_image
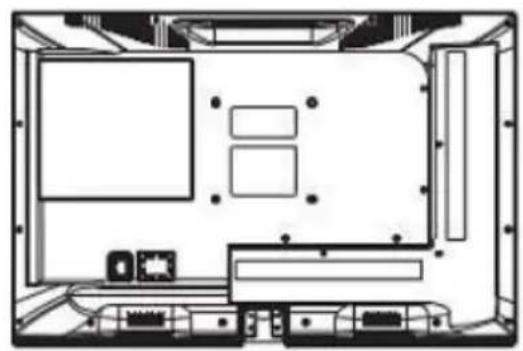
Isometric technical diagram of a mechanical component with internal channels and mounting brackets (no text or symbols)Please note the basis of management:
natural_image
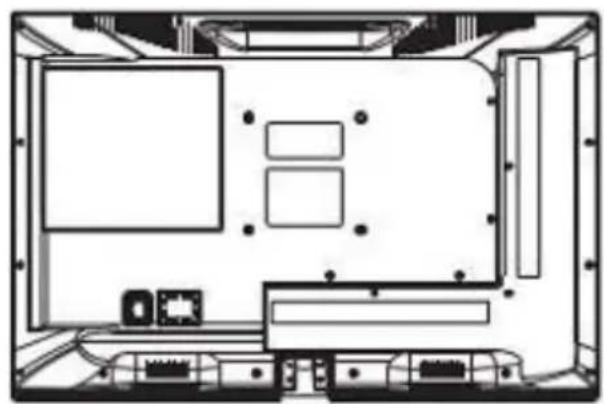
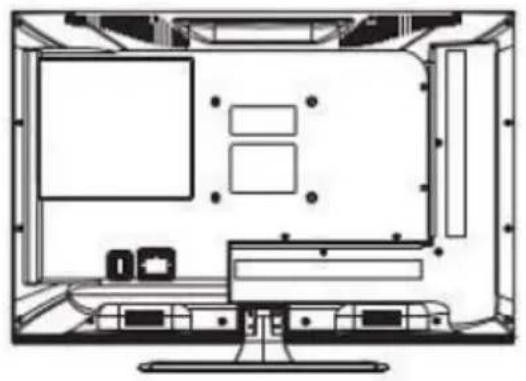
Technical line drawing of a rectangular electronic device with multiple ports and connectors (no text or symbols)The bottom view of the TV (the cabinet front is facing downwards) (The illustration is for reference only. Please prevail in reality)
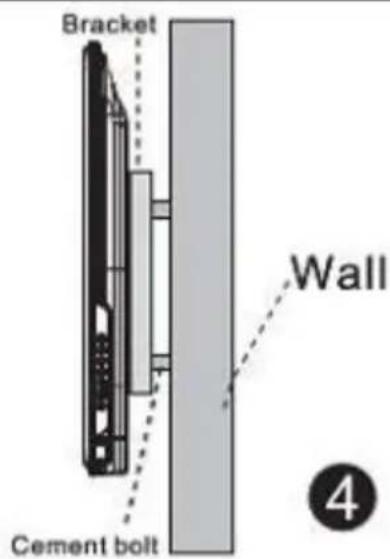
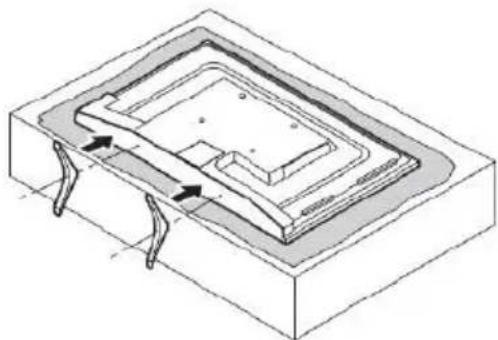
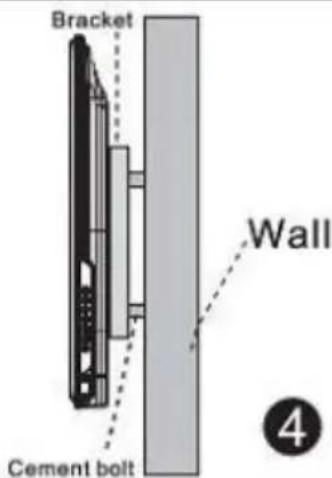
WALL MOUNTING INSTRUCTIONS
Securing the TV to the wall
- Forward, gently place the TV on the table using a soft cloth to avoid damaging the screen.
- Using a screwdriver, you can remove the screws at the bottom of the base (the direction of the arrow refers to the picture 1). Remove the base (make sure to remove the screws and the pedestal carefully).
natural_image
Top-down schematic of a computer monitor layout with labeled areas (no text or symbols)1
natural_image
Top-down schematic of a room layout with furniture and fixtures (no text or labels)2

3
Remarks:
• Wall mounting is an option.
- Be careful that there are no other objects around the TV when you edit.
• Take care to respect the order of work.
- The figures are for reference only.
- Follow the instruction manual for the wall bracket.
• Use a VESA compatible mounting.
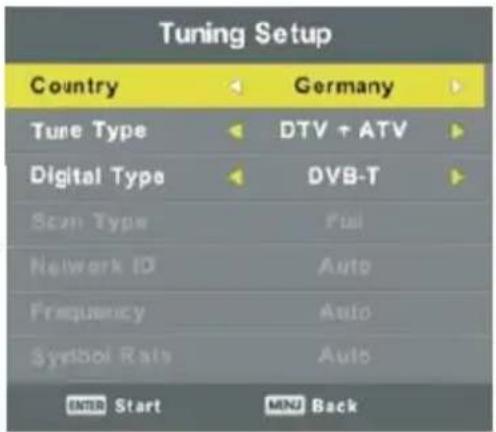
FIRST TIME INSTALLATION
First Installation
Connect an RF cable from your TV input "RF-IN" and plug your TV antenna.
Select Language
Press a / d to select the language used to display menus and messages.
Select Country
Press the w and s to highlight the Country menu. Press a / d to select the country of your choice.

Auto Adjust
First setting ATV, press the MENU key and the left arrow key to move to the YEAR setting. Second DTV setting, press the MENU key and the left arrow key to move the DTV setting.
Next page: Basic operation


Channel Menu
Press the MENU button to display the main menu.
Press a / d to select CHANNEL (CHAIN) in the main menu.
- Press w and s keys to select the option to change the CHANNEL menu (CHAIN)
- Press the Enter key to change.
- After editing, press the Enter key to save and return to the previous menu.
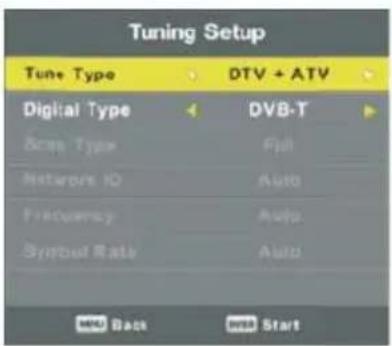
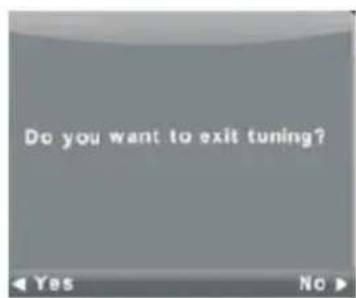
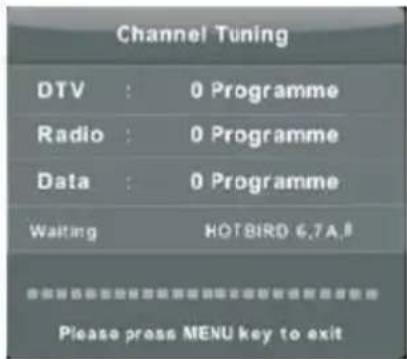
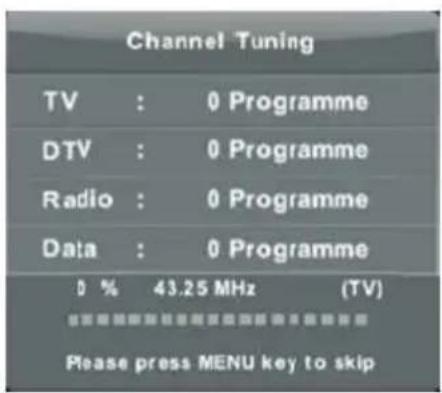
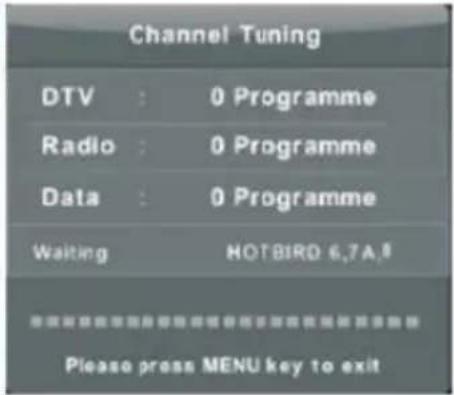
Auto Tuning
Press the w and s to select Auto Tuning (Auto Adjustment), then press the Enter / d to enter.


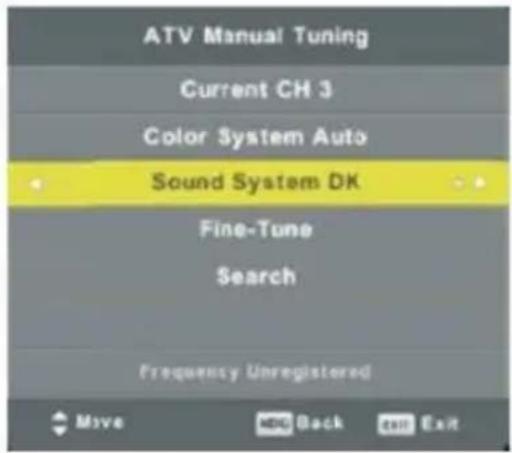
ATV Manual Tuning
Current Channel: Set the channel number.
Color System: Select the color system (System available: AUTO, PAL, SECAM)
Sound System: Select the sound system.
Fine-Tune (Grant finely): Set the frequency of the chain more finely.
Research:
Turn on the search string.
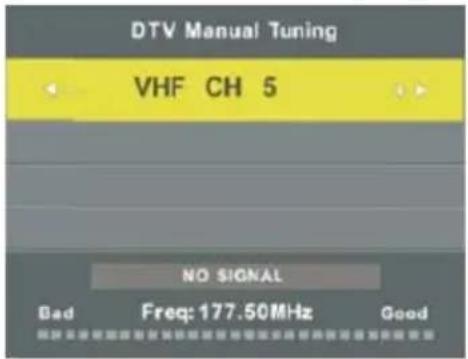
DTV Manual Tuning
Press the w and s to select DTV Manual Tuning, then press the Enter key to enter the menu Sou.
Press a / d to select CHANNEL (CHAIN) and press Enter to get the program.
Program Edit
Press the w and s to select Edit Program and press the Enter key to enter the submenu.


The three-color key is a shortcut key to program a chain.
Press the w and s to highlight the chain of your choice, then:
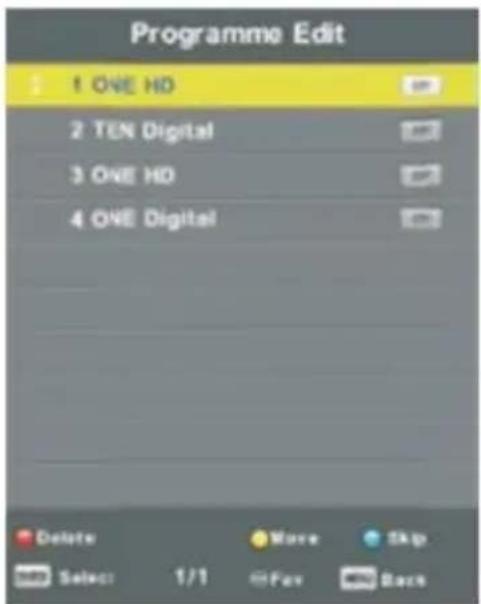
- Press the Red button to delete a program from the list.
- Press the yellow button to add a string to the list of favorite channels.
- Press the Blue button to skip the selected channel. Press the FAV button to add or remove the channel to your list of favorite channels.
(Your TV will skip the chain automatically using CH +/- to the vision of channels).
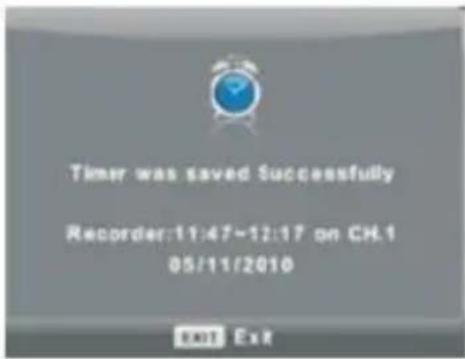
Schedule List
Press the w and s to select programming list and press the Enter key to enter the submenu.
Available
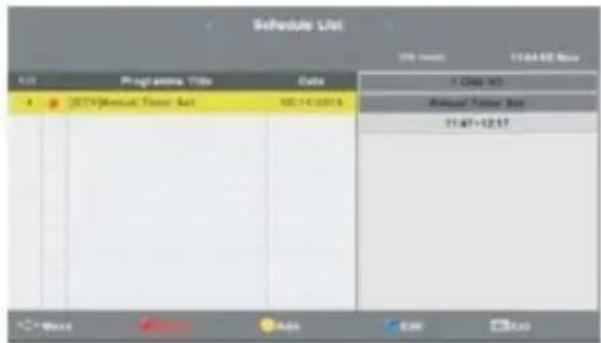
Press YELLOW button to enter the interface below
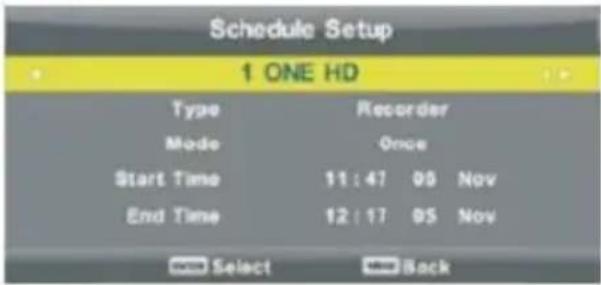
The following message indicates that the programming is successful (in case of schedule conflict warning will be displayed).
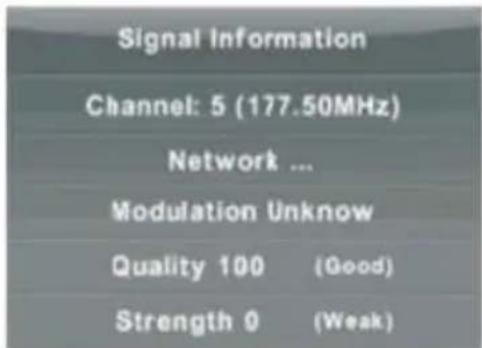
Signal Information
Press the w and s to select Signal Information, press the Enter key to devote Information Signal. Only available if DTV signal.
CI Information(Need to support the CI function)
- Press the w and s to select CI Information and press the button to display information after the insertion of the IC card.
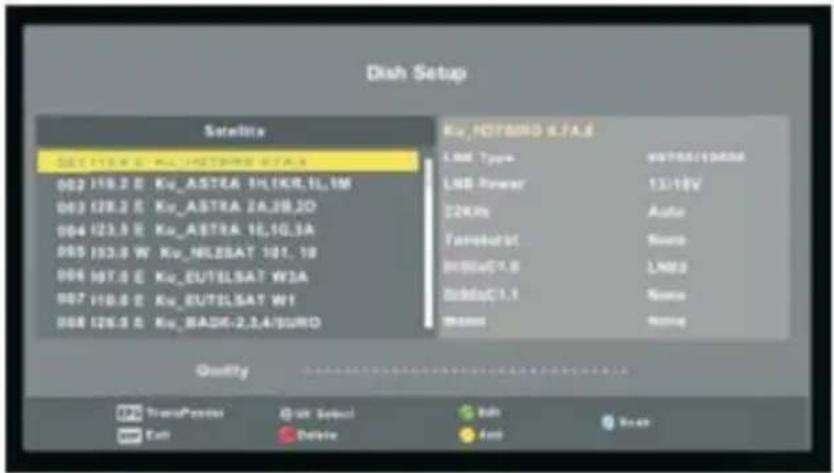
- List CHAINS source Satellite. (Must be compatible with the DVB-S2 based)
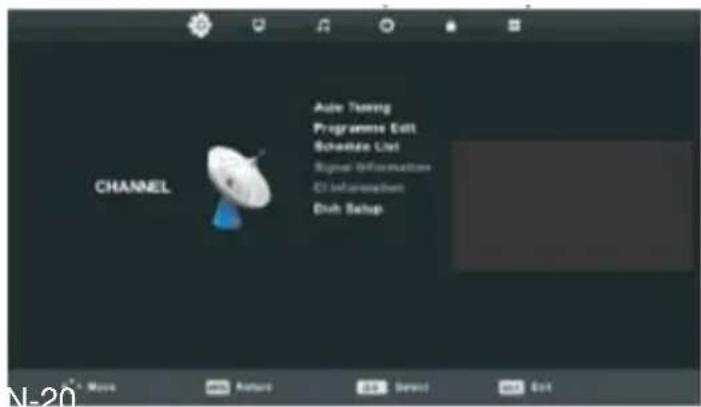
Automatic adjustment
Les Touches Press w and s to select Auto Adjustment, then press the Enter / 1 to enter.
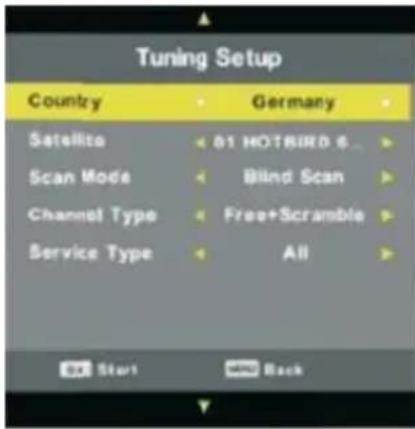
Dish setup
Press the w and s to select Setup Dish and press the Enter / 1 to enter.
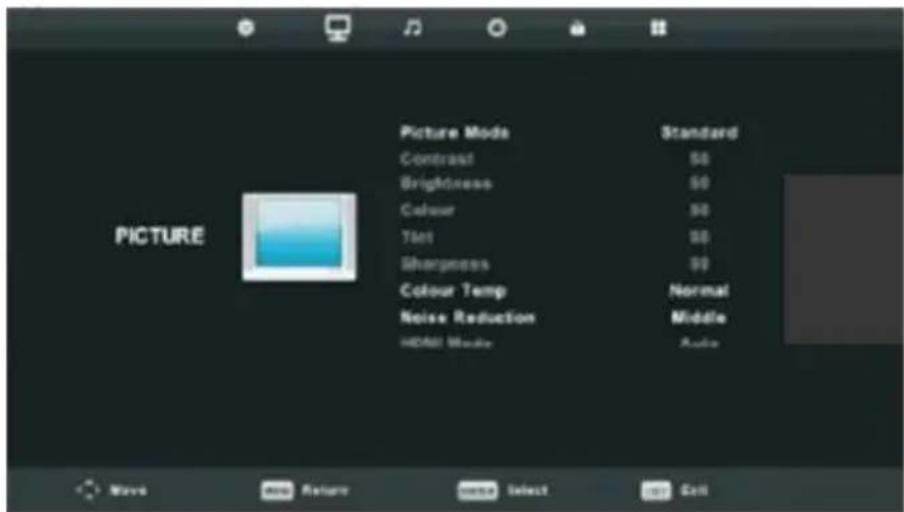
Picture Menu
Press the MENU button to display the main menu.
Press a / d to select PICTURE in the main menu.
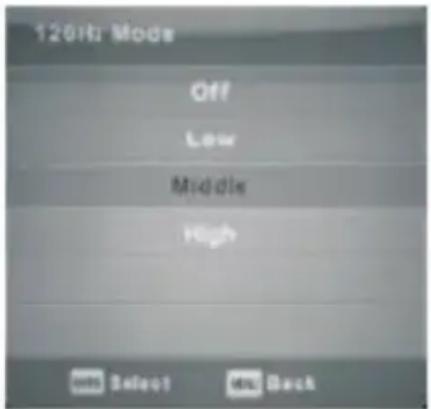
Note: 120Hz MODE exclusively compatible with UHD TV.
- Press w and s to select the option you want to adjust in the PICTURE menu.
- Press the Enter key to change.
3 After setting, press the Enter key to save and return to the previous menu.
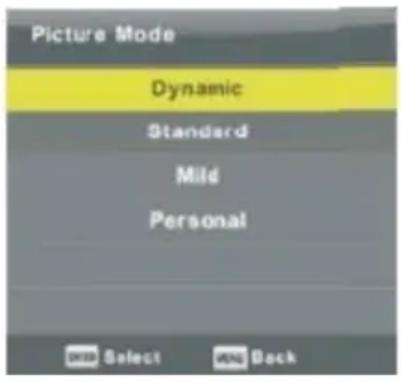
Picture mode
- Press the w and s to select Picture Mode, then press the OK button to enter the submenu.
- You can change the values of contrast, brightness, color, sharpness and color when the picture is in Personal mode.
- Tip: You can press the button to change PMODE the picture mode directly.
Contrast / Brightness / Color / Tint / Sharpness
Press the w and s to select the option you want to adjust.
- Contrast: Set the light intensity of the image, the shade of the image remains unchanged.
- Brightness: Set the output of the optical fiber to adjust the brightness of the image.
- Color: Adjust the saturation of color to your chobe.
- Complexion: Use to compensate for the color with a broadcast NTSC system.
- Sharpness: Adjust the Sharpness of the image in detail.
Color temperature
- Adjusts the white tones of the image.
- Press the w and s to select color temperature, then press the OK button to enter the submenu.
- Press c / d to select: Cool, Normal, Warm.
- You can change the values of red, green and blue colors when the temperature is in USER mode.
Cool: Gives the white a bluish tint
Normal: Gives a neutral tint white
Warm: Gives the white a reddish tint

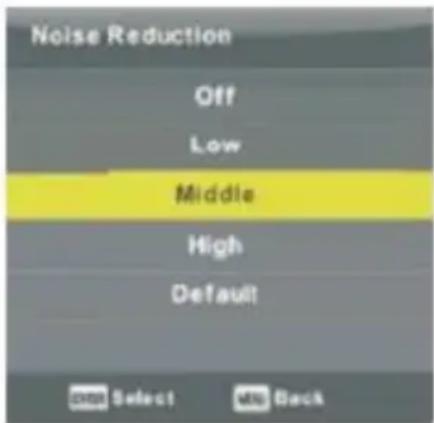
Noise Reduction
- Reduces image noise and improve picture quality.
- Press the r and s to select.
- Noise Reduction and press OK to enter the submenu.
Off: Turn off noise reduction. Low Detection and reduction of low noise.
Middle: Detection and reduction in average noise.
Top: Detection and reduction of high noise.
Default: Default.
120Hz MODE (only UHD TV)
- Setting the motion compensation.
- To improve the flow of pictures, watching sports or games.
- Press the u / d to select Off / Low / Medium / High
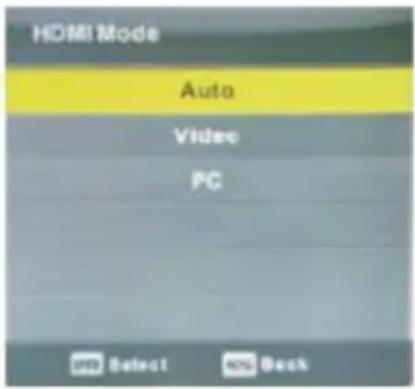
HDMI
Press the w and s to select the HDMI mode, then press the OK button to enter the submenu. Press c / d to select: Auto / Video / PC.
Sound Menu
Press the MENU button to display the main menu. Press a / d to select SOUND in the main menu.
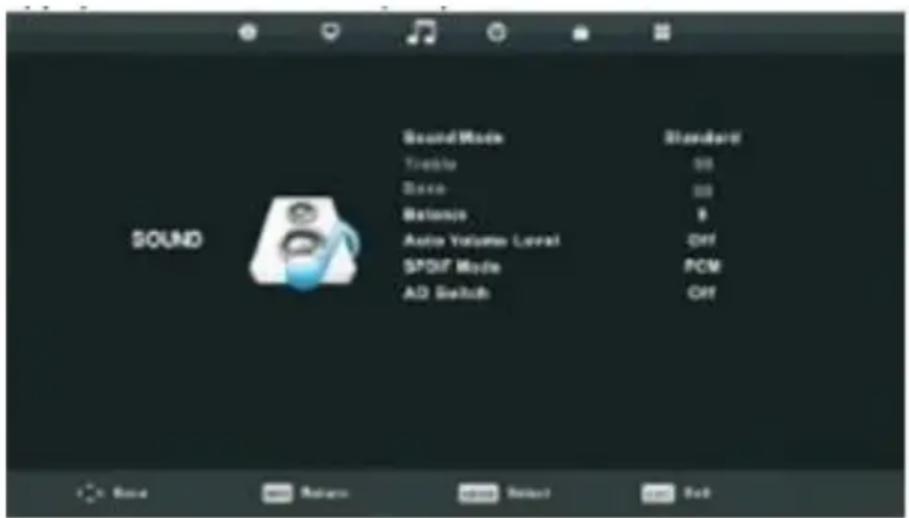
- Press w and s to select the option you want to adjust in the SOUND menu.
- Press the OK button to change.
- After setting, press the MENU button to save and return to the previous menu.
Sound mode
- Press the touches: and s to select Sound Mode and press the Enter key to enter the submenu.
- Press the w and s to select.
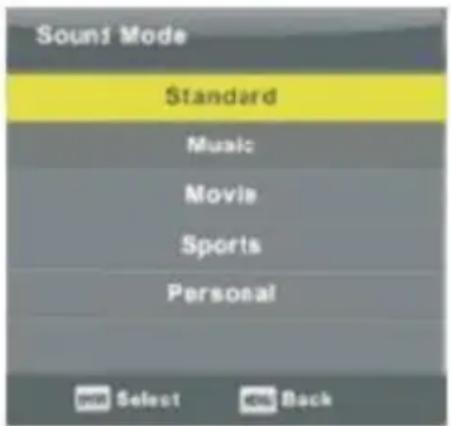
You can adjust the bass (Bass) and Treble (Treble) when the sound is in Personal mode. Tip: Pressing the SMODE button on the remote, you can change the sound mode directly.
Standard: Produces a standard in all environments.
Music: Do not change the original sound. Suitable for musical programs.
Movie: Improves the bass and treble for a rich sound experience.
Sports: Improves voice for sports.
Personal: Select to customize the settings.
Note: bass and treble are only available in User mode, you can adjust.
Balance
Press the w and s to select the option, press a / d to adjust.
Auto Volume Level
Press the w and s to select Auto Volume Level, press a / d to select Enable / Disable.
SPDIF mode
Press the w and s to select AD Switch Press / to select Enable / Disable.
Audio Function description for the blind.
It must be compatible with a codestream (code stream).
Note: Balance: Libra can adjust the output of the speaker, it allows you to listen in an optimal position.
Auto Volume: The volume Automatic is used to reduce the volume difference between the chain and the program automatically.
Time Menu
Press the MENU button to display the main menu.
Press c / d to select TIMER in the main menu.
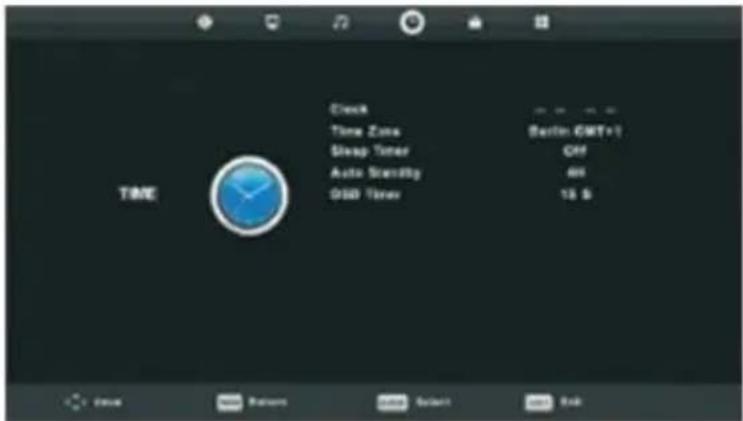
- Press w and s to select the option you want to set in the CLOCK menu.
- Press the Enter key to change.
- After setting, press the Enter key to save and return to the previous menu.
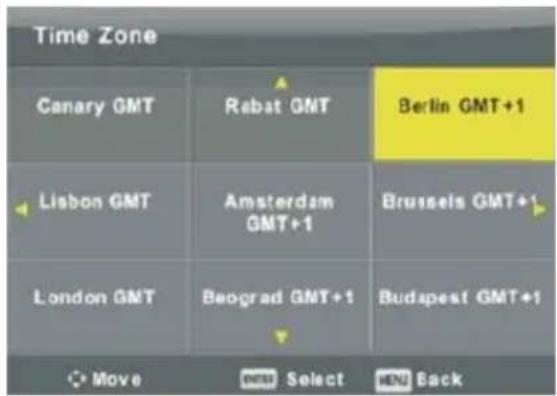
Time Zone
- Press a / d to select Time Zone, then press the Enter key to enter the submenu.
- Press the keys w and s / a / d to select the Time Zone.
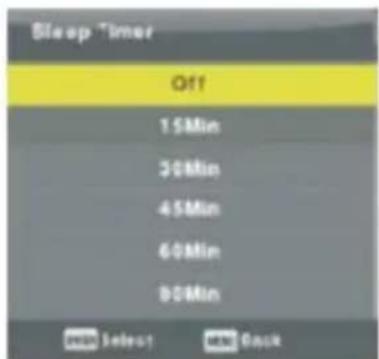
Sleep Timer
- Les Touches Press w and s to select Timer Sleep, and then press the Enter key to enter the submenu.
- Press the w and s to select.
Press the w and s to select Getting Sleep, and then press the Enter key to enter the submenu.
Press the w and s to select.
Tip: If you do not use the remote control in the set time, the TV will turn off automatically. If you use the remote control, the timer will reset.
OSD Timer
Press the w and s to select OSD Timer, then press the Enter key to enter the submenu.
Press the w and s to select.
Lock Menu
Press the MENU button to display the main menu. Press u / d to select LOCK in the main menu.
- Press w and s to select the option you want to adjust in the LOCKING SYSTEM menu.
- Press the Enter key to change.
- After setting, press the Enter key to save and return to the previous menu.
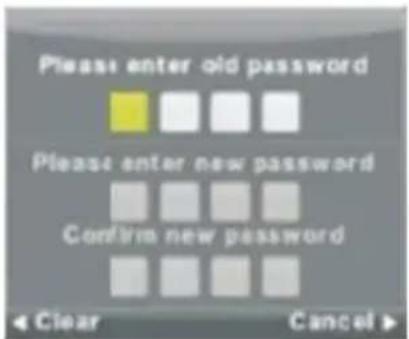
Lock System
Press the w and s to select System Lock, then press the Enter key to confirm the following 3 options.
The default password is 0000, if you forget the password, please call the customer service.
Set Password
Press the w and s to select the password and press the Enter key to enter the submenu and set a new password.
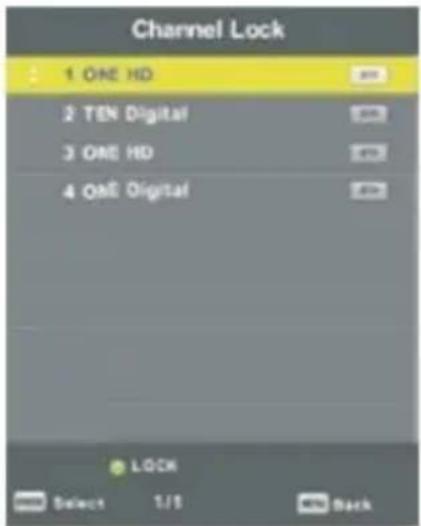
Channel Lock
- Press and lestouchesw s to select Channel Lock and press the Enter key to enter the menu and sub-select.
- Press the green button pourverrouiller or unlock the channel.
Parental Guidance
Press lestouchesw and s to select Parental Control, then press the Enter key to enter the sub-menu and select age appropriate for your children.

Key Lock
- Press and lestouchesw s to select Lock Keypad, and then press the a / d to select Enable or Disable.
- If the Keypad Lock feature is enabled, you can not use the button panel.
Hotel Mode (Need support the Hotel Mode)
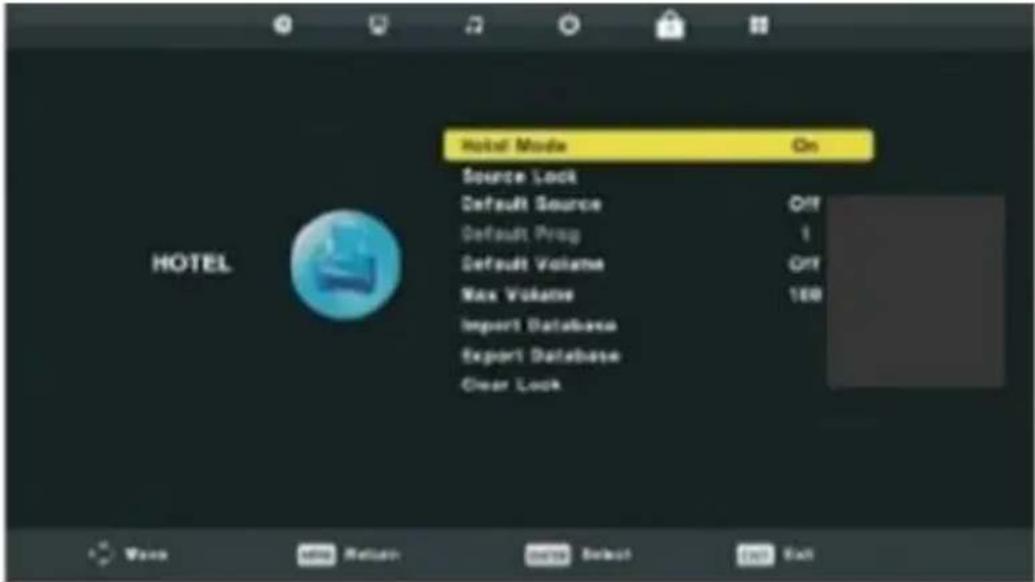
- Press w and s to select the option you want to adjust in the HOTEL menu.
- Press the Enter key to change.
- After setting, press the Menu key to save and return to the previous menu.
Hotel Mode
Press the w and s to select Hotel Mode, then press the a / d to select Enable or Disable.
Source Lock
Press the w and s to select Source Lock and press the Enter key to enter the menu and sub-select.
Default Source
Press lestouchesw and s to select Default Source and press the Enter key to enter the menu and sub-select.
Default Prog
- Press the w and s to select Default Program, then press the a / d to set.
- Available when the default source is TV.
Max Volume
Press the w and s to select Unlock, and press the Enter key to clear the settings.
Setup Menu
Press the MENU button to display the main menu.
Press c / d to select CONFIGURATION in the main menu.
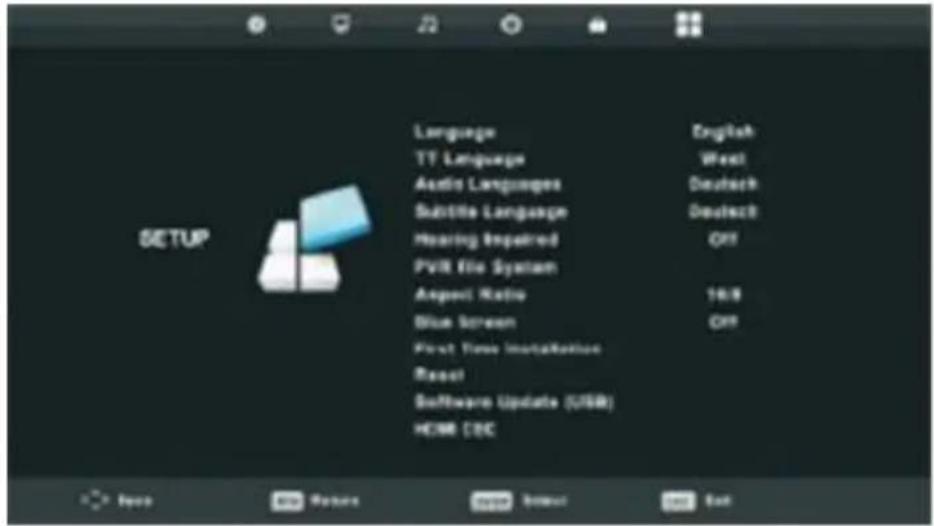
- Press w and y keys to select the option you want to adjust in the SETUP menu.
- Press the Enter key to change.
- After setting, press the Menu key to save and return to the previous menu.
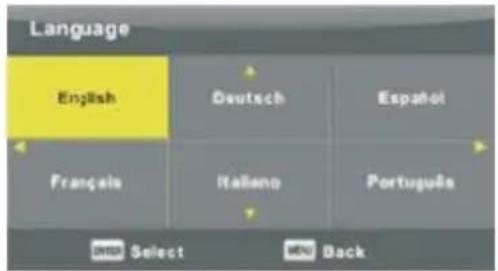
OSD Language
- Select an OSD language. The default language is English.
- Press the keys w and s / a / d to select the Language menu.
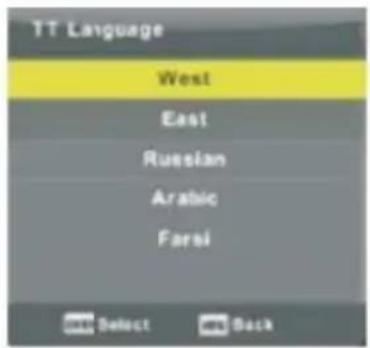
TT Language
- Press the w and s to select TT Language, then press the Enter key to enter the submenu.
- Press Les Touches w and s / a / d to select Language TT.
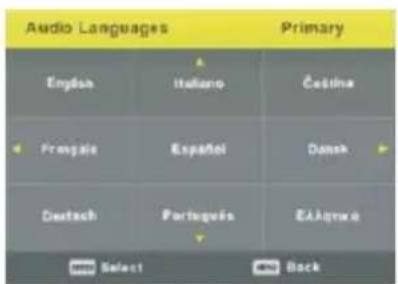
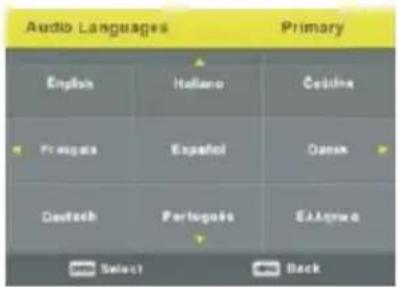
Audio Languages
- Press w and s to select Audio Languages, then press the Enter key to enter the submenu.
- Press c / d to select the primary of Audio Language.
- Press the keys w and s / a / d to select the Audio Language.
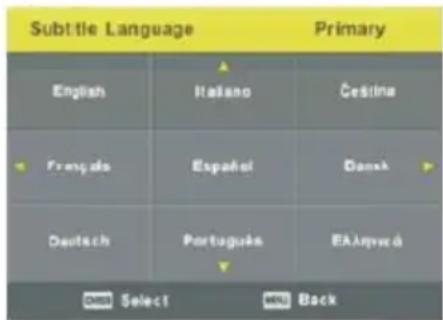
Subtitles Language
- Press w and s to select Subtitle Language, then press the Enter key to enter the sub-menu.
- Press c / d to select the primary of Subtitles Language.
- Press the keys w and s / a / d to select the Subtitles Language.
Hearing Impaired
Press the w and s to select Hearing Impaired, then press the key of Enter to select On or Off.
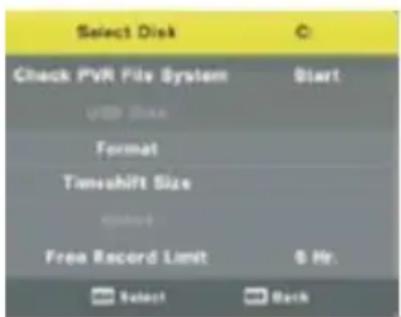
PVR File System
- Press the w and s to select PVR File System, then press the Enter key to enter the sub-menu.
- Press the w and s to select Control File System PVR, then press the Enter key to enter. Controlling the speed of the USB.
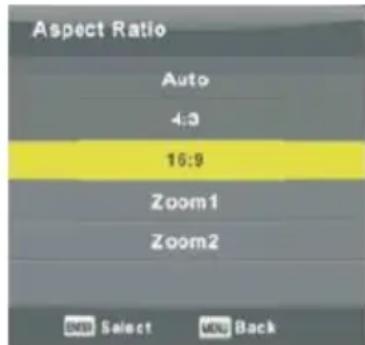
Aspect Ratio
- Press the w and s to select Aspect Ratio and press the Enter key to enter the submenu.
- Press the w and s to Aspect Ratio. (Available options are: Auto, 4: 3, 16: 9, Zoom 1, Zoom2)
Blue Screen
Press the w and s to select Blue Screen, then press the Enter key to select On or Off.
First Time Installation
Press the w and s to select First Time Installation and press the Enter key to enter.
Reset
Press the w and s to select Reset, then press the Enter key to enter the sub-menu.
Software Update (USB)
Press the w and s to select Software Update (USB), insert the USB device into the USB slot and press the Enter key to update the own software.
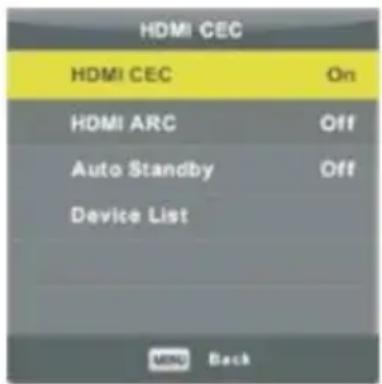
HDMI CEC (It must be compatible with HDMI CEC / ARC)
Press the w and s to select HDMI CEC and press the Enter key to enter the sub-menu.
HDMI CEC
Press a / d to turn the HDMI CEC on or
off.
HDMI ARC
Press a / d to turn the HDMI ARC on or off.
Auto Standby off.
Press a / d to turn the Auto Standby on or Device List
Press the Enter key to open the main menu of device.
Screen Menu
Press the MENU button to display the main menu.
Press u / d to select SCREEN in the main menu.

- Press w and s to select the option you want to adjust in the SCREEN menu.
- Press the Enter key to adjust.
- After setting, press the Enter key to save and return to the previous menu.
Auto Adjust
Press the Enter button to start adjusting H-Offset/V-Offset/Size/Phase automatically.
H-Offset
- Adjust the horizontal position of the image.
- Press the w and s to select H-Offset and press the Enter key to enter the sub-menu.
V-Offset
- Adjust the vertical position of the image.
- Press the w and s to select V-Offset and press the Enter key to enter the sub-menu.
Size
- Adjusting the display size.
- Press the w and s to select Size and press the Enter key to enter the sub-menu.
Phase
- Setting interference horizontal lines of the image.
- Press the w and s for select Phase and press the Enter key to enter the sub-menu.
Position Reset
Press the w and s to select Position Reset, then press the Enter key to enter.
Notes:
- Noise Reduction in PICTURE option is invalid.
- AD Switch in SOUND option is invalid.
- TIME menu and description are the same as that for Airmode.
- Block Program and Parental Guidance in LOCK option is invalid.
- Audio Languages, Subtitle Language, Hearing Impaired and PVR File System in SETUP option is invalid.
- PC mode has no CHANNEL menu.
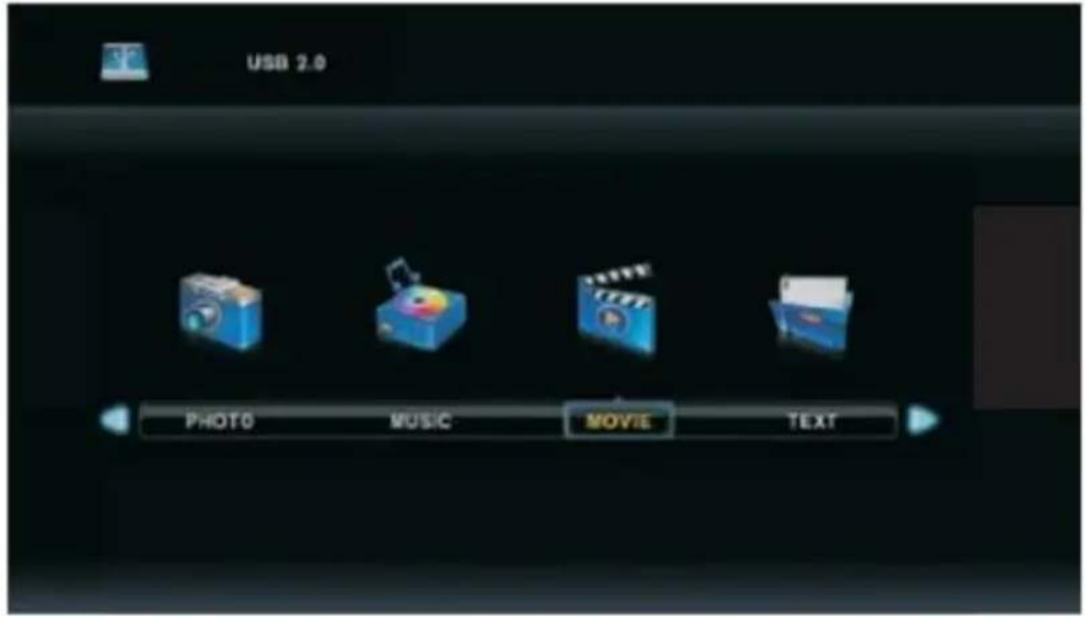
Media Operation
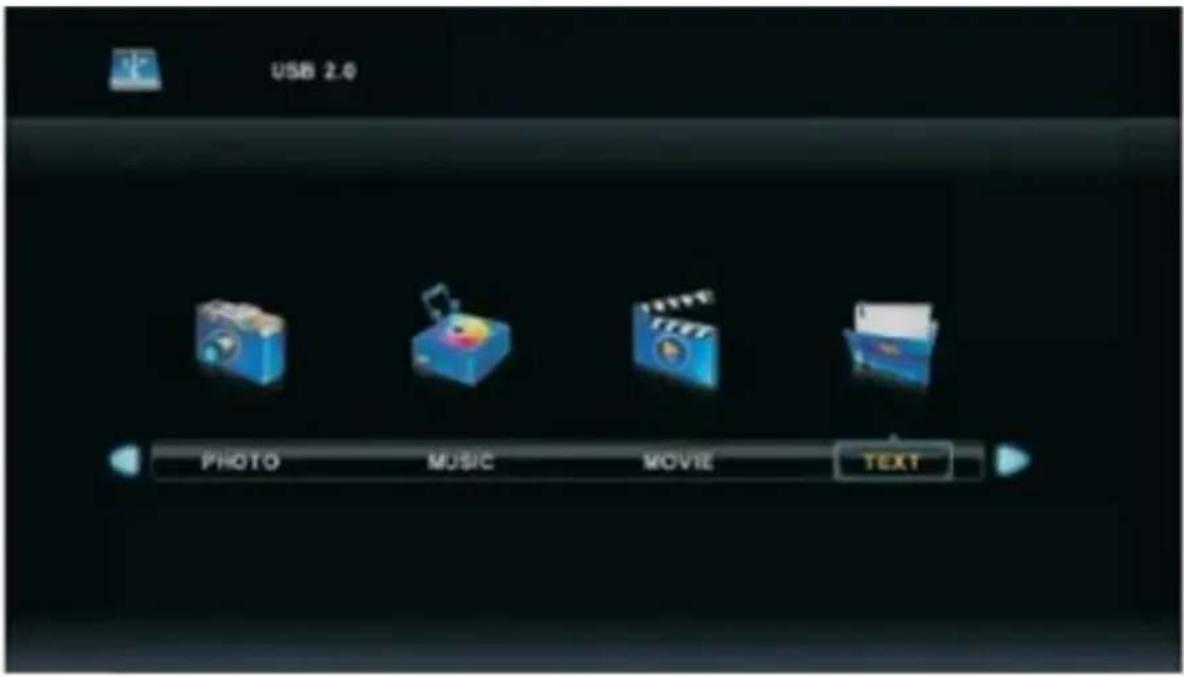
- Note: Before using the MEDIA menu, plug in USB device, then press Source button to set the Input Source to Media.
- Press the w and s for select MEDIA and press the Enter key to enter.
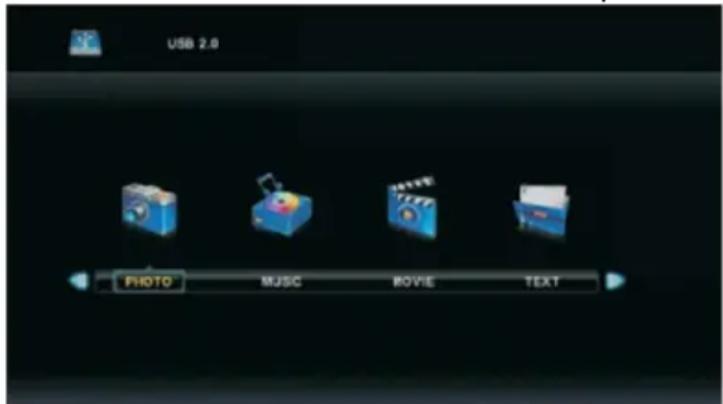
Press the key of a / d for select the option you want to adjust in the main MEDIA menu and press the Enter key to enter.
Photo Menu
Press a / d to select PHOTO in the main menu and press the Enter key to enter.
Press the Exit button to return to the previous menu and exit.
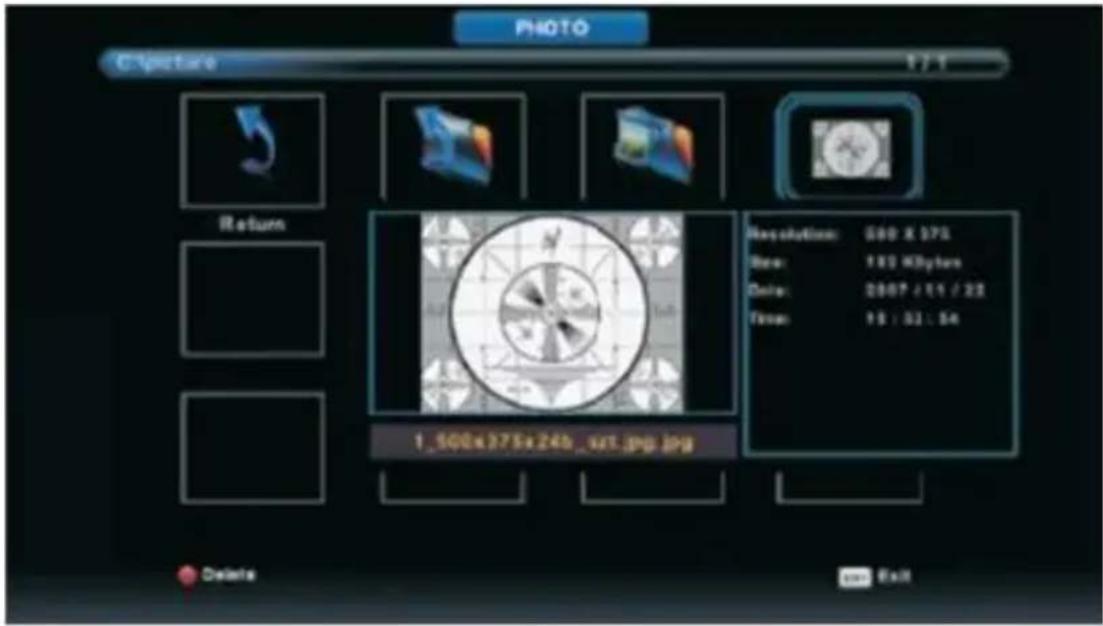
Press the key of a / d to select the file you want to watch in the file selecting menu, then press enter button to display picture.
When you highlight your selection, information of file is displayed to the right and the picture will be displayed at the center.
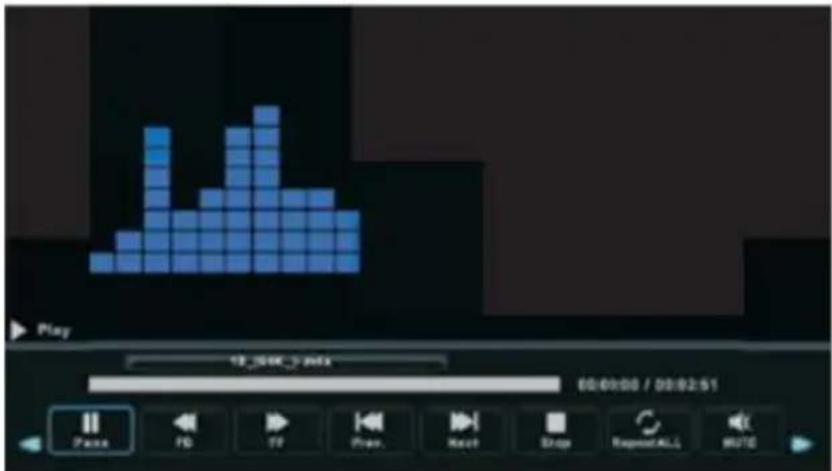
Music Menu
Press the key of a / d to select MUSIC in the main menu and press the Enter key to enter.
Press the Exit button to return to the previous menu and exit.
![USB 2.0 PHOTO MUSIC MOVIE TEXT MUSIC C:\Music\84A 17.2 Return Up Folder ALAC Album [ steelheart- ] 10_594K_/_m4a 11_594K_/_m4a 1_594K_124E2 & 2_594K_128Bar... 3_594K_32Burn... 4_594K_35Puts... 5_594K_31LC+A... Delete Edit](/content/2026/04/728795/images/0b2c18d0564febed9ed225aa3e40922cf1d6d121aa734fab6ac852c4aa52f215.jpg)
Press the key of a / d to choose the drive you want to watch and press the Enter key to enter.
Press the key of a / d to select return to the previous menu.
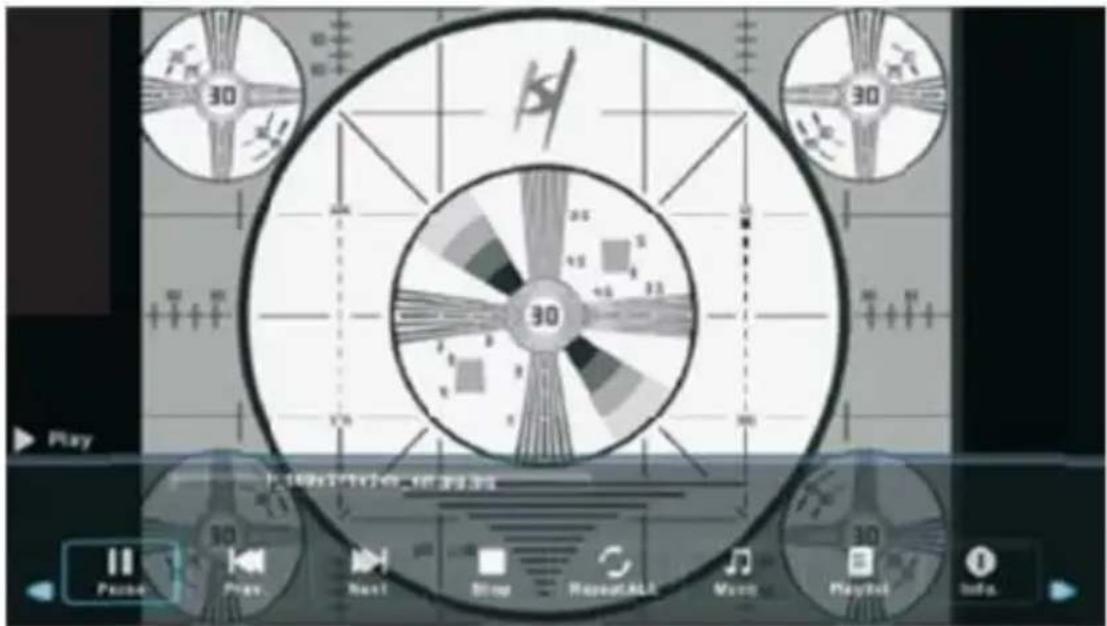
Movie Menu
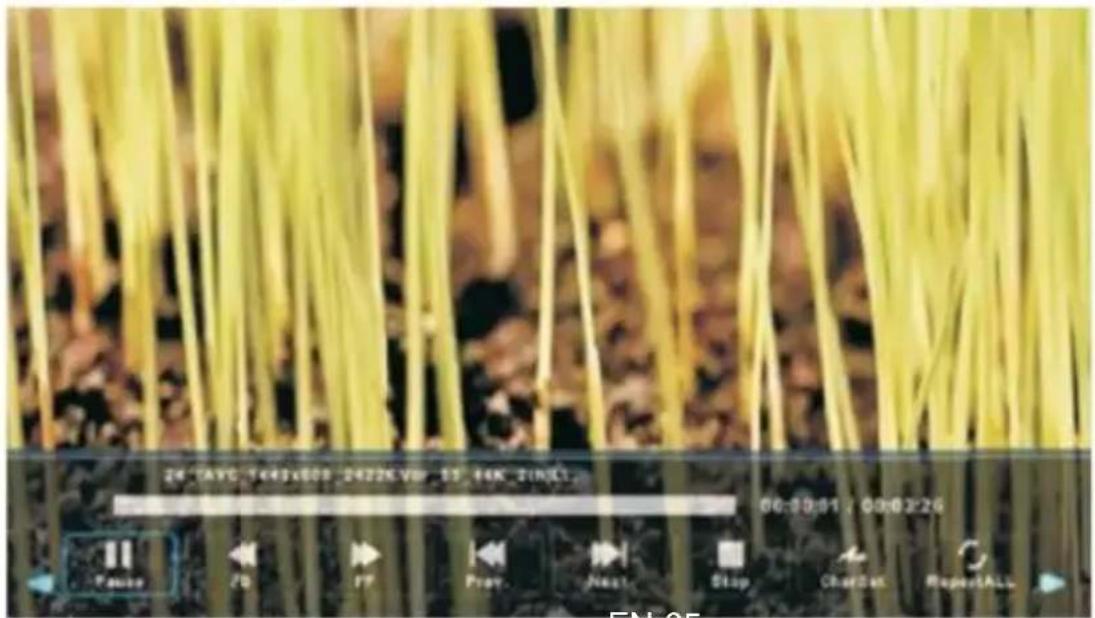
Press c / d to select MOVIE in the main menu and press the Enter key to enter.
Press the Exit button to return to the previous menu and exit.
Press the key of a / d to choose the drive you want to watch and press the Enter key to enter.
Press enter button to play the selected movie.
Press display button to select menu in the bottom you want to run, then press Enter button to operate.
Press Exit button to back to the previous menu and exit button to quit the entire menu.
EN-35
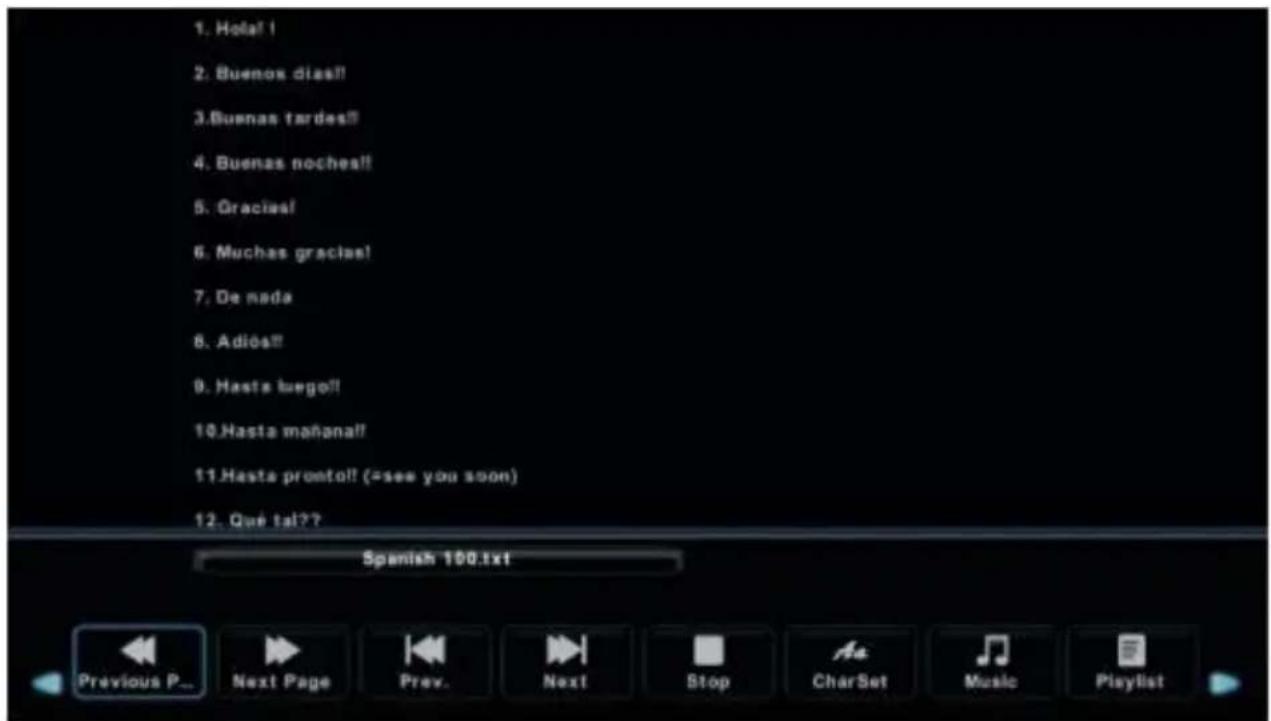
Text Menu
Press the key of a / d to select TEXT in the main menu and press the Enter key to enter.
Press the Exit button to return to the previous menu and exit.
Press the key of a / d to choose the drive you want to watch and press the Enter key to enter.
Press the key of a / d for return to the previous menu.
TROUBLESHOOTING
| Power off | ·Check if the power cord is brazed or damaged. If there is no power supply, unplug the cord, stop for 60 seconds and plug it. Put TVBy on. |
| Poor signal reception | ·A double image or rotten ghost nt be visible on Miran, if there are large buildings or mountains in your area. You can adjust the image manually: adjust the direction of the external antenna.·When using an internal antenna, sometimes b signal reception could be more diffk ie. Adjust the direction of antenna position for optimum reception. If the reception does not improve, you may have to switch to an external antenna. |
| No image | ·Check whether the antenna to the back of the TV is connected correctly.·View other channels to see if the problem still occurs. |
| Video is displayed without audio | ·Turn up the volume.·Check if the TV is in mute mode. |
| There is sound but the video is not displayed or is decolored | ·Try to adjust the contrast and brightness. |
| Static noise affects the quality of video and sound | ·Check whether the antenna to the back of the TV is connected correctly. |
| The interference lines on the screen | ·Electrical appliances such as hair dryers or vacuum cleaner could cause interference with your TV ries. Turn off these devices. |
| The remote control does not work | ·Check if the plastic confection is removed from the remote control. Try using the remote control closer to the TV. Check that the batteries are inserted correctly or replace the batteries.The TV put in standby mode automatically if the TV does not receive a response within minutes. |
| No video (PC mode) | Check whether the VGA cable is connected to the port, or if the cable is not bent. |
| Vertical lines are flashing (PC mode) | Enter the main menu and set the vertical placement to remove the vertical lines. |
| Horizontal lines visible (PC mode) | Enter the main menu and set the horizontal placement to eliminate horizontal lines. |
| Screen brightness is too high / low | Adjust the brightness or the contrast in the main menu. |
| No response from the PC | Check whether the screen resolution of the PC is compatible with the resolution of the TV. |
| Visible lines when a device is connected with the RCA ports | Make sure you use the good quality cable. |
| Unresolved Issues | Disconnect the power and shut down for 30 seconds and plug it. If the problem remains unsolved, do not try to repair the TV by yourself. Please contact customer service. |
Note on faulty pixels
Do not leave your TV displaying a static or stationary picture, such as a paused video or menu display for a long period of time, this could cause damage to the screen and cause a residual picture "or" a picture ghost".

- Before cleaning this product, press STANDBY button to turn it to the standby mode and wait for a few minutes to disconnect the power plug.
- Wipe this product with a dry, soft cloth. Do not spray water directly onto the TV, but apply a small amount of water on the corner of the cloth and wipe as gently as possible. Never use cleaning fluids, wax, or chemicals.
- Never use alcohol, benzene, thinner, cleaning fluid or other chemicals. And do not use compressed air to remove dust.
- If the surface is extremely dirty, wipe it with a cloth which has been dipped in a weak soap-water solution and wrung out thoroughly, and then wipe again with a dry cloth.
- Before you plug in the TV back, let the screen dry completely.
Technical sheet
TV Data Sheet according to European Directive 1062/2010
| Mark | OCEANIC |
| Model | OCEALED22120B2 |
| Energy efficiency class | A |
| Display area (diagonal) | 54 cm / 21.5 inches |
| Walking in Power Consumption | 21W |
| Energy Consumption | 31KWh |
| Power consumption in off mode | 0 W |
| Energy consumption in standby mode | <0.5W |
| Resolution of the screen (pixels) | 1920(H) x 1080 (V) |
| Trademark | OCEANIC |
| REFERENCE | OCEALED22120B2 |
| MODEL | LE-2229D |
| Viewing | Typical: 176 (H) \ 176 (V) |
| Resolution | 1920*1080 |
| Display Color | 16.7M |
| Contrast | 3000: 1 (typical) |
| Ratio | 16: 9 |
| Lifetime | 30,000 hours |
| Tuner | DVB-T / C |
| Power TV | DC12V |
| Consumption | max.36W |
| Dimensions | 509.5 (W) x 164.8 (D) x 340.5 (H) mm |
| Weight | 3.1kg |
| Basement | 2pcs, removable |
| Operating temperature | 0 °C and 40 °C |
| Remote power | AAA * 2pcs |
| Power USB ports | 5V, 500mA |
| lock Hotel | Yes |
| Loud speaker | 2 * 3 W |
| Inputs | DC IN, PC AUDIO IN, HDMI, USB, AV IN, ANNT, VGA |
| Outputs | Earpiece, Coaxial |
| Wireless Connectivity | N / A |
| Functions via USB | *.Dat, *.vob, *.ts, *.mpg, *.avi, *.mkv, .mp4 and * for video, .jpg for picture, *.mp3 in music |
| Playback Formats | Video : . mp4 |
| Multimedia USB | Music: .mp3 |
| Photos: .jpg | |
| Text: .txt | |
| Processor: | No |
| RAM: | No |
| Operating (firmware) system: | No |
| Internal memory | No |
Note :
- Class of efficiency Energy : A+++ (most efficient) to D (Least efficient).
- TV's annual energy consumption is based on a use of 4 hours a day for 365 days. Actual consumption may vary depending on the operating time and the contrast or brightness settings.
Adaptor information
| Nameplate Information | Value and precision | Unit |
| Maufacturer's name or trade mark, commercial registration number and address | SHENZHENJIAKEYUANINDUSTRY CO LTD | -- |
| Model identifier | JKY36-SP1203000 | -- |
| Input voltage | 100-240 | V |
| Input AC frequency | 50/60 | Hz |
| Output voltage | 12.0 | V |
| Output current | 3.0 | A |
| Output power | 36 | W |
| Average active efficiency | 88.585 | % |
| Efficiency at low load (10%) | 87.857 | % |
| No-load power consumption | 0.04 | W |

bar
| Performance Level | Energy Consumption (kWh/annum) | | ------------------ | ------------------------------ | | A++ | 54 | | A++ | 21 | | A+ | 31 | | A | 31 | | B | 31 | | C | 31 | | D | 31 |DISPOSAL OF THE DEVICE
- This logo set on the product means that the recycling of this apparatus comes within the framework of the directive 2012/19/EU of July 4, 2012 concerning the waste on electrical and electronic equipment (WEEE).
- The presence of dangerous substances in the electrical and electronic equipments can have potential consequences on the environment and human health in the cycle of reprocessing this product.
- Therefore, at the end of its lifetime, this product shall not be disposed with other non-recycled waste.
- As the end user, your role is of prime importance in the cycles of re-using, recycling, and other forms of valorization of this electrical and electronic equipment. Local authorities and resellers have set special procedures for the purpose of collecting and recycling this product.
- You have the obligation to use the selective waste collection systems put in place by your local authorities.
WARRANTY
WARRANTY EXCLUSIONS:
The warranty does not cover the worn-out parts of the product, or the problems or damages resulting from:
(1) Surface deterioration due to normal wear and tear of the product;
(2) Defects or deterioration due to contact with food or liquids and corrosion caused by rust or the presence of insects;
(3) Any incident relating to abuse, misuse, alteration, or unauthorized disassembly or repair;
(4) Improper maintenance, improper use of the product, or incorrect voltage connection;
(5) Any use of accessories that are not supplied or approved by the manufacturer.

The warranty will be void if the nameplate and/or serial number of the product is removed.
DECLARATION UE DE CONFORMITE
CE
DANS LE CADRE DE L'APPLICATION DES DIRECTIVES:
IEC 62321-7-1: 2015, IEC 62321-7-2: 2017, IEC 62321-6: 2015
IEC 62321-8 :2017 & ISO 17075-1 :2017