
Powerline Cyclonic RH7737 - Vacuum Cleaner ROWENTA - Free user manual and instructions
Find the device manual for free Powerline Cyclonic RH7737 ROWENTA in PDF.

| Product type | Cyclonic canister vacuum cleaner |
| Brand | Rowenta |
| Model | Powerline Cyclonic RH7737 |
| Separation technology | Cyclonic |
| Filtration system | HEPA filter (RS-RH5024) + foam filter + separator |
| Power adjustment | Power control (max for floors, min for delicate fabrics) |
| Dust bin | With quick-release emptying hatch, removable and washable |
| Included accessories | 2-position nozzle (smooth floors/carpets), parquet nozzle, upholstery nozzle, crevice tool, extension tube, hose, carrying strap* |
| Additional brushes | Mini Turbo Brush* and Maxi Turbo Brush* |
| Carrying handle | Integrated + carrying strap |
| Cord length | Approx. 6 m (not specified, reasonable estimate) |
| Weight | Approx. 4.5 kg (not specified, reasonable estimate) |
| Dimensions (L x W x H) | Approx. 40 x 25 x 30 cm (not specified, reasonable estimate) |
| Noise level | Not specified |
| Foam filter maintenance | Washable with soapy water, dry 12 h; replacement filter provided |
| HEPA filter maintenance | Cleanable by tapping; replace if worn (max 6 months) |
| Dust bin maintenance | Quick empty by push button; complete cleaning under warm water |
| Safety | Unplug before maintenance; do not vacuum liquids, ashes, sharp objects |
| Warranty | Domestic use only; repairs by authorised service centre |
| Spare parts and repairability | Original Rowenta filters and accessories; repairs by authorised service centre |
Frequently Asked Questions - Powerline Cyclonic RH7737 ROWENTA
User questions about Powerline Cyclonic RH7737 ROWENTA
0 question about this device. Answer the ones you know or ask your own.
Ask a new question about this device
Download the instructions for your Vacuum Cleaner in PDF format for free! Find your manual Powerline Cyclonic RH7737 - ROWENTA and take your electronic device back in hand. On this page are published all the documents necessary for the use of your device. Powerline Cyclonic RH7737 by ROWENTA.
USER MANUAL Powerline Cyclonic RH7737 ROWENTA
natural_image
Exterior view of a Rowenta power vacuum cleaner (no visible text or symbols on body)italiano
DESCRIZIONE 1
GARANZIA 1
CLEANING AND MAINTENANCE 10
ADVICE AND PRECAUTIONS 12
WHAT TO DO IF... 12
español
DESCRIPCIÓN 13
GARANTÍA 13
fig. 1
natural_image
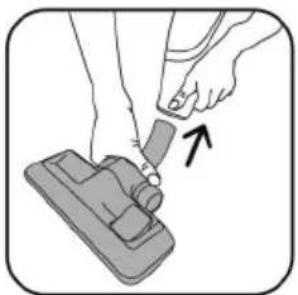
Illustration of a hand using a tool to adjust a mechanical component (no text or symbols visible)fig. 2

natural_image
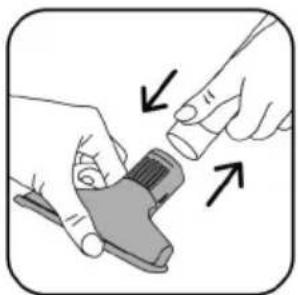
Illustration of a hand cleaning a tiled floor with a cloth (no text or symbols)fig. 3
natural_image
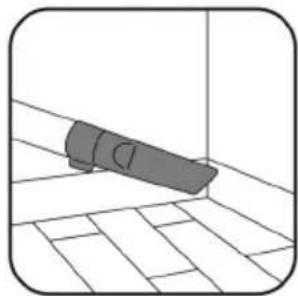
Illustration of hands using a tool to adjust a component (no text or symbols present)fig. 4
natural_image
Simple line drawing of a car on a tiled floor with diagonal lines (no text or symbols)fig. 5
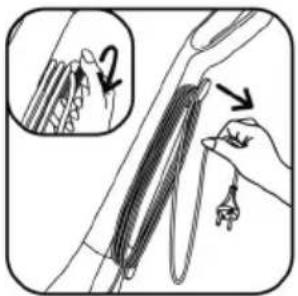
fig. 6
natural_image
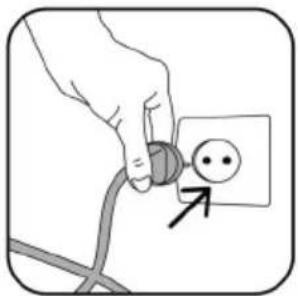
Hand holding a plug with a circular icon, pointing to a socket (no text or symbols)fig. 7
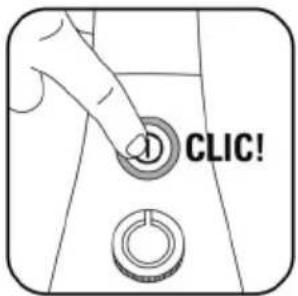
fig. 8
natural_image
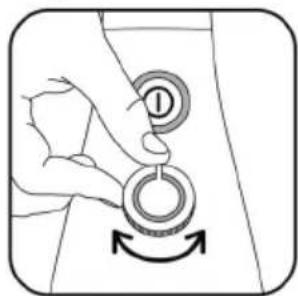
Illustration of a hand pressing down on a circular button labeled '1', with an arrow indicating clockwise rotation (no text or symbols beyond the number and arrow)fig. 9
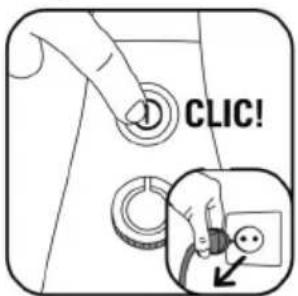
fig. 10

natural_image
Illustration of a hand holding a coiled cable or wire with a loop, no text or symbols presentfig. 11
natural_image
Hand inserting a component into a device (no text or symbols visible)fig. 12
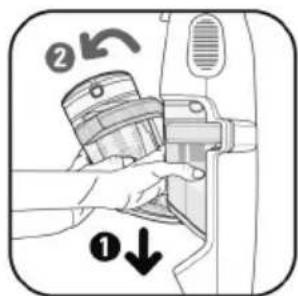
fig. 13
natural_image
Illustration of hands using a portable device to lift a surface, with an arrow indicating the motion (no text or symbols present)fig. 14
natural_image
Illustration of hands using a handheld device to interact with a grid-patterned device (no text or symbols visible)fig. 15
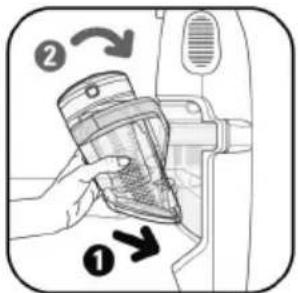
fig. 16

natural_image
Illustration of a hand using a handheld device to interact with an electronic device, showing a magnified inset of its components (no text or symbols present)fig. 17
natural_image
Diagram of a laboratory procedure with a test tube and tubing, showing an inset image of a 12-hour timer (no text or symbols present)fig. 18
natural_image
Mechanical component diagram showing a wheel assembly with an arrow indicating direction (no text or symbols)fig. 19
natural_image
Diagram of a mechanical component with a highlighted section and arrow indicating direction (no text or symbols)fig. 20
natural_image
Diagram of a fan assembly with a directional arrow indicating motion (no text or symbols present)fig. 21 fig. 22 fig. 23
natural_image
Illustration of a hand using a sponge to clean or repair a small object (no text or symbols visible)DESCRIZIONE

Vista esplosa
6 Door opening button
7 Container compartment door
8 Container compartment
Zoom on cord rewind
9 Cord
Zoom on back of product
10 Hooks for transport strap*
Accessories\*
11 2-position fitting (smooth floors - carpeting)
12 Parquet nozzle
13 Upholstery nozzle
14 Mini turbo brush*
15 Maxi turbo brush*
16 Crevice tool
17 Extension
18 Transport strap*
19 Flexible*
WARRANTY
- This appliance is for household use only; in the event of inappropriate or non-recommended use, no liability can be accepted and the warranty is cancelled.
- Read the instructions for use carefully before using the appliance for the first time: utilisation not complying with the instructions for use will relieve Rowenta of any liability.
SAFETY ADVICE
For your safety, this appliance complies with applicable standards (Low voltage directions, electromagnetic compatibility, the environment, ...) Read your instructions for use carefully and keep them safe.
1 • Conditions of use
Your vacuum cleaner is an electrical appliance: it must be used under normal conditions of use. Use and store it out of reach of children. Do not allow it to run unsupervised. Do not hold the suction fitting or the end of the hose near the eyes or ears.
Do not use on moist surfaces, or to suck up any liquids, hot substances, ultra-fine substances (plaster, cement, ash...), large or sharp items of waste (glass), harmful products (solvents, descalers...), aggressive products (acids, cleaners ...), inflammable and explosive products (based on petrol or alcohol).
Never place the appliance in water, do not spray water on it and do not store it outside. Do not use it after it has been dropped and does not function normally or has signs of visible damage. In that event do not open it but send it to an authorised Service Centre or contact a Rowenta customer service centre (addresses are on the last page).
This appliance is not designed for use by persons (including children), whose physical, sensory or mental capacities are impaired, or by persons devoid of experience or knowledge, unless they are supervised by a person responsible for their safety, surveillance or have received prior instructions in the use of the appliance. It is necessary to supervise children to ensure that they do not play with the appliance.
This appliance may be used by children aged 8 or over, and by persons lacking
appropriate knowledge and experience or whose physical, sensory or mental capacities are limited, provided that they are supervised, have received instruction in the safe use of the appliance, and are fully aware of the risks involved. Children must not be allowed to play with the appliance. Home cleaning and maintenance of the appliance must not be carried out by children unless they are aged 8 or over and are supervised. Always keep the appliance and power cord out of reach of children under 8 years.
2 • Electrical supply
Ensure that the voltage at which your vacuum cleaner operates is the voltage installed on your premises. Disconnect the appliance by pulling out the plug without pulling the cord: immediately after use, before any change of accessory, every cleaning, servicing or change of filter.
Do not use it if the cord is damaged. The power cord of your vacuum cleaner must be replaced by an approved Service Centre because special tools are needed for carrying out any repair in order to avoid danger.
3 • Repairs
Repairs must only be carried out by specialists and using original spare parts. Repairing the appliance oneself may endanger the user and cancels the warranty.
Let us take part in protecting the environment!
① Your appliance contains numerous reusable or recyclable materials.
take it to collection point or in its absence, to an approved service centre for disposal.
BEFORE USE
1 • Assemble your vacuum cleaner (fig. 1) - (fig. 2)
2 • Select the right accessory* (fig. 2) - (fig. 3) - (fig. 4) - (fig. 5)
VACUUMING
3 • Switch on your vacuum cleaner (fig. 6) - (fig. 7) - (fig. 8)
4 • Set the vacuum power (fig. 9)
Max: Floors
Min: Furniture, delicate fabrics...
5 • Switch off your vacuum cleaner (fig. 10)
STORAGE (fig. 11)
CLEANING AND MAINTENANCE
The air we breathe contains particles, which may cause allergies; the larvae and waste of mites, moulds, pollen, smoke and animal residues (hair, skin, saliva, urine). The finest particles penetrate into the respirator where they may cause inflammation and completely alter the respiratory function.
HEPA filters (high efficiency particulate air filters, namely high efficiency filters for air-borne particle filters) make it possible to hold back the finest particles. Thanks to the HEPA filter, spent air in the room is cleaner than vacuumed air.

IMPORTANT
Always switch off and disconnect your vacuum cleaner before servicing or cleaning. Check and clean regularly your whole vacuum cleaner and the different filters.
ATTENTION
Never use your vacuum cleaner without the filtration system (microfilter and filter).
1 • Cleaning the dust container (5)
Quick emptying
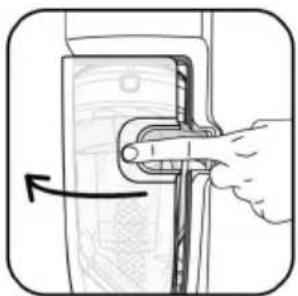
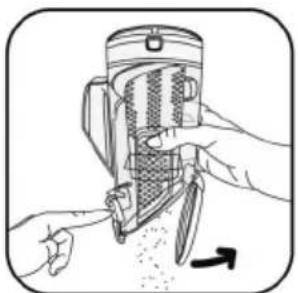
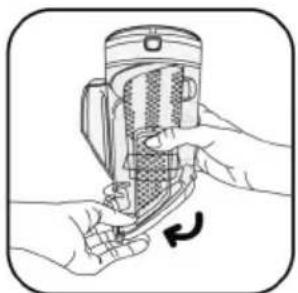
When the dust container (5) is full, remove the cover from the vacuum cleaner (Fig. 12) then remove the dust container (5) by sliding it slightly downwards (Fig. 13). Place it over a waste container and press the button marked "Push" to tip the emptying flap down, then empty out the contents of the container (Fig. 14). Close up the flap (Fig. 15) and refit the dust container, then refit the cover onto the vacuum cleaner (Fig. 16).
Complete cleaning
The container assembly (5) requires regular cleaning.
Remove the cover from the vacuum cleaner (Fig. 12). Then remove the dust container (5) by sliding it slightly downwards (Fig. 13). Then separate each element: Remove the dust container cap (5c) then the HEPA filter (5b3).
Then remove the foam filter (5b2) and the separator (5b1).
Place the receptacle/dust container (5a) and separator (5b1) under warm water, then leave it to dry or wipe it with a dry cloth (Fig. 17).
For cleaning the foam filter (5b2) : Please refer to Section 2 – CLEANING THE FOAM FILTER. For cleaning the HEPA filter (5b3) : For information on servicing filters, please refer to Section 3 – CLEANING THE HEPA FILTER.
Once dry, refit the dust container (5) elements, then refit the complete assembly onto the vacuum cleaner (Fig. 16).
Refit the vacuum cleaner cover (7).
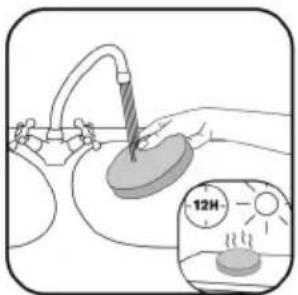
2 • Cleaning the foam filter (5b2)
The foam filter (5b2) should be cleaned after every use, using warm soapy water (Fig. 18). Rinse and leave to dry for at least 12 hours before refitting.
An additional foam filter is supplied with your vacuum cleaner so that you can continue to use your vacuum cleaner while the original foam filter is drying.
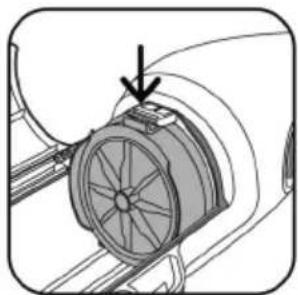
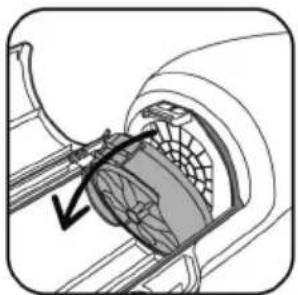
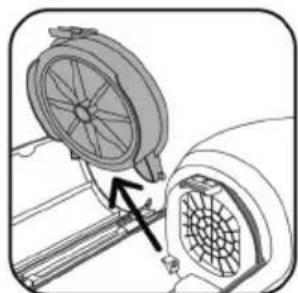
3 • Cleaning the HEPA filter
Your vacuum cleaner is fitted with a HEPA filter (5b3).
If you notice your vacuum cleaner losing power, then we recommend that you clean the HEPA filter to retain vacuum performance:
- remove the cover from the vacuum cleaner (Fig. 12)
- remove the dust container by sliding it slightly downwards (Fig. 13) then remove the dust container cap (5c)
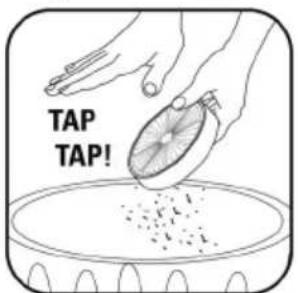
- pull out the HEPA (Fig. 19-20-21) filter and tap it lightly over a waste container (Fig. 22)
Replace the HEPA filter inside the dust container cap, refit the dust container elements, then refit the complete assembly onto the vacuum cleaner. Refit the vacuum cleaner cover (7).
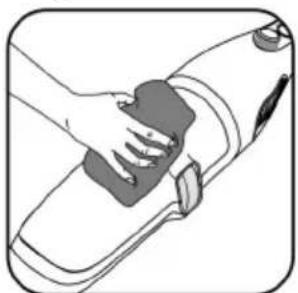
4 • Clean your vacuum cleaner
Wipe the body of the appliance and the accessories with a soft damp cloth and then dry. (Fig. 23)

ADVICE AND PRECAUTIONS
- Before every cycle of use, the cord must be fully unwound.
- Do not enter corners and do not pass over sharp shards.
- Do not move the vacuum cleaner by pulling the cord, but use the carrying handle.
- Do not lift the appliance by the cord.
- If you are using an extension cable, ensure that it is in perfect condition and matches the power of your vacuum cleaner.
- Do not unplug the appliance by pulling the cord.
- Stop and disconnect your vacuum cleaner after each utilisation cycle.
- Only use dry accessories and original Rowenta pieces.
- Verify that all filters are in place.
- Never use without dust container and filter.
• In case of difficulty in obtaining accessories and filters for the vacuum cleaner, contact Rowenta Consumer Service on 0845 302 1454
WHAT TO DO IF...
IMPORTANT
When your vacuum cleaner is not working as it should be and before any verification, stop it by using the stop/start pushbutton and unplug.
| Your vacuum cleaner will not start or does not suck. | ·The appliance is not receiving current: check that it is correctly connected.·An accessory or the tube is blocked: unblock the accessory or the pipe.·The cover is badly closed or cannot be closed: check the position/or the presence of the dust container and re-close the cover. |
| Your vacuum cleaner has less suction power, makes a noise, and whistles. | ·An accessory or the tube is partially blocked: unblock the accessory or the tube.·The dust container is full or saturated with fine dust: replace the dust container.·The HEPA filter is saturated: clean the HEPA filter if 6 months of use have elapsed, otherwise change it following instructions in the notice.·The power control is in minimum position: increase the power using the power control (except when cleaning fine fabrics).·The suction fitting is difficult to move: reduce the power using the power control. |
If a problem persists, take your vacuum cleaner to the nearest approved Rowenta Service Centre. See the list of approved Rowenta Service Centres or contact Rowenta Customer Service: 0845 302 1454
DESCRIPCIÓN

Imagen detallada

- italiano
- español
- DESCRIZIONE
- Vista esplosa
- Zoom on cord rewind
- Zoom on back of product
- Accessories\*
- WARRANTY
- SAFETY ADVICE
- • Conditions of use
- • Electrical supply
- • Repairs
- Let us take part in protecting the environment!
- BEFORE USE
- VACUUMING
- STORAGE (fig. 11)
- CLEANING AND MAINTENANCE
- IMPORTANT
- ATTENTION
- • Cleaning the dust container (5)
- Quick emptying
- Complete cleaning
- • Cleaning the foam filter (5b2)
- • Cleaning the HEPA filter
- • Clean your vacuum cleaner
- ADVICE AND PRECAUTIONS
- WHAT TO DO IF...
- DESCRIPCIÓN
- Imagen detallada
Brand : ROWENTA
Model : Powerline Cyclonic RH7737
Category : Vacuum Cleaner