VC8246 NG - Wine cellar Fors - Free user manual and instructions
Find the device manual for free VC8246 NG Fors in PDF.

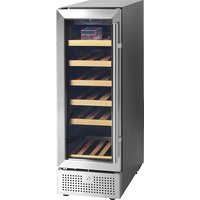
| Product type | Wine cellar |
| Brand | Fors |
| Model | VC8246 NG |
| Power supply | 220-240 V / 50 Hz |
| Number of compartments | 2 |
| Temperature range upper compartment | 5 °C to 10 °C |
| Temperature range lower compartment | 10 °C to 18 °C |
| Temperature display | Digital screen with red (actual) and green (set) digits |
| Interior lighting | Yes, with automatic shut-off after 10 minutes or permanent mode |
| Cooling system | Compressor |
| Charcoal filter | Yes, to combat odors |
| Water tray | Yes, to maintain humidity |
| Adjustable shelves | Yes |
| Reversible door | Yes |
| Maintenance | Clean interior/exterior with unscented dish soap; ventilated grill with vacuum cleaner |
| Safety | Do not store flammable products; wait 2 hours after horizontal transport |
| Service | Contact the dealer with the reference and serial number (interior label) |
| Disposal | Follow environmental regulations |
Frequently Asked Questions - VC8246 NG Fors
User questions about VC8246 NG Fors
0 question about this device. Answer the ones you know or ask your own.
Ask a new question about this device
Download the instructions for your Wine cellar in PDF format for free! Find your manual VC8246 NG - Fors and take your electronic device back in hand. On this page are published all the documents necessary for the use of your device. VC8246 NG by Fors.
USER MANUAL VC8246 NG Fors
Important safety instructions 4
Unpacking and installation 4
Electrical connections 5
Start-up of the cabinet 5
Operation VS8619 GES 6
Operation VS8248 NG/GES 7
Operation VC8246 NG/GES 8
Water tray 9
Carbon filter 9
Changing position of shelves 10
Door reversal 10
Maintenance and cleaning 11
Service 12
Disposal 12
Error codes 31
D Inhalt
Important safety instructions
- To obtain full use of the cabinet, we recommend reading this instruction manual.
- It is the user's responsibility to operate the appliance in accordance with the instructions given.
- Contact your dealer immediately in case of any malfunctions.
- Place the cabinet in a dry and ventilated place.
- Keep the cabinet away from strongly heat-emitting sources and do not expose it to direct sunlight.
- Always keep in mind that all electrical devices are sources of potential danger.
- Do not store inflammable material such as thinner, gasoline etc. in the cabinet.
- We declare that no asbestos nor any CFC are used in the construction.
- The oil in the compressor does not contain PCB.
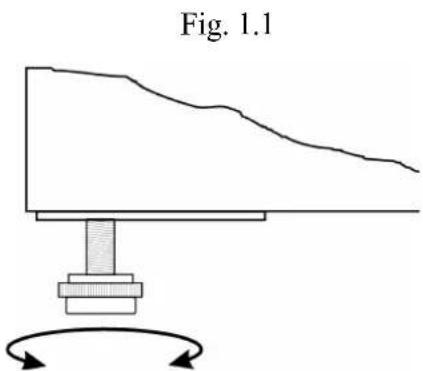
Unpacking and installation
Remove the wooden pallet and the packing.
To ensure correct function it is important that the cabinet is level. The cabinet is supplied with legs, which can be adjusted. See fig. 1.1.
If you want to build in your cabinet please note the following:
- There must be at least 10cm free space above the cabinet in order for the cooling system to work satisfactorily.
- There must be sufficient space at the hinge side to clean and replace the shelves and clean around the hinge.
Electrical connecting
The cabinet operates on 230V / 50Hz
The wall socket should be easily accessible.
All earthing requirements stipulated by the local electricity authorities must be observed. The cabinet plug and wall socket should then give correct earthing. If in doubt, contact your local supplier or authorized electrician.
The flexible cord fitted to this appliance has three cores for use with a 3-pin 13-Amp or 3-pin 15-Amp plug. If a B.S. 1363 (13-Amp) fused plug is used, it should be fitted with a 13-Amp fuse.
The wires in this mains lead are coloured in accordance with the following code: Green/Yellow: Earth, Blue: Neutral, Brown: Live.
The main electrical connections must be done by skilled electricians.
Start-up of the cabinet
Before use, we recommend that the cabinet is cleaned, see the section on maintenance and cleaning.
Important!
If the cabinet has been horizontally placed during transport, please wait 2 hours before starting up the cabinet.
In order to ensure optimum function of the cabinet the ambient temperature must be between 18 and 35^ .
Operation model VS8619 GES
Connect the cabinet to a socket and turn on the switch on the control panel (POWER), see fig. 1.9.
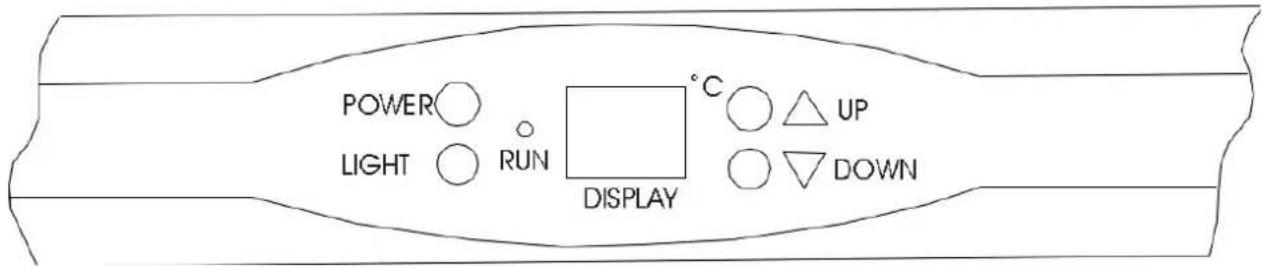
Fig. 1.9
When the cabinet is turned on, the display will show the current temperature in the cabinet.
Display set temperature:
UP
Press this key and the display will flash the set temperature. After 5 seconds the thermostat will return to normal reading.
Set new temperature:
UP
Press this key and the set temperature will increase by 1^ for each pressure.
DOV
Press this key and the set temperature will decrease by 1^ for each pressure.
Indicator lamps:
RUN
Control lamp "Run" will turn on when the compressor is running.
Internal light:
LIGHT

Press this key to turn on/off the internal light.
In order to reduce energy consumption, this cabinet will automatically switch off the internal light after 10 minutes.
If you want the internal light to remain on continuously, press and hold this key for 5 seconds until display show 'LP'.
To revert to normal mode, press and hold this key for 5 seconds until display show 'LF'
Operation model VS8248 NG/GES
Connect the cabinet to a socket and turn on the switch on the control panel (POWER), see fig. 2.0.
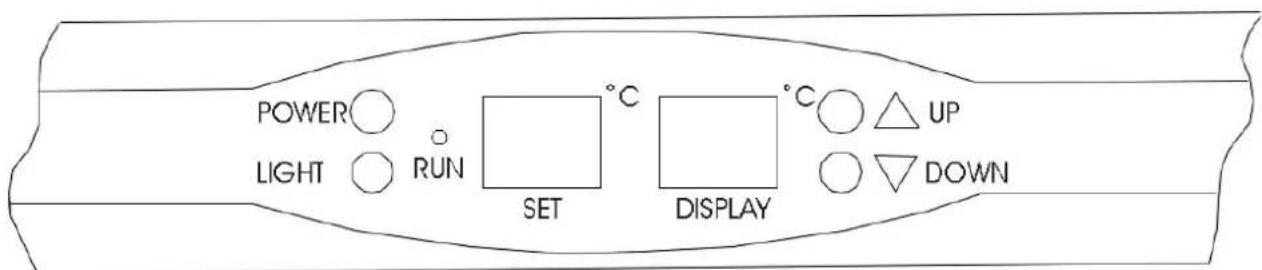
Fig. 2.0
When the cabinet is turned on, the display will show the current temperature in the cabinet.
SET displays set temperature.
DISPLAY displays the temperature in the cabinet
Set new temperature:
UP
Press this key and the set temperature will increase by 1^ for each pressure.
DOWN
Press this key and the set temperature will decrease by 1^ for each pressure.
Indicator lamps:
RUN
Control lamp "Run" will turn on when the compressor is running.
Internal light:
LIGHT

Press this key to turn on/off the internal light.
In order to reduce energy consumption, this cabinet will automatically switch off the internal light after 10 minutes.
If you want the internal light to remain on continuously, press and hold this key for 5 seconds until display show 'LP'.
To revert to normal mode, press and hold this key for 5 seconds until display show 'LF'
Operation model VC8246 NG/GES
Connect the cabinet to a socket and turn on the switch on the control panel (POWER), see fig. 2.1.
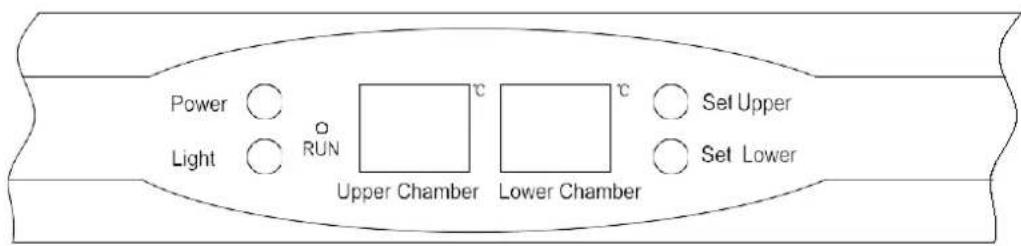
Fig. 2.1
When the cabinet is turned on, the display will show the current temperatures in the cabinet's two chambers.
Display set temperature:

Set Upper
Press this key and the display will flash the set temperature for the upper chamber. After 5 seconds the thermostat will return to normal reading.

Set Lower
Press this key and the display will flash the set temperature for the lower chamber. After 5 seconds the thermostat will return to normal reading.
Set new temperature:

Set Upper
Press this key and the display will flash the set temperature.
Every subsequent press on this key will lower the setting by 1^ , from 10^ to 5^ and will start over again after that.
When the required temperature is reached, wait for 5 seconds and the thermostat will return to normal reading.

Set Lower
Press this key and the display will flash the set temperature.
Every subsequent press on this key will lower the setting by 1^ , from 18^ to 10^ and will start over again after that.
When the required temperature is reached, wait for 5 seconds and the thermostat will return to normal reading.
Indicator lamps:
RUN
Control lamp "Run" will turn on when the compressor is running.
Internal light:
LIGHT

Press this key to turn on/off the internal light.
In order to reduce energy consumption, this cabinet will automatically switch off the internal light after 10 minutes.
If you want the internal light to remain on continuously, press and hold this key for 5 seconds until display show 'LP'.
To revert to normal mode, press and hold this key for 5 seconds until display show 'LF'
Water tray
In order to prevent drying up of the wine corks due to low humidity the cabinet is supplied with a water tray, which should be placed at the top shelf, see fig. 1.3.
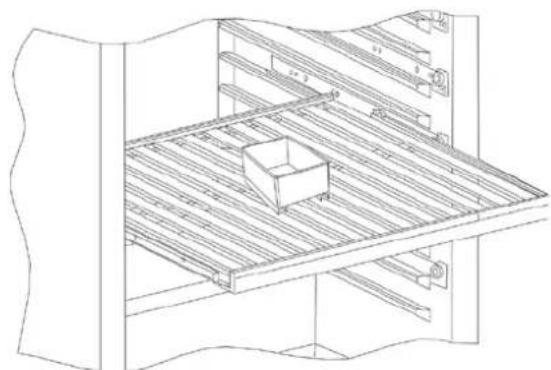
Fig. 1.3
Carbon filter
The cabinet is supplied with a carbon filter to prevent bad smell. This is placed at the rear wall inside the cabinet, see fig. 1.4.

Changing position of shelves
Tilt the shelf and pull out the shelf, see fig. 2.2.
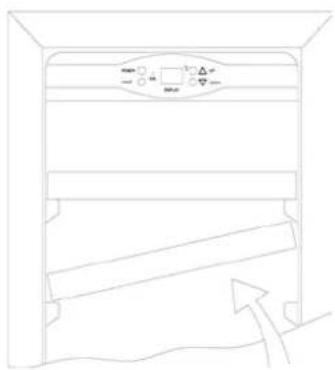
Fig. 2.2
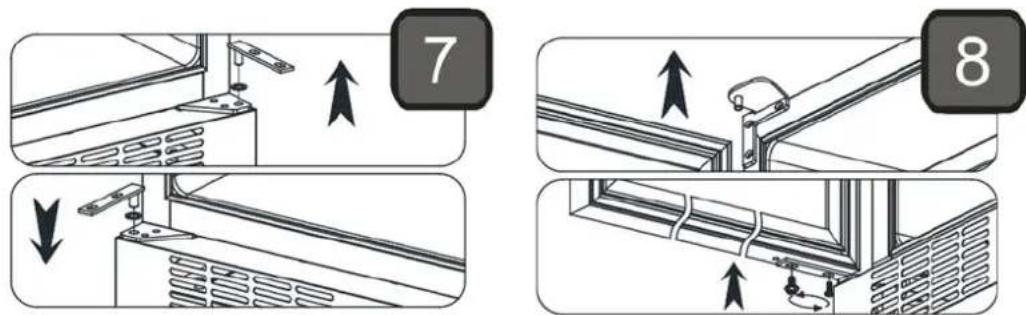
Door reversal
Open the door, remove the two screws in the bottom hinge and lift out the door.
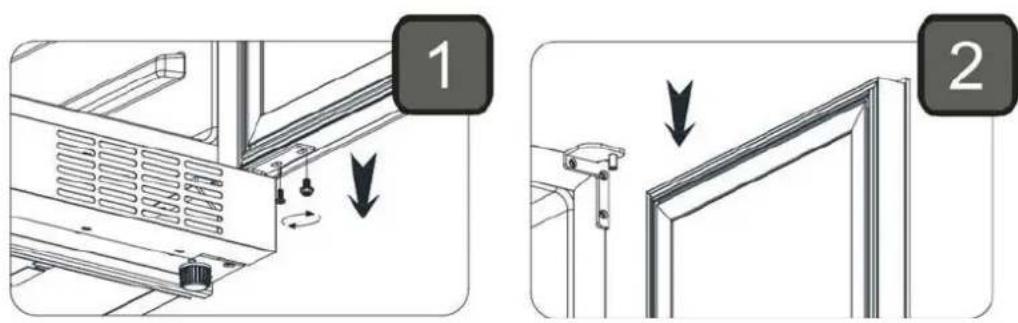
Move the two plastic caps from top to bottom and rotate the door 180 degrees. (Frameless)
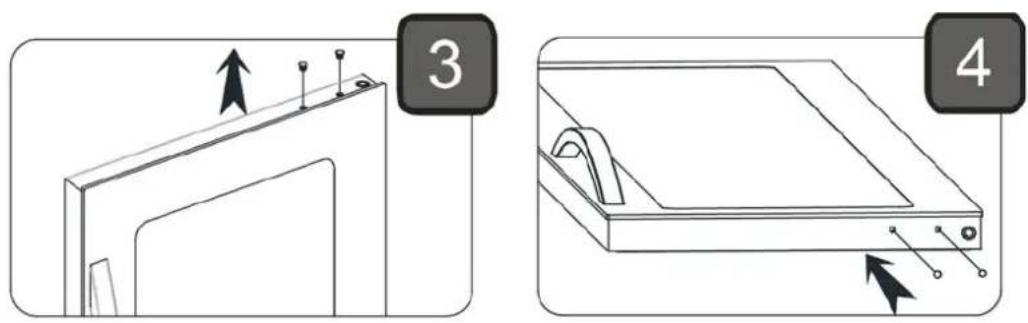
The enclosed top hinge should be fitted at the opposite side. Move the plastic support to the opposite side.
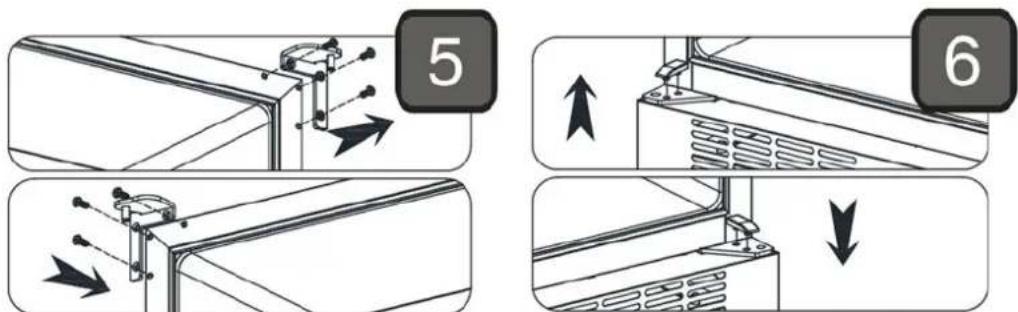
Move the hinge pin & washer to the opposite side. Mount the door and screws again.
Maintenance and cleaning
Switch the cooler off at the socket.
The cabinet must be periodically cleaned. Clean the external and internal surfaces of the cabinet with a light soap solution and subsequently wipe dry. External surfaces can be maintained using steel oil.
Keep the fan cover clean by using a vacuum cleaner and a stiff brush.
Do NOT use cleansers containing chlorine or other harsh cleansers, as these can damage the stainless steel surfaces and the internal cooling system.
Do NOT hose the compressor compartment with water as this can cause short circuits and damage on the electrical parts.
Service
The cooling system is a hermetically sealed system and does not require supervision, only cleaning.
If the cabinet fails to cool, check if the reason is a power cut.
If you cannot locate the reason to the failure of the cabinet, please contact your supplier. Please inform model and serial number of the cabinet. You can find this information on the rating label which is placed on the back side of the cabinet on the left hand side.
Disposal
Disposal of the cabinet must take place in an environmentally correct way. Please note existing regulation on disposal. There may be special requirements and conditions which must be observed.
D
| FAULT CODE | DESCRIPTION |
| E1 | A upper compartment sensor disconnected fault and the sensor should be replaced |
| E2 | A upper compartment sensor short circuit fault and the sensor should be replaced |
| E3 | An evaporator sensor disconnected fault and should be replaced |
| E4 | An evaporator sensor short circuit fault and the sensor should be replaced |
| E7 | A lower compartment sensor disconnected fault and the sensor should be replaced |
| E8 | A lower compartment sensor short circuit fault and the sensor should be replaced |
VS8619 and VS8248 NG/GES
| FAULT CODE | DESCRIPTION |
| E1 | A white connecter's sensor disconnected fault and the sensor should be replaced |
| E2 | A white connecter's sensor short circuit fault and the sensor should be replaced |
| E3 | An evaporator sensor disconnected fault and should be replaced |
| E4 | An evaporator sensor connected is short circuit. |
| E7 | A yellow connecter's sensor disconnected fault and the sensor should be replaced |
| E8 | A yellow connecter's sensor short circuit fault and the sensor should be replaced |