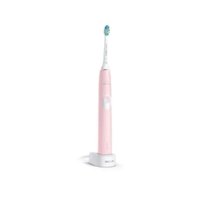
Sonicare HX6816 - Toothbrush PHILIPS - Free user manual and instructions
Find the device manual for free Sonicare HX6816 PHILIPS in PDF.


User questions about Sonicare HX6816 PHILIPS
0 question about this device. Answer the ones you know or ask your own.
Ask a new question about this device
Download the instructions for your Toothbrush in PDF format for free! Find your manual Sonicare HX6816 - PHILIPS and take your electronic device back in hand. On this page are published all the documents necessary for the use of your device. Sonicare HX6816 by PHILIPS.
USER MANUAL Sonicare HX6816 PHILIPS
text_image
PHILIPS ProtectiveClean 4100
natural_image
White electric toothbrush with toothbrush and digital display (no visible text or symbols on body)PHILIPS sonicare

natural_image
Illustration of an open book with a grid and an arrow indicating rotation (no text or symbols)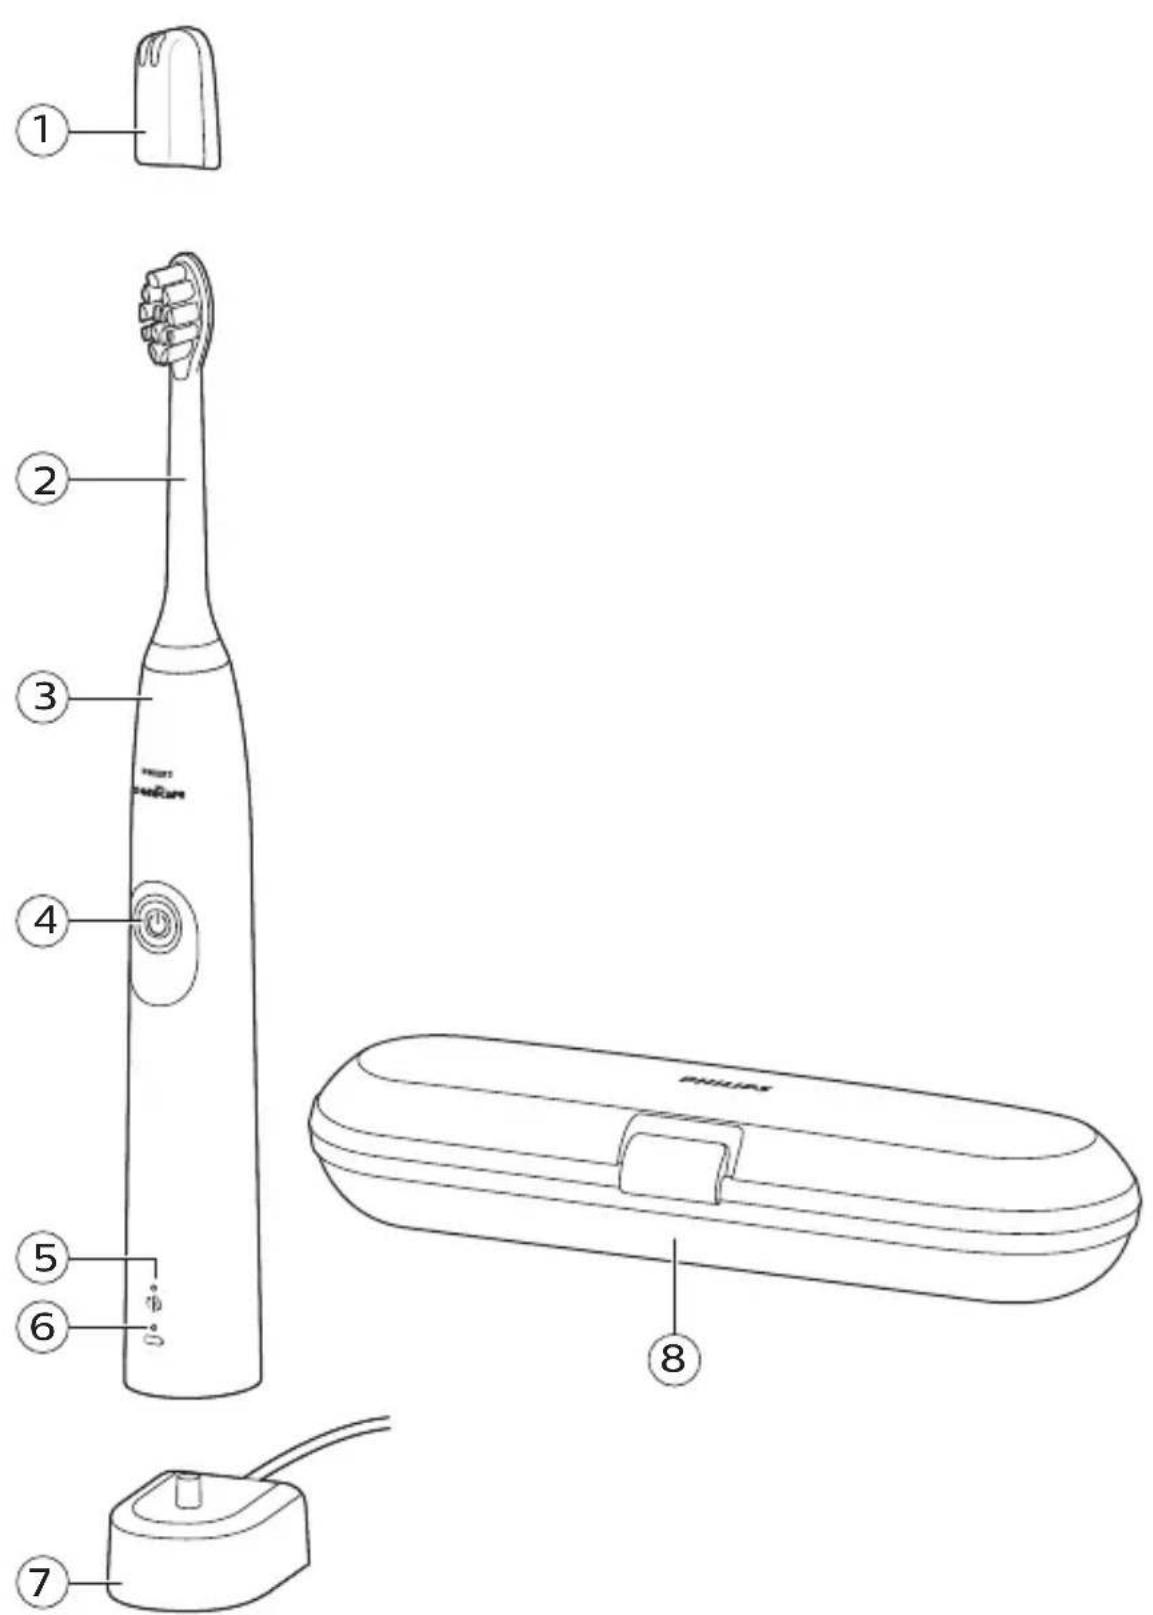
English 6
Español 25
Français (Canada) 46
IMPORTANT SAFEGUARDS
READ ALL INSTRUCTIONS BEFORE USE
When using electrical products, especially when children are present, basic safety precautions should always be followed, including the following:
DANGERS
To reduce the risk of electrocution:
1 Always place and store the charger at a safe distance from water.
2 Do not reach for a product that has fallen into water. Unplug immediately.
3 Never use a charger with a damaged cord or plug.
WARNINGS
To reduce the risk of burns, electrocution, fire or physical injury:
1 Do not clean the brush head, the handle or the charger in the dishwasher.
2 Do not use attachments other than those recommended by the manufacturer.
3 Do not plug into an outlet with a voltage other than specified on the bottom of the product. This product is designed to operate within a range of 100 to 240 volts. Voltage converters do not warrant voltage compatibility.
4 Never force the plug into an outlet; if the plug does not easily fit into the outlet, discontinue use.
5 Discontinue use if the product appears damaged in any way (brush head, handle or charger, etc.).
6 The mains cord cannot be replaced. If the mains cord is damaged, discard the charger.
7 Keep the cord away from heated surfaces.
8 Do not use the base charger outdoors or near heated surfaces.
9 This product contains no user-serviceable parts. Refer to 'Warranty and support' if the product no longer works properly or needs repair.
10 Use this product only for its intended use as described in this document or as recommended by your dental professional.
11 This product is not intended for use by persons (including children) with reduced physical, sensory, or mental capabilities, or lack of experience and knowledge, unless they have been given supervision or instruction concerning use of the appliance by a person responsible for their safety.
12 Children should be supervised to ensure that they do not play with the product.
13 Philips Sonicare is a personal care device and is not intended for use on multiple patients in a dental office or institution.
14 The product is not intended to be repaired by service personnel in case of failure or component defect (unit can be thrown away).
15 For connection to a supply not in the U.S.A., use a charger of the proper configuration for the power outlet.
16 This appliance has only been designed for cleaning teeth, gums and tongue. Do not use it for any other purpose. Stop using the appliance and contact your doctor if you experience any discomfort or pain.
MEDICAL WARNINGS
1 Consult your dental professional before you use this product if you have had oral or gum surgery in the previous 2 months.
2 Contact your dental professional if excessive bleeding occurs after using this product or bleeding continues to occur after 1 week of use.
3 Discontinue use of this product and contact a physician/dentist if discomfort or pain is experienced.
4 This product complies with the safety standards for electromagnetic devices. If you have a pacemaker or other implanted device, contact your physician or the device manufacturer prior to use.
5 Consult your physician if you have other medical concerns.
SAVE THESE INSTRUCTIONS
Radio Equipment Directive
- Radio Equipment in this product operates at 13.56 MHz
- Maximum RF power transmitted by the Radio Equipment is 30.16dBm
Introduction
Congratulations on your purchase and welcome to Philips! To fully benefit from the support that Philips offers, register your product at www.philips.com/welcome.
Your Philips Sonicare (Fig. 1)
1 Hygienic travel cap
2 Smart brush head(s)*
3 Handle
4 Power on/off button
5 Brush head replacement reminder light
6 Battery indication
7 Charging base
8 Travel case (specific types only)*
*Note: The content of the box may vary based on the model purchased.
Brush heads
Your Philips Sonicare comes with one or more brush heads which are designed to deliver superior results for your oral care needs.
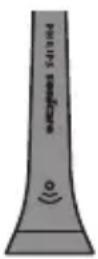
Philips Sonicare BrushSync Technology
Your smart brush heads use a microchip to sync with your handle, enabling brush head replacement reminder. For more information regarding the brush head replacement reminder, see 'Features'.
This symbol indicates the brush head is equipped with BrushSync technology.
Brushing modes
Your power toothbrush is equipped with clean mode.
Clean mode
Clean is a 2-minute mode. It gives you a thorough and complete clean and is recommended to be used with the C2 Optimal Plaque Control brush head.
Using your Philips Sonicare
Brushing instructions
natural_image
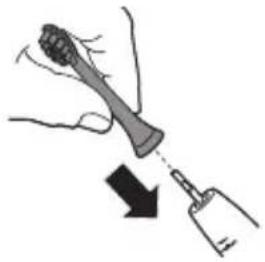
Illustration of a hand holding a tool with a black arrow indicating direction (no text or symbols)1 Press the brush head onto the handle in such a way that the bristles will face the front of the handle.
2 Firmly press the brush head down onto the metal shaft until it stops.
Note: It is normal to see a slight gap between the brush head and the handle.
natural_image
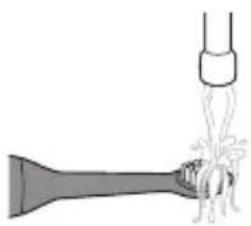
Diagram of a funnel pouring liquid into a bulb with a splashing effect (no text or symbols)3 Wet the bristles.
natural_image
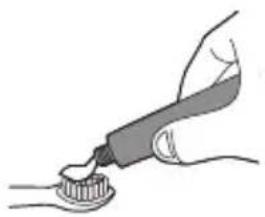
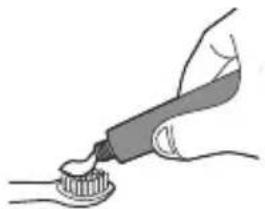
Illustration of a hand using a tool to apply a substance from a small container (no text or symbols visible)4 Apply a small amount of toothpaste on the bristles.
text_image
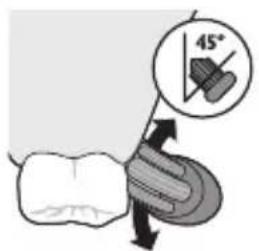
45°5 Place the toothbrush bristles against the teeth at a slight angle (45 degrees), pressing firmly to make the bristles reach the gumline or slightly beneath the gumline. A change in vibration (and a slight change in sound) alerts you when you apply too much pressure while brushing.
Note: Keep the center of the brush in contact with the teeth at all times.
12 English
text_image
MILKON Power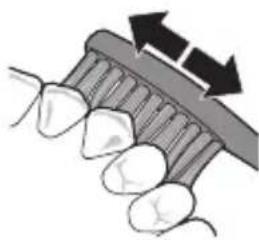
natural_image
Illustration of dental tool manipulation with arrows indicating direction (no text or symbols)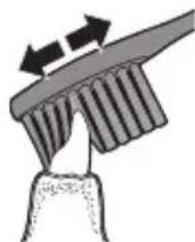
natural_image
Diagram of a mechanical component with arrows indicating motion or force direction (no text or symbols)
flowchart
graph TD
    A["Top Loop"] --> B["Bottom Loop"]
    B --> C["Top Loop"]
    C --> D["Bottom Loop"]
    D --> E["Top Loop"]
    E --> F["Bottom Loop"]
    F --> G["Top Loop"]
    style A fill:#f9f,stroke:#333
    style B fill:#f9f,stroke:#333
    style C fill:#f9f,stroke:#333
    style D fill:#f9f,stroke:#333
    style E fill:#f9f,stroke:#333
    style F fill:#f9f,stroke:#333
text_image
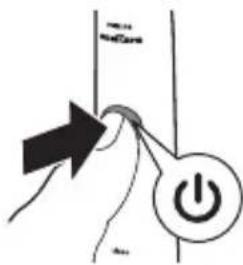
1 2 30 sec. 30 sec.6 Press the power on/off button to turn on the Philips Sonicare.
7 Gently keep the bristles placed on the teeth and in the gumline. Brush your teeth with small back and forth motion so the bristles reach between the teeth.
Note: The bristles should slightly flare. Do not scrub.
8 To clean the inside surfaces of the front teeth, tilt the brush handle semi-upright and make several vertical overlapping brushing strokes on each tooth.
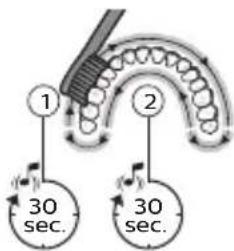
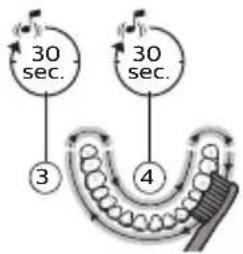
9 To make sure you brush evenly throughout the mouth, divide the mouth into 4 sections using the Quadpacer feature. The quadpacer feature beeps after 30 seconds.
10 Brush for the full 2 minutes following the Quadpacer. After 2 minutes, the toothbrush will automatically shut off.
flowchart
graph TD
    A["Step 3"] --> B["30 sec."]
    B --> C["Step 4"]
    C --> D["30 sec."]
    D --> E["Step 5"]
    E --> F["Step 6"]
    F --> G["Step 7"]
    G --> H["Step 8"]
    H --> I["Step 9"]
    I --> J["Step 10"]
    J --> K["Step 11"]
    K --> L["Step 12"]
    L --> M["Step 13"]
    M --> N["Step 14"]
    N --> O["Step 15"]
    O --> P["Step 16"]
    P --> Q["Step 17"]
    Q --> R["Step 18"]
    R --> S["Step 19"]
    S --> T["Step 20"]
- After you have completed the brushing cycle, you can spend additional time brushing the chewing surfaces of your teeth and areas where staining occurs. You may also brush your tongue, with the toothbrush turned on or off, as you prefer.
Your Philips Sonicare toothbrush is safe to use on:
- Braces (brush heads wear out sooner when used on braces)
- Dental restorations (fillings, crowns, veneers)
Note: When the Philips Sonicare toothbrush is used in clinical studies, it must be used in the Clean mode (for plaque and gum health claims) or in White mode (for whitening claims) at high intensity with EasyStart turned off.
Features
- EasyStart
- Brush head replacement reminder
- Pressure sensor
- Quadpacer
EasyStart
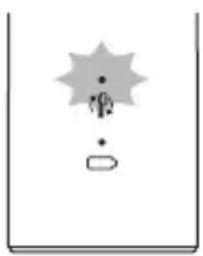
This Philips Sonicare model comes with the EasyStart feature activated. The EasyStart feature gently increases the power over the first 14 brushings to help you get used to the brushing with the Philips Sonicare. The EasyStart feature works in all modes.
natural_image
Simple diagram with a starburst shape and a small circle below, no text or symbols presentTo deactivate EasyStart see 'Activating or deactivating features'.
Brush head replacement reminder
Your Philips Sonicare is equipped with BrushSync technology that tracks the wear of your brush head.
1 When attaching a new smart brush head for the first time the brush head replacement reminder light blinks green three times. This confirms you have a Philips brush head with BrushSync technology.
2 Over time, based on the pressure you apply and the amount of time used, the handle will track brush head wear in order to determine the optimal time to change your brush head. This feature gives you the guarantee for the best cleaning and care of your teeth.
3 When the brush head replacement reminder light lights up amber, you should replace your brush head.
To deactivate the brush head replacement reminder see 'Activating or deactivating features'.
Pressure sensor
Your Philips Sonicare is equipped with an advanced sensor that measures the pressure you apply while brushing. If you apply too much pressure, the toothbrush will provide immediate feedback to indicate that you need
to reduce the pressure. This feedback is given by a change in vibration and therefore brushing sensation.
To deactivate the pressure sensor see 'Activating or deactivating features'.
Quadpacer
The Quadpacer is an interval timer that has a short beep and pause to remind you to brush the different sections of your mouth.
Depending on the brushing mode you have selected (see 'Brushing modes'), the
Quadpacer beeps at different intervals during the brushing cycle.
Activating or deactivating features
You can activate or deactivate the following features of your toothbrush:
- EasyStart
- Brush head replacement reminder
- Pressure sensor
To activate or deactivate these features, follow the instructions below:
EasyStart
1 Put the handle on the plugged-in charger.
2 Press and hold the power on/off button while the handle remains on the charger.
3 Keep the power on/off button pressed until you hear a single short beep (after 2 seconds).
4 Release the power on/off button.
- Triple tone of low-med-high means the EasyStart feature has been activated.
The brush head replacement light and battery light will also blink green 3 times in unison to confirm activation. - Triple tone of high-med-low means the EasyStart feature has been deactivated.
The brush head replacement light and battery light will also blink amber 3 times in unison to confirm deactivation.
Note: To achieve clinical efficacy, EasyStart needs to be deactivated.
Brush head replacement reminder
1 Put the handle on the plugged-in charger.
2 Press and hold the power on/off button while the handle remains on the charger.
3 Keep the power on/off button pressed until you hear a series of two short beeps (after 4-5 seconds).
4 Release the power on/off button.
- Triple tone of low-med-high means the Brush head replacement reminder feature has been activated. The brush head replacement light and battery light will also blink green 3 times in unison to confirm activation.
- Triple tone of high-med-low means the Brush head replacement reminder feature has been deactivated. The brush head replacement light and battery light will also blink amber 3 times in unison to confirm deactivation.
Pressure sensor
1 Put the handle on the plugged-in charger.
2 Press and hold the power on/off button while the handle remains on the charger.
3 Keep the power on/off button pressed until you hear a series of three short beeps (after 6-7 seconds).
4 Release the power on/off button.
- Triple tone of low-med-high means the pressure sensor feature has been activated. The brush head replacement light and battery light will also blink green 3 times in unison to confirm activation. - Triple tone of high-med-low means the pressure sensor feature has been deactivated. The brush head replacement light and battery light will also blink amber 3 times in unison to confirm deactivation.
If you continue holding the power on/off button after the three short beeps, the activate/deactivate sequence repeats.
Battery status and charging
1 Put the plug of the charger in an electrical outlet.
2 Place the handle on the charger.
- The charger will emit 2 short beeps to confirm that the handle is placed properly.
- The flashing light of the battery level indicator shows that the toothbrush is charging.
- When handle is fully charged on the charger, the battery light shows solid green for 30 seconds and switches off.
Note: Your toothbrush comes pre-charged for first use. After first use, charge for at least 24 hours.
Battery status (when handle is not on charger)
When removing the Philips Sonicare from the charger, the battery light at the bottom of the toothbrush will indicate the status of the battery life.
- Solid green LED: full battery
- Flashing green LED: medium battery
- Flashing amber LED and three beeps: low battery
- Flashing amber LED and five beeps: No brushing sessions left (charge toothbrush)
Cleaning
Note: Do not clean the brush head, handle or travel case in the dishwasher.
Toothbrush handle
natural_image
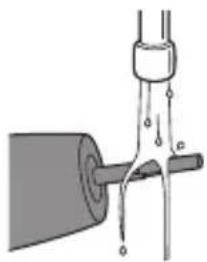
Diagram of a mechanical or electrical component with a cylindrical shaft and connecting rods (no text or symbols)1 Remove the brush head and rinse the metal shaft area with warm water. Make sure you remove any residual toothpaste.
Caution: Do not push on the rubber seal on the metal shaft with sharp objects, as this may cause damage.
2 Wipe the entire surface of the handle with a damp cloth.
Note: Do not use isopropyl rubbing alcohol, vinegar or bleach to clean handle as this may cause discoloration.
Brush head
natural_image
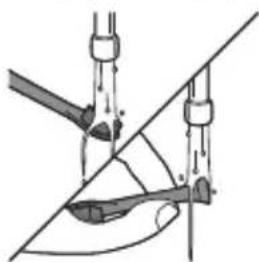
Diagram of a mechanical or electrical component with two arms and a curved base, no visible text or symbols1 Rinse the brush head and bristles after each use.
2 Remove the brush head from the handle and rinse the brush head connection with warm water at least once a week.
Charger
1 Unplug the charger before you clean it.
2 Wipe the surface of the charger with a damp cloth.
Storage
If you are not going to use your Philips Sonicare for an extended period of time,
unplug the charger from the wall socket, clean it and store it in a cool and dry place away from direct sunlight.
Locating the model number
Look on the bottom of the Philips Sonicare toothbrush handle for the model number (HX681x).
Disposal

text_image
RECYCLE RBRC 1.800.822.8837This appliance contains a rechargeable battery which must be disposed of properly. Contact your local town or city officials for battery disposal information. You can also call 1-800-8-BATTERY or visit www.rbrc.com for battery drop-off locations.
For assistance, visit our website www.philips.com/support or call 1-800-243-3050 toll free.
Removing the rechargeable battery
Warning: Only remove the rechargeable battery when you discard the appliance. Make sure the battery is completely empty when you remove it. Any attempt to remove the battery will void the warranty.
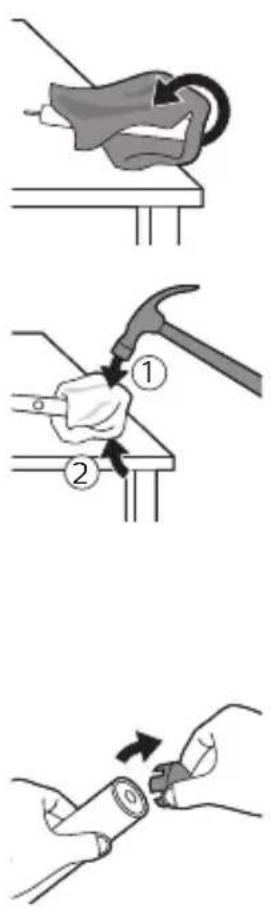
- To remove the rechargeable battery, you need a towel or cloth, a hammer and a flat-head (standard) screwdriver. Observe basic safety precautions when you follow the procedure outlined below. Be sure to protect your eyes, hands, fingers, and the surface on which you work.
1 To deplete the rechargeable battery of any charge, remove the handle from the charger, turn on the Philips Sonicare and let it run until it stops. Repeat this step until you can no longer turn on the Philips Sonicare.
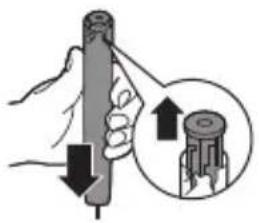
2 Remove and discard the brush head. Cover the entire handle with a towel or cloth.
3 Hold the top of the handle with one hand and strike the handle housing 0.5 inch above the bottom end. Strike firmly with a hammer on all 4 sides to eject the end cap.
Note: You may have to hit on the end several times to break the internal snap connections.
4 Remove the end cap from the toothbrush handle. If the end cap does not release easily from the housing, repeat step 3 until the end cap is released.
natural_image
Illustration of a hand holding a cylindrical object with arrows indicating direction, and an inset showing a mechanical component (no text or symbols)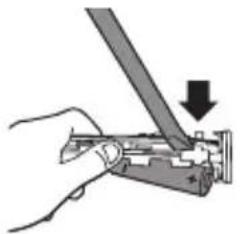
natural_image
Hand holding a mechanical component with a downward arrow indicating a process (no text or symbols present)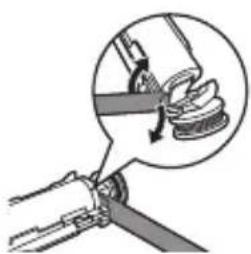
natural_image
Diagram of a mechanical assembly with a magnified inset showing a rotating component (no text or symbols)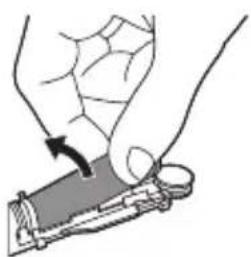
natural_image
Illustration of a hand holding a small object with an arrow indicating motion (no text or symbols)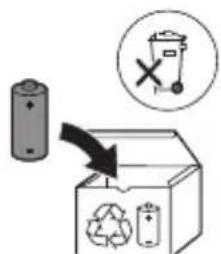
text_image
Diagram illustrating a battery recycling process with a magnified inset showing a trash bin and recycling symbol.5 Holding the handle upside down, press the shaft down on a hard surface. If the internal components do not easily release from the housing, repeat step 3 until the internal components are released.
6 Wedge the screwdriver between the battery and the black frame at the bottom of the internal components. Then pry the screwdriver away from the battery to break the bottom of the black frame.
7 Insert the screwdriver between the bottom of the battery and the black frame to break the metal tab connecting the battery to the green printed circuit board. This will release the bottom end of the battery from the frame.
8 Grab the battery and pull it away from the internal components to break the second metal battery tab.
Caution: Be aware of the sharp edges of the battery tabs so as to avoid injury to your fingers.
9 Cover the battery contacts with tape to prevent any electrical short from residual battery charge. The rechargeable battery can now be recycled and the rest of the product discarded appropriately.
Warranty and support
Philips warrants its products for two years after the date of purchase. Defects due to faulty materials and workmanship will be repaired or replaced at Philips' expense provided that convincing proof of purchase in the qualifying period is provided. Philips recommends use of genuine Sonicare brush heads for optimal performance. Use of other brush heads may damage your Sonicare toothbrush and limit your warranty protection.
Contact our Consumer Care Center at 1-800-682-7664 (North America), outside North America contact your local Philips
Consumer Care Center. Internet information:
www.sonicare.com (North America) or www.philips.com/support (outside North America).
WARRANTY EXCLUSIONS
What is not covered under warranty:
- Brush heads.
- Damage caused by use of unauthorized replacement parts or unauthorized brush heads.
- Damage caused by misuse, abuse, neglect, alterations or unauthorized repair.
- Normal wear and tear, including chips, scratches, abrasions, discoloration or fading.
IMPLIED WARRANTIES
ANY IMPLIED WARRANTIES, INCLUDING IMPLIED WARRANTIES OF MERCHANTABILITY
AND FITNESS FOR A PARTICULAR PURPOSE, SHALL BE LIMITED TO THE DURATION OF THE EXPRESS WARRANTIES SET FORTH ABOVE. IN SOME STATES LIMITATIONS ON DURATION OF IMPLIED WARRANTIES DO NOT APPLY.
LIMITATION OF REMEDIES
IN NO EVENT SHALL PHILIPS OR ANY OF ITS AFFILIATED OR SUBSIDIARY COMPANIES BE LIABLE FOR ANY SPECIAL, INCIDENTAL OR CONSEQUENTIAL DAMAGES BASED UPON BREACH OF WARRANTY, BREACH OF CONTRACT, NEGLIGENCE, TORT, OR ANY OTHER LEGAL THEORY. SUCH DAMAGES INCLUDE, WITHOUT LIMITATION, LOSS OF SAVINGS OR REVENUE; LOSS OF PROFIT; LOSS OF USE; THE CLAIMS OF THIRD PARTIES INCLUDING, WITHOUT LIMITATION, DENTISTS AND DENTAL HYGIENISTS; AND COST OF ANY SUBSTITUTE EQUIPMENT OR SERVICES. SOME STATES DO NOT ALLOW THE EXCLUSION OR LIMITATION OF INCIDENTAL OR CONSEQUENTIAL DAMAGES.
PRECAUCIONES IMPORTANTES
LEA TODAS LAS INSTRUCCIONES ANTES DE USARLO
natural_image
Illustration of a hand holding a toothbrush with a tool inserted, showing a downward arrow (no text or symbols)natural_image
Diagram of a funnel pouring liquid into a bulb (no text or symbols)3 Moje las cerdas.
natural_image
Illustration of a hand brushing a tooth with a toothbrush (no text or symbols)text_image
Diagram showing a hand pressing a button with an arrow and a power symbol, likely illustrating a manual press or control mechanism.natural_image
Illustration of dental tool manipulation with arrows indicating direction (no text or symbols)natural_image
Diagram of a mechanical component with arrows indicating motion or force direction (no text or symbols)text_image
① 30 sec. ② 30 sec.natural_image
Simple diagram with a starburst shape above a small rectangle, no text or symbols presentnatural_image
Diagram of a mechanical or fluidic device with a cylindrical shaft and connecting rod, showing fluid flow paths (no text or symbols)natural_image
Diagram of a mechanical or electrical component with no visible text, numbers, or symbolstext_image
RECYCLF RBRC 1.800.822.8837text_image
Diagram illustrating two steps of a tool application: adding a curved tool to form a workpiece, then using a hammer to apply the process.natural_image
Illustration of hands holding a battery with a close-up of its tip (no text or symbols)natural_image
Illustration of a hand holding a pen with a magnified inset showing the tip of a cylindrical object (no text or symbols)natural_image
Hand holding a tool with a downward arrow indicating a process (no text or symbols present)natural_image
Illustration showing two-step mechanical assembly: top shows hand tool with tool, bottom shows hand holding component (no text or symbols)text_image
Diagram illustrating a recycling process with a battery, recycling symbol, and labeled components including a 'X' symbol.GARANTÍAS IMPLÍCITAS
TODA GARANTÍA IMPLÍCITA, INCLUIDAS LAS GARANTÍAS IMPLÍCITAS DE COMERCIALIZACIÓN Y APTITUD PARA UN FIN
natural_image
Illustration of a hand holding a toothbrush with a tool inserted, showing a downward arrow (no text or symbols)natural_image
Diagram of a funnel pouring liquid into a bulb (no text or symbols)natural_image
Illustration of a hand using a toothbrush to apply or brush on a tooth (no text or symbols present)text_image
Diagram showing a hand pressing a button labeled 'Power' with an arrow indicating direction, likely illustrating a control or electrical operation.natural_image
Illustration of dental tool manipulation with arrows indicating direction (no text or symbols)natural_image
Diagram of a toothbrush applying force to a tooth (no text or symbols)flowchart
graph TD
    A["Top Loop"] --> B["Bottom Loop"]
    B --> C["Top Loop"]
    C --> D["Bottom Loop"]
    D --> E["Top Loop"]
    E --> F["Bottom Loop"]
    F --> G["Top Loop"]
    G --> H["Bottom Loop"]
    H --> I["Top Loop"]
    I --> J["Bottom Loop"]
    J --> K["Top Loop"]
    K --> L["Bottom Loop"]
    L --> M["Top Loop"]
    M --> N["Bottom Loop"]
    N --> O["Top Loop"]
    O --> P["Bottom Loop"]
    P --> Q["Top Loop"]
    Q --> R["Bottom Loop"]
    R --> S["Top Loop"]
    S --> T["Bottom Loop"]
    T --> U["Top Loop"]
    U --> V["Bottom Loop"]
    V --> W["Top Loop"]
    W --> X["Bottom Loop"]
    X --> Y["Top Loop"]
    Y --> Z["Bottom Loop"]
    Z --> AA["Top Loop"]
text_image
1 2 30 sec. 30 sec.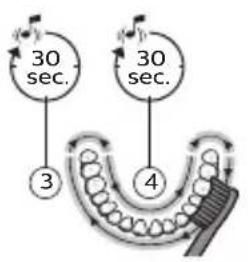
flowchart
graph TD
    A["3"] --> B["30 sec."]
    B --> C["4"]
    C --> D["30 sec."]
    D --> E["Music Icon"]
    style A fill:#f9f,stroke:#333
    style B fill:#ccf,stroke:#333
    style C fill:#cfc,stroke:#333
    style D fill:#fcc,stroke:#333
    style E fill:#ffc,stroke:#333
natural_image
Simple diagram with a starburst shape and a small oval shape below, no text or symbols present.natural_image
Diagram of a mechanical or fluidic device with a cylindrical shaft and connecting rod (no text or symbols)natural_image
Diagram of a mechanical clamp or hook assembly with no visible text or symbolsChargeur
text_image
RECYCLF RBRC 1.800.822.8837text_image
Diagram illustrating two steps of a hand tool application: adding a curved tool to form a workpiece, and using a hammer to adjust the component.natural_image
Illustration of hands holding a battery with a switch, no text or symbols presentnatural_image
Illustration of a hand holding a pen with arrows indicating force direction, and a magnified inset showing the same object (no text or symbols present)natural_image
Hand holding a tool with a downward arrow indicating a process (no text or symbols present)natural_image
Mechanical assembly diagram showing a lever mechanism with a magnified inset (no text or symbols)natural_image
Illustration of a hand holding a small electronic device with a circular component, no text or symbols presenttext_image
Diagram illustrating a recycling process with a battery, recycling symbol, and trash bin, accompanied by a warning icon.EXCLUSIONS DE GARANTIE
www.philips.com/Sonicare
©2017 Koninklijke Philips N.V. (KPNV). All rights reserved. Philips and the Philips shield are trademarks of KPNV. Sonicare and the Sonicare logo are trademarks of Philips Oral Healthcare, LLC and/or KPNV.
75% recycled paper
75% papier recyclé