BPT12-13H1 - Fan Canarm - Free user manual and instructions
Find the device manual for free BPT12-13H1 Canarm in PDF.


User questions about BPT12-13H1 Canarm
0 question about this device. Answer the ones you know or ask your own.
Ask a new question about this device
Download the instructions for your Fan in PDF format for free! Find your manual BPT12-13H1 - Canarm and take your electronic device back in hand. On this page are published all the documents necessary for the use of your device. BPT12-13H1 by Canarm.
USER MANUAL BPT12-13H1 Canarm
- This ventilation fan is approved for use over a bathtub or shower when installed in a GFCI protected circuit. Do not use unapproved fans over a bathtub or shower that does not include a GFCI protected circuit.
- Installation work must be carried out by a qualified person(s) in accordance with all local and safety codes including the rules for fire-rated construction.
- To reduce the risk of fire, always vent fans to the exterior and in compliance with local codes. Do not vent exhaust air into spaces within walls, ceilings, attics, crawl spaces, or garages.
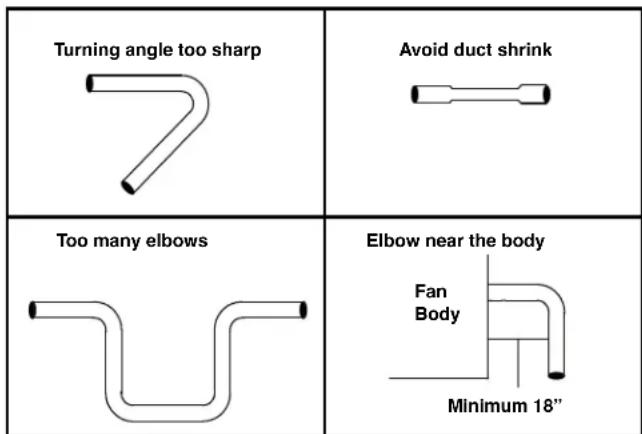
- Install ductwork in a straight line with minimal bends.
- Use 120V, 60Hz for the electrical supply and properly ground the unit. Follow all local safety and electrical codes.
- Do not use this fan with any solid state control device; such as a dimmer switch. Solid-state controls may cause harmonic distortion, which can cause a motor humming noise.
- Use this unit only in the manner intended by the manufacturer. If you have questions, contact the manufacturer.
- Before servicing or cleaning unit, switch power off at service panel and lock the service disconnecting means to prevent power from being switched on accidentally. When the service disconnecting means cannot be locked, securely fasten a prominent warning device, such as a tag, to the service panel.
- Sufficient air is needed for proper combustion and exhausting of gases through the flue (chimney) of fuel burning equipment to prevent back drafting. Follow the heating equipment manufacturer's guideline and safety standards such as those published by the National Fire Protection Association (NFPA), and the American Society for Heating, Refrigeration and Air Conditioning Engineers (ASHRAE), and the local code authorities.
- Not to be installed in a ceiling thermally insulated to a value greater than R40. (This is required for installation in Canada only).
PRE-INSTALLATION
When installing the ventilation fan in a new construction site, install the main body of the fan and duct work during the rough-in construction of the building. The grill should be installed after the finished ceiling is in place.
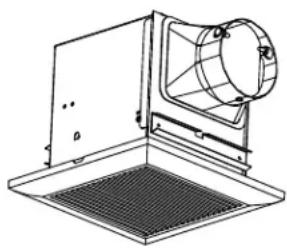
When installing in existing construction, use the dimensions shown below to determine the required hole size for the ceiling. Grill edges should overlap finished ceiling.
NOTE: If installing in existing construction, you must have access to space above and below the installation location.
If you are replacing an existing fan, ensure that the new grill will adequately cover the existing opening.
Do not install ventilation fan in areas where the duct work will require configurations shown right.
DIMENSIONS
BPT12-13H1
(For bathroom size up to 75 ft²)
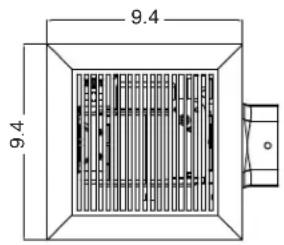
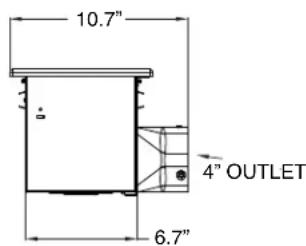
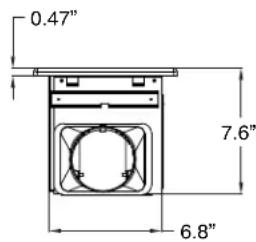
PRODUCT SPECIFICATIONS
| MODEL | DUCT DIAMETER | VOLTAGE | Hz | POWER CONSUMPTION | AIR DELIVERY @ 1" WG (CFM) | NOISE | WEIGHT |
| BPT12-13H1 | 4" | 120 | 60 | 17 WATTS | 70 | 1.5 SONES | 8.0 LBS |
BEFORE YOU BEGIN
- Carefully unpack and remove the unit from the carton.
- Check to make sure you have all components listed in the tables shown right and below.
- If any components are missing, please contact the manufacturer.
| ITEM PICTURE QUANTITY | ||
| Quick Connect | 3 | |
| Long Wood Screw (4 x 30mm) | 8 | |
| Screw (4 x 6mm) | 4 | |
| Bracket | 4 | |
| ITEM PICTURE QUANTITY | ||
| Fan Unit | 1 | |
| Spring Clips | 2 | |
| Grill | 1 | |
INSTALLATION INSTRUCTIONS

WARNING: TURN OFF ELECTRICITY AT BREAKER BOX BEFORE BEGINNING INSTALLATION
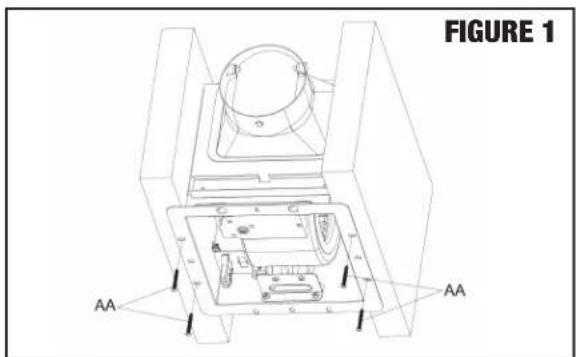
1. PREPARATION FOR MOUNTING (FIGURE 1)
Determine thickness of finished ceiling board (* measurement shown in FIGURE 1). Place fan unit body against ceiling joist in desired location. Ensure bottom of main body hangs down below joist to account for finished ceiling board.
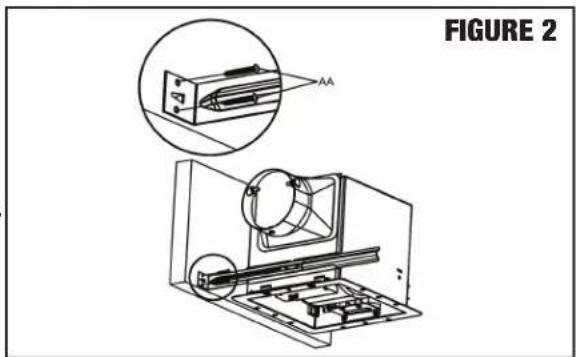
2. MOUNTING FAN BODY (FIGURE 2)
Use long wood screws to loosely attach both sides of main body to joist (right side shown). Ensure ventilation fan is level and that proper clearance is given for finished ceiling board. When main body is level and in the intended location, tighten screws on both right and left side of main body.
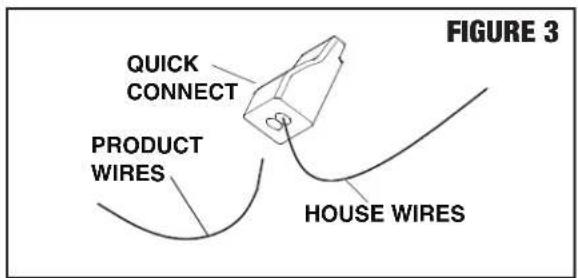
3. USING QUICK CONNECT (FIGURE 3)
WARNING: Wiring must comply with all applicable electrical codes.
Turn power OFF before removing or installing connectors.
WARNING: COPPER to COPPER ONLY. Do not use on Aluminum wire.
CAUTION: The Quick Connect accessory part should be installed as per instructions below.
NOTE: Connector is reusable on solid wires of the same wire gage or smaller. Do not reuse connector on stranded wires.
a) Strip the wires so half of the bare wire is showing.
b)Grip the wire firmly and push the stripped end of the wire into the open port of connector). Use only one stripped end of the wire per port.
c) Verify the stripped end of the wire is fully inserted to the back of the connector.
NOTE: Important wire information. Maximum temperature rating 105^ (221^) . 600 volts maximum for building wire and 1000 volts maximum in signs and lighting fixtures. Flammability rating of the wires must meet UL94-V2. The acceptable wire range includes: Solid: 12-20 AWG, Stranded: 12-16 AWG ( ≤ 19 STRAND); 18AWG (7 STRAND), Tin bonded: 14-18 AWG ( ≤ 19 STRAND).
INSTALLATION INSTRUCTIONS CONTINUED...
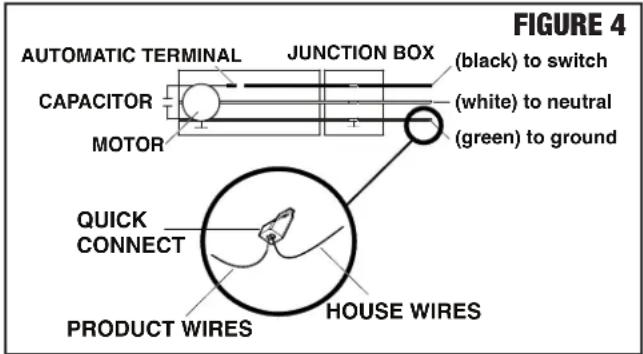
4. CONNECTING WIRING FROM UNIT TO HOUSE (FIGURE 4)
WARNING: Make sure that the main power is off.
WARNING: Failure to wire product correctly could result in electrical shock, fire hazards, or damage to the product. Consult a licensed electrician if you are unsure of your ability to correctly install wiring.
CAUTION: If your house wires do not match these colors, determine what each house wire represents before connecting. You may need to consult a licensed electrician to determine this safely.
a) Connect house wires to ventilation fan wires.
b) Match colors as shown (black to black, white to white, and green to green) using quick connects or wire nuts (not provided).
c) Replace the junction box cover. Do not pinch the lead wires.
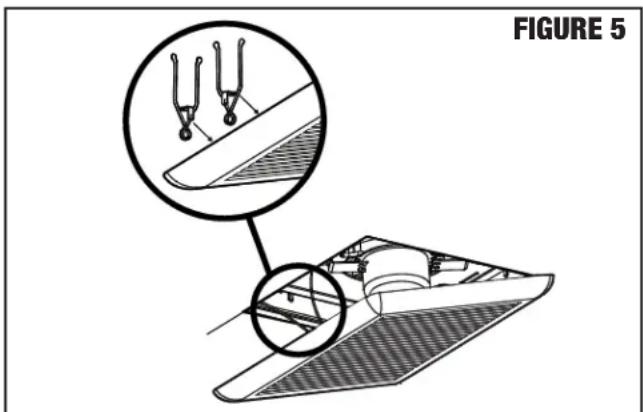
5. INSTALLING FAN GRILL (FIGURE 5)
a) Insert the mounting springs into the grill.
b)Squeeze mounting springs together, and insert into main body.
CLEANING
CAUTION: Do not use solvents, thinner or harsh chemicals for cleaning the fan.
CAUTION: Do not allow water to enter the motor.
CAUTION: Do not immerse resin parts in water over 140^ F (60^ C).
a) Before servicing or cleaning the unit, disconnect the power supply at the panel and lock to prevent the power from being turned on. If the panel cannot be locked, clearly mark the panel with a warning tag to prevent the power from being turned on.
b) Remove the grill by squeezing the springs and pulling the grill down.
c) Wash and clean the grill in a sink and dry with a cloth.
d) Remove dust and dirt from the fan housing with a vacuum cleaner.
e) Dampen a cloth with dish detergent, wipe the fan housing and dry with a cloth.
f) Replace the grill.
g) To reduce the risk of fire, always vent fans to the exterior and in compliance with local codes. Do not vent exhaust air into spaces within walls, ceilings, attics, crawl spaces, or garages.
h) Unplug or disconnect the appliance from the power supply before servicing.
WARRANTY
We guarantee this fan to be free of defects, in material and workmanship, for a period (1) one year, from date of purchase. During this period, we will, at our option repair or replace and defective product or part, which is returned freight prepaid to the nearest distributor. This warranty does not include any labour or transportation costs incidental to the removal or re-installation of the said products at the uner's premises. This warranty is void in the case of alteration, accident, abuse or operation not in accordance with the operation/ assembly instruction.
NOTE: Please DO NOT remove your cULus label as this will void the warranty. The cULus lable must be affixed to process warranty claims.
As a result of varying climatic conditions in our area, this warranty does not cover any changes in finishes, including rusting, pitting, corroding, tarnishing or peeling.
Installation or Product problems? Do not return to store of purchase. Contact Canarm Service at 1-800-265-1833 (CANADA), 1-800-267-4427 (U.S.A.), 1-800-567-2513 (EN FRANCAIS) Monday to Friday 8:00 - 5:00pm e.s.t. or visit www.canarmna.com
SUPPLEMENT SHEET
WARNING:
When cutting or drilling into wall or ceiling, do not damage electrical wiring and other hidden utilities. 1 CAUTION - For general ventilating use only. Do not use to exhaust hazardous or explosive materials and vapors.2
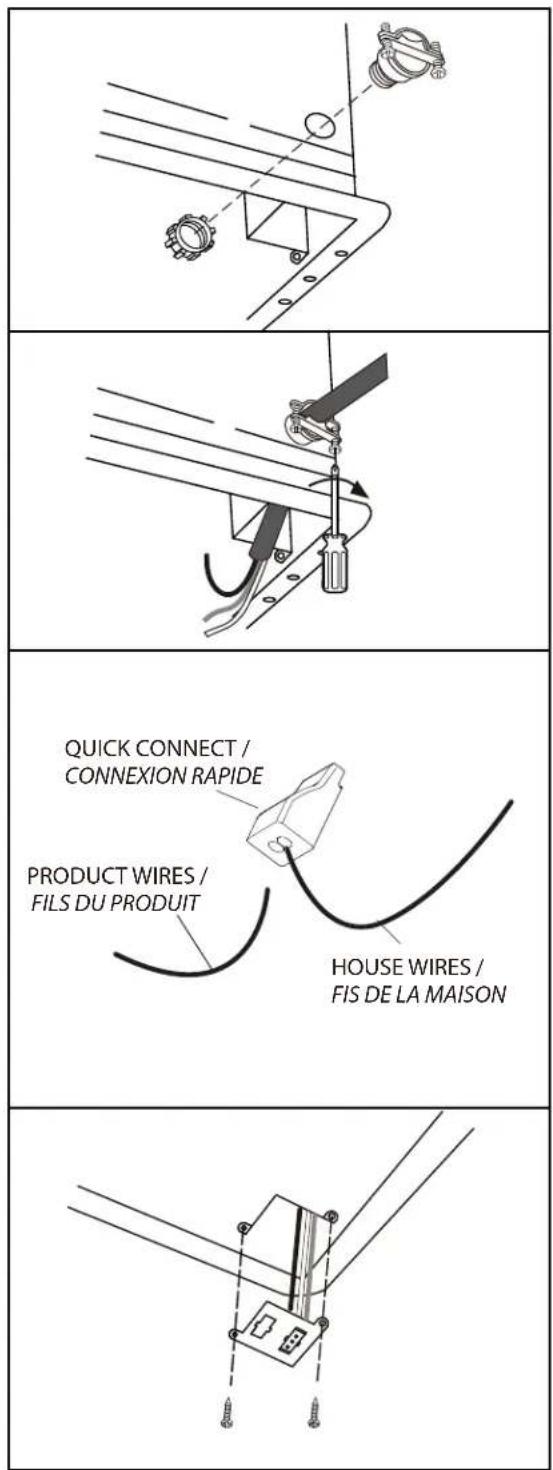
- Secure a UL recognized or listed wire coupling or strain relief (not included) through the knock-out or hole on the casing.
- Install the conduit or armoured cable through the wire coupling. Secure the cable by tightening the two screws on the wiring coupling.
- WARNING: Wiring must comply with all applicable electrical codes. Turnpower OFF before removing or installing connectors.
WARNING: COPPER to COPPER ONLY. Do not use on aluminum wire. CAUTION: the Quick Connect accessory part should be installed as per instructions below.
NOTE: Connector is reusable on solid wires of the same wire gage o smaller. Do not reuse connector on stranded wires. a) Grip the wire firmly and push the stripped end of the wire into the open port of connector. Use only one stripped end of the wire per port. b) Verify the stripped end of the wire is fully inserted to the back of the connector. - Secure the cover to the fixture by 2 screws.
VENTILATEUR DE SALLE DE BAIN
BPT12-13H1

CANARMNAC
MODE D'EMPLOI ET LIST DES PIECES LIRE ET GARDER CES INSTRUCTIONS
SECURITE GÉNÉRALE
MISE EN GARDE - POUR RÉDUIRE LES RISQUES D'INCENDIES, CHOQUES ÉLECTRIQUES OU BLESSURES, SUIVRE LES INDICATIONS :