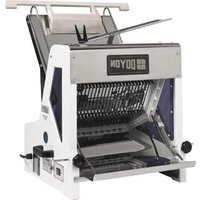
SM302A - Slicer Doyon - Free user manual and instructions
Find the device manual for free SM302A Doyon in PDF.


User questions about SM302A Doyon
0 question about this device. Answer the ones you know or ask your own.
Ask a new question about this device
Download the instructions for your Slicer in PDF format for free! Find your manual SM302A - Doyon and take your electronic device back in hand. On this page are published all the documents necessary for the use of your device. SM302A by Doyon.
USER MANUAL SM302A Doyon
IMPORTANT SAFETY INSTRUCTIONS
SAVE THESE INSTRUCTIONS
DANGER
TO REDUCE THE RISK OF FIRE OR ELECTRIC SHOCK,
CAREFULLY FOLLOW THESE INSTRUCTIONS
TABLE OF CONTENTS
DESCRIPTION PAGE
Installation and maintenance 1
Construction and shipping 2
Warnings 3
Installation and operation 4
Before calling for service - Answers to most frequent questions ..... 5
Slicer cleaning and maintenance 5
Slicer description and changing blades 6
For more information, please call our office 9
Dimensions 10
Component parts 13
Electric schematic - 120Volts 17
Warranty 19
SM302.DOC
REV. 06-2004
INSTALLATION AND MAINTENANCE MANUAL
The manufacturer suggests to read this manual carefully.
The bread slicer is manufactured with first quality materials by experienced technicians. Normal use and adequate maintenance will guarantee a reliable service for years to come.
The SM302 bread slicer is available in four different slice thickness (1/2, 5/8, 3/4 and 1 inch).
A nameplate fixed to the left side of the slicer specifies the serial number, model number, amperage, voltage and frequency.
Drawings, electrical diagrams and replacement part numbers are included in this manual.
ATTENTION
ÉQUIPMENT DOYON INC. is not responsible for damages to the property or the equipment caused by non certified personnel. The customer is responsible for finding a qualified electrician for the installation of the slicer.
CONSTRUCTION
You have now the most performant bread slicer on the market in its category. This bread slicer is manufactured using the highest quality components and materials.
SHIPPING
For your safety, this equipment has been verified by qualified technicians and carefully crated before shipment. The freight company takes full responsibility for the delivery of this equipment in good condition, by accepting to transport it.
IMPORTANT
RECEPTION OF THE MERCHANDISE
Take care to verify that the received equipment is not damaged before signing the delivery receipt. If damage or loss is noticed, write it clearly on the receipt and have the carrier sign it. If the damage is noticed after the carrier left, contact the freight company immediately so that they may inspect.
We do not take responsibility for damages or losses that may occur during transportation.
WARNING
FOR YOUR SAFETY
BEFORE USING THE BREAD SLICER, VERIFY THAT NOTHING OBSTRUCTS THE CHUTE BLADE AND TIGHTEN THE GUIDE ADJUSTMENT.
IMPORTANT
INSTALLATION AND SERVICE
A qualified technician must do servicing.
The bread slicer must be connected to the utility and electrically grounded in conformity to the effective local regulations. If these are not established, the oven must be connected according to the Canadian Electrical Code (CSA-C22.1-XX) or National Electrical Code (NFPA 70-XX). Refer to last edition year for XX.
INSTALLATION
IN GENERAL
Open the crate and remove all materials used for packing as well as the accessories.
Put the slicer on a stable table or counter and make sure the slicer is on level.
Each unit is set up to be used with the electrical supply specified on the nameplate fixed on the left side of the slicer.
To the electrician
The electrical supply installation must be in accordance with the electrical rating on the nameplate.
SLICER OPERATION
- Make sure there are no obstructions in the chute.
- Adjust the side and top guide a 1/2 inch from each side of the bread and a 1/2 inch from the top.
- Use only cold bread in the slicer.
- Start the slicer with the main switch on the left side.
- Put the bread in the chute and by using the wood bread presser exert pressure on the bread. When the bread comes out, remove it and put it on the bread support on the top of the slicer. Take a bag and insert over the support and bread; then remove them and close the bag.
WARNING
NEVER TRY TO PUSH OR PULL OUT THE BREAD WITH YOUR HANDS WHEN THE SLICER IS ON. ALWAYS DISCONNECT THE ELECTRIC CORD OR MAIN POWER BREAKER.
POWER FAILURE
When you have a power failure take care to switch off the slicer otherwise it start to work when the power comes back on.
BEFORE CALLING FOR SERVICE
ANSWERS TO MOST FREQUENT QUESTIONS
Always cut off the main power before replacing any parts.
| Questions Solutions | |
| The slicer does not turn on when powered. | Check if the electric cord is connected.Check the breaker of the building.Check the breaker on the side of the slicer.If the slicer is still not working, call a technician or us. |
| The slicer does not slice properly. | Make sure the bread is not hot.Check if the blade is clean.Check the guide adjustment.If the slicer still does not slice properly, change the blade. |
SLICER CLEANING AND MAINTENANCE
We recommend cleaning the slicer every day to prevent accumulation of bread pieces. Use a small vacuum to clean the breadcrumbs.
SLICER DESCRIPTION AND CHANGING BLADES
DESCRIPTION
Bread width: 15 inches max.
Bread height: 5 inches max.
Capacity: 240 breads per hour.
Bread slice thickness: 5/8 (optional: 1/2, 3/4 or 1 inch).
Length of the chute: 22 inches.
Motor: 1/4 Hp, 120 Volts, 60 Hz.
Weight: 200 pounds.
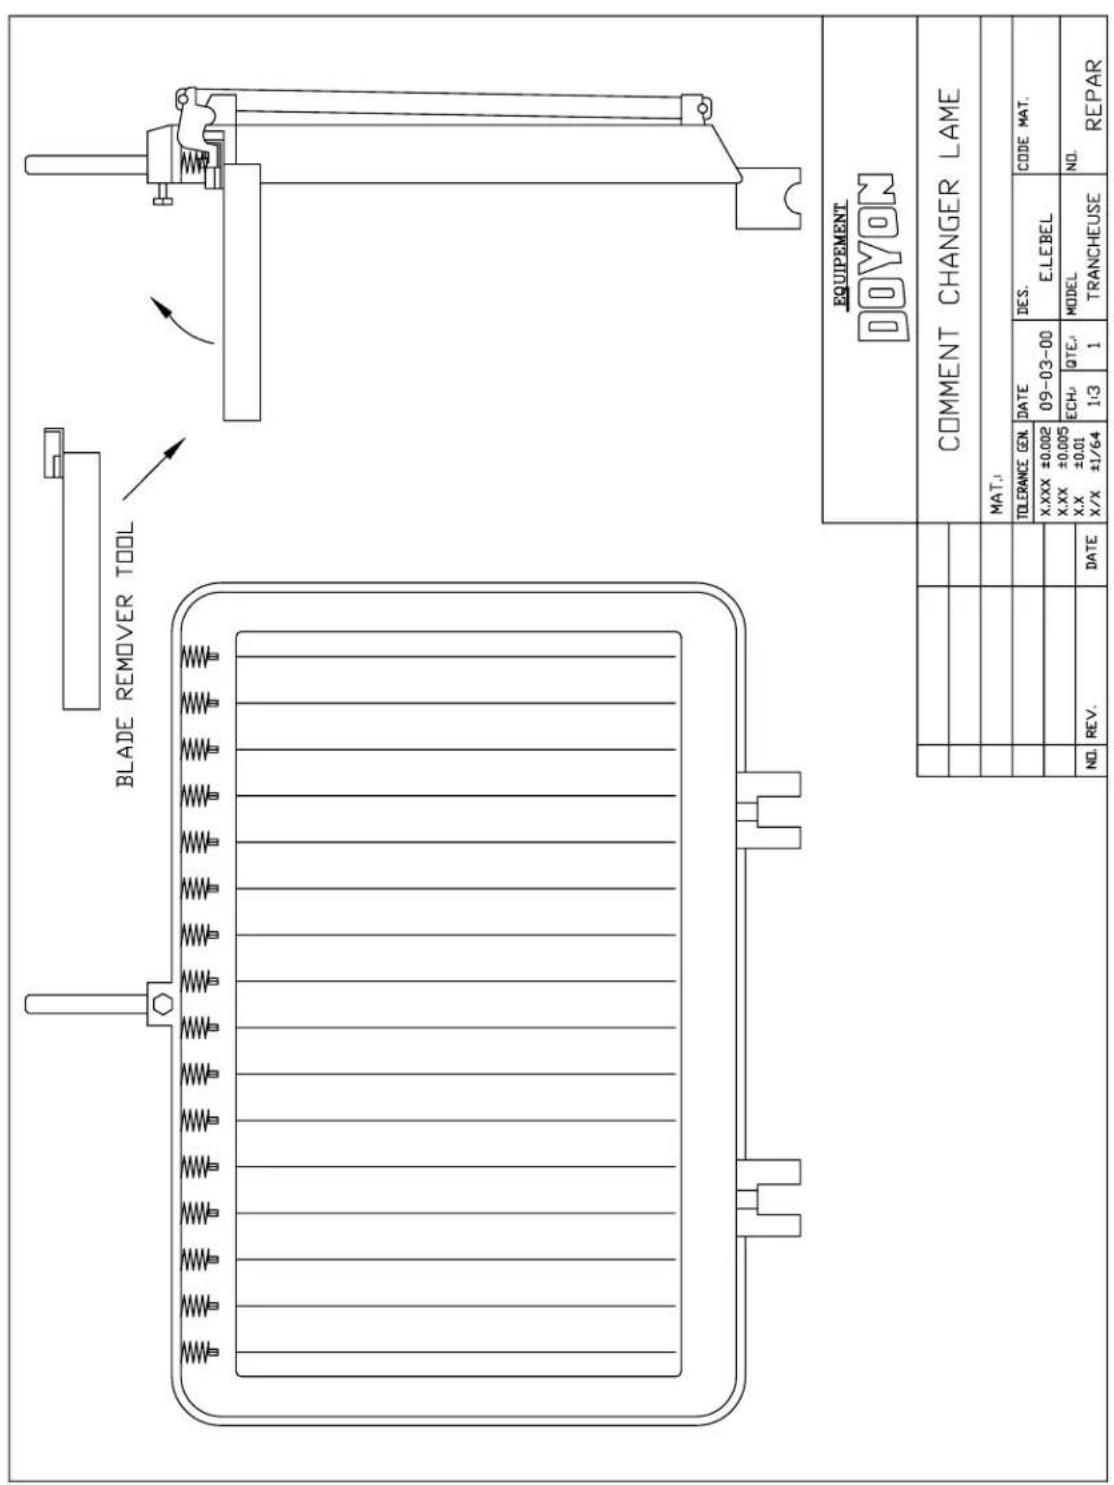
TO REMOVE THE BLADES
- Remove the top cover (9) and the guide (11).
- Remove the exit chute (10).
- Remove the support angle on each side of the chute (10) (10mm key).
- Unscrew bolt (31).
- Unscrew the bottom bolt on the blade frame.
- Turn the frame cam wheel (37 and 41) with the v belt.
- Use the special tool to remove the blades one by one.
TO INSTALL THE NEW BLADES
- Use the special tool to install the blades one by one.
- Install the blade frame (25 and 26) tighten the bottom bolt (31) and make sure the frames are aligned.
- Install the angle support on each side of the chute (10) (10mm key).
- Install the exit chute (10).
- Install the top cover (9) and the guide (11).
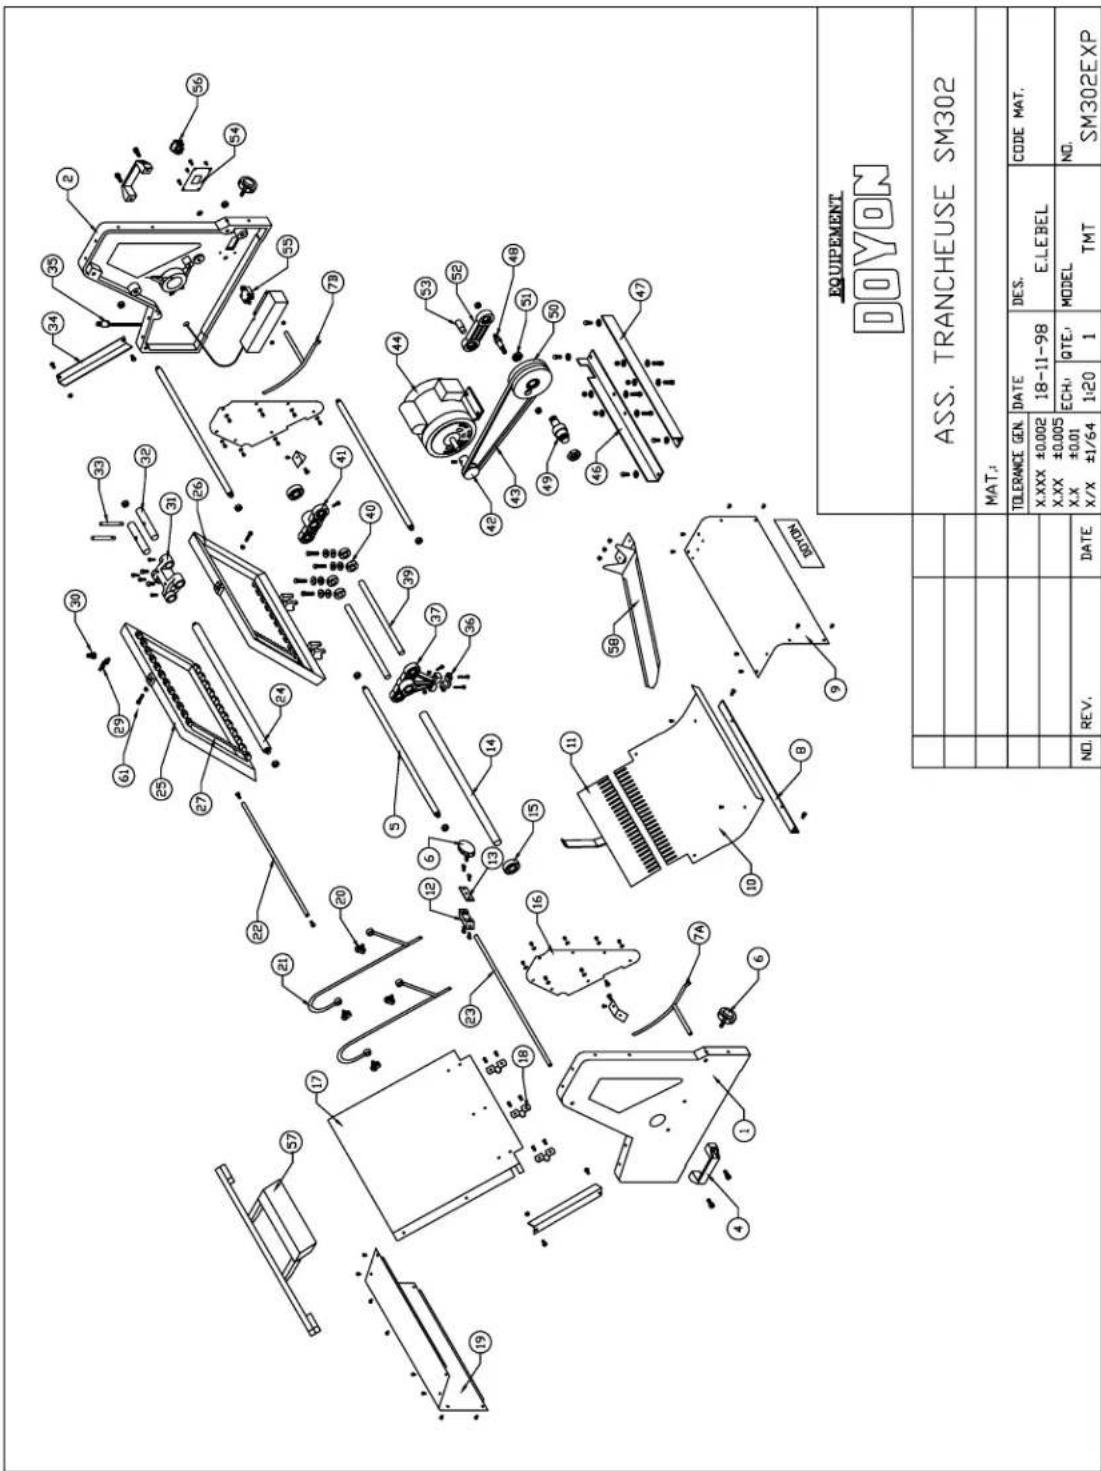
text_image
EQUIPEMENT DOYON ASS. TRANCHEUSE SM302 MAT. TOLERANCE GEN. DATE DES. 18-11-98 E.LEBEL CODE MAT. X.XXX ±0.002 X.XX ±0.005 X.X ±0.01 X/X ±1/64 ECH. QTE. MODEL 1:20 1 TMT NO. NO. REV. DATE SM302EXP| EQUIPEMENTDOYON | |||||||
| ASS. TRANCHEUSE SM302 | |||||||
| MAT.: | |||||||
| TOLERANCE GEN. | DATE18-11-98 | DES.E.LEBEL | CODE MAT. | ||||
| X.XXX ±0.002X.XX ±0.005X.X ±0.01X/X ±1/64 | ECH.1:20 | QTE.1 | MODELTMT | NO.SM302EXP | |||
| NO. | REV. | DATE | |||||
text_image
BLADE REMOVER TOOL EQUIPEMENT DOYON COMMENT CHANGER LAME MAT.: TOLERANCE GEN. X.XXX ±0.002 X.XX ±0.005 X.X ±0.01 X/X ±1/64 DATE 09-03-00 DES. E.LEBEL CODE MAT. ECH. QTE. 1:3 1 MODEL TRANCHEUSE NO. REPARFOR MORE INFORMATION, PLEASE CONTACT OUR OFFICE :
DOYON EQUIPMENT INC.
1255, rue Principale
Linière, QC, Canada G0M 1J0
Tel.: (418) 685-3431
text_image
N G L1 10 A. MAIN SWITCH L1 1/4hp MOTOR N| N | L1 | |
| 6AMPS | 6AMPS |
| 120 VOLTS 1 Ph. | 2 WIRES |
EQUIPEMENT
SM-302 120 V. 1 PH.
| DATE10-11-98 | DES.P. POIRIER | REV.#0 |
| SER: | MODELE | NO.SM302 |
LIMITED WARRANTY (Continental United States Of America And Canada Only)
Doyon Equipment Inc. guarantees to the original purchaser only that its product are free of defects in material and workmanship, under normal use.
This warranty does not cover any light bulbs, thermostat calibration or defects due to or resulting from handling, abuse, misuse, nor shall it extend to any unit from which the serial number has been removed or altered, or modifications made by unauthorized service personnel or damage by flood, fire or other acts of God. Nor will this warranty apply as regards to the immersion element damaged by hard water.
The extent of the manufacturer's obligation under this warranty shall be limited to the replacement or repair of defective parts within the warranty period. The decision of the acceptance of the warranty will be made by Doyon Equipment service department, which decision will be final.
The purchaser is responsible for having the equipment properly installed, operated under normal conditions with proper supervision and to perform periodic preventive maintenance.
If any parts are proven defective during the period of one year from date of purchase, Doyon Equipment Inc. hereby guarantees to replace, without charge, F.O.B. Linière, Quebec, Canada, such part or parts.
Doyon Equipment Inc will pay the reasonable labor charges in connection with the replacement parts occurring within one year from purchase date. Travel over 50 miles, holiday or overtime charges are not covered. After one year from purchase date, all labor and transportation charges in connection with replacement parts will be the purchaser's responsibility.
Doyon Equipment Inc. does hereby exclude and shall not be liable to purchaser for any consequential or incidental damages including, but not limited to, damages to property, damages for loss of use, loss of time, loss of profits or income, resulting from any breach or warranty.
In no case, shall this warranty apply outside Canada and continental United States unless the purchaser has a written agreement from Doyon Equipment Inc.
TRANCHEUSE À PAIN
SM-302
120 Volts
IMPORTANT INSTRUCTIONS DE SÉCURITÉ CONSERVEZ CE MANUEL D'INSTRUCTIONS
DANGER AFIN DE RÉDUIRE LES RISQUES D'INCENDIE OU D'ÉLECTROCUTION, SUIVRE CES INSTRUCTIONS AVEC SOIN.
TABLE DES MATIÈRES
DESCRIPTION PAGE
Installation et entretien .... 1
RÉCEPTION DE LA MARCHANDISE
POUR PLUS D'INFORMATIONS,
text_image
N G L1 10 A. MAIN SWITCH L1 1/4hp MOTOR N| N | L1 | |
| 6AMPS | 6AMPS |
| 120 VOLTS 1 Ph. | 2 WIRES |
EQUIPEMENT
| DOYON |
SM-302 120 V. 1 PH.
| DATE10-11-98 | DES.P. POIRIER | REV.#0 |
| SER: | MODELE | NO.SM302 |