
KK1430B - Fridge INVENTUM - Free user manual and instructions
Find the device manual for free KK1430B INVENTUM in PDF.

User questions about KK1430B INVENTUM
0 question about this device. Answer the ones you know or ask your own.
Ask a new question about this device
Download the instructions for your Fridge in PDF format for free! Find your manual KK1430B - INVENTUM and take your electronic device back in hand. On this page are published all the documents necessary for the use of your device. KK1430B by INVENTUM.
USER MANUAL KK1430B INVENTUM
natural_image
Black rectangular appliance with white trim and a small white lid (no visible text or symbols)Reversing the door opening page 3-5
- Safety instructions page 16
- Product description page 21
- Prior to first use page 22
- Use page 23
- Accessories page 23
- Tips page 24
- Cleaning & maintenance page 24
- Resolving failures yourself page 25 general terms and conditions of service and warranty page 49
Deutsch
reversing the door opening
DE FR
natural_image
Technical line drawing of a mechanical assembly with a tool and component (no text or symbols)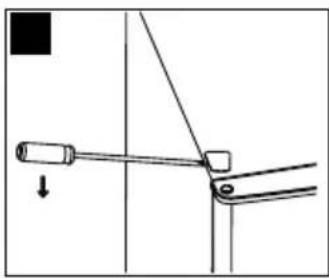
natural_image
Pure mechanical diagram showing a lever and pivot mechanism without any text or symbols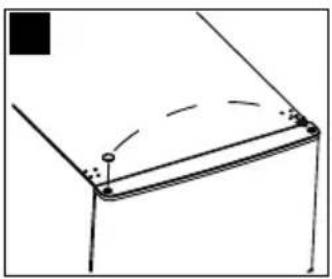
natural_image
Pure geometric diagram showing a corner joint with dashed lines and dots, no text or symbols present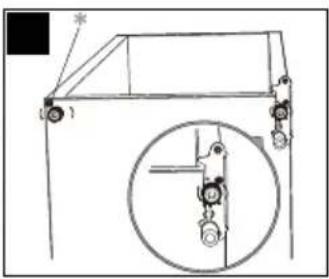
natural_image
Technical line drawing of a mechanical structure with a magnified inset showing a pulley system (no text or symbols)
natural_image
Mechanical component diagram showing two views of a valve mechanism with rotating shaft (no text or symbols)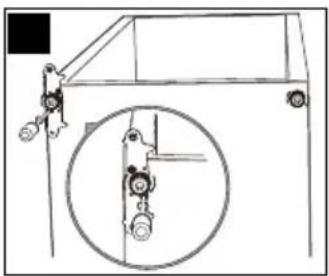
natural_image
Technical line drawing of a vehicle door frame with an inset circular component detail (no text or symbols)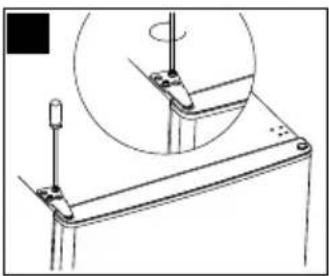
natural_image
Technical line drawing of a mechanical clamp or bracket assembly with a circular inset showing a rotating component (no text or symbols)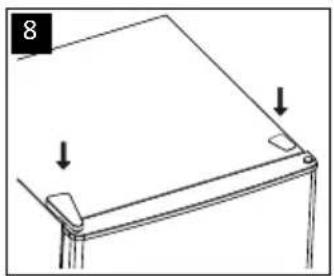
natural_image
Simple line drawing of a flat-panel object with two corner fasteners and arrows indicating side details (no text or symbols)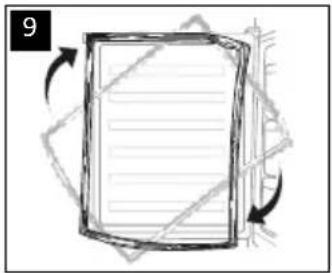
natural_image
Diagram of a document with arrows indicating rotation around it, no text or symbols presentreversing the door opening
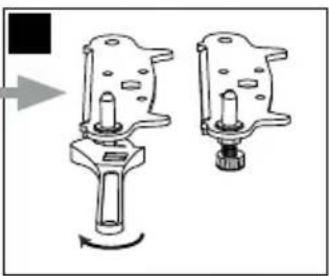
The door of the appliance can be opened on the right or left side. In order to reverse the door opening, please observe the instructions below. It would be best to do this with two people.
Attention: switch off the thermostat and remove the plug from the socket. Remove all items from the appliance before reversing the door opening.
- Remove the guard cover from the upper hinge and unscrew the screws from the hinge.
- Remove the left cover plate from the top.
- Move the cover cap from the left to the right side of the door. Carefully lift the door from the lower hinge and place it on a blanket or something similar to prevent scratches.
- Unscrew the screws from the lower hinge. Remove both adjustable feet.
* Caution: remove this screw when present.
5a. Screw the pen out of the lower hinge and turn the hinge around by 180 degrees.
5b. Then screw the pen back in the lower hinge. - Place the bracket at the lower hinge again. Attach both adjustable feet.
- Place the door against the appliance and make sure the bottom side is properly placed on the lower hinge. Make sure the door is straight in relation to the exterior of the appliance.
Place the upper hinge and screw tight. - Place the guard cover and cover plate.
- Carefully remove the door rubbers and rotate them 180^ before you attach them again.
Allow the appliance to rest for approx. 3 hours before inserting the plug in the socket.
4 gebruik
natural_image
Line drawing of a hand holding a shelf with a paper tab (no text or symbols)Verstelbare deurvakken
natural_image
Simple diagram of a container with two upward arrows inside, no text or symbols present6 tips
1 safety instructions
- Carefully and fully read the instruction manual prior to using the appliance and carefully store the manual for future reference.
- Only use this appliance for the purposes described in the instruction. The appliance is suitable for storing food.
- Only connect the appliance to alternate current, to an earthed wall socket, with a mains voltage that corresponds with the information provided on the information plate of the appliance.
- The appliance falls under protective class I and may only be used in combination with an earthed connection. The manufacturer is not liable for unsuitable operation and possible damage caused by unsuitable electric installations.
- Make sure that children are unable to play with the appliance, such as hide in it. This is dangerous.
- Keep the appliance out of reach of children. Children do not see the dangers when handling electrical appliances. Therefore, never allow children to work with electrical appliances without supervision. Keep the appliance and cord out of reach of children younger than 8 years of age.
- The appliance can be used by children of 8 years and older and persons with a limited physical, sensory or mental capacity or lack of experience or knowledge, provided they use the appliance under supervision or have been instructed about its safe use and understand the hazards involved.
- The appliance may not be cleaned or maintained by children, unless this is done under supervision.
- Do not locate multiple portable socket-outlets or portable power supplies at the rear of the appliance.
- Never bend the power cord sharply or allow it to run across hot parts.
- Make sure that the power supply cable does not get jammed during installation or is running along sharp edges.
- The connection point, socket and/or plug must always be accessible.
- Do not use the appliance if the plug, cord or appliance are damaged, or if the appliance no longer functions properly or if it is damaged in any other way. If this is the case, consult the shop or our technical service. Never replace the plug or cord yourself.
- The appliance must be moved and installed by two or more persons.
- When moving the appliance, do not lift it or pull the doors or handles.
- Be careful when moving the appliance to prevent the floor from getting damaged.
- During installation, do make sure the power cable is not damaged.
- Check that the appliance is not placed too close to a heat source.
- Do not place heat generating appliances such as (microwave) ovens on top of the appliance.
- In order to ensure proper ventilation, a free space of 10 cm should be maintained around the appliance.
• Install the appliance on a sturdy, flat and stable surface.
• Install the appliance in a dry and well ventilated room. The appliance is intended for use in a room where the ambient temperature falls within the applicable class, depending on the climate class found on the information plate on the back of the
- Never cover the ventilation openings.
- Do not store explosive or highly flammable substances in the appliance. The vapours could cause a fire hazard or an explosion.
- Do not store glass bottles or jars with liquids in the freezer, as they could break when frozen.
- Do not use mechanical, electrical or chemical agents to speed up the defrosting process.
- Repairs to electrical appliances should only be performed by skilled persons.
- Only use the appliance indoors.
- Always remove the plug from the socket when the appliance must be cleaned or repaired.
- Never use the appliance with parts that are not recommended or supplied by the manufacturer.
- Do not pull the cord and/or appliance to remove the plug from the wall socket. Never touch the plug with wet or moist hands.
| Climate class Ambient temperature |
| SN From 10°C to 32°C |
| N From 16°C to 32°C |
| ST From 16°C to 38°C |
| T From 16°C to 43°C |
- Be careful with ice cubes and ice pops. If these are consumed directly out of the freezer, there is a risk of frostbite.
- Never submerge the appliance, cord or plug in water.
- Never clean the appliance with a high pressure cleaner or steam cleaner.
- The appliance cannot be used with a timer or separate remote control.
-
This appliance is intended for household and similar use, such as:
-
in staff kitchens, shops, offices and other work environments;
- by guests of hotels, motels and other residential environments;
- in Bed&Breakfast type environments;
- farms.
- If the appliance is not used as intended, no compensation can be claimed in case of defects or accidents and the warranty will be invalidated.
Refrigerant
The refrigerant isobutene (R600a) is contained within the refrigerant circuit of the appliance, a natural gas with a high level of environmental compatibility, which is nevertheless flammable. During transportation and installation of the appliance, ensure that none of the components of the refrigerant circuit becomes damaged. The refrigerant (R600a) is flammable.
WARNING: Refrigerators contain refrigerant and gases in the insulation. Refrigerant and gases must be disposed of professionally as they may cause eye injuries or ignition. Ensure that tubing of the refrigerant circuit is not damage prior to proper disposal.

WARNING: Risk of fire/ flammable materials
If the refrigerant circuit should be damaged:
- Avoid open flames and sources of ignition.
- Thoroughly ventilate the room in which the appliance is situated. It is dangerous to alter the specifications or modify this product in any way. Any damage to the cord may cause a shortcircuit, fire, and/or electric shock.
INFORMATION ABOUT HOW TO AVOID FOOD CONTAMINATION
To avoid contamination of food, please respect the following instructions:
- Opening the door for long periods can cause significant increase of the temperature in the compartments of the appliance.
- Clean regularly surfaces that come in contact with food and accessible drainage systems.
• Store raw meat and fish in suitable containers in the appliance, so that it is not in contact with or drip onto other food. - Two-star frozen-food compartments are suitable for storing pre-frozen food, storing or making ice cream and making ice cubes
- One-, two- and three-star compartments are not suitable for the freezing of fresh food.
| Order Com | partments TYPE | Target storage temp. [°C] | Appropriate food |
| 1 Fridge +2 - | +8 Eggs, cooked food | d, packaged food, fruits | ts and vegetables, dairy products, cakes, drinks and other foods are not suitable for freezing. |
| 2 (***)*-Freezer | ≤-18 Seafood (fish, shrimp, shellfish), fresh water aquatic products and meat products (recommended for 3 months, the longer the storage time, the worst the taste and nutrition), suitable for frozen fresh food. | ||
| 3 ***-Freezer | ≤-18 Seafood (fish, shrimp, shellfish), fresh water aquatic products and meat products (recommended for 3 months, the longer the storage time, the worst the taste and nutrition), suitable for frozen fresh food. | ||
| 4 **-Freezer | ≤-12 Seafood (fish, shrimp, shellfish), fresh water aquatic products and meat products (recommended for 3 months, the longer the storage time, the worst the taste and nutrition), suitable for frozen fresh food. | ||
| 5 *-Freezer | ≤-6 Seafood (fish, shrimp, shellfish), fresh water aquatic products and meat products (recommended for 3 months, the longer the storage time, the worst the taste and nutrition), suitable for frozen fresh food. | ||
| 6 0-star -6 | 0 Fresh pork, beef, fish, chicken, some packaged processed foods, etc.(recommended to eat within the same day, preferably no more than 3 days). Partially encapsulated processed foods (non-freezable foods). | ||
| 7 Chill | -2 ~ +3 | Fresh/ frozen pork, beef, chicken, freshwater aquatic products, etc. (7 days below 0°C and above 0°C is recommended for consumption within that day, preferably no more than 2 days). Seafood (less than 0 for 15 days, it is not recommended to store above 0°C). | |
| 8 Fresh food | 0 ~ +4 | Fresh pork, beef, fish, chicken, cooked food, etc. (recommended to eat within the same day, preferably no more than 3 days). | |
| 9 Wine +5 ~ | +20 Red wine, white wine, sparkling wine, etc. | ||
NOTE:
Please store different foods according to the compartments or target storage temperature of your purchased products..
- If the refrigerating appliance is left empty for long periods, switch off. Defrost, clean and dry it and leave the door open to prevent mould developing within the appliance.
Water dispenser cleaning (special for water dispenser products):
- Clean water tanks if they have not been used for 48 h; flush the water system connected to a water supply if water has not been drawn for 5 days.
WARNING
- Food needs to be packed in bags and liquids in bottles or capped containers before putting into the appliance to avoid the problem that the inside of the appliance is not easy to clean.
ENVIRONMENTAL PROTECTION
The appliance is energy-efficient. Save even more energy when using the appliance with the following tips, and how to dispose of your appliance in an environmentally-friendly way.
Saving energy
- A high ambient temperature will have a negative effect on the energy consumption. Direct sunlight and other heat sources near the appliance also have a negative effect.
- Keep ventilation holes free. Covered and dirty holes cause a higher energy consumption. Ensure sufficient space around the appliance, so that a proper ventilation and air flow around the appliance is possible.
- Do not open the doors of the appliance more often than necessary and leave the doors open as briefly as possible.
• The distance between the shelves and the rear wall ensures a free air circulation. Do not place food against the rear wall. - Allow cooked food that you want to store in the appliance to cool down to room temperature before placing it in the appliance.
- A door rubber that does not close properly could increase the energy consumption.
- If the instructions are not observed, this could lead to a higher energy consumption.
Environmentally-friendly disposal
Recycling - WEEE
- Dispose of packaging in an environmentally-friendly manner.
- This appliance is labelled in accordance with European Directive 2012/19/EU concerning used electrical and electronic appliances (waste electrical and electronic equipment - WEEE). The guideline determines the framework for the return and recycling of used appliances as applicable throughout the EU.
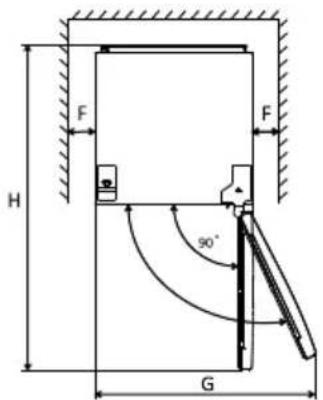
required space for placement
Ensure sufficient room to be able to open the door.
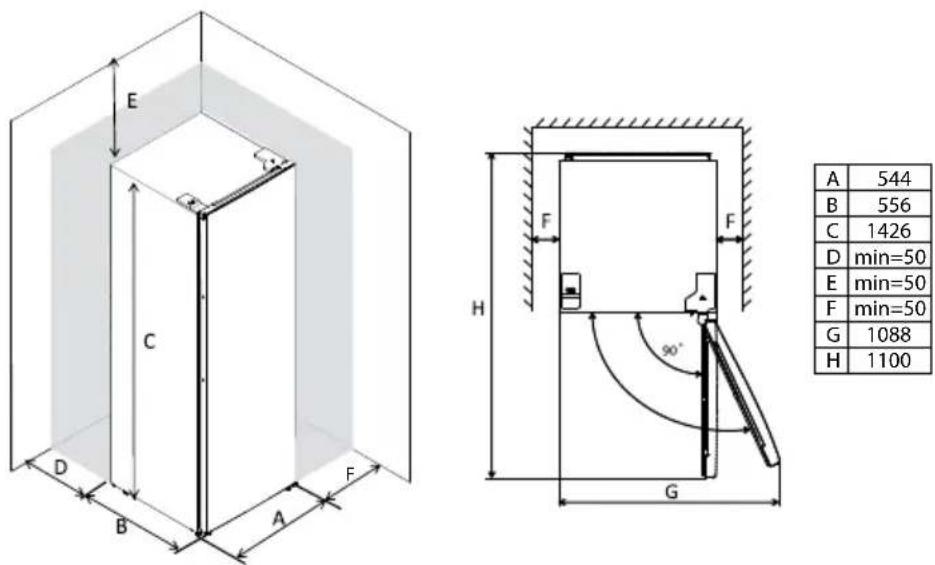
| A | 544 |
| B | 556 |
| C | 1426 |
| D | min=50 |
| E | min=50 |
| F | min=50 |
| G | 1088 |
| H | 1100 |
Caution: the appliance is not suitable for use as a built-in appliance.
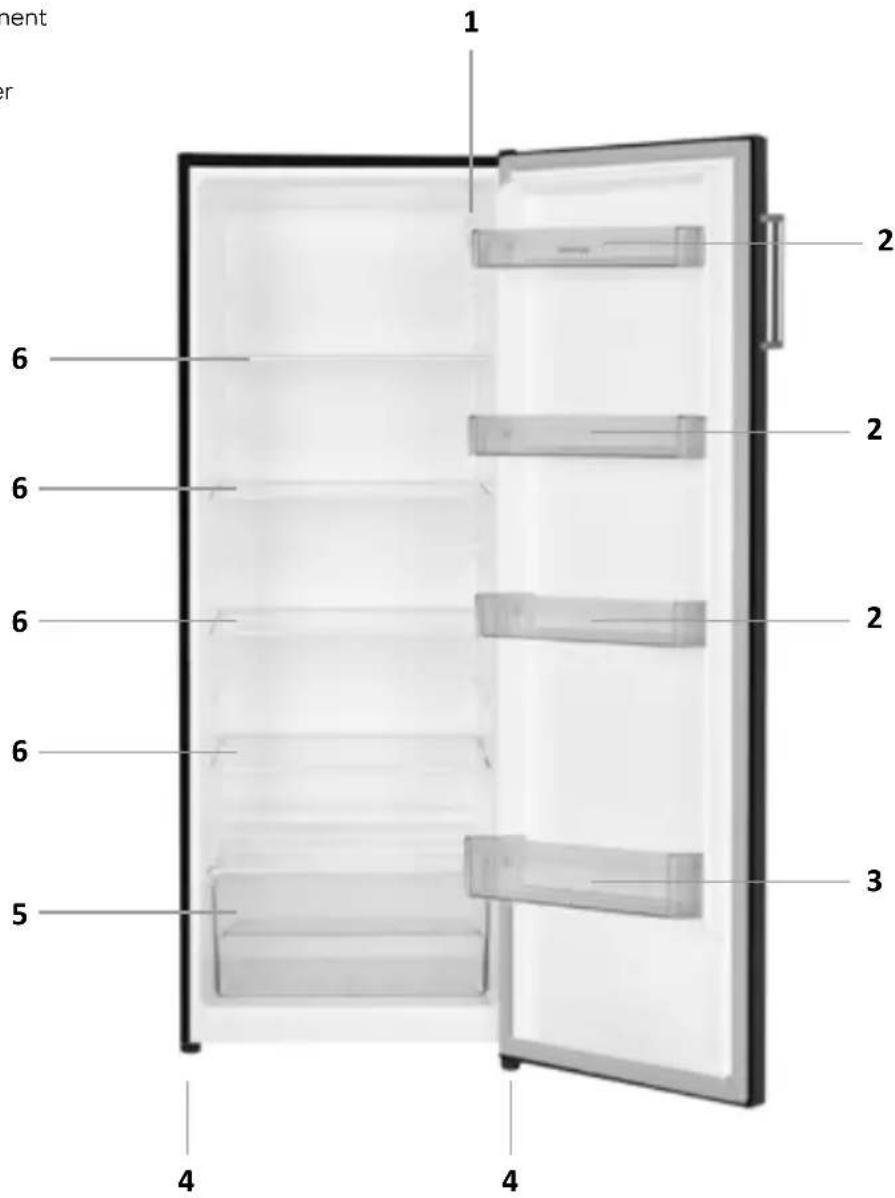
2 product description
- Thermostat with interior lighting
- Door compartment
- Bottle compartment
- Adjustable feet
- Vegetable drawer
- Glass shelf
3
prior to first use
Before using the appliance for the first time, you should proceed as follows: carefully unpack the appliance and remove all packaging material and any promotional stickers. Keep the packaging (plastic bags, polystyrene and cardboard) out of the reach of children. After unpacking the appliance, carefully check it for external damage that may have occurred during transport. Place the appliance on a sturdy, flat surface and make sure there is enough space all around for sufficient ventilation. A minimum space of 5 cm is required between the appliance and the surrounding walls. In this way the appliance is able to release heat properly, cool well and function in an energy efficient way.
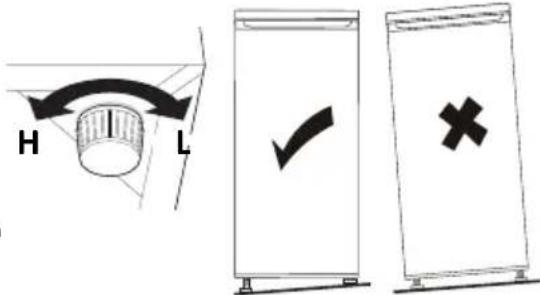
- You can use the adjustable feet to the left and right to level the appliance.
- Turn the adjustable feet clockwise to lower the appliance.
- Turn the adjustable feet counter-clockwise to raise the appliance.
Do not place the appliance near heat sources such as central heating or a stove. Do take note of the climate class of the appliance. When placed in a room that is too cold, the appliance will not function properly.
After placing the appliance, leave it for at least 3 hours before inserting the plug in the socket.
First clean the interior of the appliance. Use warm soapy water with, for instance, washing-up liquid, all-purpose cleaner or soda. Wipe the inside of the appliance after cleaning with clean water and properly wipe everything dry. Leave the appliance to dry for 1 to 2 hours.
Installing the door handle

4 use
The control unit of the appliance is located on the inside. Check that the thermostat is off [0]. Check that the voltage corresponds with the voltage stated on the information plate and insert the plug in the socket.
Adjusting the temperature
By means of the thermostat you are able to switch on the appliance and change the temperature in the appliance.
The possible positions of the thermostat:
0 no cooling, now power 1 least cooling 2-6 optimum temperature 7 most cooling
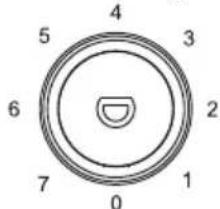
Set the temperature with the thermostat knob and select a position between 1 and 7. We recommend setting the appliance to position 3-4. The appliance will now cool continuously until the set temperature has been reached. Allow the appliance to reach the set temperature, before filling it with food. Usually this will take 2 to 3 hours. After that, you can set the thermostat to the required position and fill the appliance with food.
To switch off the appliance, set the thermostat to the [0] position and remove the plug from the socket.
Attention:
The ambient temperature, the frequency of opening the doors and the position of the appliance have an effect on the temperature in the appliance. Take this into account when setting the thermostat.
5 accessories
Adjustable glass shelves
The walls of the appliance are fitted with multiple guides allowing the glass shelves to be placed inside the appliance as desired.

natural_image
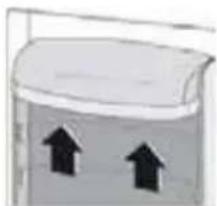
Line drawing of a hand holding a shelf with a paper tab (no text or symbols)Adjustable door compartments
To be able to place products of various sizes, the door compartments can be placed at different heights. To adjust this, proceed as follows: gradually pull the door compartment in the direction of the arrows until it releases and place it in the desired position.
natural_image
Simple diagram of a container with two upward arrows inside, no text or symbols present6 tips
- A high ambient temperature will have a negative effect on the energy consumption. Direct sunlight and other heat sources near the appliance also have a negative effect.
- Keep ventilation holes free. Covered and dirty holes cause a higher energy consumption. Ensure sufficient space around the appliance, so that a proper ventilation and air flow around the appliance is possible.
- Do not open the door of the appliance more often than necessary and leave the door open as briefly as possible.
- Set the thermostat to a lower setting if circumstances allow.
- Allow cooked food that you want to store in the appliance to cool down to room temperature before placing it in the appliance.
- Frost or ice will increase power consumption. Therefore, these should be removed regularly once they are 3 to 5 mm thick.
- A door rubber that does not close properly could increase the power consumption. Therefore, have it replaced by a skilled person in time.
- If the instructions are not observed, this could lead to a higher power consumption.
7 cleaning and maintenance
Before cleaning the appliance, switch it off by removing the plug from the socket.
Frost settles on the rear wall of the cooling compartment. It is removed automatically. During the defrosting, the condensate, which can contain contaminants may clog the water discharge opening. Should it occur, carefully unclog the water discharge opening with the cleaning plug.
- Remove the food from the appliance.
- The shelves, drawers and door trays can be removed from the appliance easily and washed by hand. These components may never be cleaned in the dishwasher.
- Clean the inside of the appliance. Use warm soapy water with a neutral cleaning agent to prevent nasty smells.
- Wipe the inside of the appliance after cleaning with clean water and properly wipe everything dry.
- Leave the appliance to dry for 1 to 2 hours.
For areas in the appliance that are difficult to clean, such as small openings or corners, it is recommended wiping them clean regularly with a soft cloth or brush. If necessary, a tool can be used, such as thin sticks (cocktail sticks, for example), to make sure no contamination can occur in these areas.
Clean the outside of the appliance and the door rubber with a soft damp cloth.
Clean the back of the appliance and the surface on which it stands at least once a year with a vacuum cleaner, so that the ventilation holes remain clean and the appliance is able to function as well and energy efficient as possible.
Do not use hard brushes, steel wool, abrasives (such as toothpaste), organic solvents (such as alcohol, acetone, oil, etc.), boiling water, acid or alkaline product to clean the appliance, as this could damage the surface or interior of the appliance. Boiling water and benzene could deform or damage plastic components.
| Breakdown Cause Solution | ||
| The appliance no longer works | The thermostat knob is on [0]. Set the thermostat to a position between 1 and 7 to switch on the appliance. | |
| The plug is not in the socket. Insert the plug into the socket. | ||
| Temperature in the appliance is too high or too low | Wrong setting of the thermostat. Turn the thermostat to a different position. | |
| The door of the appliance is opened too frequently or remains open for too long. | Open the door less often and/or reduce the time that the door remains open. | |
| A large amount of warm food has been placed in the appliance in the last 24 hours. | Temporarily set the thermostat to a lower position. | |
| The ambient temperature is higher or lower than the temperature indicated in the table with technical data. | The appliance is intended for operation in an ambient temperature indicated in the table with technical data supplied with the appliance. | |
| The appliance is located in direct sunlight or near a heat source. | Change the location of the appliance according to the instructions in the instruction manual. | |
| There is water in the lower section of the appliance. | The opening of the defrost water drain is clogged. | Clean the opening of the defrost water drain by means of the skewer. |
| Unusual or loud noises | The appliance is not level and stable. Level the appliance with the adjustable feet. | |
| The appliance is standing against something. | Place the appliance in such a way that it is not standing against anything. | |
| The side of the appliance is very warm | The condenser is located at the side of the appliance. | It is normal for the exterior to become warm. |
During normal use of the cooling appliance, different types of noises can occur that do not have any effect on the correct operation of the appliance.
Noises that can be heard during normal use of the appliance are caused by the operation of the thermostat, compressor (activation), cooling system (shrinkage and expansion of the material under the influence of temperature differences and flow of cooling liquid).
If the door opening must be reversed, please observe the instructions on pages 3-5.
| A | 544 |
| B | 556 |
| C | 1426 |
| D | min=50 |
| E | min=50 |
| F | min=50 |
| G | 1088 |
| H | 1100 |
4 Verwendung
natural_image
Line drawing of a hand holding a shelf with a small object on top (no text or symbols)natural_image
Simple diagram of a container with two upward arrows inside, no text or symbols present.6
Tipps
4 utilisation
natural_image
Line drawing of a hand holding a shelf with a tool, no text or symbols presentnatural_image
Simple diagram of a container with two upward-pointing arrows inside, no text or symbols present.6
conseils
General terms and conditions of service and warranty
5-year Inventum warranty!
- Customers enjoy a 5-year full manufacturer's warranty on all Inventum products.
- Within this period, a defective product or part, which makes normal functioning of the product or part impossible, will always be repaired free of charge or, if repair is not possible and/or does not provide a solution, replaced (by the same or equivalent product). The assessment of this lies with Inventum.
- In order to make a claim under the 5-year Inventum warranty you must, within two months after discovering the fault or defect, either return the product to the shop where you bought it, or contact the Inventum customer service department by using the form at www.inventum.eu/service.
- The warranty period starts from the date stated on the product's original sales receipt.
- To invoke the warranty, you must always send a copy of the original proof of purchase with the service request and present the original proof of purchase to the service technician.
- The 5-year warranty applies only to normal domestic use of Inventum products within the Netherlands.
Warranty exclusions
- The 5-year Inventum guarantee does not apply in case of: normal wear and tear, consumables, improper use, insufficient or incorrect maintenance, incorrect and/or inexpert assembly and installation of the appliance, repairs by unauthorised third parties, business or commercial use, missing serial number, damage caused by an external cause. This enumeration is not exhaustive.
- B-choice products and products that have been built-in in a showroom are not covered by the 5-year Inventum warranty. All optical damage such as dents, scratches and slight traces of use are excluded from any warranty.
Reporting malfunctions on Inventum products
- Faults or defects on Inventum products can be reported by using the service request form on the website www.inventum.eu/service or through the seller of the product.
- A copy of the original proof of purchase must be included with the request.
- Inventum's service department determines whether the product will be repaired or replaced, based on the request and the sales receipt.
Important to know
- Products sent without prior notification will not be accepted. Further to the notification you will be informed by Inventum whether a warranty applies and whether you must return the product.
- The replacement or repair of a defective product, or a part thereof, does not lead to an extension of the original warranty period.
- Products eligible for replacement or repair must be emptied and clean.
For a detailed explanation of the warranty conditions and items excluded from them, please visit Inventum's website www.inventum.eu/algemene-voorwaarden
These general warranty and service conditions apply to Inventum brand products purchased after 27 April 2022 and intended for use within the Netherlands.
For Inventum products used outside the Netherlands, but within a EU Member State, the warranty rules of that country apply. Inventum provides warranty and service by a white goods technician only in the Netherlands.
As a consumer, you are entitled by law to a properly working product. Does the product break down sooner than you might expect? This means that the product is not in conformity. In that case, the law offers you, the buyer, with a number of legal remedies for your protection. This legal protection is not affected by the above commercial warranty given by Inventum on Inventum products used within the Netherlands.
Modifications and errors reserved
facebook.com/inventum1908
pinterest.com/inventum1908
youtube.com/inventum1908
instagram.com/inventum1908


- Reversing the door opening page 3-5
- Deutsch
- DE FR
- reversing the door opening
- gebruik
- Verstelbare deurvakken
- tips
- safety instructions
- Refrigerant
- WARNING: Risk of fire/ flammable materials
- INFORMATION ABOUT HOW TO AVOID FOOD CONTAMINATION
- NOTE:
- WARNING
- ENVIRONMENTAL PROTECTION
- Saving energy
- Environmentally-friendly disposal
- Recycling - WEEE
- required space for placement
- product description
- 3
- prior to first use
- use
- Adjusting the temperature
- Attention:
- accessories
- Adjustable glass shelves
- Adjustable door compartments
- cleaning and maintenance
- Verwendung
- 6
- Tipps
- utilisation
- conseils
- General terms and conditions of service and warranty
- 5-year Inventum warranty!
- Warranty exclusions
- Reporting malfunctions on Inventum products
- Important to know
Brand : INVENTUM
Model : KK1430B
Category : Fridge