
Warp 7 - Audio Amplifier HUGHES & KETTNER - Free user manual and instructions
Find the device manual for free Warp 7 HUGHES & KETTNER in PDF.

User questions about Warp 7 HUGHES & KETTNER
0 question about this device. Answer the ones you know or ask your own.
Ask a new question about this device
Download the instructions for your Audio Amplifier in PDF format for free! Find your manual Warp 7 - HUGHES & KETTNER and take your electronic device back in hand. On this page are published all the documents necessary for the use of your device. Warp 7 by HUGHES & KETTNER.
USER MANUAL Warp 7 HUGHES & KETTNER
text_image
INPUT VOLUME BASS MD TREBLE CLEAN WARP GAIN MASTER BASS MD TREBLE PRESENCE FX SIND FX RETURN SWITCH PHONES POWER WFARIP 7MANUAL
2.0
IMPORTANT SAFETY INSTRUCTIONS BEFORE CONNECTING, READ INSTRUCTIONS
- Read all of these instructions!
- Save these Instructions for later use!
- Follow all warnings and instructions marked on the product!
- Do not use this product near water, i.e. bathtub, sink, swimming pool, wet basement, etc.
- Do not place this product on an unstable cart, stand or table. The product may fall, causing serious damage to the product or to persons!
- Slots and openings in the cabinet and the back or bottom are provided for ventilation; to ensure reliable operation of the product and to protect it from overheating, these openings must not be blocked or covered. This product should not be placed in a built-in installation unless proper ventilation is provided.
- This product should not be placed near a source of heat such as a stove, radiator, or another heat producing amplifier.
- Use only the supplied power supply or power cord. If you are not sure of the type of power available, consult your dealer or local power company.
- Do not allow anything to rest on the power cord. Do not locate this product where persons will walk on the cord.
- Never break off the ground pin on the power supply cord.
- Power supply cords should always be handled carefully. Periodically check cords for cuts or sign of stress, especially at the plug and the point where the cord exits the unit.
- The power supply cord should be unplugged when the unit is to be unused for long periods of time.
- If this product is to be mounted in an equipment rack, rear support should be provided.
- This product should be used only with a cart or stand that is recommended by Hughes & Kettner.
- Never push objects of any kind into this product through cabinet slots as they may touch dangerous voltage points or short out parts that could result in risk of fire or electric shock. Never spill liquid of any kind on the product.
- Do not attempt to service this product yourself, as opening or removing covers may expose you to dangerous voltage points or other risks. Refer all servicing to qualified service personnel.
- Unplug this product from the wall outlet and refer servicing to qualified service personnel under the following conditions:
- When the power cord or plug is damaged or frayed.
- If liquid has been spilled into the product.
- If the product has been exposed to rain or water.
- If the product does not operate normally when the operating instructions are followed.
- If the product has been dropped or the cabinet has been damaged.
- If the product exhibits a distinct change in performance, indicating a need of service!
- Adjust only these controls that are covered by the operating instructions since improper adjustment of other controls may result in damage and will often require extensive work by a qualified technician to restore the product to normal operation.
- Exposure to extremely high noise levels may cause a permanent hearing loss.
- Individuals vary considerably in susceptibility to noise induced hearing loss, but nearly everyone will lose some hearing if exposed to sufficiently intense noise for a sufficient time. The U.S. Government's Occupational Safety and Health Administration (OSHA) has specified the following permissible noise level exposures:
| Duration Per Day In Hours | Sound LeveldBA, Slow Response |
| 8 | 90 |
| 6 | 92 |
| 4 | 95 |
| 3 | 97 |
| 2 100 | |
| 1^1/_2 | 102 |
| 1 105 | |
| 1/2 | 110 |
| ^1/_4 or less 115 |
- According to OSHA, any exposure in excess of the above permissible limits could result in some hearing loss.
- Ear plug protectors in the ear canals or over the ears must be worn when operating this amplification system. In order to prevent a permanent hearing loss if exposure is in excess of the limits as set forth above. To ensure against potentially dangerous exposure to high sound pressure levels, it is recommended that all persons exposed to equipment capable of producing high sound pressure levels such as this amplification system be protected by hearing protectors while this unit is in operation.
- Fuses: For continued protection against risk of fire, replace fuses only with the same type and ratings.
TO PREVENT THE RISK OF FIRE AND SHOCK HAZARD, DO NOT EXPOSE THIS APPLIANCE TO MOISTURE OR RAIN. DO NOT OPEN CASE; NO USER SERVICE-ABLE PARTS INSIDE. REFER SERVICING TO QUALIFIED SERVICE PERSONNEL.
PLEASE READ BEFORE USE AND KEEP FOR LATER USE!
- The unit has been built by Hughes & Kettner in accordance with IEC 60065 and left the factory in safe working order. To maintain this condition and ensure non-risk operation, the user must follow the advice and warning comments found in the operating instructions. The unit conforms to Protection Class 1 (protectively earthed).
- HUGHES & KETTNER ONLY GUARANTEE THE SAFETY, RELIABILITY AND EFFICIENCY OF THE UNIT IF:
- Assembly, extension, re-adjustment, modifications or repairs are carried out by Hughes & Kettner or by persons authorized to do so.
- The electrical installation of the relevant area complies with the requirements of IEC (ANSI) specifications.
- The unit is used in accordance with the operating instructions.
- The unit is regularly checked and tested for electrical safety by a competent technician.
WARNING:
- If covers are opened or sections of casing are removed, except where this can be done manually, live parts can become exposed.
- If it is necessary to open the unit this must be isolated from all power sources. Please take this into account before carrying out adjustments, maintenance, repairs and before replacing parts.
- Adjustment, maintenance and repairs carried out when the unit has been opened and is still live may only be performed by specialist personnel who are authorized by the manufacturer (In accordance with VBG 4) and who are aware of the associated hazards.
- Loudspeaker outputs which have the IEC 417/5036 symbol (Diagram 1, below) can carry voltages which are hazardous if they are made contact with. Before the unit is switched on, the loudspeaker should therefore only be connected using the lead recommended by the manufacturer.
- Where possible, all plugs on connection cables must be screwed or locked onto the casing.
- Replace fuses using only those of the specified type and current rating.
- It is not permitted to use repaired fuses or to short-circuit the fuse holder.
- Never interrupt the protective conductor connection.
- Surfaces which are equipped with the „HOT" mark (Diagram 2, below), rear panels or covers with cooling slits, cooling bodies and their covers, as well as tubes and their covers are purposely designed to dissipate high temperatures and should therefore not be touched.
- High loudspeaker levels can cause permanent hearing damage. You should therefore avoid the direct vicinity of loudspeakers operating at high levels. Wear hearing protection if continuously exposed to high levels.
MAINS CONNECTION:
- The unit is designed for continuous operation.
- The set operating voltage must match the local mains supply voltage.
- Caution: The unit mains switch must be in position '0' before the mains cable is connected.
- The unit is connected to the mains via the supplied power unit or power cable.
- Power unit: Never use a damaged connection lead. Any damage must be rectified by a competent technician.
- Avoid connection to the mains supply in distributor boxes together with several other power consumers.
- The plug socket for the power supply must be positioned near the unit and must be easily accessible.
PLACE OF INSTALLATION:
- The unit should stand only on a clean, horizontal working surface.
- The unit must not be exposed to vibrations during operation.
- Keep away from moisture and dust where possible.
- Do not place the unit near water, baths, wash basins, kitchen sinks, wet areas, swimming pools or damp rooms. Do not place objects containing liquid on the unit - vases, glasses, bottles etc.
- Ensure that the unit is well ventilated.
- Any ventilation openings must never be blocked or covered. The unit must be positioned at least 20 cm away from walls. The unit may only be fitted in a rack if adequate ventilation is ensured and if the manufacturer's installation instructions are followed.
- Keep away from direct sunlight and the immediate vicinity of heating elements and radiant heaters or similar devices.
- If the unit is suddenly moved from a cold to a warm location, condensation can form inside it. This must be taken into account particularly in the case of tube units. Before switching on, wait until the unit has reached room temperature.
- Accessories: Do not place the unit on an unsteady trolley, stand, tripod, base or table. If the unit falls down, it can cause personal injury and itself become damaged. Use the unit only with the trolley, rack stand, tripod or base recommended by the manufacturer or purchased together with the unit. When setting the unit up, all the manufacturer's Instructions must be followed and the setup accessories recommended by the manufacturer must be used. Any combination of unit and stand must be moved carefully. A sudden stop, excessive use of force and uneven floors can cause the combination of unit and stand to tip over.
- Additional equipment: Never use additional equipment which has not been recommended by the manufacturer as this can cause accidents.
- To protect the unit during bad weather or when left unattended for prolonged periods, the mains plug should be disconnected. This prevents the unit being damaged by lightning and power surges in the AC mains supply.
Diagram


CONSEILS DE SECURITE IMPORTANTS!
PRIERE DE LIRE AVANT L'EMPLOI ET A CONSERVER POUR UTILISATION ULTERIEURE!
21st century metal is all about detuned guitars, ponderous & ominous riffs, big & bold effected clean sounds. No wonder that yesteryear's amplification can't cut it in this brave new world of sound. The WARP 7™ is designed specifically to do the sound, vibe and feel of detuned guitars justice. No quarter expected, none granted. The WARP channel will hammer out every hard-as-nails riff you send its way. Its CLEAN channel also packs a mighty wallop; even the wildest effect sounds slice through loud and clear. Both channels sport dedicated 3-band EQs, letting you dial in great tone and extreme contrasts, from nasty, paint-peeling riffs to glassy & glossy clean arpeggios and chord work. With its beefy 100-watt power amp, the WARP 7™ is the ideal tool for winning friends and influencing people; particularly your neighbors and parents are sure to be delighted. The combo is loaded with Celestion® Hot 100 speakers and the 4x 12"cabinet with Celestion RockDriver Junior speakers. Both are powerhouse setups that your musical message across most emphatically!
HERE'S WISHING YOU LOTS OF SUCCESS AND FUN WITH THE TONE OF YOUR WARP 7™!
CONTENTS
THINGS TO DO BEFORE OPERATING THE AMP .....5
1.0 THE CHANNELS OF THE WARP 7 ^TM .....6
2.0 CONNECTIONS AND CONTROL FEATURES .....7
3.0 STANDARD SETUP / CABLE CONNECTIONS .....8
4.0 OPERATING THE WARP 7 ^TM .....8
4.1 SELECTING CHANNELS .....8
4.2 THE WARP 7™ AND FX DEVICES .....8
4.3 THE WARP 7 ^™ AND AUXILIARY POWERAMPS .....9
4.4 THE WARP 7™ AND MIXING CONSOLES .....9
5.0 SERVICE AND PREVENTIVE MAINTENANCE .....9
6.0 POSSIBLE ERROR SOURCES/TROUBLE-SHOOTING . . .9
7.0 TECHNICAL SPECIFICATIONS .....10
THINGS TO DO BEFORE OPERATING THE AMP You're probably champing at the bit, impatient to plug in and pound out your first riff. Before you do, though, be sure to read these guidelines thoroughly. They have been known to ensure long life for many an amp.
- Check out the voltage rating displayed next to the WARP 7 ^TM 's MAINS INPUT and make sure it matches your local mains current before you plug in.
- Make sure plenty of air can circulate around your amp's ventilation ducts.
- Place the amp on a sturdy, secure base and avoid exposing it to mechanical shocks and extreme temperatures that could endanger the device or your and others' safety.
- The manufacturer disclaims any liability or responsibility whatsoever for any damage or defect to this and other devices resulting from misuse.
1.0 THE CHANNELS OF THE WARP 7 ^TM
What's so special about the design of the WARP 7™ circuitry?
Well, there are two new wrinkles particularly worth noting:
1) The preamp is optimized for the signal and frequency response of detuned guitars. The WARP 7™ just starts to unleash the brunt of its sonic fury at frequencies other amps can't even begin to render. This big bad beast likes the taste of detuned riffs best, so be sure to feed it regularly!
2) WARP 7™ sports two channels that are, sonically speaking, polar opposites: ultra clean vs. roaring high gain tone. And that calls for closer examination:
CLEAN:
The CLEAN channel delivers razor-sharp tone piercing enough to stop a charging rhino in its tracks at a hundred paces. The signal remains distortion-free even at a very high volume. Not until the Volume knob is cranked to the hilt will the amp begin to bare its teeth with a hint of snarl. Nice but nasty are the adjectives that come to mind.
Now what's so remarkable about that? In a nutshell, you can lather the wildest and weirdest effects on your guitar signal and it will still cut through loud and clear, with enough punch to put the rest of the band's instruments in their place. Say goodbye and good riddance to those wimpy, washed-out sounds. Now you can play with the big boys' toys - hip vibe, roto and tremolo effects of the variety used by the headlining acts - and still be heard at denture-rattling volume levels.
WARP:
CAUTION! This is the WARP 7™'s sonic heart of darkness. This channel offers the kind of earsplitting high gain sound that you have come to know and love from your fave CDs. Its distortion can be best be described as a throaty rumble - picture a genetically engineered, steroid-addled lion with an attitude problem. Depending on the setting, it delivers a nasty nu metal thump, post-grunge growl, alternative snarl or the doomsday thunder so cherished by devotees of death and Goth metal. The Presence knob tweaks the upper mids to suit each genre. Case in point: Gain all the way up, Bass cranked, Mid and High to 12 o'clock positions, Presence to 11 o'clock - presto, there's that trademark "Bizkit" sound. Now you have some idea of what the WARP 7™ is able to deliver in terms of tone. But there's more to it than that - you'll find truckloads of our trademark Technology of Tone in the various connectors, buttons and knobs as well. And that's our cue to look at these in detail:
2.0 CONNECTIONS AND CONTROL FEATURES

text_image
INPUT VOLUME BASS MD TIBBLE CLEAN WARP GAIN MASTER BASS MD TIBBLE PRESENCE FX SIND FX RETURN SWITCH PHONES POWER WFARIP 7INPUT: Input jack for guitars. It input sensitivity is designed to take guitars with even very high output levels, so feel free to slap this input silly with powerful signals. Totally bulletproof (in this respect, that is), it is built to take everything your guitar can dish out and more.
CLEAN VOLUME: Determines the level of the CLEAN channel. Even at high settings, the amp's output signal will remain virtually free of distortion. You may want to take pity on your band mates and hand out earplugs before the next rehearsal.
BASS, MID, TREBLE: The CLEAN channel's 3-band EQ. Again, this channel has oodles of headroom, delivering tremendous clarity and packing the kind of punch it takes to get heavily processed signals across load and clear. If you don't use many effects, you'll come up with the best results if you turn the BASS knob well up and the TREBLE knob to just to the left of the 12 o'clock position. Then adjust the MID knob to tune the tone to your guitar and taste.
YELLOW WARP LED: Illuminates to indicate the CLEAN channel is active.
CHANNEL SELECT: Switches from the CLEAN channel to the WARP channel. The WARP channel is active when the pushbutton is pressed.
RED WARP LED: Illuminates to indicate the WARP channel is active.
WARP GAIN: Controls the WARP channel's saturation level. This knob is your grit selector: Go from merely dirty but tremendously punchy tone at lower settings to an evil roar at higher GAIN settings.
WARP MASTER: Controls the level of the WARP channel; use it to dial in the desired balance between the CLEAN and WARP channels. If you want to send your band buddies home with bleeding ears, this is the knob to use. Witticisms aside, though: The WARP 7™ is a truly loud amp and your hearing is extremely sensitive. Please use common sense and exercise restraint with volume levels
BASS, MID, TREBLE: 3-band EQ for the WARP channel. You'll find an example setting in section 2.0 above describing the WARP channel.
PRESENCE: Fine-tunes the upper mids (1,100 to 1,800 hertz). This frequency range has a considerable influence on the overall flavor of your sound. The amount of "bite" varies depending on this knob's setting. With a little experimentation, this knob will soon help you discover the sonic secrets of the big boys.
FX-SEND: If you want to employ an effect device, connect this jack to the signal processor's input. (More on this in section 4.2). You can also use this output to send the signal to another power amp or a RED BOX® for the purposing of patching your signal into a mixer. (More on this in section 4.3)
FX-RETURN: Connect this jack to the effect device's output.
FOOTSWITCH: Jack designed to take a standard footswitch (the HUGHES & KETTNER® FS-1 will do nicely) for switching back and forth between the CLEAN and WARP channels. To do this, the CHANNEL SELECT switch on the front panel must be set to CLEAN (red LED does not light up).
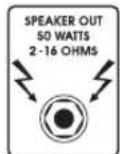
PHONES: Connect headphones to this jack. The head's SPEAKER OUT is automatically disconnected when you insert a plug into this jack. On the combo, both the SPEAKER OUT and internal speaker are disabled, ensuring conciliatory relationships with landlords.
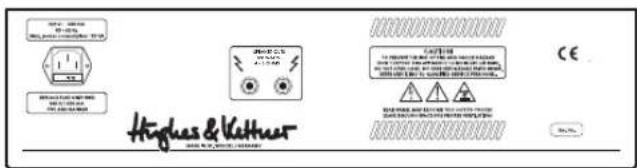
REAR PANEL:
text_image
HUGHES & V catheter CE 50.0%MAINS: Connect the included Euro norm mains cable to this socket. Before you plug in the mains cord, ensure your local mains voltage matches the specification indicated on the device.
SPEAKER OUTPUTS:
Serial (combo): Designed to connect an auxiliary cabinet with a minimum impedance of 4 ohms. Unless of course you want to use the WARP 7™ one last time as a hot air grill, barbecuing it in the process. That's an option we can't advocate...
Parallel (heads): Designed to connect to the included 4x12" cabinet and another auxiliary cabinet with a rating of at least 8 ohms. The minimum permissible impedance is 4 ohms. This means if you connect cabinets to both outs, each cabinet's impedance may be no lower than 4 ohms! Unless of course...(see above)
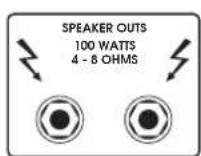
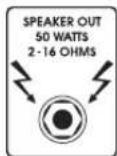
Head version Combo version
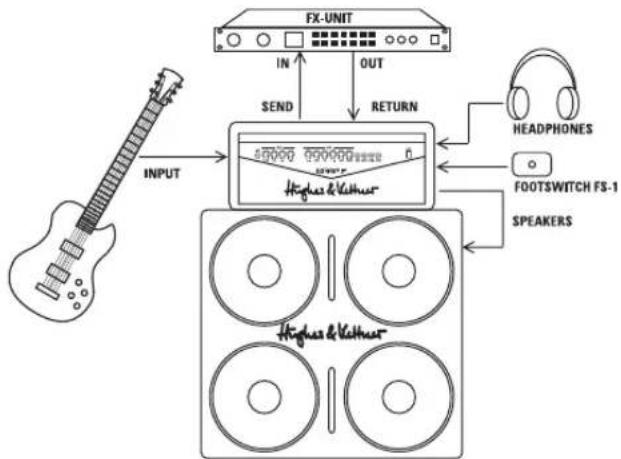
3.0 STANDARD SETUP / CABLE CONNECTIONS
HEAD/COMBO:
flowchart
graph TD
    A["Input"] --> B["FX-UNIT"]
    B --> C["IN"]
    B --> D["OUT"]
    B --> E["RETURN"]
    C --> F["HGUs & Kellner"]
    D --> F
    E --> F
    F --> G["HEADPHONES"]
    F --> H["FOOTSWITCH FS-1"]
    F --> I["SPEAKERS"]
Now that you know a bit about the key features, let's take a look at how the WARP 7™ handles. This section also provides useful tips on connecting the WARP 7™ to other devices.
4.1 SELECTING CHANNELS
You can activate the channels of the WARP 7™ via the front panel CHANNEL SELECT button or an external footswitch. The HUGHES & KETTNER® range of accessories offers a footswitch that fits the bill, the FS 1.
4.2 THE WARP 7 ^TM AND FX DEVICES
WARP 7™ is equipped with a serial effects loop. This means that the preamp output signal is routed through an inserted effect device in its entirety, and that the entire signal is processed. Please note that the sound quality of the processed signal depends largely on the quality of the employed effect device. A sorry signal processor can corrupt your tone.
HOW TO CONNECT AN EFFECTOR:
- Connect the FX SEND jack to the input and the FX RETURN jack to the output of your effects device.
- Use high-quality patch cords only to avoid signal loss, background noise and drop-outs.
- Ensure that the effect device is not being overdriven. Keep an eye on whatever type of level meter, gain indicator or overload lamp the effects device is equipped with, and adjust its input and output controls accordingly.
- Unless you have a jones of lo-fi effects, distortion devices simply don't belong in an FX loop. Any kind of device that compresses the signal should be connected first in the signal chain. Depending on the type of effect you want to achieve, it may be preferable to plug a compressor to the amp's input.
- Other stompboxes should also be plugged into the front panel input.
4.3 THE WARP 7™ AND AUXILIARY POWERAMPS
Connect FX-SEND (+6 dB output level with the power amp's line input. This port's output level is independent of the MASTER volume knob. -Again, use high-quality patch cords only to avoid signal loss, background noise and drop-outs.
4.4 THE WARP 7™ AND MIXING CONSOLES
When you want to connect the WARP 7™ to a mixer, we recommend that you patch the signal through a HUGHES & KETTNER® RED BOX® PRO first. Connect it to the amp's FX SEND jack. Here too, the output level is independent of the MASTER knob setting. The RED BOX® balances the signal and simulates the sound of speakers. A RED BOX® may also be inserted between the speaker out and the speakers. In this scenario, the output level depends on the MASTER knob setting.
5.0 SERVICE AND PREVENTIVE MAINTENANCE
The WARP 7 ^™ amp does not require any type of regular maintenance, and there are no user-serviceable parts inside. However, there are a few precautions you would be well-advised to take because they will extend the life of your amp tremendously:
- Make sure all peripheral devices, cords and cables are in a state of good repair!
- Defective speaker cables (shorted cables, loose connections) are by far the most common cause of power amp failure.
- Low-quality patch cords lack adequate shielding; they are noisy and often the source of annoying hum.
- Ensure plenty of air can circulate around your amp's ventilation areas (that is, the back of the amp's chassis) at all times.
- Definitely avoid exposure to mechanical shocks and extreme heat, dust and particularly moisture.
- Be picky about the kind of peripheral devices that you connect to your amp and always check out their specs before you plug them in. Never connect devices with high output signal levels (e.g. power amps) to your amp's input.
- Be sure the AC power source delivers the current that your amp is designed to handle before you plug it in. When in doubt about the local rating, ask the venue's sound technician or a stage hand.
- Refrain from DIY repairs! Be sure to take your to an experienced technician when internal fuses need replacing.
Use a soft damp cloth to clean the exterior surface of the WARP 7 ^™ .
6.0 POSSIBLE ERROR SOURCES/ TROUBLE-SHOOTING
6.1 The WARP 7™ won't power up when you switch it on:
- It's not getting AC power. Check the mains cable to see if it's connected properly!
- The mains fuse is defective. Replace it another fuse bearing the identical rating. If another defect occurs, please get in touch with your local HUGHES & KETTNER dealer.
6.2 The WARP 7 ^™ is cabled up and connected properly, but no sound is audible:
- One or several GAIN or MASTER controls is/are turned all the way down. Dial in a higher setting.
- Your guitar cord may be defective; try another cord.
- A short circuit in the speaker signal chain may have tripped an internal fuse. Make sure none of the connections are shorted out and have a qualified service technician replace the fuse.
6.3 Your footswitch will not switch channels:
- The footswitch cord's plug is not inserted properly into the jack,
- Check if you connected a suitable footswitch. We recommend the FS-1, another great product of the HUGHES & KETTNER ^® range of accessories.
6.4 When in use, the FX-SEND / FX-RETURN jacks generate annoying hum:
- An electrical or magnetic field is causing interference. Use cables of a higher quality or rearrange the cables you are using to reduce interference to a minimum. If this still doesn't improve the situation, use a DI box.
- The connected devices' ground circuit may be causing a ground loop. At least one device's connection must be galvanically using a DI box or transformer.
CAUTION: Under no circumstances should you sever the ground of the connected devices!
6.5 The signal is totally distorted when you connect an FX device (even when you dial in a clean sound).
- The effector's input is being overdriven. Decrease the processor's input sensitivity by backing off its input or gain knob.
6.6 The output signal level drops considerably when you connect an effect device.
- The FX processor's output level is set to too low a level. Turn it up
7.0 TECHNICAL SPECIFICATIONS
Preamp section:
INPUT: -10 dB/1 m ohms
FX SEND: +6 dBV/270 ohms
FX RETURN: 0 dB/220 ohms
Power amp:
'CURRENT FEEDBACK' solid state power amp
Output power: 100 watts RMS at 4 ohms
(2x 12" combo and head)
80 watts RMS at 4 ohms
(1x 12" combo)
Headphones out: 100 mW at 4 - 600 ohms
Frequency response: 20 Hz - 30 kHz
Combos:
Celestion® Hot 100 1x 12" and 2x 12" versions
Speaker Cabinet:
4 CELESTION RockDriver 12" Junior speakers
200 watts RMS at 8 ohms
GENERAL DATA:
Voltage: 230 V\~ (European model)
117 V\~ (North American model)
100 V\~ (Japanese model)
Max. power consumption:
175 VA at 4 ohms
Mains fuse:
T 500 mA (230 V model)
T 1000 mA (117 V model)
T 1000 mA (100 V model)
Internal fuses: 2x T2A
Dimensions (W x H x D):
1x 12" Combo: 590 x 500 x 320 mm
2x 12 Combo": 654 x 565 x 330 mm
Head: 610 x 235 x 255 mm
Speaker cabinet: 765 x 825 x 345 mm
Weight:
1x 12" Combo: 20 kg
2x 12 Combo: 26 kg
Head: 9 kg
Speaker cabinet: 38 kg
WARIP 7
WIR FREUEN UNS, DASS DU DICH FÜR EINEN HUGHES & KETTNER® WARP 7™ ENTSCHIEDEN HAST!
text_image
HUGHES & V catheter CE 50.0%INPUT: -10 dB/1 Mohm
FX-SEND: +6 dBV/270 Ohm
FX-RETURN: 0 dB/220 Ohm
Endstufe:
Head version Combo version
4.2 IL WARP 7™ E I PROCESSORI EFFETTI
INPUT: -10 dB/1 MOhm
FX SEND: +6 dBV/270 Ohm
FX RETURN: 0 dB/220 Ohm
text_image
INPUT VOLUME BASS MD TRELE CLEAN WARP GAIN MAISTER BASS MD TRELE PREFERENCE FX SIND FX RETURN SWITCH PHONES POWER WARIP 7flowchart
graph TD
    A["Handheld Guitar"] -->|INPUT| B["FX-UNIT"]
    B -->|IN| C["FX-UNIT"]
    B -->|OUT| D["FX-UNIT"]
    C --> E["Signal Receiver"]
    D --> F["Signal Receiver"]
    E --> G["Headphones"]
    F --> H["FootSwitch FS-1"]
    G --> I["SPEAKERS"]
    H --> I
    I --> J["Speaker 1"]
    I --> K["Speaker 2"]
    I --> L["Speaker 3"]
    I --> M["Speaker 4"]
4.0 MANEJO DEL WARP 7 ^TM
INPUT: -10 dB/1 MOhmios
FX-SEND: +6 dBV/270 Ohmios
FX-RETURN: 0 dB/220 Ohmios
Etapa final:
Etapa final de semiconductor 'CURRENT FEEDBACK'
Potencia de salida:
100 W RMS a 4 Ohmios (2x 12"Combo y parte superior)
80 W RMS a 4 Ohmios (1x 12"Combo)
Salida de auriculares: 100 mW a 4 - 600 Ohmios
This is to certify that
HUGHES & KETTNER WARP 7™
complies with the provisions of the Directive of the Council of the European Communities on the approximation of the laws of the Member States relating to electromagnetic compatibility (EMC Directive 89/336/EEC) and the low voltage Directive (73/23/EEC). This declaration of conformity of the European Communities is the result of an examination carried out by the Quality Assurance Department of STAMER GmbH in accordance with European Standards EN 50081-1, EN 50082-1 and EN 60065 for low voltage, as laid down in Article 10 of the EMC Directive.
SteinR
HUGHES & KETTNER WARP 7™
Allied Music Exports GmbH, Munich/Germany
CANADA
EFKAY MUSIC, Lachine, Quebec H8T 2P1
CROATIA
Allied Music Exports GmbH, Munich/Germany
CZECH REPUBLIC
MUSICDATA, 59401 Velké
DENMARK
Allied Music Exports GmbH, Munich/Germany
MALAYSIA
GUITAR COLLECTION, 60 000 Kuala Lumpur
NEW ZEALAND
MUSIC WORKS, Onehunga, Auckland
NORWAY
BELCO A/S, 3921 Porsgrunn
POLAND
AMTEC, 51-663 Wroclaw
PORTUGAL
ALRICA, 1100 Lisboa
RUSSIA
Bayland Music House, 119146 Moscow
SLOVAK REPUBLIC
GB Music spol. s.r.o., 8111 06 Bratislava
SOUTH KOREA
Firtra Trading Co., Ltd., Seoul
SPAIN
ADAGIO, 08110 Montcada | Reixach
SWEDEN
ILT AB, 84100 Ånge
SWITZERLAND
SDS Music Factory AG, 8048 Zürich
TAIWAN
OMEGA MUSIC, Taichung
TURKEY
Lay Lay Lom A.S., Istanbul
UNITED KINGDOM & EIRE
SENNHEISER, Highwycombe, Bucks HP12 3SL
USA
HUGHES & KETTNER Inc., Mt Prospect, IL 60056
YUGOSLAVIA
Allied Music Exports GmbH, Munich/Germany