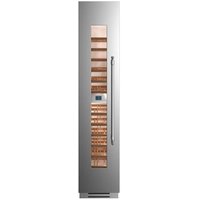
REF18WCPIXR23 - Wine cellar BERTAZZONI - Free user manual and instructions
Find the device manual for free REF18WCPIXR23 BERTAZZONI in PDF.


| Product Type | Wine cellar |
| Brand | Bertazzoni |
| Model | REF18WCPIXR23 |
| Estimated capacity | 18 bottles |
| Number of zones | 2 (upper and lower compartments) |
| Temperature range | +4°C to +18°C (adjustable per compartment) |
| Display and control | Touch screen with digital display |
| Interior lighting | LED |
| Power supply | 220-240 V, 50/60 Hz, Schuko plug 16A |
| Material | Stainless steel, wooden shelves |
| Special functions | Humidity control, 12-hour light, Sabbath mode, holiday mode, open door alarm |
| Maintenance | Condenser cleaning every 6 months |
| Safety | Child lock, temperature alarm, automatic shutdown in case of failure |
| Warranty | 2 years parts and labor, 5 years on sealed system |
| Country of origin | Italy (Bertazzoni brand) |
Frequently Asked Questions - REF18WCPIXR23 BERTAZZONI
User questions about REF18WCPIXR23 BERTAZZONI
0 question about this device. Answer the ones you know or ask your own.
Ask a new question about this device
Download the instructions for your Wine cellar in PDF format for free! Find your manual REF18WCPIXR23 - BERTAZZONI and take your electronic device back in hand. On this page are published all the documents necessary for the use of your device. REF18WCPIXR23 by BERTAZZONI.
USER MANUAL REF18WCPIXR23 BERTAZZONI
Built-in Columns Wine Cabinets
User manual
Cave à Vins
Mode d'emploi
Armario cava
Manual del usuario
REF18WCPiXL/23
REF18WCPIXR/23
REF18WCPRL/23
REF18WCPRR/23
REF24WCPiXL/23
REF24WCPIXR/23
REF24WCPRL/23
REF24WCPRR/23
1 IMPORTANT DIRECTIONS OF SAFETY AND THE ENVIRONMENT 4
1.1 For your safety 4
1.2 Important information when using the appliance. 4
1.3 Caring for the environment 5
1.4 Warning and danger 6
2 INSTALLATION 8
2.1 Installation 8
2.2 Connection to electrical power 8
3 BEFORE STARTING 9
3.1 Know your appliance 9
3.2 Main components.. 10
3.3 Electronic control 11
3.4 Main control panel. 11
4 APPLIANCE SWITCHING ON AND OFF 12
4.1 Turning the appliance on and off. 12
4.2 How to adjust the temperature for different requirements 14
4.3 Information signals of warning messages on the display 15
4.4 Wine Cellar temperatures.. 16
5 FUNCTIONS AND SETTINGS 17
5.1 Functions 17
5.2 Settings. 18
6 INTERNAL LAYOUT 24
6.1 Internal layout (positioning, adjustment, removal). 24
7 LIGHTING 24
7.1 Interior lighting. 24
8 WINE STORAGE 25
8.1 General directions 25
8.2 Conservation temperature 25
8.3 Time of conservation 26
8.4 Consumption temperature 27
8.5 Position of bottles 28
9 CARE AND CLEANIG 28
9.1 Care and cleaning 28
9.2 Cleaning of the toe kick cover and condenser 29
9.3 Internal cleaning.. 30
0 TROUBLESHOOTING GUIDE 30
10.1 Troubleshooting guide 30
10.2 Malfunction indications appearing of the display 32
11 LIMITED WARRANTY STATEMENT 33
1.1 For your safety
If this appliance is replacing an existing appliance which must be removed or disposed of, make sure that it does not become a dangerous trap for children by cutting its power supply cable and rendering it impossible to close the door. Use the same caution at the end of the lifespan of the new appliance.
This appliance is designed to refrigerate beverages and foods and is intended for domestic use.
The appliance must be installed by following the instructions in the Installation Guide, particular care should be taken not to obstruct the vent openings of the appliance and of the built-in units.
The appliance features a concentrated lighting system with LED lamps. Do not stare into these lamps when they are on to avoid possible eyesight damage.
This warning is also contained on the label attached to the inside of the refrigerator door.
Do not use any type of electrical equipment inside of the food conservation compartments.
When positioning the shelves, do not place fingers in the shelf slide guides.
Do not position containers of flammable liquids near the appliance.
Completely switch off the appliance and unplug the power supply cable during cleaning operations. If the plug is not easily reached, it is a good idea to turn off the breaker or remove the fuse that controls the socket that the appliance is connected to.
The packaging material can be dangerous for children: do not allow children to play with the plastic bags, plastic film or Styrofoam.
Any repairs must be performed by a qualified Bertazzoni Service technician.
This appliance is not intended for use by persons (including children) with reduced physical, sensory or lack of experience and knowledge unless they have been given supervision or instruction concerning use of the appliance by a person responsible for their safety. Children should be supervised to ensure that they do not play with the appliance.
Do not damage the appliance refrigerant circuit pipes.
Do not store explosive substances such as aerosol cans with a flammable propellant in this appliance.
If the power cord of this appliance is damaged, it must be replaced by the manufacturer, service company or a similarly qualified person. Improper installations and repairs may put the user at considerable risk.
Repairs may be performed by the manufacturer.
service company or a similarly qualified person only.
Plug into a grounded 3 prong outlet.
Do not remove ground prong.
Do not use an adapter.
Do not use an extension cord.
Disconnect power to all units before servicing.
If the SUPPLY CORD is damaged, it must be replaced by the manufacturer, its service agent or similar qualified person in order to avoid a hazard.
Children should be supervised to ensure that they do not play with the appliance.
1.2 Important information when using the appliance
Never use electrical appliances inside the appliance (e.g. heater, electric ice maker, etc.). Explosion hazard!
Never defrost or clean the appliance with a steam cleaner! The steam may penetrate electrical parts and cause a short-circuit. Risk of electric shock!
Do not use pointed and sharp-edged implements to remove frost or layers of ice. You could damage the refrigerant tubes. Leaking refrigerant may cause eye injuries or ignite.
Do not store products which contain flammable propellants (e.g. spray cans) or explosive substances in the appliance.
Explosion hazard!
Do not stand on or lean heavily against base of appliance, drawers or doors, etc.
Before cleaning the appliance, pull out the power cord plug or switch off the fuse. Do not pull out the power cord plug by tugging on the power cord.
Store high-percentage alcohol tightly closed and standing up.
Keep plastic parts and the door seal free of oil and grease. Otherwise, parts and door seal will become porous.
Never cover or block the ventilation openings for the appliance.

Warning
To avoid contamination of food, please respect the following instructions:
Opening the door for long periods can cause a significant increase of the temperature in the compartments of the appliance.
Clean regularly surfaces that can come in contact with food and accessible drainage systems.
Store raw meat and fish in suitable containers, so that it is not in contact with or drip onto other food.
If the refrigerating appliance is left empty for long periods, switch off, clean, dry, and leave the door open to prevent mould developing within the appliance.
Symbols used in the Guide:

Note
Recommendations for correct use of the appliance

Important
Directions for avoiding appliance damage

Warning
Indications for avoiding injury to people
1.3 Ca
Pay special attention to correct disposal procedure for all the packaging materials.

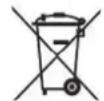
The appliance must not be disposed of with urban waste. Contact local waste disposal centers for on how to dispose of recyclable waste.
Prior to disposal, cut the power supply cord and make it impossible to close the door.
During disposal, avoid damage to the refrigeration circuit.
The appliance does not contain hazardous substances for the atmospheric ozone layer, neither in the refrigeration circuit nor in the insulation.

Caution
Risk of Fire or Explosion:
This product uses flammable refrigerant.
Do not use mechanical devices to defrost the refrigerator.
Do not use chemicals for cleaning.
Do not pierce the refrigerant tubing.
1.4 Warning and danger

This is the safety alert symbol. This symbol alerts you to potential hazards that can kill or hurt you and others. All safety messages will follow the safety alert symbol and either the word "DANGER" or "WARNING." These words mean:

You can be killed or seriously injured if you don't follow instructions.

You can be killed or seriously injured if you don't immediately follow instructions.
All safety messages will tell you what the potential hazard is, tell you how to reduce the chance of injury, and tell you what can happen if the instructions are not followed.
SAVE THESE INSTRUCTIONS!
WARNING
IMPORTANT SAFETY INSTRUCTIONS
This manual contains operational instructions for the users of the appliance. Keep this manual in an easily accessible place for future reference. Improper installation, adjustment, alteration, service or maintenance can cause property damage, injury, or death. Read the installation, operating, and maintenance instructions thoroughly before installing or servicing this equipment.
To reduce risk of fire, electric shock, or injury to persons when using your appliance, follow basic precautions, including the following:
Children should be supervised to ensure that they do not play with the appliance.
This appliance is not intended for use by persons (including children) with reduced physical, sensory or lack of experience and knowledge unless they have been given supervision or instruction concerning use of the appliance by a person responsible for their safety.
This appliance is designed to refrigerate beverages and foods and is intended for domestic use.This appliance is intended to be used in household and similar applications such as: staff kitchen areas in shops, offices, and other working environments; farm houses and by clients in hotels, motels, and other residential-type environments; bed and breakfast-type environments; and catering and similar non-retail applications.
Do NOT use an extension cord or adapter.
Plug into a grounded 3 prong outlet.
Do not remove ground prong.
If available, ice make kit can be added to some models. See serial tag inside the food compartment of appliance for ice maker kit model information.
A qualified service technician must connect i ce maker (if available) and the appliance to the water supply system (if the appliance has water load included).
If pre sent, clean the ice bucket or drawer regularly but using only drinking water.
The appli ance should be supplied only with drinkable water (if is --- a water connection).
WARNING
In the event of a power failure, do not attempt to operate this appliance.
WARNING
Keep the appliance area free and clear from combustibles or flammable materials and vapors.
WARNING
Keep ventilation openings, in the appliance enclosure or in the built-in structure, clear of obstruction. Do not obstruct the air intake or exhaust openings of the appliance.
WARNING
Do not store explosive substances such as aerosol cans with a flammable propellant in this appliance.
WARNING
Do not use electrical appliances inside the food storage compartments of the appliance, unless they are of the type recommended by the manufacturer.
IMPORTANT SAFETY INSTRUCTIONS FOR PROPER DISPOSAL OF YOUR OLD REFRIGERATOR
WARNING
Suffocation Hazard
Remove doors or lid from your old appliance.
Failure to do so can result in death or brain damage.
WARNING
Risk of child entrapment.
Before you throw away your old refrigerator or freezer:
Take off the doors.
Leave the shelves in place so that children may not easily climb inside.
IMPORTANT: Child entrapment and suffocation are not problems of the past. Junked or abandoned refrigerators are still dangerous, even if they will sit for "just a few days." If you are getting rid of your old refrigerator, please follow these instructions to help prevent accidents.
Important information to know about disposal of refrigerants:
Dispose of refrigerator in accordance with federal and local regulations. Refrigerants must be evacuated by a licensed. EPA-certified refrigerant technician in accordance with established procedures.
IMPORTANT SAFETY INSTRUCTIONS FOR MAINTENANCE AND CARE
DANGER
Risk of fire or explosion due to puncture of refrigerant tubing; follow handling instructions carefully. Flammable refrigerant used.
WARNING
To be repaired only by trained service personnel.
Use only manufacturer-authorized service parts, Do not use replacement parts that have not been recommended by the manufacturer (e.g, parts made at home using a 3D printer). If power supply cord is damaged, it must be replaced by the manufacturer, its service agent, or a similarly qualified person in order to avoid a hazard.
Any repair equipment used must be designed for flammable refrigerants. Follow all manufacturer repair instructions. Use nonflammable cleaner.
WARNING
Do not puncture refrigerant tubing, do not damage the refrigerant circuit.
WARNING
Do not use mechanical devices or other means to accelerate
the defrosting process, other than those recommended by the manufacturer.
TIP OVER HAZARD
WARNING
Refrigerator is top heavy and tips easily when not completely installed; to avoid a hazard due to instability of the appliance, it must be fixed in accordance with the instructions (see instruction manual provided).
Keep doors taped closed until refrigerator is completely installed.
Use two or more people to move and install refrigerator.
Failure to do can result in death or serius injury.
2.1 Installation
Make sure that installation is performed correctly, adhering to all of the instructions in the specific installation guide provided with the appliance.
2.2 Connection to electrical power supply
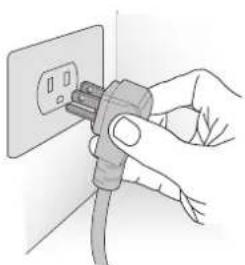
The appliance operates at 115VAC,60Hz and is equipped with a power supply cord with a 3-prong grounded plug, which must be connected to a corresponding 3-prong (15 Amp) grounding-type wall receptacle.

Important
Do not use extension cords and/or multiple adapters for connection.
EN
3.1 Know your appliance
Congratulations for having purchased your new appliance: from now on you can use our innovative conservation system, which will allow you to keep any kind of beverage in the best way possible.
This manual will answer most of your questions about the product's features. Should you require further information, please
our website
in the US http://us.bertazzoni.com/care-service in Canada https://ca.bertazzoni.com/more/support
or write us an e-mail at aftersaleservice@bertazzoni.com

Important
Before calling, write down the model type and serial number which are available on the warranty certificate and on the rating plate located on the bottom left-hand corner of the appliance, behind the bottom drawer.
Built-in wine cellars come with 2 years parts and labor warranty and 5 year parts and labor for sealed system only.
Before calling, please make sure to have the following information ready:
- Date of Purchase;
- Name of dealer where product was purchased.
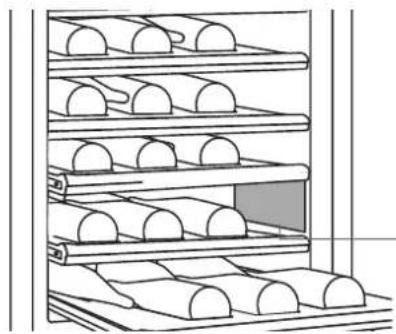
Position of the serial number inside the compartment.
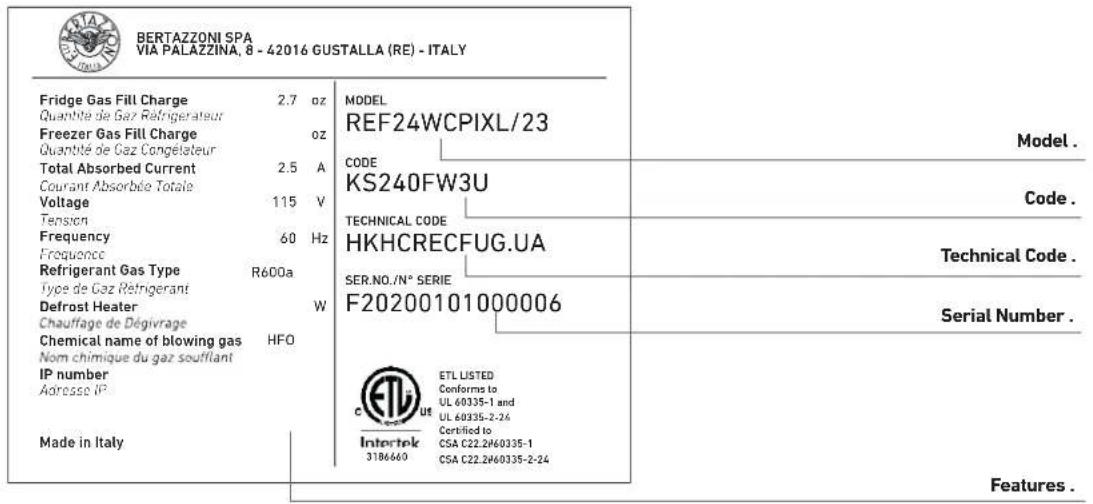
Features .
3.2 main components
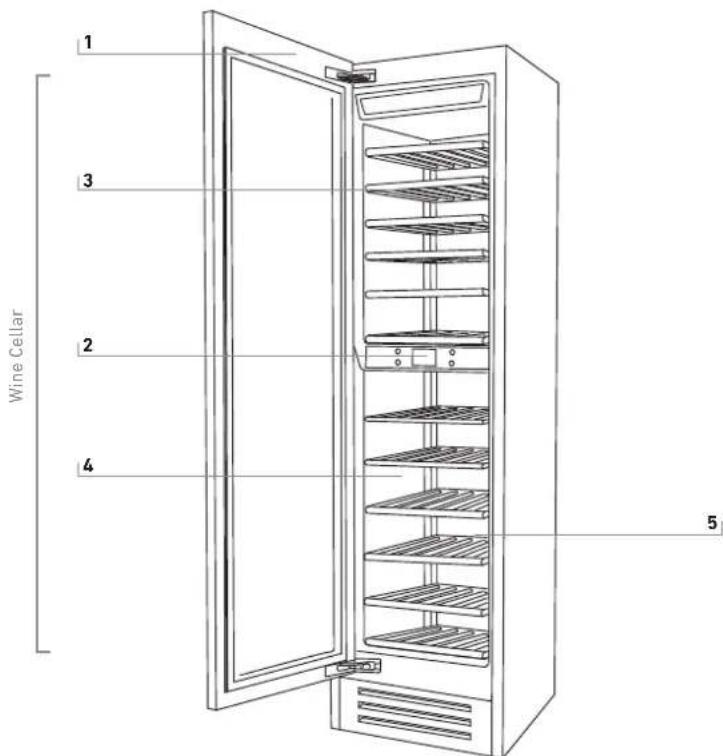
1 Structure in stainless steel with aluminium trim.
2 Interactive control panel.
3 Upper Compartment.
4 Sliding bottle shelves, mounted on wheels for easy extraction.
5 Lower compartment.
3.3 Electronic Control
The innovative electronic control system designed by Bertazzoni maintains constant temperature on the 2 temperature zones and visualizes it on the control panel display. It also allows user interaction making it possible to personalize settings of the various functions and to receive sound and/or visual messages should any malfunction occur in the appliance.
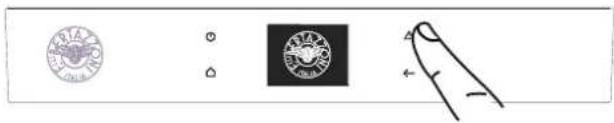
3.4 Main control panel





On/Off:
Touch the icon to turn the unit on or off.

Home
Touch the Home icon for going back to the main display screen.

Alarm
Touch the icon to view the alarm tone functions and to deactivate them.

Back
Touch the arrow icon for going back to the previous display screen.
4.1 Turning the appliance on and off
First time starting the unit
Touch the button. The display shows the following launch screens:

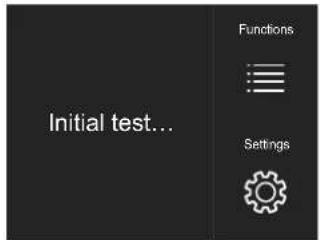
1) Bertazzoni Logo.
2) Initial test (last 3 minutes).
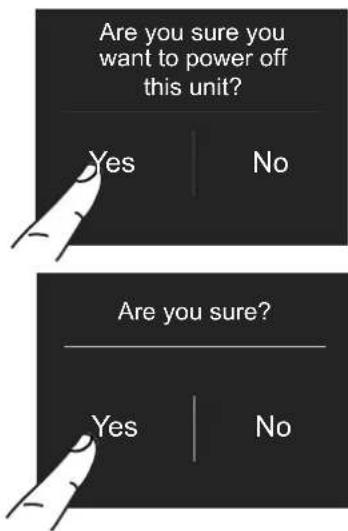
2) Touch the icon Yes to switch off.
3) Confirm shutdown by touching the Yes icon.

When the wine cellar is off there are no warning signs that prove that the wine cellar is plugged to a socket.
3) The display shows the main screen with the environment temperature measured from the wine cellar inside the compartments. Automatically the unit starts to cool down until reaching the set temperatures.
Switching off upper and lower compartments.
The upper compartment and the lower compartment, can be shutdown individually.
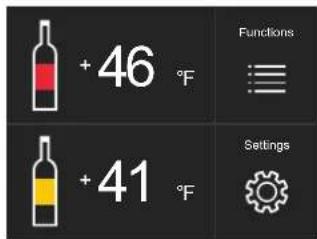
4) Home screen.
- upper compartment +46^(+8^)
- lower compartment +41^(+5^)
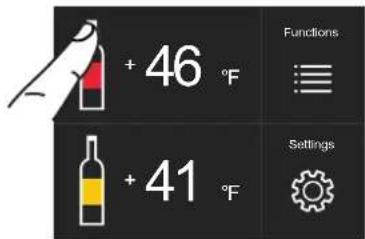
1) Home screen.
When the appliance is first switched on is recommended to wait at least 12 hours without opening the doors and before placing any bottles inside the unit. During such period deactivate any error message by pressing the Alarm button.
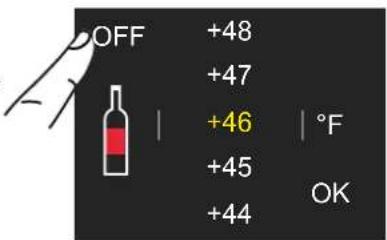
2) Touch the Off icon.
Shutdown.

1) Touch the button off.
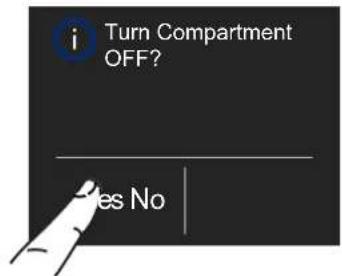
3) Touch the icon Yes to turn compartment off.
EN
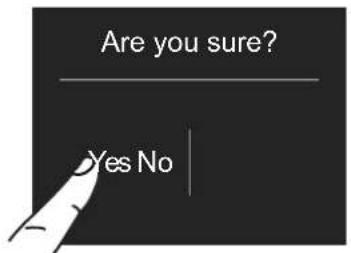
4) Touch the icon Yes for confirming the deactivation.
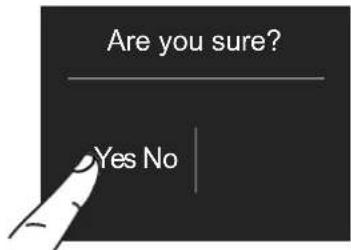
4) Touch the Yes icon for confirm- ming.

5) On the home screen appears the icon off, which indicates that the lower compartment is off.
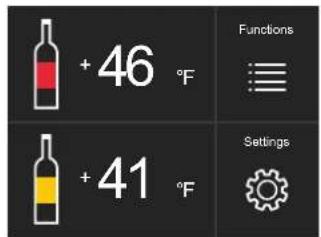
5) Turn on again the lower compartment. Home screen will open up.
For turning off the upper compartment follow the same directions
The same procedure is required if you want to restart the upper cellar compartment.
Turning the upper and lower compartments on again
To turn the unit on again press the button, the display will turn on and the launch screen will appear again with the temperatures measured inside the wine cellar compartments. The wine cellar will start to cool down until reaching the set temperatures.
Restart the compartments.
In case you wish to turn the upper and lower compartments on again.
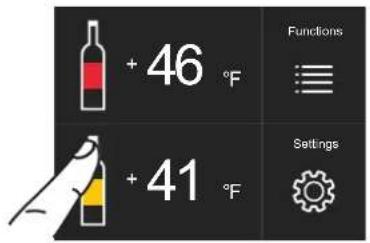
1) Home screen. To turn on the lower compartment on again, touch the icon
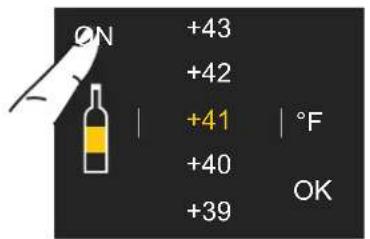
2) Touch the On icon.
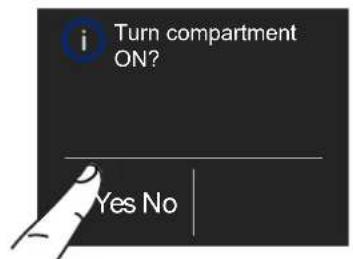
3) Touch the Yes icon.
Switching off for long periods
During long absence periods it is recommended to switch off the wine cellar by pressing the Unit button for three seconds and disconnecting the electrical plug or the breaker controlling the socket.
Completely empty the wine cellar, clean and dry it and leave the doors and drawers partially open to prevent unpleasant odors.

If at the first startup the Standby message does not appear, but another message appears, it means that the appliance has already started the cooling process.
During the first startup, it will not be possible to use the Menu to modify the factory settings until the preset temperature has been reached. During the first startup, it will not be possible to use the Menu to modify the factory settings until the preset temperature has been reached.
Each time the appliance is switched on it goes through a self-diagnosis procedure lasting three minutes before completely starting up.
4.2 How to adjust the temperature for different requirements.
Each model has been carefully tested before leaving the factory and is adjusted in such a way to ensure high performance and low power consumption. Usually, it is not necessary to modify the settings.
Follow the following on screen steps to personalize the temperature settings:
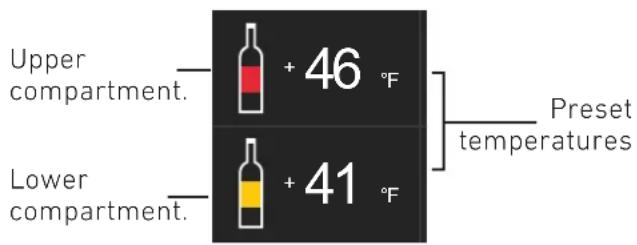
Modify the temperatures compartment
Example: How to modify the upper compartment temperature.
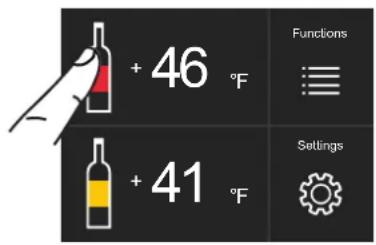
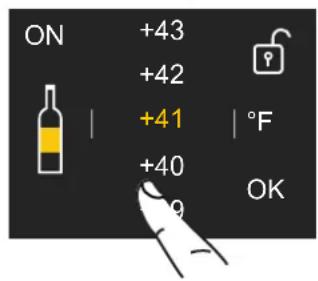
1) Home screen. Touch icon of upper compartment.
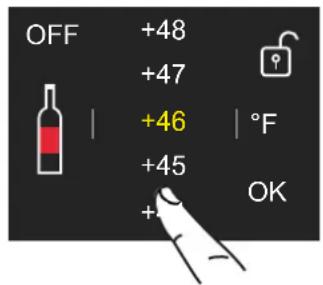
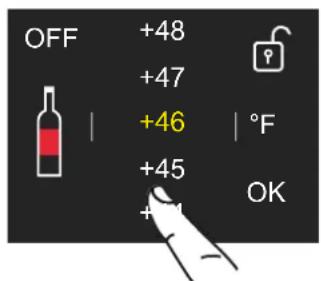
2) Scoll up/down to select the desided temperature. Upper Compartment from +39^ to +64^ (from +4^ to +18^ ).
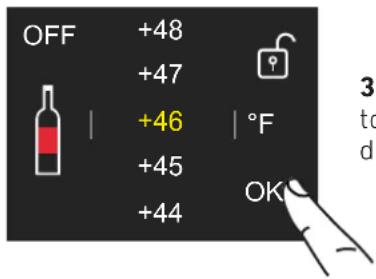
3) Touch the icon Ok to confirm the desired temperature.

The temperature shown can vary slightly in respect to the set temperature following frequent openings of the doors or insertion of room temperature foods or large quantities of foods.
It might take between 6 to 12 hours to reach the selected temperature.
Padlock icon.
The padlock icon shows up when the temperatures are set up.
The padlock open/close shows that the compartment's temperatures can or can not be modified by the user.

Usually a yellow padlock will show open, in that case you can scroll up or down with a finger on the display, selecting the desired temperature and press OK to confirm.
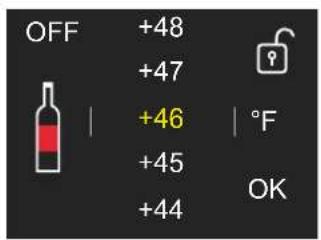
Whereas a closed padlock will be seen if the user has activated a function that modifies the settings of the refrigerator and prevents the user from changing the temperature of the compartment.
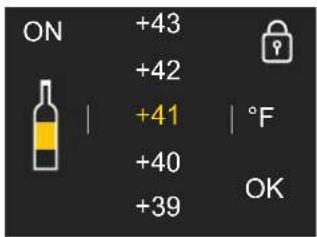
If the icon function is touched and a specific function is set, the yellow padlock will be seen closed and it won't be possible to change the temperature of the compartments as long as the function won't be completed or if it is manually deactivated as long as the function is active.
4.3 Information signals of warning messages on the display.
An integrated control system will give information through messages you will see on the display. There is an alarm tone that occurs with some error messages which can be turned off by touching the alarm button on the main control panel. You can find the list of the error messages at the end of this manual.
4.4 Wine Cellar temperatures.
Most red wines are best stored a slightly warmer temperatures.
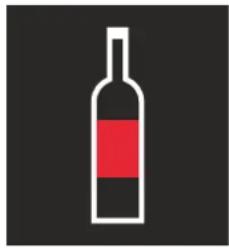
Red Wine.
from +50^ to +64^ (from +10^ to +18^ ).
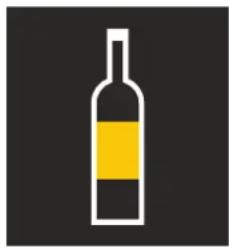
White Wine.
from +39^ to +48^ (from +4^ to +9^ ).
For example if a temperature higher than +48^ (+9^) is set for white wine, the display will change icon from white wine to red wine.
Bordeaux BOTTLE
EN
INFORMATION FOR USING THE DISPLAY.
It is possible to personalize the operation of your unit in order to adapt it to the different ways you might want to use it.
1) Humidity Control.
This function enables to set the humidity of the upper and lower compartments. The default setting is set to "Medium".
5.1 Functions.
After touching the functions icon on the home screen, the user will be shown the icons of the following available functions.
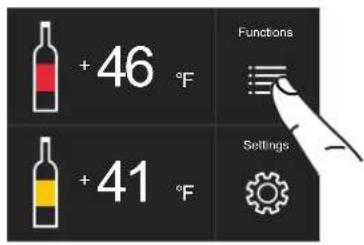
A) Home screen. Touch the Functions icon.
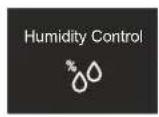
1) Humidity Control.
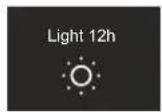
2) Light 12h.
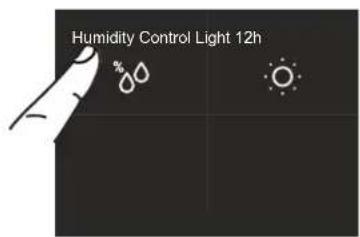
B) Touch the Humidity Control icon.
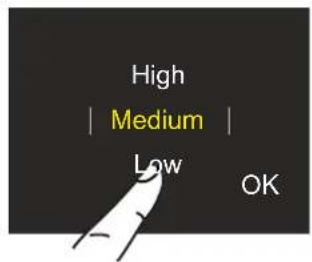
c) Scroll until setting the desired humidity and press Ok.
2) Interior light for 12h .
This function enables to set the timing of the interior light and it stays on 12 hours when the wine cellar door is closed, in order to see the inner part lighted up, through the glass.
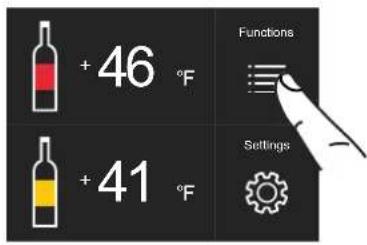
A) Home screen. Touch the Functions icon.
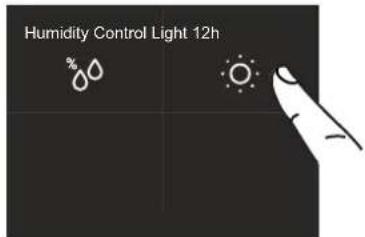
B) Touch the Light 12h icon.
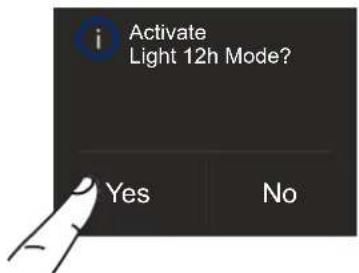
C) Push Yes if you want to activate Light 12h Mode.
5.2 Settings.
It is possible to personalize the settings of your wine cellar or adapting it to the different ways you might want to use it.
1) Date.
2) Time.
3) Celsius and Fahrenheit.

4) Language.
5) Sabbath.
6) Reset.
7) Demo Mode.
8) Maintenance.
9) Service.
10) Information.
EN
1) Date
The display will show the date in the format (day:month:year).
By touching the display you can modify the settings.
2) Time
The display shows the hours and minutes in the format hh:mm.
This function selects the display at 12 or 24h
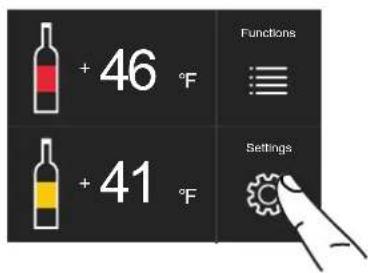
A) Home screen. Touch the Settings icon.
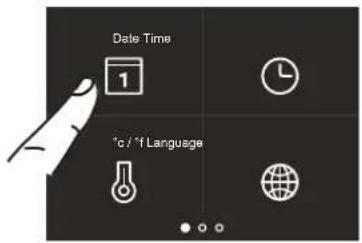
c) Scroll up or down until the desired year appears and press Ok.
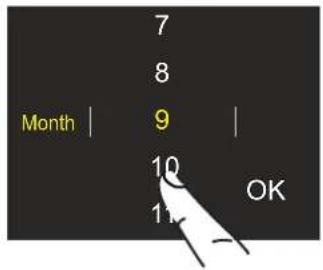
D) Scroll up or down until the desired month appears and press Ok.
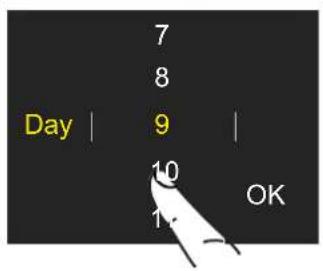
E) Scroll up or down until the desires date appears and press Ok.
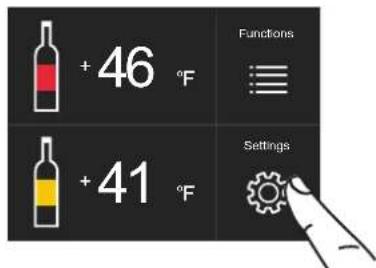
A) Home screen. Touch the Settings icon.
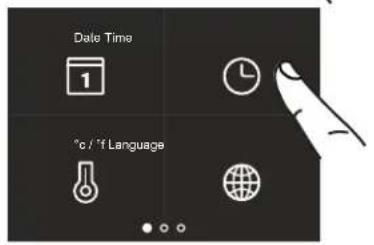
C) Touch the desired method which you want the time to display: 12 hour or 24 hours.
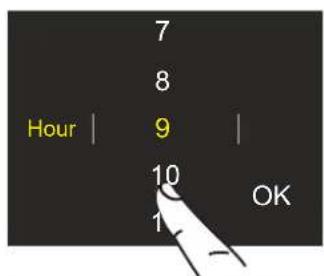
D) Scroll up / down to set the hour and then press ok.
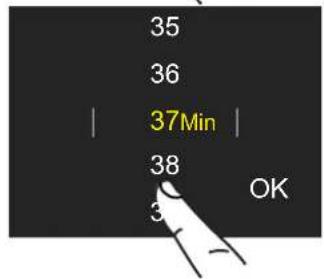
E) Scroll up / down to set the minutes and then press Ok.
3) SET°F/°C
This function allows the temperature to be displayed in Centigrade or Fahrenheit. The factory setting is Centigrade.
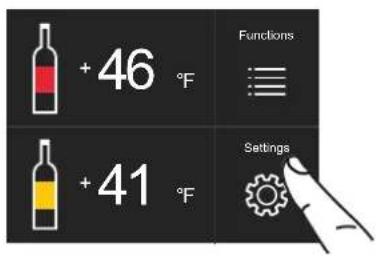
A) Home screen. Touch the Settings icon.
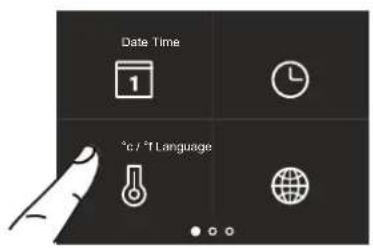
B) Touch the icon ^ F / ^
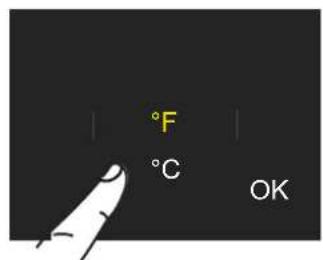
C) Scroll up / down to select either centigrade or fahrenheit degrees and press Ok.
4) Language
To set the language of the fridge, simply touch the settings button on the display.
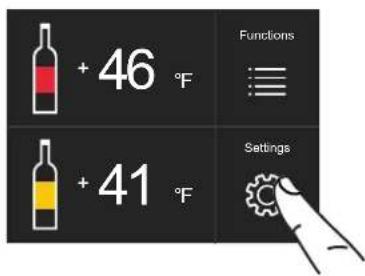
A) Home screen. Touch the Settings icon.
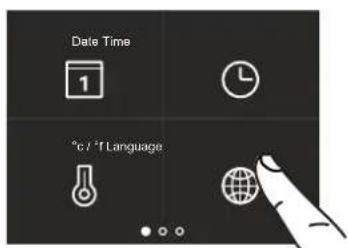
B) Touch the Language icon.
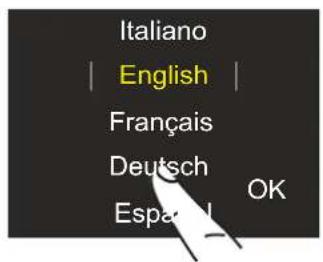
c) Scroll up / down to select the desired language and press Ok.
EN
6) Sabbath Mode
The function makes it possible to comply to certain religious observances requiring the operation of the appliance to not be affected by the opening or closing of the doors. The thermostatic control and inner lighting are deactivated.
7) Reset
It gives the possibility to restore the base settings that were set in the factory, cancelling all the changes that has been made from there onward.
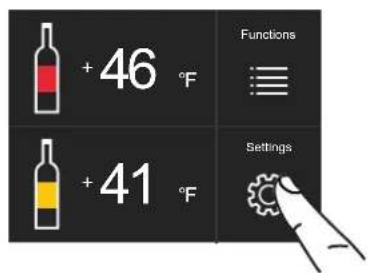
A) Home screen. Touch the Settings icon.
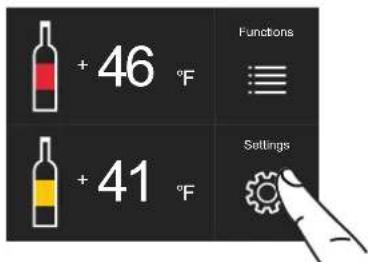
A) Home screen. Touch the Settings icon.
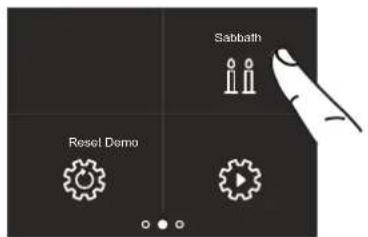
B) Scroll right once and touch the Sabbath icon.
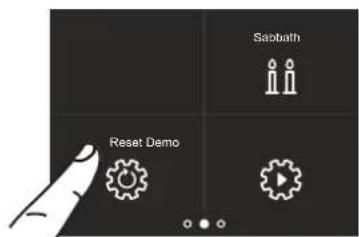
B) Scroll right once and toch touch the Reset icon.
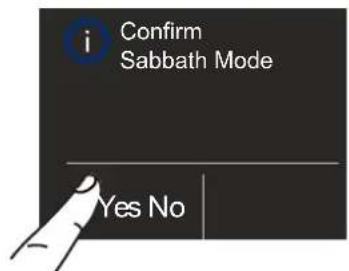
C) Touch the Yes button to confirm the Sabbath Mode.
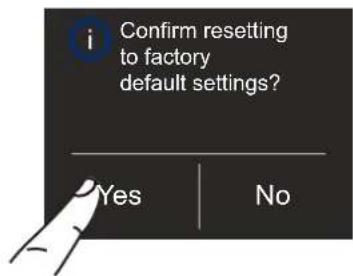
C) Touch the Yes button to to confirm the selection of the resetting of factory default settings.
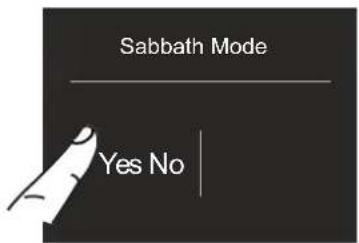
D) Touch the Yes button to activate the function.
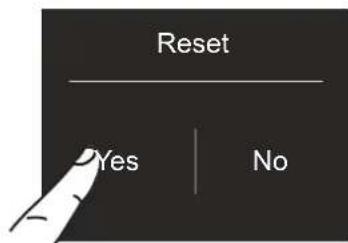
E) The wine cellar will work accordingly to this configuration.
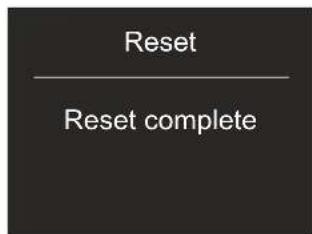
E) The reset has been performed. The wine cellar's factory settings have been restored.
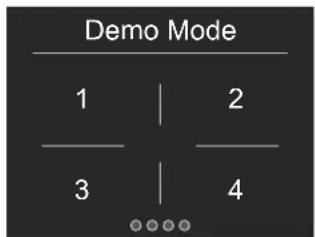
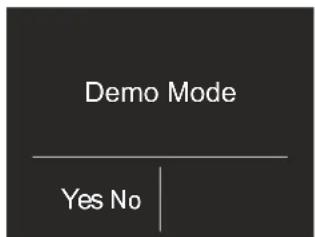
8) Demo Mode
It is possible to simulate the functioning of the fridge, for showroom display or for trade shows.
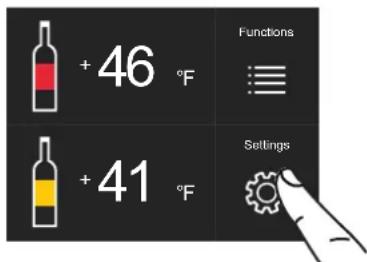
A) Home screen. Touch the Settings icon.
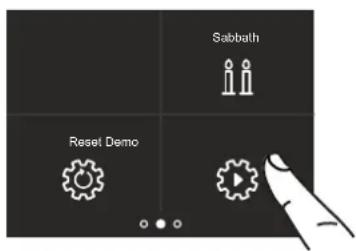
B) Scroll right once and touch Demo mode.
9) Maintenance (through alarm sign).
For the entire to function as designed, it is important to periodically clean the access toe-kick cover and the condenser. The default setting of the unit is "Warning disabled". Cleaning is recommended every 6 months. Audio and visual on display messages will serve as standard reminders. It is possible to disable the warning signal and see the time left before the next cleaning that has to be done.
For details see following pages.
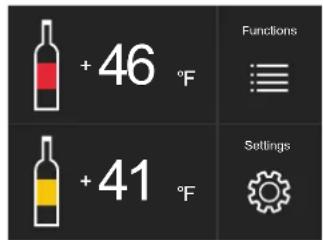
A) Home screen. Touch the Settings icon.
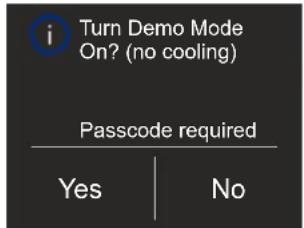
C) Touch Yes.
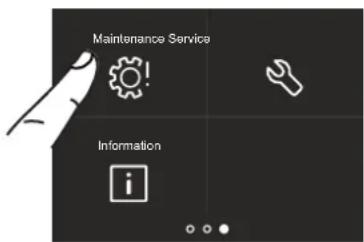
B) Scroll to the right twice and touch the Maintenance icon.
D) Insert the password for the activation.
Default password 1-2-3-4
c) If you want to enable the warning, touch the icon reset.
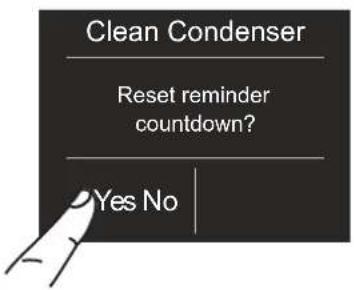
D) To enable it, touch the Yes icon.
If you want to disable the reminder, at step C touch Off, then touch Yes.
10) Service
The service function is reserved for the Bertazzoni assistance.
11) Info System
The Info System function shows the product data, for example the software code, serial number and the factory code of the of the wine cellar.
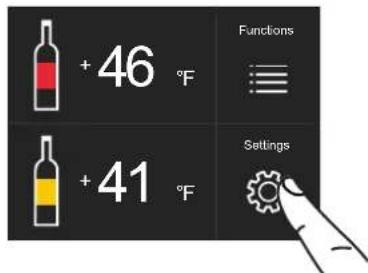
A) Home screen. Touch the Settings icon.
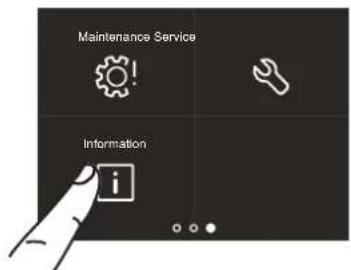
B) Touch the Information icon.
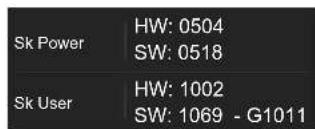
C) The display will show the data specific to the appliance.
6.1 Internal Layout (positioning, adjustment, removal)
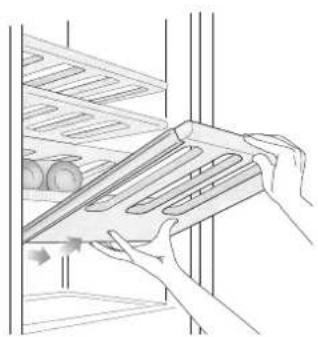
Wine shelf
The shelves can be easily removed for cleaning. Remove the bottles, completely extract the shelf, tilt it upward until the wheels are detach from the side rails and extract it.
7.1 Interior lighting
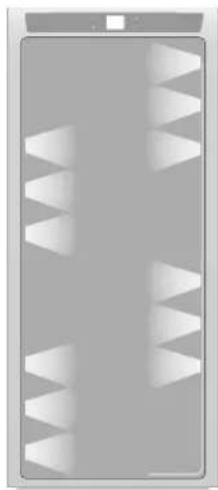
To provide optimum interior lighting, LED strips illuminate both compartments from the top and sets of LED lights directly illuminate different areas of both zones.
In case of malfunction and/or failure of the lighting system, you should contact an authorized Bertazzoni Service Agent.

Once activated, the light of the top compartment will automatically shut off after 6 hours.
8.1 General directions
Wine can stored for extended periods of time, especially under the following conditions:
Suitable temperature without significant mid to long term temperature changes over time
Controlled level of humidity
Protection from light
Absence of vibrations
Absence of odours
Bottle kept horizontal.
All of these conditions are fully met in the Bertazzoni Wine Cellar.
8.2 Conservation temperature
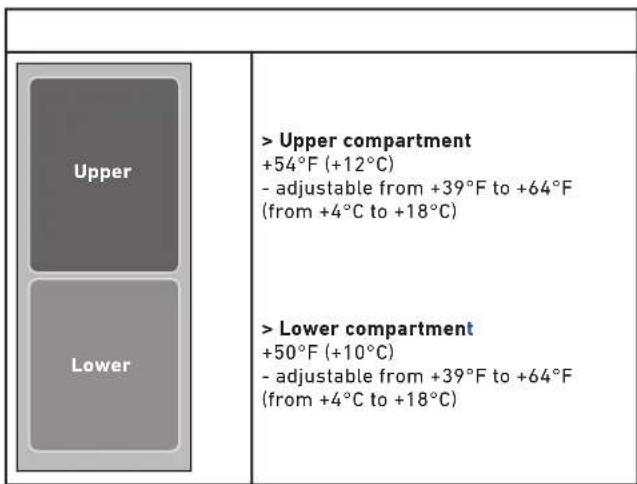
The space offered by the upper and lower compartments, allows conservation of your best wines at two different temperatures.
The two compartments are initially set to the following temperatures:
Upper compartment
+54°F (+12°C) - adjustable from +39°F to +64°F (from +4°C to +18°C)
Lower compartment
+50°F (+10°C) - adjustable from 39°F to 64°F (from +4°C to +18°C)
All the temperatures can be modified according to the characteristics of the wines and personal preferences. However, you should attempt to keep the temperature as constant as possible over time.
Rapid and large-scale temperature variations can in fact cause dilation of the liquid and early aging of the wine.
You should also avoid very low temperatures (below +39^ and +4^ ) which may lead to the formation of deposits and damage the aesthetic qualities of the wine.
All the compartments offer optimal conditions and take into account all these needs. It should however be noted that the upper compartment, in particular, is thermostatically controlled in
a very precise manner and ensures the utmost care and attention over time of your most prized bottles. When the upper compartment is set below +54^ (+12^) the lower compartment must not be set beyond +50^ (+10^) .
8.3 Time of conservation
Improvement of wine over time and its duration usually depends on the character of the variety and its type. The following chart shows the best period of conservation and aging for various types in ideal conservation conditions offered by your appliance.
However, you should always follow the instructions of the winemaker, especially for fine wines.
| TYPE OF WINE CONSERVATION TEMPERATURE TIME OF CONSERVATION | |
| New wines (Vin Nouveau) from +54° to +57° F 6 months | |
| Sweet sparkling wines from +46° to +50° F 1 year | |
| Rosé from +50° to +57° F 1 year | |
| Semi-sparkling wines from +50° to +54° F 1-2 year | |
| Normal white wines from +50° to +57° F 1-2 year | |
| Light red wines from +54° to +57° F 2 year | |
| Dry sparkling wines from +46° to +50° F 2 year | |
| Classic sparkling wines from +46° to +50° F 3-4 year | |
| Barrique and Vigorous white from +46° to +54° F 3-5 year | |
| Normal red wines from +57° to +61° F 3-5 year | |
| Barrique and Vigorous red wines from +57° to +64° F 7-10 year | |
| Straw wines or Liquorous wines | from +61° to +64° F 10-15 year |
8.4 Consumption temperature
As a general rule, white wines should be served at a temperature between +50 and +54^ F (+10 and +12^ C) and red wines between +54 and +57^ F (+12 and +14^ C).
Some wines may however be best enjoyed at higher or lower temperatures.
You should also keep in mind that, during the summer, wine is generally enjoyed at lower temperatures than during the winter.
You should also consider the following:
White wines
White wines are normally not served at high temperatures, since they are generally more acidic that red wines and not very tannic. Therefore they are more enjoyable at low temperatures.
It is preferable to serve these wines between +50^ and +57^ (+10^ and +14^) . Young, fresh and aromatic wines can also be served at +50^ (+10^) , while less aromatic ones are served at +54^ (+12^) .
Temperatures between +54^ and +57^ (+12^ and +14^) are for soft, mature white wines that have been aged for some years in the bottle.
Higher temperatures would favour the exaltation of the sweet character of the wine, at the expense of the acidity and flavour, which are considered pleasant and desirable characteristics of this type of wine.
Rosé
Rose wine is served at the same temperature as white wines. It should be noted that these wines may include a certain amount of tannin and may therefore be preferable at higher temperatures. Therefore, they are served between +50^ and +54^ (+10^ and +12^) if young and fresh, and between +54^ and +57^ (+12^ and +14^) if robust and mature.
Due to the special processing they undergo, new vintage wines contain a low tannin content and are therefore more enjoyable if served between +54 and +57^ F (+12^ and +14^) .
Red wines
Since they contain more tannin and are less acidic, red wines are normally served at higher temperatures.
Younger wines with less tannin are normally served between +57 and +61^ F (+14^ and +16^) , while more full-bodied ones that are more tannic may be served at up to +64^ (+18^) . Some wines that have aged for years in the bottle, still full-bodies and tannic, may be served at +64^ (+18^) or even +68^ (+20^) .
Young red wines with little tannin and slightly structured may be enjoyable at lower temperatures, between +54 and +57^ F (+12^ and +14^) .
Sparkling wines
It is difficult to provide instructions to cover the wide variety of sparkling wines in available.
As a general rule, sweeter and more aromatic sparkling wines should be served at lower temperatures, down to +46^ (+8^) , whereas more tannic sparkling wines may be served at higher temperatures, up to +57^ (+14^) .
Dry sparkling wines are usually served between +46 and +50^ F (+8^ and +10^)
"Classic" sparkling wines are normally served at these temperatures, which may be as high as +54^(+12^) for sparkling wines that have been aged for some time.
It is however advisable, especially for finer wines, to follow the suggestions and recommendations of the winemaker on the bottle.
These types of wines can be served at temperatures between +61 and +64^ (+16^ and +18^) , depending on personal tastes, to attenuate the sweet taste of straw wines, it can also be served at +50^ (+10^) .
8.5 Position of bottles
The sliding shelves are made of fine wood and contoured so as to hold bottles of the most classical traditional shape or of the most modern design.
Whether your collection holds fine bouteilles or petite bouteilles, they will be right at home in the Bertazzoni Wine Cellar.
Also Magnum bouteilles can be stored, provided you remove the shelf just above the one that will hold them.

Warning
After a prolonged interruption of electrical power, once the electrical power is reactivated, an audible signal will indicate if the temperature has been raised above normal levels. In addition to this the display will show for one minute the highest temperature detected inside the compartments, to allow the user to decide how to better use the food items.
After one minute the display will resume normal operation, while the Alarm button will continue to blink.
Press the Alarm button to display the highest recorded temperatures.
9.1 Care and Cleaning
To clean the parts made of steel use a microfiber cloth and the sponge provided in the kit with the appliance. Always use the cloth and sponge in the direction of the steel's satin finish.
Every now and then, to polish the steel, wipe with a slightly damp microfiber cloth.
Do not use the sponge on aluminium parts, such as the handles and the profiles of the glass shelves.
You should use special care to keep the ventilation openings in the appliance or in the cabinet that houses it free of obstructions.

Note
Carefully follow the detailed directions that can be found in the provided kit and never use abrasive or metallic products which could scratch and damage the satin finishing on the appliance permanently.
Before performing any sort of cleaning, disconnect the appliance from the electrical power supply.
Make sure you do not damage the refrigerant circuit in any way.

Warning
Do not use chlorine-based detergents or cleaning agents.

9.2 Cleaning of the toe kick cover, filter and condenser.
The unit requires, for a correct operation, the cleaning of the toe kick cover, filter and condenser.
It is recommended to perform the following cleaning steps very 6 months. An audio and visual message on the display will serve as a reminder. It is possible to disable the warning signal and see the time left before the next cleaning has to be done.
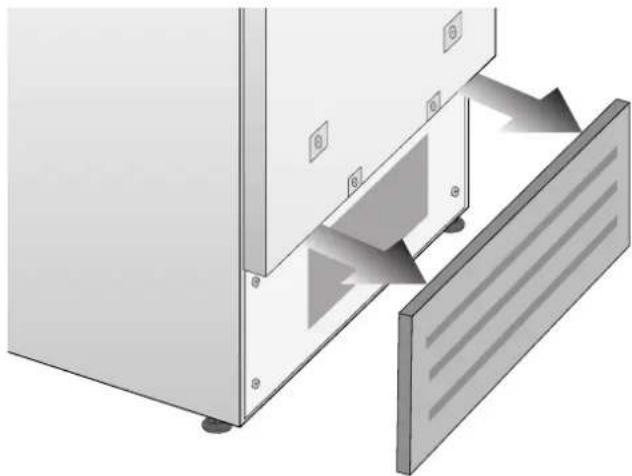
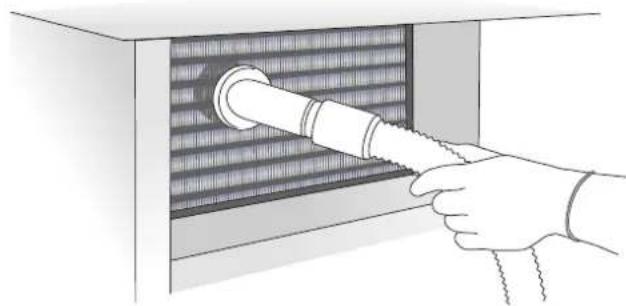
Behind the frontal toe kick cover is the condenser. To clean it use a vacuum cleaner with a soft brush attachment at maximum power, sweeping it along the vent slits. In case of a significant dust build up, the toe kick cover can be removed to allow a more accurate cleaning of the filter.
On the maintenance settings, after the installation of the unit and after it has been turned on, you can set the condenser cleaning warning.
In the case the warning sign is enabled, there will be an audible signal every 6 months, alerting that it is time to clean the condenser.
After cleaning it, touch the reset icon in order to reactivate the warning signal in 6 months.
If you do not want the cleaning signal alert for the condenser, touch the Off icon.
Lower condenser.
For cleaning the condenser follow the instructions:
Switch off the appliance by pressing the Unit button on the main control panel for approx 3 seconds.
Wait approx 30 minutes, until the finned condenser cools down to room temperature.
Remove the removable grille under the door.
Clean it thoroughly of any dust build up as shown in the picture, taking care not to damage the condenser.
Restart the unit again, pressing on the unit button for three second.

Warning
The edges of the condenser are sharp, therefore use adequate protection for hands and arms when cleaning the condenser.
9.3 Internal cleaning
Clean the internal and removable parts by washing them with a solution of lukewarm water and a small amount of dishwashing detergent.
Rinse and dry right away.
Do not use mechanical devices or other methods to speed up defrosting.

Warning
Do not use water on the electrical parts, lights and control panel.

Warning
The use of chlorine-based detergents or similar that contains it should be avoided (bleach, hypochlorite, etc).

Note
Do not bring cold glass parts into contact with boiling water.
Do not wash any parts of the refrigerator in a dishwashing machine since this could damage or irreparably deform the parts.
10.1 Troubleshooting guide
If you notice malfunctions in your appliance, use this guide before calling Service. This guide may help you resolve the problem yourself or could provide important information to ensure rapid and effective service.
Malfunction message
A malfunction is usually indicated on the display. Problems that cannot be resolved by the user are signalled through a malfunction code.
The appliance does not work
Is the appliance connected to the electrical power supply?
Does electrical power arrive at the electrical socket?
Is the Unit key activated?
Is the condenser clean?
The internal temperatures are higher than normal
Does the display show a malfunction code?
Is the temperature adjusted correctly?
Is the condenser clean?
Were the doors or drawers open for a long period of time?
Were large quantities of food recently inserted?
The appliance remains in function for a long time period
Bear in mind that during a very hot weather and with very high temperatures in the room it is normal that the compressor remains in operation for prolonged periods of time.
Were the doors or drawers open for a long period of time?
Were large quantities of food recently inserted? Is the condenser clean?
Check that the doors are closed and that the food or containers do not obstruct the perfect closure of the door.
If you hear strange noises
It is normal to hear noise from the fans or compressors during the defrost phase.
Noise could be louder depending on the position of the appliance and the surrounding environment.
Condensation forms both inside and out
If the climate is very humid, the formation of condensation is normal. Opening the door or drawers for prolonged periods of time can contribute to the formation of condensation.
In any case, make sure that the doors are always completely closed.
The doors are difficult to open
The appliance was designed to permit hermetic closure.
When the door is closed, a vacuum situation can occur: in this case it is necessary to wait a few seconds until the pressure balances before opening the door.
10.2 Malfunction indications appearing on the display
| Display message Malfunction description | |
| Power Failure | Prolonged interruption of electrical power The appliance starts up again automatically and indicates the highest recorded temperatures. |
| Door open | Door open this message appears few minutes from the door opening. |
| Upper or lower zone too warm | See the troubleshooting guide. |
| Upper or lower zone too cold | Wait 12 hours. If the problem persists, contact Customer Care. |
| Error Code... | Functional problems call Customer Care who may help you to salvage the problem or put you in contact with the nearest Service Agent may help you solve the problem. |
| Check condenser | Check Condenser Every 6 months the display shows the message "Check Cond", clean the condenser and follow the instructions above about how to clean the condenser. |
In case of errors, touch the button Alarm and the display will show the error message with its error number code.
The message will be shown for 3 seconds, then it will go back to the home screen.
For blocking the message on the screen, press on the display, the button info ( i ). The message will be on the screen for 30 seconds, then it will go back to the home screen.
In the case there is more than one error message, the dispay will show in time sequence the different error messages.
Limited two-year warranty
The Warranty coverage provided by Bertazzoni SpA ("Bertazzoni") in this statement applies exclusively to the original Bertazzoni appliance ("Product") sold to the consumer ("Purchaser") by an authorized Bertazzoni dealer/distributor/retailer, purchased and installed in the United States, District of Columbia, or Canada which has always remained within the country of original purchase (United States, District of Columbia, or Canada).
Warranty coverage is activated on the date of original retail purchase of the Product and has a duration of two(2) years.
Limited five year parts and labor warranty on sealed system
After year two(2) through year five(5) from original purchase date, Bertazzoni warranty covers all parts and labor to repair or replace any components that prove to be defective in materials or workmanship in the sealed system. The "Sealed System" means only the compressor, condenser, evaporator, drier and all connecting tubing.
Warranty coverage is non-transferrable.
In the event of parts replacement or entire product replacement, the replacement Product (or parts) shall assume the remaining original Warranty activated with original retail purchase document. This Warranty shall not be extended with respect to such replacement.
Bertazzoni SpA will repair or replace any component/part which fails or proves defective due to materials and/or workmanship within 2 years from the date of original retail purchase and under conditions of normal residential, non-commercial use.
Repair or replacement will be free of charge, including labor at standard rates and shipping expenses. Purchaser is responsible for making the Product reasonably accessible for service. Repair service must be performed by a Bertazzoni Authorized Service company during normal working hours. Labor performed at overtime or premium rates shall not be covered by Warranty. IMPORTANT: retain proof of original purchase to establish warranty period.
Bertazzoni's liability on any claim of any kind, with respect to the goods and/or services provided, shall in no event exceed the value of the goods or service or part thereof which gives origin to the claim.
30 Day Cosmetic warranty
Inspection of the product must be made by Purchaser at time of delivery.
Bertazzoni warrants that the Product is free from manufacturing defects in materials and workmanship for a period of thirty (30) days from date of original retail purchase of the Product.
This coverage includes:
Paint blemishes
Chips
Macroscopic finish defects
Cosmetic warranty does NOT cover:
issues resulting from incorrect transport, handling and/or installation (i.e: dents, broken, bowed or deformed structures or components, shattered glass components)
slight color variations in painted/enamed components
differences caused by natural or artificial lighting, location or other analogous factors.
Stains/corrosion/discoloration caused by external substances and/or environmental factors
labor costs, display, floor, B-stock, out-of-box, "as is" appliances and demo units.
How to obtain service
To receive warranty service, the Purchaser must contact Bertazzoni Service for problem determination and correct service procedures. Model number, serial number and date of original retail purchase will be requested.
IMPORTANT: retain proof of original purchase to establish warranty period.
If located in the USA
866 905 0010
https://us.bertazzoni.com/more/support
If located in CANADA
8005617265
https://ca.bertazzoni.com/more/support
Warranty exclusions - what is not covered
Use of the Product in any non-residential, commercial application
Use of the Product for anything other than its intended scope
Repair service provided by other than a Bertazzoni authorized service agency.
Damage or repair service to correct service provided by an unauthorized agency or the use of unauthorized parts.
Installation not in accordance with local/state/ city/county fire codes, electrical codes, gas codes, plumbing codes, building codes, regulations, or laws.
Defects or damage due to improper storage of the Product.
Defects or damage or missing parts on products sold out of the original factory packaging or from displays.
Service calls or repairs to correct the incorrect installation of the product and/or related accessories.
Replacement of parts/service calls to connect, convert or otherwise re- pair the electrical wiring and/or gas line to properly use the product.
Replacement of parts/service calls to provide instructions and education on the use the Product.
Replacement of parts/service calls to correct issues due to product usage in manner other than what is normal and customary for residential use.
Replacement of parts/service calls due to wear and tear such as gaskets, knobs, pan supports, shelving, cutlery baskets, buttons, touch displays, scratched or broken ceramic glass tops
Replacement of parts/service calls for lack of/ improper maintenance such as but not limited to: residue build up, stains, scratches, discoloration, corrosion
Replacement of glass components and light bulbs if claim arises after 30 days from original retail purchase date.
Defects and damages arising from accidents, alteration, misuse, abuse, improper installation.
Defects and damages arising from transport, logistics and handling of the Product. Inspection of the product must be made at time of delivery. Any issues from handling, transport and logistics must be notified to selling dealer/delivery company after receipt and inspection.
Defects and damage arising from external forces beyond the control of Bertazzoni SpA including but not limited to wind, rain, sand, fires, floods, mud
slides, freezing temperatures, excessive moisture or extended exposure to humidity, power surges, lightning, structural failures surrounding the appliance and other acts of God.
Products with altered/damaged/tampered serial number.
In no case shall Bertazzoni be liable or responsible for damage to surrounding property, including furniture, cabinetry, flooring, panels and other structures surrounding the Product.
Bertazzoni is not liable nor responsible for the Product if located in a remote area or an area where certified trained technicians are not reasonably available. Purchaser must bear any transportation and delivery costs of the Product to the nearest authorized Service center or for the additional displacement rates of a certified trained technician.
THERE ARE NO EXPRESS WARRANTY OTHER THAN THOSE LISTED AND DESCRIBED ABOVE, AND NO WARRANTY WHETHER EXPRESS OR IMPLIED, INCLUDING, BUT NOT LIMITED TO, ANY IMPLIED WARRANTY OF MERCHANTABILITY OR FITNESS FOR A PARTICULAR PURPOSE, SHALL APPLY AFTER THE EXPRESS WARRANTY PERIODS STATED ABOVE, AND NO OTHER EXPRESS WARRANTY OR GUARANTEE GIVEN BY ANY PERSON, FIRM OR CORPORATION WITH RESPECT TO THIS PRODUCT SHALL BE BINDING ON BERTAZZONI. BERTAZZONI SHALL NOT BE LIABLE FOR LOSS OF REVENUE OR PROFITS, FAILURE TO REALIZE SAVINGS OR OTHER BENEFITS, TIME AWAY FROM WORK, MEALS, LOSS OF FOOD OR BEVERAGES, TRAVELING OR HOTEL EXPENSES, EXPENSES TO RENT OR PURCHASE APPLIANCES, REMODELLING/CONSTRUCTION EXPENSES IN EXCESS OF DIRECT DAMAGES WHICH ARE DEFINITIELY CAUSED EXCLUSIVELY BY BERTAZZONI, OR ANY OTHER SPECIAL, INCIDENTAL OR CONSEQUENTIAL DAMAGES CAUSED BY THE USE, MISUSE OR INABILITY TO USE THIS PRODUCT, REGARDLESS OF THE LEGAL THEORY ON WHICH THE CLAIM IS BASED, AND EVEN IF BERTAZZONI HAS BEEN ADVISED OF THE POSSIBILITY OF SUCH DAMAGES. NOR SHALL RECOVERY OF ANY KIND AGAINST BERTAZZONI BE GREATER IN AMOUNT THAN THE PURCHASE PRICE OF THE PRODUCT SOLD BY BERTAZZONI AND CAUSING THE ALLEGED DAMAGE. WITHOUT LIMITING THE FOREGOING, PURCHASER ASSUMES ALL RISK AND LIABILITY FOR LOSS, DAMAGE OR INJURY TO
EN
PURCHASER AND PURCHASER'S PROPERTY AND TO OTHERS AND THEIR PROPERTY ARISING OUT OF THE USE, MISUSE OR INABILITY TO USE THIS PRODUCT SOLD BY BERTAZZONI NOT CAUSED DIRECTLY BY THE NEGLIGENCE OF BERTAZZONI. THIS LIMITED WARRANTY SHALL NOT EXTEND TO ANYONE OTHER THAN THE ORIGINAL PURCHASER OF THIS PRODUCT, IS NON-TRANSFERABLE AND STATES YOUR EXCLUSIVE REMEDY.
Bertazzoni does not assume any responsibility for incidental or consequential damages. Some states do not allow the exclusion or limitation of incidental or consequential damages, so the above limitation or exclusion may not apply to you. This warranty gives you specific legal rights and you may also have other rights which may vary from state to state or province to province.
Any questions about this Limited Warranty may be directed to Bertazzoni Customer Care
If located in the USA:
866 905 0010
https://us.bertazzoni.com/more/support
If located in CANADA:
8005617265
https://ca.bertazzoni.com/more/support
1 INDICATIONS IMPORTANTES CONCERNANT LA SECURITE 2
in USA http://us.bertazzoni.com/care-service in Canada https://ca.bertazzoni.com/more/support
écrire nous un mail
aftersaleservice@bertazzoni.com

Important
First time starting the unit
- compartment
supérieur
+46°F(+8°C) - compartment
inferieur
+41°F (+5°C)
This function enables to set the humidity of the upper and lower compartments. The default setting is set to "Medium".
5.1 Fonctions.
https://us.bertazzoni.com/more/support
Si situé au CANADA
8005617265
https://ca.bertazzoni.com/more/support
https://us.bertazzoni.com/more/support
https://ca.bertazzoni.com/more/support
https://ca.bertazzoni.com/more/support
Variaciones de temperatura rápidas y a gran escalaSEOSEOSEOSEOSEOSEOSEOSEOSEOSEOSEOSEOSEOSEOSEOSEOSEOSEOSEOSEOSEOSEOSEOSEOSEOSEOSEOSEOSEOSEOSEOSEOSEOSEOSEOSEOSEOSEOSEOSEOSEOSEOSEOSEOSEOSEOSEOSEOSEOSEOSEOSEOSEOSEOSEOSEOSEOSEOSEOSEOSEOSEOSEOSEOSEOSEOSEOSEOSEOSEOSEOSEOSEOSEOSEOSEOSEOSEOSEOSEOSEOSEOSEOSEOSEOSEOSEOSEOSEOSEOSEOSEOSEOSEOSEOSEOSEOSEOSEOSEO SEO
Compartmento superior
+54°F(+12°C)
-ajustabledesed +39^ ISTA +64^ (desed +4^ hasta +18^ )
Compartmento inferior
+50°F(+10°C)
-ajustabledesed +39^ ISTA +64^ (desed +4^ hasta +18^ )
https://us.bertazzoni.com/more/support
https://ca.bertazzoni.com/more/support
https://us.bertazzoni.com/more/support
https://ca.bertazzoni.com/more/support
- Built-in Columns Wine Cabinets
- Cave à Vins
- Armario cava
- IMPORTANT DIRECTIONS OF SAFETY AND THE ENVIRONMENT 4
- INSTALLATION 8
- BEFORE STARTING 9
- APPLIANCE SWITCHING ON AND OFF 12
- FUNCTIONS AND SETTINGS 17
- INTERNAL LAYOUT 24
- LIGHTING 24
- WINE STORAGE 25
- CARE AND CLEANIG 28
- TROUBLESHOOTING GUIDE 30
- LIMITED WARRANTY STATEMENT 33
- For your safety
- Important information when using the appliance
- Explosion hazard!
- Warning
- Note
- Important
- Ca
- Caution
- Warning and danger
- SAVE THESE INSTRUCTIONS!
- IMPORTANT SAFETY INSTRUCTIONS
- IMPORTANT SAFETY INSTRUCTIONS FOR PROPER DISPOSAL OF YOUR OLD REFRIGERATOR
- Suffocation Hazard
- WARNING
- Important information to know about disposal of refrigerants:
- IMPORTANT SAFETY INSTRUCTIONS FOR MAINTENANCE AND CARE
- DANGER
- TIP OVER HAZARD
- Installation
- Connection to electrical power supply
- Know your appliance
- main components
- Electronic Control
- Main control panel
- On/Off:
- Home
- Alarm
- Back
- Turning the appliance on and off
- First time starting the unit
- Switching off upper and lower compartments.
- Shutdown.
- Turning the upper and lower compartments on again
- Restart the compartments.
- Switching off for long periods
- How to adjust the temperature for different requirements.
- Modify the temperatures compartment
- Padlock icon.
- Information signals of warning messages on the display.
- Wine Cellar temperatures.
- INFORMATION FOR USING THE DISPLAY.
- 1) Humidity Control.
- Functions.
- 2) Interior light for 12h .
- Settings.
- 1) Date
- 2) Time
- 3) SET°F/°C
- 4) Language
- 6) Sabbath Mode
- 7) Reset
- 8) Demo Mode
- 9) Maintenance (through alarm sign).
- 10) Service
- 11) Info System
- Internal Layout (positioning, adjustment, removal)
- Wine shelf
- Interior lighting
- General directions
- Conservation temperature
- Time of conservation
- Consumption temperature
- White wines
- Rosé
- Red wines
- Sparkling wines
- Position of bottles
- Care and Cleaning
- Cleaning of the toe kick cover, filter and condenser.
- On the maintenance settings, after the installation of the unit and after it has been turned on, you can set the condenser cleaning warning.
- Lower condenser.
- For cleaning the condenser follow the instructions:
- Internal cleaning
- Troubleshooting guide
- Malfunction message
- The appliance does not work
- The internal temperatures are higher than normal
- The appliance remains in function for a long time period
- If you hear strange noises
- Condensation forms both inside and out
- The doors are difficult to open
- Malfunction indications appearing on the display
- Limited two-year warranty
- Limited five year parts and labor warranty on sealed system
- Day Cosmetic warranty
- How to obtain service
- Warranty exclusions - what is not covered
- INDICATIONS IMPORTANTES CONCERNANT LA SECURITE 2
- Fonctions.
Brand : BERTAZZONI
Model : REF18WCPIXR23
Category : Wine cellar