
HWF23 - Faucets FRANKE - Free user manual and instructions
Find the device manual for free HWF23 FRANKE in PDF.

| Product type | Automatic faucet with ozone generator |
| Brand | Franke |
| Model | HWF23 (Ozo-flo) |
| Use | Hand washing, sink and trap disinfection |
| Main function | Generation of ozone and oxidants for disinfection |
| Power supply | 230 V / 50 Hz (estimated, external power supply unit) |
| Required water pressure | Standard cold water supply under pressure |
| Recommended water temperature | 27-35 °C (with thermostatic mixer) |
| Recommended total dissolved solids (TDS) level | 75-350 ppm (normal conductivity) |
| Disinfection | Production of ozone, hydrogen peroxide, and hydroxyl radicals |
| Default wash cycle duration | 20 seconds |
| Post-rinse cycle | 3 seconds after washing |
| Daily purge cycle | Every 24 hours (adjustable) |
| Warranty | 2 years (spout, cables, power supply); 12 months (solenoid valve) |
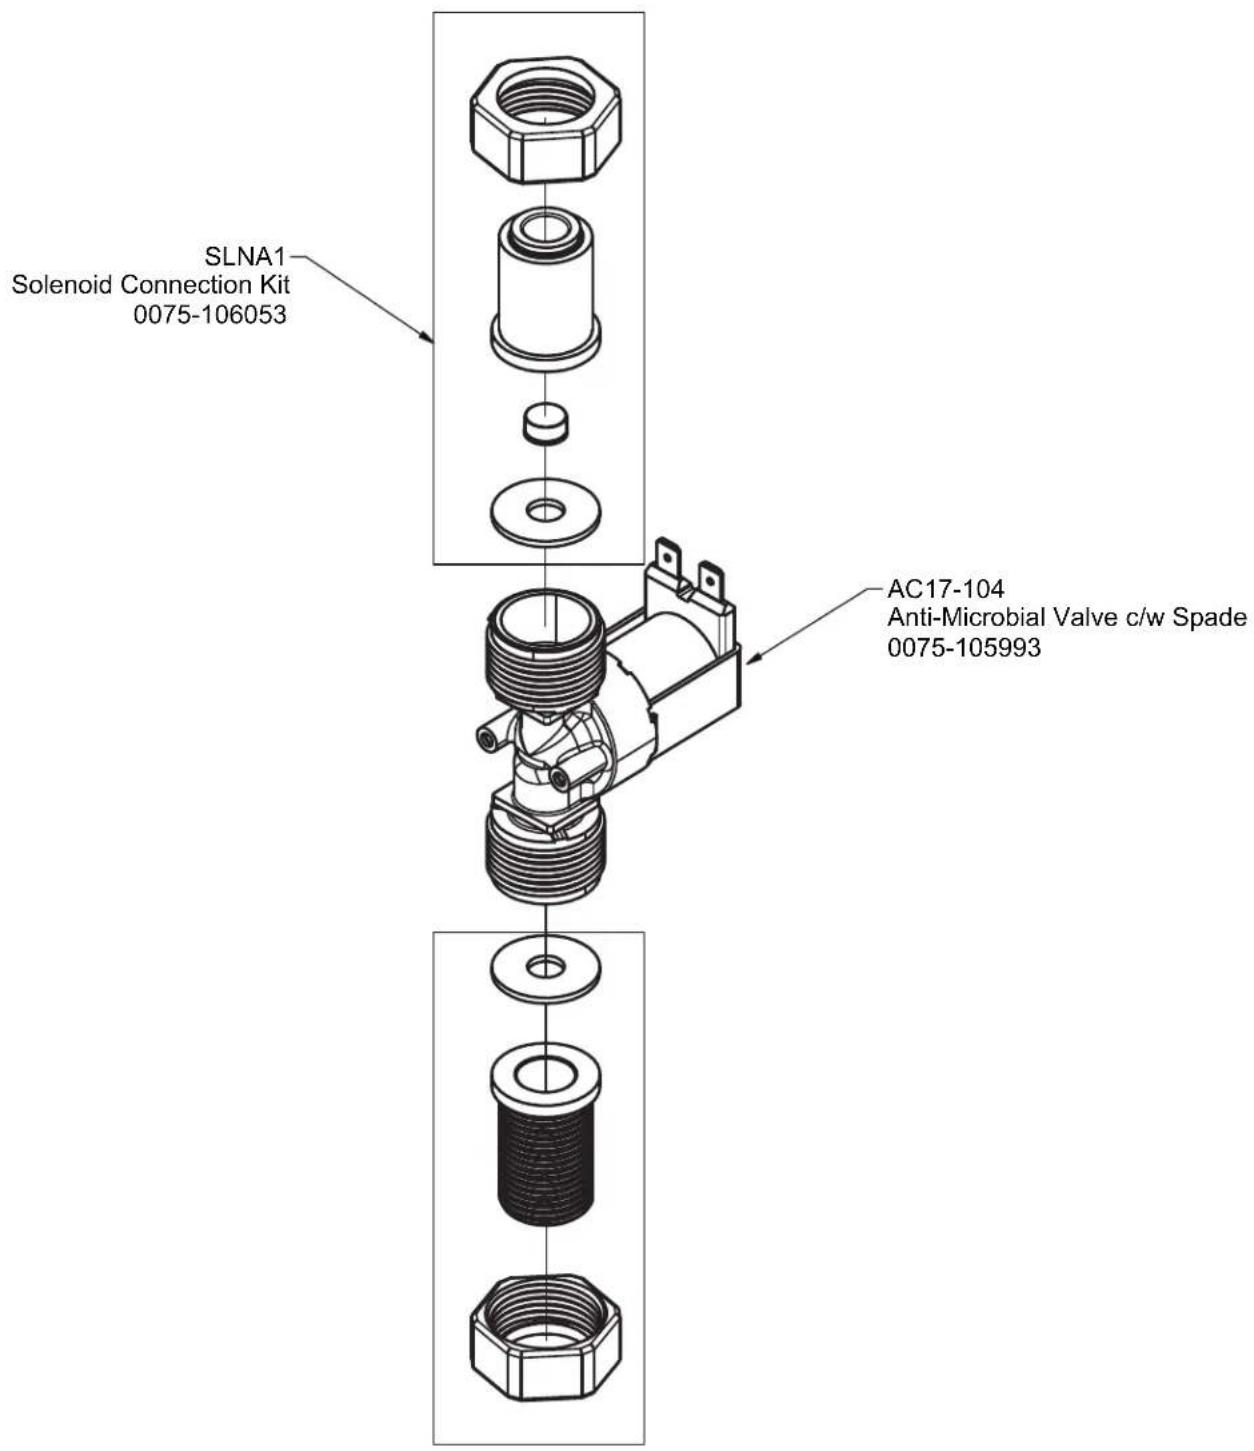
| Spare parts | Solenoid valve AC17-104, portable programmer AC01-005, cables |
| Maintenance | Cleaning the solenoid valve, checking water TDS |
| Installation | On sink or wall-mounted, 1/2" flexible connection, coded electrical connections |
| Water compatibility | Not compatible with RO or DI water |
| LED indicator | Blue ring illuminated during flow, pulsations during charge cycle |
Frequently Asked Questions - HWF23 FRANKE
User questions about HWF23 FRANKE
0 question about this device. Answer the ones you know or ask your own.
Ask a new question about this device
Download the instructions for your Faucets in PDF format for free! Find your manual HWF23 - FRANKE and take your electronic device back in hand. On this page are published all the documents necessary for the use of your device. HWF23 by FRANKE.
USER MANUAL HWF23 FRANKE
OZO-FLO FAUCET AND HOUSING INSTALLATION

INSTRUCTIONS FOR HWF05, HWF23, HWF43
Preface
Ozonated water has been proven as a safe and extremely effective way to help sanitize the sink and keep the drain and trap free of CPOs and other pathogens. This also improves the efficiency of hand washing. Other control features include a post-wash cycle of 3 seconds which ensures all soap residue and bacteria has been washed down the sink, and a daily purge cycle to prevent stagnant water in the lines and ensure continuous waste disinfection. Any standard P-trap will be disinfected with this process.
Ozo-flo has been exclusively designed for sinks intended for hand washing only. It is not recommended as a drinking source. Recommended for areas with normal water conductivity in the range of 75 - 350 total dissolved solids (TDS). If unaware of your local water conductivity, please contact customer service and this can easily be determined for you before you install the product.
Ozo-flo is recommended to be installed with a thermostatic mixing valve and set to a temperature of 27-35C. (Optional accessory MEDI-MIX is available from Franke).
INSTRUCTIONS:
a) Install the faucet onto the sink or wall
b) Determine the optimum location for the wall housing - under or near the sink. Ensure that cable connections can be made.
c) Using the white wall plate as a template, mark the screw hole locations (4)
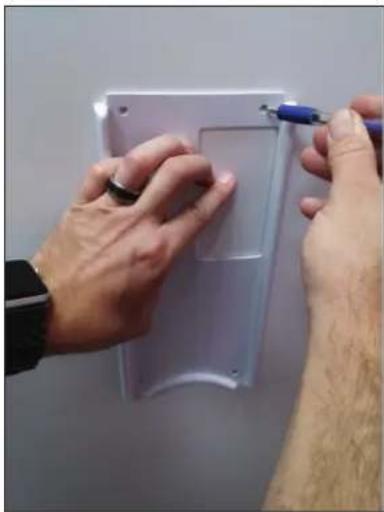
natural_image
Close-up of hands installing or adjusting a white plastic panel with a blue tool (no visible text or symbols)Figure C.jpg
d) Using hardware appropriate for the installation wall, place the white backing plate behind the stainless steel plate and secure to the wall.
natural_image
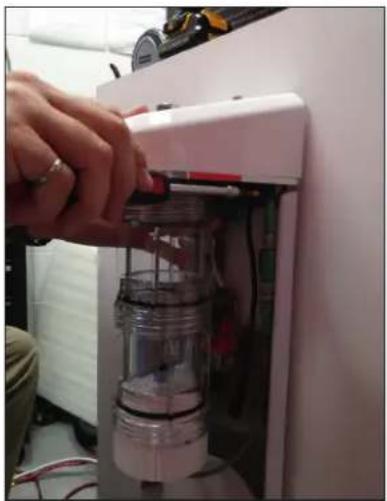
Hand inserting a small container into a white appliance (no visible text or symbols)Figure D.jpg
e) Use a standard 1/2" braided faucet supply hose, connect this to the brass threaded inlet of the solenoid valve.
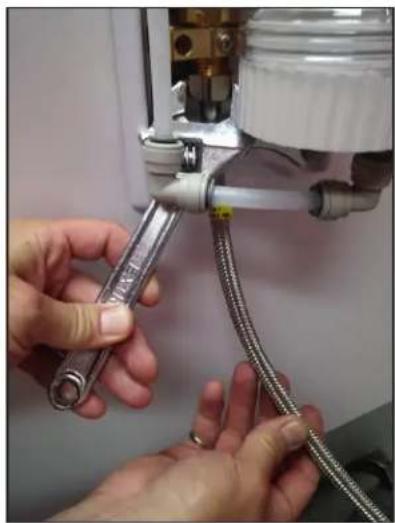
natural_image
Close-up of hands connecting a flexible hose to a mechanical device (no visible text or symbols)Figure E.jpg
f) If necessary connect the 5.1mm extension cable to the control board.
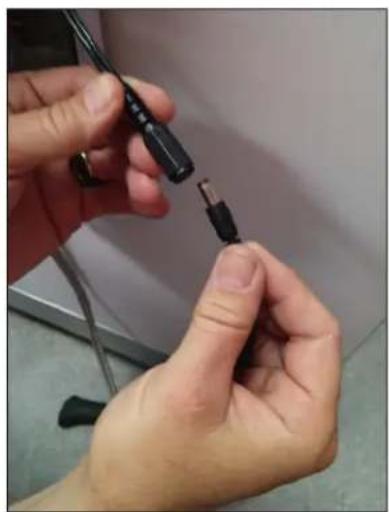
natural_image
Close-up of hands holding a black cable with a metallic connector, no visible text or symbolsFigure F.jpg
g) Pass the other end to the supply hose through the hole in the bottom of the shroud. Mark and drill the wall which will later be used to secure the shroud to the wall.
h) Connect the 12 " supply hose from the bottom of the faucet to the top of the Ozo-flo housing. Do not over-tighten (hand tighten plus 1/4 turn).
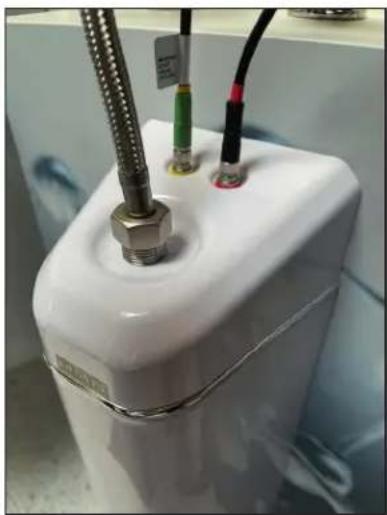
natural_image
Close-up of a white cylindrical device with metal tubing and connectors, no visible text or symbolsFigure H.jpg
i) Make note of the red and yellow colour markings of the electrical connectors and match them with the bands on the cables coming from the faucet. The connectors are keyed and will only push together one way. Gently push and rotate the connection until they assemble and screw closed.
j) Plug in the power supply, wait 10 seconds and activate the faucet. It may take 10 seconds for the ozonation chamber to fill with water and then come through the faucet.
k) Check for any leaks and proper operation. Once checked, complete the assembly by securing the shroud to the wall.
TESTING
When the faucet is activated, water should flow and the blue ring on the tap will illuminate. When you remove your hands the tap will stop water flow and start its lathering timer. During this time the LED ring will pulse in intensity. During this timed operation, the concentration of ozone and other mixed oxidants are building in the chamber. The faucet will slowly drip from the spout. This is normal as the volume in the chamber is increasing due to the oxidant generation. At the end of the lathering timer (default 20 seconds), the tap will automatically run for 3 seconds. This 3-second run time has two purposes.
a) Can be used as a timer for users to ensure they have lathered to the recommended time.
b) It helps rinse any remaining soap residue in the sink away after a user has walked away.
TROUBLESHOOTING
Ozo-flo will briefly release traces of ozonated water post-usage (as part of the ozonation purge cycle). An additional factory set purge cycle will activate once every 24 hours. The timing can be modified using our optional hand-held programmer (part number AC01-005).
No water flow - Ensure power is connected and you have water supply pressure. When you trigger the tap by placing your hands underneath, you should see the LED ring illuminate. If the LED does not illuminate check to see that the wire connections from the tap to the wall housing are correct (match colour red and yellow bands on the cable). If the LED illuminates and no water flow check to see that the spade connectors are properly installed on the solenoid valve located inside the wall housing. The brown wire should be closest to the wall. If these wires are not connected, the solenoid will not function. You should hear a click of the solenoid valve when triggered. If
the valve is not triggering and power and connections are validated, replace solenoid valve with part number AC17-104.
Water triggers but does not stop - Ensure that the range setting for distance is properly set for the faucet. Use handheld programmer part number AC01-005 (sold separately) to adjust range or contact your local rep.
LED blinking once per second - This indicates that the output of the ozone generator is low. Verify that the ozone chamber is filled with water. When activated you should see bubbles being generated. Verify that the ozone generator cable is connected (blue banded cable). Otherwise verify your local water TDS. Ozo-flo is recommended for water above TDS of 75.
LED blinking 2x per second - This indicates the ozone generator is drawing too much current and the system has shut off power for protection. Inspect ozone generator for a short between the mesh plates. Verify your local water TDS is not above 400. If you have high TDS contact our customer service and we can assist with proper generator sizing.
Tap Dripping - When the ozone generator is charging the canister, traces of ozonated water will be released from the tap. This is normal operation and will only occur when the LED is pulsing in intensity (for approximately 90 seconds). If the dripping is constant, the solenoid valve may have debris on its internal seal/seat. The solenoid may be disassembled for cleaning or you may order a replacement (part number AC17-104)
OZONE GENERATOR TECHNICAL INFORMATION
The ozone generator within Ozo-flo not only generates ozone but also other powerful oxidants such as oxygen atoms, (O2), hydrogen peroxide and hydroxyl radicals which all work together to destroy harmful bacteria and viruses.
The residual ozone (O3) & mixed oxidants produced by the system is a function of water flow rate, the water conductivity (TDS) and water composition. In other words, residual ozone is a function of the water composition (such as hardness, alkalinity, PH, iron, manganese, colour, odour, bacteria, etc.) and the flow rate (or length of time the generator is running with no flow rate during the lather time or during trap purge disinfection cycle). The mix of produced ozone and other mixed radicals is also dependent on local water conditions.
For optimum performance, we recommend installation in areas with conductivity between 75-350TDS. If below 75TDS, the ozone generator will still function down to as low as TDS of 50; however, oxidant output may be reduced to under 0.5ppm. In areas above 350TDS, we may recommend a smaller ozone generator as to not max out the power supply. TDS can be measured using a small TDS reader, your local water or pool supply store or by sending in a sample of 250ml minimum to our customer service.
We recommend the DPD test to measure ozone generator output as it also takes into consideration the additional mixed oxidant potential. Tests such as ORP and Indigo may not give valid readings due to hydrogen interference, temperature, water composition and PH. Subtract the reading obtained from straight tap water to remove any reading from chlorine.
The default operation of the ozone generator is to run a charge cycle after every use. Target canister charge is 2.0ppm of mixed oxidants. During this charge cycle, you will see the LED pulse in intensity (this can be adjusted or turned off with the handheld programmer AC01-005)
Typical approximate output is as follows: @150 TDS = 17 minutes @200 TDS = 12 minutes @250 TDS = 7 minutes @300 TDS = 4 minutes @350 TDS = 3 minutes
During a hand wash cycle, when the initial signal is received to wash hands, the user typically wets their hands and then commences lathering. While they pull away their hands to lather, the water flow will stop but we keep the ozone generator running for 20 seconds to build up concentration in the chamber to be available for the rinse cycle. Alternatively, after 20 seconds of last use the water flow will automatically come on for an additional 3 seconds. The intention is that 20 seconds after last use, the sink will dispense a small amount of water for a post-rinse clean of the sink and trap to remove any remaining soap residue.
Note: Water softeners will increase TDS and are recommended if your conductivity is low; however, reverse osmosis or de-ionized water is not compatible with Ozo-flo.
WARRANTY The automatic faucet spout, cables and Power Supply Unit (PSU) is guaranteed for 2 years from purchase against defective material and assembly. The solenoid valve is guaranteed for 12 months, subject to water condition, however it is expected that the valve mechanism will operate efficiently for many years.
Franke Kindred Canada Limited
1000 Franke Kindred Road
Midland, ON L4R 4K9
Tel 1.855.446.5663
Fax 1-866-227-3050
www.franke-commercial.com


natural_image
Close-up of hands installing or adjusting a plastic panel with a blue tool (no visible text or symbols)Figure C.jpg
natural_image
Close-up of a hand inserting a small container into a white appliance (no visible text or symbols)Figure D.jpg
natural_image
Close-up of hands connecting a metal pipe to a mechanical device with coiled cable (no visible text or symbols)Figure E.jpg
natural_image
Close-up of hands connecting a black cable to a small connector (no text or symbols visible)Figure F.jpg
natural_image
Close-up of a white cylindrical device with coiled wires and connectors, no visible text or symbolsFigure H.jpg
Franke Kindred Canada Limited
1000 Franke Kindred Road
Midland, ON L4R 4K9
Tél 1.855.446.5663
Télécopie 1.866.227.3050
www.franke-commercial.com
TROUBLESHOOTING GUIDE
OZO-FLO models HWF05, HWF23, HWF43

Contents
No water flow / Faucet not functioning ....1
Not enough water flow 2
Too much water flow 2
LED's blinking once per second....2
LED's blinking 2x per second....2
LED not working....3
Water stops flowing out when washing hands ....3
Water does not shut off....3
Appendix 1 : Parts Breakdown....4
No water flow / Faucet not functioning
a. Cycle power by unplugging and plugging in transformer. The blue LED should blink once during power up. If the LED did not blink once, make sure green LED is illuminated on the power supply. If no green LED on power supply, make sure that the GFI has not tripped and there is power at the plug.
b. If power at the plug is confirmed and the green LED is not shown on the transformer, replace transformer (ZF120A-2402500-FKC).
c. If transformer has a green LED and the blue light blinks upon power-up but the faucet will not activate, check that the yellow sensor wire is connected properly.
d. Activate the faucet by placing your hand in-front of the sensor (ensure that you are not wearing black silicone gloves as the IR signal will not bounce back if they are used). When activating the faucet, you should see the blue light ring illuminate as well as hear the solenoid valve click. If the blue light and the solenoid does not activate, replace PCB (AT00-190). If the blue light comes on but the solenoid does not click, ensure that both spade connectors are attached to the solenoid valve. If so, replace solenoid valve and re-test (AC17-104-6V).
e. If after PCB replacement and solenoid replacement the faucet still does not function, replace faucet body.
Not enough water flow
a. Ensure control stops are fully open.
b. If using a mixing valve, ensure BOTH the hot and cold water supplies are on. If the cold water supply is not active, the TMV will shut off or greatly restrict the hot water side as well.
c. Flow rate of ozo-flo is dictated by the outlet of the faucet. Using a wrench, unscrew the outlet and activate the faucet. This will be full line pressure. If flow rate (without the outlet) is still low, check for adequate flow rate prior to the mixing valve.
d. Blockages can occur in inlet screens of the mixing valve as well as the inlet of the solenoid valve (AC17-104-6V) in the wall housing.
Too much water flow
a. Water flow is controlled by the outlet of the faucet. Ensure that it is in place.
LED's blinking once per second
a. This is an indicator that ozone is not being generated.
b. First verify that the blue banded cable is connected between the PCB and the cable going to the ozone generator.
c. Verify TDS is above 50. Normally the facility maintenance team would have this checked monthly. If the customer can not determine this, each rep agency has a small TDS meter that can be used; otherwise, a handheld programmer (AC01-005) can scan the system and estimate TDS.
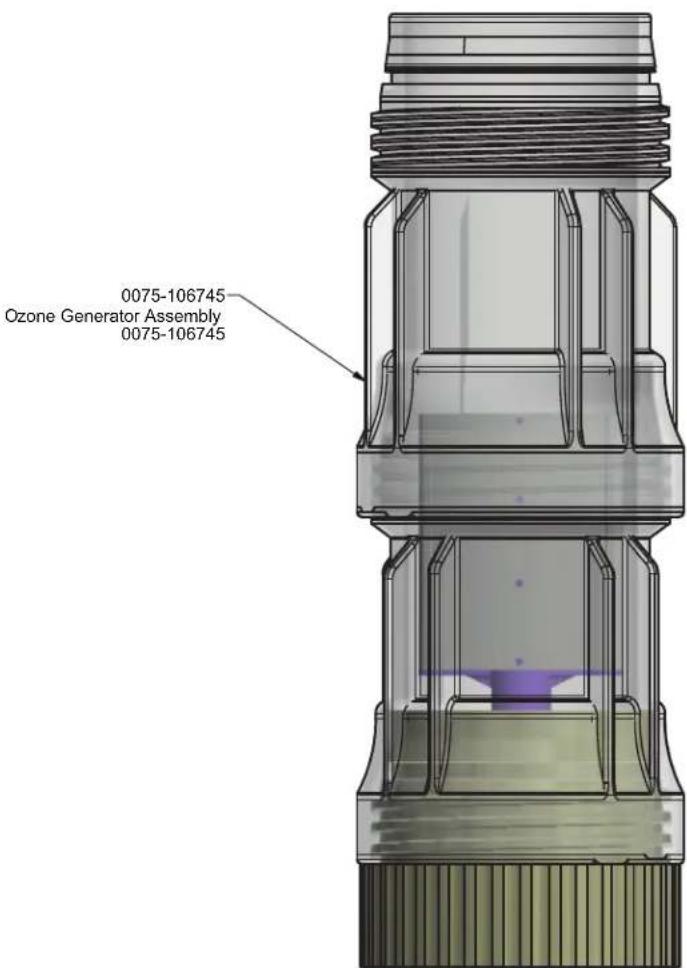
d. If TDS is acceptable and the cable is properly connected, there must be a break in the electrical connection to the ozone generator. Replace with item 0075-106745 and re-test.
LED's blinking 2x per second
a. This is an indication of the ozone generator pulling too much current from the power supply. This can happen if there is a short in the ozone generator electrodes or when the water conductivity (TDS) is too high.
b. First verify that the TDS is below 350. If TDS is above, contact customer service to obtain a smaller ozone generator.
c. If TDS is in normal range (75-350) remove ozone chamber from the rear of the sink and inspect the mesh for any debris that could cause a short in between electrodes.
d. If no short is detected and the error is still occurring, replace with new ozone generator item 0075-106745.
LED not working
a. Cycle power and observe if LED blinks once during power up. If LED illuminates then it has been set to 0 intensity using the handheld programmer AC01-005. Use the programmer to modify the LED intensity setting.
b. If the LED does not blink once during start-up, replace spout.
Water stops flowing out when washing hands
a. If while washing hands the water seems to stop from time to time, the sensor range should be increased. Using handheld programmer AC01-005 increase the sensor range.
Water does not shut off
If water does not shut off, try the following:
a. Ensure that nothing is not in front of the sensor. If so remove and test.
b. Even with debris in front of the sensor, the water flow should cease after 1 minute as part of the anti-vandal features. If water continues to run, cycle the power on and off by unplugging the transformer. When the faucet is first plugged in, the system will send a pulse to the plug in transformer to close.
c. If the water continues to run, try activating the faucet. If the faucet shuts off momentarily, this means that the latching solenoid valve is reversed. Reverse the spade connectors so that the brown wire is closest to the wall. Cycle power again to see if this solves the issue.
d. If water continues to run, replace solenoid valve with AC17-104-6V.
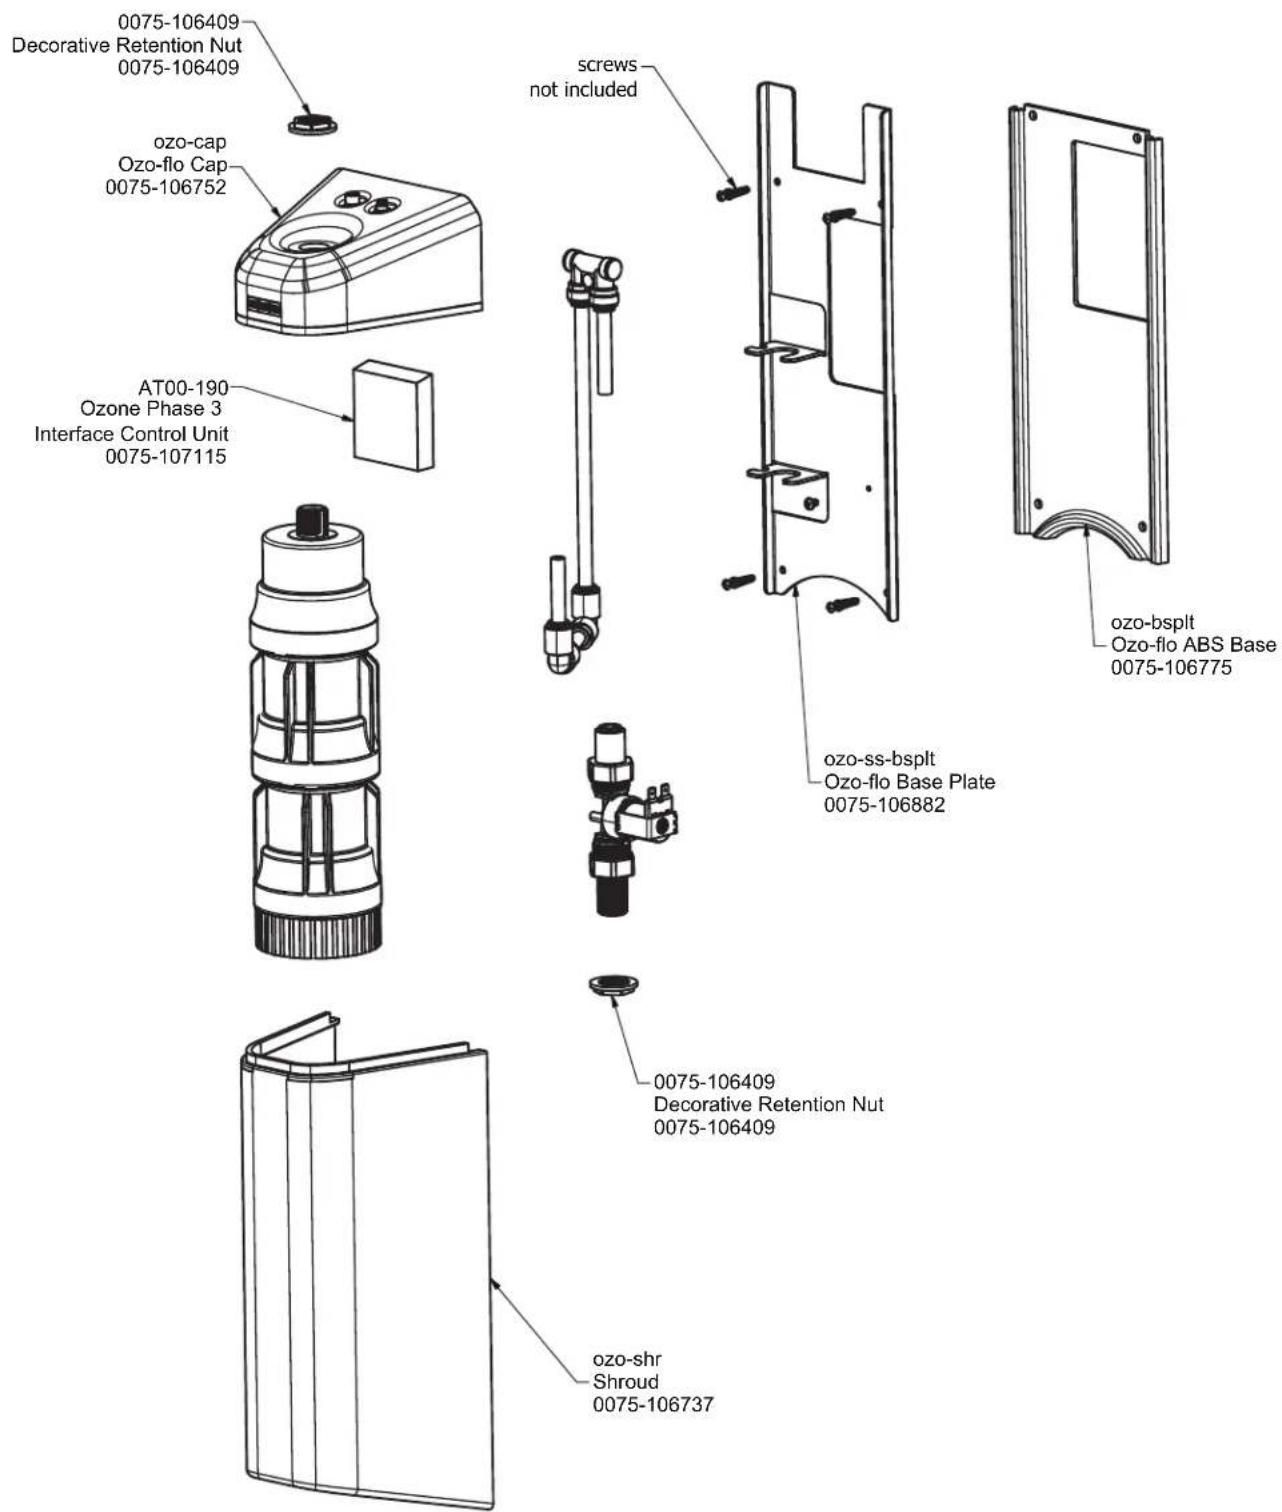
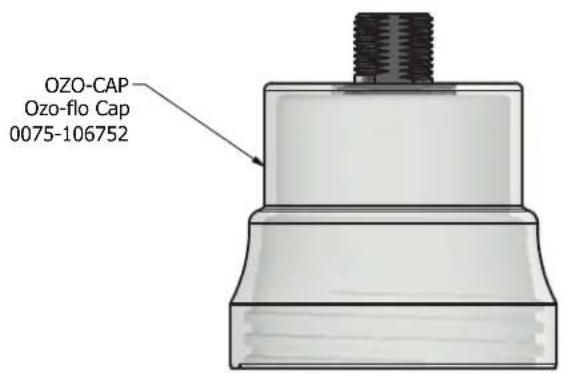
Appendix 1: Parts Breakdown
ZGI_001_2030052737-Ozo-flo-Appendix.pdf
Franke Kindred Canada Limited
1000 Franke Kindred Road
Midland, ON L4R 4K9
Tel 1.855.446.5663 (CANADA)
Tel 1.855.526.0503 (USA)
www.franke-commercial.com
commercial-info.ca@franke.com (Canada)
commercial-info.us@franke.com (USA)
APPENDIX
OZO-FLO models HWF05, HWF23, HWF43

APPENDIX
OZO-FLO models HWF05, HWF23, HWF43

Franke Kindred Canada Limited
1000 Franke Kindred Road
Midland, ON L4R 4K9
Tel 1.855.446.5663 (CANADA)
Tel 1.855.526.0503 (USA)
www.franke-commercial.com
commercial-info.ca@franke.com (Canada)
commercial-info.us@franke.com (USA)

- OZO-FLO FAUCET AND HOUSING INSTALLATION
- Preface
- INSTRUCTIONS:
- TESTING
- TROUBLESHOOTING
- OZONE GENERATOR TECHNICAL INFORMATION
- TROUBLESHOOTING GUIDE
- Contents
- No water flow / Faucet not functioning
- Not enough water flow
- Too much water flow
- LED's blinking once per second
- LED's blinking 2x per second
- LED not working
- Water stops flowing out when washing hands
- Water does not shut off
- Appendix 1: Parts Breakdown
- Franke Kindred Canada Limited
- APPENDIX
Brand : FRANKE
Model : HWF23
Category : Faucets