
CA38FL7N20WXB - Microwave Oven CANDY - Free user manual and instructions
Find the device manual for free CA38FL7N20WXB CANDY in PDF.

| Brand | Candy |
| Model | CA38FL7N20WXB |
| Type | Built-in microwave oven |
| Dimensions (W × H × D) | 595 × 385 × 337 mm |
| Recess dimensions (W × H × D) | 560+4 × 360 × 550 mm |
| Voltage | 230 V ~ 50 Hz |
| Microwave power | 800 W |
| Microwave power levels | 5 (100%, 80%, 50%, 30%, 10%) |
| Grill power | 1000 W |
| Cooking types | Microwave, Grill, Combi (C-1, C-2) |
| Defrost | By weight (100-1500 g) or by time (0:10-60:00) |
| Automatic menus | 8 (Potatoes, Pasta, Pizza, Popcorn, Vegetables, Drinks, Meat, Fish) |
| Timer | 0:10 to 60:00 minutes |
| Clock | 24 h |
| Child lock | Control panel lock |
| Interior light | LED (< 60 lm) |
| Turntable material | Glass |
| Included accessories | Turntable, Rotating ring, Grill rack |
| Standby mode (power consumption) | 0.8 W (activates after 20 min) |
| Recommended cleaning | Damp soft cloth, no steam cleaner or abrasives |
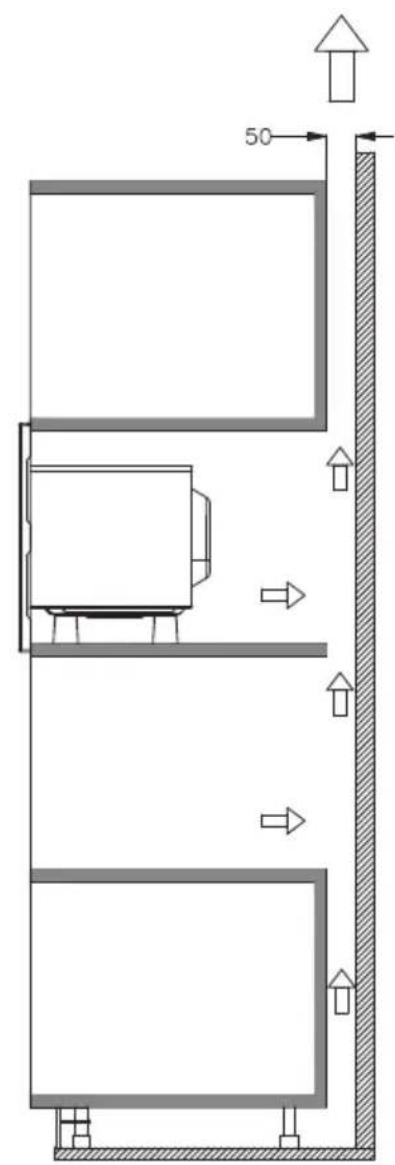
| Installation | Minimum height 900 mm from floor, top clearance as per plan |
| Repairability | Repair parts accessible by authorized professional (cable, magnetron, etc.) |
Frequently Asked Questions - CA38FL7N20WXB CANDY
User questions about CA38FL7N20WXB CANDY
0 question about this device. Answer the ones you know or ask your own.
Ask a new question about this device
Download the instructions for your Microwave Oven in PDF format for free! Find your manual CA38FL7N20WXB - CANDY and take your electronic device back in hand. On this page are published all the documents necessary for the use of your device. CA38FL7N20WXB by CANDY.
USER MANUAL CA38FL7N20WXB CANDY
CA38FL7N20WXB
IMPORTANT SAFETY INSTRUCTIONS READ CAREFULLY AND KEEP FOR FUTURE REFERENCE Household use only SAVE THESE INSTRUCTIONS
IMPORTANT SAFEGUARDS
WARNING: If the door or door seals are damaged, the oven must not be operated until it has been repaired by a trained person.
WARNING: It is hazardous for anyone other than a trained person to carry out any service or repair operation, which involves the removal of any cover, which gives protection against exposure to microwave energy. WARNING: Liquids or other food must not be heated in sealed containers since they are liable to explode.
- Only use utensils that are suitable for use in microwave ovens.
- Metallic containers for food and beverages are not allowed during microwave cooking.
- When heating food in plastic or paper containers, keep an eye on the oven due to the possibility of ignition.
- The microwave oven is intended for heating food and beverages. Drying of food or clothing and heating of warming pads, slippers, sponges, damp cloth and similar may lead to risk of injury, ignition or fire.
- If smoke is observed, switch off or unplug the appliance and keep the door closed in order to stifle any flames microwave heating of beverages can result in delayed eruptive boiling, therefore care has to be taken when handling the container.
- The contents of feeding bottles and baby food jars are to be stirred or shaken and the temperature is to be checked before consumption, in order to avoid burns.
- Eggs in their shell and whole hard-boiled eggs shall not be heated in microwave ovens since they may explode, even after microwave heating has ended.
- Failure to maintain the oven in a clean condition could lead to deterioration of the surface that could adversely affect the life of the appliance and possibly result in a hazardous situation.
- The appliance must not be placed in a cabinet.
-
Care should be taken not to displace the turntable when removing containers from the appliance.
-
The appliance shall not be cleaned with a steam cleaner.
- The appliance must not be installed equal or higher than 900 mm above the floor. Minimum height of free space necessary above the top surface of the oven: See the installation drawing.
Warning: When the appliance is operated in the combination mode, children should only use the oven under adult supervision due to the temperatures generated.
CAUTION: HOT SURFACE
- If the supply cord is damaged, it must be replaced by the manufacturer or its service agent or a similarly qualified person in order to avoid a hazard.
- This appliance can be used by children aged from 8 years and above and persons with reduced physical, sensory or mental capabilities or lack of experience and knowledge if they have been given supervision or instruction concerning use of the appliance in a safe way and understand the hazards involved.
- Children shall not play with the appliance.
- Cleaning and user maintenance shall not be made by children without supervision.
- Group 2 Class B appliance Group 2 ISM equipment: group 2 contains all ISM equipment in which radio-frequency energy is intentionally generated and/or used in the form of electromagnetic radiation for the treatment of material, and EDM and arc welding equipment. Class B equipment is equipment suitable for use in domestic establishments and in establishments directly connected to a low voltage power supply network which supplies buildings used for domestic purposes.
- The plug must be remained easily accessible after installation of the appliance.
-
This appliance must not be placed in a cabinet with a door.
-
This product internal light source LED light on < 60 lm.
- During use the appliances becomes hot. Care should be taken to avoid touching heating elements inside the oven.
WARNING: Accessible parts may become hot during use. Young children should be kept away.
WARNING: The appliance and its accessible parts become hot during use. - Care should be taken to avoid touching heating elements.
- Children less than 8 years of age shall be kept away unless continuously supervised.
- Do not use harsh abrasive cleaners or sharp metal scrapers to clean the oven door glass since they can scratch the surface, which may result in shattering of the glass.
- The appliance must not be installed behind a decorative door in order to avoid overheating. This appliance can be used by children aged from 8 years and above and persons with reduced physical, sensory or mental capabilities or lack of experience and knowledge if they have been given supervision or instruction concerning use of the appliance in a safe way and understand the hazards involved. Children shall not play with the appliance. Cleaning and user maintenance shall not be made by children without details indicating the correct installation of the shelves.
INSTALLATION
1) The position of the oven shall be such that it is far from the TV, Radio or antenna as picture disturbance, or noise may occur.
2) The appliance must be positioned so that the plug is accessible.
3) This is a cabinet microwave oven, which is subject to PRECAUTIONS and INSTALLATION below.
① RECAUTIONS:
Given the limited room of the cabinet, the microwave oven must be installed under the following instructions so as to avoid danger.
Do not cover ventilation slots and air intake points.
② INSTALLATION:
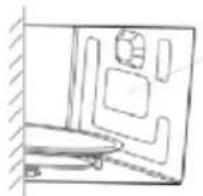
a) Put the microwave oven into built-in cabinet, and push it forward to the end. (Fig. 1)
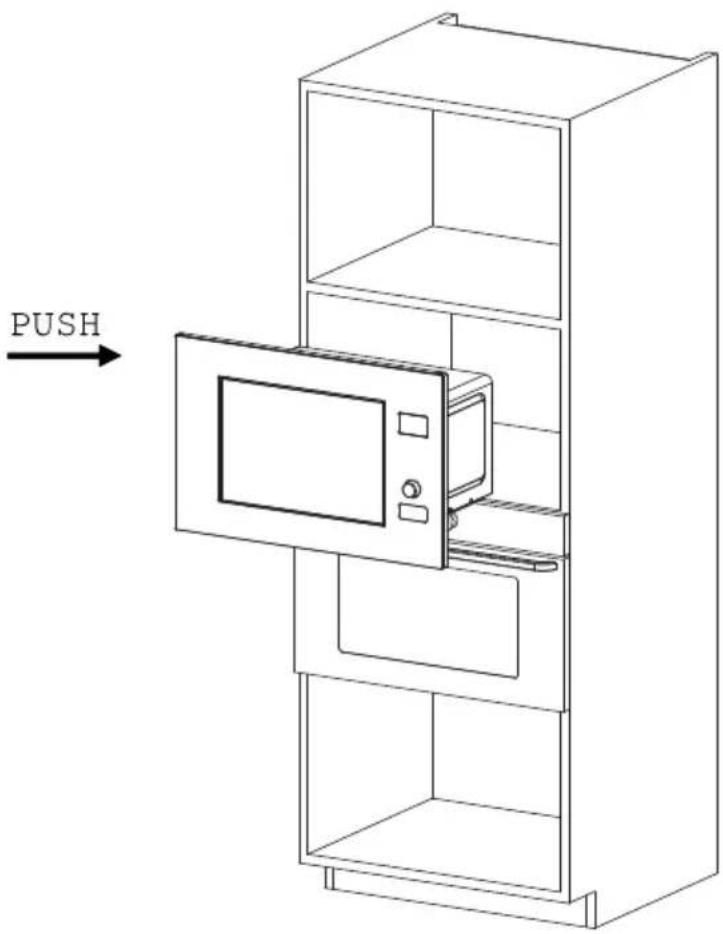
Fig. 1
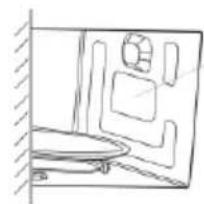
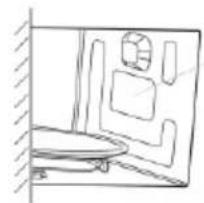
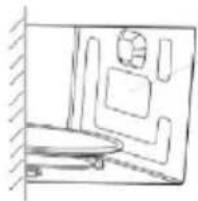
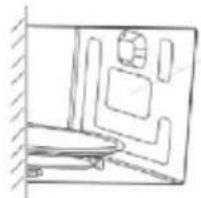
b) Push the microwave oven till to the end. (Fig. 2)
natural_image
Line drawing of a multi-tiered refrigerator with an open door and front panel, showing internal components and a close-up inset of the lid (no text or symbols)Fig. 2
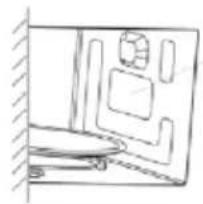
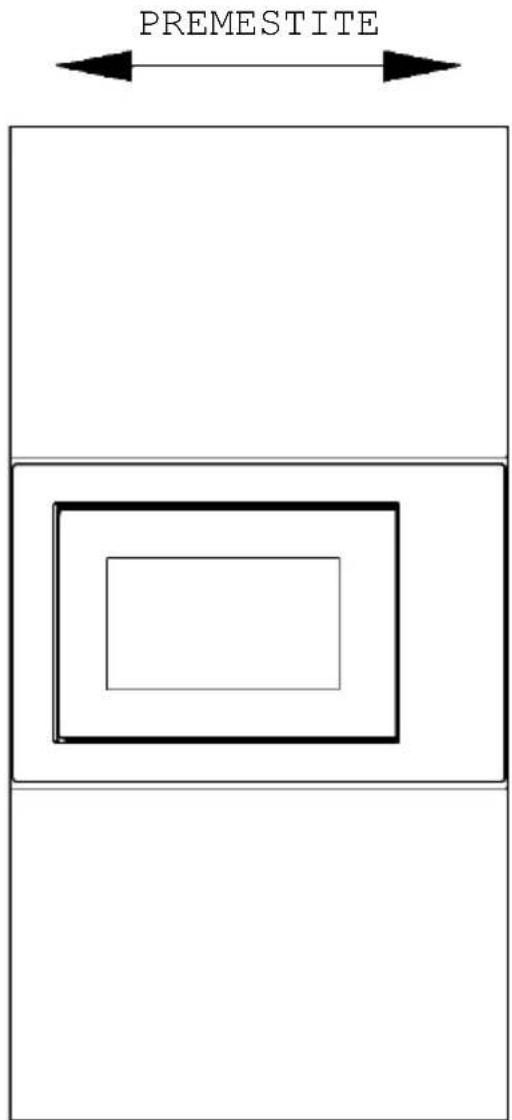
c) Move the product in parallel in the kitchen cabinet according to the direction of the arrow in the figure, and keep it centered. (Fig. 3)
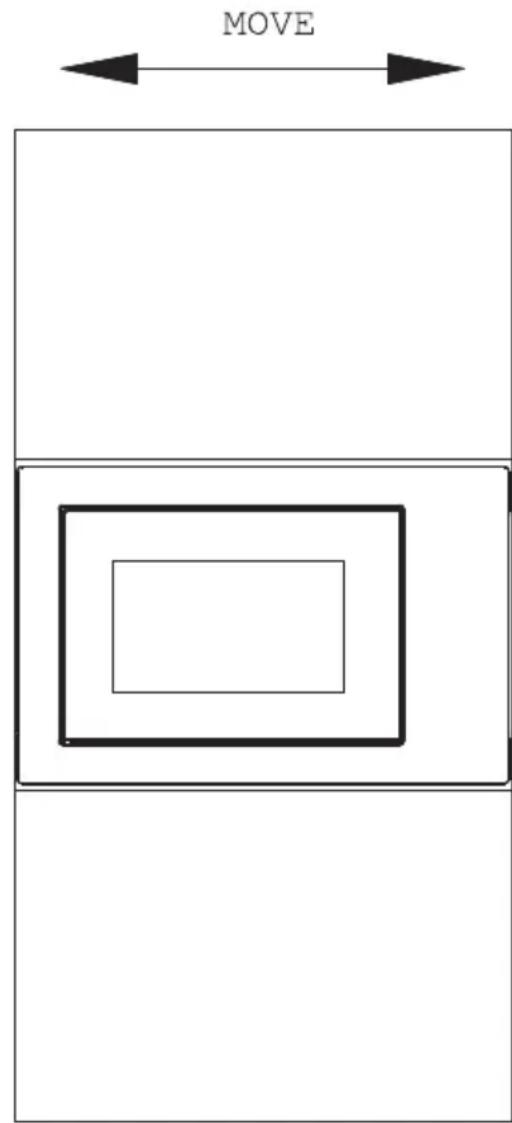
Fig. 3
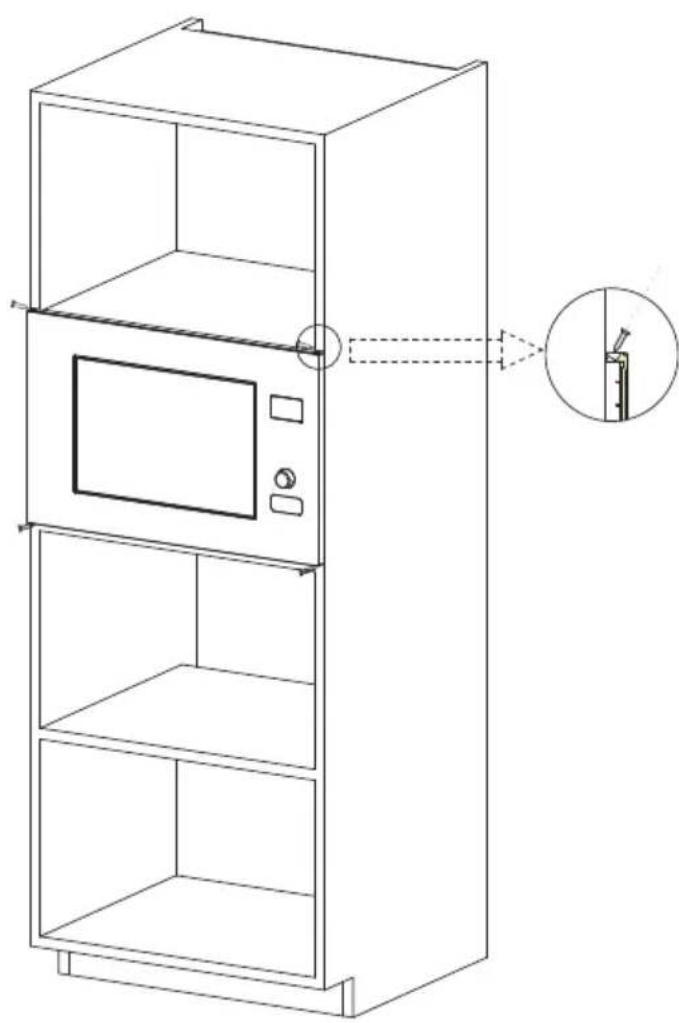
d) Use the screws of parts packing to secure the microwave oven in the cabinet. (Fig. 4)

Fig. 4
Cabinet details:
Product size: (W)595x(H)385x(D)337(mm)
Opening size: (D)560+4 x (E)360 x (F)550 (mm) as shown in
Fig. 4 “D”, “E”, “F”.

Fig. 4
CLEANING
MICROWAVE OVEN CARE
CAUTION
The oven should be cleaned regularly and any food deposits removed.
WARNING
a. Remove the power cord from the wall outlet before cleaning. After cooling products. Don't immerse the appliance in water or other fluids when cleaning.
b. Failure to maintain the oven in a clean condition could lead to deterioration of the surface that could adversely affect the life of the appliance and possibly result in a hazardous situation.
c. Never use hard detergent, gasoline, abrasive powder or metal brush to clean any part of the appliance.
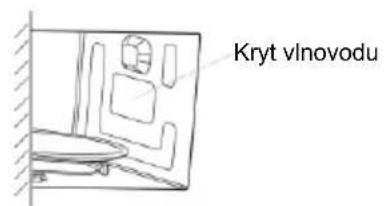
d. Do not remove the waveguide cover.
e. When the microwave oven has been used for a long time, there may be some strange odors exist in oven, following 3 methods can get rid of them:
1) Place several lemon slices in a cup, then heat with high micro power for 2-3 min.
2) Place a cup of red tea in oven, then heat with high micro power.
3) Put some orange peel into oven, and then heat them with high micro power for 1 minute.
f. When the product is not used, it should be placed in dry and ventilated areas as well as possible.
WARNING
Details how to clean surfaces in contact with food:
After use wipe the waveguide cover with a damp cloth, followed by dry cloth to remove any food splashes and grease. Built-up grease may overheat and begin to cause smoke or catch fire.
TIPS FOR CLEANING
Details for cleaning door seals, cavity and adjacent parts:
Exterior:
Wipe the enclosure with a dampened soft cloth
Door:
Using a dampened soft cloth, wipe clean the door and window Wipe the door seals and adjacent parts to remove any spill or spatter
Wipe the control panel with a slightly dampened soft cloth
Interior walls:
Wipe clean the interior surfaces with a dampened soft cloth Wipe clean the waveguide cover to remove any food splashed
Turntable / Rotation ring / Rotation axis:
Wash with mild soap water Rinse with clean water and allow drying thoroughly
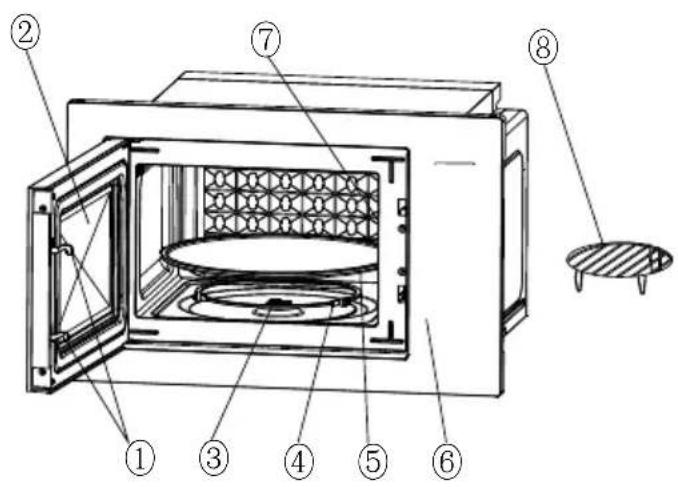
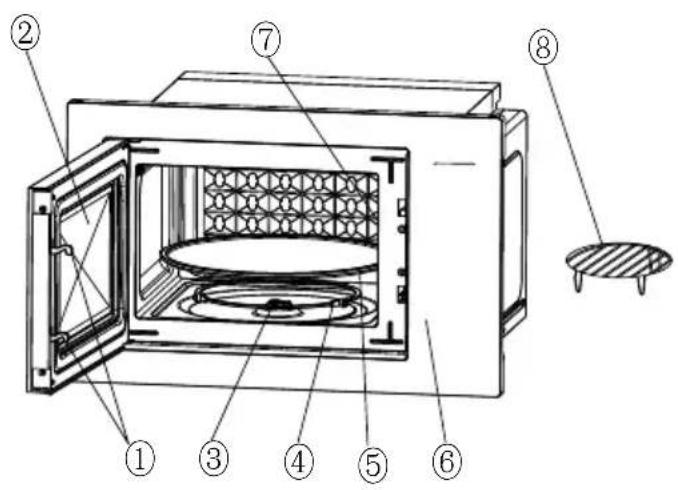
PRODUCT INSTRUCTION
natural_image
Simple line drawing of a cabinet or enclosure with a door, railing, and window (no text or symbols)Waveguide cover
1) Door lock
Microwave oven door must be properly closed in order for it to operate.
2) Viewing window
Allow user to see the cooking status
3) Rotating axis
The glass turntable sits on the axis; the motor underneath it drives the turntable to rotate
4) Rotating ring
The glass turntable sits on its wheels; it supports the turntable and helps it to balance when rotating
5) Turntable
The food sits on the turntable, its rotation during operation helps to cook food evenly
CAUTION
- Place the rotating ring first
- Fit the turntable onto the rotating axis and make sure that it is geared in properly
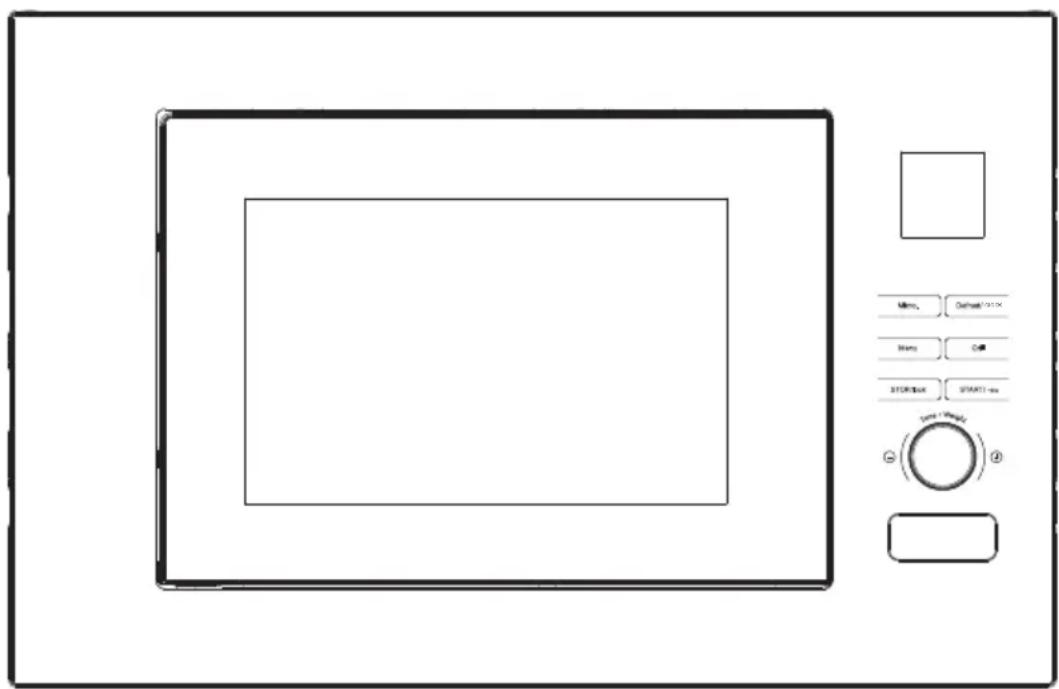
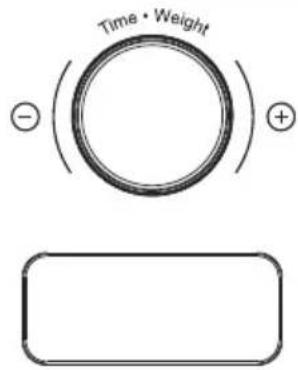
6) Control panel
See below in details (the control panel is subject to change without prior notice)
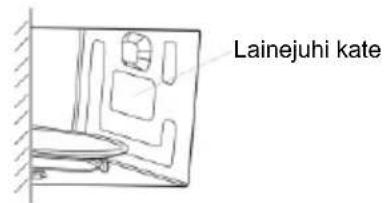
7) Waveguide cover
It is inside the air fryer oven, next to the wall of control panel.

WARNING
Never remove the waveguide cover.
8) Grill rack
Use to place the roasting food.
1. BEFORE COOKING
The display lit up when plugged in power supply, then enter the standby state and display shows 1:00.
2. MICROWAVE FUNCTION
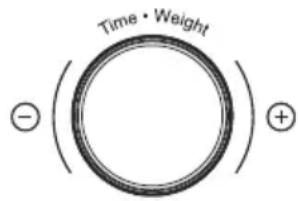
There are five microwave power levels, 100P, 80P, 50P, 30P and 10P, respectively. Press the “Micro.” button continuously and select the desired microwave power. Turn the knob to increase or decrease cooking time, the time range can be selected is from 0:10 to 60:00. After select the time, press “START/+30s.” button to start work. An buzzing sound to notify completion of the operation.
| HIGH | 100% power output | (Applicable for quick and thorough cooking) |
| M. High | 80% power output | (Applicable for medium express cooking) |
| Med | 50% power output | (Applicable for steaming food) |
| M. Low | 30% power output | (Applicable for defrosting food) |
| LOW | 10% power output | (Applicable for keeping warm) |

CAUTION
a. The max time which can be set is 60 minutes
b. Never operate the oven empty.
c. At the maximum microwave power, the oven will automatically lower the power after a certain time of cooking to lengthen the service life.
d. If you turn the food during operation, press the START/+30s button once and the preset cooking procedure will continue.
e. If you intend to remove the food before the preset time, you must press STOP/LOCK button once to clear the preset procedure to avoid unintended operation of next time use.
3. DEFROST/CLOCK
3.1 DEFROST
There are two defrost mode, dEF1 and dEF2, respectively. dEF1 for defrost by weight and dEF2 for defrost by time. Press this button to select defrost by weight or by time, and the display screen will display “dEF1” or “dEF2”. Turn the knob to select food weight or defrost time. The optional weight range of dEF1 is from 100 to 1500g, and the optional time range of dEF2 is from 0:10 to 60:00. After selecting the defrost weight or time, press the “START/+30s” button start to work. An buzzing sound to notify completion of the operation. The dEF1 defrost mode by weight will have a beeping sound to prompt the food to be turned over during defrosting.
Below is some food defrosting time advice:
| dEF1 | For defrosting, the weight range from 100 to 1500g. |
| dEF2 | For defrosting, the time range from 0:10 to 60:00. |
CAUTION
a. It is necessary to turn over the food during operation to obtain uniform effect.
b. Usually defrosting will need longer time than that of cooking the food.
c. If the food can be cut by knife, the defrosting process can be considered completed.
d. Microwave penetrates around 4cm into most food
e. Defrosted food should be consumed as soon as possible, it is not advised to put back to fridge and freeze again.
3.2 CLOCK (24-hour clock)
In standby mode, press and hold down the “DEFROST/CLOCK” button for more than 3 seconds to enter the clock setting interface.
At the same time, the display screen blinks in hours. The hour time can be set by turning the knob. After setting the hour, press the “START/+30s” button for a short time to confirm and switch to the setting minute mode. The minutes can be set by turning the knob. After setting minutes, press the “START/+30s” button again to confirm and exit the setting mode.
4. AUTO COOKING
There are eight automatic menus A.1\~A.8, potato, pasta, pizza, popcorn, vegetable, beverage, meat and fish respectively. Press the “Menu” button continuously to select the desired menu, the display screen corresponds to A.1 \~ A.8. Turn the knob to select the weight of the menu. After selecting the cooking weight, press “START/+30s” button to start work. An buzzing sound to notify completion of the operation.
| Display | Kind | Method |
| A.1 | Potato | The optional weights are 250g, 500g and 750g |
| A.2 | Pasta | The optional weights are 50g, 100g and 150g |
| A.3 | Pizza | The optional weights are 200g and 400g |
| A.4 | Popcorn | The optional weight is 100g |
| A.5 | Vegetable | The optional weights are 200g, 400g and 600g |
| A.6 | Beverage | The optional weights are 1 cup, 2 cups or 3 cups, each one about 250ml. |
| A.7 | Meat | The optional weights are 200g, 400g and 600g |
| A.8 | Fish | The optional weight are 200g, 400g and 600g |
CAUTION
a. The temperature of food before cooking would be 20-25°C. Higher or lower temperature of the food before cooking would require increase or decrease of cooking time. b. The temperature, weight and shape of food will largely influence the cooking effect. If any deviation has been found to the factor noted on above menu, you can adjust the cooking time for best result.
5. Grill FUNCTION
There are three modes of Grill: G., C-1 and C-2. They are grill, combination 1 of grill and microwave cooking and combination 2 of grill and microwave cooking. Press the “Grill” button continuously, select the desired mode and the display screen will corresponding display “G.”, “C-1” or “C-2”. Turn the knob to select the cooking time, and the time range that can be regulated is from 0:10 to 60:00. After selecting the cooking time, press the “START/+30s” button to start the work. An buzzing sound to notify completion of the operation.
| G. | Grill, the heat element will be energized during operation time. Which is applicable for rolling thin meats or pork, sausage, chicken wing as good brown color can be obtained |
| C-1 | Combination of grill and microwave cooking. 30% microwave and 70% grill. |
| C-2 | Combination of grill and microwave cooking. 55% microwave and 45% grill. |
CAUTION
In the mode of grill, all of the oven parts, as well as the rack and cooking containers, may become very hot. Use caution when removing any item from the oven. Use heavy potholders or oven mitts to PREVENT BURNS.
6. STOP
In the process of cooking settings, can press “STOP” button to cancel the settings and return to standby state. In the process of microwave oven working, can press “STOP” button to pause. In the standby state, can press “STOP” button again to cancel the function and return to standby state.
7. START/+30s
After setting the cooking time or food weight, press the “START/+30s” button to start the microwave oven immediately. In working state, can press “START/+30s” button to increase time, press one time to increase 30 seconds, but the menu mode and weight defrosting mode cannot adjust time. In pause state, can press “START/+30s” button to continue the microwave oven before cooking mode.
8. EXPRESS
In standby mode, after the food is put in and the door is closed, press the “START/+30s” button to quickly start the microwave. The default working time is 30 seconds. In the process of working, press the “START/+30s” button once for 30 seconds. An buzzing sound to notify completion of the operation.
9. CHILD LOCK FUNCTION
Use this feature to lock the control panel when you are cleaning or so that children cannot use the oven unsupervised. All the buttons are rendered inoperable in this mode.
1) Set lock: In standby mode, press and hold down the "STOP" button for more than 3 seconds, the child lock function is locked, and all buttons of the microwave oven cannot be operated.
2) Cancel lock: In the child lock state, press and hold down the "STOP" button for more than 3 seconds to cancel the child lock function.
UTENSILS GUIDELINE
It is strongly recommended to use the containers which are suitable and safe for microwave cooking. Generally speaking, the containers which are made of heat-resistant ceramic, glass or plastic are suitable for microwave cooking. Never use the metal containers for microwave cooking and combination cooking as spark is likely to occur. You can take the reference of below table.
| Material of container | Microwave | Grill | Combi | Notes |
| Heat-resistant ceramic | Yes | Yes | Yes | Never use the ceramics which are decorated with metal rim or glazed |
| Heat-resistant plastic | Yes | No | No | Can not be used for long time microwave cooking |
| Heat-resistant glass | Yes | Yes | Yes | |
| Plastic film | Yes | No | No | It should not be used when cooking meat or chops as the over-temperature may do damage to the film |
| Grill rack | No | Yes | Yes | The grill rack can only be used in grill and combination mode. |
| Metal container | No | No | No | It should not be used in microwave oven. Microwave can not penetrate through metal. |
| lacquer | No | No | No | Poor heat-resistant. Can not be used for High-temperature cooking |
| Bamboo wood and paper | No | No | No | Poor heat-resistant. Can not be used for High-temperature cooking |
COOKING TIPS
The following factors may affect the cooking result:
Food arrangement
Place thicker areas towards outside of dish, the thinner part towards the centre and spread it evenly. Do not overlap if possible.
Cooking time length
Start cooking with a short time setting, evaluate it after it times out and extend it according to the actual need. Over cooking may result in smoke and burns.
Cooking food evenly
Food such as chicken, hamburger or steak should be turned once during cooking.
Depending on the type of food, if applicable, stir it from outside to centre of dish once or twice during cooking.
Allow standing time
After cooking times out, leave the food in the oven for an adequate length of time, this allows it to complete its cooking cycle and cooling it down in a gradual manner.
Whether the food is done
Color and hardness of food help to determine if it is done, these include:
- Steam coming out from all parts of food, not just the edge
- Joints of poultry can be moved easily
- Pork or poultry shows no signs of blood
- Fish is opaque and can be sliced easily with a fork
Browning dish
When using a browning dish or self-heating container, always place a heat-resistant insulator such as a porcelain plate under it to prevent damage to the turntable and rotating ring.
Microwave safe plastic wrap
When cooking food with high fat content, do not allow the plastic wrap come into contact with food as it may melt
Microwave safe plastic cookware
Some microwave safe plastic cookware might not be suitable for cooking foods with high fat and sugar content. Also, the preheating time specified in the dish instruction manual must not be exceeded.
MAINTENANCE
SERVICING
Please check the following before calling for services.
- Place one cup of water (approx. 150ml) in a glass measure in the oven and close the door securely. Oven lamp should go off if the door is closed properly. Let the oven work for 1 min.
- Does the oven lamp light?
- Does the cooling fan work?
(Put your hand over the rear ventilation openings.)
- Does the turntable rotate?
(The turntable can rotate clockwise or counter clockwise. This is quite normal.)
- Is the water inside the oven hot?
If “NO” is the answer to any of the above questions, please check your wall socket and the fuse in your meter box.
If both the wall socket and the fuse are functioning properly, CONTACT YOUR NEAREST SERVICE CENTER APPROVED.
SERVICING SAFEGUARDS
Caution: MICROWAVE RADIATION
- The high voltage capacitor remains charge after disconnection; short the negative terminal of H. V capacitor to the oven chassis (use a screwdriver) to discharge before touching.
-
During servicing below listed parts are liable to be removed and give access to potentials above 250V to earth.
-
Magnetron
• High voltage transformer
• High voltage capacitor
• High voltage diode
- High voltage fuse
-
The following conditions may cause undue microwave exposure during servicing.
-
Improper fitting of magnetron;
- Improper matching of door interlock, door hinge and door;
- Improper fitting of switch support;
- Door, door seal or enclosure has been damaged.
Correct disposal of this product
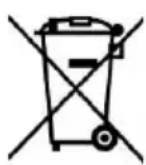

This appliance is labelled in accordance with European Directive 2012/19/EU on Waste Electrical and Electronic Equipment Regulations 2013 regarding electric and electronic appliances (WEEE). The WEEE contain both polluting substances (that can have a negative effect on the environment) and base elements (that can be reused). It is important that the WEEE undergo specific treatments to correctly remove and dispose of the pollutants and recover all the materials. Individuals can play an important role in ensuring that the WEEE do not become an environmental problem; it is essential to follow a few basic rules:
- the WEEE should not be treated as domestic waste;
- the WEEE should be taken to dedicated collection areas managed by the town council or a registered company.
In many countries, domestic collections may be available for large WEEEs. When you buy a new appliance, the old one can be returned to the vendor who must accept it free of charge as a one-off, as long as the appliance is of an equivalent type and has the same functions as the purchased appliance.
Low power consumption data according to Commission Regulation (EU) 2023/826.
| Condition | Power consumption | Period after which the equipment reaches automatically the condition |
| Standby mode with information or status display | 0.8W 20 Min |
CANDY
فرن المي كروي ف
دليل التعلييمات
CA38FL7N20WXB
natural_image
Line drawing of a multi-tiered refrigerator with an open door and front panel, showing internal components and a close-up inset (no text or symbols)2 الشكل
(1) ققل الباب
natural_image
Empty white square with a thin black border (no text or symbols)Micro.
Defrost/clock
Menu
Grill
STOP/lock
START/+30s
2. وظيفة الميكرووف
CA38FL7N20WXB
DŮLEŽITÉ BEZPEČNOSTNÍ POKYNY POZORNĚ SI PŘEČTĚTE A USCHOVEJTE PRO BUDOUCÍ POUŽITÍ Pouze pro použití v domácnosti USCHOVEJTE TYTO POKYNY
DŮLEŽITÁ OCHRANNÁ OPATŘENÍ
natural_image
Line drawing of a multi-tiered refrigerator with an open door and front panel, showing internal components and a close-up inset of the lid (no text or symbols)Obr. 2
1) Zámek dvířek
1. PŘED PŘÍPRAVOU POKRMU
CA38FL7N20WXB
TÄHTSAD OHUTUSJUHISED LUGEGE HOOLIKALT JA HOIDKE EDASPIDISEKS KASUTAMISEKS ALLES Ainult koduseks kasutamiseks HOIDKE NEED JUHISED ALLES
TÄHTSAD ETTEVAATUSABINÕUD
natural_image
Line drawing of a multi-tiered refrigerator with an open door and front panel, showing internal components and a close-up inset detail (no text or symbols)Joonis 2
1) Ukselukk
1. ENNE TOIDUVALMISTAMIST
CA38FL7N20WXB
CONSIGNES DE SÉCURITÉ IMPORTANTES LISEZ ATTENTIVEMENT ET CONSERVEZ CE MANUEL POUR POUVOIR LE CONSULTER EN CAS DE BESOIN Usage domestique uniquement CONSERVEZ CES INSTRUCTIONS
CONSIGNES DE SÉCURITÉ IMPORTANTES
natural_image
Line drawing of a multi-tiered refrigerator with an open door and front panel, showing internal components and a close-up inset detail (no text or symbols)Fig. 2
INSTRUCTIONS SUR LE PRODUIT

natural_image
Simple line drawing of a cabinet or shelf with a door and window (no text or symbols)1. AVANT LA CUISSON
natural_image
Line drawing of a multi-tiered refrigerator with an open door and front panel, showing internal components and a close-up inset detail (no text or symbols)- att.
PRODUKTA INSTRUKCIJA


natural_image
Simple line drawing of a cabinet or shelf with a door and window (no text or symbols)Vilnvada pārsegs
1) Durvju blokēšana
1. PIRMS GATAVOŠANAS
natural_image
Line drawing of a multi-tiered refrigerator with an open door and front panel, showing internal components and a close-up inset of the lid (no text or symbols)2 pav.

natural_image
Simple line drawing of a cabinet or shelf with a door and wall, no text or symbols present.1. PRIEŠ GAMINIMA
CA38FL7N20WXB
natural_image
Line drawing of a multi-tiered refrigerator with an open door and front panel, showing internal components and a close-up inset (no text or symbols)Rys. 2

natural_image
Simple line drawing of a cabinet or shelf with a door and wall, no text or symbols present.Osłona falowodu
1) Blokada drzwi
1. PRZED GOTOWANIEM
CA38FL7N20WXB
INSTRUCTIUNI IMPORTANTE DE SIGURANTĂ CITIȚI CU ATENȚIE ȘI PĂSTRATI PENTRU A PUTEA CONSULTA PE VIITOR Numai pentru uz casnic PĂSTRATI ACESTE INSTRUCTIUNI
MĂSURI DE PROTECTIE IMPORTANTE
natural_image
Line drawing of a multi-tiered refrigerator with an open door and front panel, showing internal components and a close-up inset detail (no text or symbols)Fig. 2
Fig. 4
natural_image
Simple line drawing of a cabinet or shelf with a door and wall, no text or symbols present.1. ÎNAINTE DE GĂTIRE
CA38FL7N20WXB
DÔLEŽITÉ BEZPEČNOSTNÉ POKYNY POZORNE PREČÍTAJTE A ODLOŽTE NA POUŽITIE AJ V BUDÚCNOSTI
Len na použitie v domácnosti TIETO POKYNY SI STAROSTLIVO ODLOŽTE
DÔLEŽITÉ BEZPEČNOSTNÉ OPATRENIA
natural_image
Line drawing of a multi-tiered refrigerator with an open door and front panel, showing internal components and a close-up inset of the lid (no text or symbols)Obr. 2

natural_image
Simple line drawing of a cabinet or shelf with a door and wall, no text or symbols present.1. PRED PRÍPRAVOU JEDLA
Displej sa rozsvietil po pripojení napájacieho zdroja, potom prepnite do pohotovostného stavu a na displeji sa zobrazí 1:00.
2. FUNKCIA MIKROVLNNEJ RÚRY
CA38FL7N20WXB
ВАЖНИ ИНСТРУКЦИИ ЗА БЕЗОПАСНОСТ ПРОЧЕТЕТЕ ВНИМАТЕЛНО И ЗАПАЗЕТЕ ЗА БЪДЕЩА СПРАВКА
natural_image
Line drawing of a multi-tiered refrigerator with an open door and front panel, showing internal components and a close-up inset of the lid (no text or symbols)Фиг. 2

natural_image
Simple line drawing of a door with a handle and wall, no text or symbols presentКапак на вълновода
natural_image
Empty white square with a thin black border (no text or symbols)Micro.
Defrost/clock
Menu
Grill
STOP/lock
START/+30s
1. ПРЕДИ ГОТВЕНЕ
CA38FL7N20WXB
POMEMBNA VARNOSTNA NAVODILA. POZORNO PREBERITE IN SHRANITE ZA POZNEJŠO UPORABO.
Samo za uporabo v gospodinjstvu SHRANITE TA NAVODILA
POMEMBNI ZAŠČITNI UKREPI
natural_image
Line drawing of a multi-tiered cabinet with an open door and front panel, showing internal components and a close-up inset detail (no text or symbols)Slika 2
natural_image
Simple line drawing of a door with a handle and window, mounted on a wall (no text or symbols)Pokrov vodila valov
1) Zaklepanje vrat
1. PRED KUHANJEM
CA38FL7N20WXB
VAŽNA BEZBEDNOSNA UPUTSTVA PAŽLJIVO PROČITAJTE I SAČUVAJTE ZA BUDUĆU REFERENCU Samo za upotrebu u domaćinstvu SAČUVAJTE OVA UPUTSTVA
VAŽNE MERE ZAŠTITE
UPOZORENJE: Ako su vrata ili zaptivke na vratima oštećene, nije dozvoljeno rukovati pećnicom dok je ne popravi obučeno lice.
UPOZORENJE: Opasno je da bilo koga osim obučenog lica vrši bilo kakav servis ili popravku što uključuje skidanje bilo kog poklopca koji pruža zaštitu od izlaganja mikrotalasnoj energiji. UPOZORENJE: Tečnosti ili druga hrana ne smeju se zagrevati u zapečaćenim posudama jer mogu da eksplodiraju.
- Koristite samo posuđe koje je pogodno za upotrebu u mikrotalasnim pećnicama.
- Metalne posude za hranu i piće nisu dozvoljeni tokom kuvanja u mikrotalasnoj pećnici.
- Prilikom zagrevanja hrane u plastičnim ili papirnim posudama, pazite na pećnicu zbog mogućnosti paljenja.
- Mikrotalasna pećnica je namenjena za zagrevanje hrane i pića. Sušenje hrane ili odeće i zagrevanje jastučića za zagrevanje, papuča, suđera, vlažne krpe i slično može dovesti do rizika od povreda, paljenja ili požara.
- Ako primetite dim, isključite uređaj ili ga isključite iz napajanja i držite vrata zatvorena kako biste ugušili plamen. Zagrevanje pića u mikrotalasnoj pećnici može dovesti do odloženog eruptivnog ključanja, stoga morate biti oprezni prilikom rukovanja posudom.
- Sadržaj bočica za hranjenje i tegli za hranu za bebe treba promešati ili protresti i proveriti temperaturu pre konzumiranja, kako bi se izbegle opekotine.
- Jaja u ljusci i cela tvrdo kuvana jaja ne treba da se zagrevaju u mikrotalasnim pećnicama jer mogu eksplodirati, čak i nakon završetka zagrevanja mikrotalasima.
- Neodržavanje pećnice čistom može dovesti do pogoršanja površine što bi mogla negativno uticati na radni vek uređaja i eventualno dovesti do opasne situacije.
- Uređaj se ne sme stavljati u ormarić.
-
Treba voditi računa da se okretno postolje ne pomeri prilikom uklanjanja posuda iz uređaja.
-
Nije dozvoljeno čistiti uređaj parnim čistačem.
- Uređaj se ne sme montirati na visini od 900 mm iznad poda ili većoj. Minimalna visina potrebnog slobodnog prostora iznad gornje površine pećnice: Pogledajte crtež montaže.
natural_image
Line drawing of a multi-tiered refrigerator with an open door and front panel, showing internal components and a close-up inset detail (no text or symbols)Slika 2
c) Pomerite proizvod paralelno sa kuhinjskim ormarićem u skladu sa smerom strelice na slici i držite ga u centru. (Slika 3)
Slika 3
d) Koristite zavrtnje iz pakovanja delova da biste pričvrstili mikrotalasnu pećnicu u ormariću. (Slika 4)
Slika 4
Detalji ormarića:
Veličina proizvoda: (Š)595x(V)385x(D)337(mm)
Veličina otvora: (D)560+4 x (E)360 x (F)550(mm) kao što je prikazano na slici 4 „D“, „E“, „F“.

Sl. 4
ČIŠĆENJE
ODRŽAVANJE MIKROTALASNE PEĆNICE
! OPREZ

natural_image
Simple line drawing of a door with a handle and seat, no text or symbols presentPoklopac talasovoda
1. PRE KUVANJA
Displej svetli kada je priključen na napajanje, a zatim prelazi u stanje pripravnosti i na displeju se prikazuje 1:00.
2. MIKROTALASNA FUNKCIJA
Postoji pet nivoa snage mikrotalasa, 100P, 80P, 50P, 30P i 10P.
Pritisnite dugme „Micro.“ i izaberite željenu snagu mikrotalasne pećnice. Okrenite dugme da biste povećali ili smanjili vreme kuvanja, vremenski opseg se može izabrati od 0:10 do 60:00. Kada izaberete vreme, pritisnite dugme START/+30s. da biste započeli rad. Zvuk zujanja obaveštava o završetku operacije.
| VISOKA | 100% izlazne snage | (Primenljivo za brzo i temeljno kuvanje) |
| Sr. visoka | 80% izlazne snage | (Primenljivo za srednje brzo kuvanje) |
| Srednja | 50% izlazne snage | (Primenljivo za kuvanje hrane na pari) |
| Sr. niska | 30% izlazne snage | (Primenljivo za odmrzavanje hrane) |
| NISKA | 10% izlazne snage | (Primenljivo za održavanje toplote) |
! OPREZ
natural_image
Line drawing of a multi-tiered refrigerator with an open door and front panel, showing internal components and a close-up inset of the lid (no text or symbols)Fig. 2
natural_image
Simple line drawing of a door with handle and seat, no text or symbols presentTampa da guia de ondas
1) Fecho da porta
1. ANTES DE COZINHAR
natural_image
Line drawing of a multi-tiered refrigerator with an open door and front panel, showing internal components and a close-up inset detail (no text or symbols)Fig. 2
natural_image
Simple line drawing of a door with a handle and window, no text or symbols presentnatural_image
Line drawing of a multi-tiered kitchen cabinet with an open oven and a magnified inset showing a small cylindrical object (no text or symbols)- ábra
natural_image
Simple line drawing of a door with a handle and window, no text or symbols present1. FÖZÉS ELÖTT
natural_image
Line drawing of a multi-tiered cabinet with an open door and a close-up inset showing a small mechanical component (no text or symbols)Abb. 2