
MDRD129FZE01 - Freezer MIDEA - Free user manual and instructions
Find the device manual for free MDRD129FZE01 MIDEA in PDF.
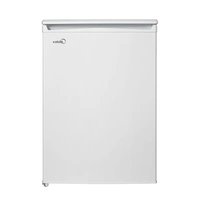


| Product Type | Freezer |
| Brand | Midea |
| Model | MDRD129FZE01 |
| Total Volume | 86 L |
| Freezing Capacity | 4 kg/24h |
| Temperature Rise Time | 15 h |
| Dimensions (W x D x H) | 553 x 574 x 845 mm |
| Power Supply | 220-240 V ~ 50 Hz |
| Rated Current | 0.6 A |
| Refrigerant | R600a, 50 g |
| Climate Class | SN, N, ST, T (from +10°C to +43°C) |
| Temperature Setting | Rotary knob (positions 1 to 4) |
| Reversible Door Opening | Yes |
| Number of Drawers | 1 drawer |
| Adjustable Feet | Yes |
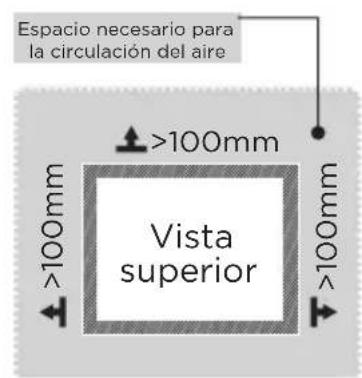
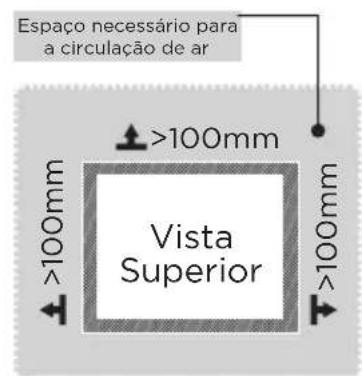
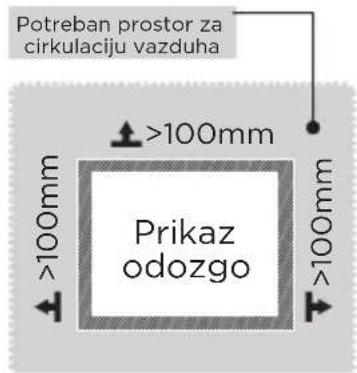
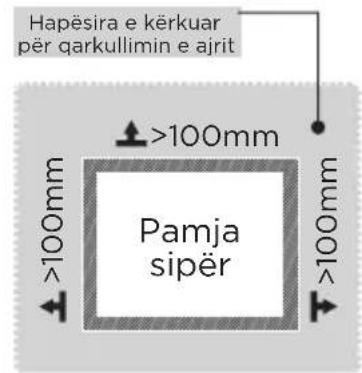
| Recommended Clearance | >100 mm on sides and back |
| Defrosting | Manual |
| Energy Consumption | Energy class not specified in the manual |
| Spare Parts Available | Thermostats, sensors, boards, lights, handles, hinges, drawers, baskets, door gaskets (minimum 7 to 10 years after the last model) |
| Weight | Not specified (estimated 30 kg) |
Frequently Asked Questions - MDRD129FZE01 MIDEA
User questions about MDRD129FZE01 MIDEA
0 question about this device. Answer the ones you know or ask your own.
Ask a new question about this device
Download the instructions for your Freezer in PDF format for free! Find your manual MDRD129FZE01 - MIDEA and take your electronic device back in hand. On this page are published all the documents necessary for the use of your device. MDRD129FZE01 by MIDEA.
USER MANUAL MDRD129FZE01 MIDEA
Upright Freezer
SINGLE DOOR SERIES
USER MANUAL
MDRD129FZE*
LANGUAGES
EN English
DE Deutsch
IT Italian
FR French
ES Spanish
PT Portuguese
GR Greek
PL Polish
LV Latvian
SR Serbian
Thank you for choosing Midea! Before using your new Midea product, please read this manual thoroughly to ensure that you know how to operate the features and functions that your new appliance offers in a safe way.
CONTENTS
THANK YOU LETTER 01
SPECIFICATIONS 02
PRODUCT OVERVIEW 03
PRODUCT INSTALLATION 04
OPERATION INSTRUCTIONS 08
CLEANING AND MAINTENANCE 11
TROUBLESHOOTING 12
APPENDIX 14
SPECIFICATIONS
EN
| Product model MDRD129FZE | |
| Rated Voltage/Frequency 220-240V~/50Hz | |
| Rated Current 0.6A | |
| Total Volume 86L | |
| Four-star Compartment Volume 86L | |
| Refrigerant, Amount R600a,50g | |
| Freezing Capacity 4kg/24h | |
| Temperature Rise Time 15h | |
| Overall Dimension (W x D x H) 553x574x845mm |
PRODUCT OVERVIEW
Names of components
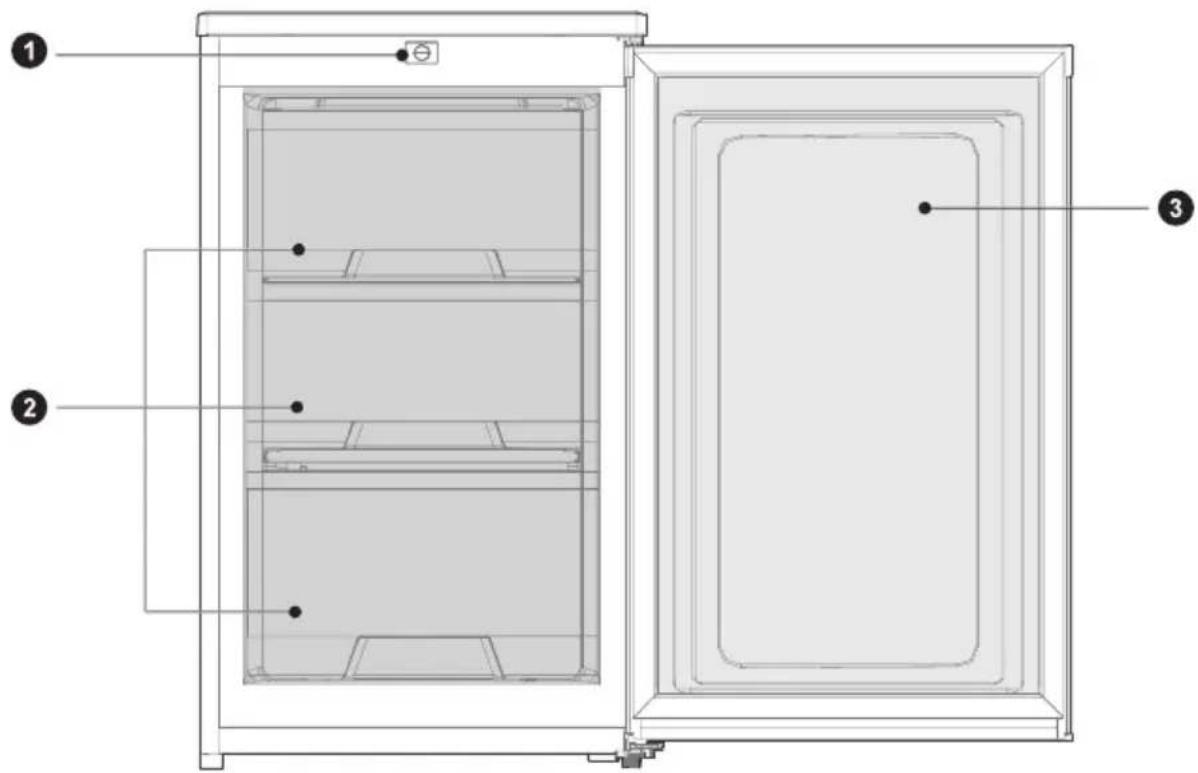
1 Temperature-control knob 2 Drawer 3 Door

ATTENTION
The picture above is only for reference. The actual configuration will depend on the physical product or statement by the distributor.
PRODUCT INSTALLATION
Install Instruction
For refrigerating appliances with climate class
- Depending on the climate class, this refrigerator is intended to be used at an ambient temperature range as specified in the following table.
- The climate class can be found on the rating plate. The product may not operate properly at temperatures outside of the specific range.
- You can find the climate class on the product label.
Effective temperature range
- The product is designed to operate normally in the temperature range specified by its class rating.
| Class Symbol | Ambient temperature range °C | ||
| IEC 62552 (ISO 15502) ISO 8561 | |||
| Extended temperate SN | + 10 to + 32 | + 10 to + 32 | |
| Temperate N + 16 to + 32 | + 16 to + 32 | ||
| Subtropical ST + 16 to + 38 | + 18 to + 38 | ||
| Tropical T + 16 to + 43 | + 18 to + 43 | ||
Dimensions and Clearances
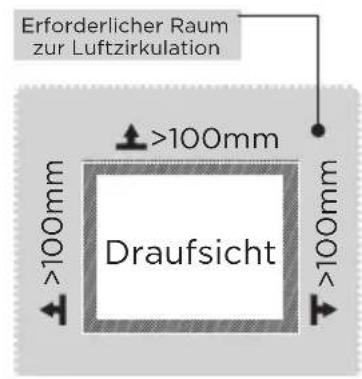
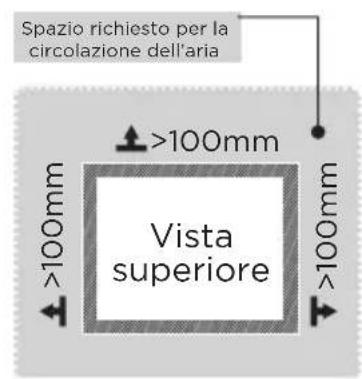
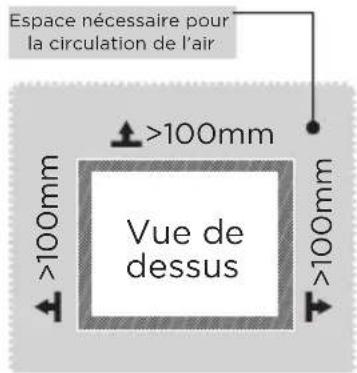
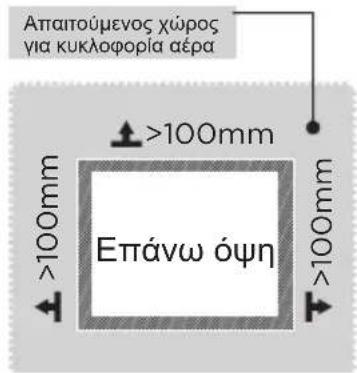
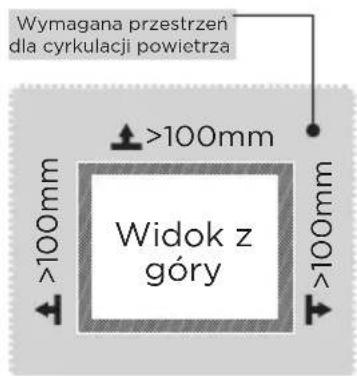
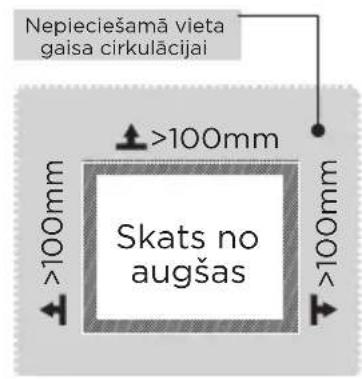
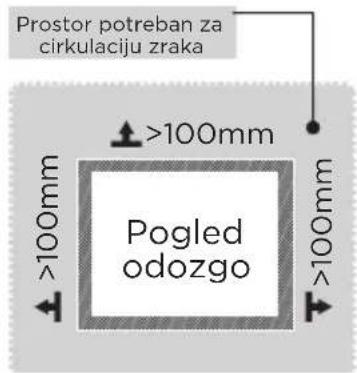
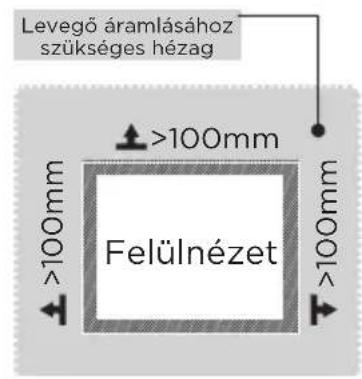
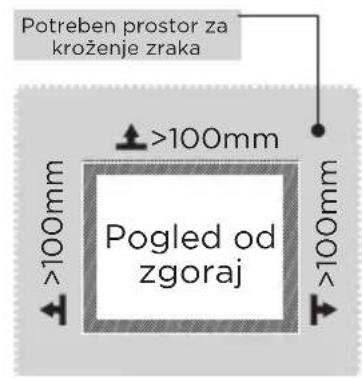
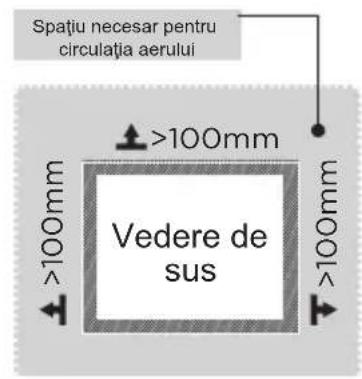
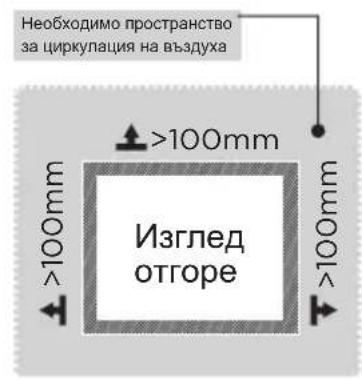
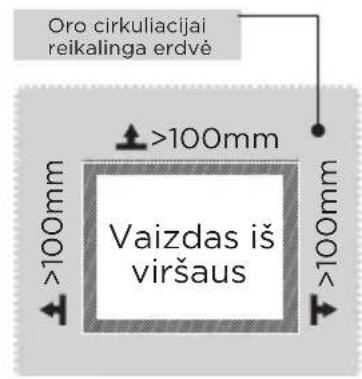
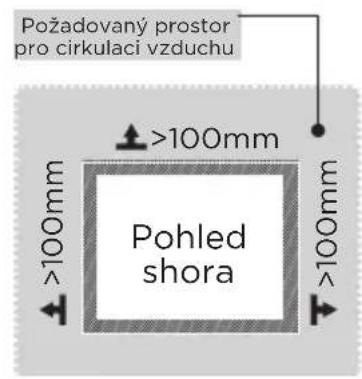
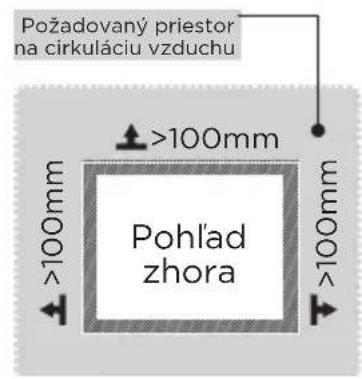
- Too small of a distance from adjacent items may result in the degradation of freezing capability and increased electricity costs. Allow over 100 mm of clearance from each adjacent wall when installing the appliance.
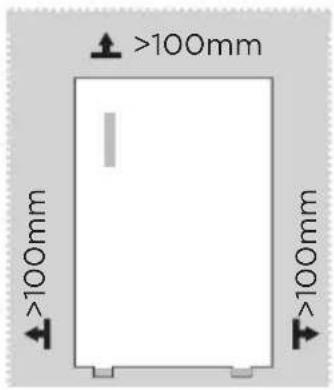
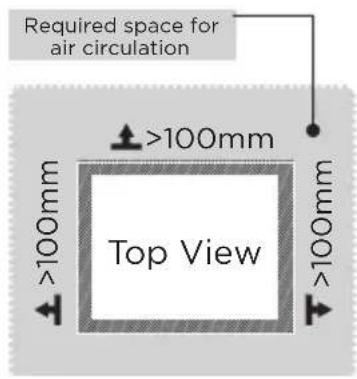

ATTENTION
The picture above is only for reference. The actual configuration will depend on the physical product or statement by the distributor.
Space requirement diagram (when the door is open and when the door is closed)
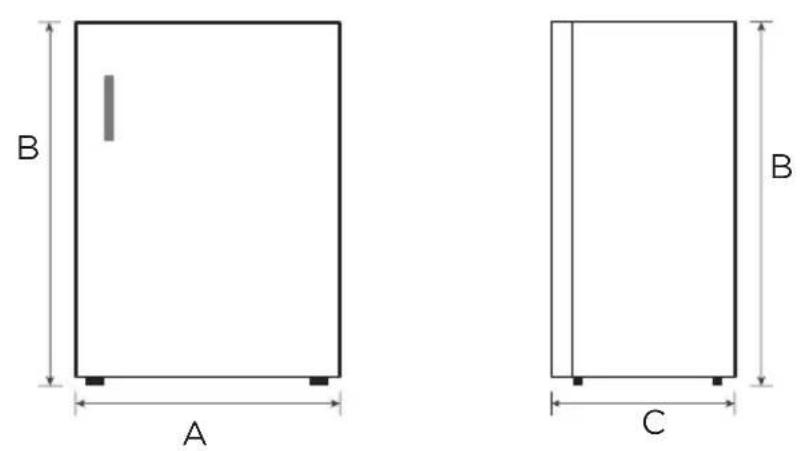
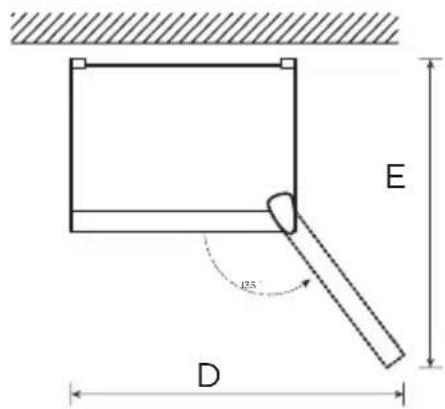
| Width Overall Height Depth | Width doors open 135° | Depth doors open 135° | |
| A B C D E | |||
| 553 845 574 935 960 |
Note: All dimensions are in mm.
Changing the door hinge side
List of tools to be provided by the user
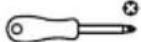 | Cross screwdriver |
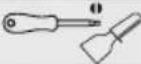 | Putty knife Thin-blade screwdriver |
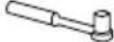 | 5/16" socket spanner |
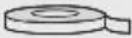 | Masking tape |
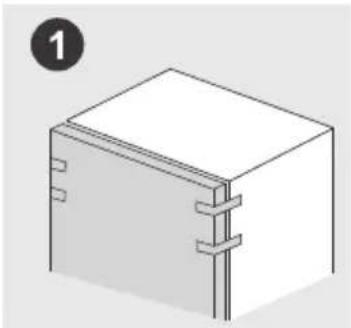
- Turn off the refrigerator and remove all items from the door shelves.
- Secure the door with tape.
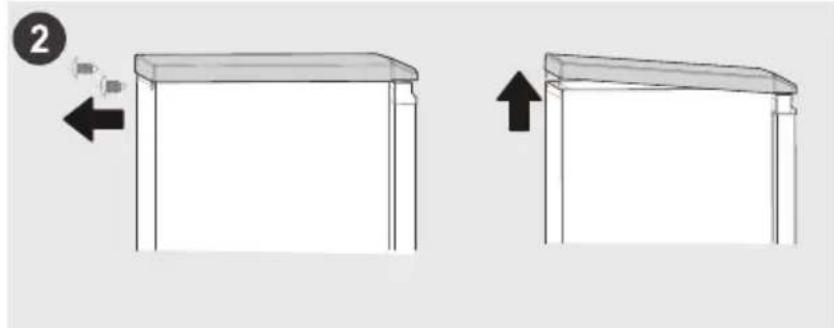
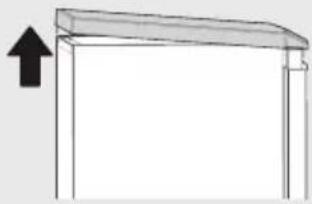
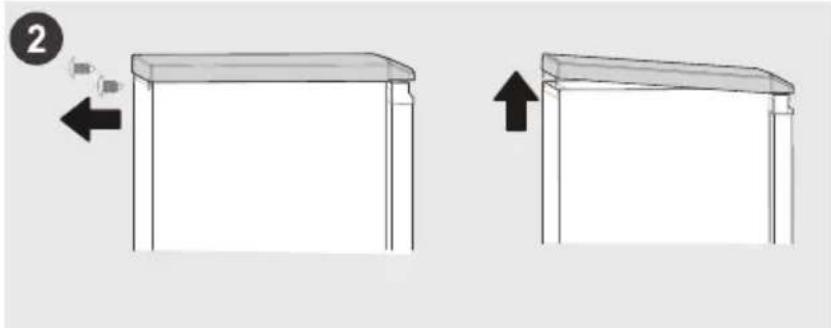
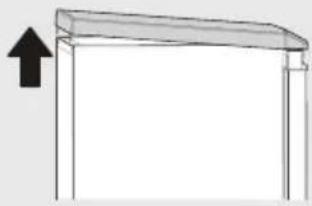
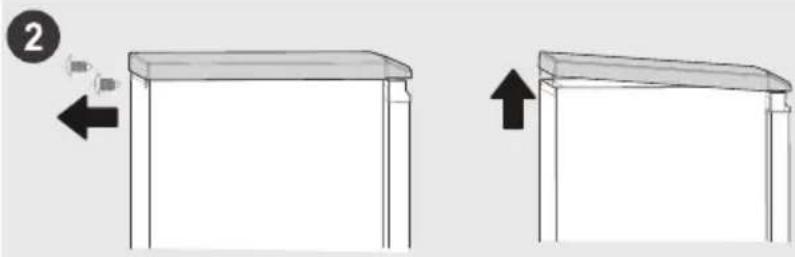
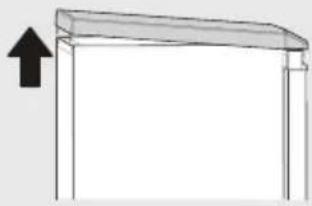
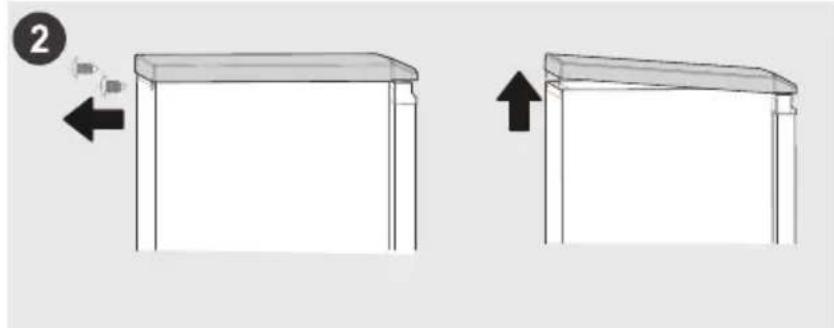
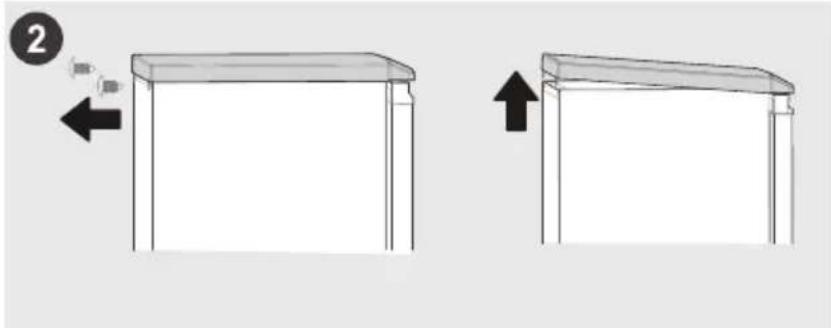
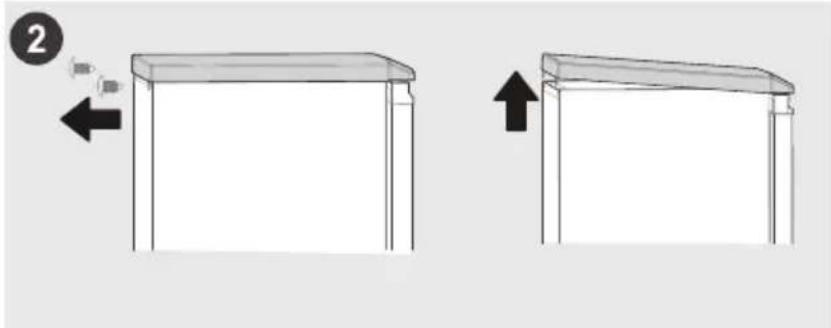
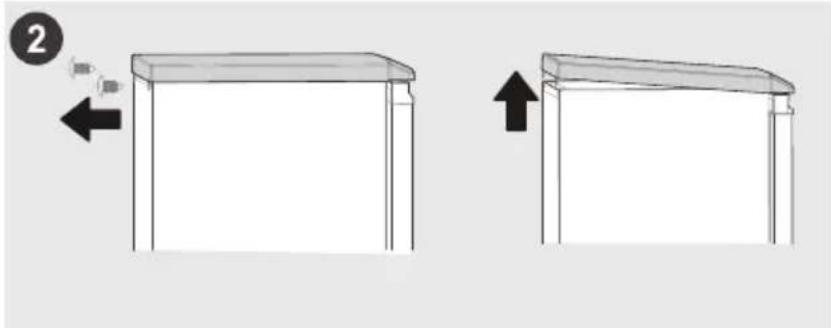
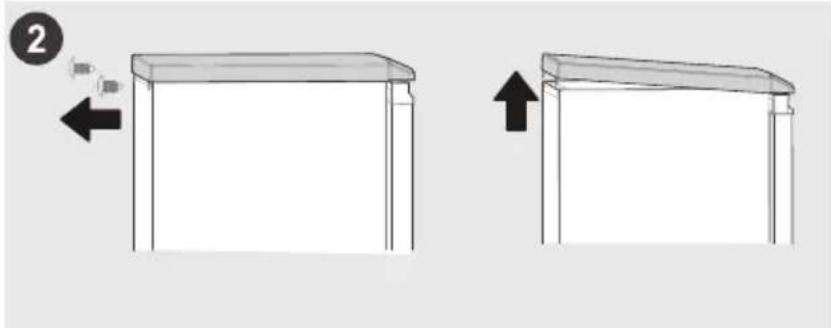
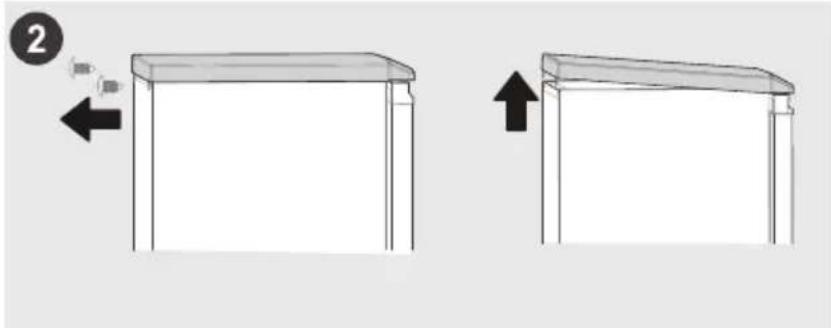
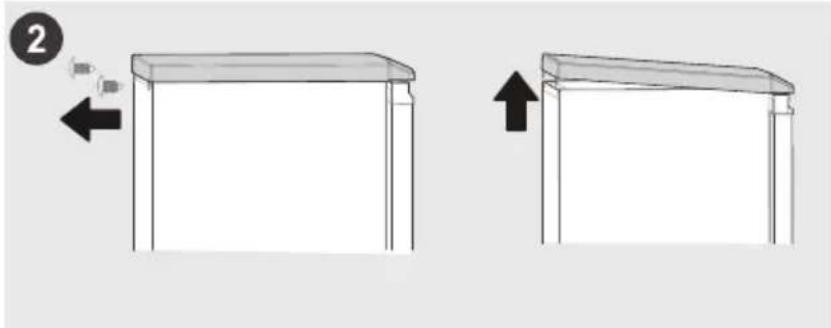
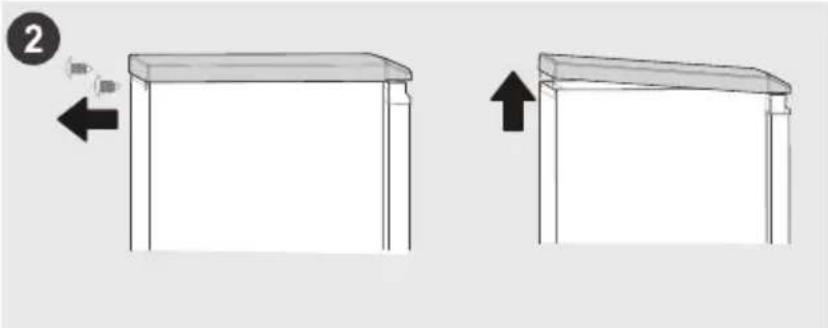
- Unscrew the screws on the top cover and remove it.
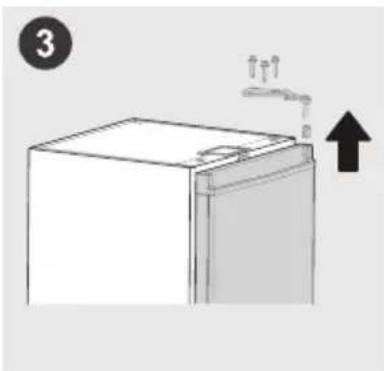
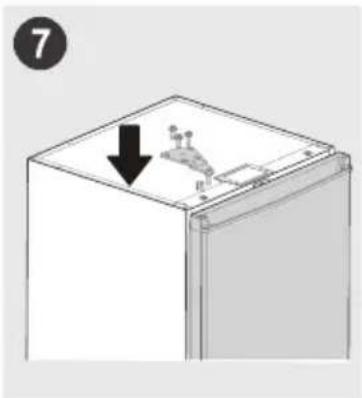
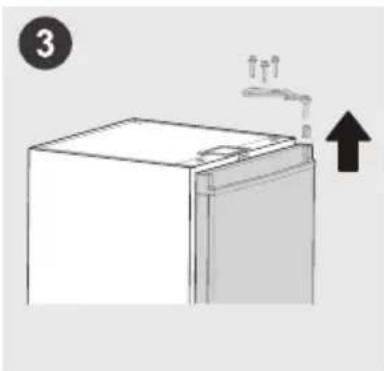
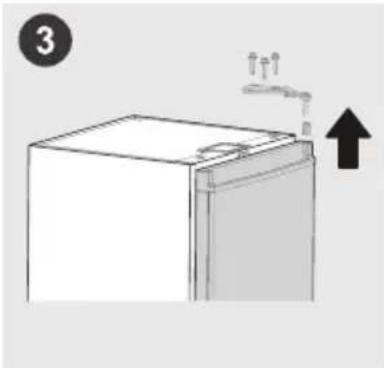
- Unscrew the screws on the upper hinge and remove it.
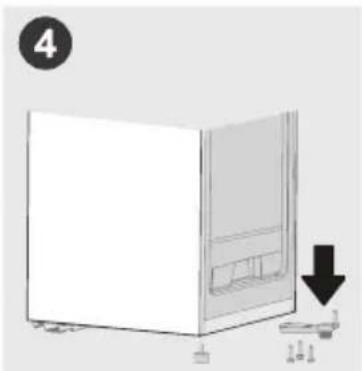
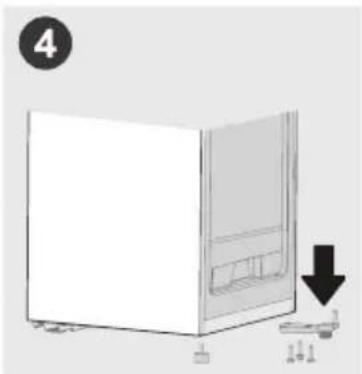
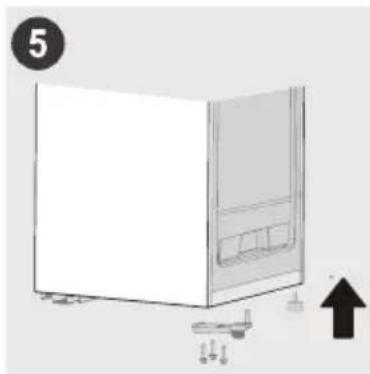
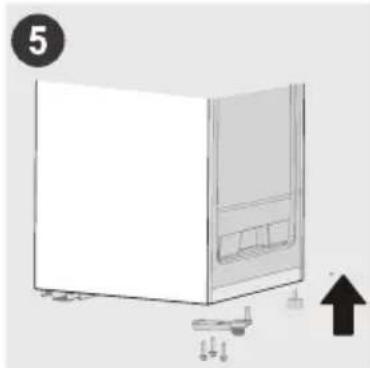
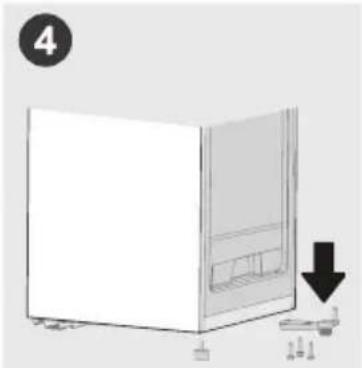
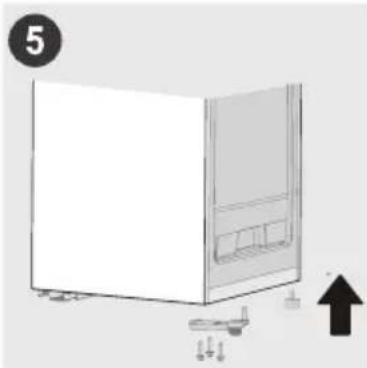
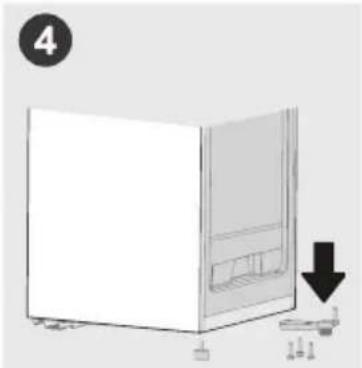
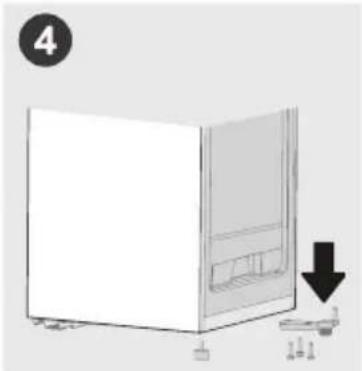
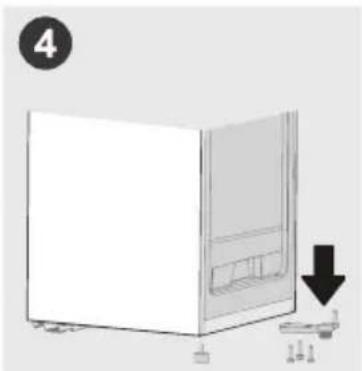
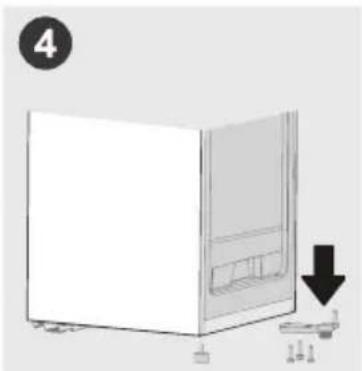
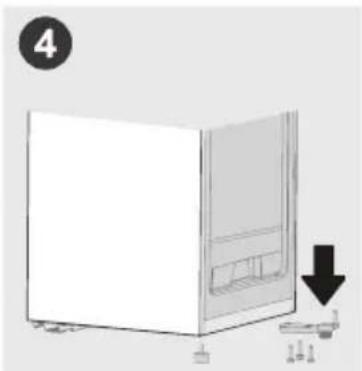
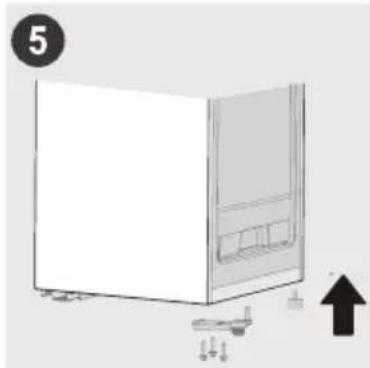
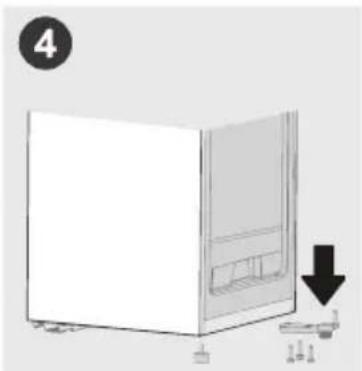
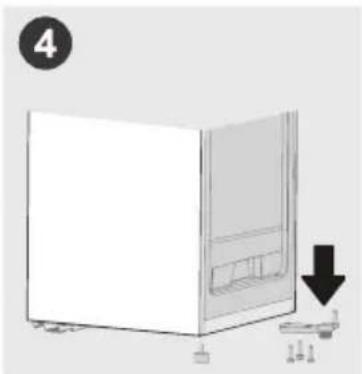
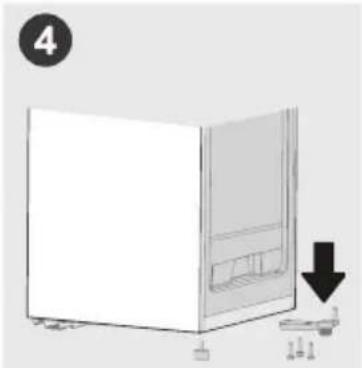
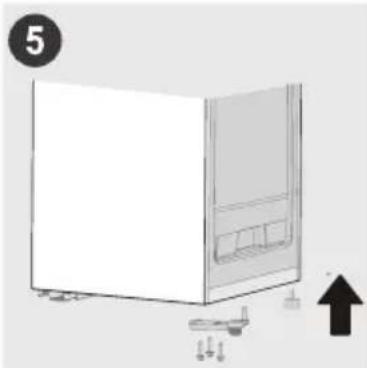
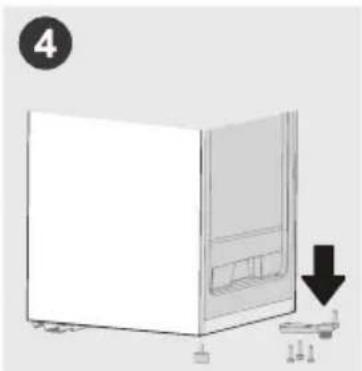
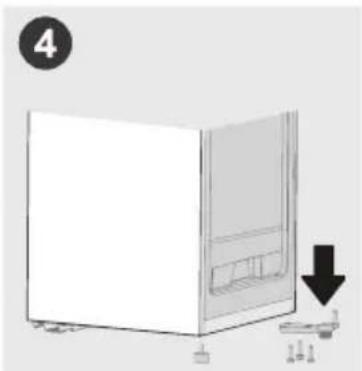
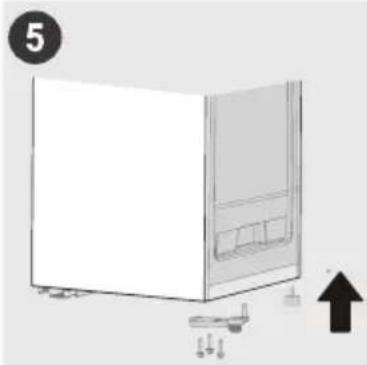
- Remove the door. Unscrew the screws on the bottom hinge, then remove the bottom hinge and the leveling feet.
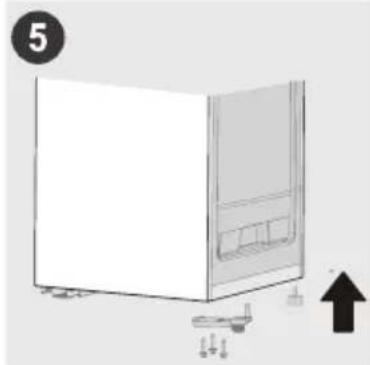
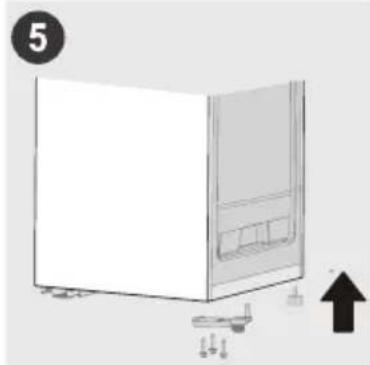
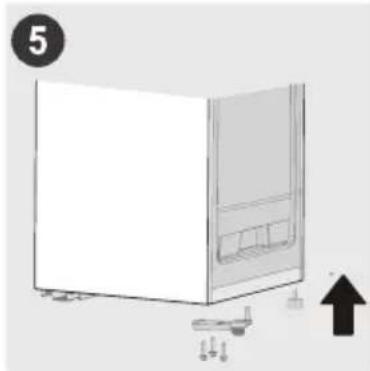
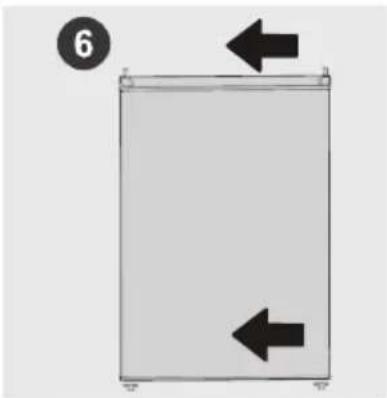
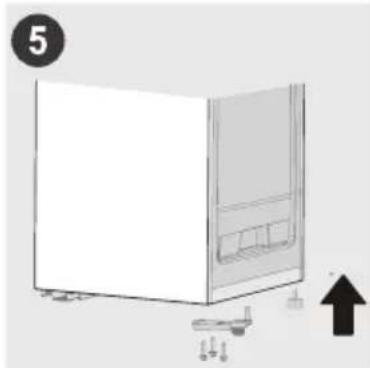
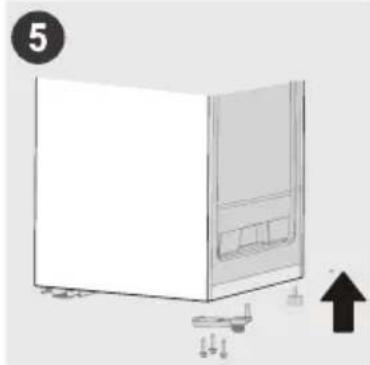
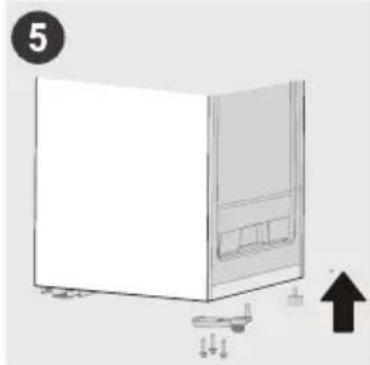
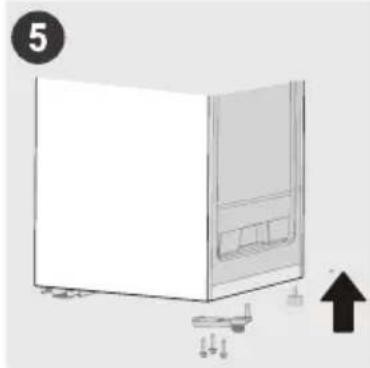
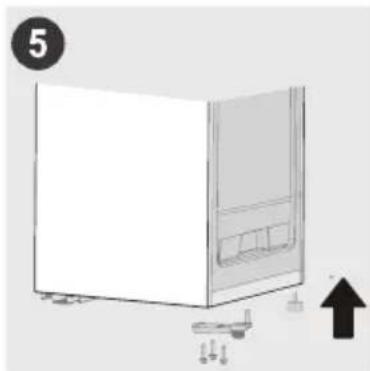
- Attach the leveling feet and bottom hinge on the opposite side.
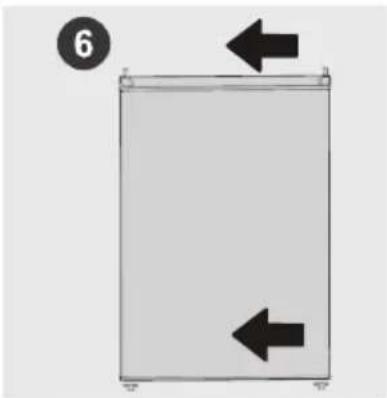
- Install the door stopper and axle sleeve on the opposite side.
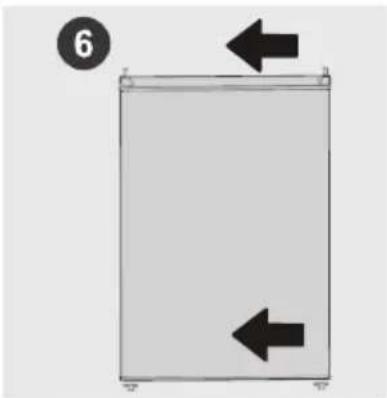
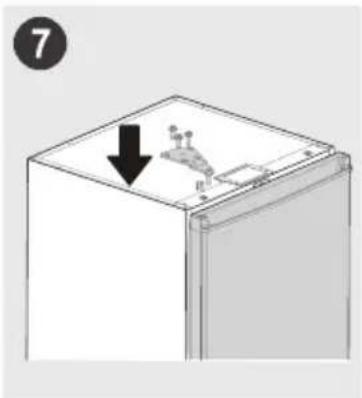
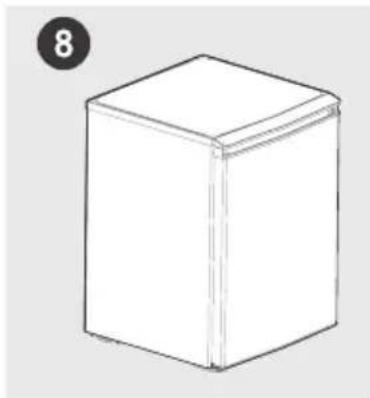
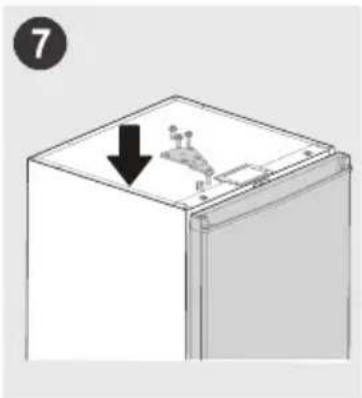
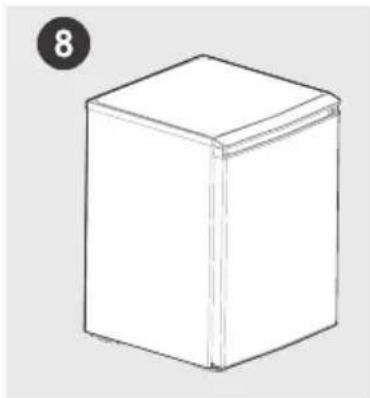
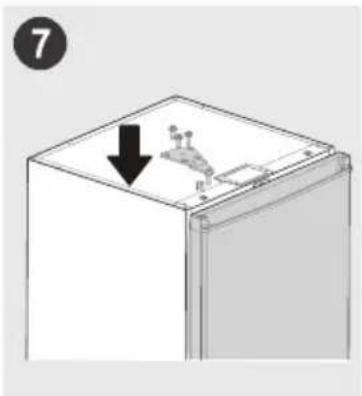
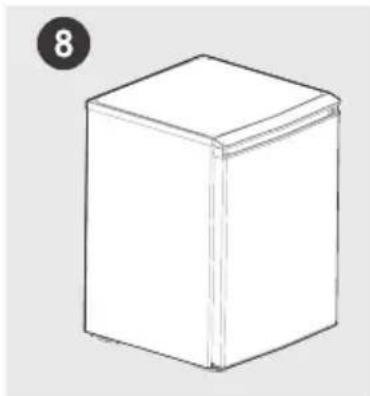
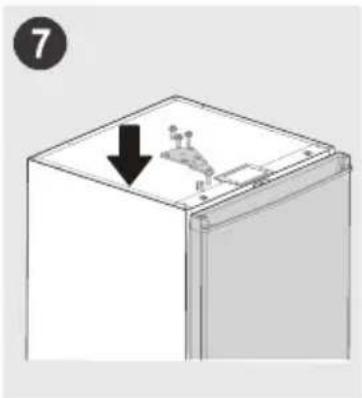
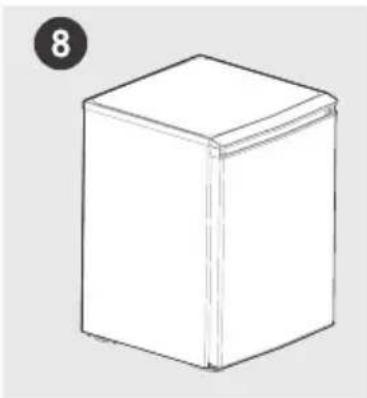
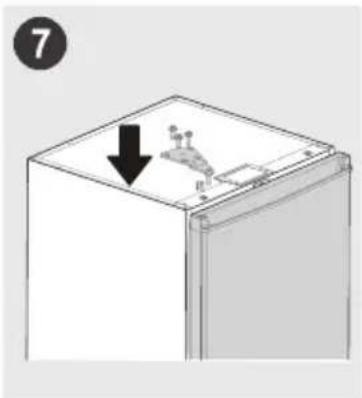
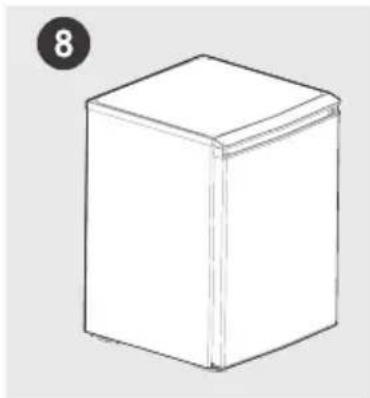
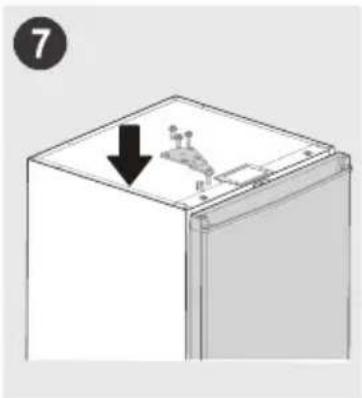
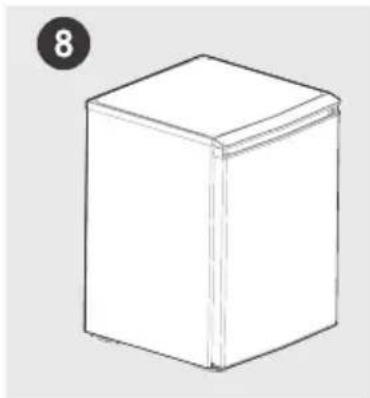
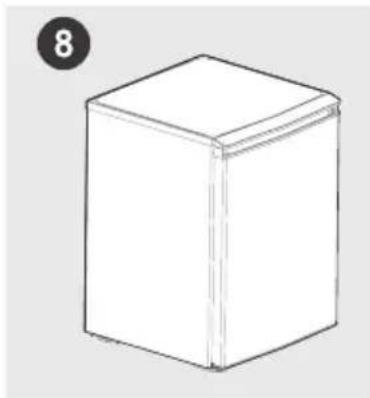
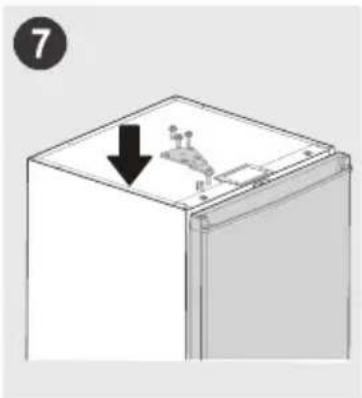
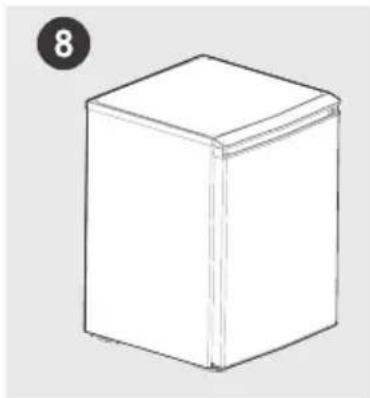
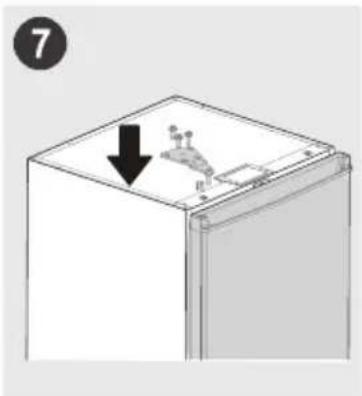
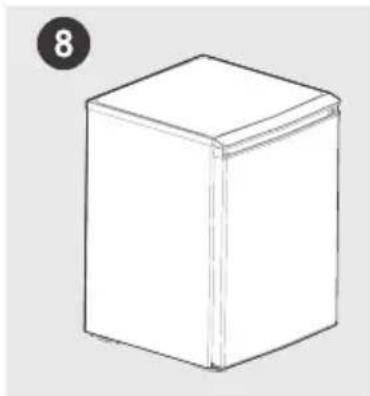
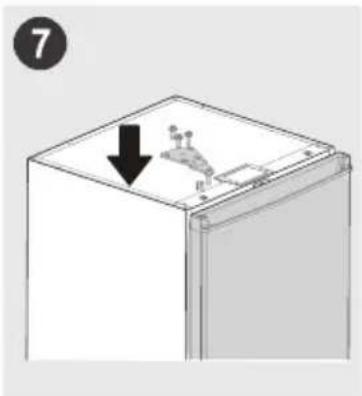
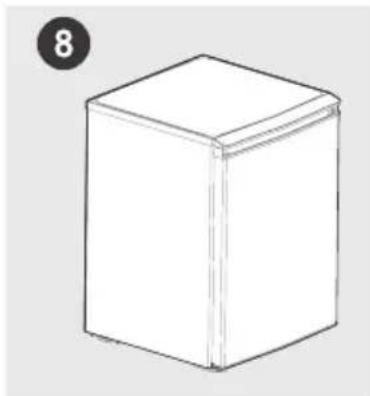
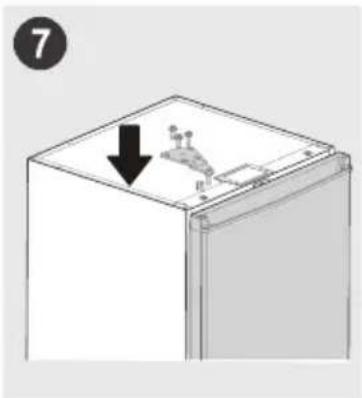
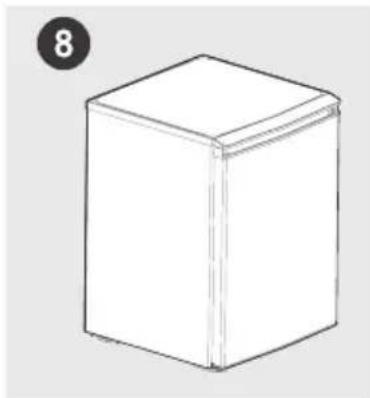
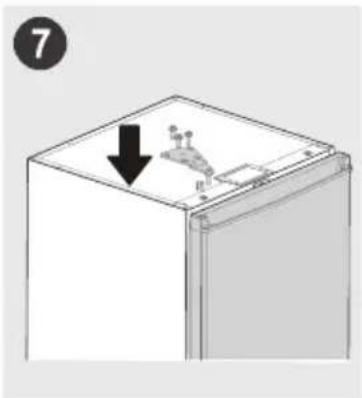
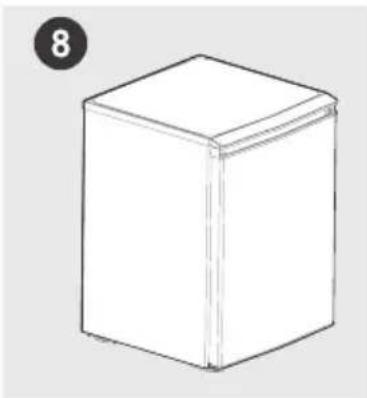
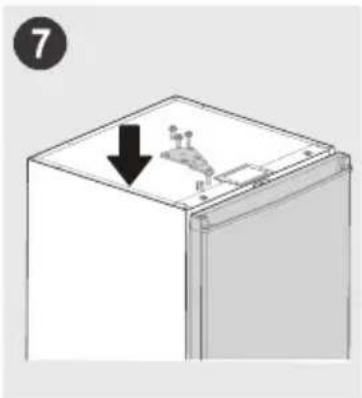
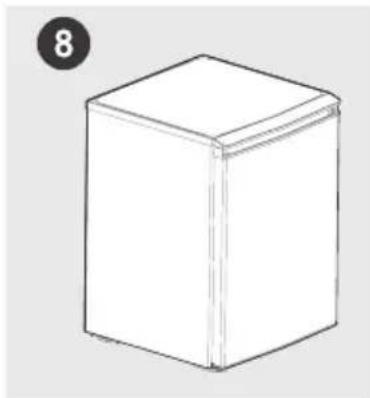
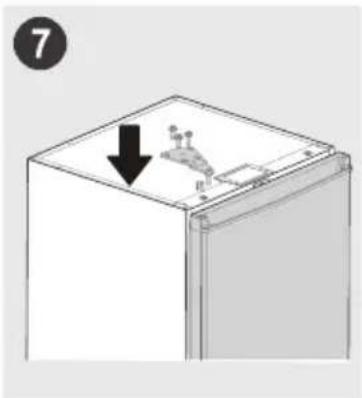
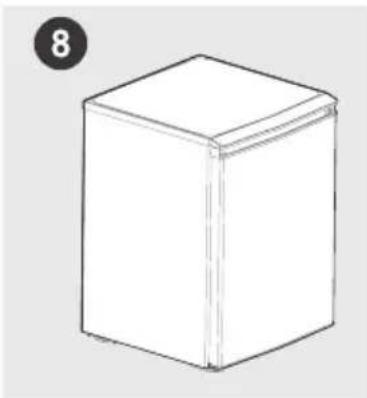
- Place the door vertically onto the bottom hinge. Attach the upper hinge and secure the top cover of the refrigerator.
Leveling feet
To prevent vibration, the unit must be leveled.
If required, adjust the leveling screws to compensate for an uneven floor.
The front should be slightly higher than the rear to aid in door closing.
Leveling screws can be turned easily by tipping the cabinet slightly.
Turn the leveling screws counterclockwise to raise the unit, clockwise to lower it.
Connecting the appliance
After installing the appliance, connect the power plug into a socket outlet.

ATTENTION
After connecting the power supply cord (or plug) to the outlet, wait 2 or 3 hours before you put food into the appliance. If you add food before the appliance has cooled completely, your food may spoil.
Tips for energy saving
- Do not place the appliance near cookers, radiators or other heat sources. If the ambient temperature is high, the compressor will run more frequently and for longer, resulting in increased energy consumption.
- Ensure that there is sufficient ventilation at the base of the appliance, on the sides of the appliance and at the back of the appliance. Never cover ventilation openings.
- Please also observe the spacing dimensions in the chapter "Installation".
- The arrangement of drawers, shelves and racks as shown in the illustration offers the most efficient use of energy and should therefore be retained as far as possible. All drawers and shelves should remain in the appliance to keep the temperature stable and save energy.
- To obtain a larger storage space (e.g. for large refrigerated/frozen goods), the middle drawers can be removed. The top and bottom drawers and shelves should be removed last if necessary.
- An evenly filled refrigerator/freezer compartment contributes to optimal energy use. Therefore, avoid empty or half-empty compartments.
- Allow warm food to cool before placing it in the refrigerator/freezer. Food that has already cooled down increases energy efficiency.
- Allow frozen food to defrost in the refrigerator. The coldness of the frozen food reduces the energy consumption in the refrigerator compartment and thus increases the energy efficiency.
- Open the door only as briefly as necessary to minimize cold loss. Opening the door briefly and closing it properly reduces energy consumption.
- The door seals of your appliance must be perfectly intact so that the doors close properly and energy consumption is not increased unnecessarily.
OPERATION INSTRUCTIONS
Control panel
EN
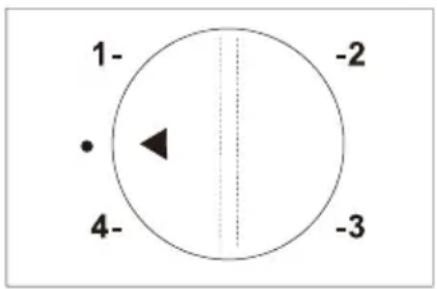
- If the ambient temperature is too high or in summer, according to actual needs, the thermostat adjusted to 4.
- If the ambient temperature is too low or in winter, according to actual needs, the thermostat adjusted to 1.
- Recommended gear: Mid-range

ATTENTION
The actual control panel may differ from model to model.
Tips on storing food
Freezer compartment
- The freezer is designated for the storage of food frozen at very low temperature, long-term storage of frozen food, and for the production of ice.
- Only use the shelves in the door of the freezer to store frozen food, not for storing hot food designated for freezing.
- Do not put fresh and frozen food next to each other. The frozen food may thaw.
- When freezing fresh food (such as meat, fish or chopped meat), cut them into parts that can be used at the same time.
- Storing frozen food: instructions are usually stated on the packages, which must be followed. If there is no information on the packaging, food should not be stored for longer than three months from the date of purchase.
- When purchasing frozen food, make sure that it was frozen at a suitable temperature and that the packaging is not damaged.
- Frozen food should be kept in suitable packages to retain the quality and should be returned to the freezer compartment as soon as possible.
- If a package of frozen food shows moisture or abnormal bulging, it is probable that it was stored at the wrong temperature and the content is spoiled.
- The storage period for frozen food depends on the room temperature, the thermostat setting, the frequency of opening the door of the freezer, the type of food and the time of transporting the product from the shop to the household. Always follow the instructions printed on the packaging and never exceed the maximum storage time stated on the package.

ATTENTION
The optimal temperature setting of each compartment depends on the ambient temperature. The above optimal temperature is based on an ambient temperature of 25 °C.
| Order | Compartments TYPE | Target storage temp. [°C] | Appropriate food |
| 1 Fridge +2 ~ +8 | Eggs, cooked food, packaged food, fruits and vegetables, dairy products, cakes, drinks and other foods are not suitable for freezing. | ||
| 2 (***)*-Freezer | ≤-18 | Seafood (fish, shrimp, shellfish), freshwater aquatic products and meat products (recommended for 3 months, the longer the storage time, the worse the taste and nutrition), suitable for frozen fresh food. | |
| 3 ***-Freezer | ≤-18 | Seafood (fish, shrimp, shellfish), freshwater aquatic products and meat products (recommended for 3 months, the longer the storage time, the worse the taste and nutrition), suitable for frozen fresh food. | |
| 4 **-Freezer | ≤-12 | Seafood (fish, shrimp, shellfish), freshwater aquatic products and meat products (recommended for 3 months, the longer the storage time, the worse the taste and nutrition), suitable for frozen fresh food. | |
| 5 *-Freezer | ≤-6 | Seafood (fish, shrimp, shellfish), freshwater aquatic products and meat products (recommended for 3 months, the longer the storage time, the worse the taste and nutrition), suitable for frozen fresh food. | |
| 6 0-star -6 ~ 0 | Fresh pork, beef, fish, chicken, some packaged processed foods, etc. (Recommended to eat within the same day, preferably no more than 3 days).Partially encapsulated processed foods (non-freezable foods). | ||
| 7 Chill -2 ~ +3 | Fresh/ frozen pork, beef, chicken, freshwater aquatic products, etc. (7 days below 0°C and above 0°C is recommended for consumption within that day, preferably no more than 2 days). Seafood (less than 0 for 15 days, it is not recommended to store above 0°C. | ||
| 8 Fresh food 0 ~ +4 | Fresh pork, beef, fish, chicken, cooked food, etc. (Recommended to eat within the same day, preferably no more than 3 days) | ||
| 9 Wine +5 ~+20 Red wine, white wine, sparkling wine, etc. | |||

ATTENTION
Please store different foods according to the compartments or target storage temperature of your purchased unit.
CLEANING AND MAINTENANCE
Defrost
• Power off the refrigerator. - Remove the food from the refrigerator and place it properly to prevent food from melting. - Clear the drain pipe (use soft materials to prevent damage to the liner). Prepare water containers for defrosting. (Pay attention to clean the compressor compartment water draining tray, avoiding overflow to the ground.) - You can also use an appropriate amount of hot water to speed up the defrost, and use a dry towel to dry the water after defrosting. • After defrosting, put back the foods in the cabinet and power on the refrigerator.
Stop using
Power failure:
In case of power failure, even if it is in summer, foods inside the appliance can be kept for several hours; during the power failure, the times of door opening shall be reduced, and no more fresh food shall be put into the appliance.
Long-time nonuse:
The appliance shall be unplugged and then cleaned. Please leave the doors open to prevent odor.
Moving:
Before the refrigerator is moved, take all objects inside out, fix the glass partitions, vegetable holder, freezing chamber drawers and etc. with tape, and tighten the leveling feet; close the doors and seal them with tape. During moving, the appliance shall not be laid upside down or horizontally, or be vibrated; the inclination during movement shall be no more than 45 degrees.
The appliance shall run continuously once it is started. Generally, the operation of the appliance shall not be interrupted; otherwise the service life may be impaired.
Foods can be preserved for a couple of hours even in summer in case of power failure; it is recommended to reduce the frequency of opening door.
TROUBLESHOOTING
The following simple issues can be handled by the user. Please call the after-sale service department if the issues are not solved.
| Problem Possible reason | |
| Failed operation | ·Check whether the appliance is connected to power or whether the plug is in well contact |
| ·Check whether the voltage is too low | |
| ·Check whether there is a power failure or partial circuits have tripped | |
| Odor | ·Odorous foods shall be tightly wrapped |
| ·Check whether there is any rotten food | |
| ·Clean the inside of the refrigerator | |
| Long-time operation of the compressor | ·Long operation of the refrigerator is normal in summer |
| ·when the ambient temperature is high it is not suggestible having too much food in the appliance at the same time | |
| ·Food shall get cool before being put into the appliance | |
| ·The doors are opened too frequently | |
| Light fails to get lit | ·Check whether the refrigerator is connected to power supply and whether the illuminating light is damaged |
| ·Have the light replaced by a specialist | |
| Door can not be properly closed | ·The door is stuck by food packages too much food is placed |
| ·The refrigerator is tilted. | |
| Loud noises | ·Check whether the floor is level and whether the refrigerator is placed stably |
| ·Check whether accessories are placed at proper locations | |
| Door seal fails to be tight | Remove foreign matters on the door seal |
| Heat the door seal and then cool it for restoration (or blow it with an electrical drier or use a hot towel for heating) | |
| Water pan overflows | There is too much food in the chamber or food stored contains too much water, resulting in heavy defrosting |
| The doors are not closed properly, resulting in frosting due to entry of air and increased water due to defrosting | |
| Hot housing | Heat dissipation of the built-in condenser via the housing, which is normal when housing becomes hot due to high ambient temperature, storage of too much food or shutdown of the compressor is shut down, provide sound ventilation to facilitate heat dissipation |
| Surface condensation | Condensation on the exterior surface and door seals of the refrigerator is normal when the ambient humidity is too high. Just wipe the condensate with a clean towel |
EN
APPENDIX
Special for new European standard
The ordered parts in the following table can be acquired from Service provider channel.
| Ordered part Provided by | Minimum time required for Provision | |
| Thermostats Professional maintenance personnel | At least 7 years after the last model is launched on the market | |
| Temperature sensors | Professional maintenance personnel | At least 7 years after the last model is launched on the market |
| Printed circuit boards | Professional maintenance personnel | At least 7 years after the last model is launched on the market |
| Light sources Professional maintenance personnel | At least 7 years after the last model is launched on the market | |
| Door handles Professional repairers and final users | At least 7 years after the last model is launched on the market | |
| Door hinges Professional repairers and final users | At least 7 years after the last model is launched on the market | |
| Trays Professional repairers and final users | At least 7 years after the last model is launched on the market | |
| Baskets Professional repairers and final users | At least 7 years after the last model is launched on the market | |
| Door gaskets Professional repairers and final users | At least 10 years after the last model is launched on the market | |
Dear customer
- If you want to return or replace the product, please contact the store where you bought it.
(Remember to bring the purchase invoice)
- If your product breaks down and needs repair, please contact the after-sales service provider.

ATTENTION
The model information in the product database, as well as the model identifier, can be obtained through a weblink scanned by a QR code, if any, on the energy efficiency label of the product.
For more information about the energy efficiency of the appliance, visit https://ec.europa.eu and search using the model name.
The model name can be found on the rating label of the appliance.

PRODUCT INSTALLATION 04
USER GUIDE 08
CLEANING AND MAINTENANCE 11
TROUBLESHOOTING 12
APPENDIX 14
SPECIFICATIONS
PRODUCT INSTALLATION
2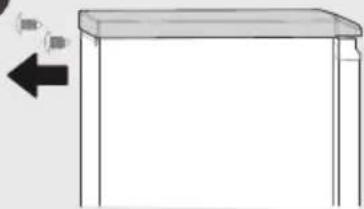
4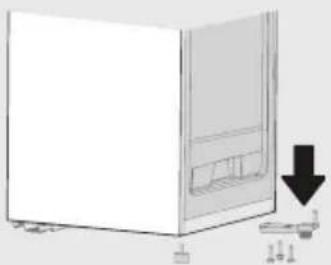
5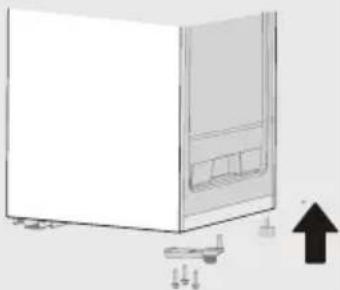
7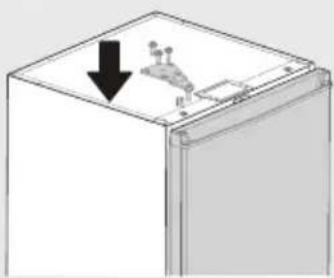
8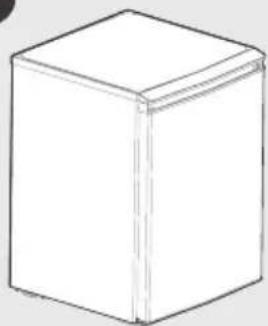
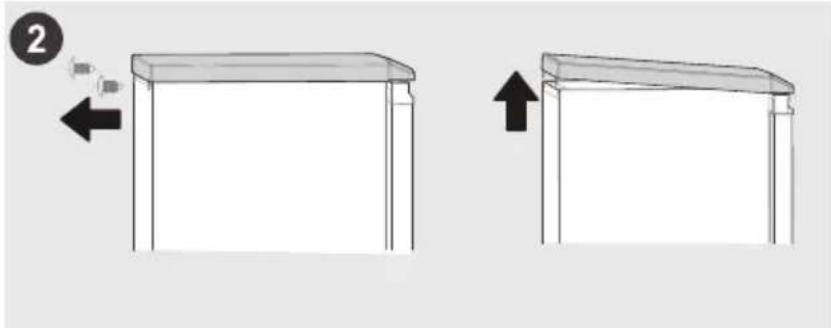
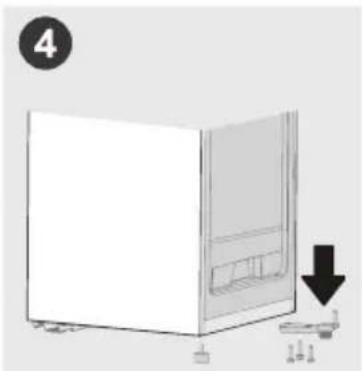
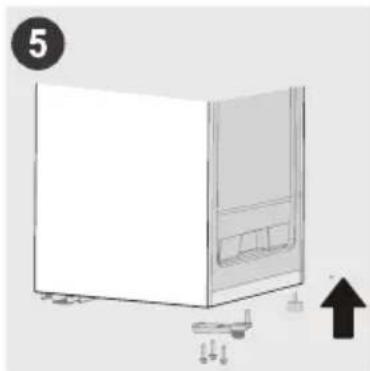
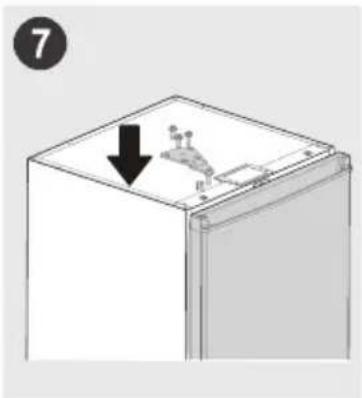
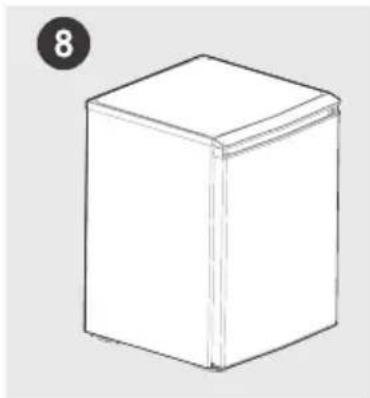
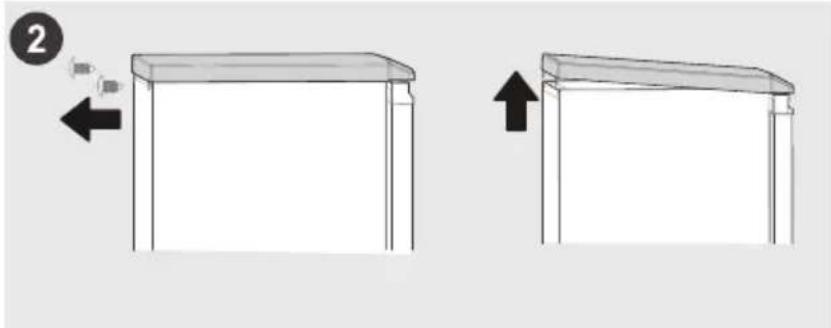
- Loosen the screws on the top cover, remove the top cover.
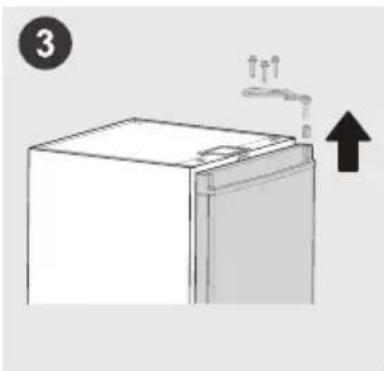
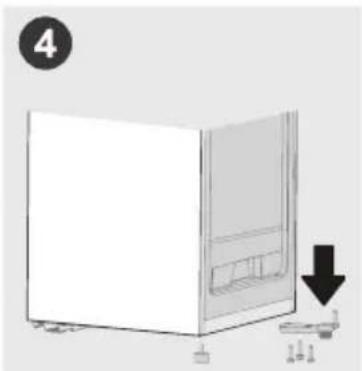
2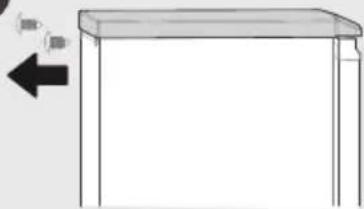
4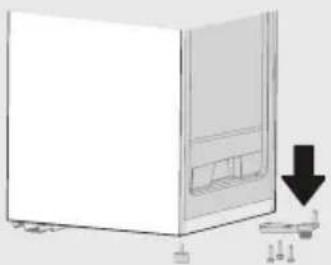
5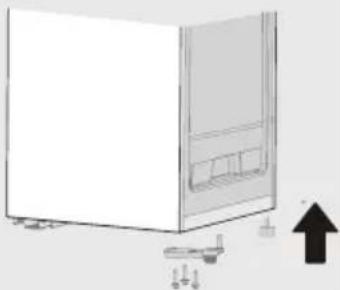
7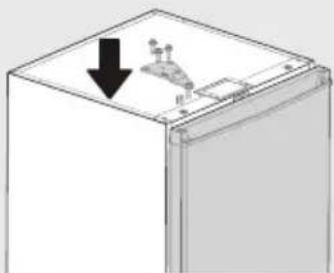
8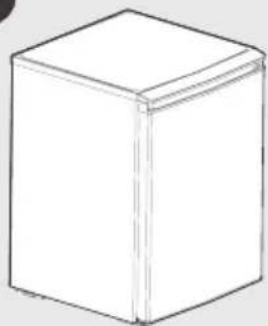
PRODUCT OVERVIEW 03
PRODUCT INSTALLATION 04
INSTRUCTIONS FOR USE 08
CLEANING AND MAINTENANCE 11
TROUBLESHOOTING 12
APPENDIX 14
SPECIFICATIONS
1 Temperature control knob
2 Drawer
3 Door
CAUTION
CAUTION
1 Temperature control button 2 Drawer 3 Door

WARNING
The image above is for reference only. The actual configuration will depend on the purchased product or the distributor's statement.
PRODUCT INSTALLATION
Installation instructions

WARNING
The image above is for reference only. The actual configuration will depend on the purchased product or the distributor's statement.
2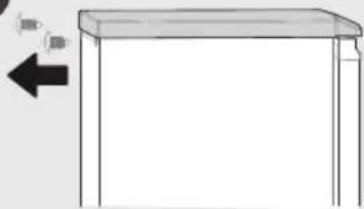
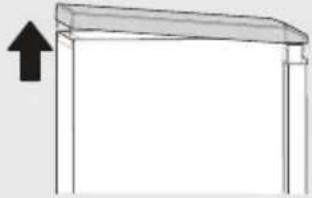
- Unscrew the screws of the top cover, then remove the top cover.
3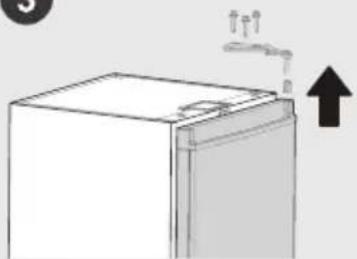
4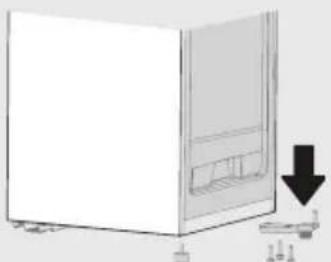
5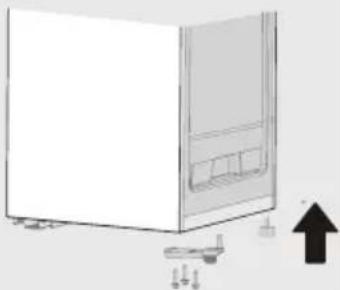
- Unscrew the screws of the upper hinge, then remove the upper hinge.
- Remove the door. Unscrew the screws of the lower hinge, then remove the lower hinge and the leveling feet.
6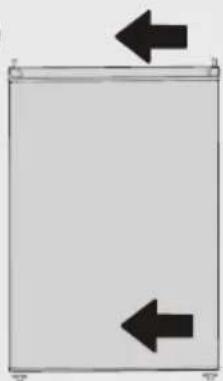
7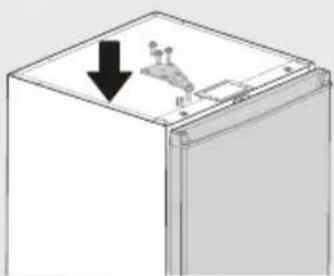
8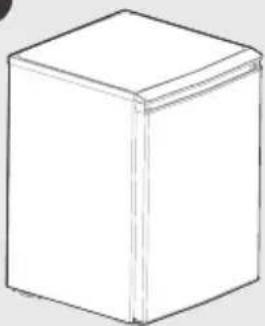
- Place the leveling feet and the lower hinge on the opposite side.
- Place the door stopper and the shaft bushing on the opposite side.
- Lower the door vertically onto the lower hinge. Attach the upper hinge and install the top cover of the refrigerator.
Leveling feet
1 Temperature control button 2 Drawer 3 Door

CAUTION
The above image is for reference only. The actual configuration will depend on the physical product or the distributor's statement.
PRODUCT INSTALLATION
Installation instructions
For refrigeration appliances with climate class

CAUTION
The above image is for reference only. The actual configuration will depend on the physical product or the distributor's statement.
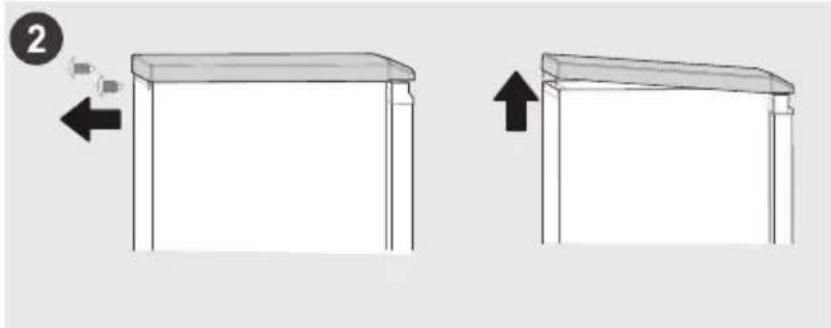
- Unscrew the screws of the top cover, remove the top cover.
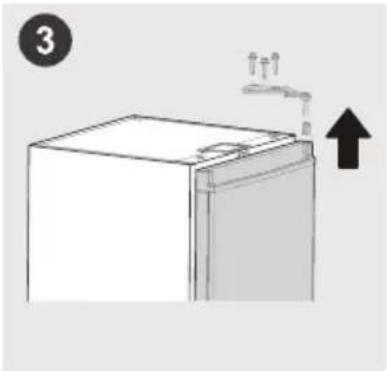
- Unscrew the screws of the upper hinge. Remove the upper hinge.
- Remove the door. Unscrew the screws of the lower hinge, remove the lower hinge and the leveling feet.
- Attach the leveling feet and the lower hinge on the opposite side.
- Assemble the door stop and the pivot sleeve on the opposite side.
- Lower the door onto the lower hinge vertically. Fix the upper hinge, fix the upper cover of the refrigerator.
Leveling feet
1 Temperature adjustment knob 2 Drawer 3 Door

WARNING

WARNING
- Unscrew the screws on the top cover. Remove the top cover.
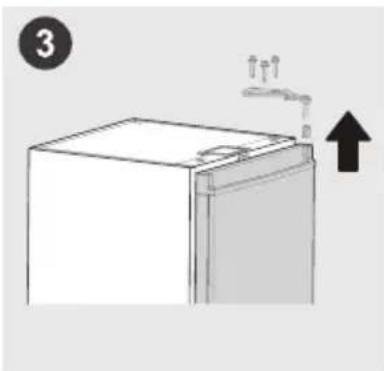
- Unscrew the screws on the upper hinge. Remove the upper hinge.
- Remove the door. Unscrew the screws on the lower hinge. Remove the lower hinge and the leveling feet.
1 Temperature control button 2 Drawer 3 Door
RO

CAUTION
1 Temperature control knob 2 Drawer 3 Door

NOTE
- Unscrew the screws on the top cover. Remove the top cover.
PRODUCT INSTALLATION
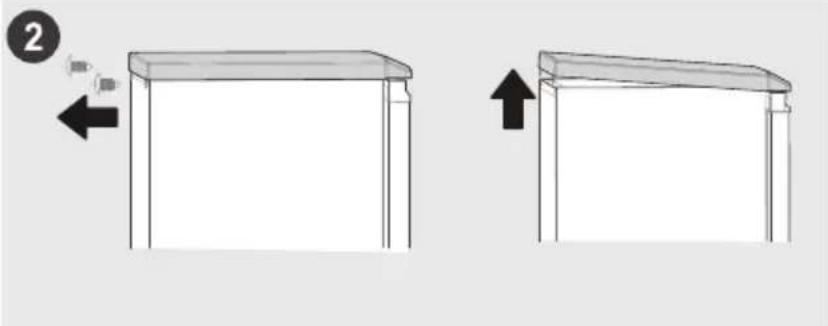
- Unscrew the screws from the top cover. Remove the top cover.
1 Temperature control knob 2 Drawer 3 Door
WARNING

WARNING
- USER MANUAL
- LANGUAGES
- CONTENTS
- SPECIFICATIONS
- PRODUCT OVERVIEW
- NAMES OF COMPONENTS
- ATTENTION
- PRODUCT INSTALLATION
- INSTALL INSTRUCTION
- FOR REFRIGERATING APPLIANCES WITH CLIMATE CLASS
- EFFECTIVE TEMPERATURE RANGE
- DIMENSIONS AND CLEARANCES
- CHANGING THE DOOR HINGE SIDE
- LEVELING FEET
- CONNECTING THE APPLIANCE
- TIPS FOR ENERGY SAVING
- OPERATION INSTRUCTIONS
- CONTROL PANEL
- TIPS ON STORING FOOD
- FREEZER COMPARTMENT
- CLEANING AND MAINTENANCE
- DEFROST
- STOP USING
- POWER FAILURE
- LONG-TIME NONUSE
- MOVING
- TROUBLESHOOTING
- APPENDIX
- SPECIAL FOR NEW EUROPEAN STANDARD
- DEAR CUSTOMER
- CAUTION
- WARNING
- INSTALLATION INSTRUCTIONS
- FOR REFRIGERATION APPLIANCES WITH CLIMATE CLASS
- NOTE
Brand : MIDEA
Model : MDRD129FZE01
Category : Freezer