
CH642B - Hob CANDY - Free user manual and instructions
Find the device manual for free CH642B CANDY in PDF.
| Brand | CANDY |
| Model | CH642B |
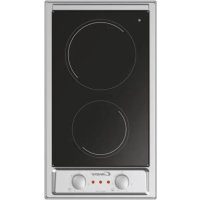
| Product type | Ceramic hob |
| Number of cooking zones | 4 zones (including two/three zone zones depending on model) |
| Zone type | Hilight (rapid heating) |
| Power supply | 230 V single-phase (adaptable three-phase 220-240 V or 380-415 V) |
| Maximum power | Variable depending on zone (up to 1800 W per zone) |
| Main functions | Boost function, programmable timer (0-99 min), child lock, residual heat indicator (H) |
| Controls | Touch sensitive controls |
| Power levels | 9 levels (1 to 9) + off (0) |
| Installation type | Built-in |
| Sealing gasket supplied | Yes, to prevent leaks |
| Recommended cookware | Flat bottom, diameter adapted to zone, stainless steel or thick aluminum |
| Maintenance and cleaning | Specific ceramic hob products, scraper for tough stains, white vinegar for limescale marks |
| Safety | Control lock, automatic shut-off in case of prolonged overflow, residual heat indication, automatic cut-off after excessive time |
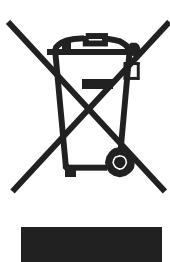
| Environmental protection | Compliant with WEEE (2002/96/EC) - mandatory recycling |
| Standards | European directives 73/23/EEC, 89/336/EEC, 2006/95/EC, 2004/108/EC |
| Power cable | Supplied without plug, cross-section 2.5 mm² (except three-phase 380-415 V: 1.5 mm²) |
| Recommended fuse | Single-phase 25 A, three-phase depending on connection (16 to 25 A) |
| Dimensions (estimate) | Approx. 580 x 510 mm (standard built-in) |
| Weight (estimate) | Approx. 8 kg |
Frequently Asked Questions - CH642B CANDY
User questions about CH642B CANDY
0 question about this device. Answer the ones you know or ask your own.
Ask a new question about this device
Download the instructions for your Hob in PDF format for free! Find your manual CH642B - CANDY and take your electronic device back in hand. On this page are published all the documents necessary for the use of your device. CH642B by CANDY.
USER MANUAL CH642B CANDY
- General warnings 6
- Installation 6
- Built-in 6
- Electrical connection 6
- Presentation according to model 7
6.Hob cookware advice 7 - Instructions for use 8
- Maintenance and cleaning 9
9.Problem solving. 10 - Aftercare 10
- Protection of the environment 10
CONTENIDO ES
Identification Plate (located under the hob's bottom casing)
We recommend you keep the instructions for installation and use for later reference, and before installing the hob, note its serial number in case you need to get help from the after sales service.
- It is strongly recommended to keep children away from the cooking zones while they are in operation or when they are switched off, so long as the residual heat indicator is on, in order to prevent the risks of serious burns.
- When cooking with fats or oils, take care always to watch the cooking process as heated fats and oils can catch fire rapidly.
- Aluminium foil and plastic pans must not be placed on heating zones.
- After every use, some cleaning of the hob is necessary to prevent the build up of dirt and grease. If left, this is recooked when the hob is used and burns giving off smoke and unpleasant smells, not to mention the risks of fire propagation.
- It is advisable not to stare directly at the halogen elements.
- Do not touch the heat zones during operation or for a while after use.
- Never cook food directly on the glass ceramic hob. Always use the appropriate cookware.
- Always place the pan in the centre of the unit that you are cooking on.
- Do not use the surface as a cutting board.
- Do not slide cookware across the hob.
- Do not store heavy items above the hob. If they drop onto the hob, they may cause damage.
- Do not use the hob as a working surface.
- Do not use the hob for storage of any items.
- In the unlikely event of a surface crack appearing, do not use the hob.
Immediately disconnect the hob from the electrical power supply and call the After Sales Service - Never use a steam or high pressure spray to clean the appliance.
This appliance is not intended for use by persons (including children) with reduced physical, sensory or mental capabilities, or lack of experience and knowledge, unless they have been given supervision or instruction concerning use of the appliance by a person responsible for their safety. - Children should be supervised to ensure that they do not play with the appliance.
We are constantly striving to improve product quality and as such may modify appliances to incorporate the latest technical improvements.
CE Appliance complies with European Directives 73/23/EEC and 89/336/EEC, replaced by 2006/95/EC and 2004/108/EC, and subsequent amendments.
2. INSTALLATION
Installing a domestic appliance can be a complicated operation which if not carried out correctly, can seriously affect consumer safety. It is for this reason that the task should be undertaken by a professionally qualified person who will carry it out in accordance with the technical regulations in force. In the event that this advice is ignored and the installation is carried out by an unqualified person, the manufacturer declines all responsibility for any technical failure of the product whether or not it results in damage to goods or injury to individuals.
3. BUILT-IN
The furniture in which your hob will be installed and all adjacent furniture, should be made from materials that can withstand high temperatures. In addition, all decorative laminates should be fixed with heat-resistant glue.
- A watertight seal is supplied with the hob.
Before fitting:
- turn the hob upside down, with the glass surface facing downwards.
Make sure the glass is protected. - fit the seal round the hob.
- make sure that it is correctly fitted to avoid any leakage into the supporting cabinet.
- Leave a gap of at least 5cm between the appliance and the vertical sides of the adjacent furniture.
- If, when installing the hob, the lower hob face is adjacent to an area normally accessible when handling or cleaning, fit a partition 1cm below the base of the hob to avoid any risk of scorching or damage.
4. ELECTRICAL CONNECTION
"The installation must conform to the standard directives." The manufacturer declines all responsibility for any damage that may be caused by unsuitable or unreasonable use.
Warning: we cannot be held responsible for any incident or its consequences that may arise during the use of an appliance not linked to the earth, or linked to an earth whose continuity is defective.
- Always check before any electrical operation, the supply tension shown on the electricity meter, the adjustment of the circuit-breaker, the continuity of the connection to earth to the installation and that the fuse is suitable.
- The electrical connection to the installation should be made via a socket with a plug with earth, or via an omnipole cut-out switch.
If the appliance has a socket outlet, it must be installed so that the socket outlet is accessible.
- The yellow/green wire of the power supply cable must be connected to the earth of both power supply and appliance terminals.
- Any queries regarding the power supply cord should be referred to After Sales Service or a qualified technician.
ATTENTION:
should it be necessary to replace the supply cord, connect the wire in accordance with the following colours/codes:
BLUE
BROWN
YELLOW-GREEN
- NEUTRAL (N)
- LIVE (L)
-EARTH(
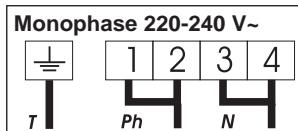
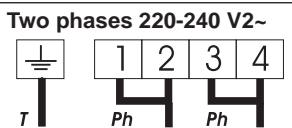
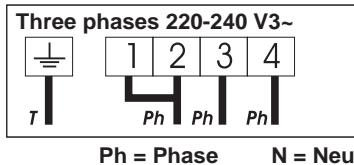
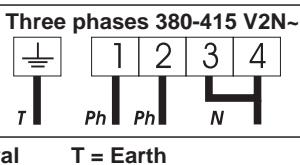
The hob is fitted with a power supply cord which allows it to be connected only to a power supply of 220-240 V between phases or between phase and neutral.
- Connect to a socket, to choose the correct fuse, you must refer on the table.
It is however possible to connect the hob to :
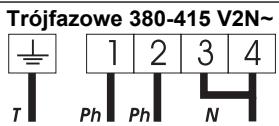
. Three phase 220-240 V3~
380-415 V2N~
To proceed to the new connection, you must adhere the following instructions.
- Before making the connection, make sure that the installation is protected by a suitable fuse, see table, and that it is fitted with wires of a large enough section to supply the appliance normally.
-
Turn over the hob, glass side against the work top, taking care to protect the glass.
-
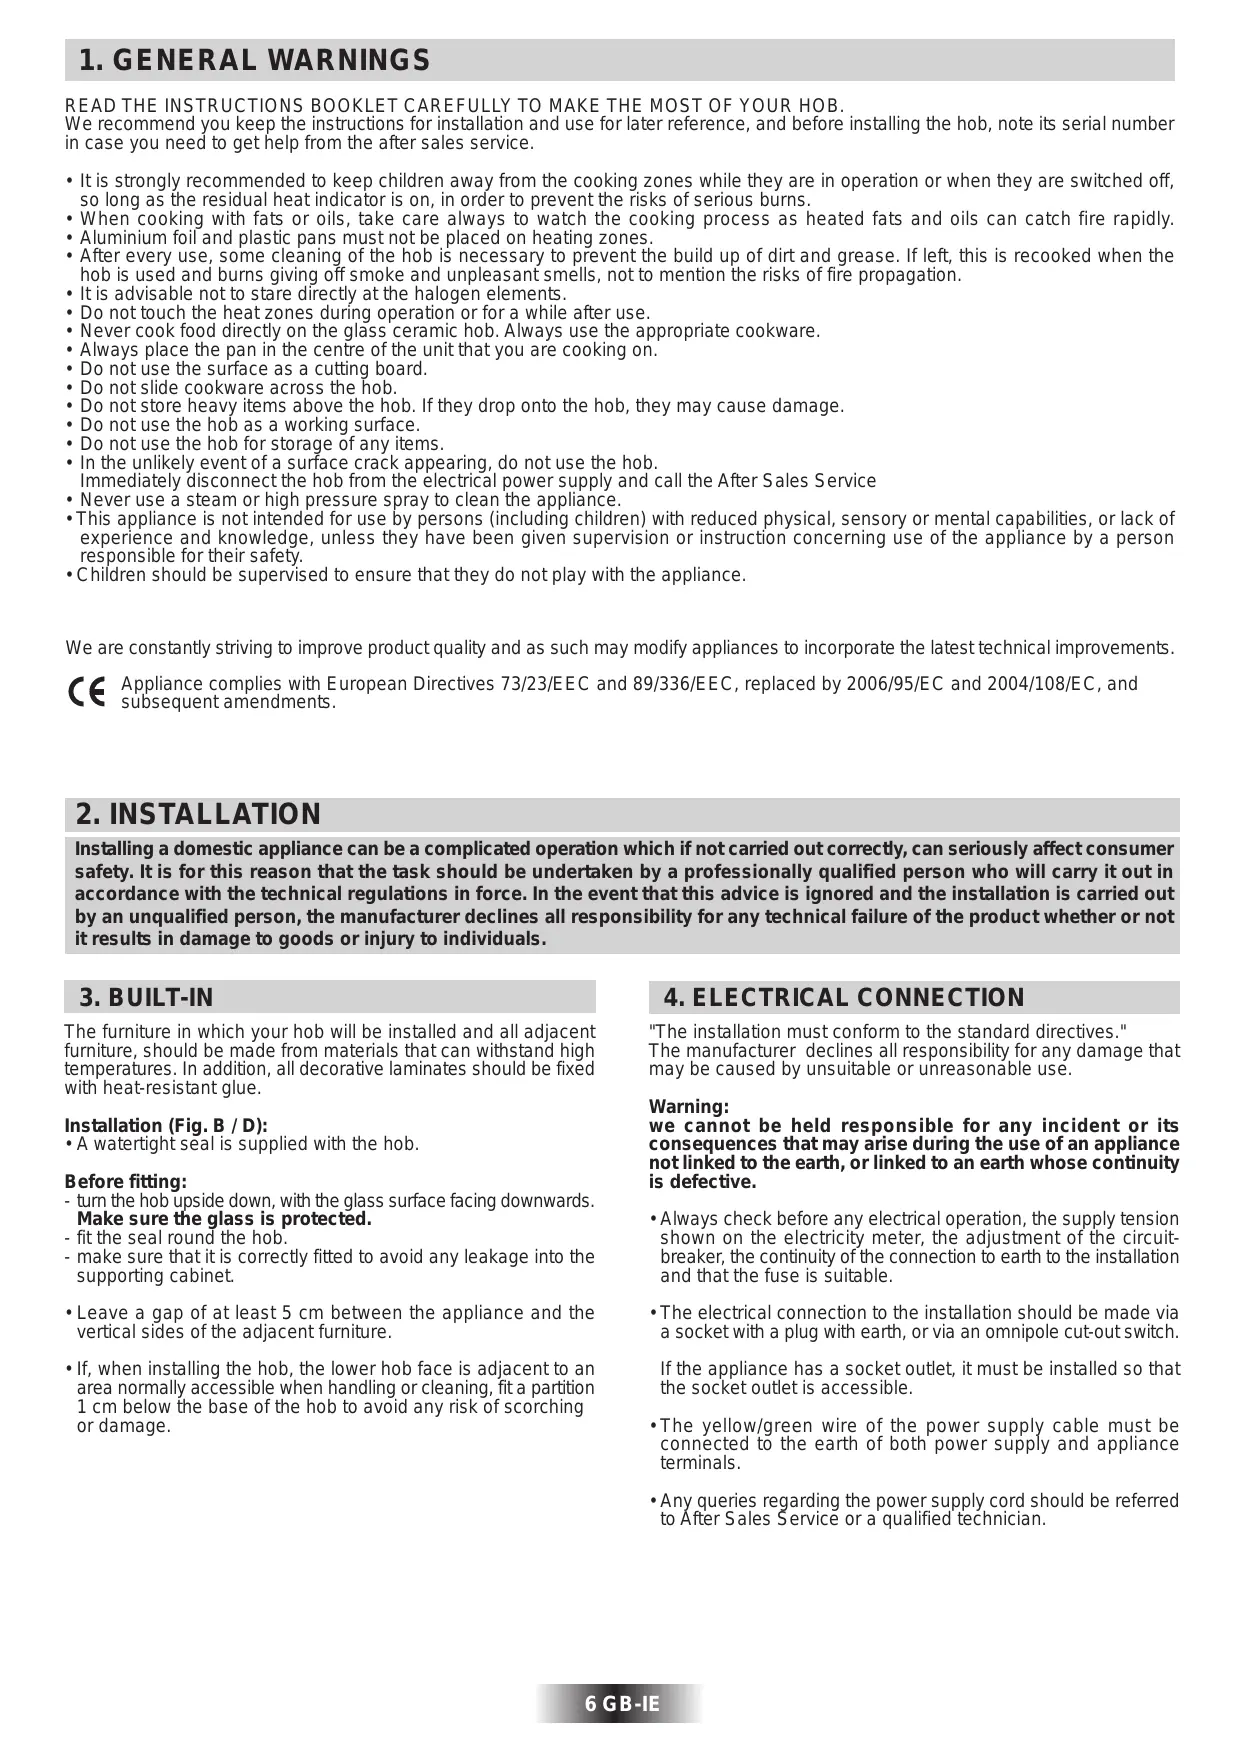
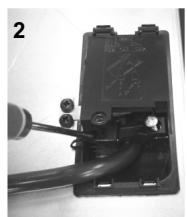
Open the cover in the following sequence:

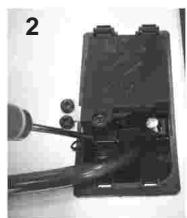
- unscrew the cable clamp "1".
- find the two tabs located on the sides,
- put the blade of a flat screw-driver in front of each tab "2" e "3", push in and press,
remove the cover.
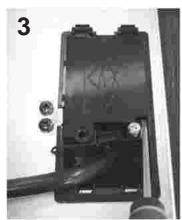
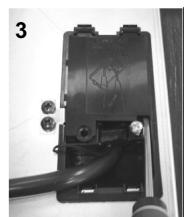
To release the power supplying cord.
- remove the screws retaining the terminal block which contains the shunt bars and the conductors of the supply cord,
-
Pull out the supply cord.
-
Operations to be carried out to make a new connection :
-
Choose the power supply cable in accordance with the recommendations in the table.
- Pass the power supply cable into the clamp.
- Strip the end of each conductor of the supply cord on a 10mm length, by taking in account the requested length of the cord for the connection to the terminal block.
- According to the installation and with the help of shunt bars which you should have recovered in the first operation, fix the conductor as shown on the chart.
Fix the cover. - Screw the cable clamp.
Note: make sure the terminal board screws are tight.
Connection to the terminals on the terminal block
| LAY OUT“5” | LAY OUT“2-3” | LAY OUT“4” | LAY OUT“1” | |
| MONOPHASE or TWO PHASES 220-240 V~ | ||||
| Fuse | 25 A | 25 A | 25 A | 20 A |
| Cable HO5V2V2F | 3x2,5 mm² | 3x2,5 mm² | 3x2,5 mm² | 3x2,5 mm² |
| THREE PHASES 220-240 V3~ | ||||
| Fuse | 25 A | 20 A | 25 A | 20 A |
| Cable HO5V2V2F | 4x2,5 mm² | 4x2,5 mm² | 4x2,5 mm² | 4x2,5 mm² |
| THREE PHASES 380-415 V2N~ | ||||
| Fuse | 16 A | 20 A | 20 A | 16 A |
| Cable HO5V2V2F | 4x1,5 mm² | 4x2,5 mm² | 4x2,5 mm² | 4x1,5 mm² |
5. PRESENTATION
- hilight zone :
a metallic conductor strip is spread uniformly over the whole surface unit. It is effective within 3 seconds and is suitable for steady, homogeneous and also sustained cooking.
The glass-ceramic hob benefits from greater heat output which is generated by the hilight cooking zones thereby accelerating the cooking process. Modifications to the design of the hob have not affected the capacity of the glass to withstand high temperatures, but they have improved controllability.
With the "Sprinter" facility, reduced cooking times of up to 15% can be achieved, depending upon the method of cooking and the type of saucepans being used.
6. HOB COOKWARE ADVICE
Using good quality cookware is critical for setting the best performance from your hob.

- Always use good quality cookware with perfectly flat and thick bases :
using this type of cookware will prevent hot spots that cause food to stick. Thick metal pots and pans will provide an even distribution of heat. - Ensure that the base of the pot or pan is dry : when filling pans with liquid or using one that has been stored in the refrigerator, ensure that the base of the pan is completely dry before placing it on the hob. This will help to avoid staining the hob.
- Use pans whose diameter is wide enough to completely cover the surface unit : the size of the pan should be no smaller than the heating area. If it is slightly wider the energy will be used at its maximum efficiency.
THE CHOICE OF COOKWARE - The following information will help you to choose cookware which will give good performance.
Stainless Steel : highly recommended. Especially good with a sandwich clad base. The sandwich base combines the benefits of stainless steel (appearance, durability and stability) with the advantages of aluminium or copper (heat conduction, even heat distribution).
Aluminium : heavy weight recommended. Good conductivity. Aluminium residues sometimes appear as scratches on the hob, but can be removed if cleaned immediately.
Because of its low melting point, thin aluminium should not be used.
Cast Iron : usable, but not recommended. Poor performance. May scratch the surface.
Copper Bottom / stoneware: heavy weight recommended. Good performance, but copper may leave residues which can appear as scratches. The residues can be removed, as long as the hob is cleaned immediately. However, do not let these pots boil dry. Overheated metal can bond to glass hobs. An overheated copper pot will leave a residue that will permanently stain the hob.
Porcelain/enamel : Good performance only with a thiny smooth, flat base.
Glass-ceramic : not recommended. Poor performance. May scratch the surface.
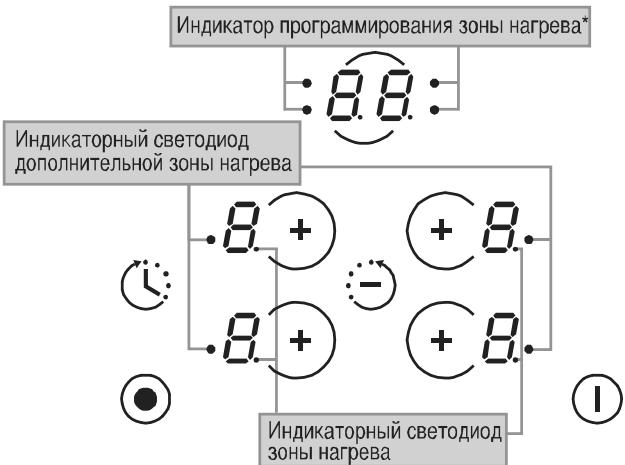
7. USE
- After powering up the hob, wait some seconds to activate the electronic controls.
- Press the button ①.
Electronic control of the hob is activated. In each display zone the heat level is displayed and the control LED blinks.
- After 20 seconds whithout use, the electronic control goes off and the starting operation has to be repeated.
- STARTING A COOKING ZONE
- Press the selection button of the required cooking zone. In the display zone, the control LED is on steady. It shows that the zone is live.
- Press the - or + button to select a heat level between 1 and 9. Hold down the + or - button and the heat level increases or decreases gradually.
The following examples are for information only. Personal experience should then let you adapt these settings to your taste and habits.
0 Off
1 )
2 ).... Melting heat
3 Keeping hot
4 Heating up
5 Thawing, stewing, full cooking, low temperature cooking
6 Cooking without lid
7 Frying, meat browning and roasting
8 High temperature cooking and roasting, seizing
9 Frying, boiling large quantities of water.....
- STOPPING A COOKING ZONE
- Press the selection button of the required cooking zone.
- Press the - button to display heat level . Now the zone goes off, the indicator goes off after 10 seconds.
- To stop rapidly, press the - and + buttons at the same time. The heat level automatically goes down to . The cooking zone goes off.
GENERAL STOP
The cooking zones and the timer can be stopped at any moment by pressing the On-Off button.

- RESIDUAL HEAT INDICATOR
The control panel tells the user when the surface temperature of the cooking zones exceeds about 60^ , by the following displaying: H. When the temperature goes back below 60^ , the H display goes off.
For ending the cooking, we advise switching off the cooking zone and using the residual heat of the zone to finish cooking gently. N.B. After a cut in the current, the residual heat indicator disappears completely, even if the surface temperature exceeds 60^ .
The cooking zone with two zones is fitted certain models. It can be either concentric or extendable.
It is active in totality when the cooking zone is in function, the control led of the additional cooking is displayed.
To desactivate the additional cooking zone :
- Press on the additional cooking zone button. The corresponding control led for the additional cooking zone goes off when it is deactivated.
To re-activate the additional cooking zone :
- Press on the additional cooking zone button. The corresponding control led for the additional cooking zone is active.
The additional cooking zone is fitted only one model. It is active in totality when the cooking zone is in function; the two control led of the additional cooking are displayed.
To desactivate the additional cooking zones :
- Press one time the additional cooking zone button . The corresponding control led for the external additional cooking zone goes off when it is deactivated.
- Press two times the additional cooking zone button () . The corresponding control led for the central additional cooking zone goes off when it is deactivated.
To re-activate the additional cooking zones :
-
Press on the additional cooking zone button, one or two times on the additional cooking zone button, according to the need.
-
PROGRAMMING A COOKING ZONE (according to the model)
Every cooking zone can be programmed for a maximum time of 99 minutes.
- Start the required zone by following the previous instructions. The control LED near the heat level must be displayed, it shows that the zone is live.
- Press the Timer button.
The zone mark around the timer display shows the controlled zone.
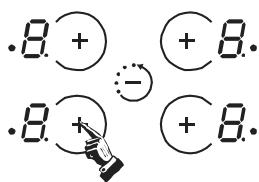
- Press again on the timer button to select a time in minutes between 0 and 99 minutes or press on the "-" button to decrease the time between 60 minutes and 0.
the programmed time can be modified at any moment reactivating the cooking zone and then the timer button.
When the time is run, the cooking zone goes off automatically and an audible beep sounds for 1 minute, press the timer button to stop it.
the time can be used alone as reminder, it will ring at the end of the programmed time.
The locking function prevents the children from starting the hob. It is also used for cleaning the control strip as the controls can be locked without the hob being on.
To lock the hob :
- Press the on/off button ①.
- Press simultaneously " - " button and " + " button of the front right zone (CH 633 front left zone), and then press again on the " + " button of this zone. The hob is locked, the locking indicator " L " is displayed on all zones for 20 seconds.
To unlock the hob :
- Press the on/off button ①. The locking indicator "L" is displayed on all zones.
- Press simultaneously the " - " button and the " + " button of the front right zone (CH 633 front left zone), and then press again on the " - " button of this zone.
The hob is unlocked.
Starting the fast heater
-
Press the on/off button (1).
-
Start the required zone, press the "+" button to obtain position "9", release the button briefly and press again the "+" button; the display alternates showing "A" "fast heater" and "9" heat level.
- If necessary reduce to the required heat position, the display alternates showing "A" "fast heater" and the new heat position.
| Cooking position | Power released (%) | Time of fast heater (minutes) | Maximum operating time before automatic cut off* |
| 0 | 0 % | 0 | 0 H |
| 1 | 3 % | 1 | 6 H |
| 2 | 6 % | 3 | 6 H |
| 3 | 11 % | 5 | 5 H |
| 4 | 16 % | 6,5 | 5 H |
| 5 | 19 % | 8,5 | 4 H |
| 6 | 32 % | 2,5 | 1,5 H |
| 7 | 45 % | 3,5 | 1,5 H |
| 8 | 65 % | 4,5 | 1,5 H |
| 9 | 100 % | 0 | 1,5 H |
E.g. 1800 W zone at position 6 = 32% of 1800 W power released When the "Fast heater" is on, the zone supplies 1800 W power for 2.5 minutes, and adjusts to 576 W after this time.
* For increased safety, the cooking zones cut off automatically if they are left on too long. The cut off depends on the heat level used.
To desactivate the fast heater
- Switch on the cooking zone, press the " - " button to come back to a normal heat level, decrease to the heat level required or to " 0 " to stop the cooking zone.
8. CLEANING AND MAINTENANCE
- Before carrying out any maintenance work on the hob, allow it to cool down.
- Only products, (creams and scrapers) specifically designed for glass ceramic surfaces should be used. They are obtainable from hardware stores.
- Avoid spillages, as anything which falls on to the hob surface will quickly burn and will make cleaning more difficult.
- It is advisable to keep away from the hob all substances which are liable to melt, such as plastic items, sugar, or sugar-based products.
MAINTENANCE:
- Place a few drops of the specialised cleaning product on the hob surface.
- Rub any stubborn stains with a soft cloth or with slightly damp kitchen paper.
- Wipe with a soft cloth or dry kitchen paper until the surface is clean.
If there are still some stubborn stains:
- Place a few more drops of specialised cleaning fluid on the surface.
- Scrape with a scraper, holding it at an angle of 30^ to the hob, until the stains disappear.
- Wipe with a soft cloth or dry kitchen paper until the surface is clean.
- Repeat the operation if necessary.
A FEW HINTS:
Frequent cleaning leaves a protective layer which is essential to prevent scratches and wear. Make sure that the surface is clean before using the hob again. To remove marks left by water, use a few drops of white vinegar or lemon juice. Then wipe with absorbent paper and a few drops of specialised cleaning fluid. The control knobs can be removed for a complete cleaning. However, you must care not to let any liquid go into the open zones, and then to push the knobs fully on fitting back. The glass ceramic surface will withstand scraping from flat-bottomed cooking vessels, however, it is always better to lift them when moving them from one zone to another.
Do not use a sponge which is too wet.
Never use a knife or a screwdriver.
A scraper with a razor blade will not damage the surface, as long as it is kept at an angle of 30^ .
Never leave a scraper with a razor blade within the reach of children.
Never use abrasive products or scouring powders.
- The metal surround : to safely clean the metal surround wash with soap and water, rinse, then dry with a soft cloth.
9. PROBLEM SOLVING
The cooking zones do not simmer or only fry gently
- Only use flat-bottomed pans. If light is visible between the pan and the hob, the zone is not transmitting heat correctly.
- The pan bottom should fully cover the diameter of the selected zone.
The cooking is too slow
- Unsuitable pans are being used. Only use flatbottomed utensils, that are heavy and have a diameter at least the same as the cooking zone.
Small scratches or abrasions on the hob's glass surface - Incorrect cleaning or rough-bottomed pans are used; particles like grains of sand or salt get between the hob and the bottom of the pan. Refer to the "CLEANING" section; make sure that pan bottoms are clean before use and only use smooth bottomed pans. Scratches can be lessened only the cleaning is done correctly.
Metal marks
- Do not slide aluminium pans on the hob. Refer to the cleaning recommendations.
- You use the correct materials, but the stains persist. Use a razor blade and follow the "CLEANING" section.
Dark stains
- Use a razor blade and follow the "CLEANING" section.
Light surfaces on the hob
- Marks from an aluminium or copper pan, but also mineral, water or food deposits; they can be removed using the cream cleaner.
Caramelisation or melted plastic on the hob.
Refer to the "CLEANING" section.
The hob does not operate or certain zones don't work
- The shunts are not positioned correctly on the terminal board. Have a check made that the connection is done in compliance with the recommendations.
- Hobs with sensitive controls: a big spill or object covers at least two buttons, for at least 10 seconds. Clean up the spill or remove the object.
- The control panel is locked. Unlock the hob.
The hob does not cut off.
- The control panel is locked. Unlock the hob.
The hob stops automatically
- A spill covers at least two buttons for more than 10 seconds; the hob switches to safety, and an audible beep sounds. Clean up the spill or remove the object.
- The cooking zones stop automatically if they are left on for too long. Refer to the section, "operating time".
Frequency of on/off operations for cooking zones
- The on-off cycles vary according to the required heat level:
- low level: short operating time,
- high level: long operating time.
"H" display, residual heat indicator, blinking.
- The electronic temperature is too high. A technician should verify the fitting in compliance with the recommendations.
10. AFTERCARE
Before calling out a Service Engineer please check the following:
that the plug is correctly inserted and fused;
If the fault cannot be identified switch off the appliance — do not tamper with it — call the Aftercare Service Centre. The appliance is supplied with a guarantee certificate that ensures that it will be repaired free of charge at the Service Centre.
11. PROTECTION OF THE ENVIRONMENT
This appliance is marked according to the European directive 2002/96/EC on Waste Electrical and Electronic Equipment (WEEE). By ensuring this product is disposed of correctly, you will help prevent potential negative consequences for the environment and human health, which could otherwise be caused by inappropriate waste handling of this product. The symbol on the product indicates that this product may not be treated as household waste.

Instead it shall be handed over to the applicable collection point for the recycling of electrical and electronic equipment Disposal must be carried out in accordance with local environmental regulations for waste disposal.
For more detailed information about treatment, recovery and recycling of this product, please contact your local city office, your household waste disposal service or the shop where you purchased the product.
1. AVVERTENZE GENERALI
LEGGERE ATTENTAMENTE LE ISTRUZIONI INCLUDE IN QESTO LIBRETTO.
Blu - neutrto/neutral (N)
Marrone - fase/ live (L)
Giallo-Verde - Terra/ earth (
$$ N = N e u t r o $$
$$ T = T e r r a $$
5. PRESENTAZIONE
- La zona hilight :
Ph = Phase N = Nulleiter T = Erdung
5. DARSTELLUNG
1. MEPbI PPEIOCTOPOXHOCTN
YTO6blIO6bTcR HANJyUHIX PE3yJIbTATOB PPN 3KcPJIYATAUIN BAPOUHOI IOBEPXHOCTN, BHIMATEJIbHO IPOUTNTE 3TU INHCTPYKUNIO
Pekomehnyetc coxpaHntb 3tu nHCTpykCnIO no yctaHOBKn n 3KcnPyataunn n obaaTbcra K Hei no Mepe Heo6xoDMoctnn n pepe d yctaHOBko BapOCHNO NobepxHoctn. B cnyae obpaueHnna 3a nmoUb B cepBncbI ceHTp ykaJITe cepHNO HOpE BapOCHNO NobepxHOctn, yka3aHHbI B ee naCnpTHO TabNtue, KaNtOka3aHO Hnke.
- Bo n36exkHne cepbe3hIX OXKOrOB He pa3pe7aIe Te DeTAM NOxOuNTb 6n3KO K 3oHaM HarpeBa, KOrda OH N BkNIOUeHbI, IIN KOrda OH N BkNIOUeHbI, HO pRr TOM rOpIT INdIKaTOP OCTaTOHOrO HarpeBa.
-Пи пи��товлпици CИСПОЛьЗВАнгелм КИРОВ ИЛМ Macna Bcergа Спеди Te 3a ПpoцeСССМ РИ�OTOBЛЕнгЯ ПИЗ,ТAK KAK JИрь I MacNo MOrTy BHe3aNHO 3aRopeTbCry.
-
He klaaIte Ha 30hI hArpeBa aIOMHHeBvIO fOJIbry I He CTaBtE Ha HIX pIaCTMaCCoByIO Nocdy.
-
Pocne Kaqdo IcnoB3oBAHnI Tpe6yETc OOnuATb BapOHyIO NobepxHocTb, YTo6bl IpTeODBpaNTb Obpa3oBAHne npiropeBseI rpa3n Ijupa. Ecn OctaBt 3arpy3HeHn Ha BapOHOIOBepxHocTN, To pN CLeDyUeM IcNoB3oBAHm OH bdyT npiropA Tb, N npn 3Tom 6ydt BlydelaTbC DaBIM HnepnraTHb 3anax. Kpome 3TO, 3TO MoKet npnbecTN KnoXapy.
He pekomeHnyetc cMOTpeTb Ha ranoreHHbIe lambli.
He npikacaiTecb pykam K3OHAM HarpBa, KOrda OHN BKNIOUeHbI, ININ NOKA OHN HE OCTBJIN.
HnkOrda He roTOBbTe NnUy HnOcpeDCTBeHHo Ha CTekJIOkepAMuYeCKoB BApOHyo NOBepXHOCTN. Bcerda NoJIb3yIteCb dJa 3To0 nOxOJaSeK kXOHNo NocDoB. Bcerda CTAbTe KAcTpIOIo NmN cKOBOpOky B ceHTp 3OnbI HarpeBa, Ha KOtOpO Bbl rOTOBITE NnUy. HnkOrda He nOlb3yIbTecb BApOHyo NOBepXHOCTbIO B KaueCTBe DOckn DnPa pe3Kn. He npotaackBaIte KxOHHyIO Nocdy no BapOHyo NOBepXHOCTN.
He xpaHnTe naBapOchno IOBepxHOCTbI TAgKeIbIe IpeDMeTbI. EcnOn OHyT ha BapOCHyIO NOBepxHOCTb, To OHmOrTy NOBpeDHTbe.
Hnkorga He nojIb3yI TeScB BapOuHOI NOBepxHOCTbIO B KaueCTBe pa6oeryo cTolJa.
He noIb3yIeScB BapOuHNo IOBepxHocTbIO B KaueCTBe MeCTa IJX XpaHEnHa KaKnx-JIn6o PpeMeTOB.
EcnHa BapOCHNO IOBepxHOCTN IPOBHTC TpeUHa, HemeJeHNO OTCOEuHNTE BapOCHYIO IOBepxHOCTb OT 3JIeKTPoCeTN IO6paTNTecb 3a POMOcIbU B cnyk6by NocJIePnoJaXHOrO o6cIyKuBaHn.
HnkOrda He nCnOlb3yIe Teporayn nap nn BOD NOB BbICOKIM DaBJIeHnEM IJY NCTKIN3JeJIa.
DaHHbI 3NeKtponp6op He npEHa3HaueH IJI NcNoB3OBAHnI DeTBMN IIOBmC fN3HueCKMm IIN PCNXUeCKM HeEOCTaKaMn, a TaKke IIOdbMn, He OblaAIOUIm N DOCTaTOHbIM ONbITOM IN 3HaHnRA M, ecNI 3TN JInca He NOpUynIN HCTpykui NOTHCNTeJbHO 3KcNJIyatauIN 3NeKtponp6opa, nIN He IcNOJb3yIOT 3NeKtponp6op IOd pnpcmotpom liua, OTBeauioero 3a INx 6e3OnacHocTB. He pa3peaaiTe DetamIrpaTb C3NeKtponp6opom.
Ha7a KOMPnAHnI NOCTOARHHo CTpeMHTcI NOBbICITb KaueCTBO BbIpyCKaEMo EHO IPOyKzIM, I03TOMy B KOHCTpyKzIO BbIpyCKaEMbIX HaMN3JeIN MOrYT BHOCITbcra HOBeIShne TEXHNeCKeY YCOBepSeHCTBOBaHnI.
89/336/EEC, KOtopbie 6bln 3aMeHebl dapeKtBamn 2006/95/EC n 2004/108/EC n noCneIyUOUMn nonpaBkAmn KnHm.
2. YCTAHOBKA
UcTaHOBKa 6bIIOBOI TexHKn YBJIeTcra CLOJHO pa6OTo, HnPaBnIbHoe BbINOJHHeHne KOTOpO MoKeT OTruCaTeHbHO cKa3aTbcra Ha 6e3OnacHocTn PONb3OBaTeJI. Ioo 3ToI npUInHe yCTaHOBKa 6bIIOBOI TexHKn DoJXHa BblIOJNHTbcra BBICOKKBAJIINΦIcnipOBaHHbIMn CneuaJIncTaMn, KOTOpBIE BbINOJHrT yCTaHOBKy C co6JIouHeHem Bcex DeiCTByUOxN npabII n HopM. B TOM clyuae, ecnn 3To npedocTepeXeHne 6ydet npOnrHopropoBaHo, u yCTaHOBKa 6ydet BblIOJHeHa liuOcm, He IMeIoUm DocTaTOHoi KBaJIINΦIkaUN, pOn3BOJnteJIb He 6ydet npInHMAtb HkAKnx IpTeH3n OTHOCHTeHbHO BbIXOda o6OpudobAHnna n3 CTPO n HaHeCEHHOro npn 3TOM uyep6a ImyueCTBy nII IN3doPObBIO JIOdeI.
3. BCTPANBAEMARБBITOBARTEXHINKA
Kyxonna Me6eB, B KOTOpU 6yDet BCTpaNBaTbCBAwa BapOHa naOBepxHocTb, n BCa pacnOJoxKeHHa nO6bn3OcTN OT Hee Me6eB bONJHa 6bITb N3rTOBJeHa n3 MaTePnaIob, KOTOpBie MOryt BbldepXnBaT bBlCOKne TempePaTypb. Kpome 3TORo BCE deKopatNBhle PNeEHKn DOJXHb 6bITb PrnKneeHb TENIOCTOnkIM KJeeM.
YcTaHOBka:
B KOMJIeKTe C BapOuHoi NOBepXHOCTbIO NOCTaJIaETcRepeMTeI3npyUo7A npoklaJaKa.
IpepeyctahOBkoI:
-
Положи te Bapочну IO nobepxHocTb TaK, yTo6bl cTeKIOkepaMNUeCKa IOBepxHocTb 6blIa HnPaBJIeHa BHN3. IpoBepbte TTO cTeKIOkepaMNUeCKa IOBepxHocTb 3aUNIeHa. - YctahOBIne npOKNaIDky NO nepIMeTpY BapOCHNo nobepxHocTn.
-
y6eHntecb B TOM, cho npoknaika npabnIbHO yCTaHOBJeHa DnToro, YTObblN36ExKaTb npoteueK B WkaΦ, Ha KOTOpbI ONIPAETcB BapOuHa NOBepxHOCtB.
PacctoarHne MeKdy BapOCHNOBepxHOCTbIO IN BepTnKaJIbHbIMCTeHKAMPiacpONIOXeHHoI pAOM C Hei KxyOHHO Me6eJIbIO DOJXeH6bITbHe MeHbSe 5 cm. - Ecnn HnKnHcTcPOHa yCTaHOBHeHHo BapOuHoi NOBepxHoCTn pacNoIaraetcB OblaactN, K KOTOpO OcyUeCTBnIeTcDocTyN BO BpEmBaIIOJIeHHraYbOpKn IIN dpyrnx Opeaun, TO yCTaHOBtne HnKe BApOuHoi NOBepXHOCTn neperopOky. Ppeperopoka DoJxHa 6bItb yCTaHOBJIeHa Ha paCctOraHHn 1 CM OT BapOuHoi NOBepxHOCTn DnToro, YTO6bl
n36ekatb oXoROB nIINOBpeHn.
4. NOДКЛЮЧЕНЕ KЭЛЕKTPOCETN
UcTaHOBKa DOnJXHa 6bITb BbIOnJIHeHa B COOTBETCTBnC DeIcTBYIOUIMN IpaBUNaMn IN HopMaMn 3JIeKTpOBe3OaNacHOCTn. Ipon3BOIDTeNb He npINHMAe HnKaKnx IpTeH3n OTHOCITeNbHO NOBpeXdEHH, YBJIaIOUxxCs CJeDCTBnEM HEnpaBUNbHOro npImMeHnI3DeJIy.
IpeDynpexJeHHe: POn3BODInTeJb He HecetOTBeTCTBeHHOCTb 3a HeCuaCTHbIe Cnyan, YBJIaHOUneCe CNeIcTBeM TORO, YTO 3NeKtpOpn6Op He 6bl3a3EmJeH, IIN npOn3oWeJ O6pbI B JINHN 3a3EmJeHn.
- PepeД bblonHeHemпоКнluЧeHЯ 3neKtpoPn6opa K 3neKtpocetN ob8aTeBNo npObePbTe HapRjaKeHne B 3neKtpocetN, perynipOBky ABtOMaTnuecCKOrO BblKJIouCAteN, OTCyTCTBnO 6pbIbA B JInHm 3a3eMJIeHЯ JekTpOpnp6opa, n HOMHaI NJaBKO rnpdoxpaHnteN.
-3NeKtpoPnp6op DOnJKeH NoDKnHouaTbC KAnEKeTpnueCKo pO3eTke C NOMOuB BuNk, CnA6XeHHo WtBipbKOM 3aUHTHO 3aEmHeHn, INIype3 DBYxNpOCHb pa3BeENHITeB.
Ecnn 3neKtponpnp6op cna6xhen wTeNceNbHO p03eTKo,TO OH dOnJxH e 6bIb yCTaHOBnEH TAK, YTO6bIK WTeNceNbHO pO3eTKe OcyueeCTBnIcnyo6HbI DOCTyI. - JeIto-3eJIeHbI npOBODnK shHypa nHTaHn IdoJxeh NoDCoeDnHЯTbC K KOHTaKTy 3a3EmHeHn 3NeKtpUYeCKo pO3EtKn I 3JeKtpOpnp6opa.
- Пи ВОЗнКНовен КаКИX-ЛИБО BONPOCOB, CB73aHHbIX CИСПОЛБЗВАнEM SHHypa ПИТанЯ, СLEДуET OБРаТьСВ B CNYK6y PОСЛЕnpodaxHORO OБслУЖИВAHЯ ИЛ K KBaIINФицрОВАнHOMY ЗЛЕКТПИКУ.
BHIMAHHE:
EcIn Bo3HNKHeT Heo6XoDImOCTb BbIIOJHnTb 3aMeHy shHypa nHTaHn, NOcOeDInHnTe npOBdHnKn shHpya nHTaHn B COOTBeTCTBn C yKa3aHHbIMn HnKe ZBeTOBbIMN KoJaMn.
CINHIN-HEINTPAJB(N1
KOPNUHEBbl-ΦA3A(I.)
XEJITo-3EJIeHbI-3EMJIA ()
- MoDéJI N PYP
B KOMNJIeKT NocTbKIN BAPoUHoi NOBepXHOCTN BXOJNT UHYP NITaHn. 3TO N03BOJIaR TIOKIIHOuATb 3OT 3JIeKTPoPn6Op TOJbKO K 3JIeKTPocETn C HApPjaKeHHem 220-240 B MeJy DByMa Φa3amn INI MEXd y a3oI N HeITpaJIbIbI.
- PodklnouhTe 3JIeKtpponp6Op K 3JIeKtpnuecko po3eTke, 3aunueneHHo nJaBKM npedeoxpaHntelem (HomHaI npedeoxpaHnteBAb6npaetcC nOMOcbTu6nCbI).
OdHako maKke umeemc8o3MOxHocmb nodKnIouumb 6apouHyIOsepxHocmb K cneDyUoUM JluHuaM 3Jekmpocemu:
TpiΦa3b220-240B3~
-Tpnsfa3b1 380-415B31\1~
IЯ nepexoHa HOBOe NOKJIIOHHe BbINONHTe CneDyUOuNe HNCTpyKc:
- Pered BbIIOJIHeHHeM NOdKIIoueHn IPOBepbTe, yTO 3JIeKTPoPnB6Op 3aUHsE H C NOMOuBbIO NOxODJUeR OINABKOro IpeOxpanHTeY (CM. TaBNIuCy), n YTO NIOUaDb CeueHn IOIbOJDIAux INPOBOHNKOB YBnEeTc DOCTaTOUHOn, YTO6bl ObecneuBaIocb HopMaIbHoE NITAHne 3JIeKTPoPnB6Opa.
- Плобожиные варочны по breast Ha по breast Stola CTekknokepamuecko CTOPOH BHN3. (CTekknokepamuecka noBepxHocTbdoJnka 6bTb 3aunuHa!.
- CHIMITE KpbIshky KJIeMMHoi KOLOdKn, BbINOJIHNB CneDyIOuIe onepaun:
3NEKTPNueCKNE COEINHEHNA
| LAY OUT "5" | LAY OUT "2-3" | LAY OUT "4" | LAY OUT "1", | |||||
| Одna phаза 220-240 B- Дve phазы 220-240 B 2- | ||||||||
| ПЕДОХPAHINTEь | 25 A | 25 A | 25 A | 20 A | ||||
| SUHYP ПИТАния HO5V2V2F | 3x2,5 mm² | 3x2,5 mm² | 3x2,5 mm² | 3x2,5 mm² | ||||
| Три phазы -220-240 B 3- | ||||||||
| ПЕДОХPAHINTEь | 25 A | 20 A | 25 A | 20 A | ||||
| SUHYP ПИТАния HO5V2V2F | 4x2,5 mm² | 4x2,5 mm² | 4x2,5 mm² | 4x2,5 mm² | ||||
| Три phазы -380-415 B 3N- | ||||||||
| ПЕДОХPAHINTEь | 16 A | 20 A | 20 A | 16 A | ||||
| SUHYP ПИТАния HO5V2V2F | 4x1,5 mm² | 4x2,5 mm² | 4x2,5 mm² | 4x1,5 mm² | ||||
| Одna phаза 220-240 B~ | Дve phазы 220-240 B 2~ | |||||||
| T | 1 | 2 | 3 | 4 | 1 | 2 | 3 | 4 |
| T | Ph | N | T | Ph | Ph | |||
| Три phазы ~220-240 B 3~ | Три phаи -380-415 B 3N~ | |||||||
| T | 1 | 2 | 3 | 4 | 1 | 2 | 3 | 4 |
| T | Ph | Ph | T | Ph | Ph | N | ||
PhΦa3a
N:HeItpaJIb
T:3emn
5. ONICAHNE
30Ha Harpeba "xaIJaT": MetaIIHuecka TOKOpBODaJcA noNocKa paCnpedeHeA OndHopOHO IO Bcei BapOHyo NOBepXHOCTn. Oha pa3OrpeBaetc B TeHeHne 3 c i MoKet IcNoJIb3ObaTcBdI pyaPBHomePHorO, OndHopOHO r DoCTaTOUHO npOdoJnxTeNbHoro npOuceCa npiroTOBNeHnPiu.
CTeknokepamuueckara Bapouhna nobepxnoctb 6bnaaet 60nbio TeNIOBO MoOIOHocTbI, THepepyemOn 3oHOH HargBa "xaJNaT", YTO oBecepeuHaBc6bICTpoe pnproTOBNeHne Niun. N3meHEny, BHeceHHbe B KOHCTpykuni Bapouhno nobepxHOCTn, He CN3UNn CnOco6HoCTb CTeknokepaMnK BIDepjkNAbTa BBcOKe TMnepaTpby, HO NHONobbcnnn nR6Ko3bpeynipOBaHn HargBa.NcNoJIb3OBAHne yUcPoiCTBa "cnPInTeP" No3BOJAEt CHN3NTB BPEm nproTOBNeHn Niun Ha 15% B 3abNCmOCTn OT cnOco6a npiroTOBNeHn Niun n NCNoJIb3yeMoK KxOHHO NOcybl
30ha Harpeba "xanonaiT": 3to KOMbHaaunra ranoreHOBO 3OHb HarpBa (1/3) n 30hBnHarpeba"XainaT"(2/3). 3Ta 30Ha pa3orpeBaetc OeHb 6bICTpo. OHa npriOnHa dIg Jaxpk Mca, b6tPoro KINPAeHn BODi n INTeHCNBHO rnpiroTOBNeHn PIIu, KOrda Tpe6yETc BbICOKa TemnepaTpaB TteHneKOPOTKORo pomexyTKa BpeMeHN.
30Ha HarpeBa "paHNT": 3Ta 3OHa HarpBeBa oBceNeuBaet bCTpoe nIIM MeDJIeHHOE NOBIIeHNE TemNepaTpybl, a TAKKe BbICOKYIO CtaBbHOCb TIOdEprJAHNA HyKHOI TemNepaTpybl. 3Ta 3OHa HarpeBa rBnIeTc OueH ToOHINoBecneHBAET OueHb XopoOee paccEHNHe TenIIa.
6. COBETbI OTHOCHTeJIbHO BblbOPA KUXOHHO NOCyIb IdIa HcNoJIb3OBAHnC BAPOUHOI NOBEPXHOCTbIO
Дяобсенья ВьICOKО зффкгTNВHOCТи Варочи NOBepxHOCrДОЛЖHA NCNoJIb3OBAtCBС ВьICOKOKaYeCTBeHHa KUXOHHa Nocya.

Ponb3yntecb TOnbko BbICOKKaueCTBeHHo KxOHHO NOcYDoC COBpeHNO NIOCKIM NTOCTbIM OCHOBAHEm: MCNoIb3OBAHne TAKOINocybl PnepOTBaPaaet Obpa3OBaHne rOpJHX TOeK, B KOtOpbIX 6dyTeNODropaTb Niua. KaTpOJIu N CKBOPoDc c TOnCTbIM OCHOBAHEm 6dyUTObeCNUEuHBaTB paBHomePHoe paccpeJeHene TenJa.
- OchoBaHne KAcTpOHN IIN cKOBOPoDbI DOJXHO 6bITb cyxHM: nocTe TOrO, KaK B NocCyDy 6yEdT 3aNtA JxIDKOCTb, IIN npN IcNoJIb3OBAHn ICAcTpOHN, KOtOpA JDO 3TO TRO HAXOINaC b XJOLOINbNIke, NepeI TEM KAK NOCTaBnTb KAcTpOHN Ha BapOHyIO NobepxHOCTb npOBepbTe, YTO OCHOBaHne KAcTpOHN YBIAETcO CBoPeHEnHO cyxHM. 3To npedeOTbPaTn OBpa3OBAHne HA BapOCHN OBOEpXHOCTn PAnTeH.
-ПользунштсTOЛькВБИСКОКаЧЕТBEнHо KУХONHо NOCUДС COBERSEHNO ПLOCKIM И TONCTbIM OCHOBAHnEM:ДиamETp NOCyDbl DOJGEN 6bIb He MeHbSe ДиamETpa 3ObHl HarpeBa. EcIn DniAMETp NOCyDbl HEMHOrO 6OJIbWe ДиamETpa 3ObHl HarpeBa,To 3Heprna 6ydet MCONJb3OBAtBcC MAKCIMMANBJHO 3ФФeKTHIBHOCTbIO
BbIbOP NODXOJAE KYXOHHO NOCybl - PpeIcTaBneHna HIXe INΦopMaζη NOMOKeT Bam BbIbPaT NocUd y dIЯ nprirotOBHeHn IINZ C MaKcImaJIbHON 3ΦΦeKTHBHOCTbHO.
Nocya n3 HepKabeoche cTann: HacToaTeNbHO peKOMeHdyETcMnObl30BaTb. Oco6eHNO xopoIoo IPOXODHT KxOHnHa Nocya c TpexCNoHOn cTpykTpyoIN OCHOBaHnA. OChOBaHne C TpexCNoHOn cTpykTpyo OBedInHRe T cBebePnEmuIeCTBa HepKaeIOSe cTann (npNBLeKaTeNbH bHeuHn BND, DOJIROBEuHOCTb IN PPOHOCb) nPpeMUYeCTBa AJHomMNIA JnMI MeDN (BbICOKa TePNLOPBODHOCTb, paBHomePHoe paccpeJeHne TempepaTybl).
Anomnuebaryocya:peKOMeHdyTcNcNoJIb3OBAbTB TJKeenyIO nocyu. BbICoKa TENIOnpOBoDHOCTb. AIIOMnHMeBAY nocya INOrda OCTaBnIeT ha BApOHNoBepXHOCTn CLeDbI, NOXOXNe HA capanHHb.I Ho 3TN CneDbI NERG YdAJaTcR, ECIN NcCTKa BapOHNOBepXHOCTn BBInONHReTc HMeEDJeHHO NOCJe O6pa3OBAHnRA 3TNX CneDB.
I3-3a Hn3KoN Tempeatypbl PnaBHeHn aIOMHHa, TOHKa aIOMHHeBaNocya He DoJnxHa NcNoB30BaTbcra.
UryHna nocya: MoXHO hCnOJIb30BaTb, Ho He peKOMeHNdyETcA. IIOxHe 3KcPJIyatauOnHHbIe xapaKTepeNCTnKn. MoXeT capanaTb NOBepxHOCtB.
Nocya c MeHbIM dHOM / KameHHa KepAMka: peKoMeHdyetcR NcNoIb3ObAtb TJeKyIO nocydu. XopoUne 3KcPlyatauOnHbIe XapakTepeNCTnK, HO MeIb MoKeT OCTabNtB Ha NOBepXHOCTn CJeIbI, NOXOJIe Ha cApAINHbI. 3TN CJeDy MOrT 6bITb YdaJIeHbI, ECIN YnCTKa BapOCHIO NOBEPXHOCTn BblONHReTcH HeMdJIeHNO nocIe Oba3OBaHNr 3TNx CJeIDOB. Ondako He CTaBbTe Ha BapOHy IOBepXHOCTb TaKyIO nocydu 6e3 HAnITOn B Hee JKnIOCTn. IpeperTeB MTaJIIN MOKeT npIrOpTeB K cTeKnOkePAmUeCKoN NOBEXHOCTn. IpeperTea NOcyda c MeiNbIM dHOM MoKeT OCTaBtB Ha cTeKnOkePAmUeCKoN NOBepXHOCTn CJeIbI, KOtOpBle HeBO3MOXHo 6yDet ydaJIntb.
ΦapΦopOBa/əMaHnPobAHHa nocya: XopoWne 3KcPnyaTaUOnHHbIe XapaKTePncTnKn TOnbKO IJIra NocydbIC TOHKIM, TlaKnM, PIOCKIM OCHOBaHHeM.
CTeKIOKepaMnuecka nocya: He peKOMeHnyetcNcNoIb3ObaTb. IINOxHe 3cKnIyatauOnHHbIe xapaKTePncTnKn. MoXeT capanaTb CTeKIOKepaMnueckyo
7. CTEKJIOKEPAMUeCKA BAPOUHAR IOBEPXHOCTb C CEHCOPHBIM YIPABJIEHNEM
-
OINCAHNE CEHCOPHO YIPTABJIEHNA
^*B 3aBcIMOCTN OT MOJIIN -
Послve BKJIIOUeHnI\PaTAHnI BApOuHoi NOBepxHOCTn NODOXdTe HeCKoJIbKO cekyHd IJrTOrO, YTObI DaTb IpOgPeTBc3NeKTPOHOMY 6ILOky ynpabLeHnI.
HaKMTe KONky ① BKnIOuayTeJNeKTPOHbI6NOKynpaBHeH.N KaKdo3OHe dncnpe OTo6paKaetcYpOBeHb HArpeBa ,MIMraetMHdNKaTOpHbCBTeOINoD.
EcInB TceHHe 20 C He BblIOJIaIeTcH NkKaIX DeIeCTBm,3NeKtPOHHb6Kn YnpaBLeHn BbIKIOHaeTcN, HEO6xoJIMO NOBTOpNTb OpepaUHO3AnyCKA.
BKJIIOUOHEME30HbI HAFPEBA
-HaKMTe KHOIky BbI6opa HyXHOBam 30hbl HaraPeBa.B COOTBeTCTByIOUe3OHe DnCnJIeB CBTODMOH NaHnae T Opeb POBbIM CBETOM,POKA3bBAIem TEM CaMbIM,YTO 30Ha HaraPeBa BKIOUeHa.
-Bb6epTe HxKbI yPoBeHb HapReBa B IaIana3OHe OT 1 Do 9 c NOMoIbHO KhoIKN " " IIN " +". PIn HaKaTNI KHOIKN " + " IIN " -" yPoBeHb HapReBa 6ydet NOCTeHNO YBeJIuNvBaTcR IIN YMeHbWAtbcr.
OIncaHHbIe HNKe npHMeBbl npnBeDeHbT OJIbKo IaN CnpaBKn. C TeueHNEM BpeMeHb Bn Hayntecb PpaBmHbIO BbIbApTaB yCTAHOBKn HaPeBa B COOTBECTBnCO CBOMH NOTpe6HOCTAMN
OBJIEE BbIKJIIOUChEHN
30Ha HarpBaN TaMep MoryT 6bITbBkIIOyeHbI BJIIOoe BpEmc C NOMOJIbHO HaKaTINKHOJIKN BkJ./BbIKJ.

- INHДNKATOP OCTATOCHOTO HAPPEBA
Korda Tempeata ypa 30hbl HarpeBa nobblaaetcno 60^ ,Ha nncnlee noBraetc H. Korda Tempeata npaaet Hnke 60^ ,3TOT HnDkaTOp nCHe3aET.
B KOHue npiroTOBnEHHI NIIu peKoMeHdyeTcB bIKIOHTb 3OHy HArpeBa I 3aKOHHTb npiroTOBHeHne NIIu, INIOJIb3yOCTaTOHoe TEnIO 3OHi HarpeBa. BaxHOe 3ameuHne. Iocne OTKIOUeHHI NITaHn HINiKaTOP oCTaTOHOro HArpeBa racheT, daxe ecNn TEMnpaTypa 30hI HarpeBa npeBbIwaet 60^
- YIPABJIENHE PABOTOI DOIPOJHITbHOI 3OHbI HAPPEBA (ДBE 30Hbl)
B HeKOTOpbIX MoJEnX IMeHOTcR 30HbI HarpeBa, COCTOJIue M3 DByx O6nacte. 3TN 30HbI MOrY 6bITb KaK KOHcEHTPnuHbIMn, TAK N BblTAYtBMn. Ppi BkIIIOUeHHN 30HbI HarpeBa BKIIIOUaHOTcR KaK OCHOBHa, TAK IN DonONHInTeNbHa 30Ha HarpeBa. 3TO perINcTpPyETcC NOMoUbIO 3aRopAnHn INDnKaTOPHO CBeToOnNoDa DOIOnNHInTeNbHO 30HbI HarpeBa.
ДлЯ ВьIKLOUЧЕнЯ ДОЛНHTeLbHоI 3OHbI HarpeBa:
- HaxKMnte KHOJky dOnOHnTeJIbHoi 30HbI HarpeBa .Pip BbIKIOueHHN dOnOHnTeJIbHoi 30HbI HarpeBa CBeToIOoD dOnOHnTeJIbHoi 30HbI HarpeBa rachET.
He noIb3yIteCb CInIaKOM BlaJXHO rY6KoI.
Hikorda He noIb3yIeTcB IJIYnCTKN NOBepxHOCTN HOXOM NIN OTBepTKoM. CKepe60K c ne3BnEM 6pntBbl He NOBpeDNT NOBepxHOCTb, ecJIn OH pacnonaraetcnoyrom 30^
Hikorda He octabnIte cKpe60k C Ie3BnEm 6pntbI B DoCTyINbIX dIa deteMecTax.
HnKOrJa He nOJIb3yIteCb a6pa3NHBbIMu YIcTaeIaMm CpeDCTBaMn Ia6pa3NBbIMn NopoWKamn.
-MetaJIInuecka paMka: BbIMOnTe MetaJIInueckyHO paMKyMbIbHOBdoI, 3aTEM YHCTO BDOI, IN pIpOTpTE HAcYXoTKaHbIO.
9. NOCJIENPOJAXKHOE OBCJYXNBAHNE
Ipeep Tem kak Bb3BaTb cneuaancta nTo texnueckomy 06cnyxnbHIO, BblonHInTe cJeDyIoUne npOBepKn:
PObBepbTe, yTO BnIka shHpy nIpaBnIbHO BCTaBJIeHa B 3JIeKtpnueckyUo pO3ETKy, uYTO He nepeorpen IINabKn IpeDoxpAHNTeB. EcII Bbl He MoKeTe cAmocToTEnbHO ONpeJeNtB npuHy HneCnpABHoCTM, BbIKIOUHTe 3JIeKtponpIn6Op H He nbITaNTEcb OTpeMOHTpoBaTb er O camocToTEnbHO. I03BOHnTe B UcHTp NocIePdoJxHOro 06CnyXBAHH. 3JIeKtpOnpIn6Op IMeet rapaTHnO, H 6yEt OTpeMOHTnpOBaH B cepBNCOM ZHeTpe 6ecnPaTHO.
10. PELSEHNE IPOBJIEM
HeoctaTochHynHarpeB
Bapouhna NOBepxHocTb He pa6oTaet, INI Hpepa6OtaHOT HeKOTOpble 30HbI HargpeBa BapouHoi NobepxHocTu
- HénpaBnHbO yCTaHOJIeHbI yHTbI (3aKOpaHbIaUcHne nepembIcH) Ha KJIeMMHOn KOJIOdKe. IpoBepbTe, YTO NODKJIIOUcHne BblONHeHO B COOTBeTCTBnC yKa3aHnA M
BapouhIbe NOBepxHocTn CceHCOPHBIM ynpaBneHMe: npOIHTa Ha 6oJIbwoM yactke KNDKOCtB NIN 6oJIbWO OBekT, NOKpbIBAOUe, NIO KpaHNe MEpe, DBe KNOKN B TeueHHe He MeHee 10 c. YdaNITe npOItuO XuNDKocTb NIN OBekT.
-Панелыгравлия варочи поверхонтл заблкюраза.Ра36лк用药е.
Bapouhna nobepxhoctb He bblnoaetc
-3a6nokpoBaHa naneB ynpaBneHna. Pa36nokpyte ee.
Bapouhna nobepxHoctb caMonpon3BOJbHO BbIKIouaetcra
Muraet HndkaTop "H", HndkaTop octaToHoro HarpeBa
CImiKOM BbICOKa TEMepaTpya 6Ioka 3NEkTpOHNKn. CneuJaNCT no TexHnueCKomy 06cIyXKBaHIO DOJKeH NpOBepNTb, YTO yCTaHOBKa BblONHeHa B COOTBeTCTBm C peKOMEHDAUJMAH.
Даннь злектponрбор Имeel Маркировky COOTBECTBNA EBponecko Диpektne 2002/96/EC noутлизаци злектпческоги n 3лектpoHHOrO 06obypobанa (WEEE).
PpabnIbna yTnIIN3aunmaunHbI NOMOXET npedOTBpaNTb HeratUNBHOe BO3deNCTBne Ha OKpykaOuYIO Cpey Ni 3DopOBbe IIOJe.
MapknpoBka Ha n3denn yka3bIbaeT Ha To, YTO daHHOe n3dene HeIb3y BbIbpaCbIbTa, KaK 06bUHhle 6bITOBble OTxoDb. MaunHa DoJnxHa 6bIt DoCTaBJIeHa Ha MeTo C6opa Otpa6OtaBwero CBOI cPOK 3NEkTpueckoro n
3JIeKtpoHHOrO 6ObOpYOBaHnI yBbIOJIHeHnE ee yTuJIN3aUIn. YTuJIN3aUIn MoAunHbI CNeDyET PON3BOuNTb B COOTBeTCTBn C MeCTbIMN IpaBUNAMN OTHOCHTJIbHO yTuJIN3aUIn OTXoDOB.
3a 60lee nIopboHoi HnΦoMaueNe OTHOCITnelHo yTINImaun MaunHbIn IOBTOPHOrIOIIOJIb3OBAHn HaxOJaXxCB He MATEpnaIbOB CneDyET ObaaTaBC B OprAhBi MeCTHORO ynpabLeHn, B MeCTHYO Cnyk6y yTINImaUN 6bITOBbIX OTxODOB INN B MaRa3IN, Ige BBI npio6pei nn daHHe n3dEIne.
1. UWAGI OGÓLNE
PROSZE DOKLADNIA ZAPOZNAC SIE Z NINIEJSZA INSTRUKCJA PRZED PRZYSTAPIENIEM DO INSTALACJI PLYTY.
Ph = Faza
N = Zero
T = Uziemienie
5. OPIS - WYBRANE MODELE
- Pola highlight:
WAARSCHUWINGICOON VOOR RESTHITTE
Installation (fig.B/D):
Ph = Fas N = Nollan T = Jord
5. PRESENTATION
Ph = Vaihe N = Nolla
T = Maa
5. ESITTELY
Installingering (fig.B/D):
- Platetoppen leveres med en vanntett pakning.
Før montering: - Snu toppen opp ned sik at glassplaten er rettet nedover.
Sorg for a beskyte glassplaten. - Sett på pakningen rundt platetoppen.
- Pass på at den monteres riktig slick at du unngår lekkasjer til kabinettet under.
- La det.vm minst 5 cm avstand mellom platetoppen og omkringliggende vertikale flater.
- Hvis den nedre delen av platetoppen under installering er nær et område som normalt erlett tilgengelig ved for eksempel rengjøring, lar du det vare en luftespalte på 1 cm under platetoppen for a unngå fare for skolding eller skader.
4. ELEKTRISK TILKOBLING
Starte hurtigoppvarming
Deaktivere hurtigoppvarming
The manufacturer will not be responsible for any inaccuracy resulting from printing or transcript errors contained in this brochure. We reserve the right to carry out modifications to products as required, including the interests of consumption, without prejudice to the characteristics relating to safety or function.
IT
- CONTENIDO ES
- INSTALLATION
- BUILT-IN
- Before fitting:
- ELECTRICAL CONNECTION
- ATTENTION:
- BLUE
- BROWN
- YELLOW-GREEN
- To release the power supplying cord.
- PRESENTATION
- - hilight zone :
- HOB COOKWARE ADVICE
- USE
- - STARTING A COOKING ZONE
- - STOPPING A COOKING ZONE
- GENERAL STOP
- - RESIDUAL HEAT INDICATOR
- To desactivate the additional cooking zone :
- To re-activate the additional cooking zone :
- To desactivate the additional cooking zones :
- To re-activate the additional cooking zones :
- Starting the fast heater
- To desactivate the fast heater
- CLEANING AND MAINTENANCE
- MAINTENANCE:
- A FEW HINTS:
- PROBLEM SOLVING
- The cooking is too slow
- Metal marks
- Dark stains
- Light surfaces on the hob
- Caramelisation or melted plastic on the hob.
- The hob does not cut off.
- The hob stops automatically
- Frequency of on/off operations for cooking zones
- AFTERCARE
- Before calling out a Service Engineer please check the following:
- PROTECTION OF THE ENVIRONMENT
- AVVERTENZE GENERALI
- PRESENTAZIONE
- - La zona hilight :
- DARSTELLUNG
- MEPbI PPEIOCTOPOXHOCTN
- YCTAHOBKA
- BCTPANBAEMARБBITOBARTEXHINKA
- YcTaHOBka:
- IpepeyctahOBkoI:
- NOДКЛЮЧЕНЕ KЭЛЕKTPOCETN
- BHIMAHHE:
- CINHIN-HEINTPAJB(N1
- - MoDéJI N PYP
- IЯ nepexoHa HOBOe NOKJIIOHHe BbINONHTe CneDyUOuNe HNCTpyKc:
- ONICAHNE
- COBETbI OTHOCHTeJIbHO BblbOPA KUXOHHO NOCyIb IdIa HcNoJIb3OBAHnC BAPOUHOI NOBEPXHOCTbIO
- CTEKJIOKEPAMUeCKA BAPOUHAR IOBEPXHOCTb C CEHCOPHBIM YIPABJIEHNEM
- BKJIIOUOHEME30HbI HAFPEBA
- OBJIEE BbIKJIIOUChEHN
- - INHДNKATOP OCTATOCHOTO HAPPEBA
- - YIPABJIENHE PABOTOI DOIPOJHITbHOI 3OHbI HAPPEBA (ДBE 30Hbl)
- ДлЯ ВьIKLOUЧЕнЯ ДОЛНHTeLbHоI 3OHbI HarpeBa:
- NOCJIENPOJAXKHOE OBCJYXNBAHNE
- PELSEHNE IPOBJIEM
- HeoctaTochHynHarpeB
- Bapouhna NOBepxHocTb He pa6oTaet, INI Hpepa6OtaHOT HeKOTOpble 30HbI HargpeBa BapouHoi NobepxHocTu
- Bapouhna nobepxhoctb He bblnoaetc
- Bapouhna nobepxHoctb caMonpon3BOJbHO BbIKIouaetcra
- Muraet HndkaTop "H", HndkaTop octaToHoro HarpeBa
- UWAGI OGÓLNE
- OPIS - WYBRANE MODELE
- - Pola highlight:
- WAARSCHUWINGICOON VOOR RESTHITTE
- Installation (fig.B/D):
- ESITTELY
- Installingering (fig.B/D):
- ELEKTRISK TILKOBLING
- Starte hurtigoppvarming
- Deaktivere hurtigoppvarming
- IT
Brand : CANDY
Model : CH642B
Category : Hob