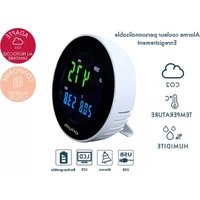
Quaelis 16 - Measuring equipment ORIUM - Free user manual and instructions
Find the device manual for free Quaelis 16 ORIUM in PDF.


User questions about Quaelis 16 ORIUM
0 question about this device. Answer the ones you know or ask your own.
Ask a new question about this device
Download the instructions for your Measuring equipment in PDF format for free! Find your manual Quaelis 16 - ORIUM and take your electronic device back in hand. On this page are published all the documents necessary for the use of your device. Quaelis 16 by ORIUM.
USER MANUAL Quaelis 16 ORIUM
MANUEL D'UTILISATION
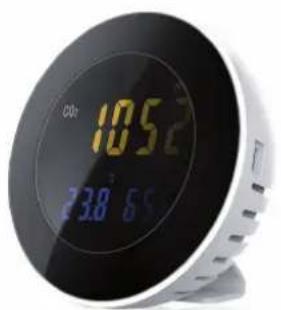
natural_image
Digital round digital clock with visible time and battery, no text or symbols on faceorium
text_image
Welcome to the HT Communication Tool Setup Wizard The installar will guide you through the steps required to install HT Communication Tool on your computer. WARNING: The computer program is protected by copyright law and international business. Unauthorized distribution or distribution of this program, in any portion of it may choose to serve civil or criminal perspective, and will be processed to the application itself possible under the law. Cancel Apply Next >text_image
Select Installation Folder The installer will install HT Communication Tools to the following folder. To install this folder, click "None". To install a different folder, enter it before to click "Showout". Folder C:\Program Files\IR\R\HT\RT\Communication\Tool Browse... Disk Cost... Install HT Communication Tools for yourself, or for anyone who uses this computer: Everyone Just use Cancel < Back Next >text_image
HT Communication Tool Confirm Installation The install is ready to install HT Communication Tool on your computer Click "Next" to start the installation. Cancel < Back Next >Set Param → Address: "1" → Serial Number: "PC1" → Test name: "Mesures" → Total Records: "10" →
Interval: “1 min” → Temp. Low: “24°C” → Temp High “30°C” → Humidity Low: “42%” → Humidity High: “50%” → CO2: “1200 ppm”.
Please read the product manual carefully prior to use. Keep these instructions.
The Quaelis 16 CO2 meter (product reference 11334) has been designed for indoor use only.
Carbon dioxide is a colourless, odourless gas that comes from a variety of sources (greenhouse gases, transport, fuel, heating...).
Carbon dioxide (CO2), a molecule that is naturally present in the atmosphere, is produced by the human body during respiration. Its concentration in the air inside buildings is linked to human occupation and air renewal, and is an indicator of the level of containment of air.
The Quaelis 16 carbon dioxide (CO2) meter continuously measures and records the level of CO2 and offers a practical safety solution.
Technical features:
- Measures and displays (LCD) the concentration of carbon dioxide in ppm (parts per million) and the relative humidity and ambient temperature of a room.
- Power supply: rechargeable lithium battery 2000 mAh 3.7v. USB Cable and 230V adapter (supplied).
| Measurement range | Concentration of CO2 | 0 to 9999 ppm |
| Temperature | -10°C to 70°C | |
| Humidity | 0 to 99.9% RH | |
| Accuracy | Concentration of CO2 | +/- 50 ppm +/- 3% |
| Temperature | +/- 0.3°C | |
| Humidity | +/- 3% | |
| Sensitivity/ resolution | Concentration of CO2 | 1 ppm |
| Temperature | 0.1°C | |
| Humidity | 0.1% |
Response time: 1 second.
Conditions for use: 0°C\~50°C, 0%\~85%, no condensation.
Storage conditions: -20°C\~60°C, 0%\~90%, no condensation.
Technology: non-dispersive infrared sensors (NDIR).
Automatic and manual calibration process.
Settings and Installation:
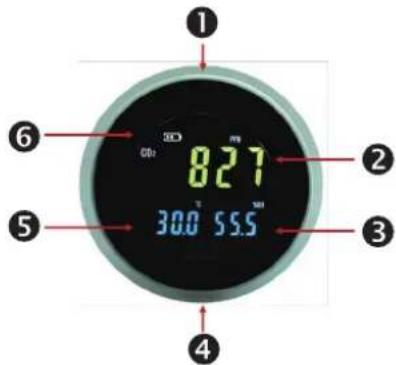
text_image
① ⑥ 821 30.0 55.5 ② ③ ④- Settings buttons.
- Display of measurement of CO2 concentration in ppm in the room.
- Display of the relative humidity of the room.
- Micro USB charging port for the battery (under the base).
- Display of the ambient temperature of the room.
- Battery indicator.
Functions of settings buttons:
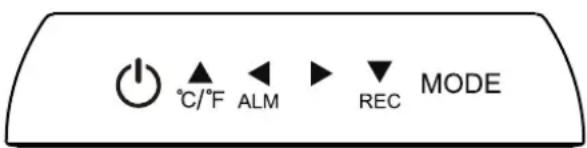
text_image
°C/°F ALM REC MODEON/OFF functions to switch the meter on and off.
In standby mode: allows you to change how the unit of temperature is displayed (°C/°F).
In configuration mode: allows you to increase the display value by +1.
In standby mode: allows you to enable/ disable the alarm.
In configuration mode: allows you to select the display value to the left.
In configuration mode: allows you to select the display value to the right.
Allows you to record data.
In configuration mode: allows you to reduce the display value by -1.
In standby mode: allows you to select the MODE configuration mode.
In configuration mode: allows you to confirm and move to the next settings.


Remove the product from the packaging, check all the accessories are included and follow the instructions.
Step 1: Fully charge the battery.
Connect the USB end of the cable to the adapter then plug the adapter into a socket (230 V \~50 Hz) and the end of the cable into the micro USB port under the product (4). Unscrew the base to make this easier if necessary.
Press ⏻ to turn the meter on. A 30-second countdown is shown on the display for the device to warm up and adjust.
Important: Do not adjust settings or use the meter when it is warming up.
The battery indicator (6) indicates the progress of charging.
After shipping and removing the protective packaging, the product must be placed in a well-ventilated area for a few minutes prior to setting and use so the sensors are clear and ready for use.
Measurements are shown on the display when the countdown is complete.
Measurements and comfort indicators for CO2.
In order to comply with user's needs, environment and european regulations, monitor Quaelis 16 enables to customise the CO2 concentration at which a color alarm is displayed and sound alarm is triggered. This does not alter the measurement system.
Default comfort indicators are set as follow:
- 0 to 600 ppm. Display is green. The air is good.
- 601 to 1199 ppm. Display is yellow. It is recommended to ventilate the room.
- From 1200 ppm. Display is red. It is necessary to ventilate the room.
Values over 2000 ppm can adversely affect the occupants of the room: it is recommended to leave the room, ventilate it and implement the necessary measures.
Reminder: Carbon dioxide is a colourless, odourless gas that comes from a variety of sources (greenhouse gases, transport, fuel, heating...).
The risks based on exposure:
- Slight exposure: mild headache, nausea, fatigue...
- Moderate exposure: persistent headache, drowsiness, confusion...
- Extreme exposure: loss of consciousness...
It is recommended not to exceed 2000 ppm as CO2 threshold for red and sound alarms.
Step 2: Setting alarms.
Values and color range previously indicated are set by default. To customise CO2 threshold and corresponding color value:
- Press and hold down the MODE button (the screen goes black quickly) then release.
Displayed value corresponds to CO2 threshold to set up for yellow visual alarm.
- Press ▶ to select the first number. The number selected flashes.
- To increase the value of the selected number, press ^ C/ ^ F
- Press _REC to decrease the value.
- Press ▶ to select the following numbers and repeat the previous steps.
- To return to a previous value press ALM
-
Press and hold down the MODE button (then release) to confirm the value of the yellow alarm and go to the next setting.
-
The calendar is displayed in Month/ Date format and the year. Proceed as indicated above to select and change the values of the calendar.
- Press and hold down the MODE button (then release) to confirm the calendar settings and go to the time setting.
- The display shows the time in format Minutes : Seconds and hour (in 24 H format). Proceed as indicated above to select and change the values of the clock.
- Press and hold down the MODE button (then release) to confirm the time setting and go to red and sound alarm setting.
Displayed value corresponds to CO2 threshold to set up for red visual alarm and alarm sound.
Proceed as indicated above to select and change the values of red alarm and sound alarm.
- Press and hold down the MODE button (then release) to confirm setting and return to standby mode.
Step 3: Enabling/ Disabling the sound alarm.
In standby mode, press ALM to activate/ deactivate the sound alarm.
The □ symbol appears above the temperature display.
This confirms that the alarm is enabled. If the symbol does not appear on the display, this means the alarm is disabled.
IMPORTANT: when the sound of the alarm is disabled, the alarm will not be heard (the visual display is maintained). It is recommended not to disable the alarm. The alarm is only available when the CO2 red value set up is exceeded.
Step 4: Selection of unit of temperature.
By default, the temperature is displayed in Celsius (°C). In standby mode, press /F to display the temperature in Fahrenheit (°F).
Step 5: Install the software.
The measurements taken by the Quaelis 16 meter can be recorded on a Windows PC. It enables up to 12700 measurements (up to 500 days recording when connected to USB).
Download the software by clicking below.
Depending on your internet browser: copy and paste the link into your internet browser.
Install the software by following steps below.
text_image
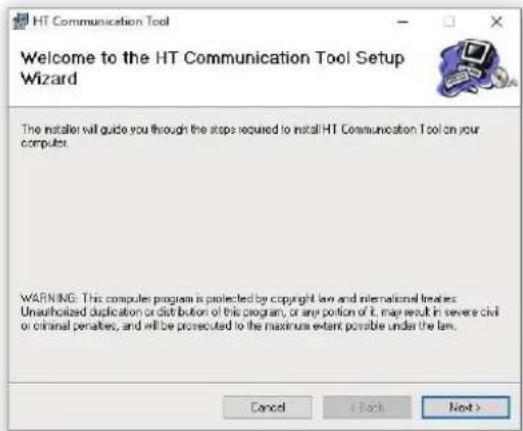
Welcome to the HT Communication Tool Setup Wizard The installer will guide you through the steps required to install HT Communication Tool on your computer. WARNING: This computer program is protected by copyright law and international treaties. Unauthorized duplication or distribution of this program, or any portion of it, may result in severe civil or criminal penalties, and will be prosecuted to the maximum extent possible under the law.Double-click on "Setup" to start the installation. The initial installer screen appears. Click on "Next".
text_image
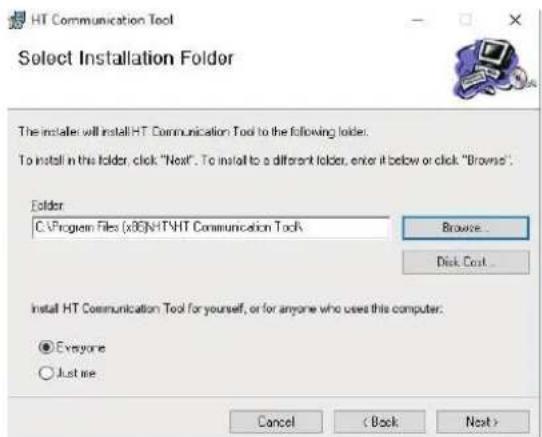
HT Communication Tool Select Installation Folder The installers will install HT Communication Tool to the following folder. To install in the folder, click "Next". To install to a different folder, enter it below or click "Browse". Folder: C:\Program Files (x86\NT\HT Communication Tool Browse... Disk Cost... Install HT Communication Tool for yourself, or for anyone who uses this computer. Everyone Just use Cancel (Back Next)Click on "Browse" and select the folder where you want to install the software. Then click on "Next".
text_image
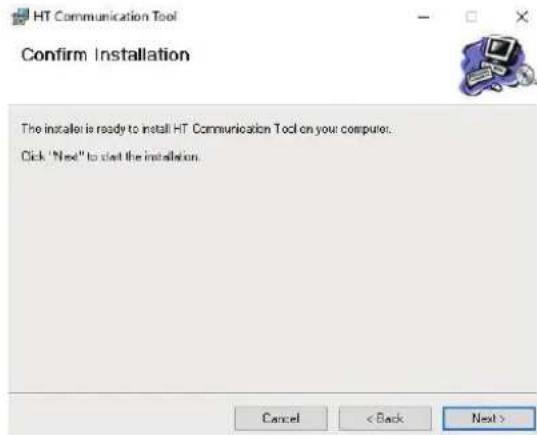
HT Communication Tool Confirm Installation The installar is ready to install HT Communication Tool on your computer. Click 'Next' to start the installation. Cancel < Back Next >Click on "Next" to confirm installation. When the progress bar is complete, click on "Close".
A shortcut will be created on the desktop:
"HT Communication Tool".
Step 6: Recording data:
Make sure the meter is on. It must be switched on (ON) to be able to record data. Double click on the icon for the software to open it (from the desktop shortcut or the list of programmes).
Connect the CO2 meter to the PC (with the USB cable supplied). Click on the "Connect" button or the icon
located at the top left or in the "Communication/Connect" menu: the CO2 meter is automatically recognised.
Proceed to settings for data record.
- 6.1 Click on "Set param" or communication/Set Parameters. A window opens.
- 6.2 Complete the Address (numerical)
Serial number and Test Name fields.
- 6.3 Indicate the total number of readings to be recorded (Total Records) and the time interval between each reading (Interval). Select the interval unit in seconds (Sec), minutes (Min) or hour (Hours).
The total recording time is automatically calculated and displayed under "Interval".
- 6.4 In the "Temperature Unit" tab, select Celsius or Fahrenheit.
- 6.5 In the "Temperature Alarm" tab, indicate the minimum (low) and maximum (High) temperature threshold.
- 6.6 In the "Humidity Alarm" tab, indicate the minimum (low) and maximum (High) humidity threshold.
- 6.7 In the "CO2 Alarm" tab, indicate the CO2 concentration at which the alarm will sound. If a different threshold has been determined manually in step 2, this will be replaced by the new value entered with the software.
- 6.8 Select "Immediate". Then click "OK".
-
6.9 Confirm by clicking "OK" in the last window which indicates that recording has started (The meter is recording data).
-
"REC" flashes on the meter display, above and to the left of the temperature reading. The interval of the flashing corresponds to the time interval set in the previous step (6.3).
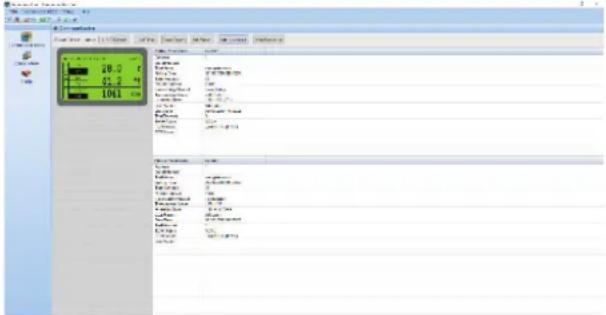
- The computer monitor then displays a green screen with the values currently measured and a summary of the settings selected for the recording (on the right). The threshold values not respected are displayed in black on the green screen (e.g.: if the threshold set for the CO2 is 1200 ppm and the measurement recorded is higher, the threshold of 1200 ppm is highlighted in black).
text_image
28.0 01.2 1041 1041 1041 1041 1041 1041 1041 1041 1041 1041 1041 1041 1041 1041 1041 1041 1041 1041 1041 1041 1042 1042 1042 1042 1042 1042 1042 1042 1042 1042 1042 1042 1042 1042 1042 1042 1042 1042 1042 1042 1043 1043 1043 1043 1043 1043 1043 1043 1043 1043 1043 1043 1043 1043 1043 1043 1043 1043 1043 1043 1044 1044 1044 1044 1044 1044 1044 1044 1044 1044 1044 1044 1044 1044 1045 1045 1045 1045 1045 1045 1045 1045 1045 1045 1045 1045 1045 1045 1046 1046 1046 1046 1046 1046 1046 1046 1046 1046 1046 1046 1046 1046 1046 1046 1046Imported by:
AIC International - 44980 Ste Luce sur Loire - France
Example recording: 10 readings every minute in room 1 on PC1 called Measurements (so the total recording time is 10 minutes). Minimum temperature of 24°C and maximum temperature of 30°C. Minimum humidity 42% and maximum 50%. A CO2 level of 1200 ppm.
Set Param → Address: "1" → Serial Number: "PC1" → Test name: "Measurements" → Total Records: "10" → Interval: "1 min" → Temp. Low: "24°C" → Temp High "30°C" → Humidity Low: "42%" → Humidity High: "50% → CO2: "1200 ppm".
Important: The “address” field must be numerical. Make sure the alarm is enabled. The minimum and maximum values for temperature and humidity are used as reference thresholds for the chart. As indicated in step 2 of the instructions, the sound alarm is only available when the red alarm setting CO2 value is exceeded.
Imported by:
AIC International - 44980 Ste Luce sur Loire - France
IMPORTANT: Do not perform any operations on the software during recording or it will stop. Recording stops automatically at the end of the time required for the measurements.
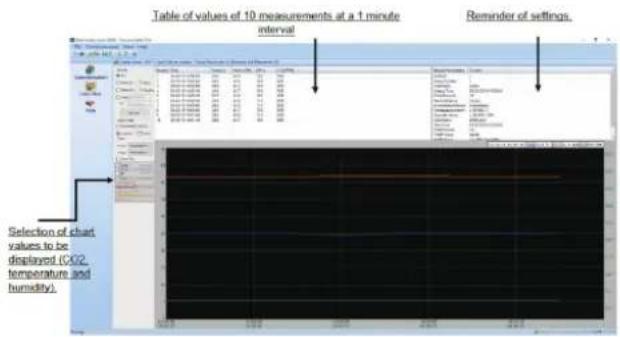
Step 7: When the time has finished, click "Data Download" to save the data recording. Click OK when the message appears. Save the file (in .HTRec format) on the PC. The chart for the data is displayed.
text_image
Table of values of 10 measurements at a 1 minute interval Reminder of settings. Selection of chart values to be displayed (CX2, temperature and humidity).Imported by:
AIC International - 44980 Ste Luce sur Loire - France
To view the different recordings:
- Click on "File/Open" and select the file to view.
To save in Excel format:
After opening the file, click on "File/ Export". Name the file and save. The Excel file contains two tabs: one tab with the measurements recorded (Data Record) and one tab with a reminder of the parameters selected for the recording (Parameters). The message "Successfully Exported" appears. Confirm with OK.
Step 8: to record data in mobile mode.
Repeat steps 6 to 6.7, then in step 6.8 select "Manual" and click OK. Disconnect the micro USB cable from the meter. Place the meter in the room to be measured and press ▼
Imported by:
AIC International - 44980 Ste Luce sur Loire - France
When the recording time has finished, connect the meter to software as indicated in step 6. Click « CONNECT », the CO2 meter is automatically recognised by the software. Repeat step 7 to save the data recording and export in Excel format.
IMPORTANT: Make sure the battery is properly powered and the monitor does not turn OFF during the time records. Do not press any button during time record.
IMPORTANT: Make sure the CO2 meter is appropriately installed and will not affect the movements and safety of the people concerned.
Choose a location where the sensors are not obstructed so the device can function properly.
Keep away from all direct sources of carbon dioxide, liquid products, heat, flammable products and magnetic fields.
Keep the meter off (press OFF) if unused for a prolonged period of time.
Conditions of use and safety:
Use the CO2 meter for its intended purpose.
Do not alter the structure of the product or repair it yourself.
Only use the connection accessories supplied with the product.
The manufacturer is not liable for damages relating to the product if it is improperly used or maintained.
Keep away from children.
Calibration process:
If the meter displays frozen or erroneous values, it is necessary to perform a calibration.
-
Make sure that the meter's battery is fully charged and that the meter is turned off.
-
Place the meter outside in a non-polluted environment.
-
Press and hold the buttons ◀ and ▶ simultaneously.
-
Then press the button (while keeping the previous two buttons pressed).
-
Release the button ⏻ and then release the buttons ◀ and ▶.
-
The display shows 400 ppm.
-
Short press the "MODE" button: the display shows 401 ppm to confirm that the calibration process is in progress.
-
Keep the meter outside during calibration and do not perform any actions on the meter.
-
The calibration process takes several minutes (about 10 minutes).
-
When calibration is complete, the display shows "1". This means that the calibration has been completed. Press the "MODE" button to finalize and exit the calibration process.
Caution: If the display shows "0" after the calibration time, it means that the latter was not successful. Press the "MODE" button to exit. Then repeat steps 1 to 10. The display will show "0" if the outdoor environment is not stable in CO2 or polluted.
Conditions of use and safety:
Use the CO2 meter for its intended purpose.
Do not alter the structure of the product or repair it yourself.
Only use the connection accessories supplied with the product.
The manufacturer is not liable for damages relating to the product if it is improperly used or maintained.
Keep away from children.
Trouble-shooting:
| Faults experienced | Solution/how to resolve the problem |
| The meter isn't turning on. | Check it has been correctly connected.Check that the USB port used (computer, mains adapter...) is receiving power.Press the ON button. |
| Visual color alarm does not display.Alarm threshold are not correct. | Proceed as described in step 2.Yellow visual alarm must be set up first.Red visual alarm must be set up last.Red alarm value must be higher than yellow alarm value. |
| The alarm doesn't sound. | Proceed as described in step 2:sound alarm threshold corresponds to red visual alarm value only.Make sure the sound of the alarm has not been disabled. Enable the sound if necessary by pressing the designated button (step 3). |
| The battery isn't charging. | Check that the USB and micro USB ports are properly connected.Check that the USB port used (computer, mains adapter...) is receiving power. |
Faults experienced Solution/how to resolve the problem
| The software does not recognise the meter. | Use the cable provided. The meter must be properly switched on (ON position) to be recognised.Try the following two steps:Turn on the meter and wait for it to warm up. Connect the USB cable and start the software.Turn on the meter and wait for it to warm up. Start the software. Then connect the USB cable. |
| The measurements aren't being recorded/saved. | Go to step 6 to set the recording parameters.Follow step 7 properly to save the recording. |
| The meter displays frozen or erroneous values | Turn the monitor off for a few minutes, then on again and place it outside (without sources of pollution) for 30 minutes to clear the sensors.If values remain incorrect, proceed to calibration. |
As part of our ecological approach, we limit the amount of paper printed on our leaflets.
However, the latter are available in several languages in digital form. Please scan the QR code or contact your distributor.
Notice 11334
NB: Electric or electronic products at the end of their useful lives can have negative effects on human health and the environment. They should not be mixed with general household waste. For proper treatment, recovery and recycling, please take this product to a designated collection point.
Batteries must never be disposed of in household waste or incinerated. They must be disposed of according to applicable local regulations for chemical wastes.
This product complies with WEEE and RoHS directives. When you dispose of this device, please respect local laws or regulations