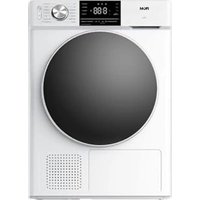
WPTL10-14A++ - Dryer PKM - Free user manual and instructions
Find the device manual for free WPTL10-14A++ PKM in PDF.


| Product Type | Heat pump dryer, freestanding |
| Brand | PKM |
| Model | WPTL10-14A++ |
| Nominal capacity | 10.00 kg |
| Energy efficiency class | A++ |
| Annual energy consumption | 278.00 kWh |
| Noise level | 64 dB(A) |
| Power | 850 W |
| Power supply | 220-240 V ~ 50 Hz |
| Dimensions (H x W x D) | 85.00 x 59.50 x 67.00 cm |
| Net / gross weight | 52.00 kg / 58.00 kg |
| Number of programs | 14 programs + special programs |
| Moisture sensor | Yes |
| Delay start | Yes, from 3 to 24 hours |
| Anti-crease function | Yes |
| Child lock | Yes |
| Height-adjustable feet | Yes |
| Drum material | Stainless steel |
| Display | Yes, LED display |
| Water tank | Yes, to be emptied after each cycle |
| Lint filter | Clean after each use |
| Condenser cleaning | Every 3 months minimum |
| Eco program | Yes, for cotton |
| Cold program (42°C) | Yes |
Frequently Asked Questions - WPTL10-14A++ PKM
User questions about WPTL10-14A++ PKM
0 question about this device. Answer the ones you know or ask your own.
Ask a new question about this device
Download the instructions for your Dryer in PDF format for free! Find your manual WPTL10-14A++ - PKM and take your electronic device back in hand. On this page are published all the documents necessary for the use of your device. WPTL10-14A++ by PKM.
USER MANUAL WPTL10-14A++ PKM
natural_image
Front view of a white washing machine with a circular front panel and digital display (no visible text or symbols)| Deutsch | Seite | 2 |
| English | Page | 49 |
| FRANÇAIS | Page | 94 |
www.pkm-online.de
natural_image
Three technical diagrams showing a washing machine with cross symbols, mounted on a surface (no text or labels present)2.3Nivellierung
natural_image
Diagram of a washing machine with a tool and a red dashed valve, no text or symbols presentnatural_image
Simple line drawing of a basket with an arched handle (no text or symbols)KUNSTSTOFFRACK

natural_image
Line drawing of a 3D rectangular prism with no text or symbols| 1 | VORDERE HALTUNG |
| 2 | METALLRACK AUF DEN FILTER KLEMMEN |
| 3 | METALLRACK |
| 4 | FLUSENSIEB |
natural_image
Simple line drawing of a door with an arrow pointing upward and a box inside, no text or symbols present.natural_image
Simple line drawing of a cabinet with two hanging items on top (no text or symbols)Dearcustomer!Wewouldliketothankyouforpurchasingaproductfromourwide rangeofdomesticappliances.Readthecompleteinstructionmanualbeforeyou operate the appliance for the first time. Retain this instruction manual in a safe place forfuturereference.Ifyoutransfertheappliancetoathirdparty,theinstruction manualshouldbeincluded.
Index
- Safety information....51
1.1 Signal words....52
1.2 Safety instructions.... 52
- Installation 56
2.1 Scope of delivery....56
2.2 Unpacking/site 57
2.3 Levelling....58
2.4 Water drain hose 58
2.5 Connection to the mains.... 59
- Description of the appliance....60
3.1 Heat pump dryer....60
3.1.1 Front....60
3.1.2 Back 61
3.2 Control panel....62
- The drying programmes 66
4.1 General textile care symbols....68
4.2 Max. load....69
4.3 Weight of clothes: reference values....70
- Operation....70
5.1 Before the first use 70
5.2 Instructions for the drying of laundry in a dryer 71
5.3 Setting and starting of a drying programme 72
5.3.1 Drying programmes «Warm/Cold» 73
5.3.2 Rack programmes 74
5.4 Selection of the additional functions 76
5.4.1 Selection of the drying level....77
5.4.2 Selection of the programme duration for time programmes....77
5.4.3 Delayed programme start 78
5.4.4 Activation of the crease protection....79
5.4.6 Activation/deactivation of the child safety lock....80
5.5 End of a drying programme 80
5.6 How to interrupt, cancel or change a drying programme 81
- Environmental protection 81
6.1 Environmental protection: disposal 81
6.2 Environmental protection: energy saving....82
- Cleaning and maintenance 82
7.1 Water container 83
7.2 Cleaning of the fluff filter....84
7.3 Cleaning of the condenser 85
- Troubleshooting.... 87
8.1 Error codes.... 88 - Technical data.... 90
- Waste management....91
- Guarantee conditions....92

Do not dispose of this appliance together with your domestic waste. The appliance must be disposed of a collecting centre for recyclable electric and electronic appliances. Do not remove the symbol from the appliance.
The figures in this instruction manual may differ in some details from the current design of your appliance. Nevertheless, follow the instructions in such a case. Delivery without content.
i Any modifications, which do not influence the functions of the appliance. shall remain reserved by the manufacturer.
i Please dispose of the packing with respect to your current local and municipal regulations.
The appliance you have purchased may be an enhanced version of the unit this manualwasprintedfor.Nevertheless,thefunctionsandoperatingconditionsare identical.Thismanualisthereforestillvalid.
i Technicalmodificationsaswellasmisprintsshallremainreserved.
EC-DECLARATIONOFCONFORMITY
★ The products, which are described in this instruction manual, comply with the harmonised regulations.
★ The relevant documents can be requested from the final retailer by the competent authorities.
1. Safetyinformation
READTHESAFETYINFORMATIONANDSAFETYINSTRUCTIONS CAREFULLYBEFOREYOUOPERATETHEAPPLIANCEFORTHE FIRSTTIME.
Allinformationincludedinthosepagesservefortheprotectionofthe operator. If you ignore the safety instructions, you will end angery your health and life.
i Storethismanualinasafeplacesoyoucanuseitwheneveritisneeded.Strictly observetheinstructionstoavoiddamagetopersonsandproperty.
Checkthetechnicalperipheryofthecappliance!Doallwiresandconnectionsto the appliance work properly? Or are they time-worn and do not match the technicalrequirementsofthecappliance?Acheck-upofexistingandnewly-made connectionsmustbedonebyanauthorisedprofessional.Allconnectionsand energy-leading components (incl. wires inside a wall) must be checked by a qualified professional. All modifications to the electrical mains to enable the installationofthecapplianccmustbeperformedbyaqualifiedprofessional.
i Theapplianceisintendedforprivateuseonly.
i The appliance is intended for drying laundry in a private household only.
i Theapplianceisintendedforindoor-useonly.
The appliance is not intended to be operated for commercial purposes, during camping and in public transport.
i Operatetheapplianceinaccordancewithitsintendeduseonly.
Do not allow anybody who is not familiar with this instruction manual to operate the appliance.
This appliance may be operated by children aged from 8 years and above as wellasbypersonswithreducedphysical,sensoryandmentalcapabilitiesorlack ofexperienceandknowledgeiftheyaresupervisedorhavebeeninstructed concerningthesafeuseoftheapplianceanddocomprehendthehazards involved. Children must not play with the appliance. Cleaning and user-maintenance must not be carried out by children unless they are supervised
MAKESURETHATTHISMANUALISAVAILABLETOANYONEUSING THEAPPLIANCEANDMAKESURETHATITHASBEENREAD AND UNDERSTOODPRIORTOUSINGTHEDEVICE.

RISK OF FIRE!

Oil-affected items can ignite spontaneously when exposed to heat sources such as in a tumble dryer. The items become warm, causing an oxidation reaction in the oil. Oxidation creates heat. If the heat cannot escape, the items can become hot enough to catch fire. Piling, stacking or storing oil-affected items can prevent heat from escaping and so create a fire hazard.
If it is unavoidable that fabrics which contain vegetable or cooking oil or have been contaminated by hair care products are placed in a tumble dryer, they should be washed in hot water with extra detergent first - this will reduce, but not eliminate, the fire hazard.
1.1 Signalwords
△ DANGER! indicatesahazardous situationwhich,ifignored,willresultin deathorseverein jury.
WARNING! indicatesahazardous situationwhich,ifignored,couldresult indeathorseverein jury.
CAUTION! indicates ahazardous situation which, if not avoided, may resultin minor or moderate in jury.
NOTICE! indicates possible damage to the appliance.
1.2 Safetyinstructions
DANGER!
To reduce the risk of electrocution.
- Non-compliance of the orders of this instruction manual will endanger the life and health of the operator and/or can result in damages to the appliance.
-
All electrical work must be carried out by a qualified professional. Do not modify the energy supply. The connection must be carried out in accordance with the current local and legal regulations
-
Do not connect the appliance to the mains if the appliance itself or the power cord or the plug are visibly damaged. RISK OF ELECTRIC SHOCK!
-
The technical data of your energy supplier must meet the data on the model plate of the appliance.
-
Donotmodifytheplugprovidedwiththeappliance,ifitwillnotfitthe outlet,haveaproperoutletinstalledbyaqualifiedelectrician(not coveredbytheguarantee).
-
Never try to repair the appliance yourself. Repairs carried out by unauthorised persons can cause serious damage. If the appliance does not operate properly, please contact the aftersales service or the shop you purchased the appliance at. 16 Original spare parts should be used only.
-
Always check that the power cord is not placed under the appliance or damaged by moving the appliance.
-
When the power cord is damaged, it must be replaced by the manufacturer or an authorised aftersales service or a qualified professional only.
-
Never pull the power supply cable to unplug the appliance. Always use the power plug itself to unplug the appliance. RISK OF ELECTRIC SHOCK!
-
Never touch the power plug, the power switch or other electrical components with wet or damp hands. RISK OF ELECTRIC SHOCK!
WARNING!
To reduce the risk of burns, electrocution, fire or injury to persons.
- Unplug the appliance after operation.
- Disconnect the appliance from the mains before you clean or maintain it.
- Operate the appliance with 220\~230V/50Hz AC only. Use a suitable safety-socket near of the appliance.
- The appliance must always be grounded and protected corresponding to therequirements of your local energy supplier. The main current circuit must be equipped with a safety shut-down device.
- All electrical work that may be necessary must be carried out by a qualified professional.
- After installation, the power plug and the safety socket must be always easily-accessible.
- In case of an event caused by a technical malfunction, disconnect
theappliancefromthemains(fuseboxofyourhouseholdpower supply).Contacttheaftersalesserviceortheshopyoupurchased theapplianceat. 17
-
Donotuseadapters, multiplesocketsandextensioncordsfor connectingtheappliancetothemains.
-
Theplugmustbeconnectedtothepowercableproperly.
-
Donotbendthepowercord.
-
Remove possible dust accumulation at the power plug, at the safety power socket and at all plug connectors regularly. RISK OF FIRE!
-
Keep the cord away from heated surfaces.
-
Do not place any electrically-powered appliances on the appliance.
-
Do not carry out any modifications to your appliance.
-
Theroomtheapplianceisinstalledinmustbedryandwell-ventilated. Whentheapplianceisinstalled,aneasyaccesstoall controlelementsisrequired.
-
Do not install the appliance in rooms or at areas which contain flammable substances such as petrol, gas or paint. Do not put any laundry which is contaminated by such materials in or near of the appliance. RISKOFFIRE! RISKOFEXPLOSION!
-
Do not install the appliance on a soft carpet or wooden floor.
-
Whenanyfuelsorgasesaresetfreenearoftheappliance:
▶ openallwindowsforproperventilation.
➢ do not unplug the appliance and do not use the controls of the appliance.
➢ do not touch the appliance unless the gas has been discharged completely.
- otherwise, sparks can occur. RISK OF FIRE!
-
Never use a steam cleaner to clean the appliance. The steam will cause serious damage to the electric components of the appliance. RISK OF ELECTRICAL SHOCK!
-
Do not install the appliance near of sources of heat.
-
Do not put candles or cigarettes on the appliance.
-
Do not install the appliance in a place where it can come in contact with rain or high levels of moisture. Otherwise, the electric components can be damaged.
-
Do not spray the appliance with water.
-
If you have used a stain removal agent before or when washing, operate the rinse-programme of your washer before you put the relevant laundry in the dryer.
-
Check before drying that there are no lighters or matches in your laundry.
-
RISK OF FIRE! Do not dry the following items in the appliance as they store heat:
▶ pillows, quilts, bedspreads
clothes and items which are soaked or splattered with fat, oil or any other flammable liquid.
clothes and items which have come into contact with volatile petroleum compounds.
- items made of foam material or containing parts of foam material.
▶ swimming caps and waterproof textiles.
▶ rubberised items or clothes.
-
Never operate the appliance without the fluff filter(s) installed.
-
Children must not play with the appliance.
-
Always supervise children if they are near the appliance.
-
Check that children or pets have not get into the appliance before drying. Check the drum carefully before closing. RISK OF CHOKING HAZARD!
-
Only allow children to use the appliance without supervision when adequate instructions have been given before so that the child is able to use the appliance in a safe way and understands the risks of improper use.
-
Strictly observe the instructions in chapter INSTALLATION.
CAUTION!
- Donotuseanyaggressive, abrasive and acriddetergentsorsharpedged itemstocleanthe appliance.
- Never operate the appliance without the fluff filter(s) installed.
NOTICE
- When you move the appliance, hold it at its base and lift it carefully. Keep the appliance in an upright position.
- Never use the door for moving the appliance as you will damage the hinges.
- The appliance must be transported and installed by at least two persons.
- Remove the complete packaging materials before initial operation. The appliance may be equipped with a transportation lock. Remove the transportation lock completely. When removing be very careful. Do not use any aggressive detergents to remove residues of the transportation lock.
-
When you unpack the appliance, you should take note of the position of every part of the interior accessories in case you havetorepack and transportitatalaterpointoftime.
-
Do not operate the appliance unless all components are installed properly.
-
Do not stand or lean on the base, the drawers, the doors etc of the appliance.
-
Remove all fluffs before operating the appliance.
-
Never dry unwashed laundry.
-
When you use fabric conditioner or a similar product, observe the information given on their packaging.
-
Dry dryer-proof fabrics only. Observe the information on the labels.
-
Do not place any items liquid can escape from on the appliance as the liquid can damage the control panel.
-
Metal-made items, e.g. keys, screws, coins etc., can damage the appliance. Check that your laundry is free of such items.
-
Do not overload the appliance.
-
Do not put dripping-wet laundry in the appliance.
-
The room temperature should not be less than +5°C and not more than +35°C when operating the appliance.
-
Clean the fluff filter(s) after each use of the appliance.
-
Empty the water container after each drying process.
-
Clean the appliance and its components regularly.
-
The air vent sof the appliance or its built-in structure (if the appliance is suitable for being built-in) must be completely open, unblocked and free of any kind of dirt.
-
The rating plate must not be removed or made illegible, otherwise all terms of the warranty become invalid!
SAVETHESEINSTRUCTIONS.
★ The manufacturer and distributor are not responsible for any damage or injuryintheeventoffailuretocomplywiththeseinstructions.
2. Installation
2.1 Scopeofdelivery
| SCOPEOFDELIVERY/ACCESSORIES | |||
 | 1xHEATPUMPDRYER | ||
 | 1x | INSTRUCTIONMANUAL | |
Before initial operation, please check that all components are present and that they are not visibly damaged.
2.2 Unpacking /site
- Unpacktheappliancecarefully.Disposeofthepackagingasdescribedinchapter wastemanagement.
- Theappliancemustnotbuildin.
- Completely removethetransport-protection. Beverycareful and donotuse any aggressive or abrasive detergents to remove residuals of the transport-protection.
- Check that the appliance and the power cord are not damaged.
- Donotinstalltheapplianceinabathroomoraplacewhereitmaycomein contactwithwaterorrain;otherwise,theinsulationoftheelectricalsystemwill bedamaged.Donotinstallthecapplianceinaroomwhereexplosivcorflammable gasesarestored.
- Protect the appliance from direct sunlight.
- Install the appliance in a dry and well-ventilated place. The room temperature must be higher than +5irc C.
- Install the appliance in a suitable position with an adequate distance from sources of heat and cold.
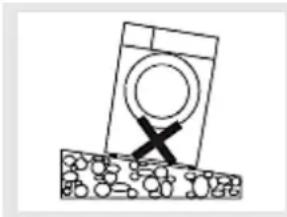
- ATTENTION: Leave the appliance in an upright position for 4-6 hours before you switch it onto ensure that the oil has flowed back into the compressor.
- Donotinstalltheapplianceonacarpet/fittedcarpet.
- Install the appliance on a level, dry and solid floor. Check the correct installation with a bubble level.
natural_image
Simple line drawing of a washing machine with a cross mark on its side, resting on a surface (no text or symbols)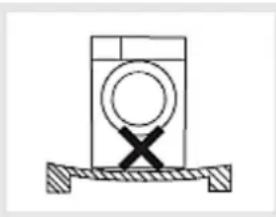
natural_image
Simple line drawing of a washing machine with a circular valve and cross symbol, mounted on a base (no text or labels)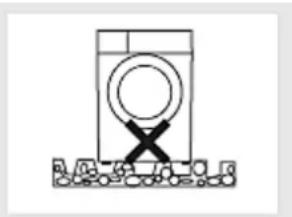
natural_image
Simple line drawing of a washing machine with a circular head and cross symbol, no text or labels present.- Connecttheappliancetothemainsproperly.
- Thenameplateissituatedatthebackoftheappliance.
Removethepackagingfoaminsidethedrum.
-
Openthedooroftheappliance.
-
Removethadhesivestripsfromtheinsidcof thedrum.
i Donotuseanyaggressiveorabrasive detergentstoremoveresidualsoftheadhesive strips.
- Removethepackagingfoam(X/2pcs.).
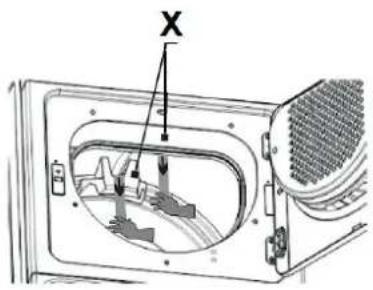
Fig.similar
2.3 Levelling
-
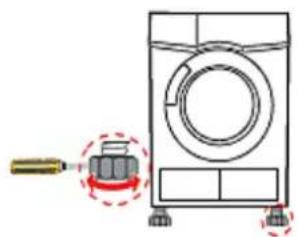
Installtheapplianceonaflatandsolidgroundonly.
-
Allowadequatedistancetothefloortoavoid vibrationsandnoise.
-
If the appliance does not stand horizontally, adjust the 4 feet by turning them clockwise / anticlockwise until the appliance is level.
natural_image
Diagram of a washing machine with a tool and red dashed indicator lights, no text or symbols presentDonotputanyblanketsorropesorpilesofitemsonthefloor. They could generateheatsothattheappliancewillnotproperlywork.
2.4Waterdrainhose
During a drying process, usually the excess water runs into the integrated water container of the appliance. However, you have the possibility to lead the excess water directly to the outside (e.g. into a drain, a sink, a wash basin, etc.). To do this, you must connect the water drainhose of the appliance to an external water drainhose 19 .
i Were recommend carrying out the installation of the external water drain hose by qualified personnel. Damages caused by improper installation of the water drain hose are not subject to the guarantee warranty!
HOWTOCONNECTTHEWATERDRAINHOSETOANEXTERNALDRAINHOSE
| 1. Pullthewaterdrainhoseoffthewater containercarefully(asshownintheright figure). | 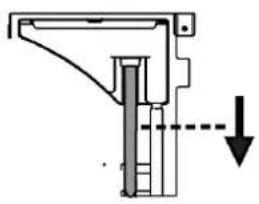 |
| 2. Connectthewaterdrainhoseofthe appliancctothecexternalwaterdrain hose. | 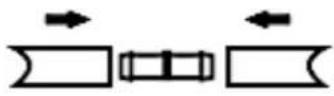 |
| 3. Fixtheexternalwaterdrainhosetothe fasteningbuckleonthebackofthe appliance(s.chapter3.DESCRIPTIONOF THEAPPLIANCE). | 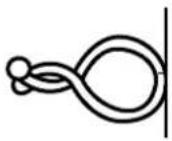 |
| 4. Placetheopenendofthehoseinadrain, etc. | 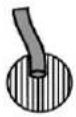 |
i Theexternalwaterdrainhosemustnotbekinked.
The drain, etc. must not be installed higher than 78 cm above the floor.
NOTICE!Alwaysplacetheopenendoftheexternalwaterdrainhoseina drain,asink,washbasin,etc. Otherwise,theexcesswaterwillruntothe floorwhiletheapplianceisinoperation.RISKOFFLOODING!RISKOF DAMAGE!
2.5Connectiontothemains
⚠️ DANGER! Do not connect the appliance to the mains if the appliance itself or the power cord or the plug are visibly damaged. RISK OF ELECTRIC SHOCK!
⚠️ DANGER! Never touch the power plug, the power switch or other electrical components with wet or damp hands. RISK OF ELECTRIC SHOCK!
➢ Operate the appliance with 220-240VAC/50 Hz. only.
The technical data of your energy supply must meet the data on the rating label. The main current circuit must be equipped with a safety shut-down device.
Do not use an extension cord, a socket board or a multi socket.
Do not modify the plug provided with the appliance, if it will not fit the outlet, have a proper outlet installed by a qualified electrician (not covered by the guarantee).
The plug must always be accessible after installation. Connect the appliance with the safety plug to a properly grounded and dedicated safety socket only. Use a safety socket to minimise any risk of electric shock.
3. Description of the appliance
3.1 Heat pump dryer
3.1.1 Front
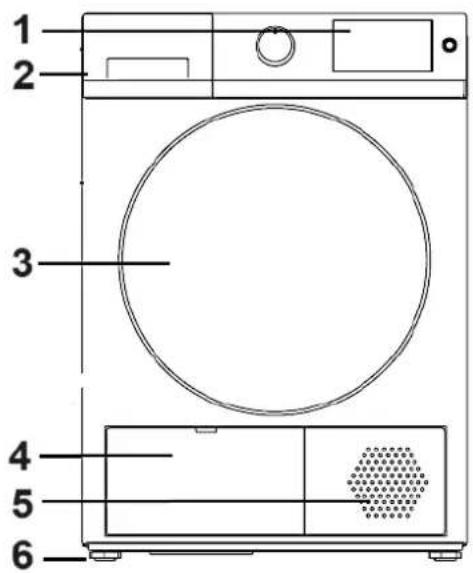
Fig. similar: modifications are possible
| 1 | CONTROL PANEL |
| 2 | WATER CONTAINER |
| 3 | DOOR |
| 4 | MAINTENANCE FLAP |
| 5 | VENTILATION OPENINGS |
| 6 | ADJUSTABLE FEET |
3.1.2 Back
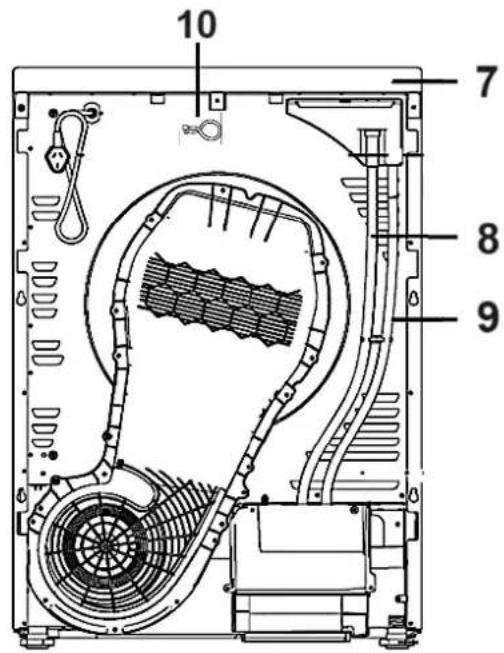
Fig. similar: modifications are possible
| 7 | TOP COVER |
| 8 | WATER DRAIN HOSE |
| 9 | RETURN HOSE |
| 10 | FASTENING BUCKLE |
3.2Controlpanel
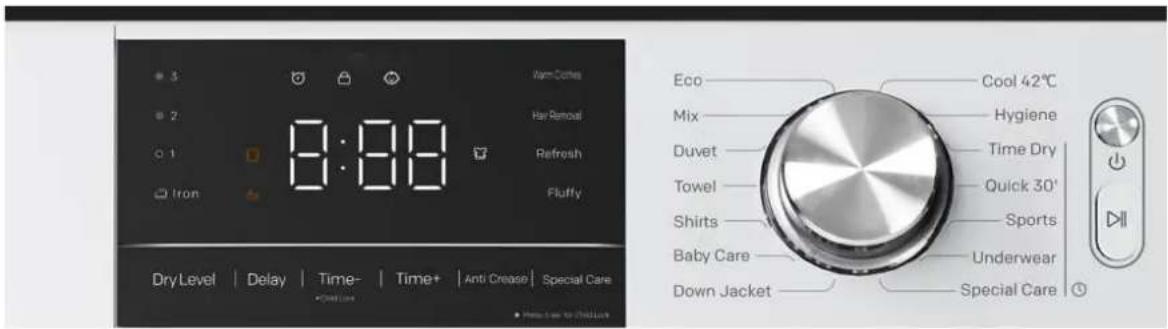
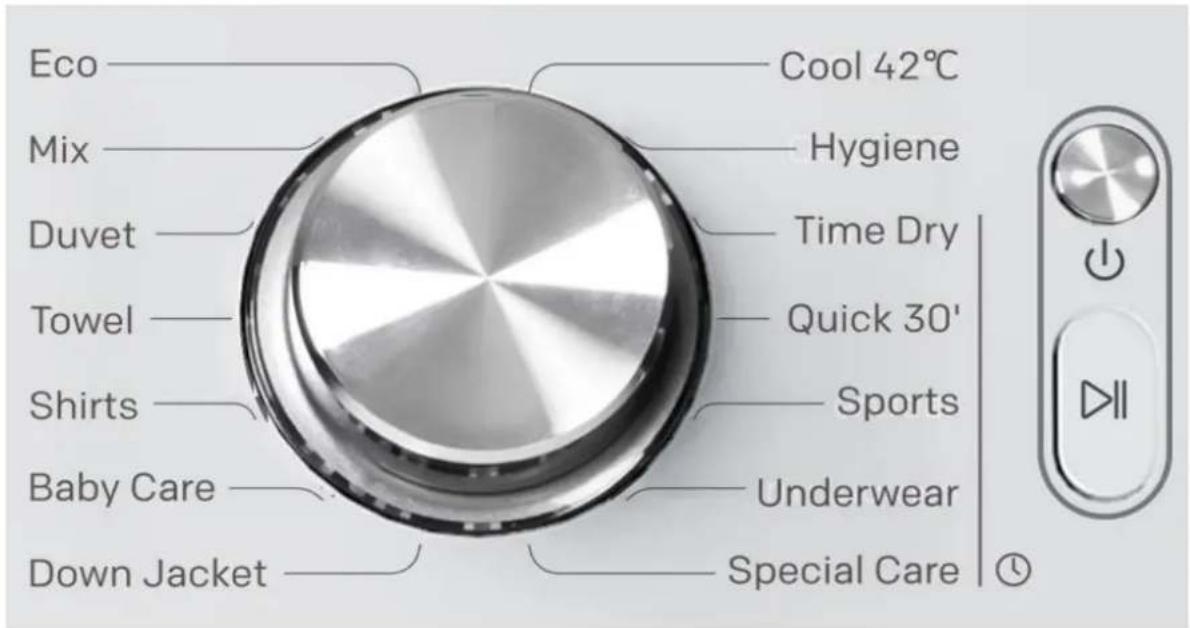
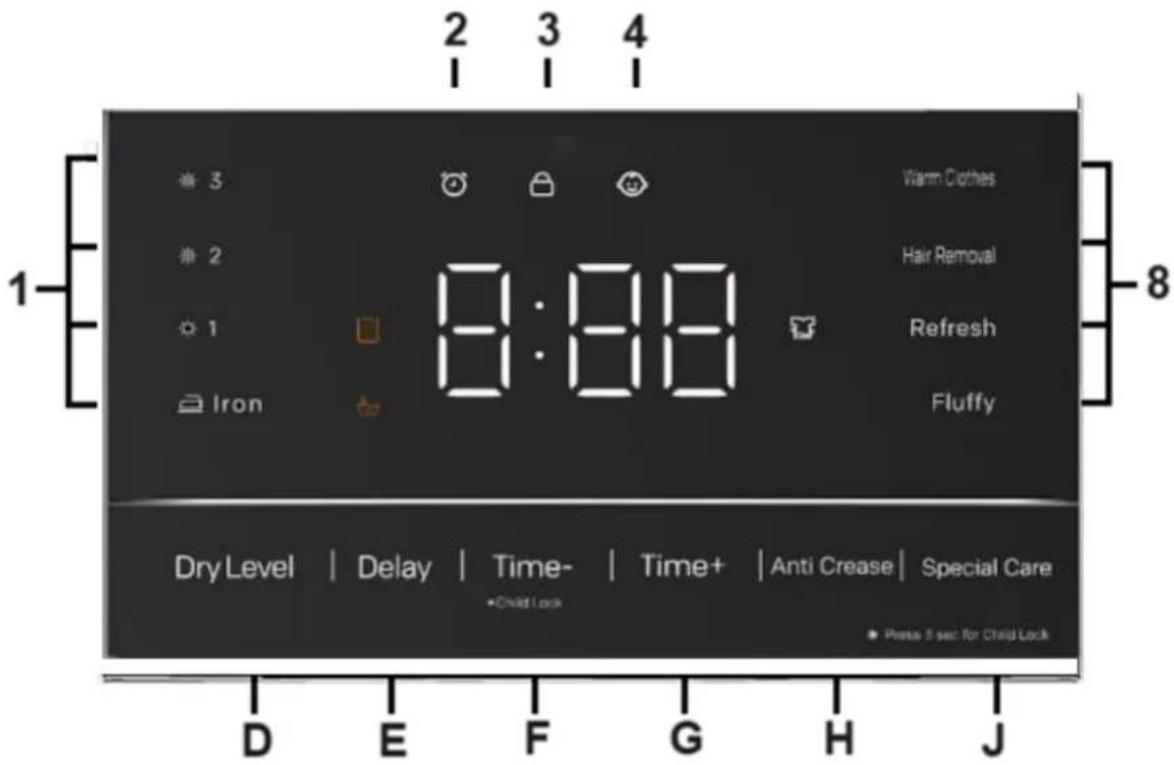
OPERATING BUTTONS
| A | ROTARY KNOB for PROGRAMME SELECTION➢ Rotary knob to select a DRYING PROGRAMME according to fibre type and degree of soiling. |
| B | «ON/OFF»-BUTTON➢ Switches on/off the appliance. |
| C | «START/PAUSE»-BUTTON➢ Button to start or pause operation; e.g. for reloading laundry. |
| D | «DRYING LEVEL»-BUTTON➢ German control panel = Trockenstufe.➢ Button to select the drying level.➢ Four drying levels are selectable: extra dry (Ger.: Extratrocken), cupboard dry (Ger.: Schranktrocken), standard dry (Ger.: Standardtrocken) or iron dry (Ger.: Bügeltrocken).➢ Press this button repeatedly to switch through the different drying levels.➢ See also chapter 5.4 SELECTION OF THE ADDITIONAL FUNCTIONS et seq. |
| E | «DELAYED-PROGRAMME-START»-BUTTON➢Germancontrolpanel=Startzeitvorwahl.➢Buttontosetadelayedprogrammestart.➢See also chapter 5.4 SELECTION OF THE ADDITIONAL FUNCTIONSetseq. |
| F | «TIME-»-BUTTON.➢Germancontrolpanel=Zeit-.➢Buttontoselectthedryingtime.➢Youcansetanindividualdryingtimeforthedrying programmes.➢Buttontoactivate/deactivateofthechildsafetylock(german controlpanel=Kindersicherung).➢See also chapter 5.4 SELECTION OF THE ADDITIONAL FUNCTIONSetseq. |
| G | «TIME+»-BUTTON.➢Germancontrolpanel=Zeit+.➢Buttontoselectthedryingtime.➢Youcansetanindividualdryingtimeforthedrying programmes.➢See also chapter 5.4 SELECTION OF THE ADDITIONAL FUNCTIONSetseq. |
| H | «CREASEPROTECTION»-BUTTON.➢Germancontrolpanel=Knitterschutz.➢Buttontoactivatethecreaseprotectionmanually(protectsthe laundryfromcreasing)➢See also chapter 5.4 SELECTION OF THE ADDITIONAL FUNCTIONSetseq. |
| J | «SPECIALCARE»-BUTTON.➢Germancontrolpanel=Spezialpflege.➢Fourspecialcareprogrammescanbeselected:Warmup(Ger.: Aufwärmen),Hairremoval(Ger.Haarentfernung),Refresh (Ger.:Auffrischen)orPlush(Ger.:Plüsch).➢Pressthisbuttonrepeatedlytoswitchthroughthedifferent specialcareprogrammes.➢See also chapter 5.3 SETTING AND STARTING OF A DRYING PROGRAMMEetseq. |
INDICATORS
| 1 |  | OPERATIONALSTATUSINDICATOR«DRYINGLEVEL»Thisindicatordisplaysthecurrentlysetdryinglevel:extra dry(Ger.:Extratrocken),cupboarddry(Ger.: Schranktrocken),standarddry(Ger.:Standardtrocken) orirondry(Ger.:Bügeltrocken). |
| 2 |  | OPERATIONALSTATUSINDICATOR«TIMEPROGRAMME»Thisindicatorgoesonduringadryingprogramme. 20 |
| 3 |  | OPERATIONALSTATUSINDICATOR«DRYING»Thisindicatorgoesonwhenatimeprogrammcis selected. |
| 4 |  | OPERATIONALSTATUSINDICATOR«CHILDSAFETYLOCK»Thisindicatorgoesonwhenthechildsafetylock functionisactivated. |
| 5 | 00:00 | «DISPLAY»Indicationofdetailedinformationdisplayingtheselected dryingprogrammeandotherfunctions(delayed programmestart,etc.). |
| 6 |  | OPERATIONALSTATUSINDICATOR«CREASEPROTECTION»Thisindicatorgoesonwhenthecreaseprotection functionisactivated. |
| 8 | SEE CONTROL PANEL ABOVE | OPERATIONALSTATUSINDICATOR«SPECIALCARE»Thisindicatordisplaysthecurrentlysetspecialcare programme. |
| 9 |  | WARNINGINDICATOR«FLUFFILTER»Thisindicatoralertstheuserduringthedryingprocess thattheflufffilterisblocked.Theappliancestopsand cannotberestarteduntiltheflufffilterhasbeencleaned. |
10
WARNINGINDICATOR《WATERCONTAINER》
Thisindicatoralertstheuserduringthedryingprocess thatthewatercontainerisfull.Theappliancestopsand cannotberestarteduntilthewatercontainerhasbeen emptied.
4. Thedryingprogrammes
NOTICE! Always observe the textile labels.
| POSSIBLEDRYERSYMBOLSONTEXTILELABELS | |||
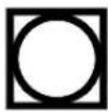 | ➢ Canbetumbledried |  | ➢ Gentledryingonly(lowtemperature) |
 | ➢ Normaldrying(normal /hightemperature) |  | ➢ Donottumbledry |
You can receive further information about the symbols on the textile labels in chapter 4.1 GENERAL TEXTILE CARE SYMBOLS or on the webpage of your local consumeradvicecentre.
| DRYINGPROGRAMMES | ||
| PROGRAMMES | MAX. LOAD | DETAILS |
| ECO | 10.00kg | Programmeforthedryingoflaundry andcolouredlaundrymadeofheat-resistantcottonorlinen. |
| MIX | 5.00kg | Specialprogrammeforthedrying of laundry and coloured laundry made of heat-resistantcotton,linenandmixed laundry. |
| DUVET | 5.00kg | Specialprogramme forthedryingof synthetic clothing(polyester,polyacrylic, viscose, etc.) and cotton blended fabric at amedium drying temperature. |
| BABYCARE | 1.00kg | ➤ Dryingbabycottonfabric |
| SHIRTS | 1.00kg | ➤ Specialprogrammecforthedryingo f shirts,T-shirtsetc.madeofcotton-linen and polyester-cottonblendedfabrics. |
| COOL42°C3.00kg | ➤ Silkandotherclotheswhichcan’t withstandhightemperatures | |
| DOWNJACKET | 1.50kg | ➤ Specialprogrammecforthedryingof downlaundry. |
| TIMEDRYING | - | ➤ Timeprogrammesforthedryingof laundrysuitablefortumbledrying.➤ Thedryingtimecanbesetindividually. |
| QUICK30’ | 1.00kg | ➤ Timed30minutes/dryclothesquickly |
| SPORTS | 1.00kg | ➤ Breathableclothingfortimed procedures/sports |
DRYINGPROGRAMMES
| PROGRAMMES | MAX. LOAD | DETAILS |
| REFRESH | 1.00kg | ➤ Specialprogrammefortherefreshingof clothesthathaveonlybeenwornfora brieftime. |
| HYGIENE3.00kg | ➤ Specialprogrammeforthedryingof hard-wearingfibres.Particularlysuitable forthchighesthygienerequirements. | |
| UNDERWEAR | 1.00kg | ➤ Timedprocedures/smallintimate clothing |
| CUPBOARDDRY | 1.00kg | ➤ Specialprogramme:cupboarddryingfor rackprogrammes. |
| WARM CLOTHES | 1.00kg | ➤ Specialprogrammeforthewarmingup ofclothes. |
| HAIRREMOVAL | 1.00kg | ➤ Specialprogrammefortheremovalof hair. |
| REFRESH | 1.00kg | ➤ Specialprogrammefortherefreshingof clothesthathaveonlybeenwornfora brieftime. |
| FLUFFY | 1.00kg | ➤ Timerprocedure/looseclothing |
i Thedescriptionaboveisonlyrecommendedforuse,theusercanselectasuitable programmerelevanttotheirneeds.Thickormulti-layeredtextiles,e.g.bedlinen, jeans,jacketsetc.arenoteasytodry.Iftheyarenotcompletelydryattheendof adryingprogramme,werecommendusingasuitabletimeprogrammetodrythe laundrycompletelybysettinganindividualdryingtime.
4.1 Generaltextilecaresymbols
 | Hard-wearingtextilesDonot 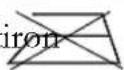 | |
 | Easy-caretextilesDampirc 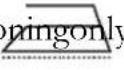 | |
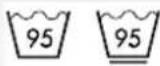 | Washableupto95°CUseinter  layer layer | |
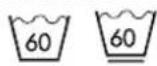 | Washableupto60°CDonotw 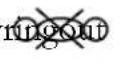 | |
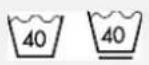 | Washableupto40°CDonotd 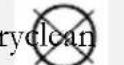 | |
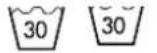 | Washableupto30°CDrying[l  | |
 | HandwashonlyHangupdrip  ,wet ,wet | |
 | Drycleaningonly(professionalcleaning)  _ _ | Hangupwct |
 | Bleachingincoldwaterallowed  _ _ | Tumbledrying:normalheat |
 | Donotbleach  _ _ | Tumbledrying:reducedheat |
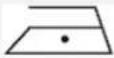 | Ironinguptomax.100°C  _ _ | Donottumbledry |
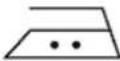 | Ironinguptomax.150°C  _ _ | Linedry |
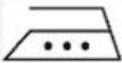 | Ironinguptomax.200°C  _ _ | Drycleaningwithperchloride,lighterfluid,purealcoholorR113onl y. |
 | Drycleaningwithparaffin,purealcoholorR113onl y  _ _ | Notmachine-washable |
i Thetextilecaresymbolsabovecareexamplesonly.Modificationsarepossible.
i Thelistabovedoesnotclaimtobecomplete.
i Youcanreceivefurtherinformationaboutthesymbolsonthetextilelabelson thewebpageofyourlocalconsumeradvicecentre.
4.2Max.load
The recommended load ratios are described in the programme schedules (s. chapter4.THEDRYINGPROGRAMMES).
| MATERIALGENERALGUIDELINES | |
| COTTON/LINEN | ➤ Drumcanbefull,butnottoocompactly-loaded |
| SYNTHETICS | ➤ Drumnotmorethanhalf-full. |
| DELICATE/WOOL | ➤ Drumnotmorethanquarter-full. |
i Trytoloadtheapplianceuptoitsparticularmaximumcapacity.Littleloadsare uneconomical.Ifyoudryeasy-to-creasematerials,werecommendyounotto runtheappliancewithmaximumload.
4.3Weightofclothes:referencevalues
| CLOTHES | REFERENCE VALUE (DRY) | CLOTHES | REFERENCE VALUE (DRY) |
| Bathrobeapprox. | 1600gNightgown | approx.265g | |
| Napkinapprox. | 130gLingerie | approx.130g | |
| Quiltapprox. | 930gMen'sworkshirt | approx.800g | |
| Sheetapprox. | 665gMen'sShirt | approx.265g | |
| Pillowcaseapprox. | 266gPyjama | approx.130g | |
| Tablecloth | approx. 330 g | Blouse | approx. 665 g |
| Terry towel | approx. 265 g | Men's Underpants | approx. 130 g |
The reference values mentioned above are examples only. Modifications are possible.
i Thelistabovedoesnotclaimtobecomplete.
5. Operation
⚠ VORSICHT! Do not use the appliance without fluff filter(s) installed.
During the drying process, water can accumulate between the door windowandtheseal. Thisprocessdoesnotaffecttheproperoperationof theappliance.
5.1 Beforethefirstuse
When the appliance is used for the first time or after a long period of time, the appliancemaygenerateavibratingnoise. Thisisnormalanddoesnotindicatea malfunction. The vibrating noise disappears after a few minutes of programme operation.
i Toremovepotentialresiduesinthedrumoftheappliancecausedbyproduction, testing or transportation of the appliance, the time programme «WARM» should bestartefor30minutesbeforethefirstregulardryingprocess.
- Connecttheappliancetothemains.
- Openthedoor.
- Putsomedampclothsinthedrumoftheappliance.
- Closethedoor.
- Switch on the appliance using the «ON/OFF»-BUTTON (GER.: EIN/AUS). The drycrisnowswitchedon.
- Set the time programme «WARM» using the ROTARY KNOB.
- Press the «TIME + (Ger.: Zeit +)»-BUTTON repeatedly until a drying time of 30 minutes displayed.
- Press the «START/PAUSE»-BUTTON to start the programme.
- Whenthedryingprogrammeisfinished,anacousticsignalsoundsandthedisplay indicates«END».
- When the drying programme is finished, switch off the appliance completely using the «ON/OFF»-BUTTON (Ger.: EIN/AUS).
5.2 Instructions forthedrying of laundry in a dryer
NOTICE! Always observe the textile labels!
Do not dry the following items in your appliance:
netcurtains,wool,materialswithmetal-madeormetalparts
▶ nylontights
➢ largepiecesoflaundry, e.g. anoraks
blankets, puffs, bedrolls, ciderdowns
- items made of foam material or containing parts of foam material
Do not put open pillow cases into the appliance. Otherwise, small pieces of laundrycanbecomeentangledinthem.Closcallzips,press-studsandhooksand tieallbeltsandapronstringstogether.Sortyourlaundryaccordingtothetypeof clothing/materialandselecttheappropriatedryingprocedure.
Do not dry your clothes too long. This avoids creases and saves energy.
Do not dry dark-coloured clothes and light-coloured and fluffy items as towels at thesametime.
The clothes must be spin-dried before you can put them into the appliance.
◆ Spin-dryeasy-careitems(e.g.shirts),too.
✿ Knitwear can shrink a bit while drying. Do not dry such clothes too long. We recommend you keep this shrinkage in mind when you buy knit wear so you may buy as suitable size them.
You can also put starched clothes into the dryer. Select the programme ‘iron drying’. Toremoveresidualsofstarchfromthedrum, wipethedrumwithamoist clothanddryitafterwards.
To avoid static charge after drying use a fabric softener when washing the laundry oraspecialsoftenersuitablefordryers.
Take your clothes out of the appliance when the drying procedure has ended.
If some items are still a little bit wet after drying, dry them again for at least 30 minutes. This may be required for some complex items (e.g. collarsorbags).
- Button up pillowcases, close zippers, hooks and press studs. Tie all belts and long ribbonstogethertopreventthelaundryfromtangling.Closezippers,buttonup duvetcoversandtietiesorribbonstogether(e.g.fromaprons).Folditemswith twolayersfrominsidetooutside(e.g.cottoncoatedanoraksshouldhavethe cottoncoatedsideontheoutside)Thesematerialsdrybetterthisway.
5.3 Setting and starting of adrying programme
- Check that the water container has been emptied and inserted correctly.
- Check that the fluff filter has been cleaned and inserted correctly.
- Check that the condenser has been cleaned and installed correctly.
- Ensure that the laundry to be dried is suitable for drying in a tumble dryer. Always observethetextilelabels!
- Openthedoor.
- Put the laundry to be dried in the drum. Always observe the maximum load (dependingonthetypeoflaundry/s.chapter4.THEDRYINGPROGRAMMESet seq.).
- Closethedoor.
- Switch on the appliance using the «ON/OFF»-BUTTON (GER.: EIN/AUS). The dryerisnowswitchedon.
- Set a drying programme -suitable for the laundry to be dried- using the ROTARY KNOB.
- In addition to the selected programme, further DRYING FUNCTIONS such as «DELAYED PROGRAMME START», etc. can be selected using the corresponding buttons (s. chapter 5.4. SELECTION OF THE ADDITIONAL FUNCTIONS. The corresponding operational status indicatorsgoon.
- Press the «START/PAUSE»-BUTTON to start the selected drying programme.
The display indicates the remaining duration of the drying process in hours and minutes(basedontheselectedprogramme,themaximumloadallowedandtherequireddryinglevel). - After the drying programme is finished, an acoustic signal sounds and the display indicates«END»(s.chapter5.5ENDOFADRYINGPROGRAMME.
- When the drying programme is finished, switch off the appliance completely using the «ON/OFF»-BUTTON (Ger.: EIN/AUS).
i Itispossible that the current runtime of these selected drying programme (depending on the dryings situation) will be adjusted automatically so that it may vary from the drying time which is indicated on the display.
i If these selected drying programmecannotbecombined with the desired functions, these functions cannot be selected or will be cancelled and the indicator switches off automatically.
If you set the time programme «Cold», you can set an individual drying time using the «TIME +/- (Ger.: Zeit +/-)»-BUTTONS (s. chapter 4. THE DRYING PROGRAMMES).
Due to the selectable drying time, this programme is very suitable for drying thick or multi-layered textiles, e.g. terry towels, or fordrying individual pieces of laundryors smaller quantities of laundry.
The time programme «COLD» is suitable for the drying of all types of laundry.
i Thickormulti-layeredtextiles, e.g. bedlinen, jeans, jackets, etc. are not easy to dry. If they are not completely dry at the end of an automatic drying programme, we recommend using a suitable time programme afterward stodry the laundry completely by setting an individual drying time.
HOWTOSETANDSTARTTHETIMEPROGRAMME
- Check that the water container has been emptied and inserted correctly.
- Check that the fluff filter has been cleaned and inserted correctly.
- Check that the condenser has been cleaned and installed correctly.
- Ensure that the laundry to be dried is suitable for drying in a tumble dryer. Always observethetextilelabels!
- Openthedoor.
- Put the laundry to be dried in the drum. Always observe the maximum load (dependingonthetypeoflaundry/s.chapter4.THEDRYINGPROGRAMMESet seq.).
- Closethedoor.
- Switch on the appliance using the «ON/OFF»-BUTTON (GER.: EIN/AUS). The dryerisnowswitchedon.
- Set the desired time programme («COLD») -suitable for the laundry to be dried-usingtheROTARYKNOB.
-
Press the «TIME +/- (Ger.: Zeit +/-)»-BUTTONS repeatedly until the desired dryingtimeisindicatedonthedisplay.
-
The operational status indicator of the time programme «©» goes on.
- Inadditiontotheselectedprogramme,further DRYINGFUNCTIONScanbe selectedusingthecorrespondingbuttons(s.chapter5.4.SELECTIONOFTHE ADDITIONALFUNCTIONS.Thecorrespondingoperationalstatusindicatorsgoon.
- Press the «START/PAUSE»-BUTTON to start the selected time programme.
- After the drying programme is finished, an acoustic signal sounds and the display indicates «END» (s. chapter 5.5 END OF A DRYING PROGRAMME.
- When the drying programme is finished, switch off the appliance completely using the «ON/OFF»-BUTTON (Ger.: EIN/AUS).
i If these selected drying programmec cannot be combined with the desired functions, these functions cannot be selected or will be cancelled and the indicator switches off automatically.
5.3.2Racks 21
METALRACK
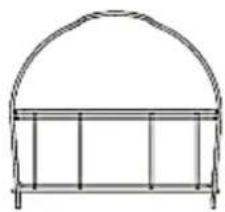
natural_image
Simple line drawing of a basket with an arched top (no text or symbols)PLASTICRACK
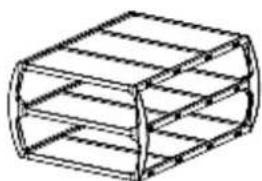
natural_image
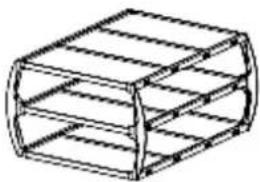
Line drawing of a 3D rectangular prism with horizontal shelves (no text or symbols)The plastic rack is suitable for the layering of clothing.
INSTALLATION OF THERACKS 22
- Clamp the metal rack (3) onto the fluff filter (4) first and then insert the rack with the bracket into the slot in the front holder (1 / s. fig. below).
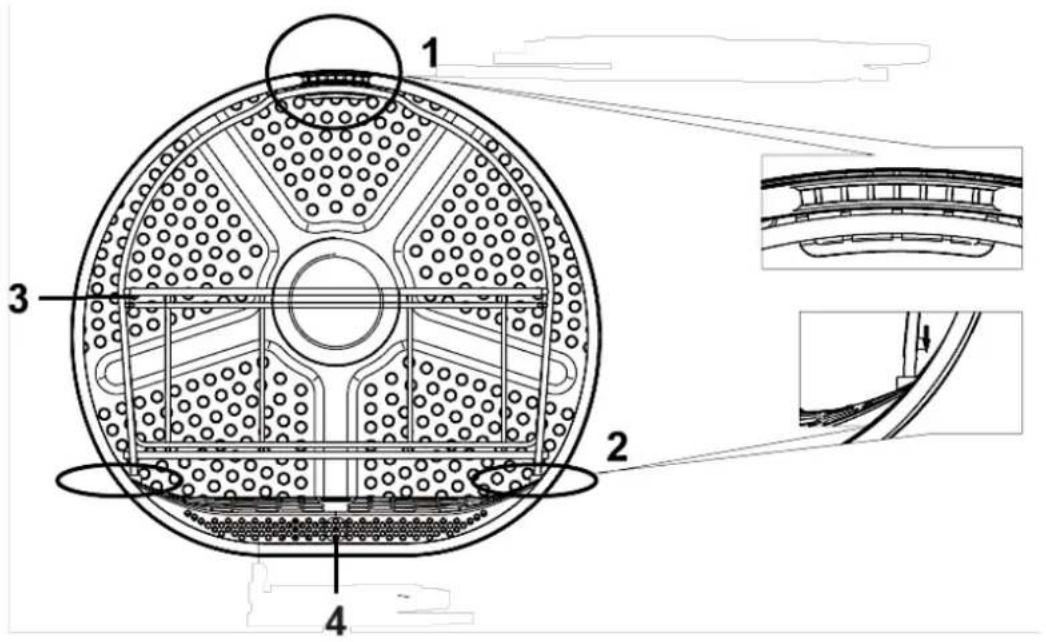
| 1 | FRONT HOLDER |
| 2 | CLAMP THE METAL RACK ONTO THE FLUFF FILTER |
| 3 | METAL RACK |
| 4 | FLUFF FILTER |
- If you want to use the plastic rack, you must install the metal rack first. Then attach the plastic rack to the metal rack.
5.3.3 Special care
HOW TO SET AND START SPECIAL CARE PROGRAMME
- Check that the water container has been emptied and inserted correctly.
- Check that the fluff filter has been cleaned and inserted correctly.
- Check that the condenser has been cleaned and installed correctly.
- Ensure that the laundry to be dried is suitable for drying in a tumble dryer. Always observe the textile labels!
-
Open the door.
-
Put the laundry to be dried into the rack(s). Always observe the maximum load (depending on the type of laundry/s. chapter 4. THE DRYING PROGRAMMES et seq.).
- Closethedoor.
- Switch on the appliance using the «ON/OFF»-BUTTON (GER.: EIN/AUS). The dryerisnowswitchedon.
- Set the programme «SPECIAL CARE (GER.: SPEZIALPFLEGE)» using the ROTARY KNOB.
- Press the «SPECIAL CARE»-BUTTON repeatedly until the desired special care programme is indicated on the control panel.
- Press the «START/PAUSE»-BUTTON to start the selected rack programme.
i Thedisplayindicatestheremainingdurationofthedryingprocessinhoursand minutes(basedontheselectedprogramme,themaximumloadallowedandtherequireddryinglevel). - After the drying programme is finished, an acoustic signal sounds and the display indicates«END»(s.chapter5.5ENDOFADRYINGPROGRAMME.
- When the drying programme is finished, switch off the appliance completely using the «ON/OFF»-BUTTON (Ger.: EIN/AUS).
i It is possible that the current run time of the selected drying programme (dependingonthedryingsituation)willbeadjustedautomaticallysothatitmay varyfromthedryingtimewhichisindicatedonthedisplay.
If these selected drying programmecannotbecombined with the desired functions, these functions cannot be selected or will be cancelled and the indicator switches off automatically.
5.4Selectionoftheadditionalfunctions
THE FOLLOWING ADDITIONAL FUNCTION SCANBESELECTED
★ FUNCTION «DRYING LEVEL»: selection of the drying level.
★ FUNCTIONS «TIME +/-»: selection of the duration of a time programme.
★ FUNCTION «DELAYED PROGRAMME START»: selection of a later programme start.
★ FUNCTION «CREASE PROTECTION»: activation of the crease protection.
★ FUNCTION «CHILD SAFETY LOCK»: activation/deactivation of the child safety lock.
-
Pressthecorrespondingbutton(s)toselectanadditionalfunction.
-
Press the corresponding button(s) once or repeatedly, until the operational status indicator of these selected drying function or combination 23 goes on.
The additional drying functions must be selected after setting a drying programme and before starting the drying programme.
If these selected drying programmecannotbecombined with the desired functions, these functions cannot be selected or will be cancelled and the indicator switches off automatically.
5.4.1 Selectionofthedryinglevel
FUNCTION «DRYING LEVEL (Ger.: TROCKENSTUFE)»: SELECTIONOFTHEDRYINGLEVEL
The drying level of some drying programmes can be selected individually. four dryinglevelsareselectable:extradry(Ger.:Extratrocken),cupboarddry(Ger.:Schranktrocken),standarddry(Ger.:Standardtrocken)orirondry(Ger.:Bügeltrocken).
◆ Nodryinglevelisdisplayedbydefault.
❖ Thehigherthesetdryinglevel,thelongertheapplianceworks.
To set the drying level for a drying programme individually, press the «DRYING LEVEL»-BUTTON repeatedly until the operational status indicator of the desired dryinglevel(extradry,cupboarddry,standarddryorirondry)isindicatedonthe controlpanel.Theselecteddryinglevelisactivated.
The «DRYING LEVEL»-FUNCTION may not be available for all drying programmes.
If these selected drying programmecannotbecombined with the desired functions, these functions cannot be selected or will be cancelled and the indicator switches off automatically.
5.4.2 Selection of the programmed duration for time programmes
FUNCTIONS«TIME+/-(Ger.:ZEIT+/-)»: INDIVIDUALSELECTIONOFTHEDRYINGTIME
Using these functions, you can individually set the duration of the drying time for atimeprogramme.
✿ Depending on the model, you can also set the running time of some automatic dryerprogrammesindividually. 24
To set the drying time for a time programme individually, press the «TIME +/- (Ger.: ZEIT +/-)»-BUTTONS repeatedly until the desired drying time is indicated onthedisplay.
The «TIME +/-»-FUNCTIONS may not be available for all drying programmes.
i If theselecteddryingprogrammecannotbecombinedwiththedesiredfunctions, thesefunctionscannotbeselectedorwillbecancelledandtheindicatorsswitchesoffautomatically.
5.4.3 Delayed-programme-start
FUNCTION «DELAYED-PROGRAMME-START (Ger.: STARTZEITVORWAHL)»: SELECTIONOFALATERPROGRAMMESTART
Using this function, you can set a delayed-programme-start (Ger.: Startzeitvorwahl)ofthedryer.
- Press the «DELAYED-PROGRAMME-START (Ger.: Startzeitvorwahl)»-BUTTON only afteryouhavesctthedryerprogramme.
Youcanchooseadelayperiodfrom3to24hours.
The delay period must be longer than the duration of the drying programme as the set delay time defines the end of the drying programme.
- Switch on the appliance using the «ON/OFF»-BUTTON (GER.: EIN/AUS).
- Setadryingprogrammesuitableforthelaundrytobedriedandsetthedesired additionalfunction(s).
-
Press the «DELAYED-PROGRAMME-START (Ger.: Startzeitvorwahl)»-BUTTON repeatedlyuntilthedesireddelayperiod(3h-24h/desiredendothedryingprogrammeinh)isindicatedonthedisplay.
i Each press of the «DELAYED-PROGRAMME-START»-BUTTON increases the delayperiodbyonehour. -
Press the «START/PAUSE»-BUTTON after you have set the delay period.
-
Assoonasthecount-downtimchasreachedthestartingtimeofthedryingprogramme,thedryingprogrammestartsandthedisplayindicatetheremainingdryingtime.
-
If you wish to cancel the delayed programme start after pressing the «START/PAUSE»-BUTTON (but before the drying programme has started), you must switch off the appliance using the «ON/OFF»-BUTTON (GER.: EIN/AUS).
EXAMPLE
It is 2:00 p.m. (24-hours display: 14:00 o'clock)
You set a drying programme with a running time of 2.00 hours.
The drying programme is to end at 5:00 p.m. (24-hours display: 17:00 o'clock).
➢ You set the delay period to 3 hours (2:00 p.m. → 5:00 p.m. = 3 hours).
The drying programme starts at 3:00 pm (15:00 o'clock) and ends at 5:00 pm (17:00 o'clock).
The «DELAYED-PROGRAMME-START (Ger.: Startzeitvorwahl)»-FUNCTION may not be available for all programmes (depending on model).
If these selected drying programmecannot be combined with the desired functions, these functions cannot be selected or will be cancelled and the indicator switches off automatically.
5.4.4 Activation of the crease protection
FUNCTION «CREASE PROTECTION (Ger.: KNITTERSCHUTZ)»: SELECTION OF THE CREASE PROTECTION
Using this function, you can activate the crease protection for a drying programmemanually.
✿ CREASE PROTECTION (Ger.: Knitter Schutz): The crease protection protects textiles from creasing. The drum rotates intermittently during the drying programme to protect textiles from creasing. The crease protection starts automatically at the end of a dryer programme.
The duration of the manually set crease protection is 180 minutes. After the time has elapsed, the function is deactivated automatically.
To activate the crease protection for a drying programme manually, press and hold the «CREASE PROTECTION»-BUTTON. The operational status indicator of the creaseprotection(« )isindicatedonthecontrolpanel. 25
The«CREASEPROTECTION»-FUNCTIONmaynotbeavailableforalldrying programmes.
If these selected drying programmecannotbecombined with the desired functions, these functions cannot be selected or will be cancelled and the indicator switches off automatically.
5.4.5 Activation/deactivation of the child's safety lock
FUNCTION «CHILD SAFETY LOCK (Ger.: KINDERSICHERUNG)»: ACTIVATION/DEACTIVATIONOFTHECHILDSAFETYLOCK
- Your appliance is equipped with a CHILD SAFETY LOCK (Ger.: Kindersicherung) to protect it from unintentional operation or operation by children.
◆ Usingthisfunction,youcanactivate/deactivatethechildlock.
To activate the child safety lock, press and hold the «TIME - (Ger.: ZEIT -)»-BUTTON for 3 seconds. The operational status indicator of the child safety lock «💡» goes on. All buttons are locked (except the «ON/OFF»-BUTTON).
To deactivate the child safety lock, press and hold the «TIME - (Ger.: ZEIT -)»-BUTTON for 3 seconds again. The operational status indicator of the child safetylockgoesoff.Allbuttonsarereleased.
If these selected drying programmecannotbecombined with the desired functions, these functions cannot be selected or will be cancelled and the indicator switches off automatically.
5.5Endofadryingprogramme
- Alldryingprogrammesendwithacoolingdownperiod.
- After the cooling down phase, the indicator «END» goes on and an acoustic signal sounds. You can open the door and take your laundry out of the appliance.
- When the drying programme is finished, switch off the appliance completely using the «ON/OFF (GER.: EIN/AUS)»-BUTTON.
- Unplugtheappliance.
5.6 How to interrupt, cancel or change a drying programme
HOWTOINTERRUPTADRYINGPROGRAMME
If you press the «START/PAUSE»-BUTTON during a drying process, the currently runningprogrammewillbeinterrupted.
- Press the «START/PAUSE»-BUTTON during a drying process.
- Thedryingprogrammeisinterrupted.
- Start the interrupted programme again using the «START/PAUSE»-BUTTON.
- Thedryerrestartsfromthepointatwhichthecprogrammewasinterrupted.
HOWTOCANCELADRYINGPROGRAMMEPREMATURELY
- To cancel a drying programme prematurely, switch off the appliance using the «ON/OFF (GER.: EIN/AUS)»-BUTTON.
- The currently running programme is interrupted and cancelled.
HOWTOCHANGEADRYINGPROGRAMME
To change a drying programme, you must cancel the currently running programmefirst.
- Switch off the appliance using the «ON/OFF (GER.: EIN/AUS)»-BUTTON.
- Thecurrentlyrunningdryingprogrammeiscancelled.
- Switch on the appliance again using the «ON/OFF (GER.: EIN/AUS)»-BUTTON.
- Setanewdryingprogrammeusingtherotaryknobandpressthe «START/PAUSE»-BUTTON to start the new programme.
6.Environmentalprotection
6.1 Environmental protection: disposal
Appliances bearing this symbol «—» must not be disposed of together with householdwastethroughouttheEU.Topreventpotentialdamagetothe environmentorhumanhealthfromuncontrolledwastedisposalandtopromote thesustainablereuseofmaterialresources,responsiblysupplytheappliancetoa recyclingcentre.
6.2 Environmental protection: energysaving
❖ Try to load the appliance up to its particular maximum capacity. Little loads are uneconomical.
Do not dry your clothes too long. This avoids creases and saves energy.
◆ Always select a drying programme according to the type of laundry and the required dryinglevelrequired.
Accumulated contamination on the fluff filters reduces the air circulation, causes longerdrying-timesandincreasedenergyconsumption.Cleantheflufffiltersafter eachuseofthecappliance.
◆ Ensure that the installation room is well ventilated.
7. Cleaning and maintenance
⚠️ DANGER! Never touch the power plug, the power switch or other electrical components with wet or damp hands. RISK OF ELECTRIC SHOCK!
⚠ WARNING! Disconnect the appliance from the mains before cleaning and/or maintenance. RISK OF ELECTRIC SHOCK!
WARNING! Remove possible dust accumulation at the power plug, at the safety power socket and at all plug connectors regularly. RISK OF FIRE!
⚠ WARNING! Never use a steam cleaner to clean the appliance. The steam will cause severe damage to the electric components of the appliance. RISK OF ELECTRIC SHOCK!
⚠️ CAUTION! Ensure before cleaning and maintenance that the appliance is cooled down completely. RISK OF SCALDING! RISK OF BURNS!
NOTICE! Clean the appliance and its components regularly.
Take off all rings and bracelets before cleaning or maintenance; otherwise, you will damage the surface orthedrum of the appliance.
DETERGENTS
➢ Do not use any harsh, abrasive and aggressive detergents.
▶ Donotuseanyabrasivedetergents!
▶ Donotuseanyorganicdetergents! 26
▶ Donotuseessentialoils!
▶ Neverusesolvents.
NOTICE! Any damage that is caused to the appliance by a cleaning product will not be fixed free of charge, even if the guarantee period of the appliance is still valid.
HOUSING
Useaneutral,diluteddetergent.
CONTROLPANEL
➢ Use a damp cloth and a mild detergent suitable for the material only to clean the control panel.
➢ Never spray cleaner on the control panel directly; it can damage the control panel.
DRUM
Use a damp cloth and a mild detergent suitable for stainless steel only to clean thedrum.
Remove all detergent residue and wipe the drum dry with a clean cloth.
Remove any rust, e.g. from metal-made objects in your laundry, immediately with achlorine-freedetergent.
▶ Neverusewirewool.
DOOR/DOORSEALS
➢ Clean the door / door seal after each drying process using a soft cloth.
➢ Remove any foreign objects which got stuck in the door seal immediately.
7.1 Watercontainer
WARNING! Condensed water is not drinkable!
-
The condensed water produced during the drying process is collected in the water container.
◆ Empty the water container after each drying process.
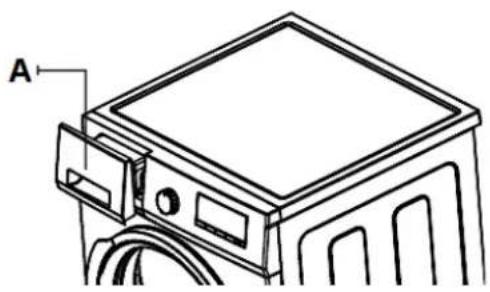
If the water container is full while the appliance is operating, the programme pauses and the warning indicator «WATER CONTAINER 📁» goes on. When you have emptied the water container, you can restart the programme using the «START/PAUSE»-BUTTON. -
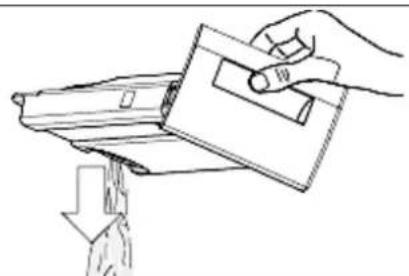
Pulloutthewatercontainer(A);hold itwithbothhands.
natural_image
Technical line drawing of a mechanical device with labeled component A (no text or symbols beyond label)- Tiltthecontainerandemptyit.
natural_image
Line drawing of a hand holding a document with a downward arrow, no text or symbols present-
Pushthewatercontainerbackintotheappliancecarefully.
-
Ensure that the water container is inserted properly.
7.2Cleaningoftheflufffilter
The warning indicator «FILTER » goes on after each drying process. 27
- Clean the fluff filter after each drying process.
NOTICE! Accumulated contamination on the fluff filter reduces the air circulation, causes longer drying times and increased energy consumption and contaminates the inside of the appliance. Clean the fluff filter after each use of the appliance.
- Openthedooroftheappliance.
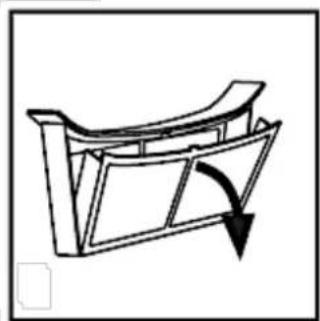
- Toremovetheflufffilter, pullit upwards.
- Opentheflufffilter.

natural_image
Simple line drawing of a mechanical component with an upward arrow, no text or symbols present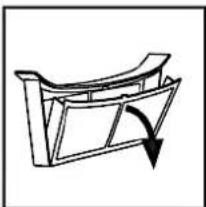
natural_image
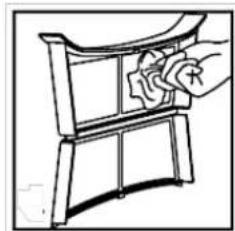
Simple line drawing of a mechanical component with an arrow indicating rotation (no text or symbols)- Cleantheflufffilter.Removeany contaminationwithadampcloth
- Drytheflufffilterthoroughly!
natural_image
Line drawing of a hand cleaning a curved wooden chair (no text or symbols)- Insert the fluff filter properly (the fluff filter must be dry completely).
⚠️ CAUTION! Do not use the appliance without the fluff filter installed.
7.3 Cleaningofthecondenser
⚠️ CAUTION! Remaining water may escape while cleaning. Place an absorbent cloth under the maintenance flap.
WARNING! Clean the condenser using water only. Never use any hard or sharp-edged objects. Never operate the appliance without the condenser.
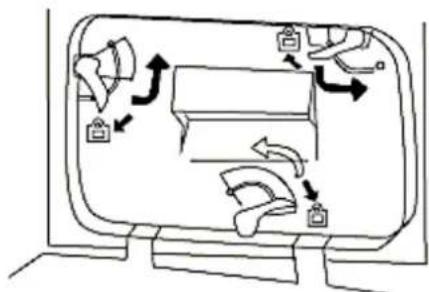
◆ Thecondenserisbehindthemaintenanceflap.
◆ Cleanthecondenseratleastoncevery3months.
i Acleancondenserisessentialforeffective drying results.
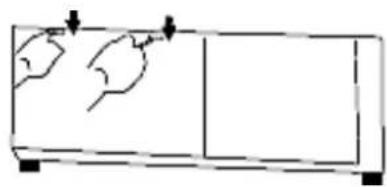
- Openthemaintenanceflapunder thedrumcompletely.
- Openthelocksandremovethe condenser.
natural_image
Simple line drawing of a cabinet with two hanging items, no text or symbols present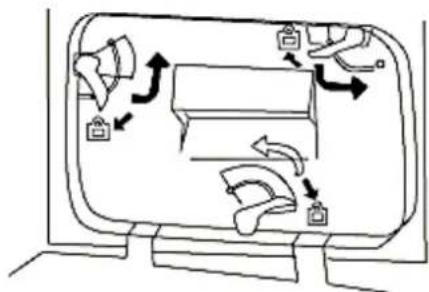
flowchart
graph TD
    A["Start"] --> B{Condition}
    B -->|Yes| C["Process"]
    B -->|No| D["End"]
| 3. Removethefluff.Cleanthe condenscarcfullyusingaclean brush. | 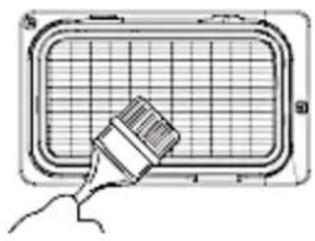 |
| 4. Reinstallthecondenserproperly andclosethelocks.The condensermustbecompletely drybeforereinstallation. | 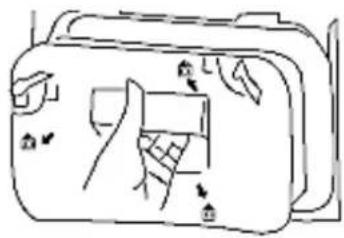 |
| 5. Closethemaintenanceflapproperly. | |
| 6. Ensurethatallpartsareinstalledproperly. | |
CAUTION! Do not use the appliance without the condenser installed.
⚠️ DANGER! Never try to repair the appliance yourself. Improper repairs or manipulating of the electric components of the appliance can endanger the life and health of the user. RISK OF ELECTRIC SHOCK! RISK OF FIRE!
| MALFUNCTION | |
| POSSIBLE CAUSE(S) | MEASURE(S) |
| THESETPROGRAMMEDOESNOTSTART. | |
| 1. Doorisnotclosed properly.1. Closethedoor properly.2. The «START/PAUSE»-BUTTON was not pressed. | 2. Press the «START/PAUSE»-BUTTON. |
| MALFUNCTION | |
| POSSIBLE CAUSE(S) | MEASURE(S) |
| THEAPPLIANCEDOESNOTWORKATALL. | |
| 1. Theplugofthecapplianceisnot connectedtothesocket.2. The plug has become loose.3. The socket is not supplied with energy.4. The fuse is switched off.5. The voltage is too low.6. The «START/PAUSE»-BUTTON was not pressed. | 1. Connectthecappliancctothemains properly.2. Check the plug.3. Check the corresponding socket by connecting itwithanothera ppliance.4. Check the fuse box.5. Compare the data on the model plate withthedataof yourener gy supplier.7. Press the «START / PAUSE»-BUTTON. |
UNCOMMONSOUNDDURINGOPERATING.
- The appliance is not installed on a level, dry and solid floor.
- The appliance is in contact with a walloranotheritem.
-
Incorrect programme selection.
-
Realigntheapplianceproperly.
- Realigntheapplianceproperly.
-
Select a drying programme suitable forthelaundr y tobedried.
-
Theflufffilter (s) is/areclo gged.4. Cleantheflufffilter (s).
- Incorrect load volume.
- Check that the appliance is not overloaded.
WATERLEAKAGE.
| 1. Theappliancesnotinstalledona level, dry and solid floor.2. The (external) water drain hose is not installed properly.3. Theflufffilter (s) is/areclo gged.3. Cle 4. The door seal is soiled. | 1. Align the appliance horizontally.2. Install the (external) water drain hose properly. Clean the flufffilter (s).4. Clean the door seal. |
DRYING LEVEL HAS NOT BEEN REACHED / DRYING-TIME IS TOO LONG.
| 1. Theflufffilter (s) is/areclo gged.1. Cleantheflufffilter (s). | |
| 2. The water container is full. | 2. Empty thewatercontainer. |
| 3. Selected programme is unsuitable. | 3. Select a drying programme suitable forthelaundr y tobedried. |
| 4. Loadvolumeistoobi g. | 4. Reduce the load. |
MALFUNCTION
| POSSIBLE CAUSE(S) | MEASURE(S) |
| THEDRYINGPERIODENDSSHORTLYAFTERTHESTARTOFTHEPROGRAMME.THEINDICATOR«END»ISDISPLAYED | |
| 1. Notenoughclothesintheappliance.Clothesare toodry for theselectedprogramme. | 1. Selectadryingprogrammesuitableforthelaundrytobedried. |
If the appliance has a malfunction not listed in the table above, or if you have checked all items in the abovetable but the problem still exists, please contact the aftersaleservice.
8.1 Errorcodes
| ERROR CODE | POSSIBLE CAUSE(S) | MEASURE(S) |
| E0 | 1. Water container is full.2. Failure of the drain pump. | 1. Emptythewatercontainer.2. Switch off and unplug the appliance, close the water tap and contacttheaftersalesservice. |
| dE | 1. Thedoorisno t closedproperly. | 1. Closethedoorproperly.Restar t theappliance.Iftheproblem cannotbesolved,switchoffand unplugtheappliance,closethe watertapandcontacttheaftersales service. |
| LE | 1. Theflufffilteris clocked.2. Failureofthemotor. | 1. Cleantheflufffilterthorou ghly.2. Switchoffandunplugthe appliance,closethewatertapand contacttheaftersalesservice. |
| HE | 1. Failureofthe compressor. | 1. Switchoffandun plugthe appliance,closethewatertapand contacttheaftersalesservice. |
| tE1 | 1. Thetemperatureof the front air duct is abnormal. | 1. Switchoffandunplugthe appliance,closethewatertapand contacttheaftersalesservice. |
| tE2 | 1. Thetem peratureof the condenser is abnormal. | 1. Switchoffandun plugthe appliance,closethewatertapand contacttheaftersalesservice. |
| ERROR CODE | POSSIBLE CAUSE(S) | MEASURE(S) |
| SE | 1. Failureofthe humiditysensor. | 1. Switchoffandunplugthe appliance,closethewatertapand contacttheaftersalesservice. |
TECHNICALDATA*
| Type | Heat pump dryer/free-standing |
| Controls ystem | Electronical |
| Colour | White/blackdoor |
| Maxload | 10.00kg |
| Energy efficiency class 1 | A++ |
| Annualener gy consumption 2 | 278.00kWh |
| Noisccmission | 64dB (A) rc 1 pW |
| Power | 850W |
| Protectionclass | IPX4 |
| Material:drum | Stainlesssteel |
| Numberof programmes | 14 |
| Humidity sensor | ✓ |
| Delayed-programme-start | ✓ /3-24h |
| Indicatorli ght:o peration | ✓ |
| Operation | Electronicbuttons/rotary knob |
| Worktop | ✓ |
| Acousticsi gnalafter programmcend | ✓ |
| Crease protection | ✓ |
| Humidity sensor | ✓ |
| Display | ✓ |
| Childsafet y lock | ✓ |
| Adjustablefeet | ✓ |
| DimensionsH*W*Dincm | 85.00*59.50*67.00 |
| Weightnet/ gross | 52.00kg /58.00kg |
◆ Technicalmodificationsreserved.
| *AccordingtoRegulation(EU)No.392/2012 | |
| 1FromA+++(highestefficiency)toD(lowestefficiency). | |
| 2 | Basedon160dryingcyclesforthestandardcottonprogrammewithfullload andpartialloadandtheconsumptionoftheoperatingmodeswiththelowest energyconsumption.Theactualenergyconsumptiondependsonthetype ofuseofthea appliance. |
- While unpacking, the packaging materials (polythene bags, polystyrene pieces, etc.) should be kept away from children and pets. CHOKINGHAZARD!
- Oldandunusedappliancesmustbesentforddisposaltotheresponsiblerecycling centre.Neverexposetoopenflames.
- Before you dispose of an old appliance, render it inoperative. Unplug the appliance and cutoff the entire power cord. Dispose of the power cord and the plugin immediately.
- Remove the door completely so children are not able to get into the appliance asthisendangerstheirlives!
- Disposeofanypaperandcardboardintothecorrespondingcontainers.
- Disposeofanyplasticsintothecorrespondingcontainers.
- If suitable containers are not available at your residential area, dispose of these materials at a suitable municipal collection point for waste-recycling.
- Receivemoredetailedinformationfromyourretaileroryourmunicipalfacilities.
Materialsmarkedwiththissymbolare recyclable.
Pleasecontactyourlocalauthoritiesto receivefurtherinformation.
forlargeelectricappliances;PKMGmbH&Co.KG,NeuerWall2,47441Moers.
This appliance includes a 24-month guarantee for the consumer given by the manufacturer, dated from the day of purchase, referring to its flawless material-components and its faultless fabrication. The consumer is accredited with both the dues of the guarantee given by the manufacturer and the vendor's guarantees. These are not restricted to the manufacturer's guarantee.
Anyguaranteeclaimhastobemadeimmediatelyafterthedetectionandwithin
24monthsafterthedeliverytothefirstultimatevendee.Theguaranteeclaimhasto beverifiedbythevendeebysubmittingaproofofpurchaseincludingthedateof purchase and/or the date of delivery. The guarantee does not establish any entitlement to withdraw from the purchase contract or for a price reduction. Replacedcomponentsorexchangedappliancesdemisetousasourproperty.
Theguaranteeclaimdoesnotcover:
- fragilecomponentsasplastic, glassorbulbs;
- minor modifications of the PKM-products concerning their authorised condition if they do not influence the utility value of the product;
- damage caused by handling errors or false operation;
- damagecausedbyaggressiveenvironmentalconditions,chemicals,detergents;
- damage caused by non-professional installation and haulage;
- damage caused by non common household use;
- damages which have been caused outside the appliance by a PKM-product unless a liability is forced by legal regulations.
The validity of the guarantee will be determined if:
- theprescriptions of the installation and operation of the appliance are not observed.
- the appliance is repaired by a non-professional.
- the appliance is damaged by the vendor, the installer or a third party.
- the installation or the start-up is performed inappropriately.
- the maintenance is inadequately or incorrectly performed.
- the appliance is not used for its intended purpose.
- the appliance is damaged by force majeure or natural disasters, including, but with not being limited to fires or explosions.
Please provide the following information for the registration of your guaranteeclaim:
- the complete address of the location of the appliance.
- phone number(s) ande-mailcontact.
-
modelname.
-
serialnumber/photooftheratingplate.
- typeofmalfunction.
If you do not provide the above data, your guarantee claim cannot be handledimmediately.
SPECIALNOTE
Please photograph herating plate of the appliance before installation and save the photofor possible later use.
You find therating plate on the following locations.
- Fridges/freezers:insideoronthebackside.
- Dishwasher/washer/dryer:onthedoorareaorthebackside.
- Hobs:onthebottomside.
- Ovens:onthedoorarea.
- Hob/ovencombinationshave2ratingplates(ovenandhob).
- Extractorhoods:insidenearthemotor.
The guarantee claims neither extend the guarantee period nor initiate a new guarantee period. The geographical scope of the guarantee is limited with respect to appliances, which are purchased and used in Germany, Austria, Belgium, Luxembourg and the Netherlands.

CE-DÉCLARATIONDECONFORMITÉ
natural_image
Three technical diagrams showing a washing machine with cross symbols, mounted on a surface (no text or labels present)2.3Nivellement
natural_image
Diagram of a washing machine with a valve and red dashed indicator lights, showing no text or symbols.2.4Tuyaud'évacuationdel'eau
natural_image
Simple line drawing of a basket with an arched top (no text or symbols)RACKENPLASTIQUE
natural_image
Line drawing of a 3D rectangular prism with no text or symbols| 1 | POSTURE AVANT |
| 2 | FIXER LE RACK MÉTALLIQUE SUR LE FILTRE |
| 3 | RACK EN MÉTAL |
| 4 | TAMIS À PELUCHES |
natural_image
Technical line drawing of a mechanical component with labeled section A (no text or symbols beyond label)natural_image
Line drawing of a hand pouring liquid from a container into a pipe (no text or symbols)natural_image
Simple line drawing of a door with an arrow pointing upward and a box inside, no text or symbols present.- Ouvrezlefiltreàpeluches.
natural_image
Simple line drawing of a mechanical component with an arrow indicating rotation (no text or symbols)natural_image
Line drawing of a hand cleaning a curved window frame (no text or symbols)natural_image
Simple line drawing of a cabinet with two doors and arrows indicating directions (no text or symbols)- Ouvrezlesverrousetretirezle condenseur.
flowchart
graph TD
    A["Lock Icon"] --> B["Arrow Up"]
    B --> C["Arrow Down"]
    C --> D["Arrow Left"]
    D --> E["Arrow Right"]
    E --> F["Arrow Left"]
    F --> G["Arrow Down"]
    G --> H["Arrow Right"]
    H --> I["Arrow Left"]
    I --> J["Arrow Down"]
    J --> K["Arrow Right"]
    K --> L["Arrow Left"]
    L --> M["Arrow Down"]
    M --> N["Arrow Right"]
    N --> O["Arrow Left"]
    O --> P["Arrow Down"]
    P --> Q["Arrow Right"]
    Q --> R["Arrow Left"]
    R --> S["Arrow Down"]
    S --> T["Arrow Right"]
    T --> U["Arrow Left"]
    U --> V["Arrow Down"]
    V --> W["Arrow Right"]
    W --> X["Arrow Left"]
    X --> Y["Arrow Down"]
    Y --> Z["Arrow Right"]
Aftersales service information on the leaflet inside this instruction manual.
| Änderungen vorbehalten | Subjecttoalterations | Sousréservede modification |
| STANDUPDATED | MISÀJOUR | |
| 18.07.202407/18/2024 | 18.07.2024 | |
- www.pkm-online.de
- 2.3Nivellierung
- KUNSTSTOFFRACK
- Index
- EC-DECLARATIONOFCONFORMITY
- Safetyinformation
- READTHESAFETYINFORMATIONANDSAFETYINSTRUCTIONS CAREFULLYBEFOREYOUOPERATETHEAPPLIANCEFORTHE FIRSTTIME.
- RISK OF FIRE!
- Signalwords
- Safetyinstructions
- DANGER!
- To reduce the risk of electrocution.
- WARNING!
- To reduce the risk of burns, electrocution, fire or injury to persons.
- CAUTION!
- NOTICE
- SAVETHESEINSTRUCTIONS.
- Installation
- Scopeofdelivery
- Unpacking /site
- Levelling
- 2.4Waterdrainhose
- 2.5Connectiontothemains
- Description of the appliance
- Heat pump dryer
- Front
- Back
- INDICATORS
- WARNINGINDICATOR《WATERCONTAINER》
- Thedryingprogrammes
- Generaltextilecaresymbols
- 4.2Max.load
- 4.3Weightofclothes:referencevalues
- Operation
- Beforethefirstuse
- Instructions forthedrying of laundry in a dryer
- NOTICE! Always observe the textile labels!
- Setting and starting of adrying programme
- HOWTOSETANDSTARTTHETIMEPROGRAMME
- 5.3.2Racks 21
- INSTALLATION OF THERACKS 22
- Special care
- HOW TO SET AND START SPECIAL CARE PROGRAMME
- 5.4Selectionoftheadditionalfunctions
- THE FOLLOWING ADDITIONAL FUNCTION SCANBESELECTED
- Selectionofthedryinglevel
- FUNCTION «DRYING LEVEL (Ger.: TROCKENSTUFE)»: SELECTIONOFTHEDRYINGLEVEL
- Selection of the programmed duration for time programmes
- FUNCTIONS«TIME+/-(Ger.:ZEIT+/-)»: INDIVIDUALSELECTIONOFTHEDRYINGTIME
- Delayed-programme-start
- FUNCTION «DELAYED-PROGRAMME-START (Ger.: STARTZEITVORWAHL)»: SELECTIONOFALATERPROGRAMMESTART
- EXAMPLE
- Activation of the crease protection
- FUNCTION «CREASE PROTECTION (Ger.: KNITTERSCHUTZ)»: SELECTION OF THE CREASE PROTECTION
- Activation/deactivation of the child's safety lock
- FUNCTION «CHILD SAFETY LOCK (Ger.: KINDERSICHERUNG)»: ACTIVATION/DEACTIVATIONOFTHECHILDSAFETYLOCK
- 5.5Endofadryingprogramme
- How to interrupt, cancel or change a drying programme
- HOWTOINTERRUPTADRYINGPROGRAMME
- HOWTOCANCELADRYINGPROGRAMMEPREMATURELY
- HOWTOCHANGEADRYINGPROGRAMME
- 6.Environmentalprotection
- Environmental protection: disposal
- Environmental protection: energysaving
- Cleaning and maintenance
- DETERGENTS
- HOUSING
- CONTROLPANEL
- DRUM
- DOOR/DOORSEALS
- Watercontainer
- WARNING! Condensed water is not drinkable!
- 7.2Cleaningoftheflufffilter
- Cleaningofthecondenser
- Errorcodes
- Theguaranteeclaimdoesnotcover:
- The validity of the guarantee will be determined if:
- Please provide the following information for the registration of your guaranteeclaim:
- SPECIALNOTE
- CE-DÉCLARATIONDECONFORMITÉ
- 2.3Nivellement
- 2.4Tuyaud'évacuationdel'eau
- RACKENPLASTIQUE
Brand : PKM
Model : WPTL10-14A++
Category : Dryer