
ATLVEKS88X10A+ - Fridge ATLANTIC - Free user manual and instructions
Find the device manual for free ATLVEKS88X10A+ ATLANTIC in PDF.

User questions about ATLVEKS88X10A+ ATLANTIC
0 question about this device. Answer the ones you know or ask your own.
Ask a new question about this device
Download the instructions for your Fridge in PDF format for free! Find your manual ATLVEKS88X10A+ - ATLANTIC and take your electronic device back in hand. On this page are published all the documents necessary for the use of your device. ATLVEKS88X10A+ by ATLANTIC.
USER MANUAL ATLVEKS88X10A+ ATLANTIC
natural_image
Cartoon illustration of a plug with an angry face and a lightning bolt, no text or symbols present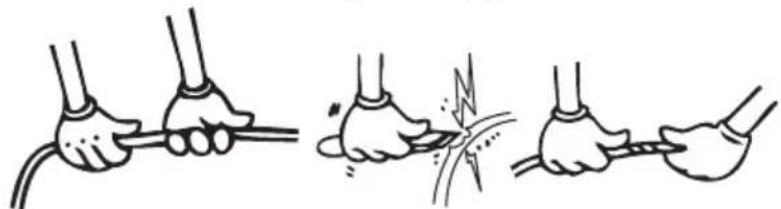
natural_image
Illustration of three hands performing a manual cable or wire manipulation technique (no text or symbols present)natural_image
Technical line drawing of a mechanical component with internal channels and mounting features (no text or symbols)natural_image
Simple line drawing of a structural beam or support with a small triangular notch at one end (no text or symbols)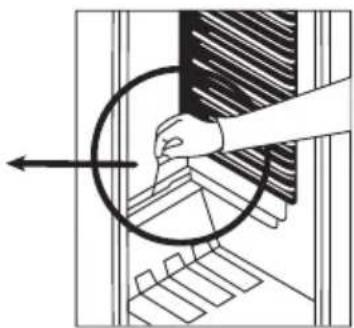
natural_image
Diagram showing a hand pressing down on a mechanical component with a circular arrow indicating direction (no text or symbols present)natural_image
Line drawing of a mechanical tool with internal components (no text or symbols)text_image
Technical diagram of a refrigerator with numbered parts for identificationtext_image
Diagram of a refrigerator with labeled parts and an inset showing internal structure with arrows and symbolsDE -13-
text_image
Abb. F Abb. G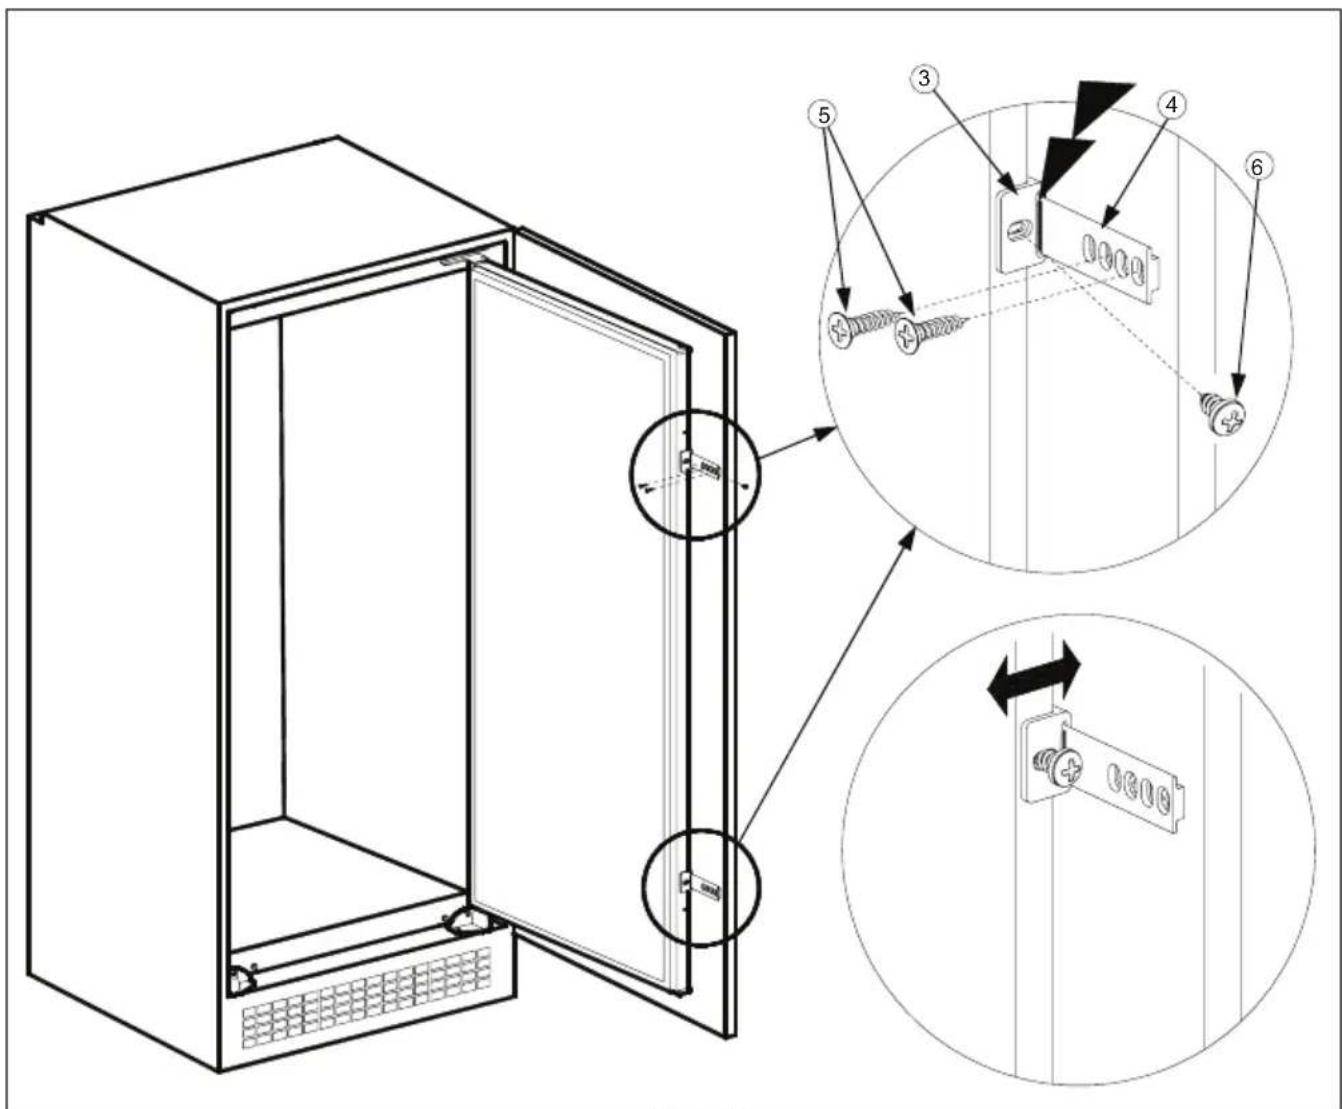
text_image
Technical diagram of a cabinet with labeled components and assembly steps, showing internal components and mounting details.Abb. H
text_image
14Abb. J
text_image
a 16 15 c b 14 18Abb. K
Old and out-of-order fridges 19
Safety warnings 19
Installing and operating your fridge 20
Before Using your Fridge 20
HOW TO OPERATE THE APPLIANCE 21
Thermostat Setting 21
FOOD STORAGE IN THE APPLIANCE 22
CLEANING AND MAINTENANCE 22
Defrosting the Refrigerator 23
Replacing the Light Bulb 23
BEFORE CALLING YOUR AFTER SALES SERVICE 24
Tips for saving energyTips for saving energy 25
PARTS OF THE APPLIANCE AND THE COMPARTMENTS.... 26
Product part list 27
Product fiche 27
-The operating instructions apply to several models. Differences may therefore occur.
PART 1. BEFORE USING THE APPLIANCE
General warnings
WARNING: Keep ventilation openings, in the appliance enclosure or in the built-in structure, clear of obstruction.
WARNING: Do not use mechanical devices or other means to accelerate the defrosting process, other than those recommended by the manufacturer.
WARNING: Do not use electrical appliances inside the food storage compartments of the appliance, unless they are of the type recommended by the manufacturer.
WARNING: Do not damage the refrigerant circuit.
WARNING: To avoid a hazard due to the instability of the appliance, it must be fixed in accordance with the instructions.
- This appliance is not intended for use at altitudes exceeding 2000 m.
- If your appliance uses R600a as a refrigerant – you can learn this information from the label on the cooler- you should be careful during shipment and montage to prevent your appliance’s cooler elements from being damaged. Although R600a is a environmental friendly and natural gas, as it is explosive, in case of a leakage to be occurred due to a damage in the cooler elements move your fridge from open flame or heat sources and ventilate the room where the appliance is located for a few minutes.
- While carrying and positioning the fridge, do not give damage to the cooler gas circuit.
- Do not store explosive substances such as aerosol cans with a flammable propellant in this appliance.
- This appliance is intended to be used in household and similar applications such as;
- staff kitchen areas in shops, offices and other working environments
- farm houses and by clients in hotels, motels and other residenti type environments
- bed and breakfast type environments;
- catering and similar non-retail applications
- If the socket does not match the refrigerator plug, it must be replaced by the manufacturer, its service agent or similar qualify persons in order to avoid a hazard.
- This appliance is not intended for use by persons (including children) with reduced physical, sensory or mental capabilities, or lack of experience and knowledge, unless they have been given supervision or instruction concerning use of the appliance by a person responsible for their safety. Children should be supervised to ensure that they do not play with the appliance.
- A specially grounded plug has been connected to the power cable of your refrigerator. This plug should be used with a specially grounded socket of 16 amperes. If there is no such socket in your house, please have it installed by an authorized electrician.
- This appliance can be used by children aged from 8 years and above and persons with reduced physical, sensory or mental capabilities or lack of experience and knowledge if they have been given supervision or instruction concerning use of the appliance in a safe way and understandt the hazard involved. Children shall not play with the appliance. Cleaning and user maintenance, shall not be made by children without supervision.
- If the supply cord is demaged, it must be replaced by the manufacturer, its service agent or similar qualified persons in order to avoid a hazard.
Old and out-of-order fridges
- If your old fridge has a lock, break or remove the lock before discarding it, because children may get trapped inside it and may cause an accident.
- Old fridges and freezers contain isolation material and refrigerant with CFC. Therefore, take care not to harm environment when you are discarding your old fridges.
natural_image
Symbol of a trash bin with crossed lines indicating no waste or restriction (no text or labels)Please ask your municipal authority about the disposal of the WEEE for the reuse, recycle and recovery purposes.
Notes:
- Please read the instruction manual carefully before installing and using your appliance. We are not responsible of the damage occurred due to misuse.
- Follow all instructions on your appliance and instruction manual, and keep this manual in a safe place to resolve the problems that may occur in the future.
- This appliance is produced to be used at houses and it can only be used in house and for the specified purposes. It is not suitable for commercial or common use. Such use will cause the guarantee of the appliance to be cancelled and our company will not be responsible for the losses to be occurred.
- This appliance is produced to be used in houses and it is only suitable for cooling / storing foods. It is not suitable for commercial or common use and/or for storing substances except for food. Our company is not responsible for the losses to be occurred in the contrary case.
Safety warnings
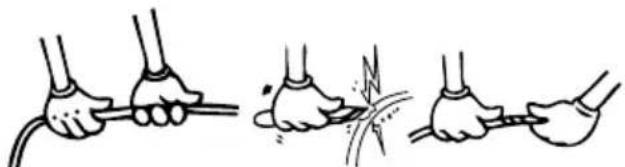
- Do not use multiple receptacles or extension cord.
- Do not plug in damaged, torn or old plugs.
- Do not pull, bend or damage the cord.
natural_image
Illustration of four hands performing a manual labor technique with tools and a tool, no text or symbols present.
- This appliance is designed for use by adults, do not allow children to play with the appliance or let them to hang over the door.
- Do not plug-in or out the plug from the receptacle with wet hands to prevent electrocution!
- Do not place explosive or flammable material in your fridge for your safety. Place drinks with higher alcohol amount vertically and by closing their necks tightly in the fridge department.
- Do not cover the body or top of fridge with lace. This affects the performance of your fridge.
natural_image
Cartoon illustration of a character peeking out of a door (no text or symbols)
natural_image
Illustration of a hand holding a prohibition sign, a smiling emoji, and a crossed-out hand (no text or symbols)
- Fix the accessories in the fridge during transportation to prevent damage to accessories.
Installing and operating your fridge
Before starting to use your fridge, you should pay attention to the following points:
- Operating voltage for your fridge is 220-240 V at 50Hz.
- Mains cord of your fridge has a grounded plug. This plug should be used with a grounded receptacle that has a 16 ampere fuse minimum. If you don't have a receptacle confirming with this, please have it done by a qualified electrician.
• We do not take the responsibility of the damages that occur due to ungrounded usage.
- Place your fridge in a place that it would not be exposed to direct sunlight.
- Your appliance should be at least 50 cm away from stoves, Gas ovens and heater cores, and should be at least 5 cm away from electrical ovens.
- Your fridge should never be used outdoors or left under the rain.
- When your fridge is placed next to a deep freezer, there should be at least 2 ~cm between them to prevent humidity on the outer surface.
- Do not place anything on your fridge, and install your fridge in a suitable place so that at least 15 cm is available on the upper side.
- The adjustable front legs should stabilized in an appropriate height to allow your fridge operate in a stable and proper way. You can adjust the legs by turning them clockwise (or in the opposite direction). This should be done before placing food in the fridge.
- Before using your fridge, wipe all parts with warm water added with a tea spoonful of sodium bicarbonate, and then rinse with clean water and dry. Place all parts after cleaning.
• Install the distance adjustment plastic (the part with black vanes at the rear) by turning it 90^ as shown in the figure to prevent the condenser from touching the wall.

text_image
KG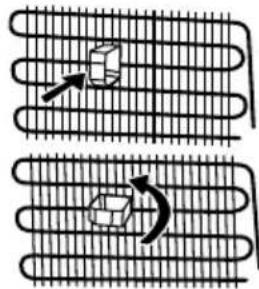
natural_image
Diagram showing two curved heat exchanger-like structures with internal components and directional arrows indicating flow or movement (no text or symbols)Before Using your Fridge
- When it is operated for the first time or after transportation, keep your fridge in the upright position for 3 hours and plug it on to allow efficient operation. Otherwise, you may damage the compressor.

natural_image
Simple line drawing of a hand holding a smiling square character (no text or symbols)- Your fridge may have a smell when it is operated for the first time; the smell will fade away when your fridge starts to cool.
PART 2. HOW TO OPERATE THE APPLIANCE
Thermostat Setting
natural_image
Technical line drawing of a handheld device with internal components and no visible text or symbols- Thermostat automatically regulates the inside temperature of the refrigerator. By rotating the knob from position 1 to 5, colder temperatures can be obtained.
- The “•” position shows thermostat is closed and no cooling is available.
- For short-term storage of food in the refrigerator, you can set the knob between minimum and medium position (1-3).
- For long-term storage of food in the refrigerator, you can set knob medium position.(3-4)
- Note that; the ambient temperature, temperature of the freshly stored food and how often the door is opened, affects the temperature in the refrigerator. If required, change the temperature setting.
- When you first switch on the appliance, you should ideally try to run it without any food in for 24 hours and not open the door. If you need to use it straight away, try not to put much food inside.
- If the unit is switched off or unplugged, you must allow at least 5 minutes before restarting in order not to damage the compressor.
- LARDERS (without star rating): Larders (coolers) have not any freezer compartment but can cool down to 4 - 6°C.
- This appliance is designed for use at an ambient temperature within the 16°C - 43°C range.
PART 3. FOOD STORAGE IN THE APPLIANCE
Refrigerator is used for storing fresh food for few days.
- Do not place food in direct contact with the rear wall of the refrigerator compartment. Leave some space around food to allow circulation of air.
- Do not place hot food or evaporating liquid in the refrigerator.
• Always store food in closed containers or wrapped.
- To reduce humidity and avoid formation of frost, never place liquids in unsealed containers in the refrigerator.
- Meat of all types, wrapped in packages, is recommended to be placed on the glass shelf just above the vegetable bin, where the air is colder.
- You can put the fruits and vegetables into crisper without packing.
- To avoid the cold air escaping, try not to open the door too often, and not leave the door open for a long time.
PART 4. CLEANING AND MAINTENANCE
- Disconnect the appliance from the power supply before cleaning.
- Do not pour water over the appliance.
natural_image
Simple line drawing of a hand reaching toward a box with a small object inside (no text or symbols)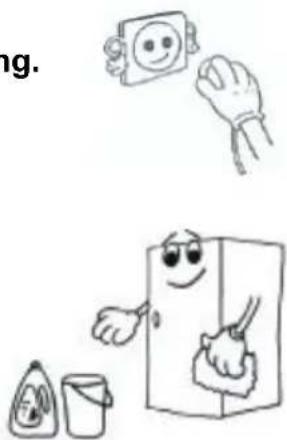
natural_image
Illustration of a smiling refrigerator, hand gesture, and food items (no text or symbols)- The refrigerator should be cleaned periodically using a solution of bicarbonate of soda and lukewarm water.
- Clean the accessories separately with soap and water. Do not put them in the dishwasher.

natural_image
Cartoon illustration of a smiling refrigerator with thumbs up and a bowl of food nearby (no text or symbols)- Do not use abrasive products, detergents or soaps. After washing, rinse with clean water and dry carefully. When the cleaning operations have been completed, reconnect the plug with dry hands.
natural_image
Cartoon illustration of a smiling rectangular character with arms and legs, accompanied by two smaller bottles (no text or symbols)Defrosting the Refrigerator
natural_image
Line drawing of a structural beam or support with a small circular hole at one end (no text or symbols)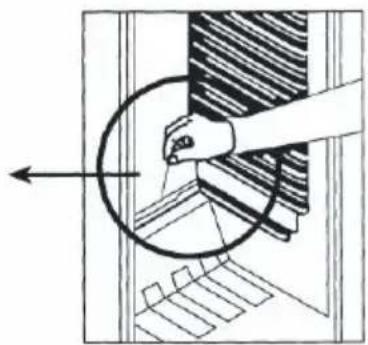
natural_image
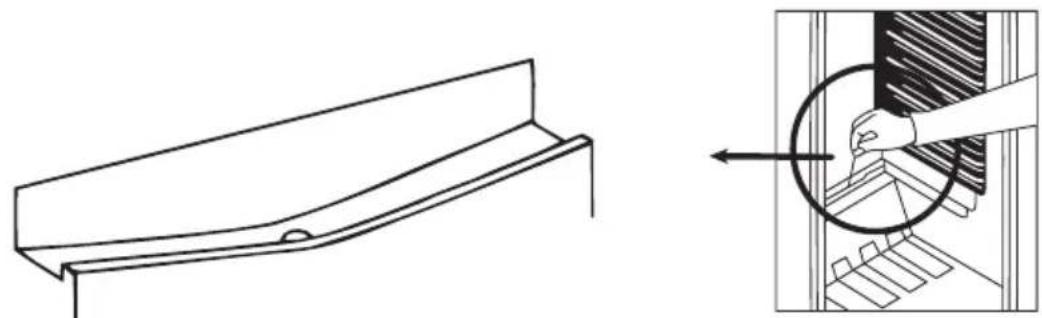
Diagram showing a hand holding a circular object over a window with patterned panels, no text or symbols present- Defrosting occurs automatically in refrigerator during operation; the defrost water is collected by the evaporating tray and evaporates automatically.
- The evaporating tray and the defrost water drain hole should be cleaned periodically with defrost drain plug to prevent the water from collecting on the bottom of the refrigerator instead of flowing out.
- You can also pour 12 glass of the water to drain hole to clean inside.
Replacing the Light Bulb
natural_image
Line drawing of a mechanical device with internal components and a circular feature (no text or symbols)When replacing the bulb of the refrigerator;
- Unplug the unit from the power supply,
- Press the hooks on the sides of the light cover top and remove the light cover
- Change the present light bulb with a new one of not more than 15 W.
- Replace the light cover and after waiting 5 minutes plug the unit.
Replacing LED Lighting
If your refrigerator has LED lighting contact the help desk as this should be changed by authorized personnel only.
PART 5. BEFORE CALLING YOUR AFTER SALES SERVICE
If your refrigerator is not working properly, it may be a minor problem, therefore check the following.
The appliance does not operate,
Check if;
• There is a power failure,
- The mains plug is not properly plugged in, or is loose
- The thermostat setting is on position “ • ”,
- The socket is defective. To check this, plug in another appliance that you know which is working into the same socket.
The appliance performs poorly;
Check if;
- You have overloaded the appliance,
• The doors are not closed perfectly, - There are not enough ventilation ducts on the kitchen unit as mentioned in the Installation Manual.
If there is noise;
The cooling gas which circulates in the refrigerator circuit may make a slight noise (bubbling sound) even when the compressor is not running. Do not worry, this is quite normal. If these sounds are different check if;
- The appliance is installed firmly as described in the Installation Manual.
- The objects on the appliance are vibrating.
If there is water in the lower part of the refrigerator;
Check if;
The drain hole for defrost water is not clogged (use defrost drain plug to clean the drain hole).
If your fridge is not cooling enough;
Your fridge is designed to operate in the ambient temperature intervals stated in the standards, according to the climate class stated in the information label. We do not recommend operating your fridge out of stated temperatures value limits in terms of cooling effectiveness.
| Climate Class Ambient Temperature (°C) | |
| T | Between 16 and 43 (°C) |
| ST Between 16 and 38 (°C) | |
| N | Between 16 and 32 (°C) |
| SN Between 10 and 32 (°C) | |
Recommendations
- In order to increase space and improve the appearance, the “cooling section” of refrigerators is positioned inside the back wall of the refrigerator compartment. When the compressor is working, this wall is covered with frost or water drops. Do not worry. This is quite normal. The appliance should be defrosted only if an excessively thick ice layer forms on the back wall.
- If the appliance is not used for a long time (for example during the summer holidays), set the thermostat knob to position “•”. Defrost and clean the refrigerator leaving the door open to prevent the formation of mildew and smell.
Tips for saving energyTips for saving energy
1- Install the appliance in a cool, well ventilated room, but not in direct sunlight and not near heat source (radiator, cooker.. etc.). Otherwise use an insulating plate.
2- Allow warm food and drinks to cool down outside the appliance.
3- When placing, drinks and liquids they must be covered. Otherwise humidity increases at the appliance. Therefore the working time gets longer. Also covering drinks and liquids helps preserve the smell and taste.
4- When placing food and drinks, open the appliance door as briefly as possible.
5- Keep the covers closed of any different temperature compartment in the appliance (crisper, chiller ...etc. ).
6- Door gasket must be clean and pliable. Replace gaskets if worn.
PARTS OF THE APPLIANCE AND THE COMPARTMENTS
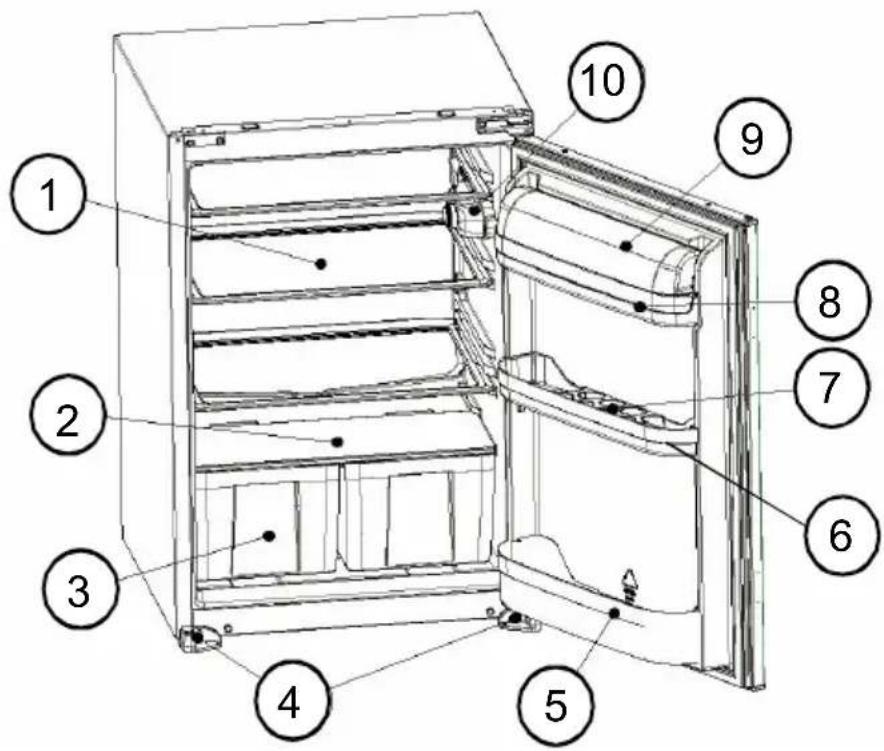
text_image
Labeled diagram of a refrigerator interior with numbered components for identificationThis presentation is only for information about the parts of the appliance. Parts may vary according to the appliance model.
1) REFRIGERATOR SHELF
2) CRISPER COVER(SAFETY GLASS)
3) CRISPER
4) LEFT&RIGHT FEET
5) BOTTLE SHELF
6) MIDDLE SHELF
7) EGG HOLDER
8) BUTTER SHELF
9) BUTTER SHELF COVER
10) THERMOSTAT BOX
Product part list
| Mark / Model | ATLANTIC |
| Fridge | |
| Glass shelves | 4 |
| Crisper | 2 |
| Door shelves | 3 |
| Egg tray | 1 |
| User manual / Installation book | Yes |
| Warranty documents | Yes |
Product fiche
| Brand / Product type | ATLANTIC | |
| Refrigerator | ||
| Model | ATLVEKS88X10A+ | |
| Energy class | A+ | |
| Annual energy consumption | kWh / Year | 121 |
| Total gross volume | Lt 135 | |
| Total net volume | Lt 134 | |
| Freezer net volume | Lt - | |
| Refrigerator net volume | Lt 134 | |
| Star rating | - | |
| Temperature rise time | Min. - | |
| Freezing capacity | kg / 24h - | |
| Climate class | T/N (16 °C - 43 °C) | |
| Voltage and Frequency | V / Hz 220-240V / 50Hz | |
| Dimensions (W x D x H) | mm | 540x545x875 |
- Between A(low consumption) to G (high consumption)
- Energy consumption of 121 kWh per year, calculated on the basis of results obtained in 24 hours under normalised test conditions. Real energy consumption depends on the conditions in which the equipment is used as well as where it is placed.
3.
(*) One Star storage is for the frozen food which keeps the inner temperature lower than -6 °C.
(**) Two Star storage is for the frozen food which keeps the inner temperature lower than -12 °C.
(***) Tree Star storage is for the frozen food which keeps the inner temperature lower than -18 °C.
(****) FOUR Star storage is for the freezing the food from +18 TO - 18 °C. It also keeps the foods under 3 star storage conditions.
- Your fridge is designed to operate in the ambient temperature intervals stated in the standards, according to the climate class stated in the information label. We do not recommend operating your fridge out of stated temperatures value limits in terms of cooling effectiveness.
| Climate Class Ambient Temperature (°C) | |
| T | Between 16 and 43 (°C) |
| ST Between 16 and 38 (°C) | |
| N Between 16 and 32 (°C) | |
| SN | Between 10 and 32 (°C) |
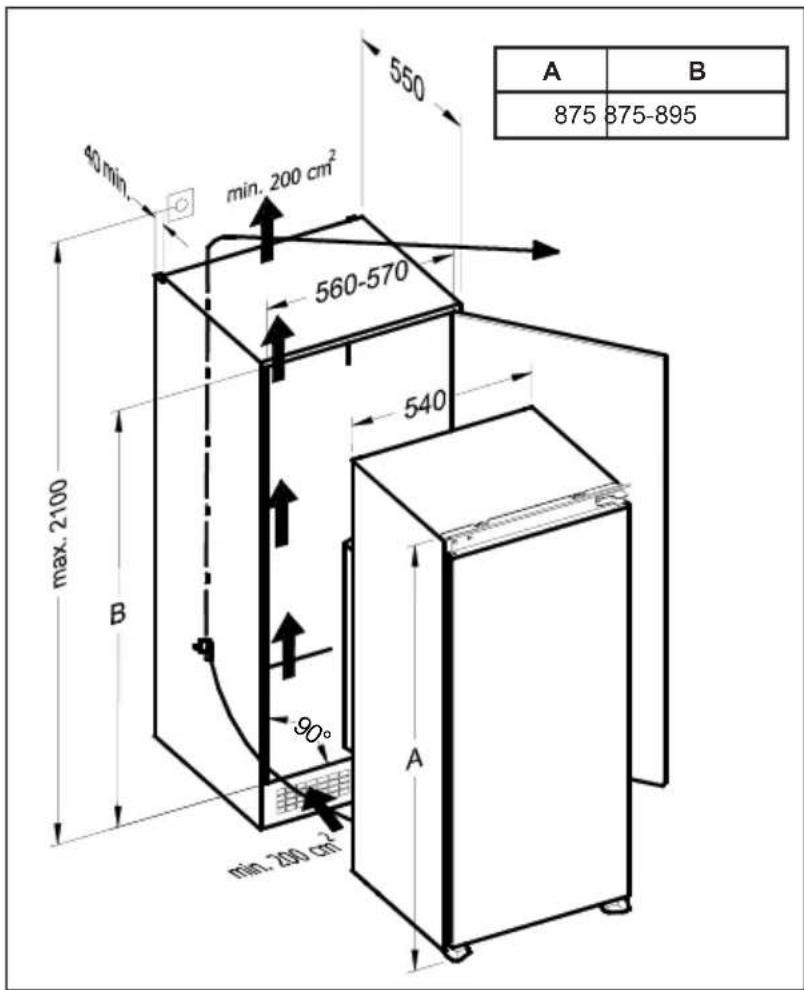
Installation instructions
! Before installation, read the instructions carefully.
! Fit the refrigerator/freezer in stable kitchen units only.
! If necessary, reverse the door according to instructions.
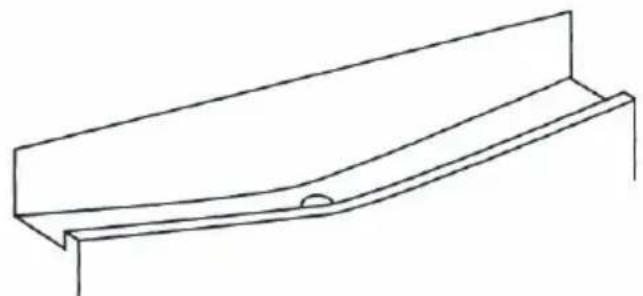
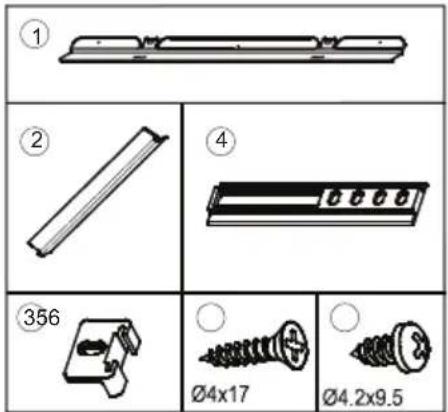
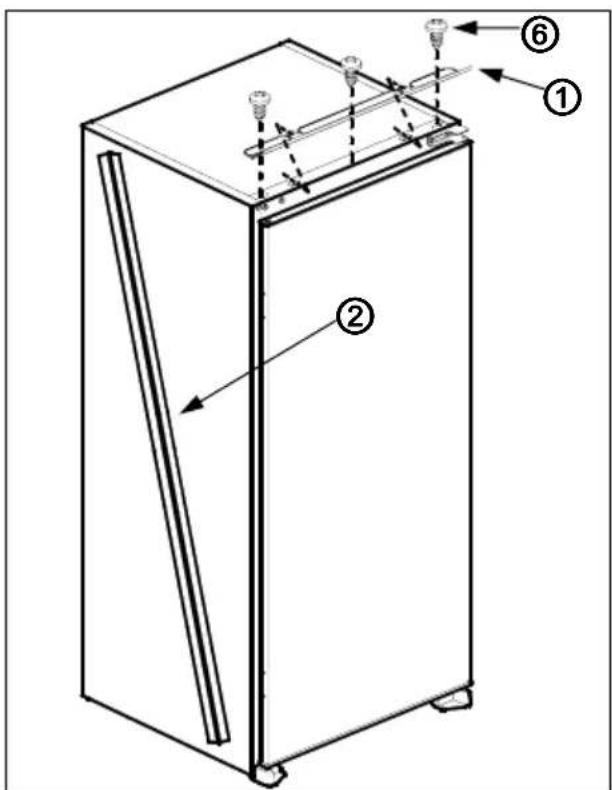
1. See fig.A for the necessary attachment components.
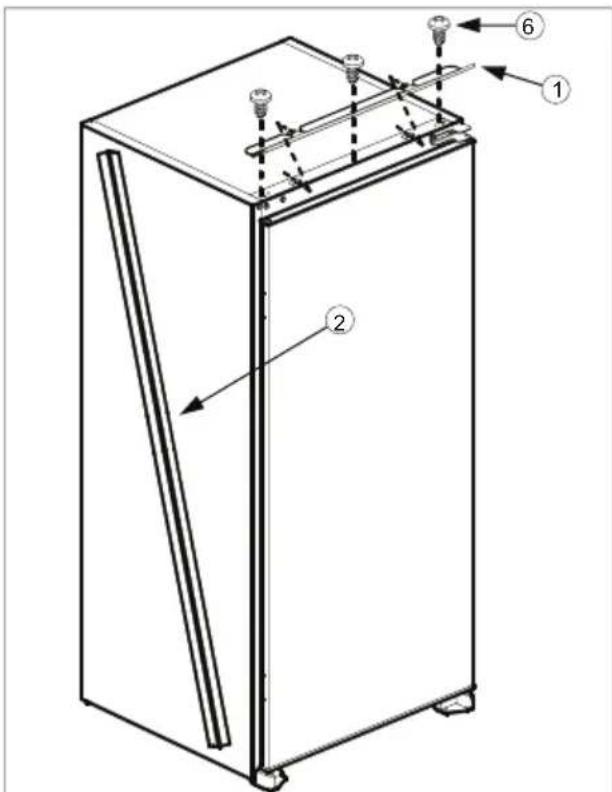
2. Insert trim flap^1 into slot and screw by screws^6 . (fig.D)
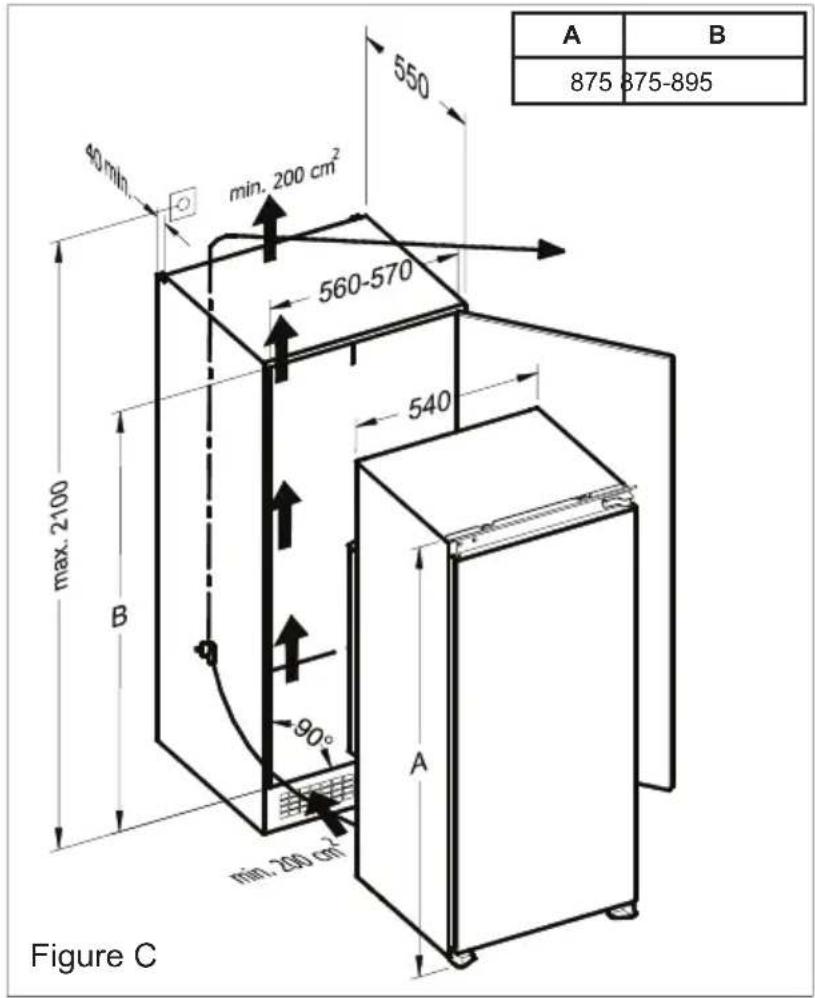
3. Pass the power cord through ventilation shaft and position it so that the appliance could be easily plugged in once it has been installed. (fig.B - fig.C)
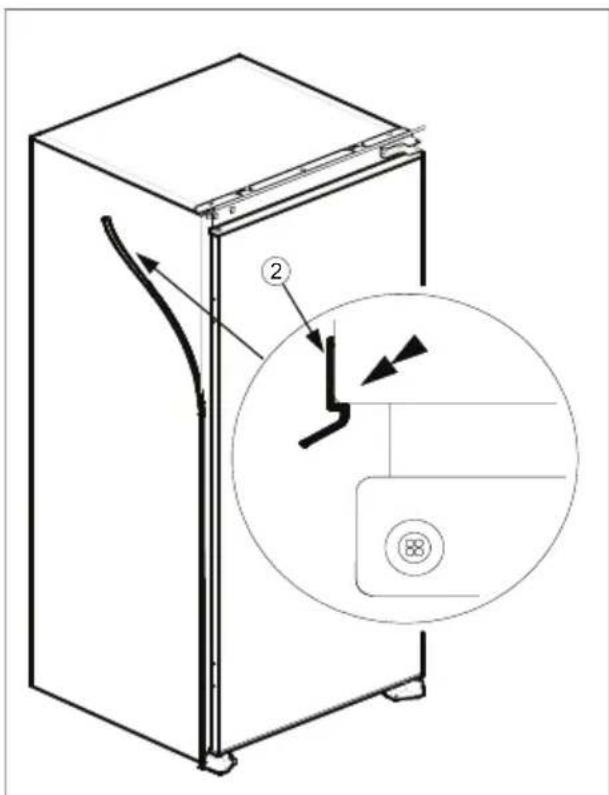
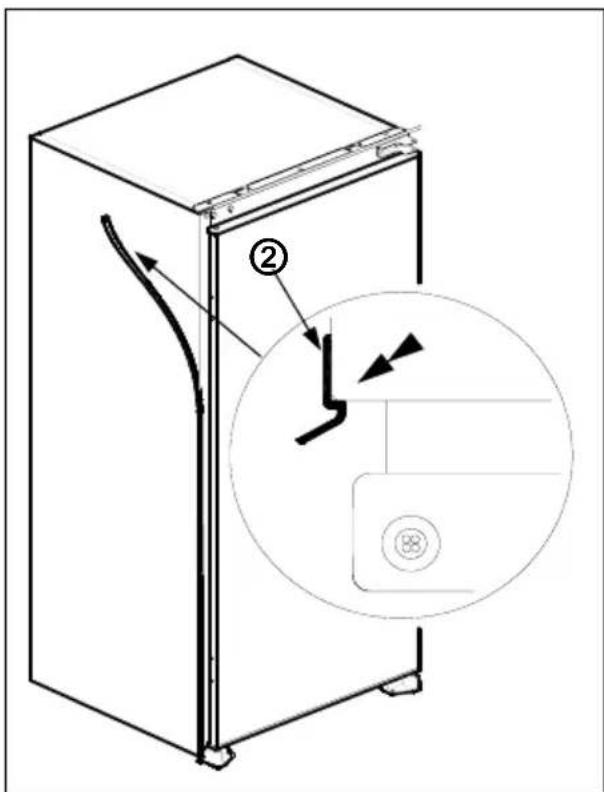
4. Take out the trim gasket located on the side panel of the appliance and stick it on reverse side of the door hinges of the appliance. (fig.D - fig.E)
5. Raise the appliance and slide into the kitchen unit.
6. Push the appliance to the reverse side of the door hinges providing that the trim gasket covers the space between the appliance and the kitchen unit.
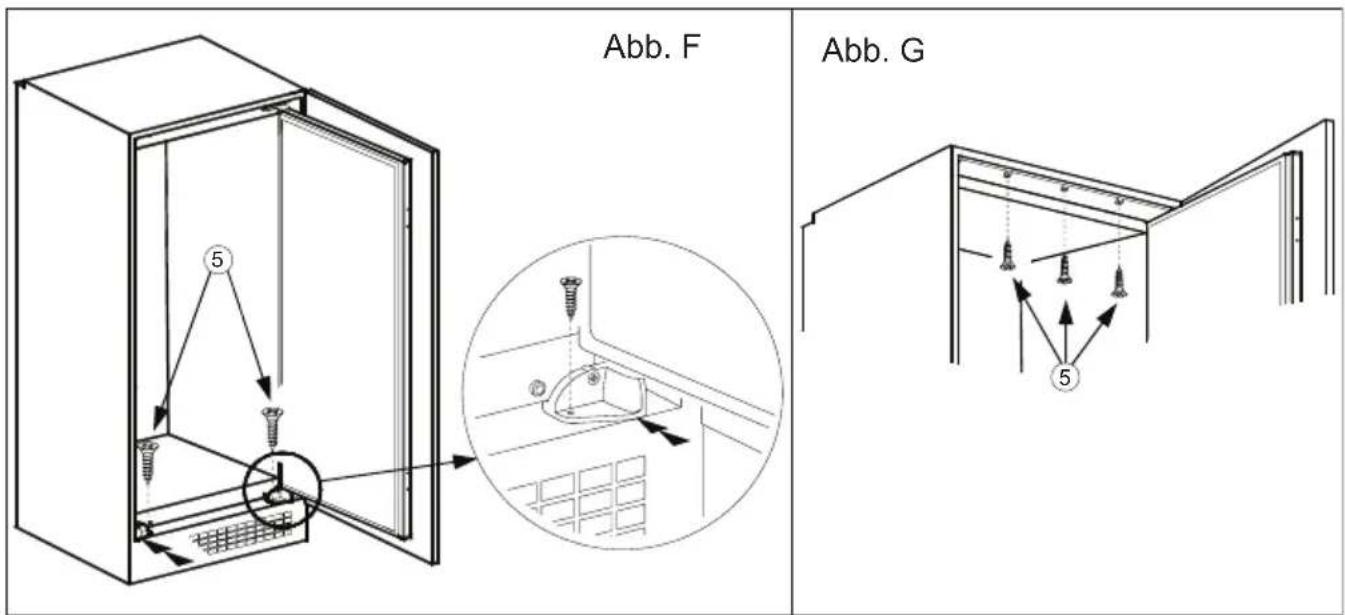
7. Align the front feet with front surface of the kitchen unit. (fig.F)
8. Screw the front feet by using screws ^5 . (fig.F)
9. Screw trim flap ^1 to kitchen unit using screws ^5 . (fig.G)
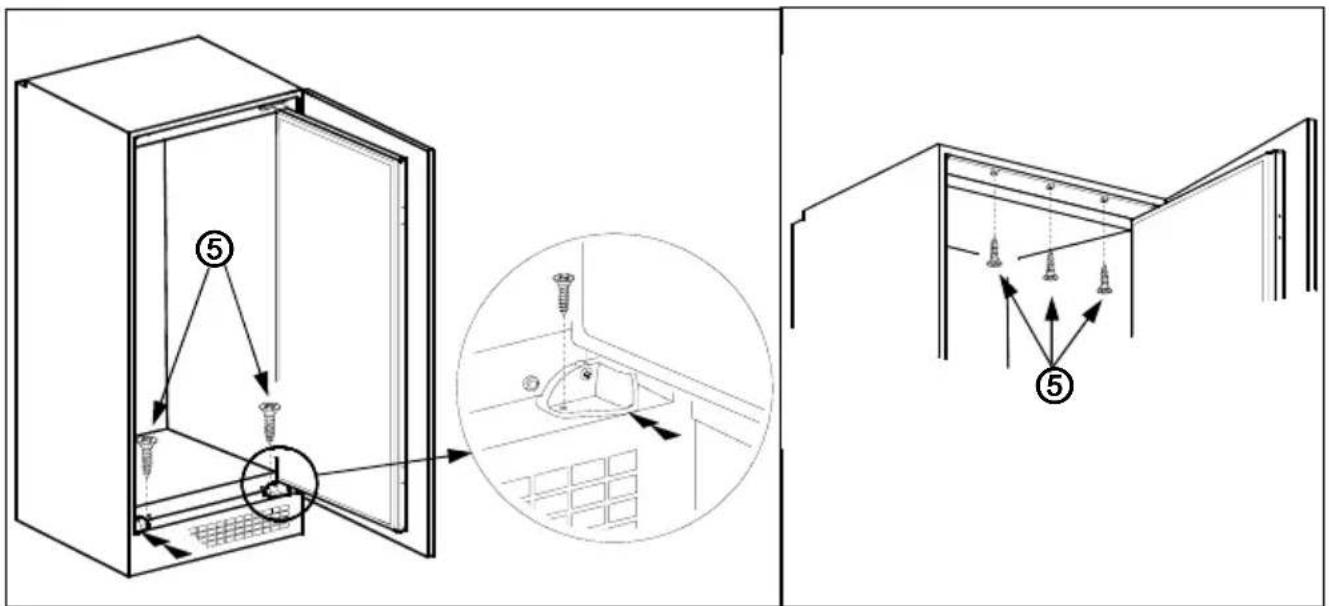
10. Screw guides ^3 to appliance door with screws ^6 . (fig.H)
11. Lean appliance door to unit door as it is opened at right angle.
12. Slide rails ^4 into guides ^3 aligning the groove. (fig.H)
13. Screw the rails ^4 to the unit door with screws ^5 . (fig.H)
14. Set 1\~2 mm gap on handle side between unit itself and unit door by adjusting guides ^3 . That is vital for appliance performance. (fig.H)
text_image
① ② ④ ③56 Ø4x17 Ø4.2x9.5Figure A
text_image
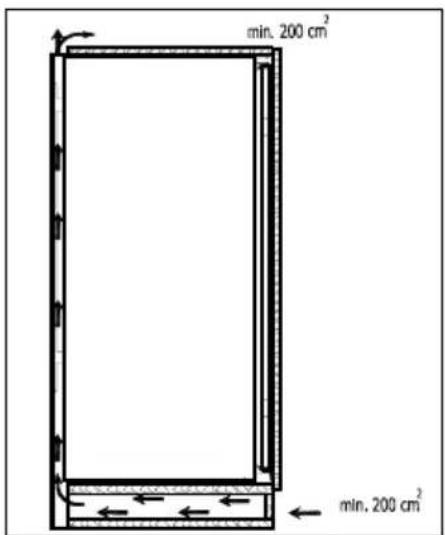
A B 875 875-895 550 40 min min. 200 cm² 560-570 540 max. 2100 B 90° min. 200 cm² Figure C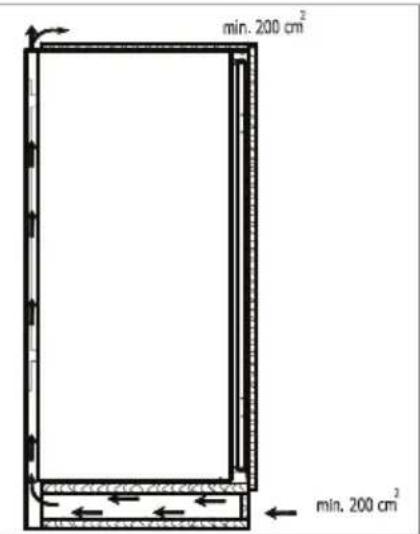
text_image
min. 200 cm² min. 200 cm²Figure B
text_image
Technical diagram of a refrigerator with labeled parts and numbered annotationsFigure D Figure E
text_image
Technical diagram of a refrigerator with labeled parts and an inset showing internal structure, likely for assembly or cleaning instructions.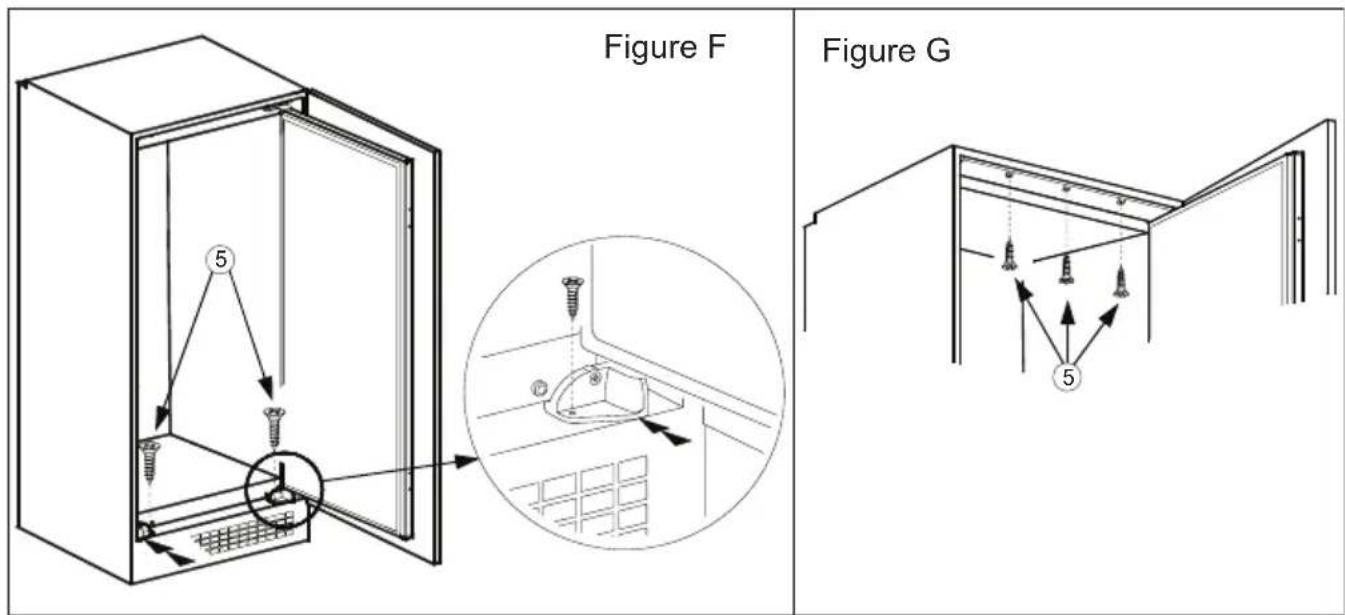
text_image
Figure F Figure G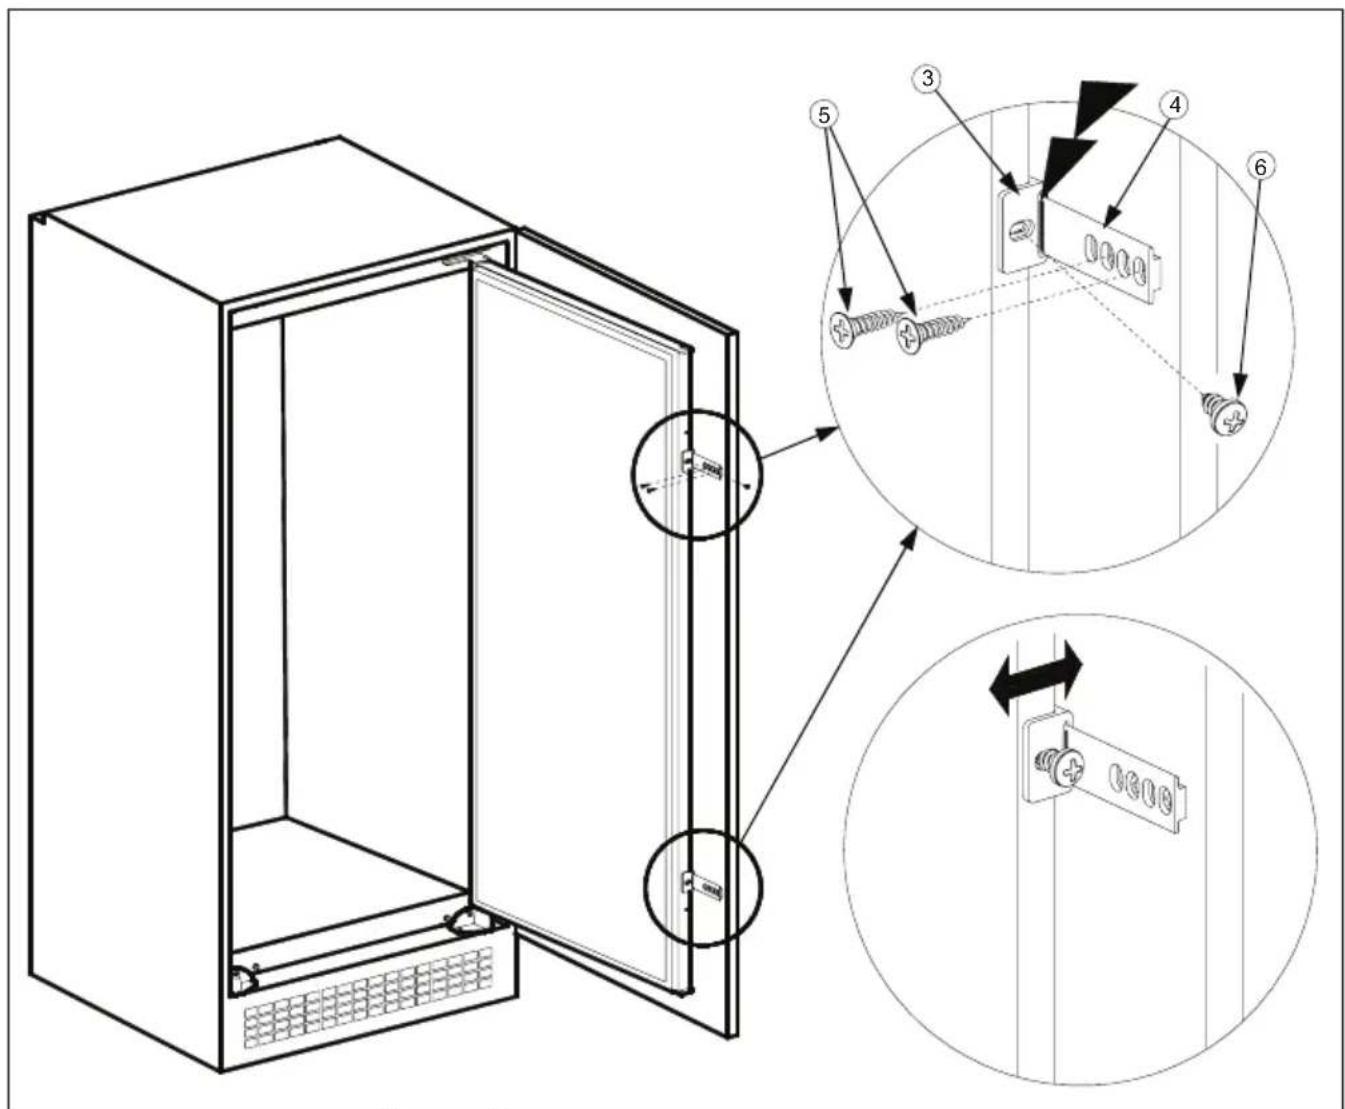
text_image
Technical diagram of a cabinet with labeled components and assembly steps, showing internal components and mounting details.Figure H
text_image
13 11 12 Figure J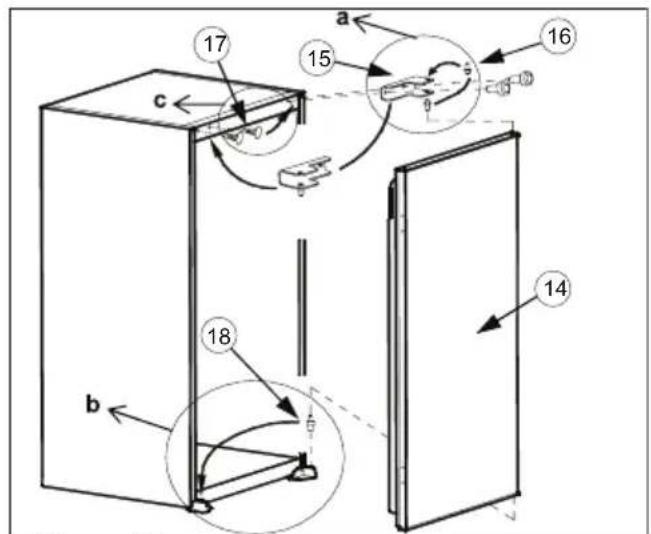
text_image
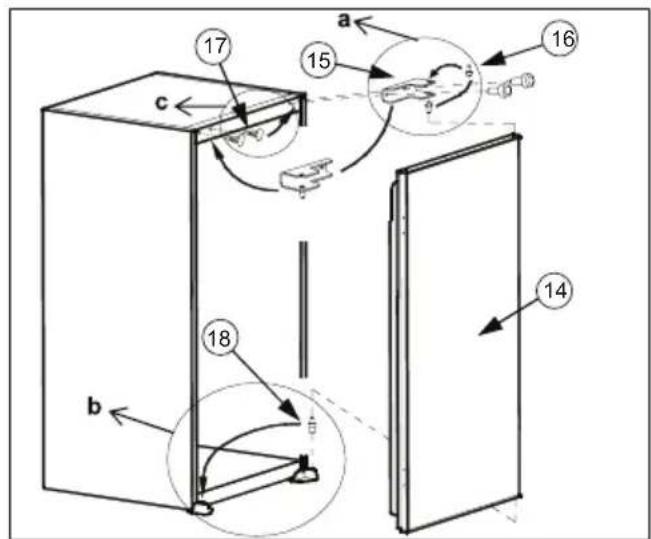
17 15 a 16 c 18 b 14Figure K
Door reversing
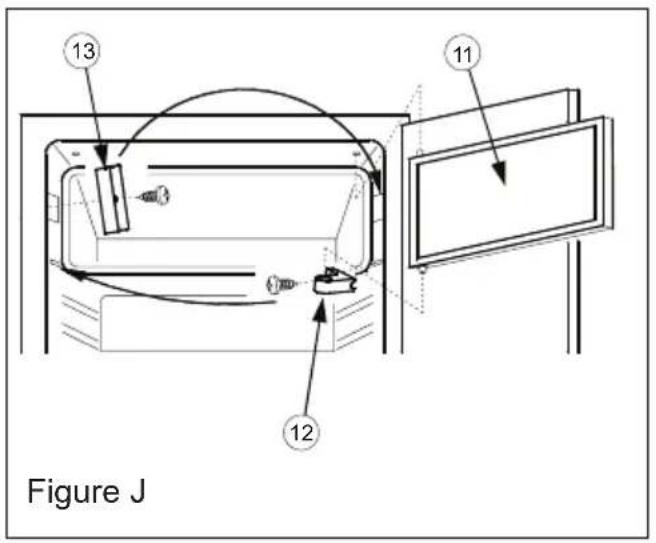
- Open appliance door ^14 and freezer door ^11 . (fig.J)
- Disassemble freezer door hinge ^12 and take freezer door ^11 to safe place. (fig.J)
- Disassemble freezer door lock ^5 and assemble it to opposite side.(fig.J)
- Position freezer door ^1 to keep handle close to freezer door lock ^13 and insert its upper axes into cabinet hole / lower axes into freezer door hinge ^12 and then assemble freezer door hinge ^12 to opposite side of original position. (fig.J)
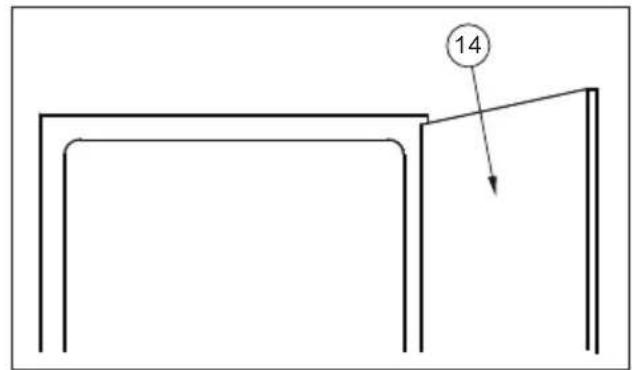
- Disassemble door hinge ^15 and take appliance door ^14 to safe place. (fig.K)
- Unscrew door hinge pin ^16 and screw it to opposite side firmly and take to safe place. (fig.K.a)
- Take door lower pin ^18 to opposite side. (fig.K.b)
- Take hole plugs ^17 to opposite side. (fig.K.c)
- Place appliance door ^14 over door lower pin18 and insert door hinge pin ^16 into hinge hole on appliance door ^14 and then screw door hinge ^15 firmly onto opposite side of original position. (fig.K)
Sommaire
INSTRUCTIONS PREALABLES 34
TRANSPORT ET DEPLACEMENT 42
AVANT D'APPELER LE SERVICE APRES VENTE.... 42
ELEMENTS ET COMPARTIMENTS DE L'APPAREIL....44
natural_image
Pure mechanical diagram showing a bin with cross-bracing and no text or symbolsnatural_image
Illustration showing three different techniques for using a tool, with no visible text or symbols.natural_image
Cartoon illustration of an electric plug with a sad face and a lightning bolt (no text or symbols)
natural_image
Cartoon illustration of a person opening a door with arms and legs, no text or symbols present
natural_image
Illustration of a hand holding a smiling face, a crossed-out hand gesture, and a prohibition symbol (no text or labels)
natural_image
Simple line drawing of a bottle and container with a spray gun, no text or symbols present
natural_image
Simple line drawing of a hand holding a smiling emoji icon next to a square (no text or symbols)natural_image
Cartoon illustration of a refrigerator with a 'KG' on top and a door-shaped refrigerator with a smiling face and pestle (no text or symbols)natural_image
Technical line drawing of a mechanical component with internal channels and a central circular feature (no text or symbols)natural_image
Cartoon illustration of a smiling rectangular character and two small figurines (no text or symbols)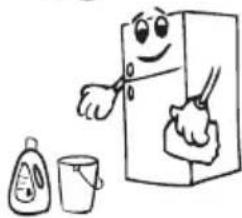
natural_image
Cartoon illustration of a smiling refrigerator with hands cleaning it, accompanied by a bottle and cup (no text or symbols)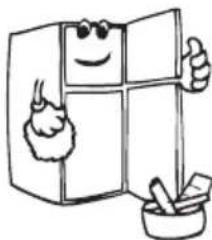
natural_image
Cartoon illustration of a smiling refrigerator with sunglasses and thumbs up, accompanied by a mortar and pestle (no text or symbols)Dégivrage
natural_image
Technical line drawing of a structural component with an inset showing a hand holding a circular object (no text or symbols present)natural_image
Line drawing of a mechanical tool with ribbed and circular components (no text or symbols)TRANSPORT ET DEPLACEMENT
natural_image
Simple line drawing of two children playing a game with a long rectangular block (no text or symbols)text_image
Labeled diagram of a refrigerator interior with numbered parts for identificationtext_image
① ② ④ ③ ⑤ ⑥ Ø4x17 Ø4.2x9.5Figure. A
text_image
A B 875 875-895 40 min. min. 200 cm² 550 560-570 540 max. 2100 B 90° min. 200 cm² AFigure C
text_image
min. 200 cm² min. 200 cm²Figure B
text_image
Technical diagram of a refrigerator with numbered components and labeled partsFigure D
text_image
Diagram of a refrigerator with labeled parts and a magnified inset showing internal structure with arrows and a circled number ⑧.Figure 2017.5
text_image
Technical diagram showing installation of a cabinet with screw fasteners and a close-up of the interior wall detail, labeled with components ⑤.Figure F
Figure G
text_image
Technical diagram of a refrigerator with labeled parts and exploded view, showing internal components and mounting details.Figure H
text_image
Technical diagram of a refrigerator with numbered parts and directional arrows indicating movement or assembly.Figure J
text_image
17 15 a 16 c 18 b 14 3 N > Y J HFigure K