37300830 - Battery charger DCU - Free user manual and instructions
Find the device manual for free 37300830 DCU in PDF.

User questions about 37300830 DCU
0 question about this device. Answer the ones you know or ask your own.
Ask a new question about this device
Download the instructions for your Battery charger in PDF format for free! Find your manual 37300830 - DCU and take your electronic device back in hand. On this page are published all the documents necessary for the use of your device. 37300830 by DCU.
USER MANUAL 37300830 DCU
text_image
QR code image containing encoded data, no visible human-readable textManual de usuario 3
User manual 10
Manual d'usuari 17
Mode d'emploi 24
natural_image
Digital clock display with time and angle settings (no visible text or symbols on the device itself)natural_image
Simple line drawing of a rectangular block (no text or symbols)Manual x1

natural_image
Pure diagram of a coiled cable or connector with no text, numbers, or symbolsCable de carga USB-A a USB-C x1
If the alarm clock, wireless charger, clock, and night light are required to work at the same time, please be sure to use a Quick Charge 3.0 or above power adapter or Power Delivery adapter; when powered by 5V voltage, the wireless charger only supports 5W load or clock operation.
Packing List
text_image
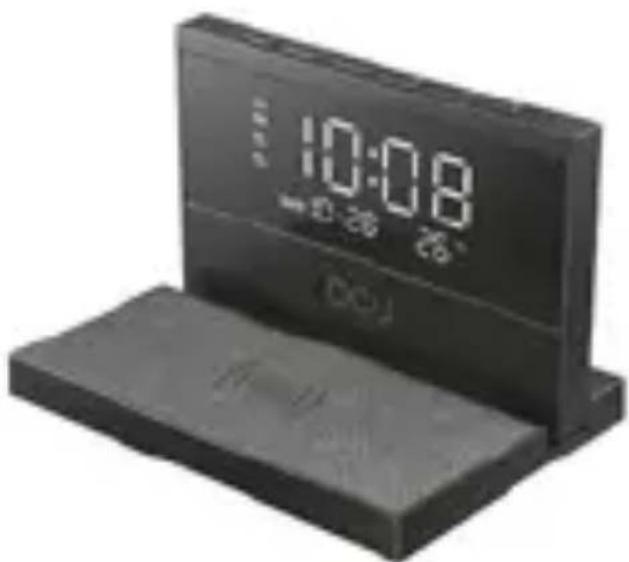
10:08 DCUWireless Charger with Alarm Clock & Night Light x1
natural_image
Simple line drawing of a rectangular shape with rounded corners (no text or symbols)User Manual x1

natural_image
Pure diagram of a coiled cable or wire with no text, numbers, or symbolsUSB-A to USB-C charging cable x1
Product Structure
text_image
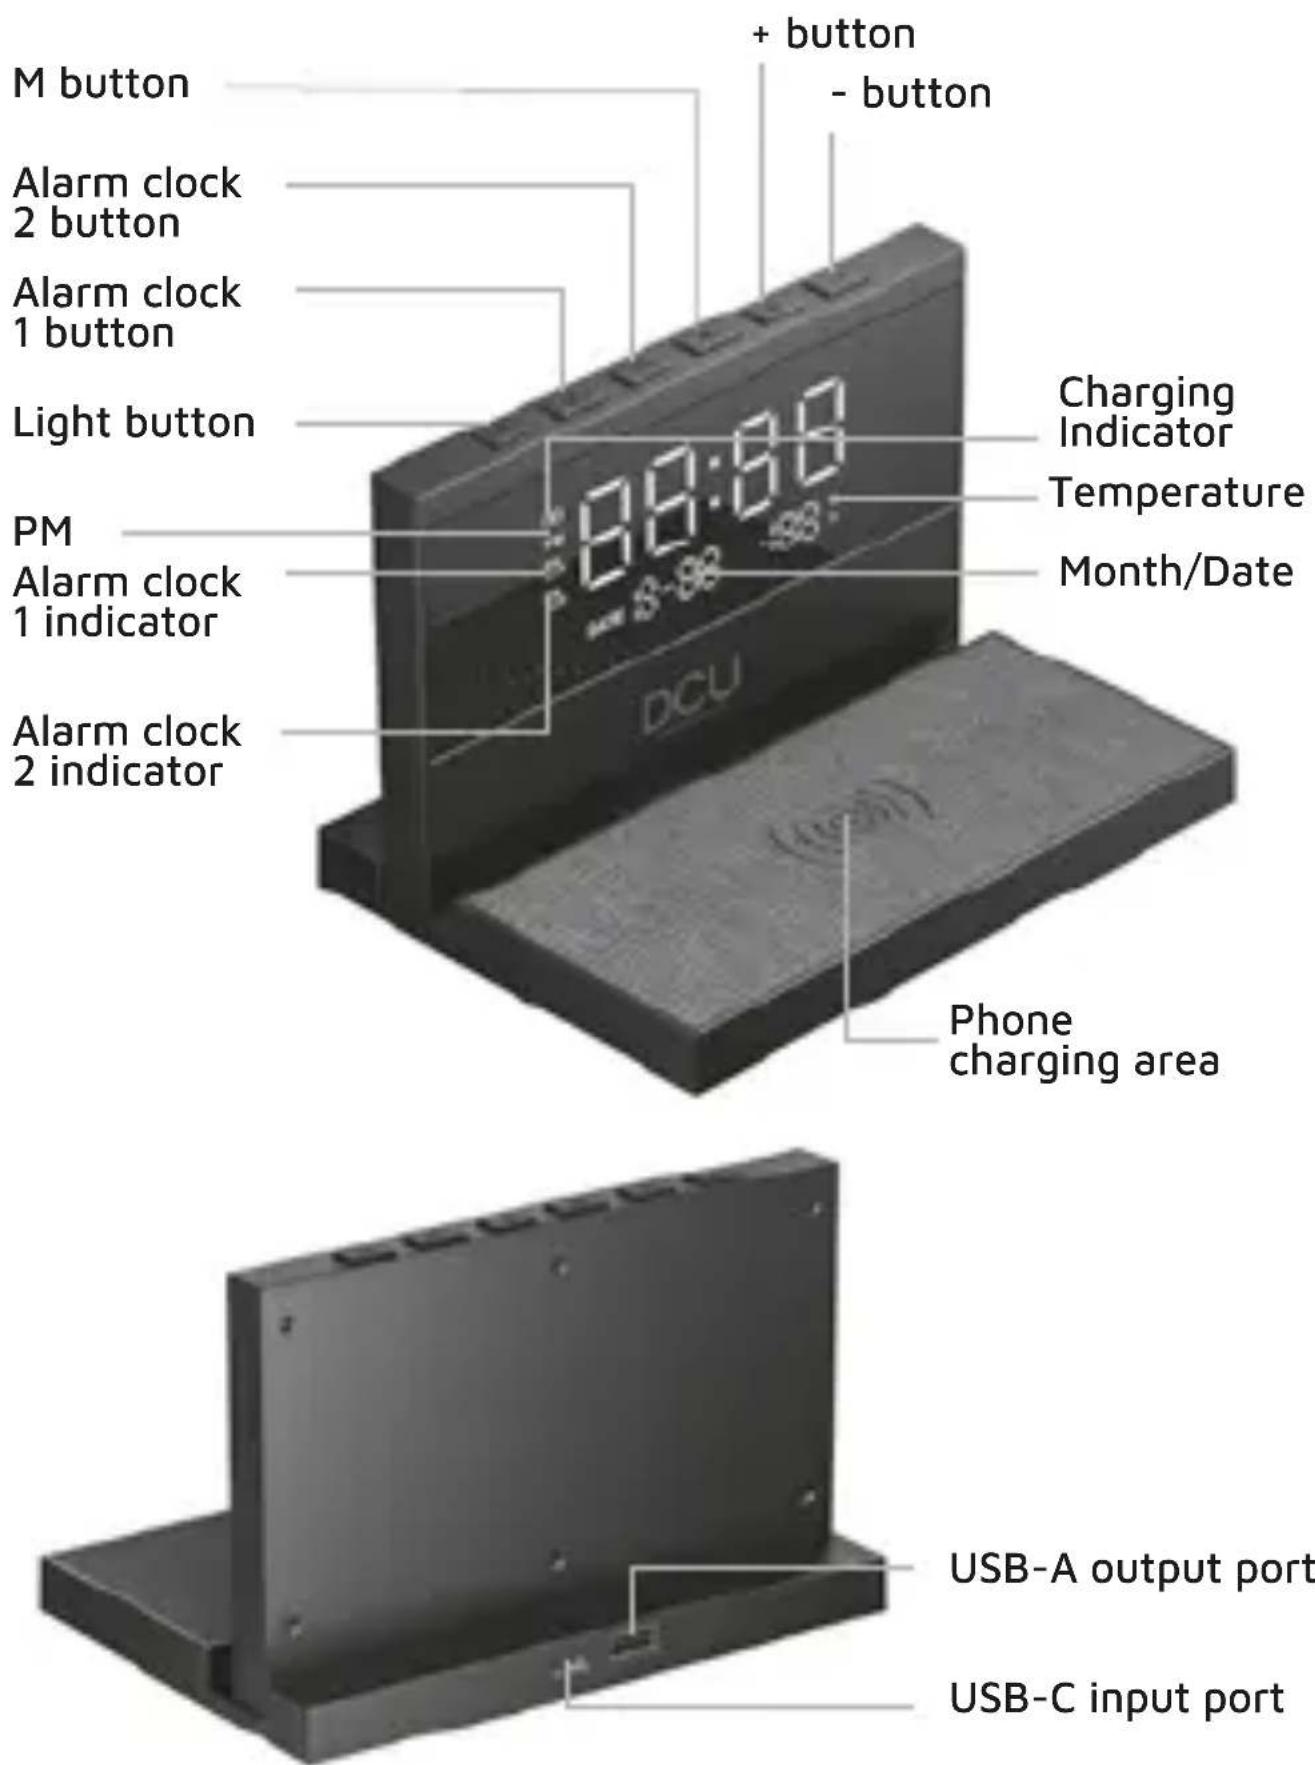
M button + button - button Alarm clock 2 button Alarm clock 1 button Light button PM Alarm clock 1 indicator Alarm clock 2 indicator Charging Indicator Temperature Month/Date DCU Phone charging area USB-A output port USB-C input portSpecification:
Product Model: 37300830
Material: ABS
Input: 5V-3A, 9V-3A, 12V-2A
Wireless output: 15W (compatible with 10W, 7.5W and 5W)
USB-A Output: 5V-1A (max)
Size: 168*118.5*110.5mm
Weight: 280g±5g
Instructions for Use:
1. Power Connection:
1.1 Plug the USB-A end of cable into the power adapter while plug USB-C end into the product.
1.2 The product enters the normal working state, it enters the standby state after all the display lights on.
1.3 USB-A port can provide 5V-1A output
2. Wireless Charging:
2.1 Output power: 15W (compatible with 10W, 7.5W and 5W)
2.2 Charging indicator:
Power on: Flash twice and then turn off
Charging: light stays on
Fully charged: light off (Some phones do not support this function)
FOD: light ashes
3. Clock Setting:
3.1 Button Functions:
6 buttons: Light button, Alarm clock 1 button, Alarm
clock 2 button, M, +, -
3.2 Time System Setting
Double click M button to setup 12H time system and 24H time system. In the 12H time system, PM will be displayed after 12:00.
3.3 Time & Calendar setting
3.3.1 Press and hold M button to enter the time setting for HOUR, adjust the value with "+/-" button; press and hold the "+/-" button to adjust continuously.
3.3.2 After nishing the Hour setting, click M button to enter the time setting for MINUTE,
adjust the value with "+/-" button; press and hold the "+/-" button to adjust continuously.
3.3.3 Do not exit after time setting complete, click M button once to set the calendar (YEAR > MONTH > DAY). As per the above steps, click "+/-" to adjust the YEAR, MONTH and DAY, press and hold the "+/-" button to adjust continuously, the adjustment sequence is YEAR, MONTH and DAY.
3.3.4 After nishing the DAY setting, press once to exit the setting and enter normal standby mode, it also will automatically exit after 5 seconds.
3.4 Alarm Clock Setting
3.4.1 Click the "Alarm clock 1" button to turn ON or OFF the Alarm clock 1; Click the "Alarm clock 2" button to turn ON or OFF the Alarm clock 2, when the alarm is turned ON/OFF, the corresponding Alarm clock indicator will be ON/OFF in the screen.
3.4.2 Press and hold "Alarm clock 1" or "Alarm clock 2" button to enter the HOUR setting for Alarm clock,
adjust the value with "+/-" button; press and hold the "+/-"button to adjust continuously.
3.4.3 After nishing the Hour setting, click "Alarm clock" button once to enter the setting for MINUTE, adjust the value with "+/-" button; press and hold the "+/-" button to adjust continuously.
3.4.4 After the MINUTE setting done, click the "Alarm clock" button to complete the setting, when the Alarm clock icon is constant on, it means the Alarm clock is activated.
3.4.5 Once the Alarm clock is buzzing, if nothing is done, it will automatically turn OFF after 3 minutes of buzzing.
3.4.6 Press any button to enter Snooze Mode when the Alarm clock is buzzing, Alarm clock will buzz again after 5 minutes, the Alarm clock indicator ashes during the snooze. Double click any button to cancel the snooze function under Snooze mode, or press and hold "Alarm clock 1"/ "Alarm clock 2" button to turn off the corresponding Alarm clock 1 or Alarm clock 2, the alarm clock setting for next day is still valid.
3.4.7 The clock brightness can be adjusted manually in 5 levels, adjust the brightness with "+/-" button, after connecting to power, the clock keep the max brightness by default. Click the "-" button once to reduce the brightness by one level, click the "+" button once to increase the brightness by one level; the last click to turn off the light on display.
3.4.8 In the standby state, double click "Alarm clock 1" or "Alarm clock 2" button to check the corresponding Alarm clock time. It will not be displayed if Alarm clock is not set.
4. Temperature Setting:
By default, the temperature display will be in Fahrenheit, double press the "+/-"to change the temperature from Celsius to Fahrenheit or from Fahrenheit to Celsius.
5. Nightlight Setting:
5.1 "Light" button can switch the night light manually in 8 levels of colors: RGB gradient cycling, yellow, light green, green, light blue, red, blue, purple, and then light off.
5.2 Press and hold the "light" button to turn off the night light
6. Memory function:
After the power is disconnected, the internal button battery can be used to memorize the clock setting, and the clock does not need to be reset after the power is connected again
Service and warranty:
- The warranty covers quality problems caused by manufacturing, materials or design within the first 3 years of purchase and battery and charger problems within the first 6 months.
- The guarantee does not cover damage caused by misuse of the product or by the following cases:
1). Disassemble or reassemble the product.
2). Damage caused by falls
3). Any man-made damage or misuse (such as: getting water into it, external force causing it to break, scratch damage to peripheral components, etc.)
4) Damages caused by water are outside the scope of the guarantee.
-
When requesting the warranty, you must provide the purchase receipt with the place and date of purchase.
-
If you have problems using the product, please don't hesitate to contact our customer service:
DCU Tecnologic customer service:
www.dcutec.com
Email: info@dcutec.com
Telephone: +34 972244105
Warning:
Please do not disassemble this product by yourself
Please do not place this product near heat sources
Please do not place the product near water or in wet places.
Please do not place it too close to a magnetic card with a magnetic stripe or chip (ID card, bank card, etc.) to avoid failure of the magnetic card.
Please keep the distance between implanted medical devices (pacemakers, cochlear implants, etc.) and wireless chargers >20CM to avoid potential interference with medical devices.
Children should be supervised to ensure that they do not play with the wireless charger as a toy to avoid unnecessary accidents.
If you need to clean the charger, please make sure it is disconnected from the power supply.
IMPORTANT! :
natural_image
Digital nightstand with digital display showing 10:08, 26°C, and 0-28°C (no text or symbols on device body)natural_image
Simple line drawing of a rectangular shape with rounded corners (no text or symbols)Manual x1

natural_image
Pure diagram of a coiled cable or wire with no text, numbers, or symbolsnatural_image
Digital 3D desk with LCD display showing time, battery, and status (no readable text or symbols)natural_image
Simple line drawing of a rectangular shape with rounded corners (no text or symbols)Mode d'emploi x1
natural_image
Pure diagram of a coiled cable or wire with no text, numbers, or symbolsService client DCU Tecnologic :
www.dcutec.com
Email: info@dcutec.com
natural_image
Digital nightstand with digital clock showing 10:08, no visible text or symbols on the device bodynatural_image
Simple line drawing of a rectangular shape with rounded corners (no text or symbols)Manual x1
natural_image
Pure diagram of a coiled cable or connector with no text, numbers, or symbolsCabo de carregamento USB-A para USB-C x1
Designed in BCN / Made in PRC B55166847