
Coraille-E - Wheelchair Vermeiren - Free user manual and instructions
Find the device manual for free Coraille-E Vermeiren in PDF.

| Product type | Electric shell wheelchair |
| Brand | Vermeiren |
| Model | Coraille-E |
| Intended use | Indoor, flat and level floors, for one person |
| Maximum user weight | 120 kg |
| Total weight | 39.0 kg |
| Weight of heaviest part (without footplate) | 36.7 kg |
| Seat width | 380 mm - 400 mm - 420 mm - 440 mm - 480 mm |
| Seat depth | 440 mm - 460 mm - 480 mm |
| Seat cushion height | 60 mm - 80 mm - 100 mm |
| Seat tilt angle | 0° to +40°, continuously adjustable (electric) |
| Footplate angle | 0° to +56°, continuously adjustable |
| Power supply | Battery (via electric remote) |
| Overall dimensions (length) | 1090 mm to 1640 mm |
| Overall dimensions (width) | 710 mm |
| Overall dimensions (height) | 1315 mm |
| Front wheels | 100 x 40 mm (4x) |
| Rear wheels | 315 x 15 mm (2x) |
| Brakes | Drum brakes, foot-operated lever |
| Available accessories | Tray, crutch holder, IV pole holder, footplates |
| Maintenance | Clean with damp cloth and mild soap, washable covers |
| Operating and storage temperature | +5°C to +41°C |
| Operating and storage humidity | 30% to 70% |
| Expected service life | 5 years (depending on use and maintenance) |
Frequently Asked Questions - Coraille-E Vermeiren
User questions about Coraille-E Vermeiren
0 question about this device. Answer the ones you know or ask your own.
Ask a new question about this device
Download the instructions for your Wheelchair in PDF format for free! Find your manual Coraille-E - Vermeiren and take your electronic device back in hand. On this page are published all the documents necessary for the use of your device. Coraille-E by Vermeiren.
USER MANUAL Coraille-E Vermeiren
natural_image
Modern baby care chair with purple backrest and black seat, mounted on a silver frame (no visible text or symbols)EN
Instructions for specialist dealer
This instruction manual is part and parcel of the product and must accompany every product sold.
Version: F, 2021-05
FR
All rights reserved, including translation.
No part of this manual may be reproduced in any form what so ever (print, photocopy, microfilm or any other process) without written permission of the publisher, or processed, duplicated or distributed by using electronic systems.
This page is intentionally left blank
Contents
Contents....1
Preface....2
1 This product....3
1.1 Description....3
1.2 Accessories 4
2 Before use ....5
2.1 Intended use 5
2.2 General safety instructions 5
2.3 Symbols on the chair 5
2.4 Transport and storage....6
3 Using the chair....7
3.1 Brakes....7
3.2 Using the safety harness 7
3.3 Moving to/from chair 8
3.4 Comfort adjustments....9
3.5 Mounting or removing the headrest 10
4 Maintenance....11
4.1 Points of maintenance 11
4.2 Instructions for maintenance....11
4.3 Troubleshooting 12
4.4 Expected lifespan....12
4.5 End of use....12
5 Technical specifications....13
Preface
Thank you for your trust in the products of Vermeiren. To support you on the use of this shell chair and its operating options, this manual is offered. Please read it carefully; it will help you to get familiar with the operation, capabilities and limitations of your chair.
If you still have questions after reading this manual, do not hesitate to contact your specialist dealer. He/she will be glad to help you.
Important note
To ensure your safety and to prolong the lifetime of your product, please take good care of it and have it checked and serviced on a regular basis.
This manual reflects the latest product developments. Vermeiren has the right to implement changes to this type of product without any obligation to adapt or replace similar products previously delivered.
Pictures of the product are used to clarify the instructions in this manual. Details of the depicted product may deviate from your product.
Information available
On our website http://www.vermeiren.com/ you will always find the most recent version of the information in this manual. Please consult this website regularly for possible updates.
Visually impaired people can download the electronic version of this manual and have it read out by means of a text-to-speech software application.

This instruction manual
For user and specialist dealer

Installation instructions
For specialist dealer

Service manual
For specialist dealer

EC declaration of conformity
1 This product
1.1 Description
The Altitude and Coraille shell chairs are very comfortable, easy to operate and to clean. Depending on country and dealer, the seat cushion of the shell chair may have different heights (thickness). For more information read the technical specifications in §5.
The following picture shows all parts that are relevant for the user and attendant.
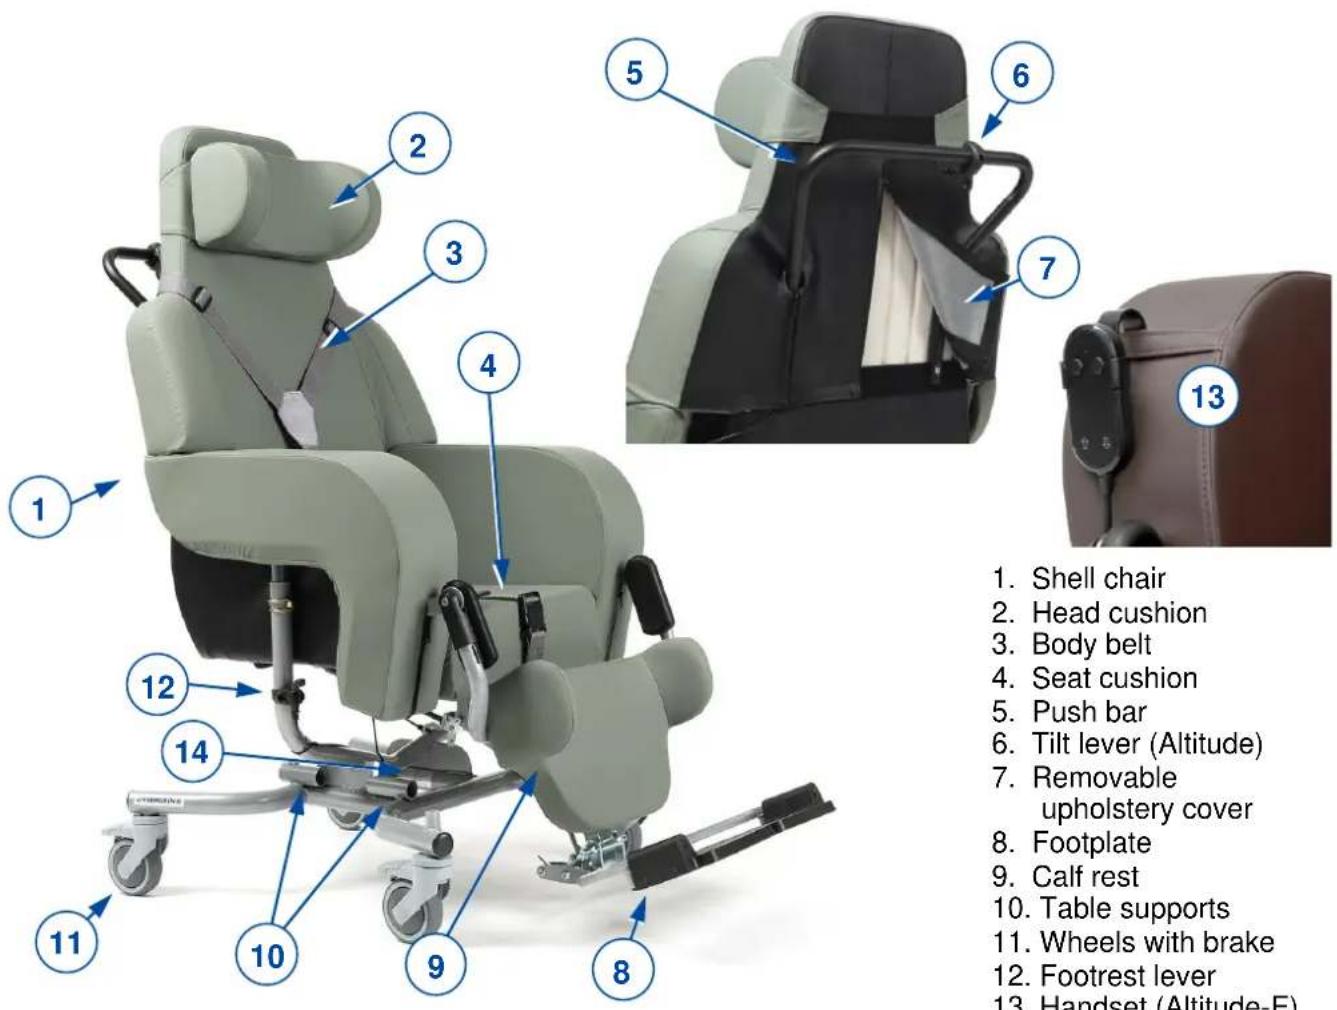
Figure 1 Important parts Altitude, Altitude-E
- Shell chair
- Head cushion
- Body belt
- Seat cushion
- Push bar
- Tilt lever (Altitude)
- Removable upholstery cover
- Footplate
- Calf rest
- Table supports
- Wheels with brake
- Footrest lever
- Handset (Altitude-E)
- Identification plate
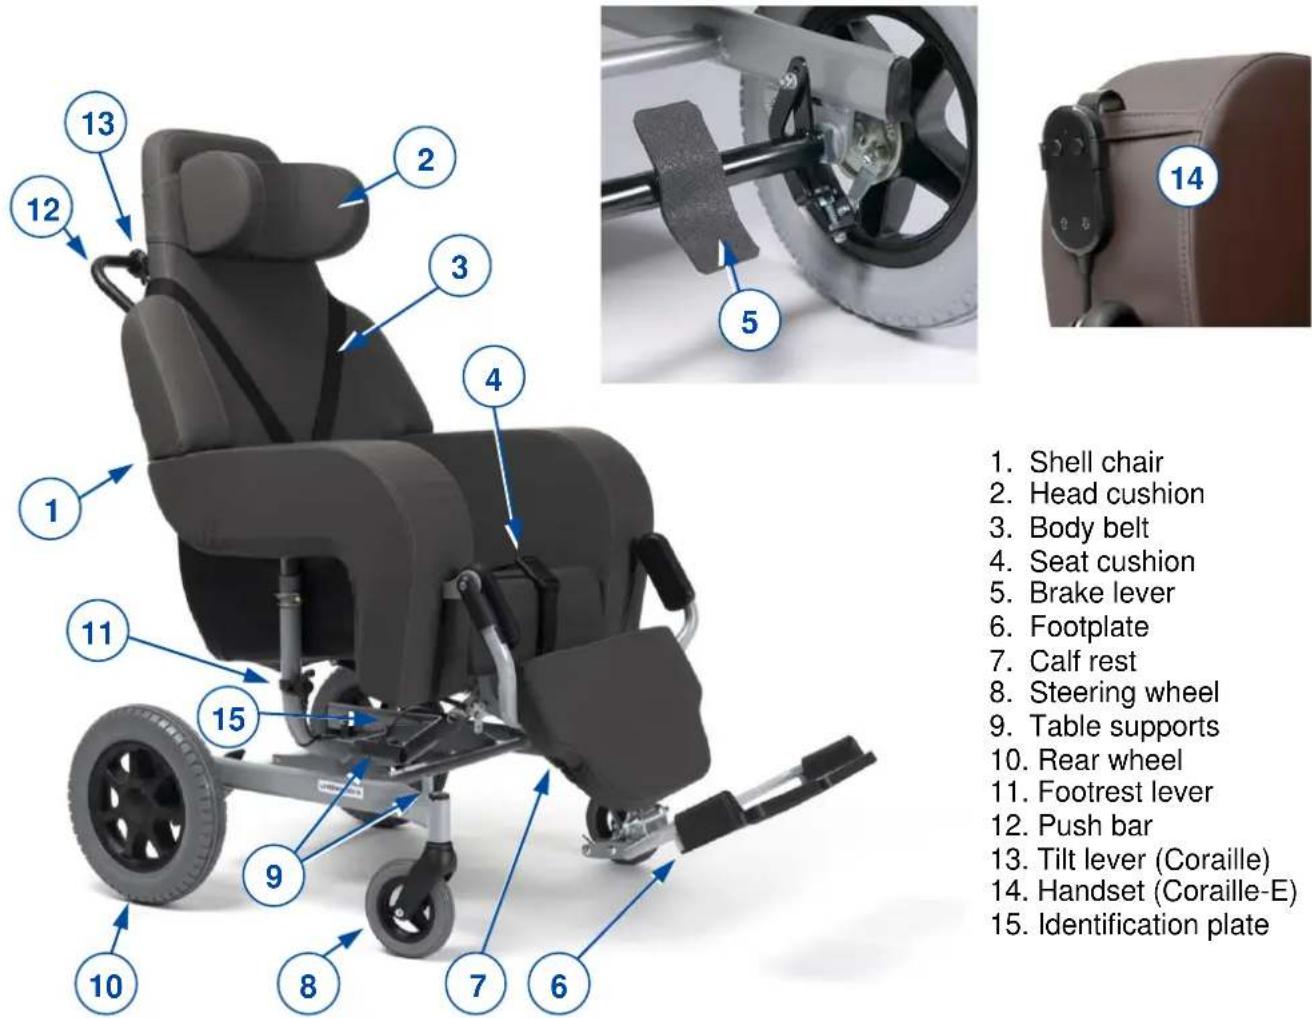
Figure 2 Important parts Coraille, Coraille-E
1.2 Accessories
Following accessories are available:
- Table (B12)
• Table with wheels (378) - Crutch holder (B31)
- Serum holder (B52)
• Footrest with one footplate and calf rest (B10)
• Footrest with two footplates and one calf rest (B6)
For more information, please consult your specialist dealer.
- Shell chair
- Head cushion
- Body belt
- Seat cushion
- Brake lever
- Footplate
- Calf rest
- Steering wheel
- Table supports
- Rear wheel
- Footrest lever
- Push bar
- Tilt lever (Coraille)
- Handset (Coraille-E)
- Identification plate
2 Before use
2.1 Intended use
In this paragraph a brief description of the intended use of your shell chair is given. Additionally, relevant warnings are added to the instructions in the other paragraphs. In this way we would like to make you aware of the possible misuse that may appear.
- This shell chair is suitable for indoor use only, on flat, level grounds.
- This chair is designed and produced solely as seat and resting place for one (1) person with a maximum weight of 120kg. It is not designed for transport of goods or objects, nor for any other use as previously described.
- This chair is meant to be operated by an attendant or care taker.
- If applicable, only use accessories and spare parts approved by Vermeiren.
- Please read all technical details and limits of your chair in §5.
- The warranty of this product is based on normal use and maintenance as described in this manual. Damage to your product caused by improper use or lack of maintenance will cause the warranty to lapse.
2.2 General safety instructions

CAUTION
Risk of injuries and/or damage
Keep the following general warnings in mind during use:
- Be aware that some parts of this chair may get very hot or cold due to ambient temperature, solar radiation, heating devices. Be careful when touching. Use protective clothing if the weather is cold.
- Negotiate thresholds or obstacles carefully.
- Be careful when using possible causes of fire such as cigarettes since they may set the seat and back covers alight.
- Do not modify this shell chair in any way.
2.3 Symbols on the chair
The symbols in following list are applicable to your chair. Symbols can be found in the relevant ISO standard (ISO 7000, ISO 7001 and IEC 417).
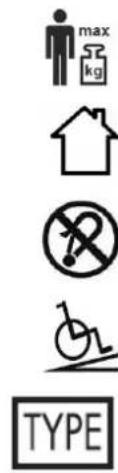
Maximum weight of user in kg
Indoor use only
Not intended to be used as seat in a motor vehicle
Maximum safe slope in ° (degrees).
Type designation
2.4 Transport and storage

CAUTION
Risk of injuries and damage
- Pay attention when passing with the chair through narrow passages.
- Make sure the passage is clear from objects, obstacles and persons.
- Never use ramps with a too large slope angle, see the technical specifications of §5.
2.4.1 Moving aside
- Use the tilt lever to return the shell chair to sitting position, see §3.4.
- Release the brakes and move the shell chair by using its wheels. Roll it to its destination, see §3.1.
i You can use a ramp to push the chair to higher or lower ground level.
If this is not possible, ask help to lift the chair with two persons and take it to its destination.
- Firmly grasp the frame and shell with both hands and lift it from the floor. Do not use leg rest(s) or wheels to grasp the chair.
2.4.2 Transport by vehicle

WARNING
Risk of injuries
- Do NOT use your shell chair as seat in a vehicle, see the following symbol.
-
Never use the same safety belt for passenger and shell chair.
-
Place the chair in the vehicle according to the instructions in §2.4.1
- Store the shell chair and its parts in the luggage compartment. If luggage and passenger compartments are NOT separated or enclosed, fasten the shell chair frame securely to the vehicle. You can use the available safety belt in the vehicle.
- Apply the brakes after loading, see §3.1.
2.4.3 Storage
CAUTION
Risk of damage
Make sure that your shell chair is stored dry to prevent mould to grow and damage the upholstery, see also technical details in §5.
3 Using the chair

WARNING
Risk of injuries
- First read the previous chapters and inform yourself about the intended use. Do NOT use your chair unless you have read and fully understood all instructions.
- In case of doubts or questions, do not hesitate to contact your local specialist dealer, your care provider or technical adviser.

CAUTION
Risk of injuries and/or damage
- Make sure that your fingers, clothes, belts, buckles or jewellery won't get caught by moving parts, during assembly, use or adjustment.
3.1 Brakes

CAUTION
Risk of injuries and/or damage
- Do not use the brakes to slow the shell chair down.
- Brakes may only be adjusted by your specialist dealer.
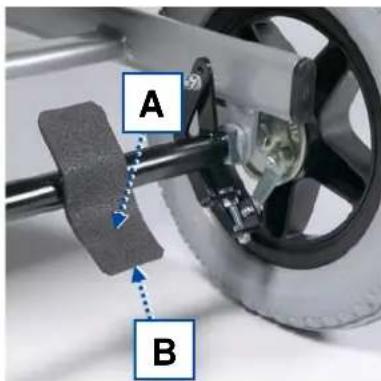
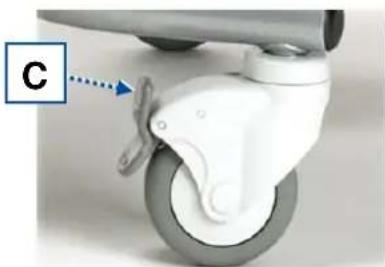
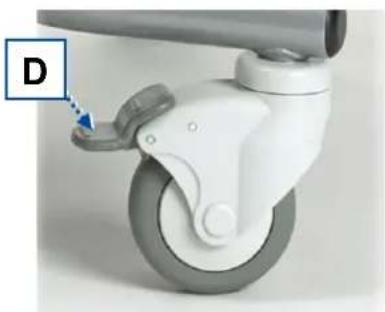
3.1.1 Coraille, Coraille-E brakes
Each rear wheel is equipped with a drum brake. Both brakes can be operated simultaneously with the brake lever:
- Applying brakes [A]: Use your foot to push the brake lever down.
- Releasing brakes [B]: Use your foot to turn the brake lever up.
3.1.2 Altitude, Altitude-E brakes
Each of the four swivelling wheels is equipped with a parking brake that blocks rotation and rolling of the wheel.
When the shell chair is in parking position, all four brakes must be applied.
natural_image
Close-up of a white car play button with a blue arrow pointing to the wheel (no text or symbols visible)- Releasing brakes [C]: Use your foot to press the top of the brake lever backwards.
- Applying brakes [D]: Use your foot to press the brake lever down towards the wheel.
natural_image
Close-up of a white plastic control lever with a blue arrow pointing to the handle (no text or symbols visible)3.2 Using the safety harness

CAUTION
Risk of injuries
- Adjust the safety harness so that the patient cannot be strangulated and so that he can sit comfortably in the chair.
- Adjust the safety harness as close as possible to the body of the patient so that the patient cannot slide out the safety harness. Use the safety harness especially for patients who make extreme movements.
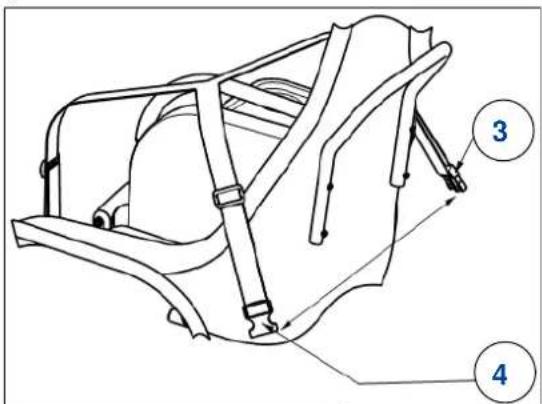
- Mount the safety harness around the body of the patient.
- Cross the harness around the back of the shell chair.
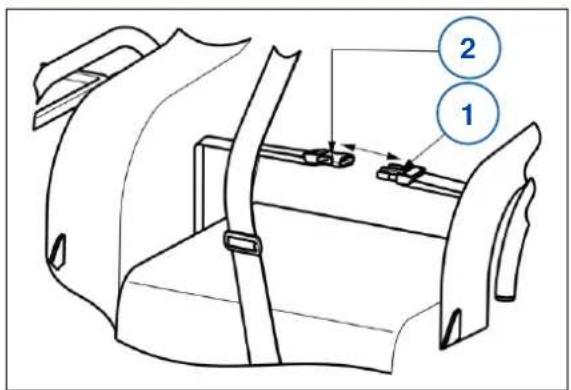
- Click the buckle of belt ③ into buckle of belt ④ to close.
-
If needed, adjust the safety harness.
-
Mount the waist belt around the waist of the patient. Click the buckle of belt ① into buckle of belt ② to close.
- If needed, adjust the waist belt.
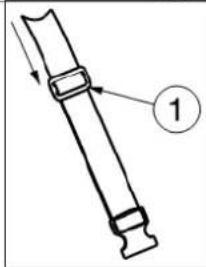
The adjustment of the belt shall be done using the plastic adjustment system ① mounted on the belt.
- Pull the belt through the adjustment system ① to lengthen or shorten.
natural_image
Technical line drawing of a mechanical component with labeled part 1 (no text or symbols beyond label)3.3 Moving to/from chair

CAUTION
Risk of injuries or damage
• In case you cannot perform the transfer in a safe manner, ask someone to assist you.
- Make sure the person in the chair cannot slip out of the body/hip belt. Adjust both belts and tilt the chair backwards to prevent this.
- The parking brakes should be applied before getting into and out of the shell chair.
- To transfer to or from the chair, first turn the leg/foot rest to vertical position and fold the footplate(s).
3.3.1 Transfer
- Make sure that the shell chair is in upright sitting position.
- Adjust the footrest to the lowest position, so that the footplate(s) touch(es) the ground.
- If necessary, fold the footplate(s) upwards or remove the footrest.
- Position the shell chair as close as possible to the person sitting in his/her chair, couch, seat or bed.
- Make sure that the chair stands on a flat and level ground.
- Turn the front swivelling wheels outwards, to the front.
- Apply the brakes, see §3.1.
- Open the buckle of the body belt and place it aside. Do the same with the hip belt.
- Transfer the person to/from the chair with the help of attendant(s) or lifting equipment.
3.3.2 Sitting in the chair
- Sit down on the seat with the lower back against the backrest.
- Make sure that the upper legs are horizontal and that the feet are in comfortable position. If necessary, adjust the seat height (cushion) or footrest, see §3.4.
- Close the hip belt and body belt and adjust it as close as possible to the body.
3.4 Comfort adjustments

CAUTION
Risk of injuries or damage
- The following comfort adjustments can be done by the attendant or caretaker. All other adjustments are done by your specialist dealer, according to the installation manual.
- If a table is installed: Do not tilt the chair when there are liquids or objects on the table top. Before folding the table top aside, make sure no persons or objects are hit by the table top.
- Be sure that the shell chair does not tip over backwards when it is placed in its most backwards position.
• Always apply the brakes before performing adjustments.
3.4.1 Manual seat angle / shell inclination adjustment (Coraille, Altitude)
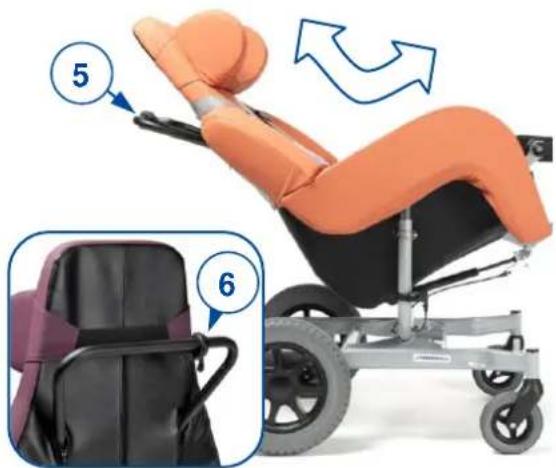
i The tilt lever (6) holds the gas spring of the tilt mechanism in position. As soon as the tilt lever is pulled, the gas spring is released.
To change the seat inclination
- Hold the push handle (5) tight and pull the tilt lever (6) with your finger in a squeezing motion.
- Push down on the push handle to tilt the seat (between 0^ to +40^ ).
- Release the tilt lever to block the position.
To return to sitting position
-
Hold the push handle tight and pull the tilt lever (6) with your finger in a squeezing motion.
-
Slowly move the push handle up. Release the tilt lever to block the position.
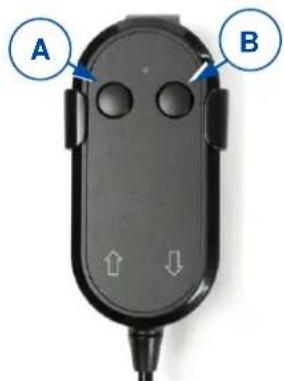
3.4.2 Electrical seat angle / shell inclination adjustment (Coraille-E, Altitude-E)
To change the inclination of the seat:
- Press and hold the button on the handset.
- The left button [A] to incline the seat backwards.
- The right button [B] to incline the seat forwards.
- Letting go of the button at any time will stop the seat in any position.
3.4.3 Footrest angle
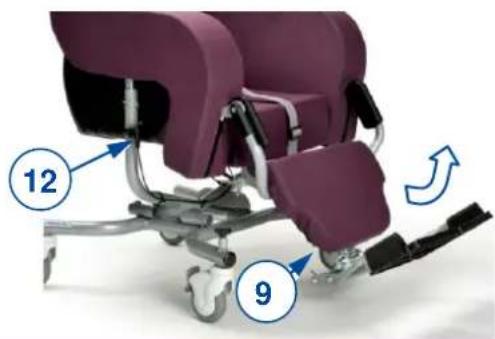
i The footrest lever (12) holds the gas spring of the push mechanism in position. As soon as the footrest lever is pulled, the gas spring is released.
By pulling the footrest lever (12) on the side of the chair the footrest (9) will turn upward. By pushing the footrest manually down while pulling the lever, it is lowered again. Release the lever when the legs are at a comfortable height.
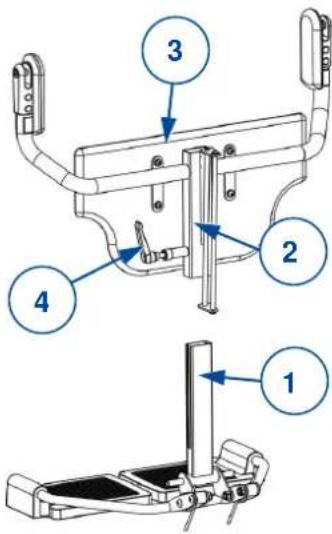
3.4.4 Footrest length
The footrest (1) can be (dis)assembled without removal of the calf rest according to the instructions below.
In the same way the footrest length can be adjusted (range 185 mm: step less).
CAUTION
Risk of damage
When the footrest is adjusted to largest size, it will touch the ground when the tilted seat is turned back to sitting position. Make sure the footrest is turned to smallest size before tilting the seat.
Disassemble
- Loosen clamping lever (4): Pull it up, turn it clockwise to place it to a new position. Next, push it down on the bolt and turn it anticlockwise to loosen the bolt.
- Repeat this until the footrest support (1) is released. Now it can be adjusted or removed.
Assemble/adjustment
- Guide the footrest support (1) into the leg rest socket (2) behind the calf rest plate (3).
- Adjust length of the footrest support and fasten lever (4), in clockwise direction.
- Make sure that the clamping lever (4) is firmly secured.
3.5 Mounting or removing the headrest
- Make sure that the large edge of the headrest attachment is placed to the bottom.
- Using the elastic band, mount the headrest to the desired position on the shell chair top.
- Using the elastic band, remove the headrest from the shell chair.
4 Maintenance
i Regular care ensures that your shell chair is preserved in a perfectly functional condition. For the maintenance manual, refer to the Vermeiren website: www.vermeiren.com.
4.1 Points of maintenance

CAUTION
Risk of injuries and damage
Repairs and replacements may only be undertaken by trained persons and only genuine replacement parts of Vermeiren should be used.
i The last page of this manual contains a registration form for the specialist dealer to record each service.
The service frequency depends on the frequency and intensity of use. Contact your dealer to agree to a common timetable for inspection/maintenance/repair.
Before each use
Inspect the following points:
- All parts: Present and undamaged or unworn.
• All parts: Clean, see § 4.2.1. - Wheels, shell, footrest, footplate(s), body belt, hip belt: Well secured.
- Working of tilt lever and footrest lever (gas springs), brakes, buckles of belts.
- Wheels/tyres; keep them free of wires, hair, sand, fibres and other contamination (oil, mud).
- Condition of frame parts: No deformation, instability, weakness or loose connections
- Shell chair upholstery, head cushion, seat cushion, calf-rest cushion: No excessive wear (like dented spots, damage or tears).
Contact your specialist dealer for possible repairs or part replacements.
4.2 Instructions for maintenance
4.2.1 Cleaning
CAUTION
Risk of damage
- Never use a steam cleaner to clean the chair.
- Wash the covers of the upholstery according to the instructions on the washing label.
Wipe all rigid parts of the chair frame with a damp cloth (not drenched). If necessary, use a mild soap, suitable for varnishes and synthetics.
The upholstery can be cleaned with lukewarm water and a mild soap. Do not use abrasive cleaning agents, sponge, or hard brush to clean.
To facilitate the cleaning, the upholstery covers can be removed (via zippers and Velcro straps). Next, they can be washed, see the washing label inside the upholstery cover.
4.2.2 Disinfection
CAUTION
Risk of damage
Disinfections may only be undertaken by trained persons. Consult your specialist dealer.
4.3 Troubleshooting

WARNING
Risk of injuries and damage to the chair
- NEVER repair your chair yourself attempting to solve the problem.
Even if you use your shell chair properly a technical problem may occur. The following symptoms may indicate a serious problem. Therefore, always contact your specialist dealer if you spot any of following deviations:
- Strange sound;
- Uneven tread wear on one of the tyres;
- Jerky movements;
• Chair deflects to one side;
• Damaged or broken wheels; - Damaged or broken tilting mechanism or footrest mechanism.
4.4 Expected lifespan
The average lifespan of your shell chair is 5 years. Depending on the frequency of use and maintenance, the lifespan of your chair will increase of decrease.
4.5 End of use
At end of life, you need to dispose your chair according to the local environmental legislation. The best way to do so, is to disassemble the chair to facilitate the transport of recyclable parts.
5 Technical specifications
The technical details below are only valid for this chair, at standard settings and optimal ambient conditions. Take these details into account during use. The values are no longer applicable if your chair has been modified, damaged, or is severely worn.
Table 2: Technical specifications
| Brand | Vermeiren | |
| Type | Shell chair | |
| Model | Altitude, Coraille | |
| Description | Dimensions | |
| Altitude | Coraille | |
| Max. weight of user | 120 kg | |
| Seat cushion height * | 60 mm - 80 mm - 100 mm | |
| Backrest height (depends on seat cushion) | 832 mm - 812 mm - 792 mm | |
| Armrests height (depends on seat cushion) | 275 mm - 255 mm - 235 mm | |
| Seat width | 380 mm - 400 mm - 420 mm - 440 mm - 480 mm | |
| Overall width | 710 mm | |
| Overall height, adjustable (at 0°) | 1290 mm - 1315 mm - 1340 mm | |
| Overall length (smallest at 0° up to largest at 40° with B06 at largest adjustment) | 1090 mm to 1640 mm | |
| Seat depth (in the middle) | 440 mm - 460 mm - 480 mm | |
| Seat surface height at front edge, adjustable (at 0°, with 80 mm seat cushion) | 465 mm - 490 mm - 515 mm | |
| Seat plane angle, adjustable stepless | 0° to +40° | |
| Footrest angle, adjustable stepless | 0° to +56° | |
| Backrest angle | 90° | |
| Distance between footplate and seat | 350 mm to 535 mm | |
| Static stability downhill | 6% | |
| Static stability uphill | 6% | |
| Total mass | 33,9 kg | 39,0 kg |
| Mass of heaviest part (without footrest) | 31,6 kg | 36,7 kg |
| Masses of removable parts Footrest B06 | 2,3 kg | 2,3 kg |
| Diameter wheels (number) | 100 x 40 (4x) | 150 x 30 (2x)315 x 15 (2x) |
| Storage and use temperature | +5 °C ~ +41 °C | |
| Storage and use humidity | 30% ~ 70% | |
| We reserve the right to introduce technical changes. Measurement tolerance ± 15 mm /1,5 kg / 1,5°. (*) Availability depends on country/dealer; measured in the middle | ||
| Model | Altitude-E, Coraille-E | |
| Description | Dimensions | |
| Altitude-E | Coraille-E | |
| Max. weight of user | 120 kg | |
| Seat cushion height * | 60 mm - 80 mm - 100 mm | |
| Backrest height (depends on seat cushion) | 832 mm - 812 mm - 792 mm | |
| Armrests height (depends on seat cushion) | 275 mm - 255 mm - 235 mm | |
| Seat width | 380 mm - 400 mm - 420 mm - 440 mm - 480 mm | |
| Overall width | 710 mm | |
| Overall height (at 0°) | 1315 mm | |
| Overall length (smallest at 0° up to largest at 40° with B06 at largest adjustment) | 1090 mm to 1640 mm | |
| Seat depth (in the middle) | 440 mm - 460 mm - 480 mm | |
| Seat surface height at front edge (at 0°, with 80 mm seat cushion) | 490 mm | |
| Seat plane angle, adjustable stepless | 0° to +40° | |
| Footrest angle, adjustable stepless | 0° to +56° | |
| Backrest angle | 90° | |
| Distance between footplate and seat | 350 mm to 535 mm | |
| Static stability downhill | 6% | |
| Static stability uphill | 6% | |
| Total mass | 33,9 kg | 39,0 kg |
| Mass of heaviest part (without footrest) | 31,6 kg | 36,7 kg |
| Masses of removable parts Footrest B06 | 2,3 kg | 2,3 kg |
| Diameter wheels (number) | 100 x 40 (4x) | 150 x 30 (2x)315 x 15 (2x) |
| Operator control | IP20, Uin: 24V --- | |
| Power supply / Transformer | Input: 100-240 V~, 50/60 Hz, max. 1,5A, Output: 24V ---Protection class: IP20Insulation class: IIDuty cycle: 2min ON / 18min OFF | |
| Storage and use temperature | +5 °C ~ +41 °C | |
| Storage and use humidity | 30% ~ 70% | |
| We reserve the right to introduce technical changes. Measurement tolerance ± 15 mm /1,5 kg / 1,5°. (*) Availability depends on country/dealer; measured in the middle | ||
Table des matières
natural_image
Close-up of a white and gray mechanical device with a blue arrow pointing to a labeled component 'C' (no text or symbols on the device itself)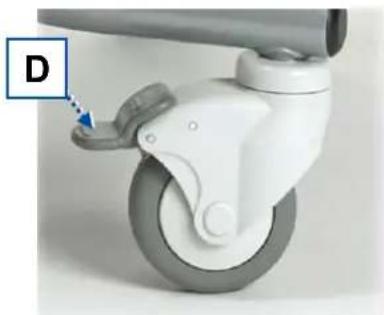
natural_image
Close-up of a white car play button with a blue arrow pointing to the wheel (no text or symbols visible)natural_image
Technical line drawing of a mechanical component with labeled part 1 (no text or symbols beyond label)4 Entretien
natural_image
Close-up of a white car play button with a blue arrow pointing to the wheel (no text or symbols visible)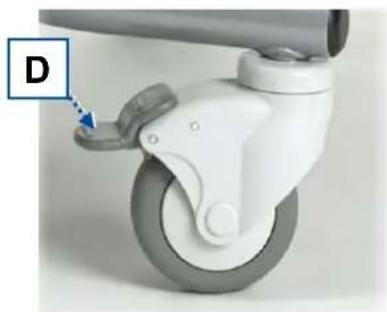
natural_image
Close-up of a white car play button with a blue arrow pointing to the handle (no text or symbols visible)natural_image
Technical line drawing of a mechanical component with labeled part 1 (no text or symbols beyond label)natural_image
Close-up of a white and gray mechanical device with a curved wheel and handle, labeled 'C' with an arrow pointing to a specific component (no text or symbols on the device itself)
natural_image
Close-up of a white car play button with a blue arrow pointing to the handle (no text or symbols visible)
natural_image
Mechanical device with numbered parts and directional arrows indicating motion (no text or symbols)Figura 1 Componenti importanti - modello Altitude, Altitude-E
natural_image
Close-up of a leather car seat with a circular badge showing the number 14 (no text or symbols on the car itself)natural_image
Close-up of a white and gray mechanical device with a blue dotted arrow pointing to a component labeled 'C' (no text or symbols on the device itself)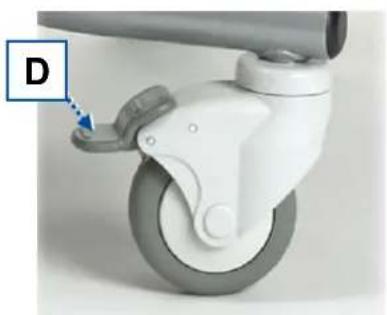
natural_image
Close-up of a white mechanical device with a blue arrow pointing to a component labeled 'D' (no text or symbols on the device itself)natural_image
Close-up of a white car RPM lift with a blue dotted arrow pointing to the wheel (no text or symbols visible)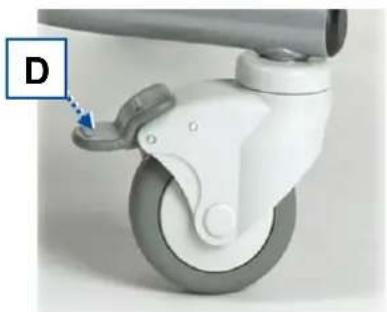
natural_image
Close-up of a white plastic carwheel with a blue arrow pointing to the wheel (no text or symbols visible)natural_image
Mechanical device with numbered components and directional arrow (no text or symbols)3.4.4 Longitud del reposapiés
natural_image
Close-up of a white car wheel with a blue arrow pointing to the wheel (no text or symbols visible)
natural_image
Close-up of a white car play button with a blue arrow pointing to the handle (no text or symbols visible)natural_image
Technical line drawing of a mechanical component with a numbered label (1) and directional arrow, no readable text or symbols present.natural_image
Close-up of a white and gray mechanical device with a blue dotted arrow pointing to a specific component (no text or symbols visible)
natural_image
Close-up of a white car steering wheel with a blue arrow pointing to the wheel (no text or symbols visible)natural_image
Technical line drawing of a mechanical component with labeled part '1' (no text or symbols beyond label)natural_image
Mechanical device with numbered components and directional arrows indicating motion (no text or symbols)Service registration form
This product (name): ....
was inspected (I), serviced (S), repaired (R) or disinfected (D):
| By (stamp):Kind of work: I / S / R / DDate: | By (stamp):Kind of work: I / S / R / DDate: | By (stamp):Kind of work: I / S / R / DDate: |
| By (stamp):Kind of work: I / S / R / DDate: | By (stamp):Kind of work: I / S / R / DDate: | By (stamp):Kind of work: I / S / R / DDate: |
| By (stamp):Kind of work: I / S / R / DDate: | By (stamp):Kind of work: I / S / R / DDate: | By (stamp):Kind of world: I / S / R / DDate: |
| By (stamp):Kind of work: I / S / R / DDate: | By (stamp):Kind of work: I / S / R / DDate: | By (stamp):Kind of work: I / S / R / DDate: |
| By (stamp):Kind of work: I / S / R / DDate: | By (stamp):Kind of work: I / S /R / DDate: | By (stamp):Kind of work: I / S / R / DDate: |
| By (stamp):Kind of work: I / S / R / DDate: | By (stamp):Kind of work: I / S / R / DDate: | By (stamp):Kind of work: I / S / R / DDate: |

Vermeiren GROUP
Vermeirenplein 1 / 15
2920 Kalmthout
BE
website: www.vermeiren.com
- EN
- Instructions for specialist dealer
- FR
- All rights reserved, including translation.
- Contents
- Preface
- Important note
- Information available
- This product
- Description
- Accessories
- Before use
- Intended use
- General safety instructions
- Symbols on the chair
- Transport and storage
- CAUTION
- Moving aside
- Transport by vehicle
- WARNING
- Storage
- Using the chair
- Brakes
- Coraille, Coraille-E brakes
- Altitude, Altitude-E brakes
- Using the safety harness
- Moving to/from chair
- Transfer
- Sitting in the chair
- Comfort adjustments
- Manual seat angle / shell inclination adjustment (Coraille, Altitude)
- Electrical seat angle / shell inclination adjustment (Coraille-E, Altitude-E)
- Footrest angle
- Footrest length
- Risk of damage
- Disassemble
- Assemble/adjustment
- Mounting or removing the headrest
- Maintenance
- Points of maintenance
- Before each use
- Instructions for maintenance
- Cleaning
- Disinfection
- Troubleshooting
- Expected lifespan
- End of use
- Technical specifications
- Table des matières
- Entretien
- Longitud del reposapiés
- Service registration form
Brand : Vermeiren
Model : Coraille-E
Category : Wheelchair